It’s a Sign – Tutorial #434

Hey there!

I pulled out my Stampin’ Up! Big Shot Die Cut Machine today for a bit of texture on this project.   I also took advantage of the wood grain stamp and texture plate to create a card that looks like painted wood.

Before we get into the tutorial today, I want to give you a heads up.  Today is the last day to order your Stampin’ Up! retiring sets from the 2010-2011 catalog.  Here is a link to my Stampin’ Up! website where you can order from me 24/7 and the products will be shipped directly to your door step.   http://www.stampinup.net/esuite/home/michellezindorf/   You won’t want to miss getting the rest of your wish list.

The New 2011-2012 Stampin’ Up! Idea Book and Catalog will be released tomorrow and let me tell you it is fabulous!  If you would like one shipped to you, please send a check for $9.95 to Michelle Zindorf, P.O. Box 116, West Alexandria, OH 45381 or send it via paypal to mzindorf@aim.com USA only.  Free shipping on catalogs.

Now on with today’s tutorial!!

Supplies:

Stamps: Stampin’ Up! Woodgrain & Thank You Kindly
Paper: Stampin’ Up! Whisper White, Soft Suede & Basic Black
Ink: Stampin’ Up! Chocolate Chip, Cherry Cobbler, Early Espresso & Basic BlackAccessories:  Stampin’ Up! Dies Bird & Branch and Join in the Cheer, Big Shot Machine, Woodgrain texture plate, Color Spritzer Tool, Hearts Punch, Brayer, Post it notes, Basic Black & Early Espresso markers, sponges, Linen Thread, Mat Pack template, Stampin’ Dimensional


Want a free copy of the new Summer Mini Catalog ?  E-mail your mailing address to mzindorf@aim.com and I will get one in the mail to you.   Are you getting inspiration from this blog?   One way you can help support it is to order your Stampin’ Up products through me.   Click HERE to place an order.    Want to become a Stampin’ Up Demonstrator , receive a 20% discount on product and earn instant income on orders?  Consider being part of my Stampin’ Up Team and start your own business or become a Hobby Demo just for the discount.  Click HERE for more information.

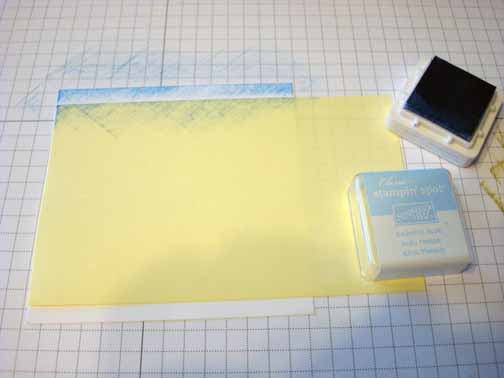
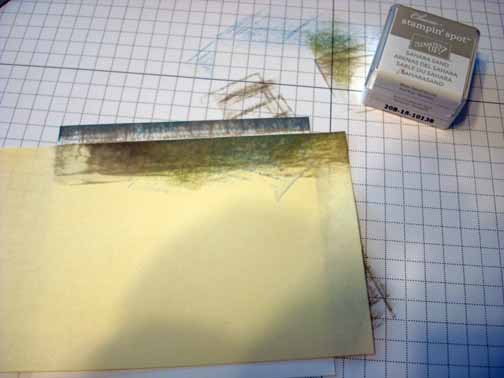
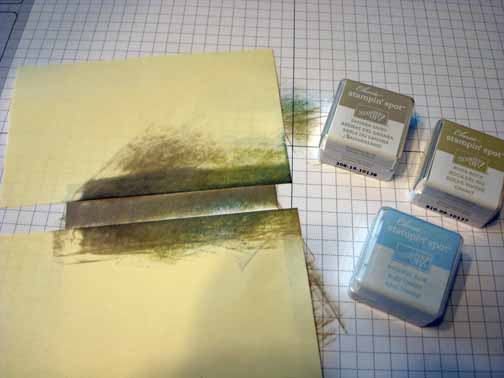
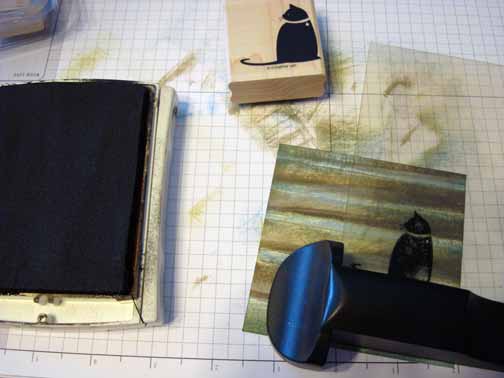
Stamped the Wood Grain stamp on a 3.75″ x 4.75″ piece of Whisper White card stock using Early Espresso ink.

Die cut the word “love” from the sticky part of a post it note using my Big Shot Machine and the Join in Cheer Die.  Note when die cutting this word have the sticky part of the post it note up so it sticks to your clear plate.  This will allow the word to then be turned over so it is not backwards on your sign.  🙂 

Punched 3 hearts from the sticky part of a post it note.

Put my masks on my wood grain stamped panel and added a post it note on each side of the panel to mask the edges.

Brayered Cherry Cobbler ink over the masks.

Removed the masks.

Sponged Chocolate Chip ink, then early Espresso ink and then finally Basic Black ink on the edges of the card stock.

Stamped the word You on the center heart by loading just the word “You” on the Rubber stamp with an Early Espresso marker, huffing my breath on it and then stamped it.

Smeared Basic Black ink on the Wood Grain texture plate and then ran a piece of Soft Suede card stock through the Big Shot Machine with it.

Sponged Basic Black ink around the edges of the card stock.

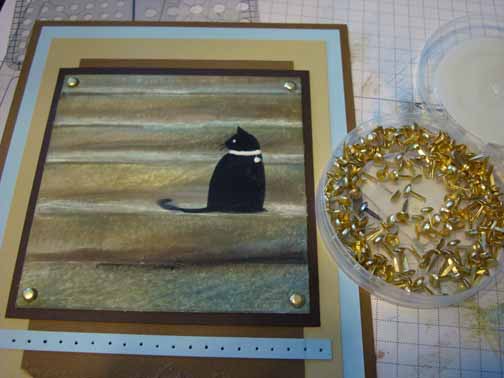
Cut the bird and 2 branches out of Basic Black card stock using the Big Shot machine and Birds & Branches Die.  Started assembling my card adding Linen Thread, a 5″ x 6.5″ Basic Black panel, my main image panel and my branches and birds die cuts.

Popped the bird’s wing up using Stampin’ Dimensionals.

Added spots on the card to distress it using a Basic Black marker and Stampin’ Up Color Spritzer Tool.

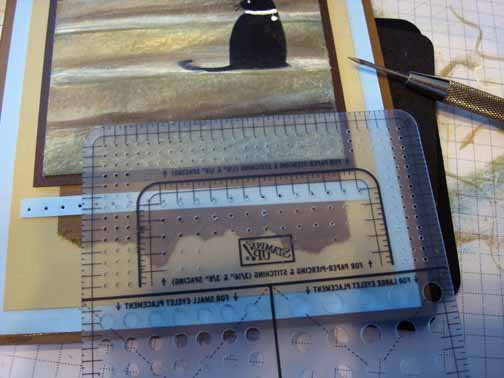
Added Basic Black marker Dots on each corner of the main image panel using the template from the Stampin’ Up Mat Pack.  

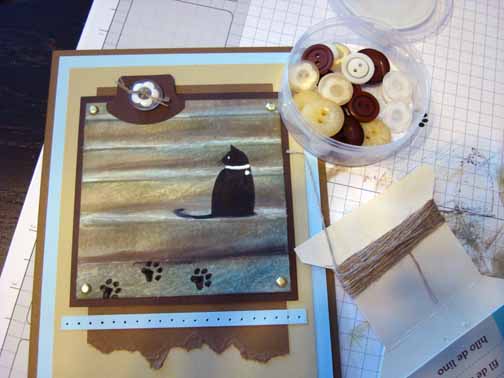
Here is my finished card measuring 5″ x 6.5″.

May you feel nothing but love and peace today.

Until my next post. . . .  . . .

Hugs,

Michelle

   Get ready for Brayer Workshops!  I am coming to the following locations, click the location name for more information.    

Owings Mills, Maryland (Baltimore Area)      

Cleveland (Euclid), Ohio       

Staley , North Carolina (South of Greensboro)       

Monroe, Connecticut       

Dayton, Ohio     

Leesburg, Florida       

Montreal, Wisconsin       

Savannah, Georgia       

Lincoln, Illinois       

Jefferson, Louisiana (New Orleans Area)       

Here is a link to my workshop calendar where you can see all of my travel schedule and to get info on beginner and advanced Brayer workshops:   http://zindorf.blogs.splitcoaststampers.com/workshop-calendar        

Don’t see a workshop in your State?  Interested in hosting the workshops in your area in 2012?   Click HERE to get hostess information.       

Link to my Stampin’ Up website where you can order all of your must have Stampin’ Up products from me 24-7:  http://michellezindorf.stampinup.net


On the Rocks – Tutorial #433

Happy Monday!

Let’s make some waves today using clear embossing powder to protect the white of the card stock.  But before we get started on today’s tutorial I have a blog candy winner to announce.  

The winner of the Stampin’ Up! Playful Pieces stamp set is. . . . . . . . . .

Sharleen Beresford who wrote “OOH LA LA count me in and enter my name please for this wonderful stamp set!  Thanks for the “blog candy” and as usual thank you for your inspiration and generous artistic spirit!”

Sharleen Beresford, Congratulations!  Please e-mail your mailing address to me at mzindorf@aim.com within 30 days and I will get this great stamp set right out to you.

Thanks to all who played along!

Now on with the tutorial. . . . . .

Supplies:

Stamps: Stampin’ Up! Just Believe
Paper: Stampin’ Up! Whisper White, Pacific Point and Basic Black
Ink: Stampin’ Up! Marina Mist, Basic Black, Pacific Point
Accessories: Stampin’ Up! sponges, Rhinestone Brads, Marina Mist Grosgrain Ribbon, Top Note Die, Big Shot, Photo Corner Punch, Brayer, Clear embossing powder, heat gun, post it note, Versamark pad
Techniques: Emboss Resist, Brayering, Direct to Paper


The Stampin’ Up USA Idea book and Catalog is here.   For your copy, please send a check for $9.95 to Michelle Zindorf, P.O. Box 116, West Alexandria, OH 45381 or send it via paypal to mzindorf@aim.com USA only.     My current customers will receive a new  Summer Mini Catalog automatically from me.   Not a current customer and want a free copy of the new Summer Mini Catalog ?  E-mail your mailing address to mzindorf@aim.com and I will get one in the mail to you.  )  Are you getting inspiration from this blog?   One way you can help support it is to order your Stampin’ Up products through me.   Click HERE to place an order.    Want to become a Stampin’ Up Demonstrator , receive a 20% discount on product and earn instant income on orders?  Consider being part of my Stampin’ Up Team and start your own business or become a Hobby Demo just for the discount.  Click HERE for more information.

Die cut a Top Note from Whisper White card stock using my Big Shot Machine.

Stamped the plant images using Basic Black ink and heat embossed them using clear embossing powder.

Using a sponge, applied Versamark lightly where I want my wave to be in the scene.  Heat embossed the Versamark using clear embossing powder and a heat gun.   Note:  When you put the embossing powder on you can lightly remove some of it until it looks like what you want before heating it.

Brayered Marina Mist ink on the card stock.  Now you can see where the embossed Versamark is.  🙂

Ripped a post it note and used it as a mask to create my rocks.

Sponged the unmasked area of the card stock using Marina Mist ink.

Smeared Pacific Point ink on the card stock (Direct to paper technique) from the left side of the card stock to the right, lightly.  Leave some of the Marina Mist ink showing through.

Sponged Basic Black ink at the bottom of the card stock.  Buffed the embossed parts of the card stock with a paper towel to remove any excess ink that may be on it.

Cut a 5″ square Whisper White card stock panel and Sponged Marina Mist around the edges.  Distressed edges of the card stock using Basic Black ink.  Also distress the edges of the top note using Basic Black ink.

Assembled the card by adding a 5.5″ square Basic Black panel, 5.25″ square Pacific Point panel, Marina Mist Grosgrain Ribbon, Basic Black and Pacific Point photo corner punches and Rhinestone brads.

Here is the finished card measuring 5.5″ square.

May your

   Get ready for Brayer Workshops!  I am coming to the following locations, click the location name for more information.    

Cleveland (Euclid), Ohio       

Staley , North Carolina (South of Greensboro)       

Monroe, Connecticut       

Dayton, Ohio     

Leesburg, Florida       

Montreal, Wisconsin       

Savannah, Georgia       

Lincoln, Illinois       

Jefferson, Louisiana (New Orleans Area)       

Here is a link to my workshop calendar where you can see all of my travel schedule and to get info on beginner and advanced Brayer workshops:   http://zindorf.blogs.splitcoaststampers.com/workshop-calendar        

Don’t see a workshop in your State?  Interested in hosting the workshops in your area in 2012?   Click HERE to get hostess information.       

Link to my Stampin’ Up website where you can order all of your must have Stampin’ Up products from me 24-7:  http://michellezindorf.stampinup.net   

 Link to my Scentsy website where you can order the best smelling, safest wickless candles from me 24-7:  https://zindorf.scentsy.us/Home


An Ottumwa, Iowa Roller Derby Evening

Whew, what a fun filled evening I had.  I’m still hanging out in Ottumwa, Iowa and man oh man, my Iowa friends did not let me down when it came to entertainment.  Check it out, we went to watch the ladies Roller Derby.  

Oskaloosa Mayhem Girls Roller Derby 

The home town team, Oskaloosa Mayhem Girls (OMG) are a force to be reckoned with!   They put a hurt’n on the Cedar Valley Push up Brawlers and won the bout.  I’m a people watcher and the crowd was just as entertaining as the Roller Derby Ladies, lol.

But wait, who are these rough looking characters in the penalty box?

Check it out, my Iowa friends and I just had to have a picture taken of us in the penalty box.   

Roller Derby ladies make up great Roller Derby names, such as, Spankins, Shear Evil, Kickn Ash, T-Erin it Up, PattyWhackerHer, Short Fuze.

So in the spirit of the Roller Derby, I made up my own Roller Derby name “Road Kill”, lol.   What would your Roller Derby name be?   Think tough.       Leave it in the comment section, I would love to hear it.

I think I may even have  a stamp set to give away to the person with the best Roller Derby name!!!!

Thanks goes out to my Iowa friends.  Ladies you ROCK!!!!

May you not have to pick yourself up off of the floor.

Until my next post. . . . . . . .

Hugs,

Michelle

   Get ready for Brayer Workshops!  I am coming to the following locations, click the location name for more information.    

 Ottumwa, Iowa       

Owings Mills, Maryland (Baltimore Area)      

Cleveland (Euclid), Ohio       

Staley , North Carolina (South of Greensboro)       

Monroe, Connecticut       

Dayton, Ohio     

Leesburg, Florida       

Montreal, Wisconsin       

Savannah, Georgia       

Lincoln, Illinois       

Jefferson, Louisiana (New Orleans Area)       

Here is a link to my workshop calendar where you can see all of my travel schedule and to get info on beginner and advanced Brayer workshops:   http://zindorf.blogs.splitcoaststampers.com/workshop-calendar        

Don’t see a workshop in your State?  Interested in hosting the workshops in your area in 2012?   Click HERE to get hostess information.       

Link to my Stampin’ Up website where you can order all of your must have Stampin’ Up products from me 24-7:  http://michellezindorf.stampinup.net   

 Link to my Scentsy website where you can order the best smelling, safest wickless candles from me 24-7:  https://zindorf.scentsy.us/Home


Ottumwa, Iowa Hot Air Balloon Races and Festival

I’m in Ottumwa, Iowa teaching my brayer techniques this weekend and I could not have timed my trip better.  After teaching yesterday I was treated to the awesome sights and sounds of the Ottumwa Hot Air Balloon Races and Festival. 

When we arrived at the festival things were just starting to heat up.  They were inflating the hot air balloons.  These balloons are really something to see floating across the sky, but it was unreal to see them up close and personal at the festival and to get to walk amoung them.


As the sun went down the balloons were kept inflated and they would do short periods of time in which the balloons were lite up all at once.  So much color, it was fantastic!


I’m deathly afraid of heights, so seeing this from the ground was the best way to see it for me.  🙂


May your weekend be full of fun surprises.

Until my next post. . . . .  .

Hugs,

Michelle

   Get ready for Brayer Workshops!  I am coming to the following locations, click the location name for more information.    

 Ottumwa, Iowa       

Owings Mills, Maryland (Baltimore Area)      

Cleveland (Euclid), Ohio       

Staley , North Carolina (South of Greensboro)       

Monroe, Connecticut       

Dayton, Ohio     

Leesburg, Florida       

Montreal, Wisconsin       

Savannah, Georgia       

Lincoln, Illinois       

Jefferson, Louisiana (New Orleans Area)       

Here is a link to my workshop calendar where you can see all of my travel schedule and to get info on beginner and advanced Brayer workshops:   http://zindorf.blogs.splitcoaststampers.com/workshop-calendar        

Don’t see a workshop in your State?  Interested in hosting the workshops in your area in 2012?   Click HERE to get hostess information.       

Link to my Stampin’ Up website where you can order all of your must have Stampin’ Up products from me 24-7:  http://michellezindorf.stampinup.net   

 Link to my Scentsy website where you can order the best smelling, safest wickless candles from me 24-7:  https://zindorf.scentsy.us/Home


Stampin’ Up! Playful Pieces Blog Candy

Going, going, gone!   Here is your chance to win the Stampin’ Up!, Level 3, Hostess Stamp Set, Playful Pieces.  This is such a large set they had to put it in 2 cases.  🙂

This set will retire in just a few short days on June 30, 2011 that is the reason I said going, going, gone.   So if you do not have this set, you will want to enter for a chance to win it.

All you have to do to enter is leave a comment on this blog post telling me to enter you.  If you are receiving this blog post update via e-mail you will need to CLICK HERE and then leave your comment on my actual blog.  Sorry, no e-mail entries.

I will select the winner using a random number generator on Monday, June 27, 2011.  Good luck everyone!

Retiring Stamps and Accessories

If you would like to see a list of all the Stampin’ Up retiring stamps and accessories or purchase them before they are gone, CLICK HERE.  You can shop from my online Stampin’ Up website 24/7 and the products will be shipped right to you door step.  

New 2011-2012 Stampin’ Up! Idea Book & Catalog out July 1, 2011!! 

Want to pre-order your brand new 2011-2012 Stampin’ Up Idea Book & Catalog?   Paypal $9.95 to mzindorf@aim.comor send a check to Michelle Zindorf, P.O. Box 116, West Alexandria, Ohio 45381.  I will get one in the mail to you July 1, 2011.

Until my next post. . . .

Hugs,

Michelle

   Get ready for Brayer Workshops!  I am coming to the following locations, click the location name for more information.    

 Ottumwa, Iowa       

Owings Mills, Maryland (Baltimore Area)      

Cleveland (Euclid), Ohio       

Staley , North Carolina (South of Greensboro)       

Monroe, Connecticut       

Dayton, Ohio     

Leesburg, Florida       

Montreal, Wisconsin       

Savannah, Georgia       

Lincoln, Illinois       

Jefferson, Louisiana (New Orleans Area)       

Here is a link to my workshop calendar where you can see all of my travel schedule and to get info on beginner and advanced Brayer workshops:   http://zindorf.blogs.splitcoaststampers.com/workshop-calendar        

Don’t see a workshop in your State?  Interested in hosting the workshops in your area in 2012?   Click HERE to get hostess information.       

Link to my Stampin’ Up website where you can order all of your must have Stampin’ Up products from me 24-7:  http://michellezindorf.stampinup.net   

 Link to my Scentsy website where you can order the best smelling, safest wickless candles from me 24-7:  https://zindorf.scentsy.us/Home


Tumble in the Grass – Tutorial #432


I have another emboss resist card for you this week.  I know this is a bit Fallish, but I love the colors.    Hope you do too.

I really have no time to chat today.  I’m packing for my trip to Ottumwa, Iowa tomorrow.   So let’s get right to the tutorial.

Supplies:

Stamps: Stampin’ Up! Inspired by Nature and Autumn Splendor
Paper: Stampin’ Up! Whisper White, Cajun Craze and Tempting Turquoise
Ink: Stampin’ Up! Basic Black, Not Quite Navy, Tempting Turquoise, Cajun Craze and Old Olive
Accessories: Stampin’ Up! Sponge, Brayer, Clear embossing powder, heat gun, mat pack, piercing tool, linen thread, More Mustard Marker, Versamark pad and marker, buttons, Modern Label punch
Techniques: Emboss Resist and Brayering


The Stampin’ Up USA Idea book and Catalog is here.   For your copy, please send a check for $9.95 to Michelle Zindorf, P.O. Box 116, West Alexandria, OH 45381 or send it via paypal to mzindorf@aim.com USA only.     My current customers will receive a new  Summer Mini Catalog automatically from me.   Not a current customer and want a free copy of the new Summer Mini Catalog ?  E-mail your mailing address to mzindorf@aim.com and I will get one in the mail to you.  )  Are you getting inspiration from this blog?   One way you can help support it is to order your Stampin’ Up products through me.   Click HERE to place an order.    Want to become a Stampin’ Up Demonstrator , receive a 20% discount on product and earn instant income on orders?  Consider being part of my Stampin’ Up Team and start your own business or become a Hobby Demo just for the discount.  Click HERE for more information.

Loaded my Inspired by Nature Stamp with Versamark and then loaded it with Old Olive ink before stamping it on a 4.5″ square piece of Whisper White card stock.  You can use Stampin’ Up Craft Old Olive ink and not use the Versamark for this step.  

Heat embossed the images using clear embossing powder and a heat gun.

Stamped the Autumn Splendor leaf by loading my stamp first with Versamark and then with Cajun Craze before stamping it.  Reloaded for the second image.   Heat embossed both images using clear embossing powder and a heat gun.

Colored the leaves in with a More Mustard marker.

Patted the excess ink off of the embossed images using a paper towel.  (Don’t rub)

Colored over the leaves using a Versamark marker and heat embossed the images using clear embossing powder and a heat gun.

Brayered Tempting Turquoise ink at an angle.

Brayered Not Quite Navy ink at an angle, not covering the Tempting Turquoise ink entirely.

Sponged a bit of Basic Black ink at the bottom of the card stock.  The black ink will stain your embossed images.

Buffed my embossed images off using a paper towel.

Added 2 Cajun Craze panels, 1 Whisper White panel and 1 Tempting Turquoise panel.  Also added 2 Cajune Craze Modern Label punches that have one end cut off. 


Using the mat pack and piercing tool, added 4 holes in each label punch.

Added 2 buttons that have linen thread tied through them.

Here is the finished card measuring 5.75″ square.  This is no little card folks!

May be be able to roll around in the grass today!  Remember doing that as a kid?

Until my next post. . . . .  . .

G

   Get ready for Brayer Workshops!  I am coming to the following locations, click the location name for more information.    

 Ottumwa, Iowa       

Owings Mills, Maryland (Baltimore Area)      

Cleveland (Euclid), Ohio       

Staley , North Carolina (South of Greensboro)       

Monroe, Connecticut       

Dayton, Ohio     

Leesburg, Florida       

Montreal, Wisconsin       

Savannah, Georgia       

Lincoln, Illinois       

Jefferson, Louisiana (New Orleans Area)       

Here is a link to my workshop calendar where you can see all of my travel schedule and to get info on beginner and advanced Brayer workshops:   http://zindorf.blogs.splitcoaststampers.com/workshop-calendar        

Don’t see a workshop in your State?  Interested in hosting the workshops in your area in 2012?   Click HERE to get hostess information.       

Link to my Stampin’ Up website where you can order all of your must have Stampin’ Up products from me 24-7:  http://michellezindorf.stampinup.net   

 Link to my Scentsy website where you can order the best smelling, safest wickless candles from me 24-7:  https://zindorf.scentsy.us/Home


A Day In The Country – Tutorial #431

Hello, hope all is well with you.  Things are busy as usual here, but all is well. 

I have a fun scene for you today.  I live in a rural area and this is a scene that I often get to see in person.  Farms, fields, animals, love it!  The banner at the top of my blog is a photo of a pastel painting I created of the farm directly across the road from my house.  I truly love living in a home that is surrounded by farms.  I get to enjoy the country life without having to work a farm.  🙂  Anyhow, today’s tutorial uses brayering along with the emboss resist technique.  This is a great way to get light colored images in front of dark backgrounds.  It also makes it possible to get depth in your scenes.

Let’s get started. . . .  . . .

Supplies:

Stamps: Stampin’ Up! Farm Life, Inspired by Nature
Paper: Stampin’ Up! Whisper White, Pear Pizzazz and Basic Black
Ink: Stampin’ Up! Whiper White, Basic Black, More Mustard, Chocolate Chip, Cajun Craze and So Saffron
Accessories: Stampin’ Up! sponge, paper snips, Markers (Basic Black, So Saffron, Sahara Sand, Crumb Cake), Ticket Corner Punch, Old Olive Brads, Post it notes, Brayer, Clear embossing powder, heat gun, paper towel


The Stampin’ Up USA Idea book and Catalog is here.   For your copy, please send a check for $9.95 to Michelle Zindorf, P.O. Box 116, West Alexandria, OH 45381 or send it via paypal to mzindorf@aim.com USA only.     My current customers will receive a new  Summer Mini Catalog automatically from me.   Not a current customer and want a free copy of the new Summer Mini Catalog ?  E-mail your mailing address to mzindorf@aim.com and I will get one in the mail to you.  )  Are you getting inspiration from this blog?   One way you can help support it is to order your Stampin’ Up products through me.   Click HERE to place an order.    Want to become a Stampin’ Up Demonstrator , receive a 20% discount on product and earn instant income on orders?  Consider being part of my Stampin’ Up Team and start your own business or become a Hobby Demo just for the discount.  Click HERE for more information.

Colored my Stampin’ Up! Farm Life stamp in with a Versamark marker and then with a Basic Black marker before stamping it on a 3″ x 5.5″ piece of Whisper White card stock.   I did not color the clouds on the stamp.

Heat embossed the image using clear embossing powder and a heat gun.

Colored the right side of the barn and silo using a Sahara Sand marker.  Colored the roofs, twice using the same Sahara Sand marker, letting the marker dry in between coats.  This gives you a darker color.

Colored the hay bales using a So Saffron marker.

Added Crumb Cake marker to the base of the hay bales.

Colored the trees and bushes using a Certainly Celery marker.

Colored over the embossed images (be very careful to stay within the lines) using a Versamark marker.  Heat embossed the images using clear embossing powder and a heat gun to protect the images.

Now that my images are embossed I can brayer over them.

Brayered So Saffron ink at the top of the card stock.

Ripped the edge off of a couple of post it notes and used them to mask the sky area of my scene.

Brayered Cajun Craze ink at the bottom of the card stock.

Removed the mask and gently wiped my embossed images off with a paper towel.

Added Certainly Celery marker to the horizon line.

Stamped the Wheat Stamp using Chocolate Chip ink.

Stamped the Wheat stamp a bit lower using Basic Black ink.

I wanted a bit more drama in the sky area so I brayered More Mustard ink right at the top of the card stock.

Sponged Basic Black ink on the edges of the card stock.

Stamped the stampin’ Up Inspired by Nature Stamp using Whisper White ink on Basic Black card stock.  Cut the images out with Stampin’ Up Paper Snip scissors.

Added a Basic Black panel, Pear Pizzazz panel and a Whisper White Panel.  Used the Stampin’ Up! Ticket Corner punch on the Whisper White panel and the Main Image panel.  Adhered the cut our flowers to the front of the card stock.  Added white Gel Pen highlights to the flowers.

Added a strip of Basic Black card stock and 2 Old Olive brads.

Here is the finished card measuring 5″ x 6.5″.

May your day be filled with peace and sunshine.

Until my next post. . . .  . .

Hugs,

Michelle

   Get ready for Brayer Workshops!  I am coming to the following locations, click the location name for more information.    

 Ottumwa, Iowa       

Owings Mills, Maryland (Baltimore Area)      

Cleveland (Euclid), Ohio       

Staley , North Carolina (South of Greensboro)       

Monroe, Connecticut       

Dayton, Ohio     

Leesburg, Florida       

Montreal, Wisconsin       

Savannah, Georgia       

Lincoln, Illinois       

Jefferson, Louisiana (New Orleans Area)       

Here is a link to my workshop calendar where you can see all of my travel schedule and to get info on beginner and advanced Brayer workshops:   http://zindorf.blogs.splitcoaststampers.com/workshop-calendar        

Don’t see a workshop in your State?  Interested in hosting the workshops in your area in 2012?   Click HERE to get hostess information.       

Link to my Stampin’ Up website where you can order all of your must have Stampin’ Up products from me 24-7:  http://michellezindorf.stampinup.net   

 Link to my Scentsy website where you can order the best smelling, safest wickless candles from me 24-7:  https://zindorf.scentsy.us/Home


Shells on the Beach – Tutorial #430

Good morning and hello.  I’m sooooo ready for Summer. How about you?

Today I felt like creating a little beach scene using the Stampin’ Up! Nature’s Nest stamp set.  I love to be outdoors and this set calls my name frequently.   It is definitely in my top ten when it comes to stamp sets.

Do you ever have one of those crafting session where you pull out everything, including the kitchen sink?  Well that was me this morning.  Even thou the card does not look over done, thank goodness.  I had so many of my embellishments etc. out trying to make them work, but as usual I went with just a ribbon treatment, LOL.   Oh, but I did get a little layer happy.

Let’s get started. . . . .  .

Supplies:

Stamps: Stampin’ Up! Nature’s Nest
Paper: Stampin’ Up! Whisper White, River Rock, Tempting Turquoise and Tangerine Tango
Ink: Stampin’ Up! Sahara Sand, Tangerine Tango, Tempting Turquoise, River Rock and Not Quite Navy
Accessories: Stampin’ Up! Scallop Circle Die Cut, Big Shot Machine, Sponges, Stampin’ Dimensionals, Paper Snips, White Gel Pen, Craft Knife, Basic Black and Soft Suede Markers, Brayer, Stampin’ Up! Color Spritzer Tool


The Stampin’ Up USA Idea book and Catalog is here.   For your copy, please send a check for $9.95 to Michelle Zindorf, P.O. Box 116, West Alexandria, OH 45381 or send it via paypal to mzindorf@aim.com USA only.     My current customers will receive a new  Summer Mini Catalog automatically from me.   Not a current customer and want a free copy of the new Summer Mini Catalog ?  E-mail your mailing address to mzindorf@aim.com and I will get one in the mail to you.  )  Are you getting inspiration from this blog?   One way you can help support it is to order your Stampin’ Up products through me.   Click HERE to place an order.    Want to become a Stampin’ Up Demonstrator , receive a 20% discount on product and earn instant income on orders?  Consider being part of my Stampin’ Up Team and start your own business or become a Hobby Demo just for the discount.  Click HERE for more information.

I started my project by die cutting a Scallop Circle using my Big Shot Machine and Whisper White card stock.

Brayered River Rock ink on the card stock.

Brayered Tempting Turquoise on the other side.

Brayered Not Quite Navy on the top, not covering the Tempting Turquoise entirely.

I speckled the sand area of the card stock using my Stampin’ Up! Color Spritzer Tool and a Soft Suede Marker.

Stamped the shells by loading my stamp first with Tangerine Tango ink and then patted the Sahara Sand on the top and bottom of the stamp image before stamping it on Whisper White card stock.  This gave me a 2 toned image.

Cut the 2 shells out.

Sponged Sahara Sand ink at the top and bottom of the shells.  Sponged Tangerine Tango ink in the middle area.

Darkened the edges and stripes in the middle of the shells with a Sahara Sand marker.

Added Basic Black marker to the right side of one shell and left side of the other shell.

Sponged 2 spots of Sahara Sand ink in the sand area to create a shadow for the shells.

Glued the Shells on the card stock.    Added lots and lots of White Gel pen dots to create sea foam.  Cut a slit on each side of the Scallop Circle using craft knife.  Put my Peach Parfait Ribbon through the slits.

Cut 2 panels of River Rock, one Tempting Turquoise panel (not shown), 1 panel of Tangerine Tango.    Distressed the edges of the River Rock panels using Not Quite Navy ink and a sponge.   Used the Stampin’ Up! Color Spritzer Tool and the Soft Suede Marker lightly on the smallest River Rock panel.

Assembled by card using Stampin’ Demionsionals under the scallop circle.

Here is the finished card measuring 5.75″ square.

I hope you enjoyed this tutorial and give it a try.

May your day be just beachy!

Until my next post. . . . .  . . .

Hugs,

Michelle

   Get ready for Brayer Workshops!  I am coming to the following locations, click the location name for more information.    

 Ottumwa, Iowa       

Owings Mills, Maryland (Baltimore Area)      

Cleveland (Euclid), Ohio       

Staley , North Carolina (South of Greensboro)       

Monroe, Connecticut       

Dayton, Ohio     

Leesburg, Florida       

Montreal, Wisconsin       

Savannah, Georgia       

Lincoln, Illinois       

Jefferson, Louisiana (New Orleans Area)       

Here is a link to my workshop calendar where you can see all of my travel schedule and to get info on beginner and advanced Brayer workshops:   http://zindorf.blogs.splitcoaststampers.com/workshop-calendar        

Don’t see a workshop in your State?  Interested in hosting the workshops in your area in 2012?   Click HERE to get hostess information.       

Link to my Stampin’ Up website where you can order all of your must have Stampin’ Up products from me 24-7:  http://michellezindorf.stampinup.net   

 Link to my Scentsy website where you can order the best smelling, safest wickless candles from me 24-7:  https://zindorf.scentsy.us/Home


Cat on the Steps – Tutorial #429

Hello there peeps!   I’m back from beautiful Colorado Springs where I  had the pleasure of teaching some wonder students how to brayer over the weekend.  Unfortunately, that all means that I am playing catch up as usual after my trip.  🙂  Maybe I should re-think my stand on the whole cloning issue.

I hope everyone had an wonderful weekend and had a chance to stop by my blog to sign up for the blog candy that am about to give away.  So here goes it, the winner of the adorable Stampin’ Up Kimono Kids stamp set is. . . . . . . .  .

Caroline King who wrote “have fun in colorado springs. lovely place.  Please enter me in the blog candy contest.   have a great weekend yourself.
Caroline
Minnetonka, MN”

Caroline King, CONGRATULATIONS!!!!  Please e-mail your mailing address to me at mzindorf@aim.com within 30 days and I will get this set in the mail to you.

Thank you to everyone that played along.  Check back at the end of this week for a chance to win another stamp set.

Now on with today’s cat tutorial. . . .  . .

Supplies: 

Stamps: Stampin’ Up! “C” is for Cat
Paper: Stampin’ Up! Whisper White, Early Espresso, Soft Suede, Crumb Cake, Bashful Blue
Ink: Stampin’ Up! Bashful Blue, Sahara Sand, River Rock and Crumb Cake
Accessories: Stampin’ Up! Tab Punch, White Gel Pen, Crumb Cake marker, Stamp-a-ma-jig, mat pack, piercing tool, post it note, Latte button, gold brads, Linen Thread
Techniques: Direct to Paper


The Stampin’ Up USA Idea book and Catalog is here.   For your copy, please send a check for $9.95 to Michelle Zindorf, P.O. Box 116, West Alexandria, OH 45381 or send it via paypal to mzindorf@aim.com USA only.     My current customers will receive a new  Summer Mini Catalog automatically from me.   Not a current customer and want a free copy of the new Summer Mini Catalog ?  E-mail your mailing address to mzindorf@aim.com and I will get one in the mail to you.  )  Are you getting inspiration from this blog?   One way you can help support it is to order your Stampin’ Up products through me.   Click HERE to place an order.    Want to become a Stampin’ Up Demonstrator , receive a 20% discount on product and earn instant income on orders?  Consider being part of my Stampin’ Up Team and start your own business or become a Hobby Demo just for the discount.  Click HERE for more information.


Time to create some steps.

Mask the bottom of a 3.5″ square piece of Whisper White card stock with a post it note.  Using the edge of a Bashful Blue ink spot, smeared the ink on the top of the unmasked area.

Smeared some Sahara Sand ink over it a bit.

Took my post it note mask off and turned it so it was covering the top of the card stock.  Masking the colored area and a bit of white paper.  The white paper area that I am masking at the top will be the flat part of the step.

Added another post it note mask below it leaving space in between the 2 post it notes.  This space will be the front of the step.

Smeared Bashful Blue, River Rock and Sahara Sand ink in the unmasked area.

Kept shifting the post it notes down and inking the same colors, masking and leaving white space in between each colored section.

Removed the mask and smeared Bashful Blue ink lightly in the white areas.  Added some Crumb Cake ink the right sides of the steps to create a bit of a shadow.

Stamped my cat from the Stampin’ Up set “C” is for cat on one of the steps using a Stamp-a-ma-jig for placement and Basic Black ink.

Added a bit of white gel pen to the Bashful Blue areas (tops of steps) and then smeared it a bit with my finger to lighten it.   Added straight lines of Crumb Cake maker to the steps where the front of the step meets the top of the step.  Also colored the cat’s eye and collar using the White Gel pen.

Added the following layers of card stock under the main image panel as follows:

Early Espresso, Soft Suede (ripped at the bottom), Crumb Cake, Bashful Blue, Soft Suede and just a thin strip of Bashful Blue on the bottom.

Using my mat pack and piercing tool, pierced holes on my strip of Bashful Blue card stock.

Add 4 gold brads to the main image panel corners.

Stamped the cat paw stamp at the bottom of the main image panel 3 times using Basic Black ink.

Punched a tab punch from Early Espresso card stock and cut the tab in half.

Added the 1/2 tab punch and a flower button with a piece of Linen thread tied through the buttons holes.

Here is the finished card measuring 5″ x 6.5″.

Before I end my post for today I want to make you aware of the new Scentsy Burner and scent of the month.   They are discounted.

Good old American pride—there's simply nothing like it! Share your love of country with Star Spangled, a whimsical representation of our nation's flag. Buy today and save 10%      CLICK HERE TO CHECK THEM OUT!  You will love all of the Scentsy Burners and scents.

May your day be the cat’s meow.  🙂

Until my next post. . . .  . .

Hugs,

Michelle

   Get ready for Brayer Workshops!  I am coming to the following locations, click the location name for more information.    

 Ottumwa, Iowa       

Owings Mills, Maryland (Baltimore Area)      

Cleveland (Euclid), Ohio       

Staley , North Carolina (South of Greensboro)       

Monroe, Connecticut       

Dayton, Ohio     

Leesburg, Florida       

Montreal, Wisconsin       

Savannah, Georgia       

Lincoln, Illinois       

Jefferson, Louisiana (New Orleans Area)       

Here is a link to my workshop calendar where you can see all of my travel schedule and to get info on beginner and advanced Brayer workshops:   http://zindorf.blogs.splitcoaststampers.com/workshop-calendar        

Don’t see a workshop in your State?  Interested in hosting the workshops in your area in 2012?   Click HERE to get hostess information.       

Link to my Stampin’ Up website where you can order all of your must have Stampin’ Up products from me 24-7:  http://michellezindorf.stampinup.net   

 Link to my Scentsy website where you can order the best smelling, safest wickless candles from me 24-7:  https://zindorf.scentsy.us/Home


Stampin’ Up! Kimono Kids Blog Candy!

Hello there!   I’m off to beautiful Colorado Springs, Colorado to teach my brayer techniques this weekend.  While I’m away, I have some wonderful Stampin’ Up! Kimono Kids stamps to give away as blog candy.

All you have to do to enter is leave a comment on this post telling me to enter you.  If you are getting these blog updates via e-mail you will need to CLICK HERE AND THEN LEAVE A COMMENT ON THE ACTUAL BLOG POST.

I will be selecting the winner upon my return home on Tuesday, June 14, 2011 using a random number generator.   Good luck to everyone.  Please note, you cannot win if you don’t enter.  🙂

May your weekend be out of this world fun!

Until my next post. . . . . .

Hugs,

Michelle