Hello There,
I am in Arizona for the weekend but I had this post prepared a head of time so it would post while I am on the road. Enjoy!
************************************************************************
I love homemade pizza and when I make it I make a few extra to freeze for an easy, easy dinner or lunch. It’s so easy to freeze and taste way better than the store bought frozen pizzas at about a 3rd of the cost. Can’t beat it!
Started by making up 2 lbs of bread dough in my bread machine. This gave me enough dough to make 4 personal pizzas and a large 12″.
Here is the ingredients for 1 lbs, I doubled the recipe.
3/4 cup water
2 cups all purpose flour (you can add 1/2 wheat flour if you prefer)
1/2 teaspoon salt
1 1/2 tablespoons olive oil
2 teaspoons sugar
2 teaspoons active dry yeast
Added ingredients to bread machine, and select dough setting. When done, mound dough on a floured counter top, cover with a towel and let rest for 10 minutes. Now it is ready for dividing. Use 1/3 of it for Large Pizza and then cut the rest in 4 pieces for the personal sized ones.

Sprayed my pizza pans with cooking spray, spread the dough on to the pizza pans. I cook two at a time.

Added my sauce and whatever I have on hand in the fridge. I just had pepperoni and mushrooms when I made these. You can be creative here. Cooked for 7 minutes at 450 degrees and then added cheese for 3 more minutes of cooking. You want to under cook your pizzas a bit so they don’t get over done on cooking day.

Wrap you pizzas to freeze in plastic wrap and then heavy alumium foil. Label your pizzas with date and what it is on the foil using a Sharpie marker. Put the 4 personal pizzas in a 2 gallon freezer bag and then into the freezer they go.


On cooking day, place the frozen pizza on your pizza pan and bake at 350 degrees until middle is hot and cheese is slightly browned, 10-15 minutes. Enjoy!

*********************************************************************************
CLICK HERE TO SEE THE LATEST STAMPIN’ UP! PROMOTION AND TO SHOP NOW!
Stampin’ Up! is selling single stamps from 3 stamp sets on a trial bases until January 2, 2012. Check out the flyers at the links below.
Also, Merry Christmas from Stampin’ Up!

Don’t miss out on my Customer free stamp set program. Check it out! Along with a handmade thank you card from me for your order you will receive a token for each $50 in product you ordered using me as your demonstrator. After you have collected 10 tokens you will receive a free current stamp set of your choosing, a value of $39 or less. Here is a link to my online shopping page that you can shop at 24/7 (from the comfort of your home, even in your pj’s) and the products will be shipped directly to your door step from Stampin’ Up: CLICK HERE TO SHOP. My free stamp set program will be an on going program. ![]()
 The new Stampin’ Up! Holiday Catalog is now in effect. I love all of Stampin’ Up’s products, but the new catalog just blew me away (CLICK HERE TO VIEW THE HOLIDAY CATALOG). I especially love the coordinating products that you can get as a bundle at a discount. Gotta love a discount, right? Especially for those products to make your holiday gifts and cards.
Want a new annual catalog shipped to you? I will be happy to send you one. The catalog is free, but there is a $5 shipping charge. Note, I will only sell or ship within the United States do to Stampin’ Up! policies. Please contact me at mzindorf@aim.com. Payment can be sent via Paypal or check.
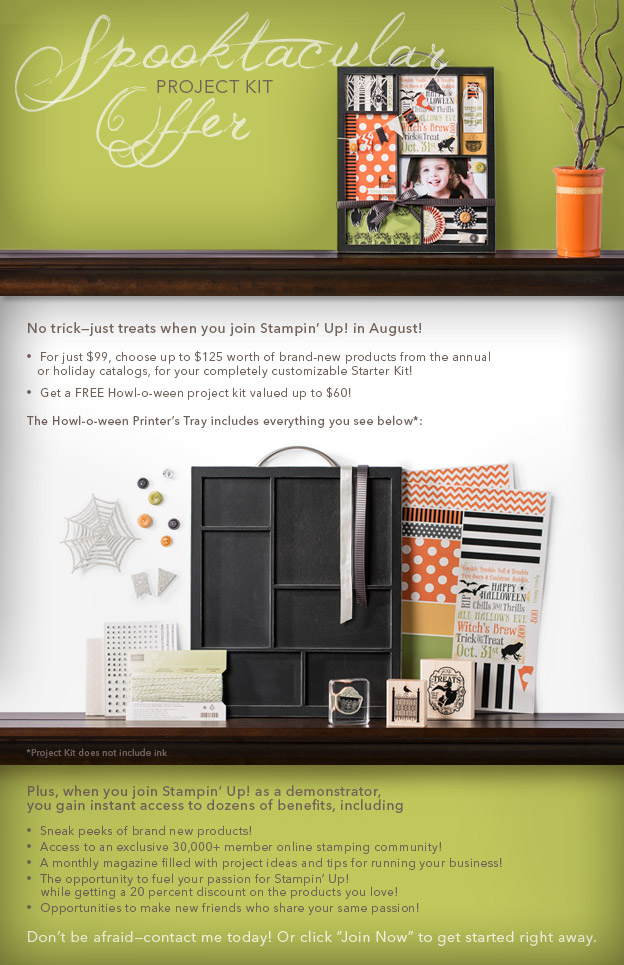
You can join my Stampin’ Up! team and become a Stampin’ Up! Demonstrator now for the great new price of $99, and you can create your own kit, CLICK HERE TO CHECK IT OUT. Contact me whether you want to start your own business or just enjoy the 20% discount on products.
*****************************************************************************
Until my next post.. . . . .
Hugs,


 Get ready for Brayer and Direct to Paper Workshops! I am coming to the following locations, click the location name for more information.
Stamp the Day Away – West Alexandria, Ohio – Non-Brayering Event
I hope you can make it to one of my workshops in 2012. I have decided not to travel after this year, so be sure to catch one now!
Link to my Stampin’ Up website where you can order all of your must have Stampin’ Up products from me 24-7: http://michellezindorf.stampinup.net


