Cherished Flight – Tutorial #335

dsc04024.JPG

Good Afternoon!

I’m hanging out in my PJ’s this afternoon working away.   I had plans to have lunch with my Mother and then dinner out with my Stampin’ Up! Up Line, Karen Barber.  Well both my Mother and Karen are under the weather today so all of my plans have been canceled.   Since I didn’t need to be any where, I am still tooling around in the PJ’s, sorry sight, I tell ya.

I did however manage to stamp this project that I am sharing with you today.  Hope you enjoy it.

Let’s get started. . . . . . .

Supplies:

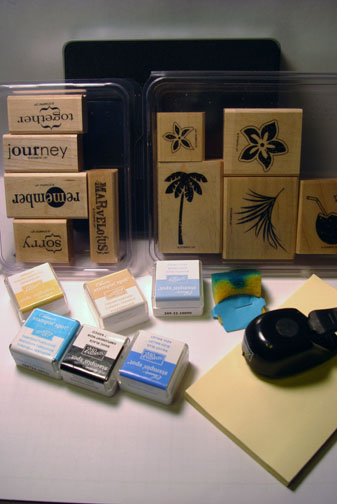
Stamps: Stampin’ Up! Eastern Influences, Trendy Trees, Baroque Motifs
Paper: Stampin’ Up! Whisper White, Brilliant Blue, Certainly Celery
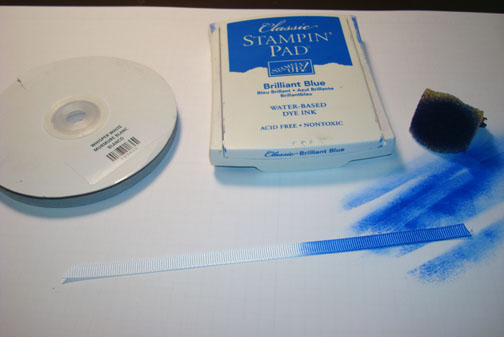
Ink: Stampin’ Up! Brilliant Blue, Certainly Celery, Night of Navy, Basic Black, Tempting Turquoise and Green Gable
Accessories: Stampin’ Up! Certainly Celery marker, Tempting Turquoise Rhinestone Brad, White Gel Pen, Versamark Pad, Clear embossing Powder, Heat Gun, XL Bird Punch, Flower Punch, Stampin’ Pastels and Brayer

Live in the USA and need a copy of the Summer Mini Catalog?  E-mail your mailing address to mzindorf@aim.com and I will get one in the mail to you.  )  Are you getting inspiration from this blog?   One way you can help support it is to order your Stampin’ Up products through me.   Click HERE to place an order.  Want to become a Stampin’ Up Demonstrator , receive a 20% discount on product and earn instant income on orders?  Consider being part of my Stampin’ Up Team and start your own business.  Click HERE for more information.

dsc04030.JPG

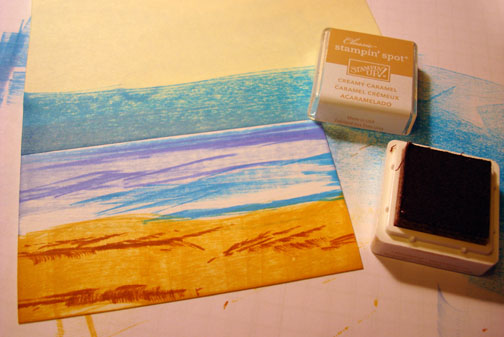
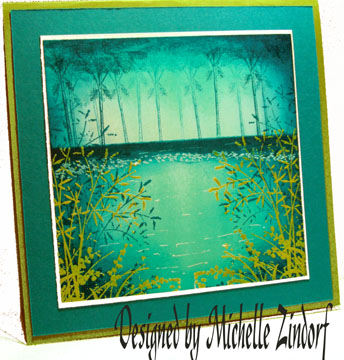
On a 3.5″ x 5″ piece of Whisper White stamped the leaves of the trees by first loading my stamp with Versamark and then with Green Galore ink before stamping them.  Heat embossed the images using clear embossing powder and a heat gun.

dsc03995.JPG

dsc03996.JPG

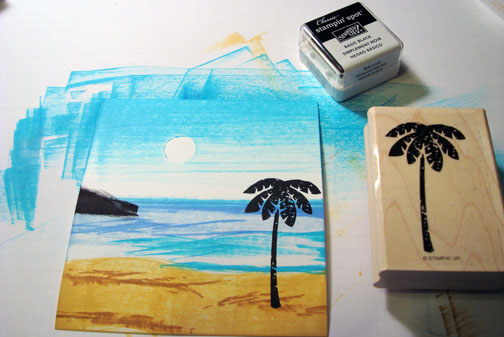
Stamped the trunks of the trees using Brilliant Blue ink only.

dsc03997.JPG

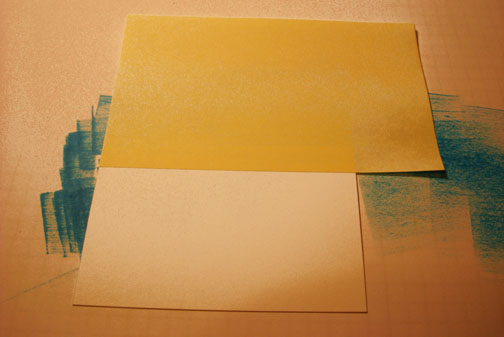
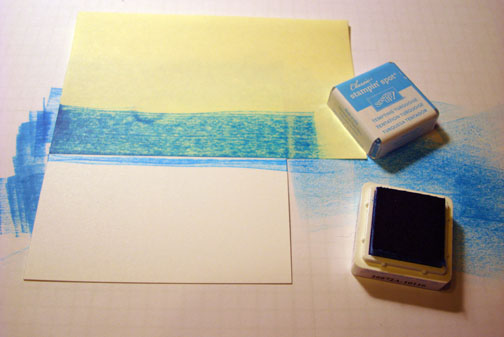
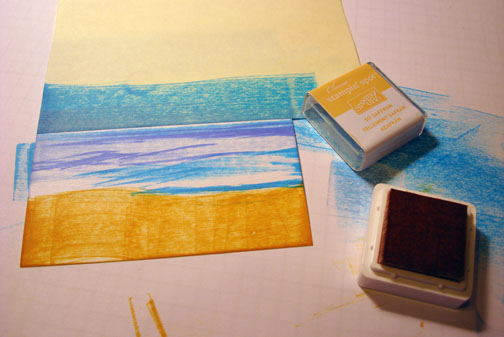
Brayered Tempting Turquoise ink at the top right corner and bottom left corner of the card stock.

dsc03998.JPG

dsc03999.JPG

Brayered Brilliant Blue ink at the top right corner and bottom of the card stock.

dsc04000.JPG

dsc04001.JPG

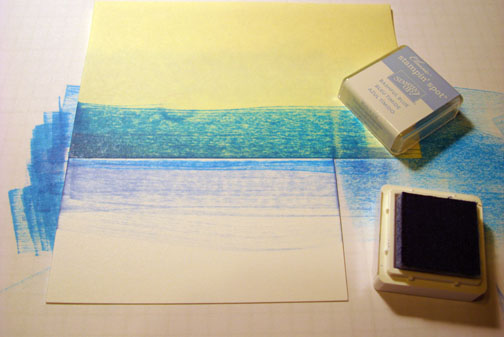
Wiped the ink off of the embossed images using a paper towel.

dsc04002.JPG

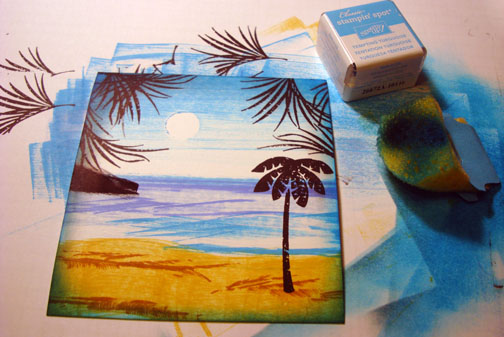
Stamped the flourish  at the top of the card stock a few times with Tempting Turquoise and stamping off once before stamping each image.

dsc04003.JPG

Stamped the birds using Basic Black ink.

dsc04004.JPG

Colored in the bird using a white gel pen.

dsc04006.JPG

Added a bit of Brilliant Blue Stampin’ Pastel to each tree, in the bottom of the leafy area.

dsc04007.JPG

Added White Gel Pen dots to each tree.

dsc04008.JPG

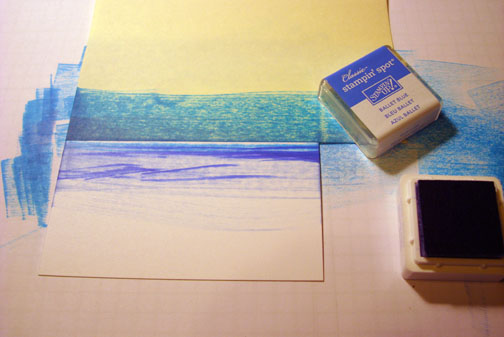
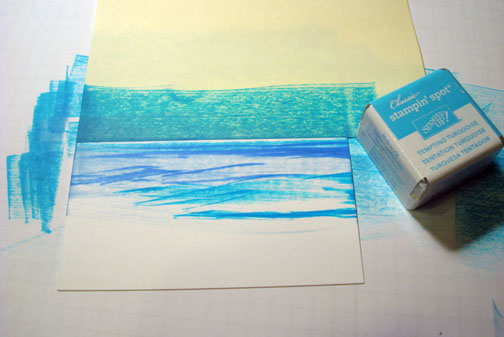
Brayered Night of Navy ink to the top right corner and the bottom of the card stock.

dsc04009.JPG

Stamped the flourish on a 4.75″ x 6.25″ piece of Certainly Celery card stock using Certainly Celery ink.

dsc04012.JPG

Assembled my card front and added Certainly Celery leaves punched with the bird punch.

dsc04015.JPG

Added Celery marker to the bottom of each leaf to give them some depth.

dsc04017.JPG

Stamped the sentiment using Brilliant Blue ink.

dsc04018.JPG

Added a flower punch and a Tempting Turquoise Rhinestone brad.

dsc04019.JPG

Here is the finished card measuring 5″ x 6.5″.

dsc04024.JPG

May your day be one of leisure. 

Until my next post. . . . .  . . . . . . .

Hugs,

Michelle

dsc03326-2.jpg   Get ready for Brayer Workshops!  I am coming to:

St. Cloud, Minnesota (1 spot available)

Rockville, Maryland

North Chili, New York (near Rochester)

Kenova (Huntington), West Virginia

Helena, Montana

Middleburg Heights, Ohio (Sold Out)

Venice, Florida

Grinnell, Iowa

Piedmont, Alabama (Near GA border close to Cedartown)

Auburn, Washington (near Seattle)

Elk Grove Village, Illinois

Savannah, Georgia

Atlanta, Georgia

Soledad, California

Here is a link to my workshop calendar where you can see all of my travel schedule and to get info on beginner and advanced Brayer workshops:   http://zindorf.blogs.splitcoaststampers.com/workshop-calendar 

Link to my Stampin’ Up website where you can order all of your must have Stampin’ Up products from me 24-7:  http://michellezindorf.stampinup.net

Frequently asked questions answers:  http://zindorf.blogs.splitcoaststampers.com/frequently-asked-questions/ 


Tool Time – Coloring Ribbon

dsc03991.JPG

This is a quick tool time tip. 

If you don’t have ribbon that is just the right color to match your project.  Take Whisper White Ribbon and sponge ink on it to match your project.   I like to use Classic Dye Ink for this.  It dries quickly.  🙂

Click HERE for other Tool Time Tips.

Hugs!

Michelle

dsc03326-2.jpg   Get ready for Brayer Workshops!  I am coming to:

St. Cloud, Minnesota (1 spot available)

Rockville, Maryland

North Chili, New York (near Rochester)

Kenova (Huntington), West Virginia

Helena, Montana

Middleburg Heights, Ohio (Sold Out)

Venice, Florida

Grinnell, Iowa

Piedmont, Alabama (Near GA border close to Cedartown)

Auburn, Washington (near Seattle)

Elk Grove Village, Illinois

Savannah, Georgia

Atlanta, Georgia

Soledad, California

Here is a link to my workshop calendar where you can see all of my travel schedule and to get info on beginner and advanced Brayer workshops:   http://zindorf.blogs.splitcoaststampers.com/workshop-calendar 

Link to my Stampin’ Up website where you can order all of your must have Stampin’ Up products from me 24-7:  http://michellezindorf.stampinup.net

Frequently asked questions answers:  http://zindorf.blogs.splitcoaststampers.com/frequently-asked-questions/ 


A Day at the Pond – Tutorial #334

dsc03982.JPG

I’m back for the second time today.  This time I have a tutorial for you.

Let’s get right into it. . . .

Supplies:

Stamps: Stampin’ Up! Asian Artistry
Paper: Stampin’ Up! Whisper White, Brilliant Blue and Apricot Appeal
Ink: Stampin’ Up! Dusty Durango, Apricot Appeal, Brilliant Blue, Old Olive, Creamy Caramel, Chocolate Chip and Bashful Blue
Accessories: Stampin’ Up Markers – Certainly Celery, Brilliant Blue and Basic Black, White Gel Pen, Whisper White Ribbon, Brayer, Glass Pad, X-acto knife and sponges

Live in the USA and need a copy of the Summer Mini Catalog?  E-mail your mailing address to mzindorf@aim.com and I will get one in the mail to you.  )  Are you getting inspiration from this blog?   One way you can help support it is to order your Stampin’ Up products through me.   Click HERE to place an order.  Want to become a Stampin’ Up Demonstrator , receive a 20% discount on product and earn instant income on orders?  Consider being part of my Stampin’ Up Team and start your own business.  Click HERE for more information.

dsc03985.JPG

Brayered Apricot Appeal ink on a 4″ x 4.5″ piece of Whisper White card stock.

dsc03957.JPG

Brayered Dusty Durango ink at the top of the card stock, not covering the Apricot Appeal ink completely.

dsc03958.JPG

Using a Stampin’ Up glass mat and X-acto knife, cut a scrap piece of card stock.  Keep both pieces.

dsc03956.JPG

Masked the bottom of the card stock using one of the cut pieces.  I am holding this mask in place with my hand and sponging Creamy Caramel ink on .

dsc03959.JPG

Added Chocolate Chip ink right at the masks edge.

dsc03960.JPG

Took the bottom mask off and put the top mask on.

dsc03962.JPG

Sponged Bashful Blue ink in the unmasked area.

dsc03963.JPG

Sponged Brilliant Blue ink at the masks edge.

dsc03964.JPG

Added a few lines of Brilliant Blue marker around the curves.

dsc03965.JPG

Stamped the plant and dragonfly with Old Olive ink.

dsc03966.JPG

dsc03967.JPG

Added some Brilliant Blue marker lines in the water at the base of the plants.

dsc03969.JPG

Colored in the flowers with a Brilliant Blue marker.

dsc03971.JPG

Added Certainly Celery marker tothe middle of the dragonfly.  Also darkened his legs and eyes with a Basic Black marker.

dsc03972.JPG

Added Basic Black marker shadows to the undersides of the leaves and highlights to the tops of them using a White Gel Pen.  Also added White Gel Pen water lines and colored in the dragonfly’s wings.

dsc03975.JPG

Sponged around the edges of the card stock using Brilliant Blue ink.

dsc03976.JPG

Cut a 5.25″ square piece of Apricot Appeal card stock and brayered Dusty Durango ink at the top of it.

dsc03977.JPG

Cut a section of the side of a Top Note Die cut. 

Assembled card and added Whisper White Ribbon.  Here it is finished measuring 5.5″.

dsc03982.JPG

May your day be one of peace and harmony.

Until my next post. . . . . . .

Hugs,

Michelle

dsc03326-2.jpg   Get ready for Brayer Workshops!  I am coming to:

St. Cloud, Minnesota (1 spot available)

Rockville, Maryland

North Chili, New York (near Rochester)

Kenova (Huntington), West Virginia

Helena, Montana

Middleburg Heights, Ohio (Sold Out)

Venice, Florida

Grinnell, Iowa

Piedmont, Alabama (Near GA border close to Cedartown)

Auburn, Washington (near Seattle)

Elk Grove Village, Illinois

Savannah, Georgia

Atlanta, Georgia

Soledad, California

Here is a link to my workshop calendar where you can see all of my travel schedule and to get info on beginner and advanced Brayer workshops:   http://zindorf.blogs.splitcoaststampers.com/workshop-calendar 

Link to my Stampin’ Up website where you can order all of your must have Stampin’ Up products from me 24-7:  http://michellezindorf.stampinup.net

Frequently asked questions answers:  http://zindorf.blogs.splitcoaststampers.com/frequently-asked-questions/ 


A Few Garden Photos

imgp0665-a.jpg

I am posting these garden photos so you don’t think that I have completely fallen off of the planet.  Actually, I just returned from Wheaton, IL and took a day off.  That’s right, I took a day off, first one in over a month, lol.   When I am traveling, sometimes I miss the peak times for those flowers that don’t bloom very long.  When I left for Illinois last week none of these peonies where blooming.  So you can imagine my surprise to pull in the driveway upon my return to be greeted by these beauties.  🙂    

imgp0664-a.jpg

I only have perennial gardens.  Perennials come up year after year for you.  Which is totally awesome since I don’t have any time for replanting.   The flowers also feel like old friends when you see them in bloom each year.  These peonies hold a very special place in my heart since they once graced my Grandmother’s garden.  Who has passed now.  Then they were passed down to my Mother, who then past them on to me.

imgp0656-a.jpg

Never fear, this is still a stamping blog, so I will hop off of here and create something to share with you later today.

Until my next post.. . .  . . .

Hugs,

Michelle

dsc03326-2.jpg   Get ready for Brayer Workshops!  I am coming to:

St. Cloud, Minnesota (1 spot available)

Rockville, Maryland

North Chili, New York (near Rochester)

Kenova (Huntington), West Virginia

Helena, Montana

Middleburg Heights, Ohio (Sold Out)

Venice, Florida

Grinnell, Iowa

Piedmont, Alabama (Near GA border close to Cedartown)

Auburn, Washington (near Seattle)

Elk Grove Village, Illinois

Savannah, Georgia

Atlanta, Georgia

Soledad, California

Here is a link to my workshop calendar where you can see all of my travel schedule and to get info on beginner and advanced Brayer workshops:   http://zindorf.blogs.splitcoaststampers.com/workshop-calendar 

Link to my Stampin’ Up website where you can order all of your must have Stampin’ Up products from me 24-7:  http://michellezindorf.stampinup.net

Frequently asked questions answers:  http://zindorf.blogs.splitcoaststampers.com/frequently-asked-questions/ 


Just Beachy – Tutorial #333

dsc03954.JPG

It is still raining at my house today, just like it has been the past couple of days.  I decided to look on the sunny side of things though and created a beach scene using my new favorite tools, the ink spots.  These little cuties are sold as sets.   Each Stampin’ Up! color family has a set.  Of course, I had to have them all.  The little ink spot pads are a mere 1 inch and the pads are raised from the base of the ink pad holder so you can easily use them to apply ink directly to the paper.  They are much easier to control then the larger pads when doing Direct to Paper Techniques.

dsc03932.JPG

Today’s project was also made for my Stampin’ Up! Down Line, Ink To Art Team’s Technique Swap.  This month’s technique is, you guest it, Direct to Paper. 

Let’s get started. . . . . . . . .

Supplies:

Stamps: Stampin’ Up! Tropical Party and In a Word
Paper: Stampin’ Up! Whisper White, Basic Black, More Mustard and Tempting Turquoise
Ink: Stampin’ Up! Ink spots, Tempting Turquoise, Basic Black, Ballet Blue, Bashful Blue, So Saffron and Creamy Caramel
Accessories: Stampin’ Up! Top Note Die, Big Shot Machine, 1/2″ circle Punch, Sponge, Post it Notes

Live in the USA and need a copy of the Summer Mini Catalog?  E-mail your mailing address to mzindorf@aim.com and I will get one in the mail to you.  )  Are you getting inspiration from this blog?   One way you can help support it is to order your Stampin’ Up products through me.   Click HERE to place an order.  Want to become a Stampin’ Up Demonstrator , receive a 20% discount on product and earn instant income on orders?  Consider being part of my Stampin’ Up Team and start your own business.  Click HERE for more information.

dsc03955.JPG

Masked the sun using a 1/2″ punch from the sticky part of a post it note.    Put the mask on a 3.75″ x 4″ piece of Whisper White card stock.

dsc03933.JPG

Swiped the Tempting Turquoise ink spot across the top of the card stock.

dsc03934.JPG

Masked the top of the card stock using a post it note.

dsc03935.JPG

Swiped the Tempting Turquoise ink spot across the card stock right at the post it note edge.

dsc03936.JPG

Swiped the Bashful Blue ink spot across the card stock.

dsc03937.JPG

Swiped the Ballet Blue ink spot onto the card stock using the edge of the pad.

dsc03938.JPG

Swiped the Tempting Turquoise ink spot at the bottom of the water area.

dsc03939.JPG

Swiped the So Saffron ink spot at the bottom of the card stock to create a sandy area.

dsc03940.JPG

Added a marks of Creamy Caramel using the edge of the Ink pad.

dsc03941.JPG

Removed all of the Post it Note Masks.

dsc03942.JPG

swiped in a piece of island using the edge of the Basic Black ink spot.

dsc03943.JPG

Stamped the Palm Tree from the New Stampin’ Up set Tropical Party using Basic Black ink.

dsc03944.JPG

Stamped the Palm Fod using Basic Black ink.

dsc03945.JPG

Sponged around the egde of the main image panel using Tempting Turquoise ink.

dsc03946.JPG

Die Cut a Top Note Die using my Big Shot Die Cut machine and Whisper White card stock.

dsc03947.JPG

Cut the Top Note in half.

dsc03948.JPG

Stamped the word Marvelous on the top note half using Basic Black ink.

dsc03949.JPG

Assembled the card adding Basic-Black, More Mustard and Tempting Turquoise panels.

Here is the finished card measuring 5.5″ square.

dsc03954.JPG

Hey, I am taking off on a road trip to Illinois to teach my Brayer Workshops this weekend, woohoo!  I love road trips, stamping and new friends.  🙂

I will be back on Monday.

May your weekend be filled with lots of fun and laughter.

Until my next post. . . . . . 

Hugs,

Michelle

dsc03326-2.jpg   Get ready for Brayer Workshops!  I am coming to:

Wheaton, Illinois

St. Cloud, Minnesota (2 spots available)

Rockville, Maryland

North Chili, New York (near Rochester)

Kenova (Huntington), West Virginia

Helena, Montana

Middleburg Heights, Ohio (Sold Out)

Venice, Florida

Grinnell, Iowa

Piedmont, Alabama (Near GA border close to Cedartown)

Auburn, Washington (near Seattle)

Elk Grove Village, Illinois

Savannah, Georgia

Atlanta, Georgia

Soledad, California

Here is a link to my workshop calendar where you can see all of my travel schedule and to get info on beginner and advanced Brayer workshops:   http://zindorf.blogs.splitcoaststampers.com/workshop-calendar 

Link to my Stampin’ Up website where you can order all of your must have Stampin’ Up products from me 24-7:  http://michellezindorf.stampinup.net

Frequently asked questions answers:  http://zindorf.blogs.splitcoaststampers.com/frequently-asked-questions/ 


Baby Shower – Tutorial #332

dsc03928.JPG

Rain, rain go away.  Come again another day.  🙂

It is raining, raining, raining here at my house.  My perennial gardens are loving it, but I have a bunch of errands to run and I just might melt.  Because I’m so very sweet, right!   Hahaaaahaaaa!

All is not lost, the rain inspired this baby shower card today. 

Before I start the tutorial I need to announce the winner of the Stampin’ Up!  “C” is for stamp set that I put up for blog candy last Thursday.  And the winner is. . . . .  .. . . . .

dsc03829.JPG

Mary Ann Daughertywho wrote “I really love this card. Please enter me for this set. I have been looking for a cat stamp set but none have said got to have it till this one. Please pick me. I have 3 cats and am excited to put together some scrapbook pages using that stamp set.  Have fun in Oregon. It is a beautiful state have visited 3 times when my in laws lived there. My husband is originally from Portland but he wanted to come to PA. Wish I was going with you. Have a safe trip and looking forward to your next blog”

Mary Ann Daugherty, Congratulations!  Please e-mail your address to mzindorf@aim.com within 30 days and I will ship this wonderful stamp set out to you.

Thank you to all who played along.  It just might be you who wins next time.

Now on with the tutorial. . . . .  . . . .

Supplies:

Stamps: Stampin’ Up! Level one Hostess set “Love Bug” and Autumn Splendor
Paper: Stampin’ Up! Whisper White, Certainly Celery, Brilliant Blue and Tempting Turquoise
Ink: Stampin’ Up! Certainly Celery, Always Artichoke, Tempting Turquoise and Brilliant Blue
Accessories: Stampin’ Up! Markers Real Red, Certainly Celery, Old Olive, Summer Sun, Always Artichoke and Chocolate Chip, Versmark marker and pad, Photo Corner Punch, Tempting Turquoise brads and ribbon, Brayer, sponge, Clear embossing powder and heat gun

Live in the USA and need a copy of the Summer Mini Catalog?  E-mail your mailing address to mzindorf@aim.com and I will get one in the mail to you.  )  Are you getting inspiration from this blog?   One way you can help support it is to order your Stampin’ Up products through me.   Click HERE to place an order.  Want to become a Stampin’ Up Demonstrator , receive a 20% discount on product and earn instant income on orders?  Consider being part of my Stampin’ Up Team and start your own business.  Click HERE for more information.

dsc03931.JPG

On a 3.75″ square piece of Whisper White card stock, stamped the leaf and baby carriage by first loading my stamp with Versamark and then with Always Artichoke ink before stamping.  Heat embossed the images using clear embossing powder and a heat gun.

dsc03904.JPG

dsc03905.JPG

Added Always Artichoke marker to the leaf and carriage.

dsc03906.JPG

Added Certainly Celery marker to the leaf and carriage.

dsc03907.JPG

Added Old Olive marker to the leaf and carriage.

dsc03908.JPG

Colored the bug with Summer Sun, Certainly Celery and Real Red markers.  Colored the wheels of the baby carriage using Always Artichoke marker.

dsc03909.JPG

Added Chocolate Chip marker to the leaf veins and bottom of the carriage.

dsc03910.JPG

Heat set the markers using my heat gun.

dsc03911.JPG

Colored over the leaf and the carriage using a Versamark marker, staying within the embossed design.  Heat embossed the images again using clear embossing powder and a heat gun.  Now the images are completely covered with embossing.

dsc03912.JPG

Brayered Tempting Turquoise ink at the top of the card stock.

dsc03913.JPG

Brayered Brilliant Blue ink at the top of the card stock,not covering the Tempting Turquoise ink entirely.

dsc03914.JPG

Brayered Certainly Celery ink at the bottom of the card stock.

dsc03915.JPG

Brayered Always Artichoke at the bottom of the card stock, not covering the Certainly Celery ink entirely.

dsc03916.JPG

Using a ruler as a guide, made random dashes in the sky area to indicate rain using a white gel pen.

dsc03917.JPG

Sponged Brilliant Blue ink on the egdes of the card stock.

dsc03918.JPG

Added a drop shape at the tip of one of the leaf points using a White Gel Pen.

dsc03919.JPG

Added a straight line under the leaf and carriage using an Old Olive marker to suggest a shadow.

dsc03920.JPG

Added Brilliant Blue, Certainly Celery and Tempting Turquoise layers.  Also added Certainly Celery photo corner punches, Tempting Turquoise brads and ribbon.

dsc03921.JPG

Here is the finished card measuring 5.5″ square.

dsc03928.JPG

Wishing you a lovely day.

Until my next post. . . . . .  ..

Hugs,

Michelle

dsc03326-2.jpg   Get ready for Brayer Workshops!  I am coming to:

Wheaton, Illinois

St. Cloud, Minnesota (2 spots available)

Rockville, Maryland (Sold Out)

North Chili, New York (near Rochester) (Sold Out)

Kenova (Huntington), West Virginia

Helena, Montana

Middleburg Heights, Ohio (Sold Out)

Venice, Florida

Grinnell, Iowa

Piedmont, Alabama (Near GA border close to Cedartown)

Auburn, Washington (near Seattle)

Elk Grove Village, Illinois

Savannah, Georgia

Atlanta, Georgia

Soledad, California

Here is a link to my workshop calendar where you can see all of my travel schedule and to get info on beginner and advanced Brayer workshops:   http://zindorf.blogs.splitcoaststampers.com/workshop-calendar 

Link to my Stampin’ Up website where you can order all of your must have Stampin’ Up products from me 24-7:  http://michellezindorf.stampinup.net

Frequently asked questions answers:  http://zindorf.blogs.splitcoaststampers.com/frequently-asked-questions/ 


Cat’s Night Out – Tutorial #331

dsc03825.JPG

I am leaving on a jet plane, laaaa laaaaa laaaa, tomorrow morning for Salem, Oregon to teach my Brayer Workshops.  Oregon are you ready to get your BRAYER ON!  I hope so because I have some great projects to teach you.  So come prepared to have fun and create.

Now, I didn’t want to forget my blog readers today and I am in the mood today to make a scene, literally, lol.  How about a brayered spotlighted scene?  I also have some fun blog candy this week.  I am giving away a brand new Stampin’ Up! cute, cute set, C is for Cat.  

dsc03829.JPG

Want to throw your hat in the ring to try to win this stamp set?  Just leave a comment on this blog post telling me to enter you.  If you are getting this blog post via e-mail, please click HERE and then leave a comment.  No e-mail entries will be accepted.

I will use a random number generator on Monday, 17, 2010 to select the winner.  Good luck everyone.  Just remember, you can’t win if you don’t play along.  🙂

Let’s get started so I can finish my packing, lol. . . . . . . .

Supplies:

Stamps: Stampin’ Up! C is for Cat
Paper: Stampin’ Up! Whisper White, Basic Black and Apricot Appeal
Ink: Stampin’ Up! Shara Sand, Basic Black, Apricot Appeal, Going Gray, Not Quite Navy and Night of Navy
Accessories: Stampin’ Up! 3/4″ & 1/2″ circle punches, Stamp-a-ma-jig, white gel pen, Basic Black marker, Sahara Sand marker and Brayer

Live in the USA and need a copy of the Summer Mini Catalog?  E-mail your mailing address to mzindorf@aim.com and I will get one in the mail to you.  )  Are you getting inspiration from this blog?   One way you can help support it is to order your Stampin’ Up products through me.   Click HERE to place an order.  Want to become a Stampin’ Up Demonstrator , receive a 20% discount on product and earn instant income on orders?  Consider being part of my Stampin’ Up Team and start your own business.  Click HERE for more information.

dsc03826.JPG

Started with a 4.25″ x 5.75″ piece of Whisper White card stock.  Stamped the cat on my Stamp-a-ma-jig plastic, flipped the plastic over onto the card stock and rubbed the back of the plastic to transfer the image.  This creates a reverse of your stamp.

dsc03801.JPG

Used my Stamp-a-ma-jig, cat stamp and Basic Black ink to stamp the cat image, lining it up with the reverse image.

dsc03802.JPG

dsc03803.JPG

dsc03804.JPG

dsc03805.JPG

Brayered Apricot Appeal ink at the top of the card stock.

 dsc03806.JPG

Brayered Not Quite Navy ink at an angle on both of the top corners of the card stock.

dsc03807.JPG

dsc03808.JPG

Brayered Night of Navy at the same angles using Night of Navy ink, not covering up the Not Quite Navy ink entirely.

dsc03809.JPG

Brayered Going Gray at the bottom of the card stock.

dsc03810.JPG

Punched a 1/2″ circle punch from Whisper White card stock.  Punch a 3/4″ punch from Apricot Appeal card stock. 

dsc03812.JPG

Punched a 3/4″ punch out of Basic Black card stock.  Lined the punch up with the circle in the card stock and punched a sliver of the circle out.

dsc03814.JPG

dsc03813.JPG

dsc03815.JPG

Assembled the light and cut a 1/4″ strip of basic Black card stock and adhered the pieces to the main image panel.

dsc03816.JPG

dsc03817.JPG

Using a Basic Black marker, drew a hook shape to connet the light to the pole.

dsc03818.JPG

Added white gel pen stars, colored in the cats collar and eye.

dsc03820.JPG

Added a shadow for the pole using a Sahara Sand marker.  Also, darkened the cats reflections with the Sahara Sand marker.

dsc03821.JPG

Added Basic Black and Apricot Appeal panels. 

Here is the finished card measuring 5″ x 6.5″.

dsc03825.JPG

May you find time to make a scene of your own today.  🙂

PS  Thank you so much from my entire family for all of your comments and e-mails yesterday congratulating my son, Mitch on his graduation from the Law Enforcement Academy.  SMOOCH!  My blog readers are the best!

Until my next post. . . . . . . .  . . . . . . . .

Hugs,

Michelle

dsc03326-2.jpg   Get ready for Brayer Workshops!  I am coming to:

Salem, Oregon (Sold Out)

Wheaton, Illinois

St. Cloud, Minnesota (2 spots available)

Rockville, Maryland (Sold Out)

North Chili, New York (near Rochester) (Sold Out)

Kenova (Huntington), West Virginia

Helena, Montana

Middleburg Heights, Ohio (Sold Out)

Venice, Florida

Grinnell, Iowa

Piedmont, Alabama (Near GA border close to Cedartown)

Auburn, Washington (near Seattle)

Elk Grove Village, Illinois

Savannah, Georgia

Atlanta, Georgia

Soledad, California

Here is a link to my workshop calendar where you can see all of my travel schedule and to get info on beginner and advanced Brayer workshops:   http://zindorf.blogs.splitcoaststampers.com/workshop-calendar 

Link to my Stampin’ Up website where you can order all of your must have Stampin’ Up products from me 24-7:  http://michellezindorf.stampinup.net

Frequently asked questions answers:  http://zindorf.blogs.splitcoaststampers.com/frequently-asked-questions/ 


Congratulations Wild Boy!

24262_1402960324256_1539793737_987092_6357845_n.jpgn1539793737_287661_4119893.jpg 

This is my youngest Son, Mitch.  He is my wild child and the graffiti artist in the family.  Mitch is the TRUE ARTIST around here.  When he was in high school and very much into graffiti I was sure that I was going to have to pay to have a train, building, bridge,  etc. painted, lol.  He always tried to reassure me that he was doing his art work in public places that allowed graffiti art, uhuh, lol, I was not born yesterday.  We won’t even mention the tatoos and piercings he has shocked me with.  🙂

Since Mitch is my wild child and free spirit, I was totally shocked to hear that he had selected law enforcement as a career choice.   I have always been very proud of my both of my sons.  Today I am extra proud of my youngest, wild child, Mitch who will graduate from the Criminal Justice Training Academy this evening.

Woohoo Wild Boy!  You made it!!!! 

My heart is overflowing with pride.  🙂  Please join me in congratulating him.

Hugs,

Michelle


Sunny Day – Tutorial #330

dsc03794.JPG

I’m in a sunny mood today, can you tell?   This tutorial features the Stampin’ Up! stamp set, Awash with Flowers that will be in the upcoming Stampin’ Up Idea Book and Catalog that will be out July 1, 2010.  I cannot wait!

This is a two step stamping set with lots of stamps in it, 18 to be exact.  Love these big sets.  🙂

Let’s get started. . . . . . .

Supplies:

Stamps: Stampin’ Up! Awash With Flowers and Medallion
Paper: Stampin’ Up! Whisper White, Summer Sun, Dusty Durango and Always Artichoke
Ink: Stampin’ Up! Dusty Durango, Really Rust, Always Artichoke, Old Olive, Pumpkin Pie, Basic Black, Green Galore and Summer Sun
Accessories: Stampin’ Up Markers, White Gel Pen, sponge, Brayer, Photo corner Punch, Circle Die, Big Shot and Old Olive brads

Live in the USA and need a copy of the Summer Mini Catalog?  E-mail your mailing address to mzindorf@aim.com and I will get one in the mail to you.  )  Are you getting inspiration from this blog?   One way you can help support it is to order your Stampin’ Up products through me.   Click HERE to place an order.  Want to become a Stampin’ Up Demonstrator , receive a 20% discount on product and earn instant income on orders?  Consider being part of my Stampin’ Up Team and start your own business.  Click HERE for more information.

dsc03800.JPG

Started by using my Big Shot Die cut machine and the circle die to cut a circle from Whisper White card stock. dsc03767.JPGBrayered Summer Sun ink on the circle.dsc03768.JPG

Brayered Pumpkin Pie ink on the circle, not covering the Summer Sun ink entirely.

dsc03769.JPG

Brayered Green Galore ink at the bottom of the circle.

dsc03770.JPG

Used the edge of the pad to swipe in some Summer Sun ink grasses.

dsc03771.JPG

Used the edge of the pad to swipe in some Green Galore ink grasses.

dsc03772.JPG

Used the edge of the pad to swipe in some Old Olive ink grasses.

dsc03773.JPG

Stamped two of the outline flower stamps using Basic Black ink.

dsc03774.JPG

Stamped the corresponding stamps using Pumpkin Pie ink and Dusty Durango ink.

dsc03775.JPG

dsc03776.JPG

Stamped the stems using Old Olive ink and then colored them in with an Old Olive marker.

dsc03777.JPG

Added Really Rust marker to the bottom of the buttercup flowers and Pumpkin Pie marker to the tops of the other three flowers.

dsc03778.JPG

Stamped somemore foliage in the scene using Always Artichoke ink.

dsc03779.JPG

Stamped the corresponging stamp using Always Artichoke ink to fill them in.

dsc03780.JPG

Added Always Artichoke ink to the bottom of the foliage and Glorious Green marker to the tops of the foliage.

dsc03781.JPG

dsc03782.JPG

Added Ruby Red marker to the very bottoms of the flowers for shadow.

dsc03783.JPG

Sponged Dusty Durango ink around the edge of the card stock.

dsc03784.JPG

Added White Gel Pen highlights to the flowers and leaves.

dsc03785.JPG

Added Always Artichoke ink grasses using the edge of the ink pad.

dsc03786.JPG

Stamped the Medallion stamp on a 4.5″ square piece of Summer Sun card stock using Dusty Durango ink.  Also sponged around the edges of the card stock using Dusty Durango ink.

dsc03787.JPG

Added Always Artichoke and Dusty Durango panels and Always Artichoke photo corners.

dsc03788.JPG

Added Old Olive brads.

dsc03789.JPG

Here is the finished card measuring 5.25″ square.

dsc03794.JPG

May your day be filled to overflowing with sunshine.

Until my next post. . . . . . . . . . .  . .

dsc03326-2.jpg   Get ready for Brayer Workshops!  I am coming to:

Salem, Oregon (Sold Out)

Wheaton, Illinois

St. Cloud, Minnesota (2 spots available)

Rockville, Maryland (Sold Out)

North Chili, New York (near Rochester) (Sold Out)

Kenova (Huntington), West Virginia

Helena, Montana

Middleburg Heights, Ohio

Venice, Florida

Grinnell, Iowa

Piedmont, Alabama (Near GA border close to Cedartown)

Auburn, Washington (near Seattle)

Elk Grove Village, Illinois

Savannah, Georgia

Atlanta, Georgia

Soledad, California

Here is a link to my workshop calendar where you can see all of my travel schedule and to get info on beginner and advanced Brayer workshops:   http://zindorf.blogs.splitcoaststampers.com/workshop-calendar 

Link to my Stampin’ Up website where you can order all of your must have Stampin’ Up products from me 24-7:  http://michellezindorf.stampinup.net

Frequently asked questions answers:  http://zindorf.blogs.splitcoaststampers.com/frequently-asked-questions/