Winter Horses – Tutorial #293

dsc02270.JPG

Today I am getting all packed to fly out bright and early tomorrow morning for the Stampin’ Up Leadership Conference in Phoenix, AZ.  I’m leaving the house at 4:00 a.m.!  It is ruff having to leave Ohio when the temps are in the teens to go to Warm Arizona, not!   I have been so very busy making a ton of swaps to take with me.   This is actually my first Stampin’ Up! conference.  I have wanted to go to many, but my calendar just would not allow it.   I cannot wait to get together with so many talented ladies.  If you are going to be at the conference, please say hi and introduce yourself to me.  It’s nice to meet people that frequent this blog so I can put faces with the names I see.

Now today is the first day of the Stampin’ Up! Sale-a-Bration event.  If you are not familiar with it, Stampin’ Up each year has a period of time when you will receive a free Sale-a-Bration stamp set for each $50 of merchandise purchased.   I love free stamps!  This event will go through March 31, 2010.

Now let’s get started on today’s chilly tutorial . . .  . . .
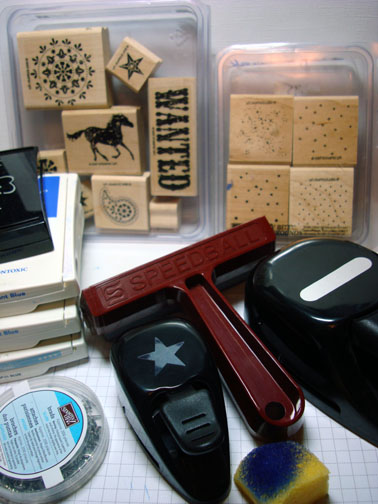
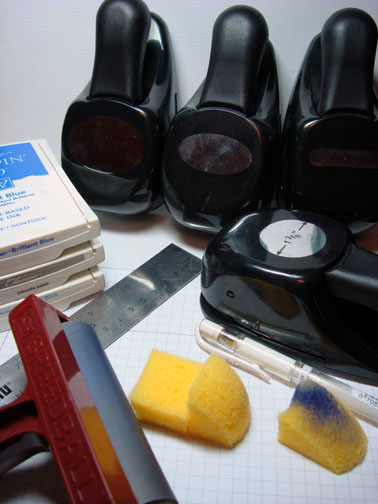
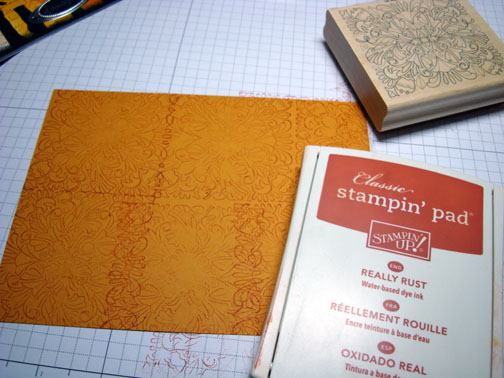
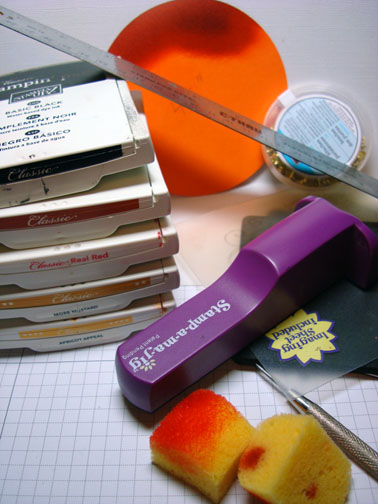
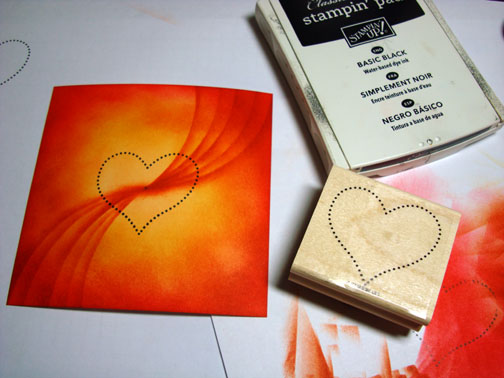
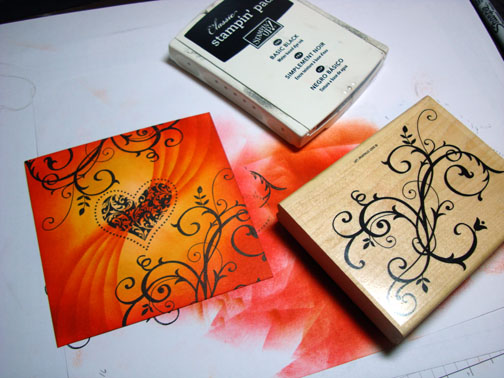
Supplies:

Stamps: Stampin’ Up! Wanted and Itty Bitty Backgrounds
Paper: Stampin’ Up! Whisper White, Bashful Blue and Brilliant Blue
Ink: Stampin’ UP! Brilliant Blue, Ballet Blue and Bashful Blue
Accessories: Stampin’ Up Punches Word Window and Star, Brayer, Sponge, Silver Brads, Post it Note, versamark pad, clear embossing powder and Heat gun.

Don’t forget to request your copy of the new Stampin’ Up Occasions mini catalog and Sale-a-bration mini.   Just e-mail me your address and I will be glad to send you a set for free.  If you are a customer of mine your copy will come to you automatically.  🙂 

The new Occasions mini catalog can also be viewed online here: 

http://204.228.150.61/catalogs/20091231/OccasionsMini10_US.pdf

The New Sale-a-Bration Mini Catalog can also be viewed online here:

http://204.228.150.61/catalogs/20091231/SAB_10_US.pdf

Are you getting inspired and enjoying this blog.   One way you can help support it is to order your Stampin’ Up products through me.   You can order from me 24-7 from this link:  http://michellezindorf.stampinup.net or e-mail me at mzindorf@aim.com.  If you are within the United States.  Want a copy 2009-2010 Stampin’ Up Catalog for $9.95 with free shipping, just e-mail me at mzindorf@aim.com and I will get one in the mail to you.  Want to become a Stampin’ Up Demonstrator and earn instant income?  Consider being part of my Stampin’ Up Team.  Also check out the Stampin’ Up specials, click this link to check it out:  http://www.stampinup.net/esuite/home/michellezindorf/promotions

dsc02273.JPG

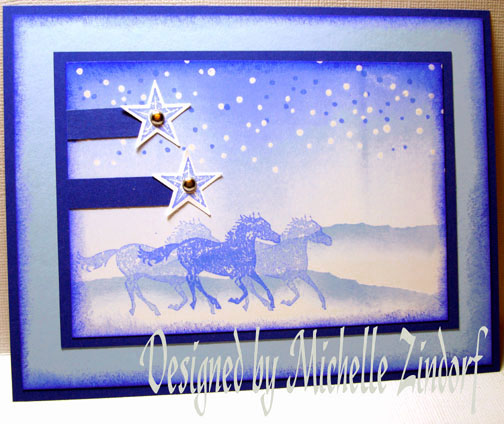
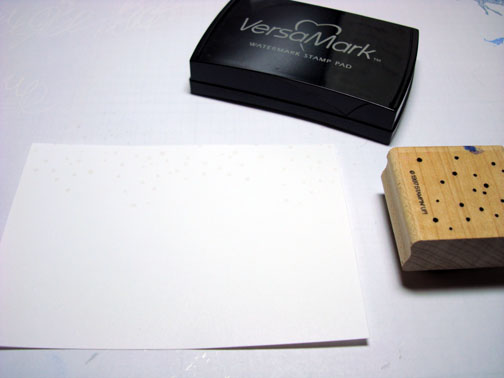
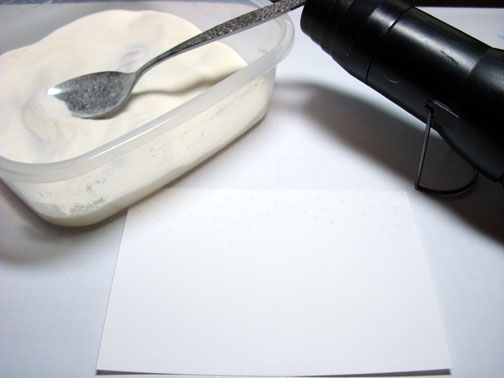
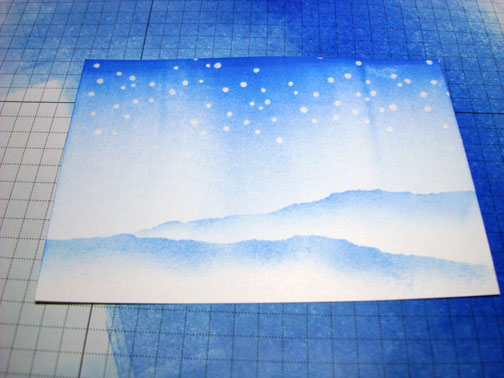
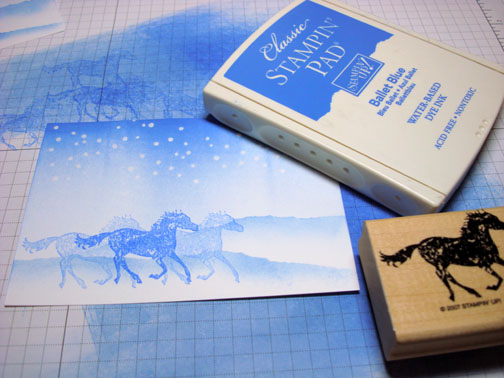
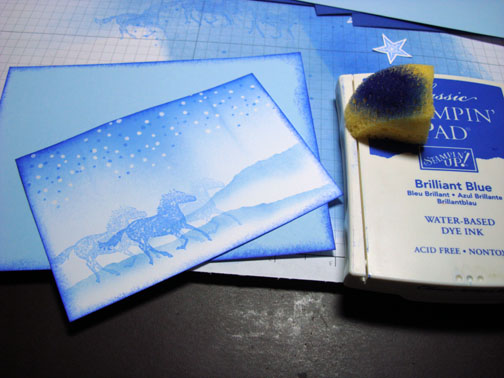
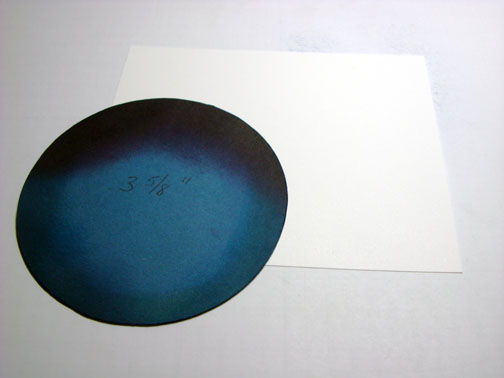
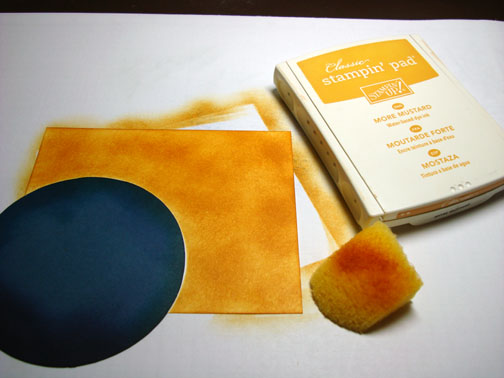
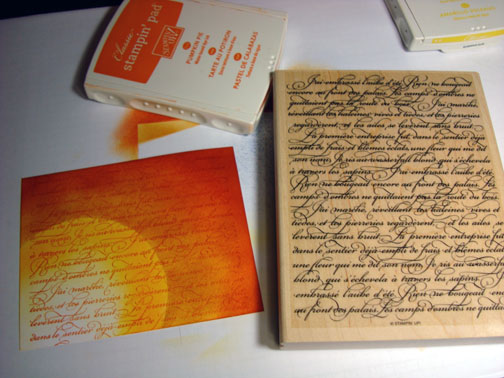
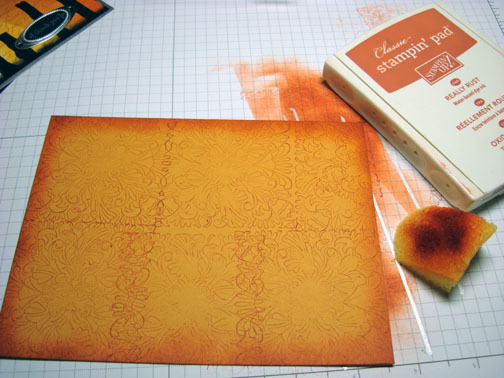
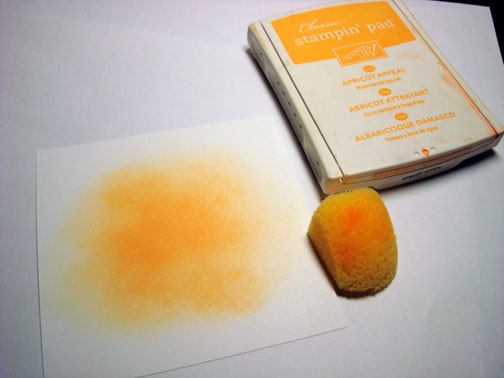
On a 3.5″ x 5″ piece of Whisper White card stock, stamped the Itty Bitty Backgrounds stamp using Versamark only.  Heat embossed the dots with clear embossing powder and a heat gun.

dsc02250.JPG

dsc02251.JPG

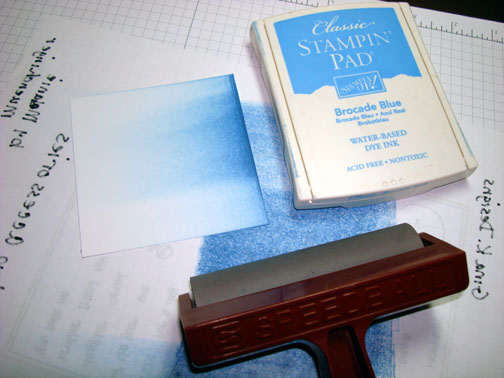
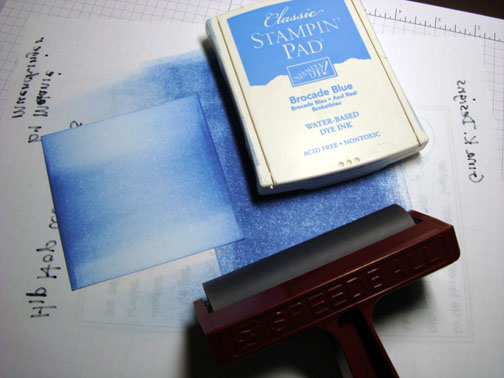
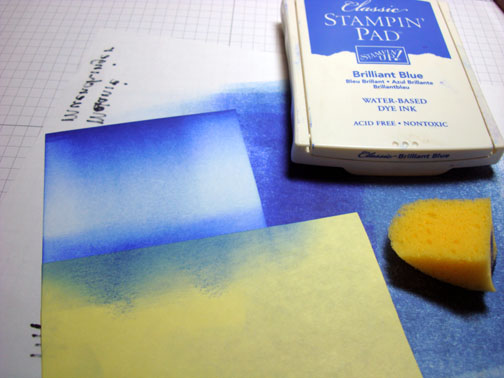
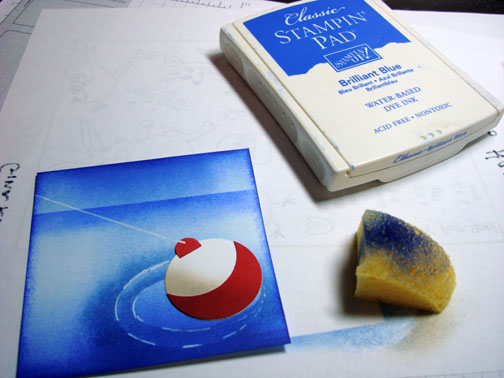
Brayered Bashful Blue ink at the top of the card stock.

dsc02252.JPG

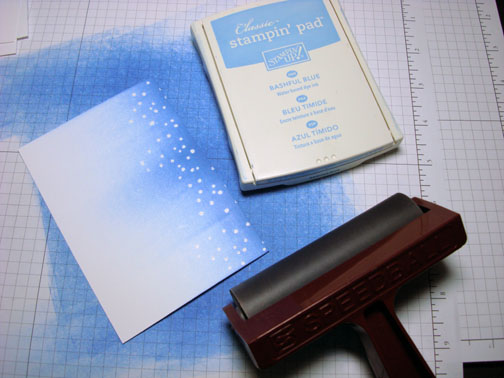
Brayered Ballet Blue ink at the top of the card stock, not covering the Bashful Blue ink entirely.

dsc02253.JPG

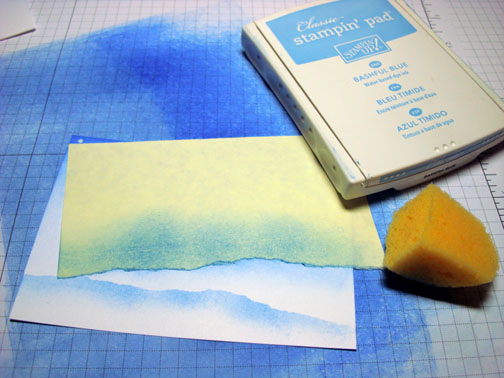
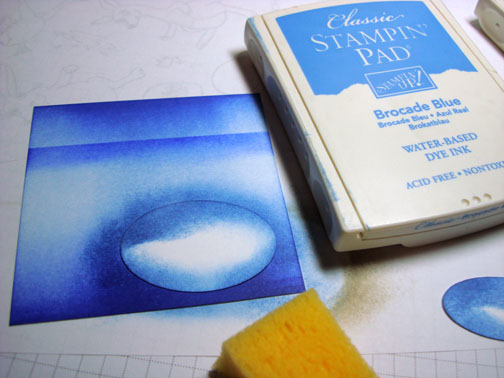
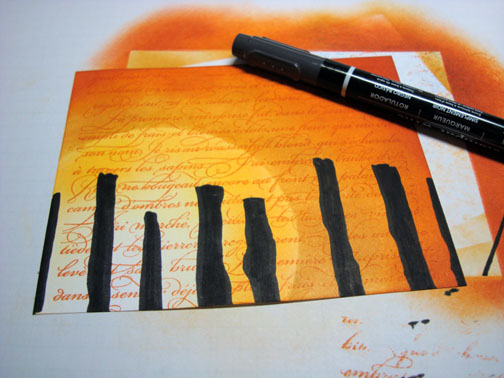
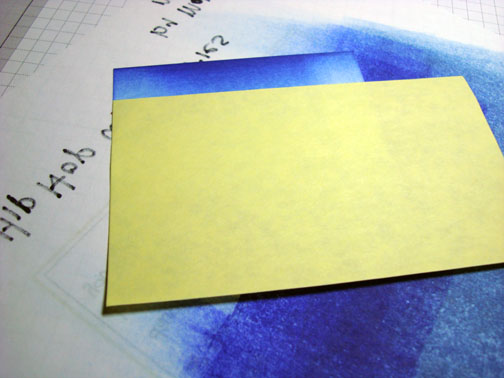
Ripped a post it note and cover the sky area of the card stock.  Sponged Bashful Blue ink at the post it notes ripped edge to create a hill. 

dsc02255.JPG

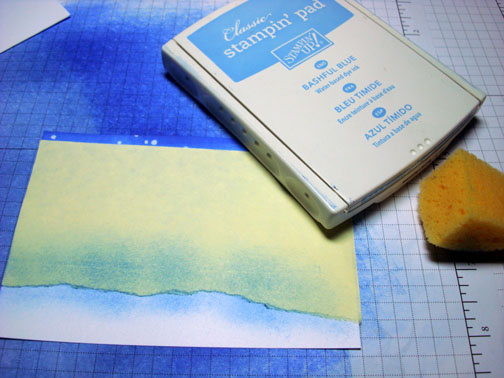
Moved the post it note and sponged Bashful Blue ink at the post it note edge to create a second hill.

dsc02256.JPG

dsc02257.JPG

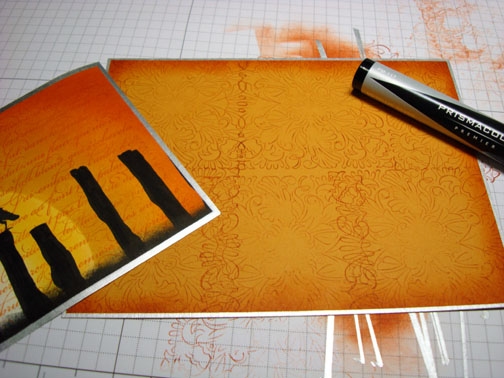
Stamped the middle Horse using Ballet Blue (First Generation).  Stamped the lighter horses using Ballet Blue (Second Generation).   Second Generation is when you stamp off once on your scrap paper and then stamp on your card stock.

dsc02260.JPG

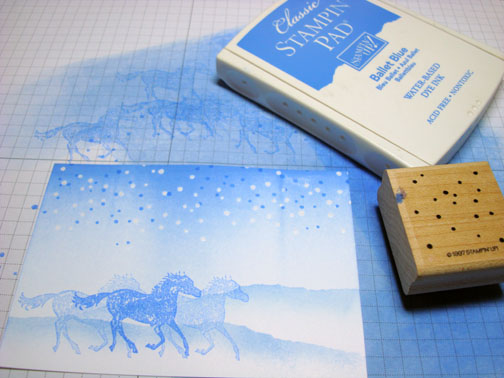
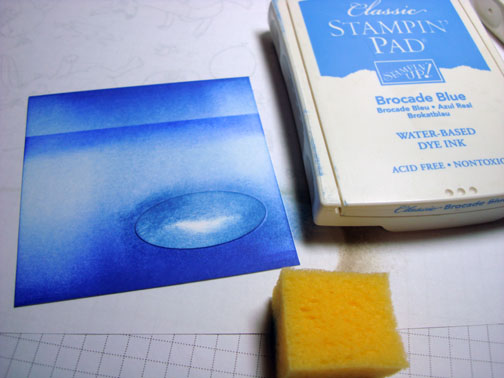
Stamped the Itty Bitty Background stamp again in the sky area using Ballet Blue ink.

dsc02261.JPG

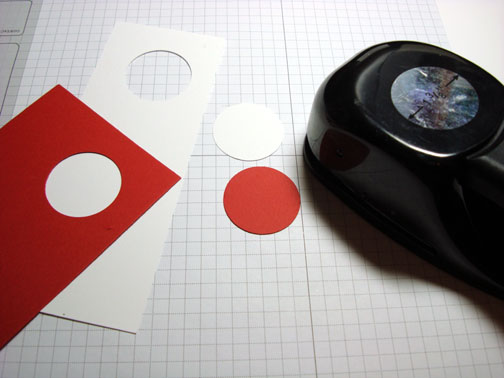
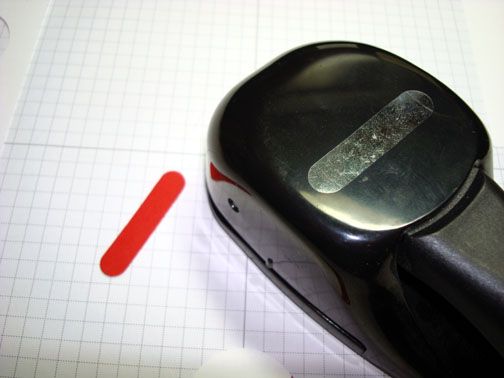
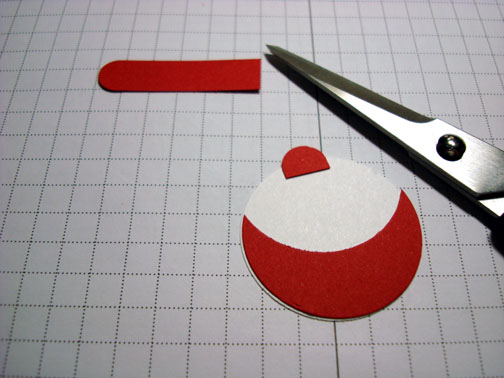
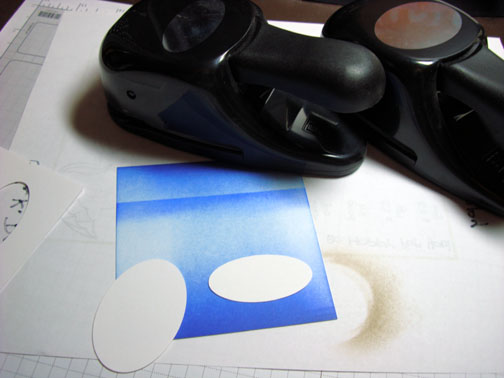
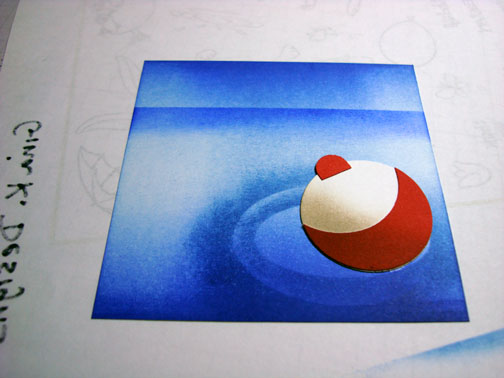
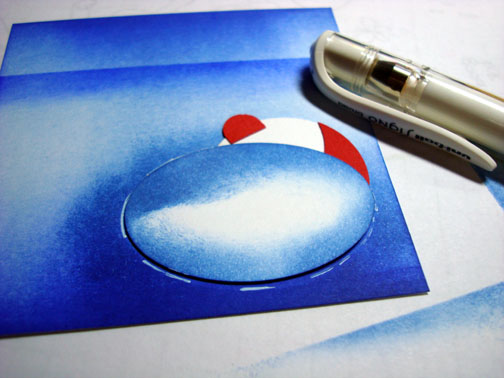
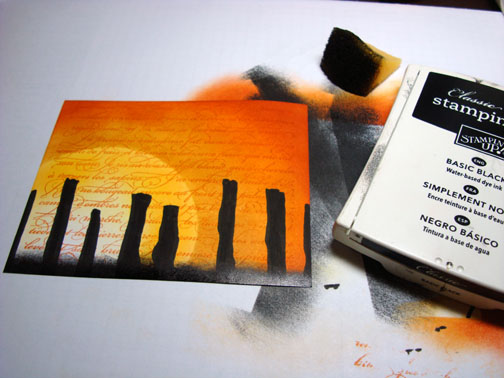
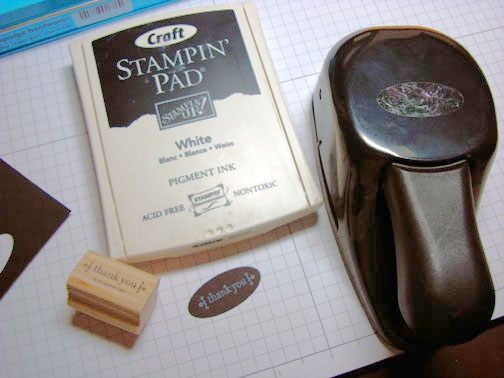
Punched two Word Windows from Brilliant Blue card stock.  Cut the end off of each one, making one word window punch longer than the other.

dsc02262.JPG

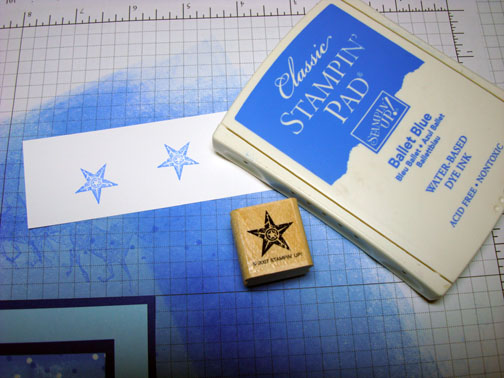
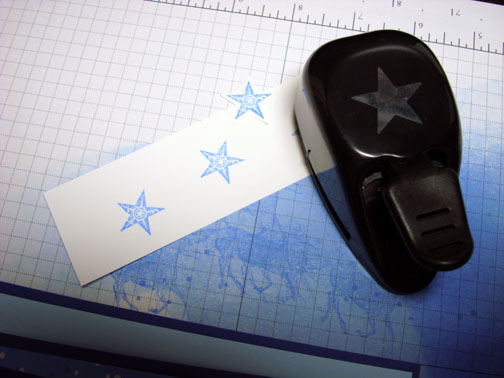
Stamped the star from the Stampin’ Up Wanted set on Whisper White card stock using Ballet Blue ink.  Punched them out using the Stampin’ Up star punch.

dsc02265.JPG

dsc02266.JPG

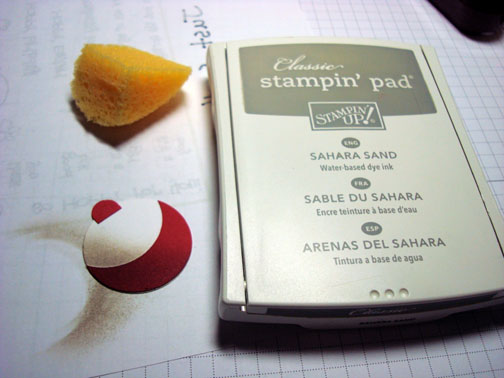
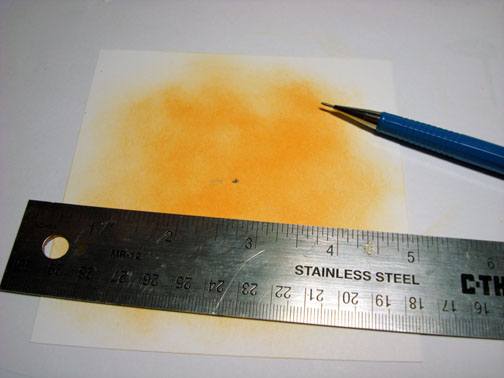
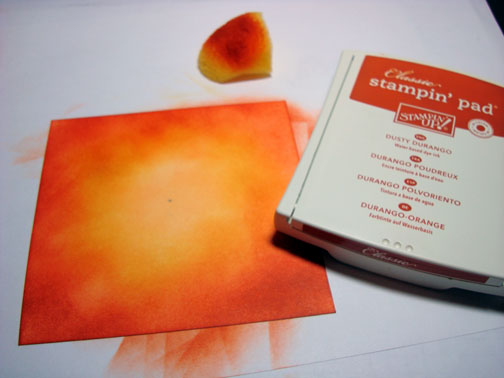
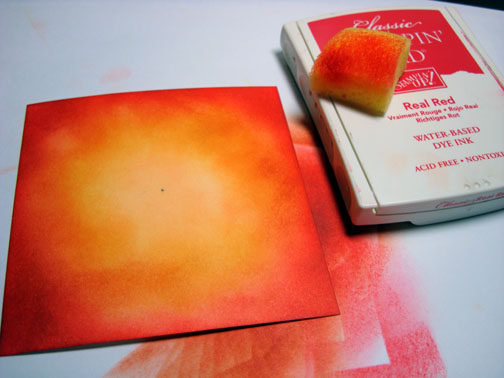
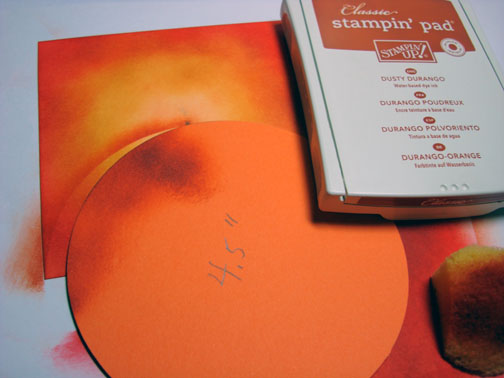
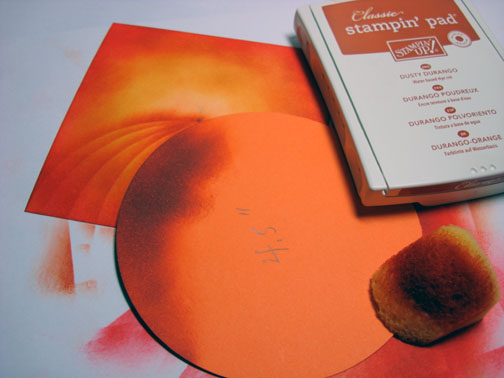
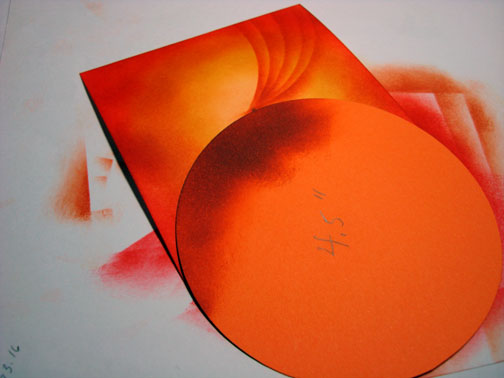
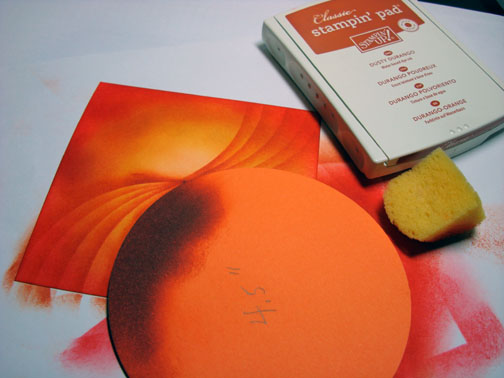
Sponged Brilliant Blue ink on the edges of the main image panel and a 4.75″ x 6.25″ Bashful Blue Panel.

dsc02267.JPG

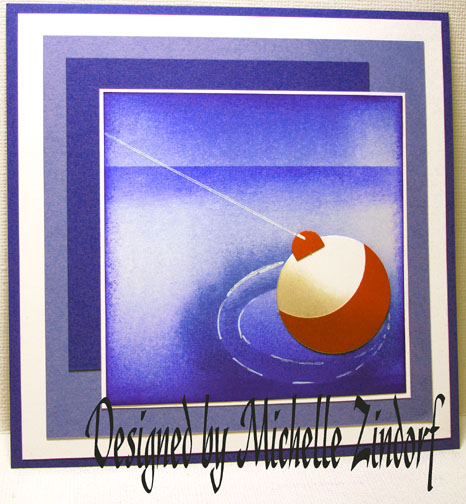
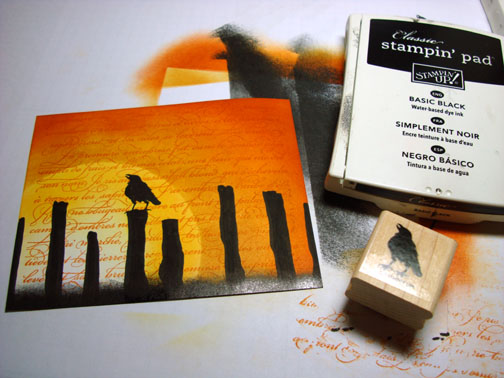
Assembled the card and here it is finished measuring 5″ x 6.5″.

dsc02270.JPG

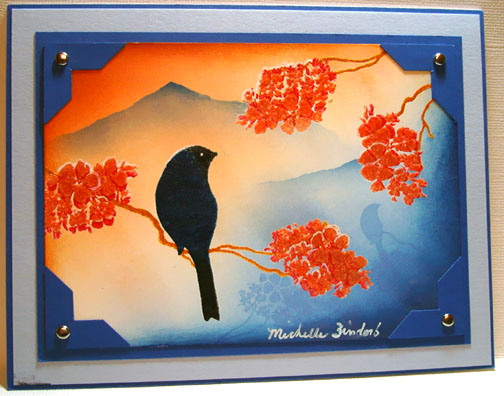
May your day be filled with warmth and sunshine.

Until my next post.  . . .  . . . . . . . . ..

Hugs,

Michelle

dsc04306-tiny.jpg  Get ready for Brayer Workshops!  I am coming to:

2010

Dayton, Ohio at Marco Paper

Phoenix, Arizona

Monroe, Louisiana

Jacksonville, Florida

 St. Louis, Missouri

Mechanicsville, Virginia

Raleigh, North Carolina 

Colleyville, Texas

Colorado Springs, Colorado

 Boise area of Meridian, Idaho

Riverside, California (Southern California)

Salem, Oregon

Wheaton, Illinois

St. Cloud, Minnesota

Rockville, Maryland

North Chili, New York (near Rochester)

New Johnsonville, Tennessee

Kenova (Huntington), West Virginia

Helena, Montana

Middleburg Heights, Ohio

Venice, Florida

Grinnell, Iowa

Piedmont, Alabama (Near GA border close to Cedartown)

Auburn, Washington (near Seattle)

Elk Grove Village, Illinois

Savannah, Georgia

Atlanta, Georgia

North Liberty, Indiana

Saledad, California

Here is a link to my workshop calendar where you can see all of my travel schedule and to get info on beginner and advanced Brayer workshops:   http://zindorf.blogs.splitcoaststampers.com/workshop-calendar 

Link to my Stampin’ Up website where you can order all of your must have Stampin’ Up products from me 24-7:  http://michellezindorf.stampinup.net

Frequently asked questions answers:  http://zindorf.blogs.splitcoaststampers.com/frequently-asked-questions/ 


Gone Fishing – Tutorial #292

dsc02242.JPG

Whew, this tutorial was done in record time.  I thought I would do a little punch fun today.  So grab those circle and oval punches and let’s get started.  🙂

Supplies:

Stamps: None
Paper: Stampin’ Up Whisper White, Brocade Blue, Brilliant Blue
Ink: Stampin’ Up Brocade Blue, Brilliant Blue and Sahara Sand
Accessories: Stampin’ Up Punches – Wide Oval, Large Oval, 1 3/8″ Circle, Word Window, Ruler, Brayer, Sponges and White Gel Pen

Don’t forget to request your copy of the new Stampin’ Up Occasions mini catalog and Sale-a-bration mini.   Just e-mail me your address and I will be glad to send you a set for free.  If you are a customer of mine your copy will come to you automatically.  🙂  Sale-a-bration starts January 5, 2010 – March 31, 2010 and during this time you will get a sale-a-bration set for free  for each $50 of merchandise ordered.  This year there are tons of free sets to choose from.

The new Occasions mini catalog can also be viewed online here: 

http://204.228.150.61/catalogs/20091231/OccasionsMini10_US.pdf

The New Sale-a-Bration Mini Catalog can also be viewed online here:

http://204.228.150.61/catalogs/20091231/SAB_10_US.pdf

Are you getting inspired and enjoying this blog.   One way you can help support it is to order your Stampin’ Up products through me.   You can order from me 24-7 from this link:  http://michellezindorf.stampinup.net or e-mail me at mzindorf@aim.com.  If you are within the United States.  Want a copy 2009-2010 Stampin’ Up Catalog for $9.95 with free shipping, just e-mail me at mzindorf@aim.com and I will get one in the mail to you.  Want to become a Stampin’ Up Demonstrator and earn instant income?  Consider being part of my Stampin’ Up Team.  Also check out the Stampin’ Up specials, click this link to check it out:  http://www.stampinup.net/esuite/home/michellezindorf/promotions

dsc02244.JPG

Punch a 1 3/8″ circle out of Whisper White card stock and one out of Real Red card stock.

dsc02220.JPG

Lined the 1 3/8″ circle punch up with the negative Real Red Circle previously punched so it looks like this  from the back side of your punch.  Punch and you will get a partial circle.  This is the bottom half of your bobber.

dsc02221.JPG

Punch the Word Window punch out of Real Red card stock and cut just the tip of one end off.  This is the top of your bobber.

dsc02222.JPG

dsc02223.JPG

Brayered Brocade Blue at the top and at the bottom of a 3.5″ square piece of Whisper White card stock.

dsc02224.JPG

dsc02225.JPG

Brayered Brilliant Blue ink at the top and bottom of the card stock, not covering the Brocade Blue ink entirely.

dsc02226.JPG

Masked the sky area of the card stock with a post it note and sponged Brilliant Blue ink at the post it note edge to create the horizon line.

dsc02229.JPG

Glued the bobber pieces together and sponged Sahara Sand ink on the left side of the bobber to create a shadow.

dsc02230.JPG

Punched a Large and Wide Oval from White Card stock to use as masks to create the ripple in the water.

dsc02231.JPG

Held the Large oval mask in place and sponged Brocade Blue ink around the edge of the mask.

dsc02232.JPG

Removed the Large oval mask and put the Wide oval mask on.  Held it in place and sponged Brocade Blue ink around the edge of the Wide Oval Mask.

dsc02233.JPG

Removed the mask.

dsc02234.JPG

Glued the Bobber on.

dsc02235.JPG

Held the Large oval mask on again and used the White Gel pen to do a skipped traced line around the mask edge.

dsc02236.JPG

Removed the Large oval mask and put the Wide oval mask back on.  Traced a skipped line around the edge of the mask.

dsc02237.JPG

Removed all of masks.  Used a Ruler and a white gel pen to put in the fishing line.

dsc02238.JPG

Sponged Brilliant Blue ink around the outside edge of the card stock.

dsc02239.JPG

Assembled the card and here it is finished measuring 5.25″ square.

dsc02242.JPG

I hope you enjoyed this punched project and that this tutorial has inspired you to get those punches out and play a while.

May your day be one with no bumps in the road.

Until my next post. . . . . . .

Hugs,

Michelle

dsc04306-tiny.jpg  Get ready for Brayer Workshops!  I am coming to:

2010

Dayton, Ohio at Marco Paper

Phoenix, Arizona

Monroe, Louisiana

Jacksonville, Florida

 St. Louis, Missouri

Mechanicsville, Virginia

Raleigh, North Carolina 

Colleyville, Texas

Colorado Springs, Colorado

 Boise area of Meridian, Idaho

Riverside, California (Southern California)

Salem, Oregon

Wheaton, Illinois

St. Cloud, Minnesota

Rockville, Maryland

North Chili, New York (near Rochester)

New Johnsonville, Tennessee

Kenova (Huntington), West Virginia

Helena, Montana

Middleburg Heights, Ohio

Venice, Florida

Grinnell, Iowa

Piedmont, Alabama (Near GA border close to Cedartown)

Auburn, Washington (near Seattle)

Elk Grove Village, Illinois

Savannah, Georgia

Atlanta, Georgia

North Liberty, Indiana

Saledad, California

Here is a link to my workshop calendar where you can see all of my travel schedule and to get info on beginner and advanced Brayer workshops:   http://zindorf.blogs.splitcoaststampers.com/workshop-calendar 

Link to my Stampin’ Up website where you can order all of your must have Stampin’ Up products from me 24-7:  http://michellezindorf.stampinup.net

Frequently asked questions answers:  http://zindorf.blogs.splitcoaststampers.com/frequently-asked-questions/ 


Yeah! I Can Post Pictures Again, Plus Colored Pencil Art and Blog Candy Winner!

dsc02213.JPG

I am very sorry I have not been able to post.   Looks like they got things fixed.  I will be back later today with a tutorial for you.  For now, here is a look at this week’s Color Pencil Art.  Remember my New Years Resolution is to draw more.

I grow Purple Cone flower throughout my Perennial Gardens and it does attract the gold finches by the droves.  So of course, that is what inspired this 8.5″ x 8.5″ color pencil drawing.

This can be found on my sales page until it is sold or I hang it in my home.  🙂   Here is a link if you are interested in picking up some original art:  http://zindorf.blogs.splitcoaststampers.com/things-for-sale/

Also, I have a blog candy winner to announce!!

The winner of the Stampin’ Up! Snow Buddies Stamp Set is . . . . . . . . . . . . . . .

Karen Neugebauer who wrote “My New Year’s resolution is to be more active, and to find more time for stamping. I have a beautiful craft room that feels neglected. After working all day, I come home exhausted and usually turn in very early. Being a cancer survivor, I guess it is still taking a lot out of me. I vow to stay up later and go to my craft room for at least an hour a night…….”

Congratulations!   Karen Neugebauer, the random number generator smiled upon you today, please forward you mailing address to mzindorf@aim.com  within the next 30 days to claim your blog candy.

Thanks to everyone who played along.  Keep trying someone has to win!

I will be back shortly with a new tutorial for you.

Hugs,

Michelle


Blog Trouble

Happy New Year Everyone! 

I am having a bit of blog trouble to start the New Year off.  I am unable to post pictures.   What is a Zindorf Blog Post with out pictures, right?

 The powers to be are working on the problem so hopefully it will be fixed soon.  So, I will post as soon as it is fixed.

In the mean time have a terrific weekend.  🙂

Huge Hugs,

Michelle


Cheers! – Tutorial #291 and a Snow Buddies Blog Candy

dsc02202.JPG

Happy New Year and Cheers to You!  I know I am a couple of days early, but you just might want to make this card for someone.  🙂

I teamed up the Stampin’ Up! sets Viola and Cheers for you.  I am not sure why I haven’t used these sets together yet since they work perfectly together.   So many stamps, so little time, lol.

Today’s tutorial illustrates how to stamp over embossed images and how to add a look of brick to your scene.

But first, let me give some blog candy away.

dsc02207.JPG  I have a brand new Stampin’ Up! Hostess Level 2 set called Snow Buddies to give away.  All you need to do to enter for a chance to win is leave a comment on this blog post telling me what your New Year Resolution is.  If you are receiving this blog update via e-mail you will need to click this link and then leave a comment on my actual blog:   http://zindorf.blogs.splitcoaststampers.com/2009/12/30/cheers-tutorial-291-and-a-snow-buddies-blog-candy/

Please no e-mail entries.

I will select the winner using a random number generator on Saturday, January 2, 2010.  Good luck!

Now let’s get started on today’s tutorial. . . . .

Supplies:

Stamps: Stampin’ Up Voila, Cheers to You and A Brand New Year
Paper: Stampin’ Up! Whisper White, Night of Navy, Close to Cocoa and Bravo Burgundy
Ink: Stampin’ Up! Basic Black, Real Red, Going Gray, Basic Gray, Blush Blossom, Bravo Burgundy, Not Quite Navy, Bashful Blue, Close to Cocoa and Creamy Caramel
Accessories: Stampin’ Up silver brads, Aqua Painter, White Gel Pen, Versamark marker and pad, brayer, ruler, sponges, Photo corner punch, piercing tools, clear embossing powder and a heat gun. 

Are you getting inspired and enjoying this blog.   One way you can help support it is to order your Stampin’ Up products through me.   You can order from me 24-7 from this link:  http://michellezindorf.stampinup.net or e-mail me at mzindorf@aim.com.  If you are within the United States.  Want a copy 2009-2010 Stampin’ Up Catalog for $9.95 with free shipping, just e-mail me at mzindorf@aim.com and I will get one in the mail to you.  Want to become a Stampin’ Up Demonstrator and earn instant income?  Consider being part of my Stampin’ Up Team.  Also check out the Stampin’ Up specials, click this link to check it out:  http://www.stampinup.net/esuite/home/michellezindorf/promotions

dsc02206.JPG

Stamped the Chef by loading my stamp first with Versamark and then with Basic Black ink before stamping it on a 4″ x 5.5″ piece of Whisper White card stock.

dsc02168.JPG

Stamped the glasses by first loading my stamp with Versamark and then with Basic Black ink before stamping it.

dsc02169.JPG

Heat embossed both images using clear embossing powder and a heat gun.

dsc02170.JPG

Sorry for the blurry images.  Nothing like starting the day out with your camera settings wrong.  🙂

I am going to color my images using a Stampin’ Up Aqua Painter and my ink pads.   To use the ink pads to watercolor with just squeeze the middle of the closed ink pad to create a pool of ink on the inside of the stamp pad lid.  You will then be able to dip your Aqua Painter brush in the pool of ink to paint with.

dsc02171.JPG

Colored the right side and under the chef’s jacket to create a shadow effect with Going Gray ink and an Aqua painter.  Also painted the tray with Going Gray ink.

dsc02172.JPG

Painted his scarf with Real Red ink.

dsc02173.JPG

Colored the Glasses in with Bravo Burgundy ink, lightly.  Waited for them to dry a bit and then added Bravo Burgundy ink heavier on the right side of the glasses.

Also added Bravo Burgundy ink to the right side of the Chef’s scraf.

dsc02175.JPG

Painted the Chef’s face and hand with Blush Blossom ink.

dsc02176.JPG

Added a bit more shadow on the right side of the chef and the tray using Basic Gray ink.

dsc02177.JPG

I don’t like waiting for things to dry so I used my heat gun and heated the images a bit just to dry them.

dsc02178.JPG

Colored over the images entirely with a Versamark marker being very careful to stay within the embossed black lines.

dsc02179.JPG

Heat embossed the images using clear embossing powder and a heat gun.

Since I want to make sure that my images stay nice and bright I am going to repeat the Versamark marker and clear embossing for a second time.  Your embossed images should be smooth as glass.

dsc02180.JPG

Masked the floor area with a post it note.

dsc02181.JPG

Brayered Bashful Blue ink on the right side of the card stock.

dsc02182.JPG

Brayered Not Quite Navy ink on the right side of the card stock, not covering the Bashful Blue  ink entirely.

dsc02183.JPG

Be sure to wipe off your embossed images after putting ink over them.  I use an old cotton towel, but you can use a paper towel too.

dsc02184.JPG

Masked the wall area of the scene.

dsc02185.JPG

Brayered Creamy Caramel ink on the right side of the card stock.

dsc02186.JPG

Brayered Close to Cocoa ink on the right side of the card stock, not covering the Creamy Caramel ink entirely.  Wipe off the embossed images.

dsc02187.JPG

Masked the floor area again with a post it note and stamped the “A Brand New Year” stamp using Bashful Blue ink on the wall area.   Wipe the ink off of your embossed images when done.

dsc02189.JPG

Sponge Not Quite Navy ink at the post it note edge to darken the wall where it meets the floor.

dsc02191.JPG

Removed all of the masks. 

Now let’s put in some brick.

Using a Ruler and a White Gel pen draw lines across the floor, skipping over the chef’s legs.

dsc02192.JPG

Now draw lines the other direction using a ruler and skipping every other section.

dsc02193.JPG

Now draw lines in the sections you skipped in the last step.  These lines should line up with the middle of the bricks you put in on the last step.

dsc02194.JPG

Sponged Bravo Burgundy ink around the edges of the main image panel and a Close to Cocoa panel.

dsc02195.JPG

Added Night of Navy and Bravo Burgundy panels to the Close to Cocoa Panel and main image panel.  Also added Night of Navy Photo Corner punches.

dsc02196.JPG

Added 3 silver brads to each Photo corner.

dsc02197.JPG

dsc02202.JPG

Here is the finished card measuring 5″ x 6.5″.

May your New Year bring you good fortune and great health!

Until next year. . . . . . . .. .

Huge Hugs to you,

Michelle

dsc04306-tiny.jpg  Get ready for Brayer Workshops!  I am coming to:

2010

Dayton, Ohio at Marco Paper

Phoenix, Arizona

Monroe, Louisiana

Jacksonville, Florida

 St. Louis, Missouri

Mechanicsville, Virginia

Raleigh, North Carolina 

Colleyville, Texas

Colorado Springs, Colorado

 Boise area of Meridian, Idaho

Riverside, California (Southern California)

Salem, Oregon

Wheaton, Illinois

St. Cloud, Minnesota

Rockville, Maryland

North Chili, New York (near Rochester)

New Johnsonville, Tennessee

Kenova (Huntington), West Virginia

Helena, Montana

Middleburg Heights, Ohio

Venice, Florida

Grinnell, Iowa

Piedmont, Alabama (Near GA border close to Cedartown)

Auburn, Washington (near Seattle)

Elk Grove Village, Illinois

Savannah, Georgia

Atlanta, Georgia

North Liberty, Indiana

Saledad, California

Here is a link to my workshop calendar where you can see all of my travel schedule and to get info on beginner and advanced Brayer workshops:   http://zindorf.blogs.splitcoaststampers.com/workshop-calendar 

Link to my Stampin’ Up website where you can order all of your must have Stampin’ Up products from me 24-7:  http://michellezindorf.stampinup.net

Frequently asked questions answers:  http://zindorf.blogs.splitcoaststampers.com/frequently-asked-questions/ 


In My Spare Time – Color Pencil Art – Zindorf Swan Lake

dsc02167.JPG

UPDATE:  THIS DRAWING HAS SOLD.

It is my New Year Resolution for 2010 to draw each week in my spare time.  I use to draw and do pastel paintings all the time, but a thing called Rubber Stamping came into my life and kinda took over, lol.    I bet a few of you out there know what I mean.  🙂 

I finished this 8.5″ x 11.5″  colored pencil drawing this afternoon and thought I would share it with you.  I know this is not stamp related, but here it is anyway.  Bare with me.  🙂

My plan is to put my drawings/paintings, as I complete them, up for sale on my sale page.  Here is a link to the sales page if you are interest in some original art:  http://zindorf.blogs.splitcoaststampers.com/things-for-sale/

Until my next post. . . .  .

Be happy!

Hugs,

Michelle

dsc00599.jpg

Get ready for Brayer Workshops!  I am coming to:

2010

Dayton, Ohio at Marco Paper

Phoenix, Arizona

Monroe, Louisiana

Jacksonville, Florida

 St. Louis, Missouri

Mechanicsville, Virginia

Raleigh, North Carolina 

Colleyville, Texas

Colorado Springs, Colorado

 Boise area of Meridian, Idaho

Riverside, California (Southern California)

Salem, Oregon

Wheaton, Illinois

St. Cloud, Minnesota

Rockville, Maryland

North Chili, New York (near Rochester)

New Johnsonville, Tennessee

Kenova (Huntington), West Virginia

Helena, Montana

Middleburg Heights, Ohio

Venice, Florida

Grinnell, Iowa

Piedmont, Alabama (Near GA border close to Cedartown)

Auburn, Washington (near Seattle)

Elk Grove Village, Illinois

Savannah, Georgia

Atlanta, Georgia

North Liberty, Indiana

Saledad, California

Here is a link to my workshop calendar where you can see all of my travel schedule and to get info on beginner and advanced Brayer workshops:   http://zindorf.blogs.splitcoaststampers.com/workshop-calendar 

Link to my Stampin’ Up website where you can order all of your must have Stampin’ Up products from me 24-7:  http://michellezindorf.stampinup.net

Frequently asked questions answers:  http://zindorf.blogs.splitcoaststampers.com/frequently-asked-questions/ 


Bright Thank you – Tutorial #290

dsc02159.JPG

I hope you had a fabulous, safe and fun filled Holiday like I had.  Russ and I went from one celebration to the next starting Christmas Eve and ending last night.  We have had way too much good food and probably put on 5 lbs in just a few days.  🙂  What can I say, I love holiday treats!

I have a bright Thank you card tutorial for you today.  Hopefully, this card will warm the heart of the recipient.  🙂

Let’s get right to the tutorial. . . .  . . .

Supplies:

Stamps: Stampin’ Up! Graveyard Gala, En Francais, Fine Flourish, All Holidays
Paper: Stampin’ Up! Whisper White, Basic Black and More Mustard
Ink: Stampin’ Up Really Rust, Pumpkin Pie, Whisper White, Basic Black, Summer Sun, Apricot Appeal and More Mustard
Accessories: Stampin’ Up Sponges, small oval punch, Basic Black marker, Scrap Card stock, Circle Scissors Plus, Silver Metallic Paint Marker

The new Stampin’ Up! 43 page Occasions Mini Catalog and Sale-a-Bration catalog will be out January 5, 2010.  E-mail me your address if you want a set for free and you are a resident of the USA.  If you are a customer of mine you will automatically get a set from me.  )

Are you getting inspired and enjoying this blog.   One way you can help support it is to order your Stampin’ Up products through me.   You can order from me 24-7 from this link:  http://michellezindorf.stampinup.net or e-mail me at mzindorf@aim.com.  If you are within the United States.  Want a copy 2009-2010 Stampin’ Up Catalog for $9.95 with free shipping, just e-mail me at mzindorf@aim.com and I will get one in the mail to you.  Want to become a Stampin’ Up Demonstrator and earn instant income?  Consider being part of my Stampin’ Up Team.  Also check out the Stampin’ Up specials, click this link to check it out:  http://www.stampinup.net/esuite/home/michellezindorf/promotions

dsc02161.JPG

Using my Stampin’ Up Circle Scissors plus, cut a 3 5/8″ circle from scrap card stock.  Held this in place on the lower left corner of a 4″ x 5″ piece of Whisper White card stock in order to mask the sun.

dsc02137.JPG

Sponged More Mustard ink in the un-masked area.

dsc02138.JPG

Sponged Pumpkin Pie around the top and right side of the card stock, not covering the More Mustard ink entirely.

dsc02139.JPG

Sponged Really Rust ink right at the top and right edge of the card stock.

dsc02140.JPG

Removed the circle mask and sponged Apricot Appeal ink at the edge of the sun.

dsc02141.JPG

Sponged Summer Sun over the Apricot Appeal ink to bright the sun up even more.

dsc02142.JPG

Stamped the Stampin’ Up! background stamp En Francais of the card stock using Pumpkin Pie ink.

dsc02143.JPG

Using the Brush end of a Stampin’ Up! Basic Black marker, drew in some post shapes.

dsc02144.JPG

Pounced some Basic Black ink with a sponge along the bottom of the card stock.

dsc02145.JPG

Stamped the Bird from the Stampin’ Up! set Graveyard Gala using Basic Black ink.  I used my Stamp-a-ma-jig for placement of the bird.  🙂

dsc02146.JPG

Stamped a brand new Stampin’ Up! stamp “Fine Flourish” all over a 5″ x 6.5″ piece of More Mustard Card stock using Really Rust ink.  This stamp will be in the new all Occasions mini catalog that will be out January 5, 2010.  🙂

dsc02150.JPG

Sponged Really Rust ink around the outside edge of the More Mustard card stock.

dsc02151.JPG

Used a Silver Metallic Paint Marker and edged my More Mustard card stock and my main image panel with it.

dsc02152.JPG

Stamped the “thank you” sentiment from the Stampin’ Up! set All Holidays using Whisper White ink on Basic Black Card stock.  Punched the sentiment out using the small oval punch.

dsc02147.JPG

Glued the sentiment Oval inside of a Silver Hodgepodge Hardware piece.

dsc02148.JPG

Assembled my card and here it is finished measuring 5″ x 6.5″.

dsc02159.JPG

A couple of things before I close this post for today.  Thank you so much to everyone that sent Russ and I holiday greetings.  I cannot believe how many stunning cards we received and I cherish each and everyone of them.

dsc02113.JPG

Now here is a little more humor from my Aunt Nancy.  🙂   I have no idea where she got this, lol.

Old Farmer’s Advice…

or Quotes to Live by   


An Old Farmer’s Advice:


* Your fences need to be horse-high, pig-tight and bull-strong. **Keep skunks and bankers at a distance.**Life is simpler when you plow around the stump.*

* A bumble bee is considerably faster than a John Deere tractor.*

* Words that soak into your ears are whispered…not yelled.*

* Meanness don’t jes’ happen overnight.*

* Forgive your enemies. It messes up their heads.*

* Do not corner something that you know is meaner than you.*

* It don’t take a very big person to carry a grudge.*

* You cannot unsay a cruel word.*

* Every path has a few puddles.*

* When you wallow with pigs, expect to get dirty.*

* The best sermons are lived, not preached.

* Most of the stuff people worry about ain’t never gonna happen anyway.*

* Don ‘t judge folks by their relatives.*

* Remember that silence is sometimes the best answer..*

* Live a good, honorable life. Then when you get older and think back, you’ll enjoy it a second time.*

* Don ‘t interfere with somethin’ that ain’t bothering you none.*

* Timing has a lot to do with the outcome of a Rain dance.*

* If you find yourself in a hole, the first thing to do is stop diggin’.*

* Sometimes you get, and sometimes you get got.*

* The biggest troublemaker you’ll probably ever have to deal with, watches you from the mirror every mornin’.*

* Always drink upstream from the herd.*

* Good judgment comes from experience, and a lotta that comes from bad judgment.*

* Lettin’ the cat outta the bag is a whole lot easier than puttin’ it back in.*

* If you get to thinkin’ you’re a person of some influence, try orderin’ somebody else’s dog around..*

Don’t pick a fight with an old man. If he is too old to fight, he’ll just kill you.


May your day be soooo much better than the little guys above.

Until my next post. . . . . . . . . .

Hugs,

Michelle

dsc00599.jpg

Get ready for Brayer Workshops!  I am coming to:

2010

Dayton, Ohio at Marco Paper

Phoenix, Arizona

Monroe, Louisiana

Jacksonville, Florida

 St. Louis, Missouri

Mechanicsville, Virginia

Raleigh, North Carolina 

Colleyville, Texas

Colorado Springs, Colorado

 Boise area of Meridian, Idaho

Riverside, California (Southern California)

Salem, Oregon

Wheaton, Illinois

St. Cloud, Minnesota

Rockville, Maryland

North Chili, New York (near Rochester)

New Johnsonville, Tennessee

Kenova (Huntington), West Virginia

Helena, Montana

Middleburg Heights, Ohio

Venice, Florida

Grinnell, Iowa

Piedmont, Alabama (Near GA border close to Cedartown)

Auburn, Washington (near Seattle)

Elk Grove Village, Illinois

Savannah, Georgia

Atlanta, Georgia

North Liberty, Indiana

Saledad, California

Here is a link to my workshop calendar where you can see all of my travel schedule and to get info on beginner and advanced Brayer workshops:   http://zindorf.blogs.splitcoaststampers.com/workshop-calendar 

Link to my Stampin’ Up website where you can order all of your must have Stampin’ Up products from me 24-7:  http://michellezindorf.stampinup.net

Frequently asked questions answers:  http://zindorf.blogs.splitcoaststampers.com/frequently-asked-questions/ 


Happy Holidays!

holiday-plaque.jpg

Russ and I just wanted to send you warm wishes for the Holidays.  🙂

I will be taking a couple of days off from blogging to clean my house and finish last minute preparations for Christmas and of course, spend precious time with loved ones.

I will however be checking my e-mail a couple of times a day so feel free to e-mail me or call me should you have any product or workshop questions.

May you have a very safe and love filled holiday!

Huge Hugs,

Michelle


Sunrise Coffee – Tutorial #289

dsc02111.JPG

Brrrr, it is a bit chilly outside today.  We received a few inches of snow and it just looks cold out.  🙂  But I am snug as a bug in my stamping room so I created a card that will hopefully warm you up a bit wherever you are today.

But before I start today’s tutorial let me announce the lucky winner of the Stampin’ Up! Asian Artistry stamp set blog candy.   The winner is. . . . . . .

dsc02041.JPG

elaine E who wrote “well, I probably don’t stand a chance to win the Asian Artistry set. I do love Oriental cards, and make a lot of them. Have not been able to get this set…………..so would really love to win it.
But anyway, I have to say, I can’t believe how you make the swirl effect on this card! How creative!! Can I borrow your muse, when you take a break? LOL

Congratulations Elaine E, please e-mail your mailing address to mzindorf@aim.com within the next 30 days and I will pop this great set in the mail to you.

Thanks to all who played along.   Keep trying, someone has to win and it could be you next week! 

One more thing, I updated my sales page with some retired used stamps I am selling.  If you want to check it out here is a link:  http://zindorf.blogs.splitcoaststampers.com/things-for-sale/

Now on with the tutorial . . . . .

Supplies:

Stamps: Stampin’ Up Font of You, Boho Backgrounds, Season of Joy, Very Vintage Wheel
Paper: Stampin’ Up Whisper White, Pumpkin Pie and Chocolate Chip
Ink: Stampin’ Up More Mustard, Summer Sun, Chocolate Chip and Really Rust
Accessories: Stampin’ Up Markers Really Rust and Chocolate Chip, White Gel Pen, Embossing Buddy, Brayer, Sponges, Clear embossing powder, Heat gun, Versamark pad, Post it note, clear acrylic Block, Swirly Die and Big Shot Machine 

The new Stampin’ Up! 43 page Occasions Mini Catalog and Sale-a-Bration catalog will be out January 5, 2010.  E-mail me your address if you want a set for free and you are a resident of the USA.  If you are a customer of mine you will automatically get a set from me.  )

Are you getting inspired and enjoying this blog.   One way you can help support it is to order your Stampin’ Up products through me.   You can order from me 24-7 from this link:  http://michellezindorf.stampinup.net or e-mail me at mzindorf@aim.com.  If you are within the United States.  Want a copy 2009-2010 Stampin’ Up Catalog for $9.95 with free shipping, just e-mail me at mzindorf@aim.com and I will get one in the mail to you.  Want to become a Stampin’ Up Demonstrator and earn instant income?  Consider being part of my Stampin’ Up Team.  Also check out the Stampin’ Up specials, click this link to check it out:  http://www.stampinup.net/esuite/home/michellezindorf/promotions

dsc02112.JPG

On a 3″ x 6″ piece of Whisper White card stock, stamped the coffee cup using Versamark only.  Heat embossed the image using clear embossing powder and a heat gun.

dsc02081.JPG

dsc02082.JPG

Stamped the Flourish from the “Season of Joy” set 4 times on the left hand side of the card stock using Versamark only and heat embossed the images using clear embossing powder.

dsc02083.JPG

dsc02084.JPG

Brayered Summer Sun ink all over the card stock.

dsc02085.JPG

Wiped the ink from the embossed images using a cotton towel.

dsc02086.JPG

Heated the card stock with my heat gun to dry the Summer Sun ink and then used my Embossing Buddy all over the card stock.  You will definately not want to skip this step or the embossing powder in the next steps will stick all over your card stock.

dsc02087.JPG

Stamped the Flourish with Versamark only on the Right hand side of the card stock and then heat embossed the images using clear embossing powder and a heat gun.

dsc02088.JPG

dsc02089.JPG

Tore a post it note in a hill shape and masked the bottom of the card stock with it.

dsc02090.JPG

Stamped the Stamp from the “Boho Backgrounds” set half on the post it note and half off using Versamark only.  Heat embossed the image using clear embossing powder and a heat gun.

dsc02091.JPG

dsc02092.JPG

Removed the post it note mask and brayered More Mustard ink all over the card stock.

dsc02094.JPG

Wiped the ink from the embossed images using a cotton towel.

dsc02095.JPG

Sponge Really Rust ink heavily at the bottom of the card stock to create a hill that goes up to the sun.  Also sponged Really Rust ink lightly in the sky area at the top of the card stock.

dsc02096.JPG

Sponged Chocolate Chip ink at the bottom of the card stock, not covering the Really Rust ink entirely.

dsc02097.JPG

Made rows of dots with a gel pen to simulate sun rays.

dsc02098.JPG

Cut a 3 7/8″ x 8 7/8″ piece of Pumpkin Pie card stock and stamped the new Very Vintage Wheel over the card stock using Really Rust ink.  This new stamp is in the new Occasions Stampin’ Up Mini that will be in effect January 5, 2010.  The Very Vintage stamp is a Jumbo Wheel, but I like to unmount mine and use them as stamps.  If you want more information on unmounting Wheels, here is a link to a post showing you how I do it:  http://zindorf.blogs.splitcoaststampers.com/2009/07/28/tool-time-unmounting-wheels/

By the way, I love, love, love this Wheel and will be using this in my backgrounds very often. 

dsc02099.JPG

Brayered Really Rust ink at the bottom of the card stock.

dsc02100.JPG

Brayered Chocolate Chip ink at the bottom of the card stock, not covering the Really Rust ink entirely.

dsc02101.JPG

Used the Swirly Die, Chocolate Chip card stock and my Big Shot Die Cut machine to create this die cut.

dsc02102.JPG

Punched it out and Glued it on the card stock.  Glued all of it down but the two large swirls that I want to go on top of my main image panel.

dsc02103.JPG

Glued the main image panel on and the Swirls were glued down on top of it. 

Decided to darken the coffee cup.  Colored over the coffee cup with a Really Rust marker and wiped the ink off of the embossed image.  Added a dark shadow at the bottom of the coffee cup and the handle using a Chocolate Chip marker.

dsc02104.JPG

Here is the finished card measuring 4″ x 9″.  This size card fits into a #10 size business envelope that is very economical to pick up at an office supply store.

dsc02111.JPG

Well I hope this card warmed you a bit. 

May your day be overflowing with peace and love.

Until my next post. . . . . . .

Happy Holidays and Hugs,

Michelle

dsc00599.jpg

Get ready for Brayer Workshops!  I am coming to:

2010

Dayton, Ohio at Marco Paper

Phoenix, Arizona

Monroe, Louisiana

Jacksonville, Florida

 St. Louis, Missouri

Mechanicsville, Virginia

Raleigh, North Carolina 

Colleyville, Texas

Colorado Springs, Colorado

 Boise area of Meridian, Idaho

Riverside, California (Southern California)

Salem, Oregon

Wheaton, Illinois

St. Cloud, Minnesota

Rockville, Maryland

North Chili, New York (near Rochester)

New Johnsonville, Tennessee

Kenova (Huntington), West Virginia

Helena, Montana

Middleburg Heights, Ohio

Venice, Florida

Grinnell, Iowa

Piedmont, Alabama (Near GA border close to Cedartown)

Auburn, Washington (near Seattle)

Elk Grove Village, Illinois

Savannah, Georgia

Atlanta, Georgia

North Liberty, Indiana

Saledad, California

Here is a link to my workshop calendar where you can see all of my travel schedule and to get info on beginner and advanced Brayer workshops:   http://zindorf.blogs.splitcoaststampers.com/workshop-calendar 

Link to my Stampin’ Up website where you can order all of your must have Stampin’ Up products from me 24-7:  http://michellezindorf.stampinup.net

Frequently asked questions answers:  http://zindorf.blogs.splitcoaststampers.com/frequently-asked-questions/ 


I (Heart) Hearts Valentine – Tutorial #288 and Blog Candy Friday

dsc02036.JPG

Now that I have got all of my Christmas cards made and in the mail I thought I would turn my attention to a warmer subject, such as love.  I know, ahhhhhhh, lol.  Actually, I was dying to use a new set that I received in my pre-order from the new Stampin’ Up mini catalog that will be out January 5, 2010.  Which is only a few short weeks from now.   The set I am referring to is called “I (Heart) Hearts” and includes the two hearts that I used for the center of this card.

But before I start the tutorial I want to give all of you a chance to win a bit of blog candy.  It is a great Stampin’ Up Level 2 hostess set “Asian Artistry”. 

dsc02041.JPG

To enter to win, please leave a comment on this post telling me to enter you.  If you are getting this blog update via e-mail you will need to click this link and leave a comment at the bottom of the post.  http://zindorf.blogs.splitcoaststampers.com/2009/12/18/i-heart-hearts-valentine-tutorial-288-and-blog-candy-friday/     Please no e-mail entries.

I will use a random number generator on Monday, December 20, 2009 to select the winner.  Good luck everyone!

Now on with the tutorial. . . . .  . .

Supplies:

Stamps: Stampin’ Up I (Heart) Hearts and Baroque Motifs
Paper: Stampin’ UP Whisper White, Real Red and Basic Black
Ink: Stampin’ Up Basic Black, Dusty Durango, Real Red, More Mustard and Apricot Appeal
Accessories: Stampin’ Up Circle Scissors Plus, Gold Brads, Piercing tools, Stamp-a-ma-jig, sponges, photo corner punches, ruler and pencil

The new Stampin’ Up! 43 page Occasions Mini Catalog and Sale-a-Bration catalog will be out January 5, 2010.  E-mail me your address if you want a set for free and you are a resident of the USA.  If you are a customer of mine you will automatically get a set from me.  )

Are you getting inspired and enjoying this blog.   One way you can help support it is to order your Stampin’ Up products through me.   You can order from me 24-7 from this link:  http://michellezindorf.stampinup.net or e-mail me at mzindorf@aim.com.  If you are within the United States.  Want a copy 2009-2010 Stampin’ Up Catalog for $9.95 with free shipping, just e-mail me at mzindorf@aim.com and I will get one in the mail to you.  Want to become a Stampin’ Up Demonstrator and earn instant income?  Consider being part of my Stampin’ Up Team.  Also check out the Stampin’ Up specials, click this link to check it out:  http://www.stampinup.net/esuite/home/michellezindorf/promotions

dsc02040.JPG

Sponged Apricot Appeal ink in the middle of a 4.5″ square piece of Whisper White card stock.

dsc02018.JPG

Used a ruler and made a dot with a pencil in the middle of the card stock.

dsc02019.JPG

Sponged More Mustard ink around the Apricot Appeal ink.

dsc02020.JPG

Sponged Dusty Durango around the outside of the More Mustard ink.

dsc02021.JPG

Sponged Real Red ink around the edge of the card stock.

dsc02022.JPG

Cut a 4.5″ circle using my Stampin’ Up Circle Scissors Plus and lined the card stock circle up with the pencil dot on my card stock and the bottom left corner.

dsc02023.JPG

Sponged Dusty Durango ink at the circle card stock edge from the dot on the card stock to the bottom corner.  Moved the circle a bit and repeated sponging at the edge of the circle.  Repeated this 5 times.

dsc02024.JPG

dsc02025.JPG

Turned my card stock upside down and repeated the above process again.

dsc02026.JPG

dsc02027.JPG

Removed the circle and used my Stamp-a-ma-jig and Basic Black ink and stamped the first heart in the center.  The pencil dot helps to make sure this is in the center.

dsc02028.JPG

dsc02029.JPG

Used my Stamp-a-ma-jig and Basic Black ink to stamp the second heart in the center of the card stock.

dsc02030.JPG

Stamped the flourish from the Stampin’ Up set Baroque Motifs in Basic Black on the top and bottom of the card stock.

dsc02031.JPG

Added Basic Black and Real Red panels.  Also added two large photo corner punches and gold brads.

dsc02032.JPG

Here is the finished card measuring 5.25″ square.

dsc02036.JPG

I hope your day is warmed by love.

Huge Hugs and Happy Holidays,

Michelle

dsc00599.jpg

Get ready for Brayer Workshops!  I am coming to:

2010

Dayton, Ohio at Marco Paper

Phoenix, Arizona

Monroe, Louisiana

Jacksonville, Florida

 St. Louis, Missouri

Mechanicsville, Virginia

Raleigh, North Carolina 

Colleyville, Texas

Colorado Springs, Colorado

 Boise area of Meridian, Idaho

Riverside, California (Southern California)

Salem, Oregon

Wheaton, Illinois

St. Cloud, Minnesota

Rockville, Maryland

North Chili, New York (near Rochester)

New Johnsonville, Tennessee

Kenova (Huntington), West Virginia

Helena, Montana

Middleburg Heights, Ohio

Venice, Florida

Grinnell, Iowa

Piedmont, Alabama (Near GA border close to Cedartown)

Auburn, Washington (near Seattle)

Elk Grove Village, Illinois

Savannah, Georgia

Atlanta, Georgia

North Liberty, Indiana

Saledad, California

Here is a link to my workshop calendar where you can see all of my travel schedule and to get info on beginner and advanced Brayer workshops:   http://zindorf.blogs.splitcoaststampers.com/workshop-calendar 

Link to my Stampin’ Up website where you can order all of your must have Stampin’ Up products from me 24-7:  http://michellezindorf.stampinup.net

Frequently asked questions answers:  http://zindorf.blogs.splitcoaststampers.com/frequently-asked-questions/