Blog Candy and Mellow Lake – Tutorial #185

dsc08063.JPG

Hello, Hello, Hello!  I am flying around here today preparing for my trip tomorrow to Wheaton Illinois where I will be teaching my Brayer workshops to some totally terrific ladies Friday and Saturday.  By the way, there are a couple of spots left if you want to jump in at the last moment, but you will have to let me know today via e-mail at mzindorf@aim.com and we will see if we can get you signed up before I leave tomorrow morning.

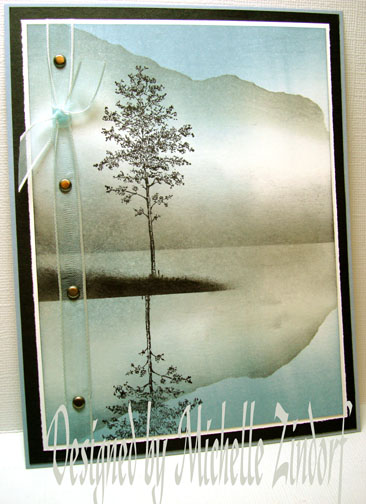
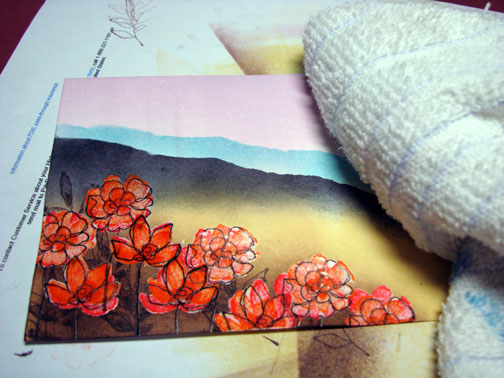
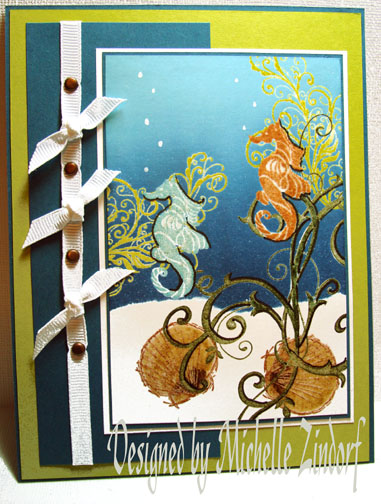
My tutorial this morning is a very mellow scene.  I think this would be a great thinking of you or sympathy card.  It has such a peaceful feel to it.

But before I get into the tutorial today I have Blog candy to give away. 

dsc08066.JPG

To throw your hat in the ring to win this stunning stamp set by Basic Grey, please leave a comment on this post for me to enter you.  If you are getting this blog update by e-mail you will need to click this link and then leave a comment at the end of the post:  

http://zindorf.blogs.splitcoaststampers.com/2009/03/11/blog-candy-and-mellow-lake-tutorial-185/

I will use a random number generator when I return from Illinois on Monday, March 16th to select the winner.

Good Luck to All!

Now on with the tutorial.  🙂
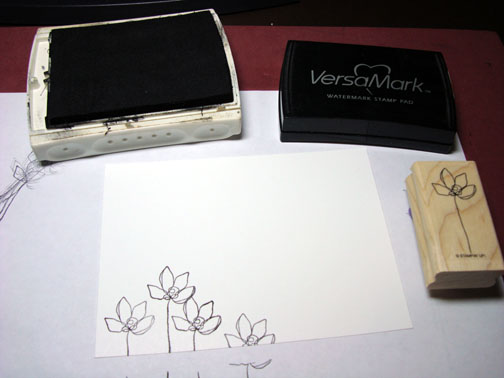
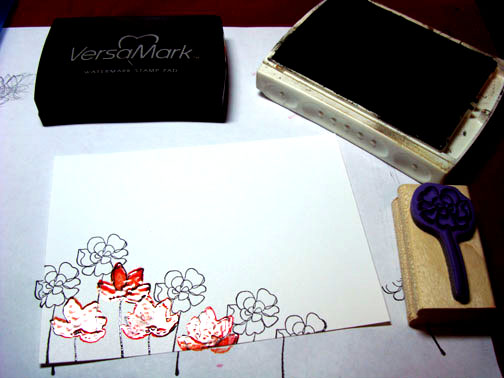
Supplies:

Stamps: Stampin’ Up LeJardin Botanique
Paper: Stampin’ Up Whisper White, Basic Black & Bordering Blue
Ink: Stampin’ Up Going Gray, Bordering Blue & Basic Black
Accessories: Brayer, sponges, Post it notes, Brads, Ribbon

Please don’t forget you can order your Stampin’ Up products from me 24-7 from this link:  http://michellezindorf.stampinup.net or e-mail me at mzindorf@aim.com if you are within the United States

dsc08065.JPG

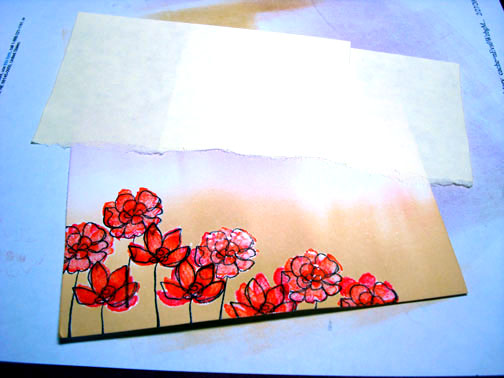
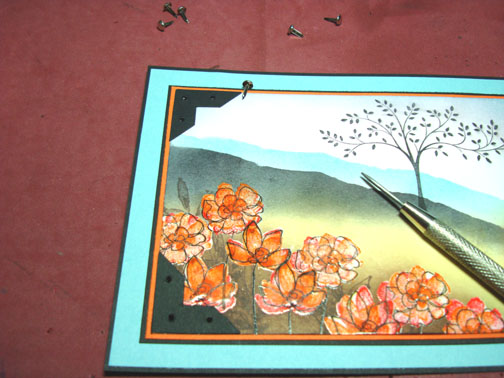
Brayered Bordering Blue ink on the top of a 4.5″ x 6″ piece of Whisper White Card stock.

dsc08043.JPG

Flipped the card stock around and brayered Bordering Blue ink at the bottom of the card stock.

dsc08044.JPG

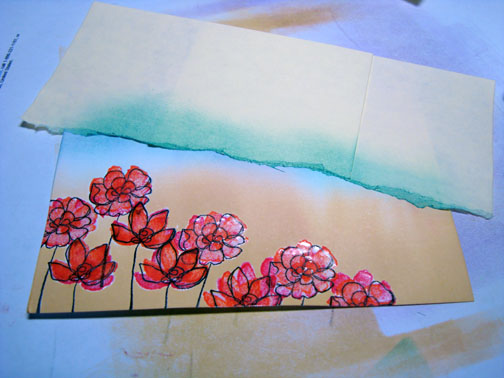
Tore a post it note through the sticky edge and used it as a mask for the sky.

dsc08045.JPG

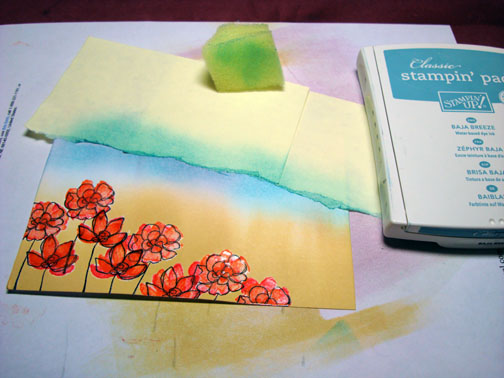
Sponged Going Gray ink on to create a mountain.

dsc08046.JPG

Added another post it note and lightly sponged in a circular motion Black ink along the bottom post it note and right at the edge of the top torn post it note.

dsc08048.JPG

Removed the two post it notes and torn a new one to create a mirror image of the mountain.  Put it at the bottom of the card stock.

dsc08049.JPG

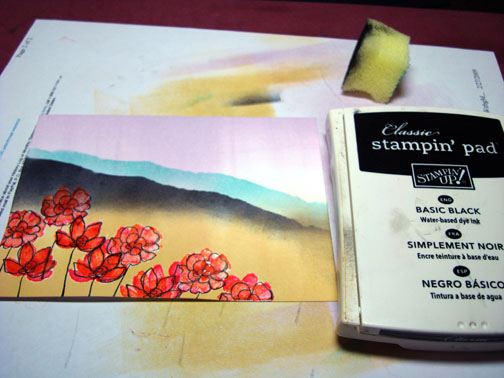
Sponged Going Gray ink at the post it note edge to create the mountain reflection.

dsc08050.JPG

Flipped the card stock upside down and sponged Going gray under the black ink in the middle of the card stock.

dsc08051.JPG

Lightly added black in the middle of the card stock, not covering the Gray ink entirely.   Also sponged a bit of the black ink right at the torn post it note edge.

dsc08052.JPG

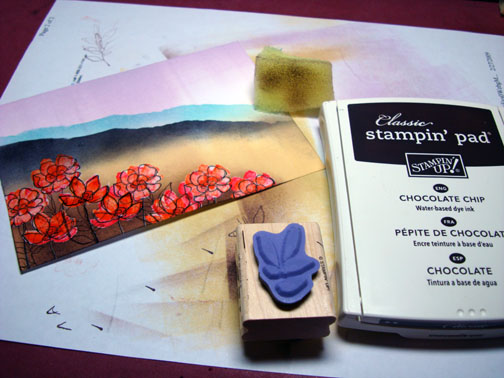
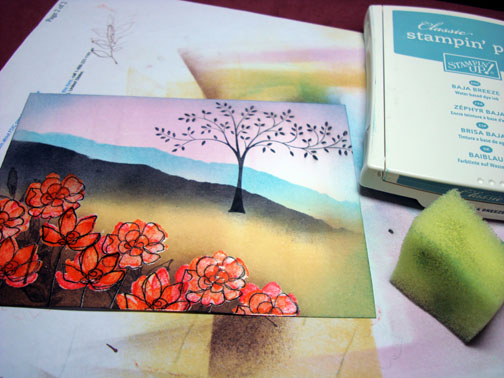
Sponged Bordering Blue in on the left middle section of the card stock over the black and gray.

dsc08054.JPG

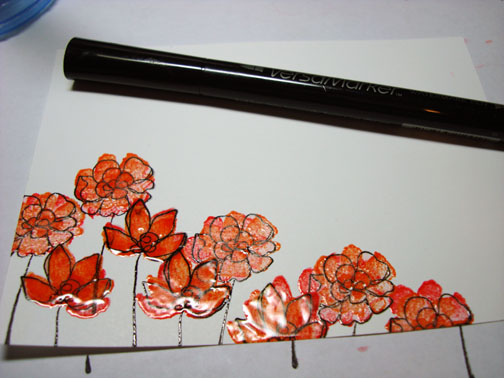
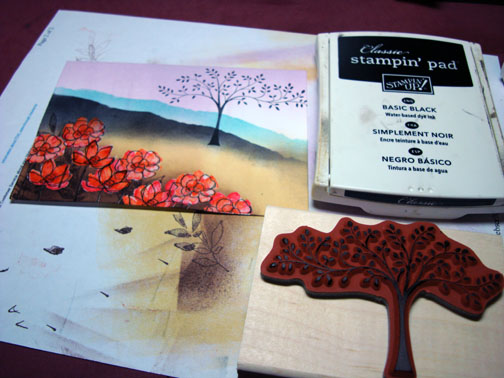
Stamped the tree using Basic Black ink.

dsc08055.JPG

Now this is a perfect example of why I should take a moment and use my Stamp-a-ma-jig for placement.  I stamped my tree upside down with Basic Black ink to create the reflection of the original tree in the water.  I was just a bit off with my stamping and it looks a bit weird. 

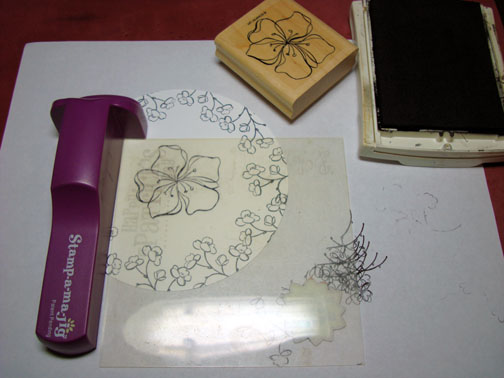
My advice use a Stamp-a-ma-jig to line things up perfectly.

dsc08056.JPG

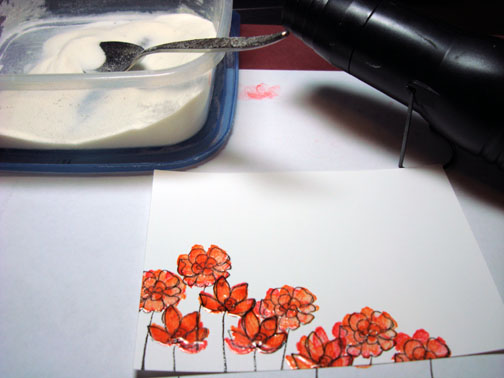
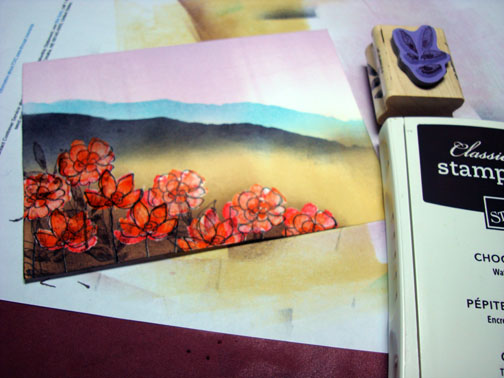
Put a post it note under the top tree and sponged Basic Black ink at the post it note edge to create the little land edge.

dsc08057.JPG

dsc08058.JPG

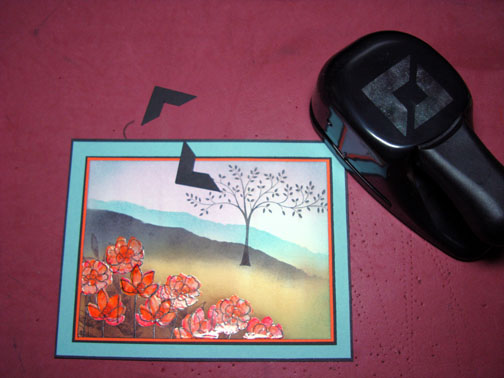
Removed the post it note and assembled the card front.  I used my piercing tool to pierce through the ribbon and card stock in order to start my brads.

dsc08060.JPG

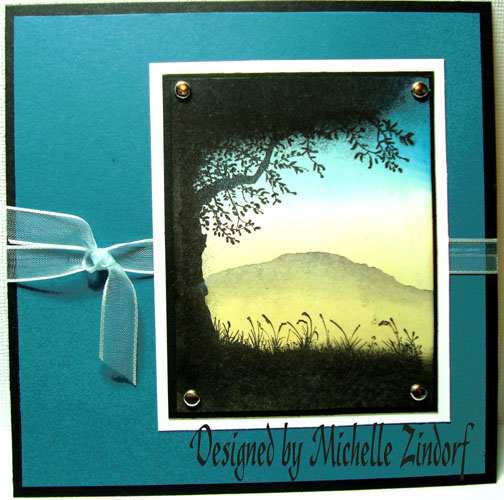
Here is my finished card measuring 5 1/8″ x 6 5/8″.

dsc08063.JPG

May you have a perfectly mellow rest of the week.

Until my next post. . . . . . . . .

Hugs,

Michelle

By the way I have added two more locations for brayer workshops.  I will be in Broomfield, Colorado and Knox, Maine!

Get ready for Brayer Workshops!  I am coming to:

3-small.jpg

Wheaton, Illinois

Fort Smith, Arkansas

Dayton, Ohio

Savannah, Georgia

Covington, Indiana

Buffalo, Minnesota

Webster, New York

Stoughton, Wisconsin

Knox, Maine

Broomfield, Colorado

Here is a link to my workshop calendar where you can see all of my travel schedule and to get info on beginner and advanced Brayer workshops:  http://zindorf.blogs.splitcoaststampers.com/workshop-calendar

Link to my Stampin’ Up website were you can order all of your must have Stampin’ Up products from me 24-7:  http://michellezindorf.stampinup.net

Here is a link to all of my tutorials:  http://zindorf.blogs.splitcoaststampers.com/tutorials-ive-written/

Frequently asked questions answers:  http://zindorf.blogs.splitcoaststampers.com/frequently-asked-questions/


Thinking of My Sister – Tutorial #184

dsc08041.JPG

This scene is one that makes me think of my Sister in Colorado.  She has photos of her garden with bright orange flowers with a background of stunning mountains.   Although my scene does not even come close to her spectacular views, I gave it a shot and was please with the results.  I used the Stampin’ Up Sale a Bration set “Botanical Blooms” in the foreground of this scene.  This is one of the cute sets you can get free with a $50 order during Sale-a-bration through March 31st.

Hang out a bit with me this morning and check out this tutorial.

First though, I have a blog candy winner!!!! 

dsc08013.JPG  Drum-roll please .. . . . . . . . . . . . ..  . .. .   .. . .. … . . . . . .  . .

The winner of the Basic Grey Stamp set chosen by the random number generator is  . . . . .

Michelle B (JustPaintingAround) who wrote “You are the best! Thanks for the chance!”

Michelle B, please e-mail your address to mzindorf@aim.com  and I will pop these in the mail to you!

Thank you to all 573 people who played along!

Now let’s get started on the tutorial.  🙂

Supplies: 

Stamps: Stampin’ Up Botanical Blooms & Thoughts & Prayers
Paper: Stampin’ Up Whisper White, Tangerine Tango, Basic Black, Baja Breeze
Ink: Stampin’ Up Tangerine Tango, Real Red, Pale Plum, So Saffron, Baja Breeze, Chocolate Chip & Basic Black
Accessories: Versamark Pad & Marker, Fine Detail Clear embossing powder, Heat Gun, Brayer, Sponges, Piercing Tool, Post it notes, Photo Corner Punch, Tombo Mono Multi Liquid Glue, Silver Brads

Please don’t forget you can order your Stampin’ Up products from me 24-7 from this link:  http://michellezindorf.stampinup.net or e-mail me at mzindorf@aim.com if you are within the United States

dsc08042.JPG

Stamped the flowers on a 4″ x 5.5″ piece of Whisper White Card stock by loading my stamp with Versamark and then loading it with Basic Black Dye based ink.  I heat embossed it with clear embossing powder and a heat gun.

Note:  I load my stamp first with Versamark because I use dye based inks.  They dry really fast so the Versamark gives the embossing powder something to stick to.  If I were using Pigment ink, I would not need the Versamark.

dsc08014.JPG

dsc08015.JPG

Loaded stamp first with Versamark and then Tangerine Tango ink before stamping it over the flowers.  Heat embossed them with clear embossing powder and a heat gun.

Note:  Botanical Blooms is a two step stamp set.  It has the out line stamps (first step) and then it has the fill in stamp (second step).  This is a quick set to use and it looks like watercoloring to me.

dsc08017.JPG

dsc08018.JPG

I over stamped the flowers with the same stamp by first loading my stamp with Versamark and then loading the stamp with Real Red before stamping.  I heat embossed the images again with clear embossing powder and a heat gun.

Although you cannot see it in this picture, the Red ink does give me a bit of variance in the flower color.

dsc08019.JPG

Stamped a second set of flowers using the very same steps I used above, heat embossing the images with clear embossing powder.

dsc08020.JPG

dsc08021.JPG

dsc08022.JPG

dsc08023.JPG

dsc08023.JPG

Now my flowers are not completely covered with embossing so I went over them with a Versamark marker and heat embossed them again using clear embossing powder and a heat gun to make sure they were protected from the ink I will be brayer and sponging over them (called the emboss resist technique).

dsc08024.JPG

dsc08025.JPG

Brayered So Saffron ink at the bottom of the card stock.

dsc08026.JPG

Brayered Pale Plum ink at the top of the card stock.

dsc08027.JPG

Layer two post it notes together and tore through the stick part of the post it notes.  I used the post it notes to mask the sky area of the scene.

dsc08028.JPG

Sponged Baja Breeze ink on the card stock creating a mountain.

dsc08029.JPG

Moved the post it notes down a bit and sponged on Basic Black ink to create a hill.

dsc08030.JPG

dsc08031.JPG

dsc08032.JPG

Removed the post it note mask and sponged Chocolate chip ink around the flowers at the bottom of the card stock.  I also stamped the outline stamp of the leaves over the flowers.

dsc08033.JPG

Stamped the leaves fill in stamp with Chocolate Chip ink over the leaves out line.

dsc08034.JPG

Waited a few moments for the Chocolate Chip ink to dry and then I wiped the ink off of my embossed images with a cotton towel.

dsc08035.JPG

Stamped the tree from the Stampin’ Up Thoughts & Prayers set with Basic Black ink.

dsc08036.JPG

Sponged Baja Breeze ink around the card stock edge.

dsc08037.JPG

Punch black photo corners out.

dsc08038.JPG

Adhered the photo corners to my card front and then used my piercing tool to start the holes for the brads.

dsc08039.JPG

Here is my completed card measuring 5″ x 6″.

dsc08041.JPG

Last Saturday I was in Indianapolis, IN at the Rubber Stamp and Paper Crafting Festival.  I had the pleasure of Demonstrating a card at Marco Paper’s booth.  It was so much fun meeting so many of you stampers.  Thank you for stopping by the booth to say hello!

indy-stamp-show.JPG

May your day be filled with a gentle warm breeze and the smell of flowers.

Until my next post. . . . . . . . . .  .

Hugs,

Michelle

Get ready for Brayer Workshops!  I am coming to:

3-small.jpg

Wheaton, Illinois

Fort Smith, Arkansas

Dayton, Ohio

Savannah, Georgia

Covington, Indiana

Buffalo, Minnesota

Webster, New York

Stoughton, Wisconsin

Here is a link to my workshop calendar where you can see all of my travel schedule and to get info on beginner and advanced Brayer workshops:  http://zindorf.blogs.splitcoaststampers.com/workshop-calendar

Link to my Stampin’ Up website were you can order all of your must have Stampin’ Up products from me 24-7:  http://michellezindorf.stampinup.net

Here is a link to all of my tutorials:  http://zindorf.blogs.splitcoaststampers.com/tutorials-ive-written/

Frequently asked questions answers:  http://zindorf.blogs.splitcoaststampers.com/frequently-asked-questions/


I Have Blog Candy Today!

dsc08013.JPG

I want to treat one of you wonderful readers to a set of Basic Grey Stamps “Wild Flowers”.   

To throw your hat in the ring to win this stunning stamp set, please leave a comment on this post for me to enter you.  If you are getting this blog update by e-mail you will need to click this link and then leave a comment at the end of the post:   http://zindorf.blogs.splitcoaststampers.com/2009/03/06/i-have-blog-candy-today/

I will use a random number generator on Monday, March 9th to select the winner.

Good Luck to All!

Have an out of this world Friday!

Until my next post. . . . . . . . . .

Hugs,

Michelle

Here I come! 

Check it out Zindorf Brayer Workshops

WHEATON, ILLINOIS – March 13th & 14th, Beginner & Advanced Brayer workshops in Wheaton, Illinois. For workshop info or to register contact me at  mzindorf@aim.com **********************************************

DAYTON, OHIO – April 4th, Beginner Brayer workshop in Dayton, OH at Marco Paper, To register, please contact Marco Paper at 937-433-7030 or 1-888-433-5239 or website at http://marcopaper.com/index.html   **********************************************

FORT SMITH, ARKANSAS – April 17 & 18th, Beginner Brayer Workshops in Fort Smith, Arkansas. For workshop info or to register contact me at mzindorf@aim.com  **********************************************

FORT SMITH ARKANSAS – April 18th, Advanced Brayer Workshop in Fort Smith, Arkansas. For workshop info or to register contact me at  mzindorf@aim.com **********************************************

SAVANNAH, GEORGIA – May 1st & 2nd, Beginner Brayer Workshops in Savannah, Georgia. For workshop info or to register contact me at mzindorf@aim.com **********************************************

SAVANNAH, GEORGIA – May 2nd, Advanced Brayer Workshop in Savannah, Georgia. For workshop info or to register contact me at mzindorf@aim.com ***********************************************

DAYTON, OHIO – May 9th, Advanced Brayer II Workshop in Dayton, OH at Marco Paper, To register, please contact Marco Paper at 937-433-7030 or 1-888-433-5239 or website at http://marcopaper.com/index.html  

***********************************************

COVINGTON, INDIANA – May 16th, Beginner Brayer workshops in Covington, Indiana. For workshop info or to register contact me at mzindorf@aim.com  ***********************************************

BUFFALO, MINNESOTA – June 5th & 6th, Beginner Brayer workshops in Buffalo, Minnesota. For workshop info or to register contact me at mzindorf@aim.com ***********************************************

BUFFALO, MINNESOTA (SOLD OUT) – June 6th, Advanced Brayer workshops in Buffalo, Minnesota. For workshop info or to register contact me at mzindorf@aim.com ***********************************************

WEBSTER, NEW YORK – June 19th & 20th, Beginner Brayer workshops in Webster, New York. For workshop info or to register contact me at mzindorf@aim.com  ***********************************************

WEBSTER, NEW YORK – June 20TH, Advanced Brayer workshops in Webster, New York. For workshop info or to register contact me at mzindorf@aim.com

***********************************************

STOUGHTON, WISCONSIN – July 17th & 18th, Beginner Brayer workshops in Stoughton, Wisconsin. For workshop info or to register contact me at mzindorf@aim.com

***********************************************

STOUGHTON, WISCONSIN – July 18th, Advanced Brayer workshops in Stoughton, Wisconsin. For workshop info or to register contact me at mzindorf@aim.com

Here is a link to my workshop calendar where you can see all of my travel schedule and to get info on beginner and advanced Brayer workshops:  http://zindorf.blogs.splitcoaststampers.com/workshop-calendar

Link to my Stampin’ Up website were you can order all of your must have Stampin’ Up products from me 24-7:  http://michellezindorf.stampinup.net

Here is a link to all of my tutorials:  http://zindorf.blogs.splitcoaststampers.com/tutorials-ive-written/

Frequently asked questions answers:  http://zindorf.blogs.splitcoaststampers.com/frequently-asked-questions/


Nature Silhouttes Tree with Mountain – Tutorial #183

dsc08010.JPG

Today’s project is a quick card for me,  not so many steps.  🙂  Silhouette stamps, such as this Stampin’ Up Set, Nature Silhouettes makes scene making a breeze.  The tutorial today will also show you how to add a mountain in the your background.  Hang out for a moment and check it out.

Let’s get started.  🙂

Supplies:

Stamps: Stampin’ Up Nature Silhouettes
Paper: Stampin’ Up Whisper White, Basic Black & Not Quite Navy
Ink: Stampin’ Up Basic Black, Going Gray, Not Quite Navy, Baja Breeze & Apricot Appeal
Accessories: Ribbon, Silver Brads, Brayer, Sponges, Tombo Mono Multi Liquid Glue, Piercing Tool

Please don’t forget you can order your Stampin’ Up products from me 24-7 from this link:  http://michellezindorf.stampinup.net or e-mail me at mzindorf@aim.com if you are within the United States.

dsc08012.JPG

Brayered Apricot Appeal on a 2 6/8″ x 3.5″ piece of Whisper White Card stock.

dsc07998.JPG

Brayered Baja Breeze ink at the top of the card stock.  Be sure not to over lap Blue and any color that has a yellow tint.  Remember Blue and Yellow make green.  Not pretty in skies, lol.

dsc07999.JPG

Brayered a bit of Not Quite Navy ink an angle at the top of the card stock.

dsc08000.JPG

Stamped the tree silhouette stamp with Basic Black ink.

dsc08001.JPG

Sponge Basic Black ink at the top, left side and bottom of the card stock, very heavy.

dsc08002.JPG

Tore a post it note sticky edge to create a mountain shape and masked the sky with it.

dsc08003.JPG

Sponged Going Gray on the card stock at the post it note torn edge.  Added just a hint of Basic Black ink right at the post it note torn edge (Top of Mountain).

dsc08004.JPG

Removed post it note.  Ta da. . . . .  a mountain appears.

dsc08005.JPG

I use brads constantly in projects.  The piercing tool that come in Stampin’ Up’s Tool kit is great for starting the brads.  I complete my entire card front and then add the brads.  The card from then gets layered on a Whisper White card.  This way my brad butts are not showing.   I don’t like to show my butts, lol.

dsc08006.JPG

Here is the completed card measuring 5.25″ Square.

dsc08010.JPG

I hope this tutorial has inspired you to add a mountain or hill in your scenes.

Before I close today, I have been asked a million times what my favorite Stampin’ Up ink pad colors are.  I have and use them all, but right now my favorites are as follows:

Baja Breeze, Not Quite Navy, Old Olive, Kiwi Kiss.  These colors are great for making scenes.

May your day be filled with warm breezes and sunshine.

Until my next post. . . . . . . . . . .

Hugs,

Michelle

Get ready for Brayer Workshops!  I am coming to:

3-small.jpg

Wheaton, Illinois

Fort Smith, Arkansas

Dayton, Ohio

Savannah, Georgia

Covington, Indiana

Buffalo, Minnesota

Webster, New York

Stoughton, Wisconsin

Here is a link to my workshop calendar where you can see all of my travel schedule and to get info on beginner and advanced Brayer workshops:  http://zindorf.blogs.splitcoaststampers.com/workshop-calendar

Link to my Stampin’ Up website were you can order all of your must have Stampin’ Up products from me 24-7:  http://michellezindorf.stampinup.net

Here is a link to all of my tutorials:  http://zindorf.blogs.splitcoaststampers.com/tutorials-ive-written/

Frequently asked questions answers:  http://zindorf.blogs.splitcoaststampers.com/frequently-asked-questions/


Butterfly and Flowers – Tutorial # 182

dsc07997.jpg

Well!  This card was a bear to photograph.  I ended up going outside in the cold and wind to take this photo in my PJ’s and I am still not happy with the way the photo looks compared to the original piece.  On top of that my computer is acting up so I am holding my breath as I type this hoping I can get this posted some time today.  It is one of those days when things keep going wrong, so much so you just have to laugh it off. 

Well I better get on with the tutorial while the getting is good. . . .

Supplies:

Stamps: Stampin’ Up God’s Beauty, Bloomin’ Beautiful & Baroque Motifs
Paper: Stampin’ Up Whisper White, Basic Black & Cameo Coral
Ink: Stampin’ Up Regal Rose, Cameo Coral, Rose Red, Chocolate Chip, Creamy Caramel, Basic Black & Always Artichoke
Accessories: Versamark Pad and Marker, Stampin’ Up Markers, Brads, Clear embossing powder, heat gun & Sponge

Please don’t forget you can order your Stampin’ Up products from me 24-7 from this link:  http://michellezindorf.stampinup.net or e-mail me at mzindorf@aim.com if you are within the United States.

dsc07977.JPG

Stamped Butterfly by first loading my stamp with Versamark and then Black ink before stamping it on a piece of 5″ x 4″ Whisper White card stock.  I then heat embossed it using clear embossing powder and a heat gun.

dsc07951.JPG

dsc07952.JPG

Stamped flowers by first loading the stamp with Versamark and then Regal Rose, and patted the Artichoke ink pad on the stem area of the stamp.  All of the coloring was done with ink pads before stamping.   Heat embossed the images using clear embossing powder and a heat gun.

dsc07953.JPG

dsc07954.JPG

Colored the flowers with a Blush Blossom marker.

dsc07955.JPG

Colored the darker areas of the flower with a Pretty in Pink marker.

dsc07956.JPG

Colored in the leaves and stem with an Always Artichoke Marker.

dsc07957.JPG

Colored the Top part of the butterfly’s wings with a Sage Shadow marker.

dsc07958.JPG

Colored the bottom part of the wings in with an Apricot Appeal marker.

dsc07959.JPG

Added a bit of More Mustard marker to the bottom part of the wings.

dsc07960.JPG

Added Always Artichoke marker to the top middle of the wings.

dsc07961.JPG

Colored the flowers and butterfly with in with a Versmark marker and heat embossed the images using clear embossing powder and a heat gun.

dsc07962.JPG

dsc07963.JPG

Stamped the Flourish by first loading the stamp with Versamark and then Rose Red ink before stamping it.  Heat embossed the image using clear embossing powder and a heat gun.

dsc07964.JPG

dsc07965.JPG

Stamped the flourish again by first loading the stamp with Versamark and then black ink before stamping it.  Heat embossed the image using clear embossing powder and a heat gun.

dsc07966.JPG

Sponged Creamy Caramel ink all over the card stock being heavier on the edges.

dsc07967.JPG

Sponged on Cameo Coral around the edges.

dsc07968.JPG

Sponged Rose Red on.

dsc07969.JPG

Stamped the wording on the left side of the card stock with Creamy Caramel ink.

dsc07970.JPG

dsc07972.JPG

Sponged Chocolate chip and then added a bit of black to the edge of the card stock.

dsc07973.JPG

dsc07974.JPG

Assembled the card front, took a million pictures, lol and here you have it the finished card measuring 5″ x 6.5.

dsc07997.jpg

Before I end my post for today I wanted to share a couple of photos.  The first one is of some great ladies from my Advanced Brayer workshop last weekend.   Hi ladies!!!

 advanced-1-small.jpg

Now I told them they could take pictures with me if they made me tall and skinny.  This made me laugh when I received it!   Gotta love it!

advanced-2-small.jpg

May you have a terrific, fun filled day!

Until my next post. . . . . . . . . .

Huge Hugs,

Michelle

Get ready for Brayer Workshops!  I am coming to:

3-small.jpg

Wheaton, Illinois

Fort Smith, Arkansas

Dayton, Ohio

Savannah, Georgia

Covington, Indiana

Buffalo, Minnesota

Webster, New York

Stoughton, Wisconsin

Here is a link to my workshop calendar where you can see all of my travel schedule and to get info on beginner and advanced Brayer workshops:  http://zindorf.blogs.splitcoaststampers.com/workshop-calendar

Link to my Stampin’ Up website were you can order all of your must have Stampin’ Up products from me 24-7:  http://michellezindorf.stampinup.net

Here is a link to all of my tutorials:  http://zindorf.blogs.splitcoaststampers.com/tutorials-ive-written/

Frequently asked questions answers:  http://zindorf.blogs.splitcoaststampers.com/frequently-asked-questions/


More Stamps for Sale!

dsc07883-small.jpg

Hey everyone, I have about a thousand irons in the fire today.  🙂  I worked up this card this morning.  No tutorial for this one.  You will need to come to the Indianapolis, Indiana Rubber Stamp and Paper Arts Festival at the Indiana State Fairgrounds this Saturday, March 7th to see me demonstrate it at Marco Paper’s booth.  Come on out!  I would love to meet you. 

I also have put a ton more retired Stampin’ Up Stamp sets on my sales page.  If you want to check them out follow this link:  http://zindorf.blogs.splitcoaststampers.com/things-for-sale/

I hope your day is as peaceful as the sea in this scene.

Until my next post. . . . . . . . . .

Hugs,

Michelle

Get ready for Brayer Workshops!  I am coming to:

3-small.jpg

Wheaton, Illinois

Fort Smith, Arkansas

Dayton, Ohio

Savannah, Georgia

Covington, Indiana

Buffalo, Minnesota

Webster, New York

Stoughton, Wisconsin

Here is a link to my workshop calendar where you can see all of my travel schedule and to get info on beginner and advanced Brayer workshops:  http://zindorf.blogs.splitcoaststampers.com/workshop-calendar

Link to my Stampin’ Up website were you can order all of your must have Stampin’ Up products from me 24-7:  http://michellezindorf.stampinup.net

Here is a link to all of my tutorials:  http://zindorf.blogs.splitcoaststampers.com/tutorials-ive-written/

Frequently asked questions answers:  http://zindorf.blogs.splitcoaststampers.com/frequently-asked-questions/


Embossed Ocean Commotion – Tutorial #181

dsc07880.JPG

When I first layed eyes on this Stampin’ Up Ocean Commotion stamp set I knew I had to get it.  Usually the ocean life sets are cartoony and I just don’t do well working with them.  But now that we have a set that is more realistic, hmmmm the possibilities are endless for me.  I heat embossed every image on this project with clear embossing powder.  This is not a quick project, lol.  I was happy with the way it turned out, especially since this is my first time using this set.  My trial run, so to speak.

Let’s get started.

Supplies:

Stamps: Stampin’ Up Ocean Commotion, Seaside & Baroque Motifs
Paper: Stampin’ Up Whisper White, Not Quite Navy & Kiwi Kiss
Ink: Stampin’ Up Not Quite Navy, Baja Breeze, Night of Navy, Kiwi Kiss, Creamy Caramel, Always Artichoke & Close to Cocoa
Accessories: Stampin’ Up markers, White Gel Pen, Faber Castell Black marker, Brayer, Versamark pad and Marker, Post it note, White Ribbon, Brads, Clear embossing powder and a Heat Gun, Piercing Tool

Please don’t forget you can order your Stampin’ Up products from me 24-7 from this link:  http://michellezindorf.stampinup.net or e-mail me at mzindorf@aim.com if you are within the United States.

dsc07882.JPG

Stamp the seahorse twice by first loading my stamp with Versamark and then the ink before stamping.  I stamped them in Creamy Caramel and Baja Breeze ink on a 3.25″ x 5″ piece of Whisper White Card stock.

dsc07856.JPG

Heat embossed the seahorses with clear embossing powder and a heat gun.

dsc07858.JPG

Colored over the seahorses using a Versamark marker and then heat embossed the images using clear embossing powder and a heat gun.  I did this step so I would not lose the white details in the image when I later apply the ink for the background.

dsc07859.JPG

dsc07860.JPG

Stamped the Baroque Motifs Flourish stamp by first loading the stamp with Versamark and then loading the stamp with Always Artichoke before stamping it.  I then heat embossed the image using clear embossing powder and a heat gun.

dsc07861.JPG

Stamped the shells by first loading the stamp with Versamark and then Close to Cocoa ink before stamping them.  I heat embossed the images using clear embossing powder and a heat gun.

dsc07862.JPG

dsc07863.JPG

Colored the shells with a Creamy Caramel marker.

dsc07864.JPG

Added Close to Cocoa marker to the shells.

dsc07865.JPG

Colored over the shells with a Versamark marker and then heat embossed them using clear embossing powder and a heat gun.

dsc07866.JPG

Stamped the Ocean Commotion Flourish by first loading my stamp with Versamark and then Kiwi Kiss ink before stamping it.  Heat embossed the images using clear embossing powder and a heat gun.

Note:  When you over stamp an embossed image with another one you don’t have to worry about cleaning off of the first embossed image.  The ink will resist and melt right off when you heat the second embossed image.  Clear as mud, lol?

dsc07867.JPG

dsc07868.JPG

Tear a post it note through the stick part and use it as a mask for the ocean floor.

dsc07869.JPG

Brayer on Not Quite Navy ink.

dsc07870.JPG

Flip the card stock around and Brayer Baja Breeze ink at the top of the card stock.

dsc07871.JPG

The Not Quite Navy was not dark enough and my Baja Breeze seahorse was not showing up well so I flip the card stock back around and Brayered Night of Navy ink over the Not Quite Navy ink.  Now that is better.  🙂

dsc07872.JPG

Wiped the brayered ink from the embossed images with a cotton rag.

dsc07873.JPG

Removed the mask.

dsc07874.JPG

Outlined the Baroque Motifs flourish on the right side of the image using a Faber Castell black marker.  I also outlined the Baja Breeze seahorse and the right side of the Creamy Carmel seahorse.  Added White dots as bubbles with a White Gel Pen.

dsc07876.JPG

Assembled my card front.  Used a Piercing tool to start my holes for my brads.

dsc07877.JPG

Here is the finished card measuring 5″ x 6.5″.

dsc07880.JPG

I hope this tutorial has inspired you to try a multi-layered emboss resist scene. 

May your ocean today be smooth and peaceful.

Until my next post. . . . . . . . . .

Hugs,

Michelle

Get ready for Brayer Workshops!  I am coming to:

3-small.jpg

Wheaton, Illinois

Fort Smith, Arkansas

Dayton, Ohio

Savannah, Georgia

Covington, Indiana

Buffalo, Minnesota

Webster, New York

Stoughton, Wisconsin

Here is a link to my workshop calendar where you can see all of my travel schedule and to get info on beginner and advanced Brayer workshops:  http://zindorf.blogs.splitcoaststampers.com/workshop-calendar

Link to my Stampin’ Up website were you can order all of your must have Stampin’ Up products from me 24-7:  http://michellezindorf.stampinup.net

Here is a link to all of my tutorials:  http://zindorf.blogs.splitcoaststampers.com/tutorials-ive-written/

Frequently asked questions answers:  http://zindorf.blogs.splitcoaststampers.com/frequently-asked-questions/


Still Clearing out Stamps to make room for the new ones!

dsc07828.JPG

Just a quick note today.  I have uploaded more to my sales page.  I am stilling clearing out some of my old favorite stamps (friends) to make room for new ones.  If you are interested you can take a peek at this link:   http://zindorf.blogs.splitcoaststampers.com/things-for-sale/

The sales page gets updated all the time so check back often.  I think I am just through the F’s in my stamp collection, so there are many, many, many more I need to add as I have time.

Get ready for Brayer Workshops!  I am coming to:

3-small.jpg

Wheaton, Illinois

Fort Smith, Arkansas

Dayton, Ohio

Savannah, Georgia

Covington, Indiana

Buffalo, Minnesota

Webster, New York

Stoughton, Wisconsin

Here is a link to my workshop calendar where you can see all of my travel schedule and to get info on beginner and advanced Brayer workshops:  http://zindorf.blogs.splitcoaststampers.com/workshop-calendar

Until my next post. . . . . . . . . . . . .

Hugs,

Michelle

Link to my Stampin’ Up website were you can order all of your must have Stampin’ Up products from me 24-7:  http://michellezindorf.stampinup.net

Here is a link to all of my tutorials:  http://zindorf.blogs.splitcoaststampers.com/tutorials-ive-written/

Frequently asked questions answers:  http://zindorf.blogs.splitcoaststampers.com/frequently-asked-questions/


Embrace Life Today – Tutorial #180

dsc07814-small.jpg

I needed to get my embossing powder fix this morning so I came up with this project using the Stampin’ Up Set Embrace Life and some clear embossing powder, love that stuff, lol.   I also love pink and brown together so I decided to use that color combo and add a bit of a twist by using Apricot Appeal in the background center to add a glow to the project.  Hope you like it.  🙂

Let’s get started.

Supplies:

Stamps: Stampin’ Up Embrace Life
Paper: Stampin’ Up Whisper White, Chocolate Chip and Apricot Appeal
Ink: Stampin’ Up Basic Black, Apricot Appeal, Close to Cocoa, Creamy Caramel, Chocolate Chip
Accessories: Sponges, Stampin’ Up Markers, White Gel Pen, Stamp-a-ma-jig, Copper Brad, Versamark Marker, Clear embossing powder and a heat gun

Please don’t forget you can order your Stampin’ Up products from me 24-7 from this link:  http://michellezindorf.stampinup.net or e-mail me at mzindorf@aim.com if you are within the United States.

dsc07816.JPG

I used a Curvy Cutter and cut a 5″ circle out of Whisper White Card Stock. dsc07794.JPGdsc07795.JPG

Stamped the flowers around the edge of the circle using Basic Black ink.

dsc07796.JPG

Used a Stamp-a-ma-jig to stamp the flower in the center using Basic Black ink.

dsc07797.JPG

Colored some of the flower petals on the small flowers and the entire large flower with a Pretty in Pink marker.

dsc07798.JPG

Added a bit of Cameo Coral marker to all of the flowers.

dsc07799.JPG

Went over the large flower’s center and the edges of the large flower again with the Pretty in Pink marker to get a graduation of color in the flower.

dsc07800.JPG

Colored over all of the little flowers and the entire large flower with a Versamark marker and heat embossed all of them at once using fine detail clear embossing powder and a heat gun.

dsc07801.JPG

dsc07802.JPG

Using a circular motion I sponged Apricot Appeal ink in the center of the circle.

dsc07803.JPG

Sponged Creamy Caramel ink around the outside of the circle, not covering the Apricot Appeal ink entirely.

dsc07804.JPG

Sponged Close to Cocoa ink around the edge of the circle, not covering the Creamy Caramel ink entirely.

dsc07805.JPG

Added Chocolate Chip ink at the very edge of the card stock using a sponge.

dsc07806.JPG

Stamped the leaves with Creamy Caramel ink.

dsc07807.JPG

Colored the leaves in with an Apricot Appeal marker.

dsc07808.JPG

Added an outline of Close to Cocoa marker on the bottom of the leaves.

dsc07809.JPG

Added a white highlight to the tops of the leaves and the center of the large flower.

dsc07810.JPG

Adhered the main image panel to a Chocolate Chip 5″ square panel and sponged Basic Black at each corner of the Chocolate Chip Panel.

dsc07811.JPG

Added a 5 1/8″ square panel of Apricot Appeal card stock and a Copper Brad in the center of the large flower.

Here is the finished card measuring 5 1/8″ square.

dsc07814-small.jpg

I hope this tutorial has inspired you to use a warm color in the center of your next project to create a glow.

By the way I have added a few new states to my Brayer Workshop schedule yesterday.   Get ready!  I am coming to:

3-small.jpg

Wheaton, Illinois

Fort Smith, Arkansas

Dayton, Ohio

Savannah, Georgia

Covington, Indiana

Buffalo, Minnesota

Webster, New York

Stoughton, Wisconsin

Here is a link to my workshop calendar where you can see all of my travel schedule and to get info on beginner and advanced Brayer workshops:  http://zindorf.blogs.splitcoaststampers.com/workshop-calendar

May you be glowing with life today!

Until my next post. . . . . . . . . . . . .

Hugs,

Michelle

Link to my Stampin’ Up website were you can order all of your must have Stampin’ Up products from me 24-7:  http://michellezindorf.stampinup.net

Here is a link to all of my tutorials:  http://zindorf.blogs.splitcoaststampers.com/tutorials-ive-written/

Frequently asked questions answers:  http://zindorf.blogs.splitcoaststampers.com/frequently-asked-questions/


Happy ST. Patrick’s Day – Tutorial #179

dsc07791.JPG

St. Patrick’s Day is just around the corner so here is a tutorial using a cute Stampin’ Up set called Pinch Proof.  This tutorial shows how to layer embossed images. 

Before we get started on today’s tutorial I have some blog candy winners.  That’s right I am giving away two Innovative Stamp Creations Stamp Sheets of Delicate Roses away.  I used a random number generator to select the following winners. . . . . . . . . . . . . . . . . .

dsc07768.JPG  The first winner is . . . . . . . . . . .

Jamie  Who wrote “I love coming to your site everyday. You don’t just make cards, it’s actual art.  It inspires me to try new things, and even though it doesn’t always turn out
the way I want it to, it’s still fun. Thanks for showing how to do the different
techniques. It’s making me more artistic.!”

The Second Winner is . . . . . . . . .

Stephanie C.Who wrote “oooohhh! How I love candy, especially blog candy! Maybe this is my lucky day!”

Ladies, please e-mail your address to mzindorf@aim.com and I will get this incredible stamp sheet in the mail to you.

Thank you to everyone that played along!  You can check out Innovative Stamp Creations Stamp sheets at the following link:  http://www.innovativestampcreations.com/ischomepage.html

Now let’s get started on today’s tutorial.  🙂

Supplies:

Stamps: Stampin’ Up Pinch Proof
Paper: Stampin’ Up Whisper White, So Saffron, Basic Black and Old Olive
Ink: Stampin’ Up Really Rust, Pumpkin Pie, So Saffron, Old Olive, Basic Black & Always Artichoke
Accessories: Stampin’ Up Piercing Tools, Always Artichoke marker, Versamark Marker and Pad, Sponges, Brayer, Clear embossing powder and a heat gun, Faber Castel Indian Ink Black marker

Please don’t forget you can order your Stampin’ Up products from me 24-7 from this link:  http://michellezindorf.stampinup.net or e-mail me at mzindorf@aim.com if you are within the United States.

dsc07793.JPG

Stamped the image by first loading the stamp with Versamark, then Old Olive ink and then colored his hands, feet and face with a Basic Black Marker before stamping it on a 4″ x 5″ piece of Whisper White card stock.

dsc07769.JPG

Made his suit and hat a bit darker with an Always Artichoke marker.

dsc07770.JPG

Heat embossed the image using clear embossing powder and a heat gun.

dsc07771.JPG

Colored over his hands, face, white areas of his neck, shirt and buckle on his hat with a Versamark marker and heat embossed the image again using clear embossing powder and a heat gun.

dsc07772.JPG

dsc07773.JPG

Stamped the sentiment by first loading the stamp with Versamark and then Basic Black ink before stamping it.

dsc07774.JPG

Heat embossed the sentiment using clear embossing powder and a heat gun.

dsc07775.JPG

Stamped the clovers by first loading the stamp with Versamark and then Old Olive ink before stamping them.

dsc07776.JPG

Heat embossed the images using clear embossing powder and a heat gun.

dsc07777.JPG

Over stamped the clovers by first loading the stamp with Versamark and then loading the stamp with Always Artichoke before stamping the images.  Heat embossed the images using clear embossing powder and a heat gun.

dsc07778.JPG

dsc07779.JPG

Brayered So Saffron ink on the card stock.

dsc07780.JPG

Brayered Pumpkin Pie ink at the top of the card stock not covering the So Saffron ink all the way.

dsc07781.JPG

Brayered Really Rust ink at the very top of the card stock, not covering the Pumpkin Pie ink entirely.

dsc07782.JPG

Using a soft cotton rag, I wiped any brayered ink from the embossed images.

dsc07783.JPG

Sponged Old Olive ink at the bottom of the card stock.

dsc07784.JPG

Sponged Basic Black ink at the bottom of the card stock, not covering the Old Olive ink entirely.

dsc07785.JPG

Sponged Really Rust ink around the edge of the entire piece of card stock.

dsc07786.JPG

Outlined the right side of the some of the clovers and the Leperkahn with a Faber Castel Indian ink Black marker.

dsc07787.JPG

Used the Stampin’ Up piercing tools to pierce two rows at the bottom of the assembled card front.

dsc07788.JPG

Here is the finished card measuring 5″ x 6.5″.

dsc07791.JPG

I hope this tutorial has inspired you to try layering embossed images.

May your day make you jump for joy like this character I used today.

Until my next post. . . . . . . . . . . .

Hugs,

Michelle

P.S.  Here are the next two stops on the Zindorf Brayer Workshops travel schedule.. . .  . .

DAYTON, OHIO – February 28th, Advanced Brayer II Workshop in Dayton, OH at Marco Paper, To register, please contact Marco Paper at 937-433-7030 or 1-888-433-5239 or website at http://marcopaper.com

**********************************************

WHEATON, ILLINOIS – March 13th & 14th, Beginner & Advanced Brayer workshops in Wheaton, Illinois. To register contact me at mzindorf@aim.com

Here is a link to my workshop calendar where you can see all of my travel schedule and to get info on beginner and advanced Brayer workshops:  http://zindorf.blogs.splitcoaststampers.com/workshop-calendar

Link to my Stampin’ Up website were you can order all of your must have Stampin’ Up products from me 24-7:  http://michellezindorf.stampinup.net

Here is a link to all of my tutorials:  http://zindorf.blogs.splitcoaststampers.com/tutorials-ive-written/

Frequently asked questions answers:  http://zindorf.blogs.splitcoaststampers.com/frequently-asked-questions/