In the Cup – Tutorial #457


Hey There,

You just never know what you are going to see on this blog of mine.  I skip from Autumn to Winter and then to golf.  Just try to figure me out, lol.  My life is CRAZY!

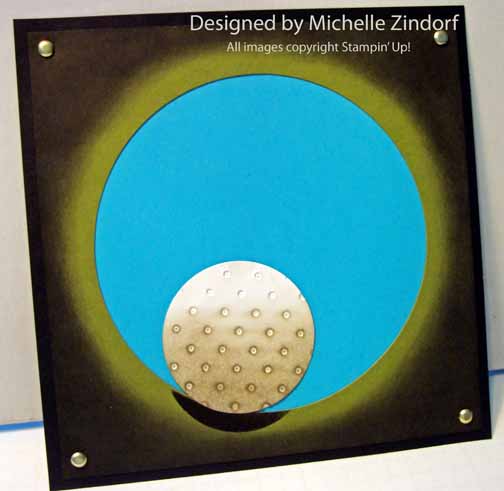
Well I am off to Montreal, Wisconsin to teach my brayer workshops so I needed a quick card for today.  So here it is.  This is a view from inside the cup as the ball comes in.  Hope the golfers in your life see lots of this, grin. 

As for me, I’m hoping to take the scenic route to Wisconsin so I can check out the beginnings of fall foliage.

*************************************************************************************

Reminder:

BIG SHOT – CUSTOMER GIVE AWAY. . . . . . DON’T MISS OUT!

Until October 31, 2011 you can get a chance to win a free brand new Big Shot Die Cut Machine worth $99.95 

How to enter. . . . Every person that orders Stampin’ Up! products through my Stampin’ Up Web Site (CLICK HERE TO SHOP) until October 31, 2011 will receive 1 entry for each $25 increment of products purchased.  So if you place a product order that totals $50 that is 2 chances to win!  How about those beans.   I love giving things away!  I will announce the winner on November 1, 2011. 

************************************************************************************

Now let’s get started on that tutorial. . . . .

Supplies:


Paper: Stampin’ Up! Whisper White, Old Olive, Tempting Turquoise and Basic Black
Ink: Stampin’ Up! Sahara Sand and Basic Black
Accessories: Stampin’ UP! Big Shot Machine, Clear Circle Die, 1 3/4″ circle punch, Perfect Dots Embossing Folder, Sponges, Gold Brads
Techniques: Punch art


 Want a free copy of the brand new Stampin’ Up! Holiday Mini Catalog?  Just e-mail your address and I will get one right out to you.  Get your copy of the new 2011-2012 Stampin’ Up! Idea Book & Catalog by sending $9.95 to me at P.O. box 116, West Alexandria, Ohio 45381 or via paypal to mzindorf@aim.com, shipping is free.      Are you getting inspiration from this blog?   One way you can help support it is to order your Stampin’ Up products through me.   Click HEREto place an order and have your ordered delivered directly to your door step from Stampin’ Up!    Want to become a Stampin’ Up Demonstrator , receive a 20% discount on product and earn instant income on orders?  Consider being part of my Stampin’ Up Team and start your own business or become a Hobby Demo just for the discount.  Click HERE for more information.


Cut a circle in a 5″ piece of Old Olive card stock using the Clear Circle Die and Big Shot Machine.

Sponged Basic Black ink around the edges of the card stock.

Glued a 4.5″ piece of Tempting Turquoise to the back of the Old Olive card stock to cover the hole.

This is what it looks like from the front.

Punched a 1 3/4″ circle punch from Whisper White card stock.

Put the dimples on the golf ball using the Perfect Dots Embossing folder and the Big Shot Machine.

Sponged Sahara Sand ink on 3/4 of the ball.

Put the Old Olive circle that was cut out back in the hole and used the negative circle from the golf ball to mask where I want the shadow to be.

Sponged Basic Black ink in for the shadow.

Removed the masks, added a Basic Black panel,  the golf ball and gold brads in the corners.

Here is the finished card measuring 5.25″ square.

May all your puts be one puts.

Until my next post. . . . . .

Hugs,

   Get ready for Brayer Workshops!  I am coming to the following locations, click the location name for more information.    

Savannah, Georgia  (Sold Out)

Lincoln, Illinois    

Dayton, Ohio – Direct to Paper Workshops

Las Vegas, Nevada    

Austin, Texas 

Seattle, Washington

 Greeneville, Tennessee 

Indianapolis, Indiana 

Indiana, Pennsylvania 

Sparta, New Jersey 

Piedmont, Alabama

Post Falls, Idaho (outside of Coeurd’Alene)

 Sand Lake, Michigan (just North of Grand Rapids)

Lawrence, Kansas 

Elizabethtown, Kentucky

West Bend, Wisconsin 

Longmont (Gunbarrel), Colorado 

Orange, Massachusetts

Sacramento, California

Staley, North Carolina

 
Here is a link to my workshop calendar where you can see all of my travel schedule and to get info on beginner and advanced Brayer workshops, along with the newly added Direct to Paper Workshop: http://zindorf.blogs.splitcoaststampers.com/workshop-calendar        
 

Don’t see a workshop in your State?  Interested in hosting the workshops in your area   Click HERE to get hostess information.       
 

Link to my Stampin’ Up website where you can order all of your must have Stampin’ Up products from me 24-7:  http://michellezindorf.stampinup.net


Snowy Trees – Tutorial #456

Hey There,

I came up with this card idea in my sleep.  Love when that happens!   It sure makes for a happy morning stamping and the creative process is shortened a great deal.   Anyone else out there dream in cards?  

In this tutorial I used the Blossom Petals Builder Punch to create my trees.  Hang out here a moment and check it out.

Reminder:

BIG SHOT – CUSTOMER GIVE AWAY. . . . . . DON’T MISS OUT!

Until October 31, 2011 you can get a chance to win a free brand new Big Shot Die Cut Machine worth $99.95 

How to enter. . . . Every person that orders Stampin’ Up! products through my Stampin’ Up Web Site (CLICK HERE TO SHOP) until October 31, 2011 will receive 1 entry for each $25 increment of products purchased.  So if you place a product order that totals $50 that is 2 chances to win!  How about those beans.   I love giving things away!  I will announce the winner on November 1, 2011. 

Now let’s get started on that tutorial. . . . .

Supplies:

Stamps: Stampin’ Up! Trendy Trees
Paper: Stampin’ Up! Whisper White, Chocolate Chip and Baja Breeze
Ink: Stampin’ Up! Baja Breeze, Island Indigo, Night of Navy, Chocolate Chip and Sahara Sand
Accessories: Stampin’ Up! Brayer, Chocolate Chip marker, Aqua Painter, Mini Brads, Baja Breeze Seam Binder, Doily Triple Layer Punch, 1 1/4″ circle Punch, Blossom Petals Builder Punch, Stamp-a-ma-jig
Techniques: Brayered Sky


Want a free copy of the brand new Stampin’ Up! Holiday Mini Catalog?  Just e-mail your address and I will get one right out to you.  Get your copy of the new 2011-2012 Stampin’ Up! Idea Book & Catalog by sending $9.95 to me at P.O. box 116, West Alexandria, Ohio 45381 or via paypal to mzindorf@aim.com, shipping is free.      Are you getting inspiration from this blog?   One way you can help support it is to order your Stampin’ Up products through me.   Click HEREto place an order and have your ordered delivered directly to your door step from Stampin’ Up!    Want to become a Stampin’ Up Demonstrator , receive a 20% discount on product and earn instant income on orders?  Consider being part of my Stampin’ Up Team and start your own business or become a Hobby Demo just for the discount.  Click HERE for more information.

Masked the very bottom of a 3.25″ x 5″ piece of Whisper White card stock using a Post it Note that has the edge torn off of it.

Brayered Baja Breeze ink at the top of the card stock.

Masked the moon using a 1 1/4″ circle punched from a Post it note.

Brayered Island Indigo ink at the top of the card stock, not covering the Baja Breeze ink entirely.

Brayered Night of Navy ink at the top of the card stock, not covering the Island Indigo ink entirely.

Brayered Sahara Sand ink at the bottom of the sky area.

Punched the Blossom Petals Builder Punch twice from Whisper White card stock.  Used a few of the petals and adhered them to the card stock.

Stamped the tree trunks from the Trendy Tree Stamp set using Chocolate Chip ink and a Stamp-a-ma-jig for placement.

There may be a slight gap in the tree trunk where you are stamping over multiple layers of card stock.  Filled the gap in with a Chocolate Chip marker.

Added Baja Breeze ink for the shadow in the tree and below the tree using an Aqua Painter.  I pushed the ink pad lid into the ink pad by squeezing it when it is closed in order to get a pool of ink in the ink pad lid in which to use.  Clear as mud?

Added 3 Chocolate Chip panels and 1 Baja Breeze panel, 2 Whisper White Doily Triple Layer punches, Mini Silver Brads and Baja Breeze seam binding.

Here is the finished card measuring 5″ x 6.5″.

May your dreams be full of wonderful ideas.

Until my next post. . . . . .

Hugs,

   Get ready for Brayer Workshops!  I am coming to the following locations, click the location name for more information.    

Leesburg, Florida       Sold Out 

Montreal, Wisconsin        

Savannah, Georgia 

Lincoln, Illinois    

Dayton, Ohio – Direct to Paper Workshops   

 Las Vegas, Nevada    

Austin, Texas 

Seattle, Washington

 Greeneville, Tennessee 

Indianapolis, Indiana 

Indiana, Pennsylvania 

Sparta, New Jersey 

Piedmont, Alabama

Post Falls, Idaho (outside of Coeurd’Alene)

 Sand Lake, Michigan (just North of Grand Rapids)

Lawrence, Kansas 

Elizabethtown, Kentucky

Longmont (Gunbarrel), Colorado 

Orange, Massachusetts

Staley, North Carolina

 
Here is a link to my workshop calendar where you can see all of my travel schedule and to get info on beginner and advanced Brayer workshops, along with the newly added Direct to Paper Workshop: http://zindorf.blogs.splitcoaststampers.com/workshop-calendar        
 

Don’t see a workshop in your State?  Interested in hosting the workshops in your area   Click HERE to get hostess information.       
 

Link to my Stampin’ Up website where you can order all of your must have Stampin’ Up products from me 24-7:  http://michellezindorf.stampinup.net


Mini Bread Loaf Band – Tutorial #455


Hey There,

I’m playing around in the kitchen today, using up the last of the Zucchini that came out of our garden.   I made up 18 mini loafs and one large loaf of Zucchini Pineapple bread, YUM!   Thought I would send a bunch of these to work with my husband for his co-workers.  I certainly cannot give them away naked and still justify all of my stamping supplies, grin.  So here is the bread band that I came up with using the Stampin’ Up! set, Autumn Splendor and the Lace Ribbon Border.

Reminder:

BIG SHOT – CUSTOMER GIVE AWAY. . . . . . DON’T MISS OUT!

Until October 31, 2011 you can get a chance to win a free brand new Big Shot Die Cut Machine worth $99.95 

How to enter. . . . Every person that orders Stampin’ Up! products through my Stampin’ Up Web Site (CLICK HERE TO SHOP) until October 31, 2011 will receive 1 entry for each $25 increment of products purchased.  So if you place a product order that totals $50 that is 2 chances to win!  How about those beans.   I love giving things away!  I will announce the winner on November 1, 2011. 

Now let’s get started on that tutorial. . . . .

Supplies:

Stamps:  Stampin’ Up! Autumn Splendor

Card Stock:  Stampin’ Up! Whisper White and Old Olive

Ink:  Stampin’ Up! Chocolate Chip and Cajun Craze

Accessories:  Stampin’ Up! Lace Ribbon Border Punch, Gold Smooch Spray, Markers (Old Olive, So Saffron, River Rock and Crumb Cake), paper snips and gold brad.  Last but not least the Mini loaves of bread.  🙂

Zucchini Pineapple bread, here is a link to the recipe:  http://www.tasteofhome.com/Recipes/Makeover-Pineapple-Zucchini-Bread   Enjoy!

Stamped the leaf with Cajun Craze ink and the acorns with Chocolate Chip ink on Whisper White card stock.

Color the acorns with markers as follows:  Color over the acorns with Crumb Cake, add So Saffron in the bottom of the acorn, color over the top of the acorn again using the Crumb Cake marker.

Color the leaves with markers as follows:  Color in the stem and vein using Old Olive, add River Rock to the center and then colored around the edges using So Saffron.

Cut the images out and spray them with the Gold Smooch Spray, Love this Stuff!!   It is much more sparkly in real life.

Cut 2″ x 11″ Old Olive strips and punched them using the Lace Ribbon Border punch.

Pierced a hole in the leaf and acorn, put a gold brad through it and the punched border (in the middle of the border).   Put the band around the mini loaf and secured the over lapping ends with a couple of Glue Dots.

Here is the finished loaf.  I think Russ will be proud to give these away and his co-workers will feel special getting these decorated treats.    What do you think?

May your day be filled with special surprises.

Until my next post. . . . .  .

Hugs,

   Get ready for Brayer Workshops!  I am coming to the following locations, click the location name for more information.    

Leesburg, Florida       Sold Out 

Montreal, Wisconsin        

Savannah, Georgia 

Lincoln, Illinois    

Dayton, Ohio – Direct to Paper Workshops   

 Las Vegas, Nevada    

Austin, Texas 

Seattle, Washington

 Greeneville, Tennessee 

Indianapolis, Indiana 

Indiana, Pennsylvania 

Sparta, New Jersey 

Piedmont, Alabama

Post Falls, Idaho (outside of Coeurd’Alene)

 Sand Lake, Michigan (just North of Grand Rapids)

Lawrence, Kansas 

Elizabethtown, Kentucky

Longmont (Gunbarrel), Colorado 

Orange, Massachusetts

Staley, North Carolina

 
Here is a link to my workshop calendar where you can see all of my travel schedule and to get info on beginner and advanced Brayer workshops, along with the newly added Direct to Paper Workshop: http://zindorf.blogs.splitcoaststampers.com/workshop-calendar        
 

Don’t see a workshop in your State?  Interested in hosting the workshops in your area   Click HERE to get hostess information.       
 

Link to my Stampin’ Up website where you can order all of your must have Stampin’ Up products from me 24-7:  http://michellezindorf.stampinup.net


Let’s Go Tropical – Tutorial #454

Hey All,

I’m back from Leesburg, Florida where I had a wonderful time teaching, catching up with old friends and making new ones.  I got to hang out at a lake there (Lake Yale) and found it very inspiring, as you can probably tell by today’s tutorial.  🙂

Before we get started on the tutorial I want to announce two more stops that I have added to my workshop calendar.  I hope you can join me in Elizabethtown, Kentucky and Orange, Massachusetts.  Just click on the location name to view the workshop information or CLICK HERE TO VIEW MY ENTIRE WORKSHOP CALENDAR.

Reminder:

BIG SHOT – CUSTOMER GIVE AWAY. . . . . . DON’T MISS OUT!

Until October 31, 2011 you can get a chance to win a free brand new Big Shot Die Cut Machine worth $99.95 

How to enter. . . . Every person that orders Stampin’ Up! products through my Stampin’ Up Web Site (CLICK HERE TO SHOP) until October 31, 2011 will receive 1 entry for each $25 increment of products purchased.  So if you place a product order that totals $50 that is 2 chances to win!  How about those beans.   I love giving things away!  I will announce the winner on November 1, 2011. 

Now let’s get started on that tutorial. . . . .

Supplies:

Stamps: Stampin’ Up! Plant Hope
Paper: Stampin’ Up! Whisper White, Basic Black, Crumb Cake and Soft Suede
Ink: Stampin’ Up! Tempting Turquoise, Basic Black, Soft Suede and Pacific Point
Accessories: Stampin’ Up! Mini Glue Dots, Sponge, Ruler, Brayer, Silver Brads, Silver Clip and Post it Note

Want a free copy of the brand new Stampin’ Up! Holiday Mini Catalog?  Just e-mail your addreGet your copy of the new 2011-2012 Stampin’ Up! Idea Book & Catalog by sending $9.95 to me at P.O. box 116, West Alexandria, Ohio 45381 or via paypal to mzindorf@aim.com, shipping is free.      Are you getting inspiration from this blog?   One way you can help support it is to order your Stampin’ Up products through me.   Click HEREto place an order and have your ordered delivered directly to your door step from Stampin’ Up!    Want to become a Stampin’ Up Demonstrator , receive a 20% discount on product and earn instant income on orders?  Consider being part of my Stampin’ Up Team and start your own business or become a Hobby Demo just for the discount.  Click HERE for more information.

Brayered Tempting Turquoise ink on the top and bottom of a 3″ x 5″ piece of Whisper White card stock.

Masked the sky area of the cardstock using a Post it Note.  Sponged Pacific Point Ink at the post it note edge to create the horizon line.

Stamped the Stampin’ Up! Plant Hope Palm Tree using Basic Black ink.

Colored the trunk of the tree in using a Basic Black marker.

Cut a 4″ x 5″ piece of Crumb Cake card stock and lightly smeared Soft Suede ink all over the cardstock.

Smeared Basic Black ink on the right side of the card stock.

Using a ruler made two lines with a pencil, one 1 1/8″ from the top of the card stock and one 1 1/8″ from the bottom of the card stock.

Ripped the card stock on the lines.

Cut 2/3rds of the ripped flap off and rolled the remainder of the flap up.  

Adhered the rolled up flap with two mini glue dots.  Added a Basic Black panel and my main image panel, 4 silver brads and a silver clip.

Also, added a Soft Suede panel and Basic Black panel. 

Here is my finished card measuring 5″ x 6.5″.

May you feel tropical breezes and sunsh

Huge Hugs,

   Get ready for Brayer Workshops!  I am coming to the following locations, click the location name for more information.    

Leesburg, Florida       Sold Out 

Montreal, Wisconsin        

Savannah, Georgia 

Lincoln, Illinois    

Dayton, Ohio – Direct to Paper Workshops   

 Las Vegas, Nevada    

Austin, Texas 

Seattle, Washington

 Greeneville, Tennessee 

Indianapolis, Indiana 

Indiana, Pennsylvania 

Sparta, New Jersey 

Piedmont, Alabama

Post Falls, Idaho (outside of Coeurd’Alene)

 Sand Lake, Michigan (just North of Grand Rapids)

Lawrence, Kansas 

Elizabethtown, Kentucky

Longmont (Gunbarrel), Colorado 

Orange, Massachusetts

Staley, North Carolina

 
Here is a link to my workshop calendar where you can see all of my travel schedule and to get info on beginner and advanced Brayer workshops, along with the newly added Direct to Paper Workshop: http://zindorf.blogs.splitcoaststampers.com/workshop-calendar        
 

Don’t see a workshop in your State?  Interested in hosting the workshops in your area   Click HERE to get hostess information.       
 

Link to my Stampin’ Up website where you can order all of your must have Stampin’ Up products from me 24-7:  http://michellezindorf.stampinup.net


Walk in the Woods – Tutorial #453


Hey There,

As promised here is the tutorial for the sneak peek I did a couple of weeks ago using the New Out on a Limb Stampin’ Up Set.  Hope you enjoy this creepy scene.

Reminder:

BIG SHOT – CUSTOMER GIVE AWAY. . . . . . DON’T MISS OUT!

Until October 31, 2011 you can get a chance to win a free brand new Big Shot Die Cut Machine worth $99.95 

How to enter. . . . Every person that orders Stampin’ Up! products through my Stampin’ Up Web Site (CLICK HERE TO SHOP) until October 31, 2011 will receive 1 entry for each $25 increment of products purchased.  So if you place a product order that totals $50 that is 2 chances to win!  How about those beans.   I love giving things away!  I will announce the winner on November 1, 2011. 

Let’s get started on that tutorial. . . . .


Supplies:

Stamps:  Stampin’ Up! Out on a Limb, Lovely as a Tree, Calendar Alphabet & Numbers

Ink:  Stampin’ Up! Baja Breeze, Island Indigo and Basic Black

Card stock:  Whisper White and Stampin’ Up! Designer Series Paper

Accessories:   Stampin’ Up! Sponges, Brayer, Basic Black Marker, White Gel Pen, Post it Notes

Want a free copy of the brand new Stampin’ Up! Holiday Mini Catalog?  Just e-mail your addreGet your copy of the new 2011-2012 Stampin’ Up! Idea Book & Catalog by sending $9.95 to me at P.O. box 116, West Alexandria, Ohio 45381 or via paypal to mzindorf@aim.com, shipping is free.      Are you getting inspiration from this blog?   One way you can help support it is to order your Stampin’ Up products through me.   Click HEREto place an order and have your ordered delivered directly to your door step from Stampin’ Up!    Want to become a Stampin’ Up Demonstrator , receive a 20% discount on product and earn instant income on orders?  Consider being part of my Stampin’ Up Team and start your own business or become a Hobby Demo just for the discount.  Click HERE for more information.

On a 4″ x 5″ piece of Whisper White brayered Baja Breeze ink at the top and bottom of the card stock.

Brayered Island Indigo at the top of the card stock.

Ripped the edge off of a post it note and used it as a mask for the ground area.

Stamped the Lovely as a Tree stamp twice using Island Indigo.

Sponged Island Indigo at the post it note edge.

Sponged a bit of Basic Black right at the post it note edge.

Removed the post it note mask and lightly sponged Basic Black under the horizon line.

Ripped a post it note in the shape of  a path.  Tried to rip as much from the sticky part of the post it note as possible.  Lightly Sponged Island Indigo in the ground area.

Removed the path mask.  Stamped the branches, bats and moon from the Out on a Limb set using Basic Black ink.  Colored in the Moon using a White Gel Pen.

Also, masked the bottom half of the ground with a post it note,  stamped the limb again using it as a tree with Basic Black ink. 

Distressed a piece of Designer Series paper and the edges of the main image panel using Basic Black ink.

Rubbed the On Board (Chip Board) Three & One on a Basic Black pad to color the front of them.

Using the Calendar Alphabet & Number set, stamped OCT using Basic Black ink.

Assembled my card adding two Basic Black panels and another Designer Series Paper panel.  Added a Basic Black marker line under the OCT.

Here is the finished card measuring 5″ x 6.5″.

May your walk in the woods be light and not so creepy, lol.

Until my next post I will be in Sunny Florida teaching some fabulous Women how to brayer. 

Have a great rest of the week.

Huge Hugs,

   Get ready for Brayer Workshops!  I am coming to the following locations, click the location name for more information.    

Leesburg, Florida       Sold Out 

Montreal, Wisconsin        

Savannah, Georgia 

Lincoln, Illinois    

Dayton, Ohio – Direct to Paper Workshops   

 Las Vegas, Nevada    

Austin, Texas 

Seattle, Washington

 Greeneville, Tennessee 

Indianapolis, Indiana 

Indiana, Pennsylvania 

Sparta, New Jersey 

Piedmont, Alabama

Post Falls, Idaho (outside of Coeurd’Alene)

 Sand Lake, Michigan (just North of Grand Rapids)

Lawrence, Kansas 

Longmont (Gunbarrel), Colorado 

Staley, North Carolina

 
Here is a link to my workshop calendar where you can see all of my travel schedule and to get info on beginner and advanced Brayer workshops, along with the newly added Direct to Paper Workshop: http://zindorf.blogs.splitcoaststampers.com/workshop-calendar        
 

Don’t see a workshop in your State?  Interested in hosting the workshops in your area   Click HERE to get hostess information.       
 

Link to my Stampin’ Up website where you can order all of your must have Stampin’ Up products from me 24-7:  http://michellezindorf.stampinup.net


Gently Falling – Tutorial #452

Hey All,

Are you ready for Autumn?  I think I am.   I find myself eyeing those sweaters in the dresser.   I’m always glad to get them out.  There is something comforting about them.   Sweaters are like old friends, don’t you think?    But, some of you are still in sweltering hot weather.  You will be the people rubbing it in when we are trudging through snow in the  winter, lol.   Here in Ohio, we are starting to see a bit of yellow in those green leaves on the trees.  Our maples will be bright yellow, orange and red in no time.   Leaf peeping season is not to far away, grin. . . .

I think you can tell by my creation today Autumn is on my mind and the new Stampin’ Up! set “Gently Falling” made quick work of  this card.   You can find this set in the Stampin’ Up! Holiday Mini Catalog (CLICK HERE TO VIEW IT).      Hang out and see how this card was put together.

Announcement before I get started:

I have added some wonderful place to my Workshop Calendar.  You will be able to catch my workshops in Dayton, Ohio,    Seattle, Washington and Post Falls, Idaho.   Click on the location to check out the details.  🙂

Reminder:

BIG SHOT – CUSTOMER GIVE AWAY. . . . . . DON’T MISS OUT!

Until October 31, 2011 you can get a chance to win a free brand new Big Shot Die Cut Machine worth $99.95 

How to enter. . . . Every person that orders Stampin’ Up! products through my Stampin’ Up Web Site (CLICK HERE TO SHOP) until October 31, 2011 will receive 1 entry for each $25 increment of products purchased.  So if you place a product order that totals $50 that is 2 chances to win!  How about those beans.   I love giving things away!  I will announce the winner on November 1, 2011. 

Let’s get started on that tutorial. . . . .

Supplies:

Stamps: Stampin’ Up! Gently Falling
Paper: Stampin’ Up! Whisper White, River Rock, Early Espresso and Soft Suede
Ink: Stampin’ Up! Marina Mist, River Rock, Soft Suede, So Saffron, Cherry Cobbler, Cajun Craze and Early Espresso
Accessories: Stampin’ Up! Gold Smooch, Big Shot Machine, Harlequin Texture Plate, Top Note Die, Color Spritzer, Stamp-a-ma-Jig, Brayer, Antique Brass Grommet, Gold Brads, Pumpkin Pie Crystal Brad


 Get your copy of the new 2011-2012 Stampin’ Up! Idea Book & Catalog by sending $9.95 to me at P.O. box 116, West Alexandria, Ohio 45381 or via paypal to mzindorf@aim.com, shipping is free.      Are you getting inspiration from this blog?   One way you can help support it is to order your Stampin’ Up products through me.   Click HEREto place an order and have your ordered delivered directly to your door step from Stampin’ Up!    Want to become a Stampin’ Up Demonstrator , receive a 20% discount on product and earn instant income on orders?  Consider being part of my Stampin’ Up Team and start your own business or become a Hobby Demo just for the discount.  Click HERE for more information.

Die cut from Whisper White card stock a Top Note using the Big Shot Die Cut Machine.

Starting from the edge of the card stock with the pad upside down and using circular motions added River Rock ink to the top note.

Starting from the edge of the card stock with the pad upside down and using circular motions added Marina Mist ink to the top note.

Starting from the edge of the card stock with the pad upside down and using circular motions added Soft Suede ink to the top note.

Using the Color Spritzer and a Soft Suede marker added speckles to the card stock.

Stamped the leaf using Soft Suede ink and stamping off once on my scrap paper (Second Generation stamping).

Using the fine point of a Basic Black marker, outlined just pieces of the leaves.

Loaded the leave stamp with So Saffron, patted a bit of Cajun Craze and Cherry Cobbler ink on the stamp.  Stamped the image on a scrap piece of Whisper White card stock.

Using a Stamp-a-ma-jig for placement, stamped the outline leaf usng Early Espresso ink.

Using my very sharp Stampin’ Up! paper snips, cut the leave out.

Added a bit of gold Smooch to the edge of the top note and the leaf.

Cut a 4.75″ square piece of Soft Suede card stock and texturized it using the Harequin texture plate and the Big Shot Machine.

Gently brayered Soft Suede ink on the texturized card stock to bring out the design a bit more.

Added a 4 7/8″ square Early Espresso panel and a 5.25″ River Rock panel.    Cut the Top Note in half and put half on each side of the card front.

Using the Crop o dile, added a large antique brass grommet and then put a Pumpkin Pie Crystal in the middle.

Added the leaf and 4 gold brads.  Here is the finished card measuring 5.25″ square.

May the sun be warming you face and the wind at your back.

Until my next post. . . .

Hugs,

   Get ready for Brayer Workshops!  I am coming to the following locations, click the location name for more information.    

Leesburg, Florida       Sold Out 

Montreal, Wisconsin        

Savannah, Georgia 

Lincoln, Illinois    

Dayton, Ohio – Direct to Paper Workshops   

 Las Vegas, Nevada   
 

Austin, Texas 

Seattle, Washington

 Greeneville, Tennessee
 

Indianapolis, Indiana
 

Indiana, Pennsylvania
 

Sparta, New Jersey
 

Piedmont, Alabama

Post Falls, Idaho (outside of Coeurd’Alene)

 Sand Lake, Michigan (just North of Grand Rapids)
 

Lawrence, Kansas
 

Longmont (Gunbarrel), Colorado
 

Staley, North Carolina

 
Here is a link to my workshop calendar where you can see all of my travel schedule and to get info on beginner and advanced Brayer workshops, along with the newly added Direct to Paper Workshop: http://zindorf.blogs.splitcoaststampers.com/workshop-calendar        
 

Don’t see a workshop in your State?  Interested in hosting the workshops in your area   Click HERE to get hostess information.       
 

Link to my Stampin’ Up website where you can order all of your must have Stampin’ Up products from me 24-7:  http://michellezindorf.stampinup.net

Stamps: Stampin’ Up! Gently Falling
Paper: Stampin’ Up! Whisper White, River Rock, Early Espresso and Soft Suede
Ink: Stampin’ Up! Marina Mist, River Rock, Soft Suede, So Saffron, Cherry Cobbler, Cajun Craze and Early Espresso
Accessories: Stampin’ Up! Gold Smooch, Big Shot Machine, Harlequin Texture Plate, Top Note Die, Color Spritzer, Stamp-a-ma-Jig, Brayer, Antique Brass Grommet, Gold Brads, Pumpkin Pie Crystal Brad

The Harvest – Tutorial #451

Note:  I have updated my items for sale page.  Click here to check it out or click “Items for Sale” at the top of the page.  Hugs!

Somebody, please, please help me!  I’m totally addicted to this new Stampin’ Up! set “Always Thankful” that can be found in the new Stampin’ Up! Holiday Mini Catalog.   This is a great set to do some coloring with.  Hang out and see how this card was created.

 You can check out the totally wonderful holiday stamps and accessories from Stampin’ Up! by CLICKING HERE.    Want a free copy of the Holiday Mini Catalog?  E-mail me at mzindorf@aim.com (include your mailing address in your e-mail, please) and I will get one out to you.    Please remember, you can order from me 24/7 by CLICKING HERE and your order will be shipped directly to your doorstep straight from Stampin’ Up!

ANNOUNCEMENT, ANNOUNCEMENT!   I want to let everyone know as of today, September 8, 2011 through October 31, 2011 you can get a chance to win a free brand new Big Shot Die Cut Machine worth $99.95.  If you don’t know what the big shot is all about, here is a link for you to drool over it, lol CLICK HERE.  Believe me you will want to win this Die Cut Machine!  

   Big Shot Die-Cut Machine - by Stampin' Up!  

How to enter. . . . Every person that orders Stampin’ Up! products through my Stampin’ Up Web Site (CLICK HERE TO SHOP) until October 31, 2011 will receive 1 entry for each $25 increment of products purchased.  So if you place a product order that totals $50 that is 2 chances to win!  How about those beans.   I love giving things away!

I will announce the winner on November 1, 2011.  I hope you can get excited about that, I am.

Now let’s start today’s tutorial. . . .

Supplies:

Stamps: Stampin’ Up! Always Thankful
Paper: Stampin’ Up! Whipser White, Cherry Cobbler and Soft Suede
Ink: Stampin’ UP! Soft Suede, Tempting Turquoise,Cherry Cobber and Stazon Jet Black
Accessories: Stampin’ Up! Sponge, Brayer, Sprtizer, Gumbo Grommet, Clear Circle Die, Big Shot Machine, Fancy Fan Letter Press, Square Lattice Embossing Folder, Stampin’ Up Markers, White Ribbon, Whisper White Ribbon, White and Silver Gel Pens, Post it Note
Techniques: Brayering, Masking

Cut a large Circle out of Whisper White card stock the Clear Circle die and the Big Shot Machine.

Brayered Tempting Turquoise ink at the top of the card stock.

Brayered Soft Suede ink at the bottom of the card stock.

Stamped the Always Thankful stamp using Jet Black StazOn ink.

Masked the top of the card stock using a post it note and sponged Soft Suede ink at the post it note edge to create a field line.

Keep moving the post it note mask down a bit and sponge to create the rest of the field lines.

Colored the pumpkins in using a More Mustard marker.

Colored the squash and corn in using a Daffodil Delight marker.

Colored the bottom of the pumpkins in using a Pumpkin Pie Marker.

Colored the leaves and stems in using an Old Olive marker.

Colored in the wheel using Sahara Sand marker.

Colored the wood handles in using a Crumb Cake Marker.

Added White Gel Pen to the flowers and Silver Gel pen to the center of the wheel.

Colored the Wheel Barrel in using a Real Red marker.  Added Cherry Cobbler marker to the bottom of the wheel barrel.

Added Cajun Craze marker to the very bottoms of the pumpkins.

Added Chocolate Chip marker to the bottom of the wood rails, the wheel barrel and the ground.

Using the Spritzer and a Chocolate Chip marker, added speckles to the ground area.

Embossed a 6.25″ x 2″ piece of Soft Suede Card stock using the Big Shot Machine and the Square Lattice Embossing Folder.

Inked up the Fancy Fan Letterpress with Cherry Cobbler ink and put a 4.75″ x 6.25″ piece of Cherry Cobbler card stock on top of it.  You can run this through the Big Shot Machine, but I wanted it to be a little lighter in color so I just used my Brayer and rolled over the back side of the card stock to transfer the color onto it.

Assembled the card by adding a 5″ x 6.5″ piece of Soft Suede card stock, Whisper White Ribbon, silver brads and Jumbo Grommet.

Here is the finished card measuring 5″ x 6.5″

May your day be full of Blue skies and soft breezes.

Until my next post. . . . .

Hugs,

   Get ready for Brayer Workshops!  I am coming to the following locations, click the location name for more information.    

Dayton, Ohio     Sold Out

Leesburg, Florida       Sold Out

Montreal, Wisconsin       

Savannah, Georgia       

Lincoln, Illinois       

Las Vegas, Nevada   

Austin, Texas 

Greeneville, Tennessee

Indianapolis, Indiana

Indiana, Pennsylvania

Sparta, New Jersey

Piedmont, Alabama

Sand Lake, Michigan (just North of Grand Rapids)

Lawrence, Kansas

Longmont (Gunbarrel), Colorado

Staley, North Carolina

Here is a link to my workshop calendar where you can see all of my travel schedule and to get info on beginner and advanced Brayer workshops, along with the newly added Direct to Paper Workshop: http://zindorf.blogs.splitcoaststampers.com/workshop-calendar        

Don’t see a workshop in your State?  Interested in hosting the workshops in your area   Click HERE to get hostess information.       

Link to my Stampin’ Up website where you can order all of your must have Stampin’ Up products from me 24-7:  http://michellezindorf.stampinup.net


Grateful – Tutorial #450


Hey There,

I hope you had the best Labor Day weekend ever.  I took some time off to go fishing and time just to relax and recharge.    Now I have my battery all reved up again and I’m ready to create.     So today I picked one of the brand new Stampin’ Up! sets out of the New Holiday Mini Catalog  “Always Thankful”.  Beautiful, beautiful images in this new set.    

You can check out the totally wonderful holiday stamps and accessories from Stampin’ Up! by CLICKING HERE.    Want a free copy of the Holiday Mini Catalog?  E-mail me at mzindorf@aim.com (include your mailing address in your e-mail, please) and I will get one out to you.    Please remember, you can order from me 24/7 by CLICKING HERE and your order will be shipped directly to your doorstep straight from Stampin’ Up!

I pulled out a technique I haven’t used in a very long time, I used a credit card and a reinker to smear on the wood looking background.  Hang out a moment and check it out.

Let’s get started. . . .  .

Supplies:

Stamps: Stampin’ Up! Always Thankful
Paper: Stampin’ Up! Whisper White, Early Espresso, River Rock and Cajun Craze
Ink: Stampin’ UP! Basic Black, Old Olive and a River Rock re-inker
Accessories: Stampin’ UP! sponges, ruler, Harlequin Texture Plate, Big Shot Machine, Antique Brads, Markers (River Rock, Pumpkin Pie, More Mustard and Old Olive), word window punch, post it notes
Techniques: Faux Woodgrain

Get your copy of the new 2011-2012 Stampin’ Up! Idea Book & Catalog by sending $9.95 to me at P.O. box 116, West Alexandria, Ohio 45381 or via paypal to mzindorf@aim.com, shipping is free.      Are you getting inspiration from this blog?   One way you can help support it is to order your Stampin’ Up products through me.   Click HEREto place an order and have your ordered delivered directly to your door step from Stampin’ Up!    Want to become a Stampin’ Up Demonstrator , receive a 20% discount on product and earn instant income on orders?  Consider being part of my Stampin’ Up Team and start your own business or become a Hobby Demo just for the discount.  Click HERE for more information.

Cut a 3.5″ x 5″ piece of Whisper White card stock and masked the bottom of the card stock with a post it note (masked the ground area).

Put some River Rock re-inker on a non-stick sheet and dipped the edge of a credit card and swiped the edge of the credit card down the card stock, starting at the top.  Did this lightly in order to leave some white card stock showing through.

Using a ruler and a River Rock marker, made lines for the boards.

Removed the ground mask and sponged Old Olive ink in the ground area.

Stamped the Always Thankful image using Basic Black ink.

Colored the wheat More Mustard marker the jug Pumpkin Pie marker.

Colored the shadow side of the jug (right side) using a Cajun Craze marker.

Colored the grasses around the base of the jug using an Old Olive marker.

Lightly sponged a bit of Basic Black ink at the bottom of the card stock.

Sponged Basic Black ink around the edges of the card stock.

Added a shadow under the stamp image using a River Rock marker.

Stamped the Always Thankful sentiment “Grateful” 3 times using Basic Black ink.

Used a Big Shot Texture plate “Harlequin” on a 4.75″ x 6.25″ piece of Cajun Craze card stock.

Punched two Word Window Punches from Early Espresso card stock and then held them together and cut the end off of the punches.

Assembled the card adding 2 Early Espresso panels and 1 River Rock panel.  Also added two Antique brads.

Here is the finished card measuring 5″ x 6.5″.

May you have a day filled with things you are grateful for.

Until my next post. . . .  . .

Hugs,

   Get ready for Brayer Workshops!  I am coming to the following locations, click the location name for more information.    

Dayton, Ohio     Sold Out

Leesburg, Florida       Sold Out

Montreal, Wisconsin       

Savannah, Georgia       

Lincoln, Illinois       

Las Vegas, Nevada   

Austin, Texas 

Greeneville, Tennessee

Indianapolis, Indiana

Indiana, Pennsylvania

Sparta, New Jersey

Piedmont, Alabama

Sand Lake, Michigan (just North of Grand Rapids)

Lawrence, Kansas

Longmont (Gunbarrel), Colorado

Staley, North Carolina

Here is a link to my workshop calendar where you can see all of my travel schedule and to get info on beginner and advanced Brayer workshops, along with the newly added Direct to Paper Workshop: http://zindorf.blogs.splitcoaststampers.com/workshop-calendar        

Don’t see a workshop in your State?  Interested in hosting the workshops in your area   Click HERE to get hostess information.       

Link to my Stampin’ Up website where you can order all of your must have Stampin’ Up products from me 24-7:  http://michellezindorf.stampinup.net


Cat in the Pumpkin – Tutorial #449

Hey There,

First of all, thank you, thank you to all of you that sent me birthday wishes via cards, blog comments, facebook comments, e-cards, e-mails etc.  Wow!  you really made my birthday a very special day.  My readers/friends, you all know your friends, right?  You all ROCK!

I have another cat card for you today.  This one is a bit more involved than my last post, grin.  This one was more fun for me.  I love to make a scene in more ways than one, lol.  By layering the images in this scene it gave it quite a bit of depth. 

One thing before I start the tutorial, the new Stampin’ Up! Holiday Mini Catalog period has started.  Have you seen it?  I had to purchase just about everything in it.  It’s one of  Stampin’ UP’s best minis in my opinion.  You can check out the totally wonderful holiday stamps and accessories by CLICKING HERE.    Want a free copy of the Holiday Mini Catalog?  E-mail me at mzindorf@aim.com (include your mailing address in your e-mail, please) and I will get one out to you.    Please remember, you can order from me 24/7 by CLICKING HERE and your order will be shipped directly to you from Stampin’ Up!

Let’s get started on the tutorial. . . . .

Supplies:

 
Stamps: Stampin’ Up! Jack of All Trades, “C” is for Cat and Season of Friendship
Paper: Stampin’ Up! Whisper White, Basic Black, Old Olive and Perfect Plum
Ink: Stampin’ Up! Basic Black, More Mustard, Cajun Craze, Old Olive, Elegant Eggplant, Perfect Plum and Tempting Turquoise
Accessories: Stampin’ Up! White Gel Pen, Cajun Craze and Old Olive Markers, Brayer, 2.5″ Circle and 1″ Square punches
Techniques: Masking and Brayering


Get your copy of the new 2011-2012 Stampin’ Up! Idea Book & Catalog by sending $9.95 to me at P.O. box 116, West Alexandria, Ohio 45381 or via paypal to mzindorf@aim.com, shipping is free.      Are you getting inspiration from this blog?   One way you can help support it is to order your Stampin’ Up products through me.   Click HEREto place an order and have your ordered delivered directly to your door step from Stampin’ Up!    Want to become a Stampin’ Up Demonstrator , receive a 20% discount on product and earn instant income on orders?  Consider being part of my Stampin’ Up Team and start your own business or become a Hobby Demo just for the discount.  Click HERE for more information.

Punched a 2.5″ circle from a post it note and used it to mask my moon by putting it on a 3.5″ x 4.5″ piece of Whisper White card stock.

Brayer Tempting Turquoise ink at the top left corner of the card stock at an angle.

Brayered Perfect Plum in and then Elegant Eggplant ink at an angle on the bottom right corner of the card stock.

Stamped the Season of Friendship tree using Basic Black ink.

Stamp a few Season of Friendship Leaves using Cajun Craze ink.

On a scrap piece of Whisper White card stock, stamp the Jack of All Trades Pumpkin by loading the stamp with More Mustard ink and then patted the Cajun Craze ink pad on the stamp so the left side of the image comes out shadowed.  Note:  you will put the Cajun Craze ink on the left side of the stamp to have it come out on the right side of the image.  Clear as mud?  LOL

Stamp the Jack of All Trades face on the pumpkin using Basic Black ink.

Cut the pumpkin out and then cut a piece off of the top.  Keep the small piece you cut off.

Stamp the “C” is for Cat, cat using Basic Black ink 1″ from othe bottom of the card stock.

Color in the cat’s eye and collar in with a White Gel Pen.

Added a 4″ x 5.5″ Basic Black panel.  Take a 4″ wide piece of Old Olive card stock and rip the top of it and then adhere it to the card stock so that it comes up to the bottom of the tree.

Adhere the pumpkin on.

Added a 4″ wide piece of Basic Black card stock that has been ripped on the top edge.  Have it come past the bottom of the pumpkin a little bit.

Added the pumpkin lid.

Stamp the stem on top of the lid using Basic Black ink.

Stamp the vine using Old Olive ink and then color it in using Old Olive marker.  Add a bit more shadow to the lid’s bottom, pumpkin’ s right side and bottom and to the bottom of the leaves using Cajun Craze marker.  Also add a bit of Cajun Craze marker to the sides of the cat and have it met the pumpkin edge.

Add White Gel pen highlights to the leaves, Pumpkin rim, Pumpkin’s mouth, lid stem and vine.

Added a 5″ x 6.5″ Basic Black panel, 4.75″ x 6.25″ Perfect Plum Panel and two 1″ Basic Black square punches.

Here is the finished card measuring 5″ x 6.5″.

May your day be filled with fun surprises.

Until my next post. . . . .

Hugs,

Michelle

   Get ready for Brayer Workshops!  I am coming to the following locations, click the location name for more information.    

Dayton, Ohio     Sold Out

Leesburg, Florida       Sold Out

Montreal, Wisconsin       

Savannah, Georgia       

Lincoln, Illinois       

Las Vegas, Nevada   

Austin, Texas 

Greeneville, Tennessee

Indianapolis, Indiana

Indiana, Pennsylvania

Sparta, New Jersey

Piedmont, Alabama

Sand Lake, Michigan (just North of Grand Rapids)

Lawrence, Kansas

Longmont (Gunbarrel), Colorado

Staley, North Carolina

Here is a link to my workshop calendar where you can see all of my travel schedule and to get info on beginner and advanced Brayer workshops, along with the newly added Direct to Paper Workshop: http://zindorf.blogs.splitcoaststampers.com/workshop-calendar        

Don’t see a workshop in your State?  Interested in hosting the workshops in your area   Click HERE to get hostess information.       

Link to my Stampin’ Up website where you can order all of your must have Stampin’ Up products from me 24-7:  http://michellezindorf.stampinup.net


Peace – Tutorial #448

Hey There,

I have a peaceful scene for you today that highlights a stamp from the Stampin’ Up! set Pocket Silhouettes.   The Pocket Silhouettes set is a must have for those foreground plants.  You can shop for Stampin’ Up! products 24/7 using my Stampin’ Up! web site, CLICK HERE.  Your order will be shipped right to your door step Stampin’ Up!.  Reminder, only 2 days left to order from the Stampin’ Up! Summer Mini Catalog.  Going, Going, Going, Gone!  The new Stampin’ Up! Holiday Mini Catalog starts September 1, 2011.  Want a free copy?  E-mail me at mzindorf@aim.com (include your mailing address in your e-mail, please) and I will get one out to you.

Before we get started on today’s tutorial I want to announce the winner of the Stampin’ Up! set Day of Gratitude.   The random number generator picked . . .  . . . . .drumroll. . . . . . .  . . . .

Leanne Durand who wrote “Golly, I would be Full of Gratitude if I was selected as the winner of the Day of Gratitude stamp set. Lovely set of stamps. I hope I win, I hope I win, I hope I win……..”

Leanne, you got your wish, congratulations!!   Please e-mail your mailing address to mzindorf@aim.com within 30 days and I will get this set in the mail to you.  🙂

Thanks everyone for playing along.  Keep playing, because you cannot win if you don’t take just a moment to enter.

Now let’s get started on that tutorial. . . .

Supplies:


Stamps: Stampin’ Up! Pocket Silhouettes and Teeny Tiny Words
Paper: Stampin’ Up! Whisper White, Blushing Bride and Basic Black
Ink: Stampin’ Up! Wistera Wonder, Basic Black, Blushing Bride
Accessories: Stampin’ Up! Sponge, Brayer, Punches (Dotted Scallop Ribbon Border, 1/2″ circle, Word Window, Modern Label), Silver Brads, Post it notes
Techniques: Brayering, masking

Get your copy of the new 2011-2012 Stampin’ Up! Idea Book & Catalog by sending $9.95 to me at P.O. box 116, West Alexandria, Ohio 45381 or via paypal to mzindorf@aim.com, shipping is free.   Want a free copy of the new Stampin’ Up! Holiday Mini Catalog ?  E-mail your mailing address to mzindorf@aim.com and I will get one in the mail to you.   Are you getting inspiration from this blog?   One way you can help support it is to order your Stampin’ Up products through me.   Click HERE to place an order.    Want to become a Stampin’ Up Demonstrator , receive a 20% discount on product and earn instant income on orders?  Consider being part of my Stampin’ Up Team and start your own business or become a Hobby Demo just for the discount.  Click HERE for more information.

Brayered Blushing Bride ink on the top and bottom of a 3.5″ x 4.5″ piece of Whisper White card stock.

Brayered Wistera Wonder ink at the bottom and top of the card stock.

Stamped the Stampin’ Up! Pocket Silhouette Plant stamp using Basic Black ink.

Masked the bottom of the card stock using a post it note.

Ripped the edge off of another post it note and masked the sky with it.

Sponged Basic Black ink between the two masks to create the islands in the distances.

Ripped another post it note and used it as a mask in order to create the rocks in the foreground.

Sponged Basic Black ink in the unmasked area at the bottom of the card stock.

Punched a 1/2″ circle in a post it note.  Put the post it note on the card stock so the hole is in the sky.  Put the punched out circle on top of that creating a crescent moon shape.  Sponged Basic Black ink in the crescent shape opening.

Punched a 5″ strip of Blushing Bride card stock.  Also punched a label from Basic Black card stock.

Stamped my sentiment on a piece of Blushing Bride card stock using Basic Black ink.  Then punched it out using a Word Window punch.

Assembled my card be adding 2 Basic Black panels, 1 Blushing Bride panel and 2 silver brads.

May your day be full of peace and harmony.

Until my next post. . . . . .  .

   Get ready for Brayer Workshops!  I am coming to the following locations, click the location name for more information.    

Dayton, Ohio     Sold Out

Leesburg, Florida       Sold Out

Montreal, Wisconsin       

Savannah, Georgia       

Lincoln, Illinois       

Jefferson, Louisiana (New Orleans Area)    

Las Vegas, Nevada   

Austin, Texas 

Greeneville, Tennessee

Indianapolis, Indiana

Indiana, Pennsylvania

Sparta, New Jersey

Piedmont, Alabama

Sand Lake, Michigan (just North of Grand Rapids)

Lawrence, Kansas

Longmont (Gunbarrel), Colorado

Staley, North Carolina

Here is a link to my workshop calendar where you can see all of my travel schedule and to get info on beginner and advanced Brayer workshops, along with the newly added Direct to Paper Workshop: http://zindorf.blogs.splitcoaststampers.com/workshop-calendar        

Don’t see a workshop in your State?  Interested in hosting the workshops in your area   Click HERE to get hostess information.       

Link to my Stampin’ Up website where you can order all of your must have Stampin’ Up products from me 24-7:  http://michellezindorf.stampinup.net