Rooster Weathervane – Tutorial #427


Howdy!   I’ve had this little country creation rattling around in my head for almost a week now.  Thought it was time to get it on card stock and share it with you.  But first, another segment of Stampin’ Up! Alaska cruise pics.  🙂

 Myself and my friend and fellow demonstrator, Kristin Kortonick sporting our Stampin’ Up! cruise jackets while viewing the icy Hubbard Glacier. 

Everyone had to wake early in the morning not to miss the wonders as the ship approached the Glacier. 

So here we are out on deck in the early morning looking at the mountains with fog circling their tops and icy blue chunks of ice floating by.  It was amazing!

You can see the Glacier in between the two mountains in the pics below.


 Already the largest tidewater glacier in North America, Hubbard Glacier continues to press forward each year. This one of Alaska’s more than 5,000 glaciers has a recorded fastest speed of just less than 5.5 feet per hour.

Below are some more pics of other views from that morning.


Now, I hear that Rooster crowing.  Time to get on with today’s tutorial.

Supplies:

Stamps: Stampin’ Up! Countryside
Paper: Stampin’ Up! Basic Black, Whisper White, Cajun Craze and Designer Series Paper
Ink: Stampin’ Up! More Mustard, Pumpkin Pie, Cajun Craze and Bravo Burgundy
Accessories: Stampin’ Up! Sponge, Spinner, brad, Pumpkin Pie Ribbon, Mat Pack, Piercing Tool, Brayer, 1 3/4″ circle Punch, Post it note, Decorative Label Punch, Basic Black marker, White Gel Pen
Techniques: Brayering, masking, silhouette, faux stitching


  The Stampin’ Up USA Idea book and Catalog is here.   For your copy, please send a check for $9.95 to Michelle Zindorf, P.O. Box 116, West Alexandria, OH 45381 or send it via paypal to mzindorf@aim.com USA only.     My current customers will receive a new  Summer Mini Catalog automatically from me.   Not a current customer and want a free copy of the new Summer Mini Catalog ?  E-mail your mailing address to mzindorf@aim.com and I will get one in the mail to you.  )  Are you getting inspiration from this blog?   One way you can help support it is to order your Stampin’ Up products through me.   Click HERE to place an order.    Want to become a Stampin’ Up Demonstrator , receive a 20% discount on product and earn instant income on orders?  Consider being part of my Stampin’ Up Team and start your own business or become a Hobby Demo just for the discount.  Click HERE for more information.

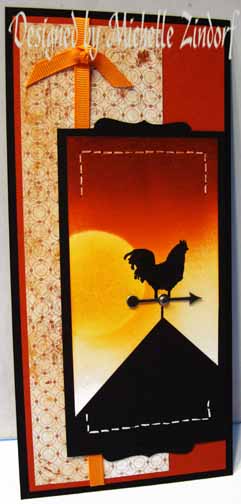
On a 2.75″ x 5.5″ piece of Whisper White card stock, masked the sun using a 1 3/4″ circle punched from the sticky part of a post it note. 

Brayered Pumpkin Pie on the top of the card stock.

Brayered Cajun Craze ink at the top of the card stock.

Brayered Bravo Burgundy ink at the top of the card stock.

Removed the circle mask and sponged More Mustard ink in the sun shape.

Stamped the rooster from the Stampin’ Up! Countryside set by coloring just the rooster in on the stamp using a Basic Black marker.  I omitted the grassy area of the stamp.

Colored in the image using the Basic Black marker.  This created a silhouette.

Added a Stampin’ Up! spinner and brad, drew the legs of the rooster down to meet the spinner using the Basic Black marker.

Cut a piece of Basic Black card stock in a square.  Angled it and glued it on the card stock.

Flipped the main image panel over on my cutter and cut the square piece of card stock off to make it even with my main image panel edges.

Cut a 3″ x 5.75″ piece of Basic Black card stock.   Also punched a label punch out of Basic Black card stock.  Cut the label in half and glued each half to the bottom and top of the Basic Black panel.

Added another Basic Black panel, Cajun Craze panel, designer series paper and a piece of Pumpkin Pie ribbon.

Using a piercing tool and mat pack, pierced holes in the top and bottom of the main image panel.

Drew white gel pen lines between the pierced holes to create faux stitching.

Here is the finished project measuring 4″ x 8.5″.

May your day be something to crow about!

I’m off to prepare for my Colorado Springs, CO brayer workshops, Whoohooo!

Until my next post. . . . . .

Hugs,

Michelle

   Get ready for Brayer Workshops!  I am coming to the following locations, click the location name for more information.    
 

Ottumwa, Iowa       

Owings Mills, Maryland (Baltimore Area)      

Cleveland (Euclid), Ohio       

Staley , North Carolina (South of Greensboro)       

Monroe, Connecticut       

Dayton, Ohio     

Leesburg, Florida       

Montreal, Wisconsin       

Savannah, Georgia       

Lincoln, Illinois       

Jefferson, Louisiana (New Orleans Area)       

Here is a link to my workshop calendar where you can see all of my travel schedule and to get info on beginner and advanced Brayer workshops:   http://zindorf.blogs.splitcoaststampers.com/workshop-calendar        

Don’t see a workshop in your State?  Interested in hosting the workshops in your area in 2012?   Click HERE to get hostess information.       

Link to my Stampin’ Up website where you can order all of your must have Stampin’ Up products from me 24-7:  http://michellezindorf.stampinup.net   

 Link to my Scentsy website where you can order the best smelling, safest wickless candles from me 24-7:  https://zindorf.scentsy.us/Home


Escape – Tutorial #426

I have a little tropical number for you today teaming up the Stampin’ Up! stamp sets Uncharted Territory and Plant Hope.  But first, as promised, I have some more photos from my Stampin’ Up! all expense paid cruise that I earned and just got back from. 

My trip started out by being flown to Seattle, Washington.   Russ and I arrived in Seattle the morning of the cruise so we didn’t get to hang out in Seattle very long, rats!  I’ll have to plan that a bit differently my next trip.

We boarded the Celebrity Infinity Cruise Ship and made ourselves at home.  That’s me chilling on our room balcony.   The balcony was pure heaven.  One morning I was out there and low and behold there was an Orca not far from the ship showing us his magnificent spout and tail.   I couldn’t pull myself way from the railing in order to grab my camera.  I was just to in awe to move.


Seriously, one of the major highlights of the trip was to get to hang out with Stampin’ Up! CEO, Shelli Gardner and the Vice President of Demonstrator Relations at Stampin’ Up!, Pam Morgan a bit.   

Pam Morgan somehow escaped our camera the entire trip, but she is just the warmest most wonderful person ever, so I wanted to mention her and how much I enjoyed getting some time with her.

Poor Shelli, Russ and I just returned from our fishing excursion when we got this photo op with Shelli.   I’m sure she was wondering why we smelled like fish and camp fire.   Really Shelli, Russ and I don’t always smell bad, lol.


I will have more about our trip in later posts.

Now let’s get on with today’s tutorial. . .  . . . .

Supplies:

Stamps: Stampin’ Up! Uncharted Territory & Plant Hope
Paper: Stampin’ Up! Whisper White, Basic Black and Melon Mambo
Ink: Stampin’ Up! Tempting Turquoise, Not Quite Navy, Always Artichoke, Basic Black, So Saffron, Melon Mambo & Rich Razzelberry
Accessories: Stampin’ Up! Sponges, Brayer, Always Artichoke & Basic Black markers, Silver and White Gel Pens, Post it notes, Big Shot Machine, Naturally Serif Alphabet Die, Linen Thread, Stampin’ Dimensionals
Techniques: Brayering, Masking

 The Stampin’ Up USA Idea book and Catalog is here.   For your copy, please send a check for $9.95 to Michelle Zindorf, P.O. Box 116, West Alexandria, OH 45381 or send it via paypal to mzindorf@aim.com USA only.     My current customers will receive a new  Summer Mini Catalog automatically from me.   Not a current customer and want a free copy of the new Summer Mini Catalog ?  E-mail your mailing address to mzindorf@aim.com and I will get one in the mail to you.  )  Are you getting inspiration from this blog?   One way you can help support it is to order your Stampin’ Up products through me.   Click HERE to place an order.    Want to become a Stampin’ Up Demonstrator , receive a 20% discount on product and earn instant income on orders?  Consider being part of my Stampin’ Up Team and start your own business or become a Hobby Demo just for the discount.  Click HERE for more information.

Cut a 3.5″ x 7.5″ piece of Whisper White card stock and brayered So Saffron ink at the top.

Brayered Melon Mambo ink at the top of the card stock, not covering the So Saffron entirely.

Brayered a bit of Rich Razzelberry ink right at the top of the card stock.

Masked the sky with post it notes and brayered Tempting Turquoise ink at the bottom of the card stock.

Brayered Not Quite Navy ink at the top of the water area.

Unmasked the water and put a new post it note mask just under the horizon line.  Sponged Always Artichoke ink on to create an island.

Stamped the palm tree by coloring in the leaves on the stamp with Always Artichoke marker and the trunk with Basic Black marker.

Sponged Basic Black ink at the post it note edge to darken the bottom of the island.

Stamped the boat by coloring in the image on the rubber stamp, omitting the sun using Basic Black marker.

Colored in the Boat base using Basic Black marker, the sail and rope with a White Gel Pen and the pole with a Silver metallic gel pen.

Darkened some of the leave of the palm tree using an Always Artichoke marker.  Colored in the trunk of the tree with a Basic Black marker and added White Gel pen highlights to the tree using a White Gel Pen.

Cut to 0.5″ x 7.5″ strips of card stock.  One from Tempting Turquoise and one from Whisper White.

Ripped the edge from the Tempting Turquoise strip and smeared it across a Not Quite Navy ink pad to darken the ripped edge.

Glued the Whisper White card stock strip to the back of the Tempting Turquoise strip and tor the edge of the card stock so it was just showing above the Tempting Turquoise strip.

Glued the strips to the main image panel.  Added a Basic Black panel behind the main image panel.  Added linen thread that I tied knots in, wrapping it around the panels.  Added a Melon Mambo panel and Basic Black panel.   Popped the main image panel up using Stampin’ Dimensionals.

Cut out the sentiment using my Big Shot Machine and the Naturally Serif Alphabet.

Here is the finished card measuring 4″ x 8.5″.

I hope you get a little time to escape and enjoy yourself.

Until my next post. .  . . . .

Hugs,

Michelle

   Get ready for Brayer Workshops!  I am coming to the following locations, click the location name for more information.    
 

Ottumwa, Iowa       

Owings Mills, Maryland (Baltimore Area)      

Cleveland (Euclid), Ohio       

Staley , North Carolina (South of Greensboro)       

Monroe, Connecticut       

Dayton, Ohio     

Leesburg, Florida       

Montreal, Wisconsin       

Savannah, Georgia       

Lincoln, Illinois       

Jefferson, Louisiana (New Orleans Area)       

Here is a link to my workshop calendar where you can see all of my travel schedule and to get info on beginner and advanced Brayer workshops:   http://zindorf.blogs.splitcoaststampers.com/workshop-calendar        

Don’t see a workshop in your State?  Interested in hosting the workshops in your area in 2012?   Click HERE to get hostess information.       

Link to my Stampin’ Up website where you can order all of your must have Stampin’ Up products from me 24-7:  http://michellezindorf.stampinup.net   

 Link to my Scentsy website where you can order the best smelling, safest wickless candles from me 24-7:  https://zindorf.scentsy.us/Home

Stamps: Stampin’ Up! Uncharted Territory & Plant Hope
Paper: Stampin’ Up! Whisper White, Basic Black and Melon Mambo
Ink: Stampin’ Up! Tempting Turquoise, Not Quite Navy, Always Artichoke, Basic Black, So Saffron, Melon Mambo & Rich Razzelberry
Accessories: Stampin’ Up! Sponges, Brayer, Always Artichoke & Basic Black markers, Silver and White Gel Pens, Post it notes, Big Shot Machine, Naturally Serif Alphabet Die, Linen Thread, Stampin’ Dimensionals
Techniques: Brayering, Masking

Lovely Reflection – Tutorial #425

Hello there, I hope you had a wonderful holiday weekend.   

My weekend was very productive and I got to spend the holiday with family.  Which always rocks!

Now, I know I didn’t get to chat up the Alaskan cruise Russ and I just returned from so I am going to give you segments of it over the next week, along with some card tutorials.  How does that sound?

I’m going to start by telling you about the amazing fishing that we did in Alaska.  We started out with our guide outfitting us in waders, slickers, boots, gloves, hats and most importantly, life vests.  There were four of us, plus our guide in the boat.   We went out to fish in scenery that almost makes you cry when you look at it.  It was soooooo beautiful.  

Picture it, here you are in a boat, catching fish, beautiful scenery all around you and then an American Bald Eagle starts circling your boat looking for a free fish to eat.   Well folks we lived it.


How about that action shot of Russ below.  🙂  He is my hero, but you need to know that yours truly caught the first fish.  🙂


Our boat mates, Tish & Mark were a delight to spend the day with.     Below is a shot of Tish and I.    Hey Tish, if you see this e-mail me.  🙂

After catching our 8 fish, we headed to a little island where they had a camp fire a blaze for us.   We got to sit by the warm fire sipping hot coffee and warm cocoa while our guide cleaned our catch.


Our fish was then cooked to perfection and served to us.  To top it off we had bread pudding for desert.    It was the best food I have ever tasted, I swear!  I’m not sure if it was because the fish was so fresh, if it was the warm fire and scenery or the wonderful company we were with, but it was perfect.


Now let’s get started on today’s tutorial. . . . . .  . . .I have missed stamping!

Supplies:

Stamps: Stampin’ Up! Lovely as a Tree, Day of Gratitude
Paper: Stampin’ Up! Basic Black, Whisper White, River Rock and Designer Series paper
Ink: Stampin’ Up! River Rock, Basic Black and Sahara Sand
Accessories: Stampin’ Up! Sponges, Basic Black Satin Ribbon, Big Shot Machine, 3.75″ circle die, Scallop Circle Die, Stamp-a-ma-jig, post it notes and Brads

The Stampin’ Up USA Idea book and Catalog is here.   For your copy, please send a check for $9.95 to Michelle Zindorf, P.O. Box 116, West Alexandria, OH 45381 or send it via paypal to mzindorf@aim.com USA only.     My current customers will receive a new  Summer Mini Catalog automatically from me.   Not a current customer and want a free copy of the new Summer Mini Catalog ?  E-mail your mailing address to mzindorf@aim.com and I will get one in the mail to you.  )  Are you getting inspiration from this blog?   One way you can help support it is to order your Stampin’ Up products through me.   Click HERE to place an order.    Want to become a Stampin’ Up Demonstrator , receive a 20% discount on product and earn instant income on orders?  Consider being part of my Stampin’ Up Team and start your own business or become a Hobby Demo just for the discount.  Click HERE for more information.

Started this project by die cutting a 3.75″ circle out of Whisper White card stock using my Big Shot Machine.

Ripped a post it note and used it to mask the top of the circle.

Sponged River Rock ink in the mountain shape.

Turned the ripped post it note around and masked the bottom of the circle.  sponged River Rock ink in for the reflection.

Removed the torn post it note mask and added a straight edge post it note at the middle of the card stock.

Stamped the Lovely As a Tree stamp on both sides of the card stock using Sahara Sand ink.

Sponged Sahara Sand ink at the post it note edge.

Moved the post it note mask to cover the top of the post it note and stamped the trees on a Stamp-a-ma-jig plastic sheet using Sahara Sand ink and flipped the plastic sheet over and rubbed the back of the plastic to transfer the image. 

Repeated

Sponged Sahara Sand ink at the post it note edge.

Repeated all the stamping and sponging again using Basic Black ink on both the and bottom of the card stock.

Die cut the Scallop Circle from Basic Black card stock using my Big Shot Machine.

Cut a 4.75″ x 6.25″ River Rock card stock panel.   Stamped the flowers from the Day of Gratitude stamp set using Basic Black ink along the long edges.

Added 2 Basic Black panels, 1 Designer Series paper panel, Basic Black ribbon and 4 brads.

Here is my finished card measuring 5″ x 6.5″.

May your day be overflowing with everything you want.

Until my next post. . . . .  .

Hugs,

Michelle

   Get ready for Brayer Workshops!  I am coming to the following locations, click the location name for more information.    
 

Ottumwa, Iowa       

Owings Mills, Maryland (Baltimore Area)      

Cleveland (Euclid), Ohio       

Staley , North Carolina (South of Greensboro)       

Monroe, Connecticut       

Dayton, Ohio     

Leesburg, Florida       

Montreal, Wisconsin       

Savannah, Georgia       

Lincoln, Illinois       

Jefferson, Louisiana (New Orleans Area)       

Here is a link to my workshop calendar where you can see all of my travel schedule and to get info on beginner and advanced Brayer workshops:   http://zindorf.blogs.splitcoaststampers.com/workshop-calendar        

Don’t see a workshop in your State?  Interested in hosting the workshops in your area in 2012?   Click HERE to get hostess information.       

Link to my Stampin’ Up website where you can order all of your must have Stampin’ Up products from me 24-7:  http://michellezindorf.stampinup.net   

 Link to my Scentsy website where you can order the best smelling, safest wickless candles from me 24-7:  https://zindorf.scentsy.us/Home


Water Lilies – Tutorial #424 & Blog Candy Give Away

Hello, hello, hello!  Today’s tutorial features the Stampin’ Up! Level 2 Hostess set “Fast & Fabulous”.  This is also the stamp set that I am giving away as blog candy!!!  Woohoo!

All you have to do to enter for a chance to win this Fabulous stamp set is leave a comment on this blog post telling me to enter you.    If you are getting this blog post via e-mail, please click here and then leave a comment at the bottom of the actual blog post.

I will select the winner using a random number generator on May 29, 2011.  Remember you have to enter to win!   Good luck to all.

Now let’s get started on the tutorial. . . .  .

Supplies:

Stamps: Stampin’ Up! Fast & Fabulous
Paper: Stampin’ Up! Always Artichoke, Old Olive, Melon Mambo, Basic Black, Marina Mist, Not Quite Navy and Night of Navy
Ink: Stampin’ Up! Whisper White, Always Artichoke, Marina Mist and Not Quite Navy
Accessories: Stampin’ Up! Sponge, Pear Pizzazz Seam Binding, Gold Brads, Large Oval Punch, Photo corner Punch, Basic Black and Always Artichoke markers
Techniques: Direct to paper


The Stampin’ Up USA Idea book and Catalog is here.   For your copy, please send a check for $9.95 to Michelle Zindorf, P.O. Box 116, West Alexandria, OH 45381 or send it via paypal to mzindorf@aim.com USA only.     My current customers will receive a new  Summer Mini Catalog automatically from me.   Not a current customer and want a free copy of the new Summer Mini Catalog ?  E-mail your mailing address to mzindorf@aim.com and I will get one in the mail to you.  )  Are you getting inspiration from this blog?   One way you can help support it is to order your Stampin’ Up products through me.   Click HERE to place an order.    Want to become a Stampin’ Up Demonstrator , receive a 20% discount on product and earn instant income on orders?  Consider being part of my Stampin’ Up Team and start your own business or become a Hobby Demo just for the discount.  Click HERE for more information.

Smeared Marina Mist ink on a 3.5″ x 4.5″ piece of Whisper White card stock using the edge of the ink pad.

Smeared Not Quite Navy ink on the left and right sides of the card stock using the edge of the ink pad.

Smeared Night of Navy ink on the right and left edges of the card stock, not covering the Not Quite Navy ink entirely.

Punched out 4 ovals out of Certainly Celery card stock using the large oval punch.

Cut a small wedge out of the edge of each oval.

Sponged Old Olive ink around the edges of the ovals.

Darkened the edges of the ovals using an Always Artichoke marker.

Scraped the edges of the ovals over my Alway Artichoke ink pad.

Stamped the flowers using Melon Mambo ink on Whisper White card stock.

Stamped the outline stamps over the Melon Mambo images using Basic Black ink.

Cut out the flowers and scraped the bottom of each flower on my Melon Mambo ink pad to darken.

Lined the bottom of the flowers using a Basic Black marker.

Assembled my scene and drew stems on the two small flowers using a Basic Black marker.  Also cut some of the lily pads so they would be going off the edge of the card stock. 

Assembled the card adding  a 3 5/8″ x 4 5/8″ Always Artichoke panel, 4.75″ x 6.25″ Marina Mist Panel, 5″ x 6.5″ Always Artichoke panel, 4 Not Quite Navy photo corner punches, 4 gold brad and  Pear Pizzaz Seam Binding.

Here is the finished card measuring 5″ x 6.5″.

May your week be totally fabulous.

Until my next post. . . . . .

Hugs,

Michelle

   Get ready for Brayer Workshops!  I am coming to the following locations, click the location name for more information.    
 

Ottumwa, Iowa       

Owings Mills, Maryland (Baltimore Area)      

Cleveland (Euclid), Ohio       

Staley , North Carolina (South of Greensboro)       

Monroe, Connecticut       

Dayton, Ohio     

Leesburg, Florida       

Montreal, Wisconsin       

Savannah, Georgia       

Lincoln, Illinois       

Jefferson, Louisiana (New Orleans Area)       

Here is a link to my workshop calendar where you can see all of my travel schedule and to get info on beginner and advanced Brayer workshops:   http://zindorf.blogs.splitcoaststampers.com/workshop-calendar        

Don’t see a workshop in your State?  Interested in hosting the workshops in your area in 2012?   Click HERE to get hostess information.       

Link to my Stampin’ Up website where you can order all of your must have Stampin’ Up products from me 24-7:  http://michellezindorf.stampinup.net   

 Link to my Scentsy website where you can order the best smelling, safest wickless candles from me 24-7:  https://zindorf.scentsy.us/Home


When the Sun Goes Down – Tutorial #423


Hello Peeps!

I have a project today that shows off a brand new Stampin’ Up! stamp set “Fabulous Florets” (item #123027) that is straight out of the new Summer Mini Catalog.  Love this set!  I paired it up with the Stampin’ Up! Decor Stencils “Mostly Vintage” (item #118877) and a bit of  Rhinestone bling (item #119246).   Hope you like it.  🙂

Let’s get started. . . . . . . . .

Supplies:

Stamps: Stampin’ Up! Fabulous Florets
Paper: Stampin’ Up! Whisper White, Basic Gray and Basic Black
Ink: Stampin’ Up! Cajun Craze, Cherry Cobbler, More Mustard, Basic Black
Accessories: Stampin’ Up! Sponges, Rhinestones, Basic Black Ribbon, Brayer, 2 1/2″ Circle Punch, Basic Black marker, Sharpie Gold Paint Marker
Techniques: Brayered Sky, Masking, Stenciling


The Stampin’ Up USA Idea book and Catalog is here.   For your copy, please send a check for $9.95 to Michelle Zindorf, P.O. Box 116, West Alexandria, OH 45381 or send it via paypal to mzindorf@aim.com USA only.     My current customers will receive a new  Summer Mini Catalog automatically from me.   Not a current customer and want a free copy of the new Summer Mini Catalog ?  E-mail your mailing address to mzindorf@aim.com and I will get one in the mail to you.  )  Are you getting inspiration from this blog?   One way you can help support it is to order your Stampin’ Up products through me.   Click HERE to place an order.    Want to become a Stampin’ Up Demonstrator , receive a 20% discount on product and earn instant income on orders?  Consider being part of my Stampin’ Up Team and start your own business or become a Hobby Demo just for the discount.  Click HERE for more information.

Brayered More Mustard ink starting at the top of a 3″ x 5″ piece of Whisper White card stock.

Used a 2 1/2″ Circle punched from a Post it Note to mask my sun area.

Brayered Cajun Craze ink starting at the top of the card stock.

Brayered Cherry Cobbler ink at the top of the card stock.

Stamped the flowers 3 times using Basic Black ink.

Sponged on the stencil using Cajun Craze ink.

Sponged Basic Black ink at the bottom of the card stock using a pouncing motion.

Edged the main image panel using a Gold Sharpie Paint Marker.

Added Rhinestones to the center of the flowers.

Cut a Basic Gray 4.75″ x 6.25″ card stock panel and Sponged the stencil in the top right and lower right corners using Basic Black ink.

Added a 3 1/8″ x 5 1/8″ Basic Black panel.

Added a short piece of ribbon folded in half with the top edge cut in a “V”.  Wrapped it around the edge of panels.

Added a Rhinestone to the ribbon.

Added a 5″ x 6.5″ Basic Black Panel.

Here is the finished card measuring 5″ x 6.5″.

May your day be filled with fun and laughter.

Until my next post. . . . . … . . . .

Hugs,

Michelle

   Get ready for Brayer Workshops!  I am coming to the following locations, click the location name for more information.    
 

Ottumwa, Iowa       

Owings Mills, Maryland (Baltimore Area)      

Cleveland (Euclid), Ohio       

Staley , North Carolina (South of Greensboro)       

Monroe, Connecticut       

Dayton, Ohio     

Leesburg, Florida       

Montreal, Wisconsin       

Savannah, Georgia       

Lincoln, Illinois       

Jefferson, Louisiana (New Orleans Area)       

Here is a link to my workshop calendar where you can see all of my travel schedule and to get info on beginner and advanced Brayer workshops:   http://zindorf.blogs.splitcoaststampers.com/workshop-calendar        

Don’t see a workshop in your State?  Interested in hosting the workshops in your area in 2012?   Click HERE to get hostess information.       

Link to my Stampin’ Up website where you can order all of your must have Stampin’ Up products from me 24-7:  http://michellezindorf.stampinup.net   

 Link to my Scentsy website where you can order the best smelling, safest wickless candles from me 24-7:  https://zindorf.scentsy.us/Home


Sail Away With Me – Tutorial #422

Happy Wednesday!

I put together a little sailing card today for your viewing pleasure.   The stamp used (Sail Away) can be found in the new Stampin’ Up Summer Mini Catalog, Item number 123013.  The minute I seen this stamp I just envisioned it being used for a reflection scene.    So, that is just what I did with it.  🙂

Let’s get started. . . . .

Supplies:

Stamps: Stampin’ Up! Sail Away
Paper: Stampin’ Up! Whisper White, Soft Suede and Marina Mist
Ink: Stampin’ Up! Basic Black, Soft Suede, Perfect Plum and Marina Mist
Accessories: Stampin’ Up! Sponge, Crumb Cake Seam Binding, Markers (River Rock, Soft Suede, Chocolate Chip), White Gel Pen, Brayer, Gold Brads, Stamp-a-ma-jig
Techniques: Brayered Sky, Reverse Image


The Stampin’ Up USA Idea book and Catalog is here.   For your copy, please send a check for $9.95 to Michelle Zindorf, P.O. Box 116, West Alexandria, OH 45381 or send it via paypal to mzindorf@aim.com USA only.     My current customers will receive a new  Summer Mini Catalog automatically from me.   Not a current customer and want a free copy of the new Summer Mini Catalog ?  E-mail your mailing address to mzindorf@aim.com and I will get one in the mail to you.  )  Are you getting inspiration from this blog?   One way you can help support it is to order your Stampin’ Up products through me.   Click HERE to place an order.    Want to become a Stampin’ Up Demonstrator , receive a 20% discount on product and earn instant income on orders?  Consider being part of my Stampin’ Up Team and start your own business or become a Hobby Demo just for the discount.  Click HERE for more information.


Brayered Marina Mist ink at the top and bottom of a 3.5″ x 7″ piece of Whisper White card stock.

Masked the bottom of the card stock with a couple of post it notes.

Brayered Perfect Plum ink at the bottom of the unmasked area of the card stock.

Removed the post it notes and repositioned them so the top of the card stock is masked, leaving  just a bit of the Perfect Plum color in the sky showing above the post it note.

Brayered Perfect Plum ink at the top of the unmasked area.

Removed the mask and stamped the sailboat using Basic Black ink.

Mask the sailboat with a post it note.

Stamped the Sailboat with Basic Black ink on the smooth side of a Stamp-a-ma-jig plastic sheet and then flipped the plastic sheet over quickly and rubbed the back side of the plastic sheet to transfer the image.

Removed the mask and colored the sails of both the original image and the reflection image using a River Rock marker.

Colored over the original sailboats sails again using the River Rock marker. 

Added Soft Suede Marker to the original image sails.

Added Chocolate Chip marker to the darkest part of the original image sails and colored in the boat.

Colored the reflection’s boat using a Soft Suede marker.

Colored over the folds of the reflection’s sails using the River Rock marker.

Added White Gel Pen water lines.  Also colored in the original image flag.

Sponged Soft Suede ink on the out side edge of the main image panel.

Added a Soft Suede and Marina Mist Panels, Crumb Cake Seam Binding and Gold Brads.

Here is the finished card measuring 4″ x 8.5″.

May your day be smooth sailing.

Until my  next post. . .  . . .

Hugs,

Michelle

   Get ready for Brayer Workshops!  I am coming to the following locations, click the location name for more information.    
   
St. Cloud, Minnesota         

Colorado Springs, Colorado       

Ottumwa, Iowa       

Owings Mills, Maryland (Baltimore Area)      

Cleveland (Euclid), Ohio       

Staley , North Carolina (South of Greensboro)       

Monroe, Connecticut       

Dayton, Ohio     

Leesburg, Florida       

Montreal, Wisconsin       

Savannah, Georgia       

Lincoln, Illinois       

Jefferson, Louisiana (New Orleans Area)       

Here is a link to my workshop calendar where you can see all of my travel schedule and to get info on beginner and advanced Brayer workshops:   http://zindorf.blogs.splitcoaststampers.com/workshop-calendar        

Don’t see a workshop in your State?  Interested in hosting the workshops in your area in 2012?   Click HERE to get hostess information.       

Link to my Stampin’ Up website where you can order all of your must have Stampin’ Up products from me 24-7:  http://michellezindorf.stampinup.net   

 Link to my Scentsy website where you can order the best smelling, safest wickless candles from me 24-7:  https://zindorf.scentsy.us/Home


Luv U in the Sand- Tutorial #421

Today’s tutorial was created for my Stampin’ Up! Down Line Team’s Monthly Technique Swap.  This month’s technique is to use torn paper/card stock.  I think I have that covered in this swap card.  Hope you like it Team!

Let’s get started. . . . .  .

Supplies:

Stamps: Stampin’ Up! Sschoolbook Serif Alphabet
Paper: Stampin’ Up! Whisper White, Tempting Turquoise, Not Quite Navy and Sahara Sand
Ink: Stampin’ Up! Sahara Sand, Not Quite Navy, Tempting Turquoise and Soft Suede
Accessories: Stampin’ Up! Sponge, Brayer, Sahara Sand Marker, Kraft Ribbon and Post it Note


The Stampin’ Up USA Idea book and Catalog is here.   For your copy, please send a check for $9.95 to Michelle Zindorf, P.O. Box 116, West Alexandria, OH 45381 or send it via paypal to mzindorf@aim.com USA only.     My current customers will receive a new  Summer Mini Catalog automatically from me.   Not a current customer and want a free copy of the new Summer Mini Catalog ?  E-mail your mailing address to mzindorf@aim.com and I will get one in the mail to you.  )  Are you getting inspiration from this blog?   One way you can help support it is to order your Stampin’ Up products through me.   Click HERE to place an order.    Want to become a Stampin’ Up Demonstrator , receive a 20% discount on product and earn instant income on orders?  Consider being part of my Stampin’ Up Team and start your own business or become a Hobby Demo just for the discount.  Click HERE for more information.

Brayered Tempting Turquoise ink at the top of a 4″ x 4.25″ piece of Whisper White card stock.

Brayered Not Quite Navy ink at the top of the card stock, not covering the Tempting Turquoise ink entirely.

Masked the water using a post it note that I tore the edge off of.

Brayered Sahara Sand ink from the mask down the uncovered card stock.

Unmasked the card stock and stamped the sentiment with the Schoolbook Serif Alphabet and Sahara Sand.

Added Sahara Sand marker dots at the water line and around each of the letters.

Ripped and distressed my Main image panel, 2 Tempting Turquoise panels and a Sahara Sand panel using Soft Suede ink and a sponge.

Assembled my card adding Kraft ribbon and a Not Quite Navy panel.

Here is the finished card measuring 5.5″ square.

May you have lots of love showered on you today.

Until my next post. . . . . . . .  . Luv U!

Hugs,

Michelle

   Get ready for Brayer Workshops!  I am coming to the following locations, click the location name for more information.    
   
St. Cloud, Minnesota         

Colorado Springs, Colorado       

Ottumwa, Iowa       

Owings Mills, Maryland (Baltimore Area)      

Cleveland (Euclid), Ohio       

Staley , North Carolina (South of Greensboro)       

Monroe, Connecticut       

Dayton, Ohio     

Leesburg, Florida       

Montreal, Wisconsin       

Savannah, Georgia       

Lincoln, Illinois       

Jefferson, Louisiana (New Orleans Area)       

Here is a link to my workshop calendar where you can see all of my travel schedule and to get info on beginner and advanced Brayer workshops:   http://zindorf.blogs.splitcoaststampers.com/workshop-calendar        

Don’t see a workshop in your State?  Interested in hosting the workshops in your area in 2012?   Click HERE to get hostess information.       

Link to my Stampin’ Up website where you can order all of your must have Stampin’ Up products from me 24-7:  http://michellezindorf.stampinup.net   

 Link to my Scentsy website where you can order the best smelling, safest wickless candles from me 24-7:  https://zindorf.scentsy.us/Home


Bird & Vines – Tutorial #420

I’m home now.  Been teaching workshops in the sunny state of Florida.   Wish I could have brought some of that sunshine home to Ohio with me.  I think we are in for yet another week of rain. 

Since I don’t have sunshine here, I’ll just create some in my tutorial today.  🙂   How does that sound to you?  It made my step a little lighter.

Announcement:  The Stampin’ Up! new Summer Mini Catalog is now in effect.   Here is a link so you can view it online CLICK HERE.  If you are a customer of mine and haven’t received your Summer Mini Catalog by now, please let me know and I will get one in the mail to you ASAP.    Want to be a customer and get the free mini sent to you, please e-mail your address to mzindorf@aim.com.   Please know you can shop online at my Stampin’ Up! website 24/7 and the products will be shipped directly to you from Stampin’ Up!   CLICK HERE TO SHOP NOW.

Announcement #2:   The Ottumwa, Iowa Zindorf Brayer Workshops were marked sold out in error for a while  until someone mentioned it to me, sheeshhhhhhh!    If you wish to attend, there are seats available.  Please contact me.  

Now on with that sunny tutorial. . . . .

Supplies:

Stamps: Stampin’ Up! Punch Potpourri & Baroque Motifs
Paper: Stampin’ Up! Whisper White, Pear Pizzazz & Early Espresso
Ink: Stampin’ Up! Cajun Craze, Early Espresso, Always Artichoke, More Mustard and Pear Pizzazz
Accessories: Stampin’ Up! Sponges, Ex-Large Bird Punch, Photo Corner Punch, Brayer, Markers (More Mustard, Cajun Craze, Basic Black & Chocolate Chip), Clear Embossing Powder, Heat Gun
Techniques: Brayering, Emboss resist, Punch art

The Stampin’ Up USA Idea book and Catalog is here.   For your copy, please send a check for $9.95 to Michelle Zindorf, P.O. Box 116, West Alexandria, OH 45381 or send it via paypal to mzindorf@aim.com USA only.     My current customers will receive a new  Summer Mini Catalog automatically from me.   Not a current customer and want a free copy of the new Summer Mini Catalog ?  E-mail your mailing address to mzindorf@aim.com and I will get one in the mail to you.  )  Are you getting inspiration from this blog?   One way you can help support it is to order your Stampin’ Up products through me.   Click HERE to place an order.    Want to become a Stampin’ Up Demonstrator , receive a 20% discount on product and earn instant income on orders?  Consider being part of my Stampin’ Up Team and start your own business or become a Hobby Demo just for the discount.  Click HERE for more information.

Stamped the Flourish from the Stampin’ Up! stamp set Baroque Motifs on a 4.25″ square piece of Whisper White card stock by loading it first with Versamark and then loaded it Pear Pizzazz ink before stamping it at the bottom of the card stock.

Heat embossed the image using clear embossing powder and a heat gun.  

Note:  If you use clear embossing powder you can emboss in any color of ink that you have.  🙂

Colored the Bird stamp from the Stampin’ Up! Hostess set Punch Potpourri using Markers, huffed on the stamp and then stamped it on a scrap piece of Whisper White card stock.      Colored the belly with More Mustard, bottom of belly and beak with Cajun Craze head and back with Chocolate Chip.

Made a dot for the bird’s eye after stamping it using a Basic Black marker.

Punched the Bird out using the Stampin’ Up! Ex-Large Bird Punch.

Put Versmark all over the bird and dipped it into the clear embossing powder and then heat it up with the heat gun to emboss the entire bird.

Back to the main image panel.

Brayered More Mustard ink at an angle at the top left side of the card stock.

Brayered Cajun Craze ink at the same angle not covering the More Mustard ink entirely.

Sponged Always Artichoke ink at the bottom of the card stock.

Sponged Early Espresso at the bottom of the card stock.

Stamped the Flourish again using Early Espresso ink.  Then wiped the ink off of my embossed image.

Added 2 Early Espresso panels, 1 Pear Pizzazz panel, 4 Early Espresso Photo Corners.   Glued the bird onto the front of the main image panel.   I then took 2 more Early Espresso photo corners and cut them in half.

Added 1/2 of a photo corner to each side of the card front.

Here is the finished card measuring 5.25″ square.

May  you feel the sun shining on you today.

Until my next post. . . . . .  .

Hugs,

Michelle

   Get ready for Brayer Workshops!  I am coming to the following locations, click the location name for more information.    
   
St. Cloud, Minnesota         

Colorado Springs, Colorado       

Ottumwa, Iowa       

Owings Mills, Maryland (Baltimore Area)      

Cleveland (Euclid), Ohio       

Staley , North Carolina (South of Greensboro)       

Monroe, Connecticut       

Dayton, Ohio     

Leesburg, Florida       

Montreal, Wisconsin       

Savannah, Georgia       

Lincoln, Illinois       

Jefferson, Louisiana (New Orleans Area)       

Here is a link to my workshop calendar where you can see all of my travel schedule and to get info on beginner and advanced Brayer workshops:   http://zindorf.blogs.splitcoaststampers.com/workshop-calendar        

Don’t see a workshop in your State?  Interested in hosting the workshops in your area in 2012?   Click HERE to get hostess information.       

Link to my Stampin’ Up website where you can order all of your must have Stampin’ Up products from me 24-7:  http://michellezindorf.stampinup.net   

 Link to my Scentsy website where you can order the best smelling, safest wickless candles from me 24-7:  https://zindorf.scentsy.us/Home


Extreme Surfing – Tutorial #419

It has been raining here in Ohio for soooooo long.  For days and days and days it has been raining.   I wish I were some where warm and beach like today.  I will be heading to a warmer climate on Friday.  I am off to Florida to teach, wooohooo!!!  Sunshine, here I come.

So with that in mind I created today’s tutorial, check it out. 

Let’s get started. . . . .  .

Supplies:

 
Stamps: Stampin’ Up! Extreme Surfboard
Paper: Stampin’ Up! Old Olive Designer Paper, Whisper White & Basic Black card stock
Ink: Stampin’ Up! Pacific Point, Not Quite Navy, Certainly Celery, Bashful Blue, Whisper White
Accessories: Stampin’ Up! Basic Black Ribbon, White Gel Pen, Basic Black marker, Jumbo Brads, Crop-o-dile
Techniques: Direct to Paper


The Stampin’ Up USA Idea book and Catalog is here.   For your copy, please send a check for $9.95 to Michelle Zindorf, P.O. Box 116, West Alexandria, OH 45381 or send it via paypal to mzindorf@aim.com USA only.     My current customers will receive a new Occasions Mini Catalog automatically from me.   Not a current customer and want a free copy of the new Occasions Mini Catalog ?  E-mail your mailing address to mzindorf@aim.com and I will get one in the mail to you.  )  Are you getting inspiration from this blog?   One way you can help support it is to order your Stampin’ Up products through me.   Click HERE to place an order.    Want to become a Stampin’ Up Demonstrator , receive a 20% discount on product and earn instant income on orders?  Consider being part of my Stampin’ Up Team and start your own business or become a Hobby Demo just for the discount.  Click HERE for more information.

I got out my boxes of ink spots.   These little pads are great for direct to paper techniques since they have a pad that sits up above the ink pad base.   Just looking at all the colors makes me excited, lol. 

Since I wanted to cover the entire 4″ x 4.5″ piece of card stock, I chose to start out with a full sized Bashful Blue ink pad and used the edge of the pad to smear the ink on.

Now this techinque is not for the faint of heart.  You have to commit  to putting a lot of ink on the paper.    Making tiny strokes does not work here.  You need to make big strokes.

Using a Bashful Blue ink spot smeared in a wave shape.

Smeared in some Pacific Point ink.

Smeared in some Certainly Celery ink.

Added a bit of Whisper White using the very corner of the ink pad.

Added Not Quite Navy ink.

Stamped the Surfer using Pacific Point Ink.

Colored in the surfer with a Basic Black marker.

Added White Gel pen dots to the water behind the surfer and also to the top of the wave.

Assembled my card adding Stampin’ Up! Old Olive Designer paper ripped on the left hand side, 2 basic Black panels, Basic Black Ribbon and Jumbo Brads.

Here is my finished creating measuring 5″ x 6.5″.

May your day be just beachy.  🙂

Until my next post. . . .  ..  . . . . . .

Hugs,

Michelle

   Get ready for Brayer Workshops!  I am coming to the following locations, click the location name for more information.       
Orlando (Davenport), Florida       St. Cloud, Minnesota         

Colorado Springs, Colorado       

Ottumwa, Iowa       

Owings Mills, Maryland (Baltimore Area)      

Cleveland (Euclid), Ohio       

Staley , North Carolina (South of Greensboro)       

Monroe, Connecticut       

Dayton, Ohio     

Leesburg, Florida       

Montreal, Wisconsin       

Savannah, Georgia       

Lincoln, Illinois       

Jefferson, Louisiana (New Orleans Area)       

Here is a link to my workshop calendar where you can see all of my travel schedule and to get info on beginner and advanced Brayer workshops:   http://zindorf.blogs.splitcoaststampers.com/workshop-calendar        

Don’t see a workshop in your State?  Interested in hosting the workshops in your area in 2012?   Click HERE to get hostess information.       

Link to my Stampin’ Up website where you can order all of your must have Stampin’ Up products from me 24-7:  http://michellezindorf.stampinup.net   

 Link to my Scentsy website where you can order the best smelling, safest wickless candles from me 24-7:  https://zindorf.scentsy.us/Home


Framed Bird Tutorial #418 and a Blog Candy Winner

Hi Peeps!  I hope everyone had an enjoyable Easter Holiday.  I did, spent my day with my Son’s, future Daughter-n-law and husband.  It was perfect!

I broke out my new Stampin’ Up! set Four Frames and paired it up with the Stampin’ Up! set Plant Hope and the matching label punch for the Four Frames set.   Decided to incorporate the  frame stamp in my scene and then punch it out.  Makes for an interesting scene. 

Before I get started on today’s tutorial though I have a blog candy winner to announce first.   The winner of the Stampin’ Up! set Four Frames is  . . . . . .  . . .drumroll, please. . . . . . . . . . . . . .

Rosemary iv “MJ” who wrote  “Thanks for the offer Michelle! What a great way to “frame” an encouraging, sweet or silly, casual or elegant, thought through a homemade card. Please enter me into the drawing!
MJ
Happy Easter!”

Congratulations MJ, please e-mail your shipping address to mzindorf@aim.com within 30 days and I will get this wonderful stamp set right out to you.

Thanks to everyone that played along.  Keep on playing, it could be you winning next week.  🙂

Now on with today’s tutorial. . .  . .

Supplies:

Stamps: Stampin’ Up! Four Frames & Plant Hope
Paper: Stampin’ Up! Whisper White, Old Olive and Rich Razzelberry
Ink: Stampin’ Up! Basic Black, Rich Razzelberry, Always Artichoke, Whisper White, Old Olive, So Saffron, Marina Mist
Accessories: Stampin’ Up! Sponge, Brayer, Markers (Basic Black, So Saffron & More Mustard), Large Dot Texture Plate and Big Shot Machine, Photo Corner & Label Punchs, Rich Razzelberry Ribbon and Gold Brads


The Stampin’ Up USA Idea book and Catalog is here.   For your copy, please send a check for $9.95 to Michelle Zindorf, P.O. Box 116, West Alexandria, OH 45381 or send it via paypal to mzindorf@aim.com USA only.     My current customers will receive a new Occasions Mini Catalog automatically from me.   Not a current customer and want a free copy of the new Occasions Mini Catalog ?  E-mail your mailing address to mzindorf@aim.com and I will get one in the mail to you.  )  Are you getting inspiration from this blog?   One way you can help support it is to order your Stampin’ Up products through me.   Click HERE to place an order.    Want to become a Stampin’ Up Demonstrator , receive a 20% discount on product and earn instant income on orders?  Consider being part of my Stampin’ Up Team and start your own business or become a Hobby Demo just for the discount.  Click HERE for more information.

Brayered Marina Mist ink at the top of a 3.75″ x 4.5″ piece of Whisper White card stock.

Brayered Rich Razzelberry ink at the top of the card stock, not covering the Marina Mist ink entirely.

Brayered So Saffron ink at the bottom of the card stock.

Brayered Old Olive ink at the bottom of the card stock.

Stamped the pine trees from the Stampin’ Up! set Plant Hope using Always Artichoke ink.

Using the corner of a Whisper White ink pad, smeared in some clouds.

Darkened the pine trees trunks using a Basic Black marker.

Stamped the Label stamp using Basic Black ink.

Punched out the label image using the Label punch.

Colored in the birds belly using So Saffron and More Mustard markers.

Trimmed the edge off of the punched image, down to the black line.

Distressed the edges of the main image panel and the punched piece using Rich Razzelberry ink.

Cut a 4.75″ x 6.25″ panel of Old Olive card stock and run it through my Big Shot machine using the Dots Texture Plate.

Assembled the card adding 2 Rich Razzelberry panels, Rich Razzelberry Ribbon, Rich Razzelberry photo corner punches and gold brads.

May your week be outrageously fun!

Until my next post. . . . . .  . .

Hugs,

Michelle

   Get ready for Brayer Workshops!  I am coming to the following locations, click the location name for more information.       
Orlando (Davenport), Florida       St. Cloud, Minnesota         

Colorado Springs, Colorado       

Ottumwa, Iowa       

Owings Mills, Maryland (Baltimore Area)      

Cleveland (Euclid), Ohio       

Staley , North Carolina (South of Greensboro)       

Monroe, Connecticut       

Dayton, Ohio     

Leesburg, Florida       

Montreal, Wisconsin       

Savannah, Georgia       

Lincoln, Illinois       

Jefferson, Louisiana (New Orleans Area)       

Here is a link to my workshop calendar where you can see all of my travel schedule and to get info on beginner and advanced Brayer workshops:   http://zindorf.blogs.splitcoaststampers.com/workshop-calendar        

Don’t see a workshop in your State?  Interested in hosting the workshops in your area in 2012?   Click HERE to get hostess information.       

Link to my Stampin’ Up website where you can order all of your must have Stampin’ Up products from me 24-7:  http://michellezindorf.stampinup.net   

 Link to my Scentsy website where you can order the best smelling, safest wickless candles from me 24-7:  https://zindorf.scentsy.us/Home