Birdie, Birdie Birdie – Tutorial #407 and Sport Stamps Blog Candy

Hey All  🙂

I’m off on yet another trip tomorrow morning.  This time to New Jersey to have some fun at a Stampin’ Up! team event.  So today I am busy packing and prepping my vehicle for the drive.  But before I start all of that I wanted to post a tutorial for you and to give away some great Stampin’ Up stamps as blog candy.

My blog candy this week is a package of 3 sets of Stampin’ Up Sports Stamps (Goal, Touchdown and Homerun).

All you have to do to put your name in this drawing is leave a comment on this post telling me to enter you.    If you are getting this blog update via e-mail you will need to CLICK HERE and then leave a comment at the end of this blog post.

I will select the winner on Monday, March 21, 2011 using a random number generator.   Remember, you cannot win if you don’t enter.  🙂  GOOD LUCK TO ALL!

Now let’s get started on today’s tutorial. . . . . .  ..
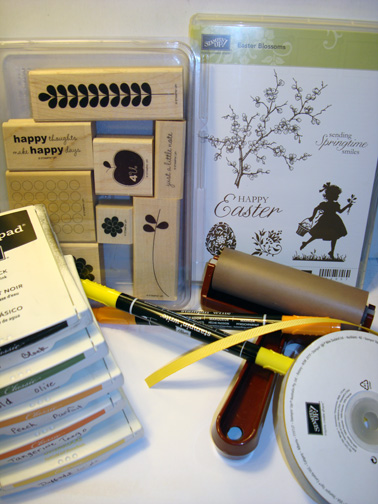
Supplies:

Stamps: Stampin’ Up! Aviary, Cheep Talk & Friendly Words
Paper: Stampin’ Up! Sahara Sand, Not Quite Navy and Basic Black
Ink: Stampin’ Up! Basic Black, Soft Suede, Cherry Cobbler & Crumb Cake
Accessories: Stampin’ Up! Sponges, Gold Brads, Basic Black marker, Cherry Cobbler marker

  My Stampin’ Up customers that order $50 in Stampin’ Up merchandise will receive this handmade card though March 31, 2011.

Don’t forget it is Sale-a-bration time at Stampin’ Up.  Receive a free Sale-a-bration set for each $50 in merchandise purchased.   Click HERE to place an order.   Your order will be shipped directly to your door step from Stampin’ Up!

The Stampin’ Up USA Idea book and Catalog is here.   For your copy, please send a check for $9.95 to Michelle Zindorf, P.O. Box 116, West Alexandria, OH 45381 or send it via paypal to mzindorf@aim.com USA only.     My current customers will receive a new Occasions Mini Catalog automatically from me.   Not a current customer and want a free copy of the new Occasions Mini Catalog ?  E-mail your mailing address to mzindorf@aim.com and I will get one in the mail to you.  )  Are you getting inspiration from this blog?   One way you can help support it is to order your Stampin’ Up products through me.   Click HERE to place an order.    Want to become a Stampin’ Up Demonstrator , receive a 20% discount on product and earn instant income on orders?  Consider being part of my Stampin’ Up Team and start your own business or become a Hobby Demo just for the discount.  Click HERE for more information.

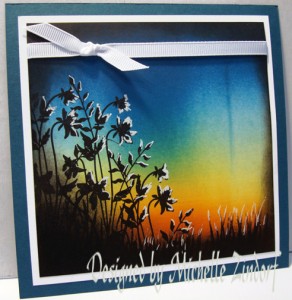
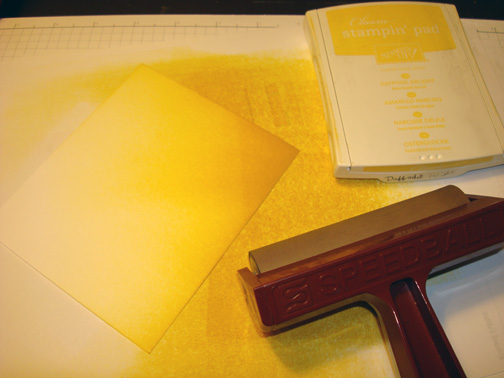
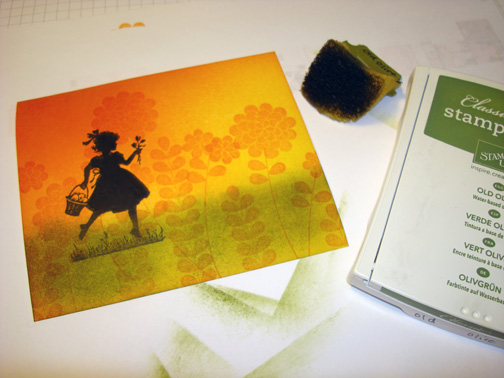
Stamped the Unmounted Friendly Words Wheel on a 3.5″ x 4.5″ piece of Sahara Sand card stock using Soft Suede ink. 

Here is a link to a post I did on Unmounting Wheels http://zindorf.blogs.splitcoaststampers.com/2009/07/28/tool-time-unmounting-wheels/.

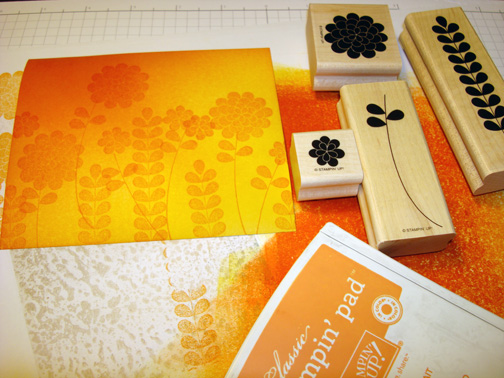
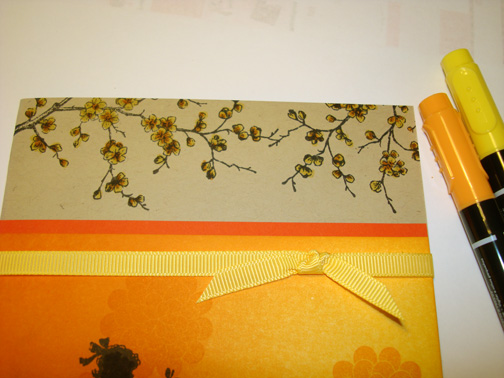
Stamped the branch from the Stampin’ Up set Cheep Talk using Crumb Cake a few times.

Stamped 2 of the Stampin’ Up Aviary bird cages using Cherry Cobbler ink.

Added circles for chains using a Cherry Cobbler marker.

Stamped the branch using Crumb Cake ink one more time towards the bottom of the card stock to balance things out a bit.

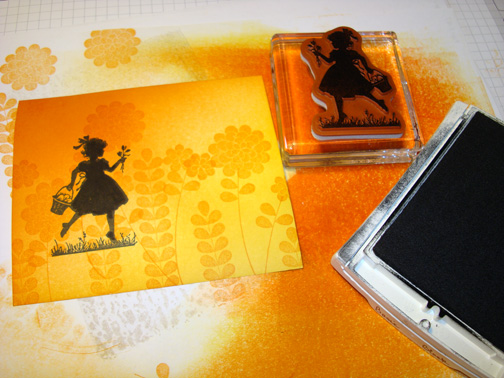
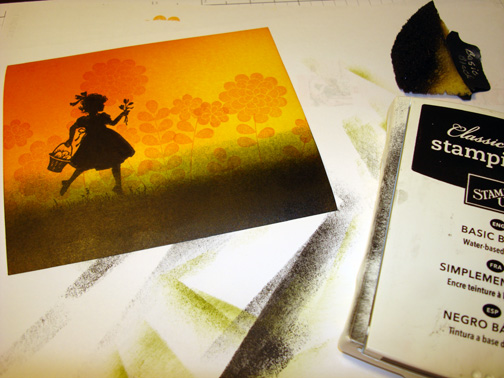
Stamped the Birds using Basic Black ink.  Colored the birds in using a Basic Black marker to darken them.

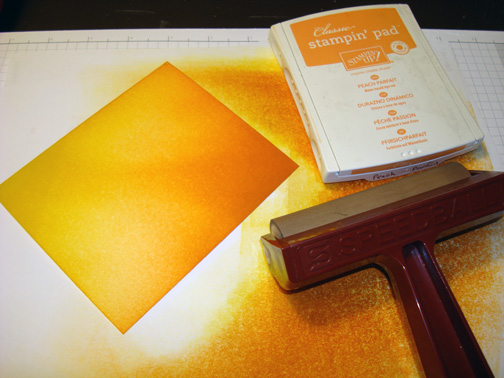
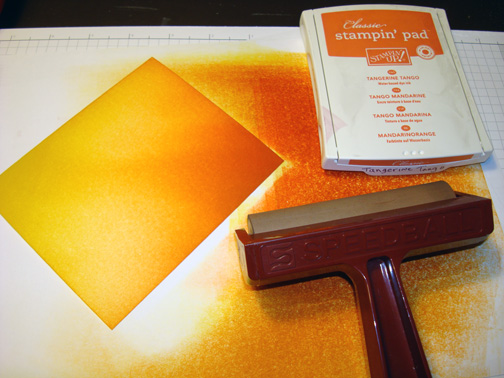
Sponged Crumb Cake ink at the top, right side and bottom of the card stock.

Sponged Soft Suede ink at the right side of the card stock.

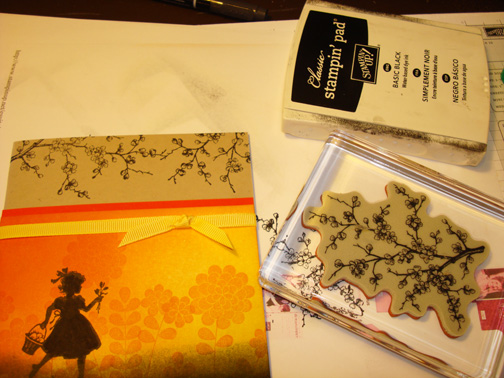
Added a 4.5″ square piece of Not Quite Navy card stock.   Stamped the branch on the left side of the card stock using Basic Black ink.     Tip:  When stamping on multi levels of card stock have a marker on hand that matches the ink you used in order to fill in the gaps that are left in the images.

Filled in the gaps in the images using a Basic Black marker.

Sponge Basic Black ink around the edges of the card stock.

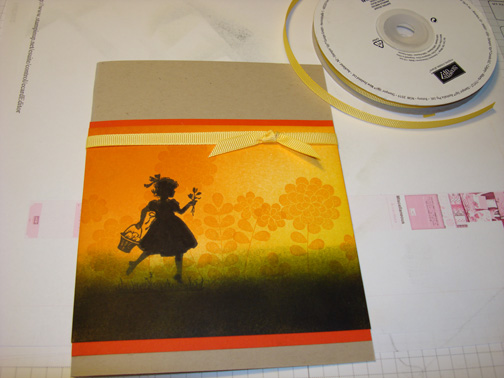
Added a 4.75″ Basic Black panel, 4 7/8″ Sahara Sand panel and 5.25″ Basic Black panel.   Also added gold brads to the main image panel corners.

Here is the finished card measuring 5.25″ square.

May your weekend be one to remember.

Until my next post. . . . . . . .. . . .

Huge Hugs,

Michelle

   Get ready for Brayer Workshops!  I am coming to the following locations, click the location name for more information.       

Syracuse (Bridgeport), New York      

St. Peters, Missouri       

La Porte, Indiana       

Orlando (Davenport), Florida       

St. Cloud, Minnesota       

Colorado Springs, Colorado       

Ottumwa, Iowa       

Owings Mills, Maryland (Baltimore Area)      

Cleveland (Euclid), Ohio       

Staley , North Carolina (South of Greensboro)       

Monroe, Connecticut       

Dayton, Ohio     

Leesburg, Florida       

Montreal, Wisconsin       

Savannah, Georgia       

Lincoln, Illinois       

Jefferson, Louisiana (New Orleans Area)       

Here is a link to my workshop calendar where you can see all of my travel schedule and to get info on beginner and advanced Brayer workshops:   http://zindorf.blogs.splitcoaststampers.com/workshop-calendar        

Don’t see a workshop in your State?  Interested in hosting the workshops in your area in 2012?   Click HERE to get hostess information.       

Link to my Stampin’ Up website where you can order all of your must have Stampin’ Up products from me 24-7:  http://michellezindorf.stampinup.net   

 Link to my Scentsy website where you can order the best smelling, safest wickless candles from me 24-7:  https://zindorf.scentsy.us/Home   

 Donate cards to the Give Thanks Project and help out Cancer Patients.   CLICK HERE TO HELP


Bird’s Eye View Bookmark – Tutorial #406

Drive home 😦


Wow, my drive home yesterday from Wichita, Kansas was a bit different than my lovely drive there, lol.

Drive there  🙂


It took quite a bit longer also.  So today I am completely exhausted.  My body hurts also from griping the steering wheel so tight in the icy conditions I found myself driving in.  Thank goodness there was only 2 states that looked like this and the others where fine.   Anyhow, I am so happy to be home safe and sound, but miss my friends in Wichita already.

Before I get to the tutorial today, I have a blog candy winner to announce.

  The winner of the Stampin’ Up! Extreme Stamp package is. . . . . . . . . . . . . . .

Kim Burmeister who wrote “Your card is awesome! I would love to be entered into the blog candy drawing. Thanks so much. These would be great for brayer cards.”   

Kim Burmeister, Congratulations!   Please e-mail your address to me at mzindorf@aim.com within 30 days and I will get this set right out to you.

Thanks to everyone who played along!  Maybe you will be the winner next week.

About the tutorial

Today’s tutorial project was created for a Stampin’ Up Team Event Swap that I will be attending in New Jersey this weekend.    I’m looking so forward to attending an event that I am not putting on, know what I mean, lol.  🙂  Also, I will be meeting new friends and hanging out with current friends.  Besides the creative release that stamping gives you that’s what stamping is all about, friendship, don’t you think?

So let’s dive right into this tutorial so I can get to making 60 of these beauties.

Supplies:

Stamps: Stampin’ Up Aviary, Lovely as a Tree
Paper: Stampin’ Up Whisper White, Basic Black and Old Olive
Ink: Stampin’ Up Basic Black, Always Artichoke, Old Olive, Baja Breeze
Accessories: Stampin’ Up Sponge, Old Olive Ribbon, 1 1/4″ circle punch, Ruler, Brayer, Crop-o-dile, Piercing Tools, Basic Black marker


  My Stampin’ Up customers that order $50 in Stampin’ Up merchandise will receive this handmade card though March 31, 2011.

Don’t forget it is Sale-a-bration time at Stampin’ Up.  Receive a free Sale-a-bration set for each $50 in merchandise purchased.   Click HERE to place an order.   Your order will be shipped directly to your door step from Stampin’ Up!

The Stampin’ Up USA Idea book and Catalog is here.   For your copy, please send a check for $9.95 to Michelle Zindorf, P.O. Box 116, West Alexandria, OH 45381 or send it via paypal to mzindorf@aim.com USA only.     My current customers will receive a new Occasions Mini Catalog automatically from me.   Not a current customer and want a free copy of the new Occasions Mini Catalog ?  E-mail your mailing address to mzindorf@aim.com and I will get one in the mail to you.  )  Are you getting inspiration from this blog?   One way you can help support it is to order your Stampin’ Up products through me.   Click HERE to place an order.    Want to become a Stampin’ Up Demonstrator , receive a 20% discount on product and earn instant income on orders?  Consider being part of my Stampin’ Up Team and start your own business or become a Hobby Demo just for the discount.  Click HERE for more information.

Brayered Baja Breeze ink at the top of a 3″ x 5″ piece of Whisper White card stock.

Brayered Old Olive ink at the bottom of the card stock.

Inked up the trees only on this Lovely As A Tree stamp with Basic Black ink, omitting the grassy areas of the image.  Stamped the image.

Extended the tree trunks a bit using a Basic Black marker.

Sponged in a shadow for each tree.

Stamped 2 birds from the Stampin’ Up Aviary set using Basic Black ink.

Drew in a wire using a Basic Black marker and a ruler.

Punched a 1 1/4″ circle from Basic Black card stock and folded it in half.

Adhered my main image panel to a 3 1/8″ x 5 1/8″ piece of Basic Black card stock.   Wrapped the circle around the top of the card stock and adhered it on both sides.

Pierced holes along the bottom of the card stock using Stampin’ Up piercing tools.

Added a 3 3/4″ x 5 3/4″ piece of Old Olive card stock.  Punched a hole in the top of the bookmark and added an Old Olive ribbon.

Here is the finished bookmark.

May your day be one of peace and love.

Until my next post. . . . .  ..  . . . . .

Hugs,

Michelle

   Get ready for Brayer Workshops!  I am coming to the following locations, click the location name for more information.      

Wichita, Kansas      

Syracuse (Bridgeport), New York      

St. Peters, Missouri      

La Porte, Indiana      

Orlando (Davenport), Florida      

St. Cloud, Minnesota      

Colorado Springs, Colorado      

Ottumwa, Iowa      

Owings Mills, Maryland (Baltimore Area)     

Cleveland (Euclid), Ohio      

Staley , North Carolina (South of Greensboro)      

Monroe, Connecticut      

Dayton, Ohio    

Leesburg, Florida      

Montreal, Wisconsin      

Savannah, Georgia      

Lincoln, Illinois      

Jefferson, Louisiana (New Orleans Area)      

Here is a link to my workshop calendar where you can see all of my travel schedule and to get info on beginner and advanced Brayer workshops:   http://zindorf.blogs.splitcoaststampers.com/workshop-calendar       

Don’t see a workshop in your State?  Interested in hosting the workshops in your area in 2012?   Click HERE to get hostess information.      

Link to my Stampin’ Up website where you can order all of your must have Stampin’ Up products from me 24-7:  http://michellezindorf.stampinup.net  

 Link to my Scentsy website where you can order the best smelling, safest wickless candles from me 24-7:  https://zindorf.scentsy.us/Home  

 Donate cards to the Give Thanks Project and help out Cancer Patients.   CLICK HERE TO HELP


Quickie Tree – Tutorial #405 and Extreme Blog Candy!


Woo Weeee!  I am pressed for time today!     I’m preparing to hit the road at 3:00 a.m. tomorrow morning  to travel from Ohio to Wichita, KS to teach this weekend so, I’m currently burning the candle at both ends.

With that being said, I want you know that this card was thought up, created, pictures taken, and posted in 1 hour 15 minutes.  My normal post take around 3.5 to 4 hours.   That is why this card is named Quickie Tree, lol.  No time to think up an appropriate name.  Plus the actual card was created in 10 minutes.  Hope it doesn’t look like a ten minute card, lol.

Before I jump into the tutorial though, I have some blog candy to announce.  I’m feeling pretty generous, so I’m giving away  a bundle of 4 of the Stampin’ Up Extreme Stamps (Extreme Skateboard, Extreme Snowboard, Extreme Dirt Bike and Extreme Surfboard). 

All you need to do to enter for this blog candy give away is leave a comment at the bottom of this post, telling me to enter you.  If you are getting this blog update via e-mail, please CLICK HERE and then leave a comment at the bottom of the post.  Please no e-mail entries.

I will select the winner using a random number generator on Tuesday, March 15, 2011.   Good Luck to Everyone!!!  Remember, you will not win if you don’t enter.

Now on with the tutorial. . . . . . .

Supplies:

Stamps: Stampin’ Up! Plant Hope
Paper: Stampin’ Up! Whisper White, Basic Black and Melon Mambo
Ink: Stampin’ Up! Melon Mambo, Basic Black, Peach Parfait and Rich Razzelberry
Accessories: Stampin’ Up! Sponge, Brayer, White Gel Pen, White Brads, Word Window Punch, Basic Black marker, 2 1/2″ circle punch

  My Stampin’ Up customers that order $50 in Stampin’ Up merchandise will receive this handmade card though March 31, 2011.

Don’t forget it is Sale-a-bration time at Stampin’ Up.  Receive a free Sale-a-bration set for each $50 in merchandise purchased.   Click HERE to place an order.   Your order will be shipped directly to your door step from Stampin’ Up!

The Stampin’ Up USA Idea book and Catalog is here.   For your copy, please send a check for $9.95 to Michelle Zindorf, P.O. Box 116, West Alexandria, OH 45381 or send it via paypal to mzindorf@aim.com USA only.     My current customers will receive a new Occasions Mini Catalog automatically from me.   Not a current customer and want a free copy of the new Occasions Mini Catalog ?  E-mail your mailing address to mzindorf@aim.com and I will get one in the mail to you.  )  Are you getting inspiration from this blog?   One way you can help support it is to order your Stampin’ Up products through me.   Click HERE to place an order.    Want to become a Stampin’ Up Demonstrator , receive a 20% discount on product and earn instant income on orders?  Consider being part of my Stampin’ Up Team and start your own business or become a Hobby Demo just for the discount.  Click HERE for more information.

Punched a 2 1/2″ circle from Whisper White card stock.  Love this large circle punch!

Brayered Peach Parfait ink on the card stock.

Brayered Melon Mambo ink on the card stock, not covering the Peach Parfait ink entirely.

Brayered Rich Razzelberry ink at the very top of the card stock.

Inked up my tree, not the pot on the stamp, using Basic Black ink and stamped it on my card stock.

Sponged a couple of hills at the bottom of the card stock using Basic Black ink.

Colored in the trunk of the tree and extended down the ground area using a Basic Black marker.

Added White Gel Pen highlights to the leaves of the tree.

Cut a 4.25″ x 5.5″ piece of Basic Black card stock.  Added a 4″ x 5.25″ piece of Melon Mambo card stock.  Added a .25″ x 5.25″ piece of Basic Black card stock down the middle.

Punched 4 Word Window punches from Basic Black card stock.

Held the 4 Word Window punches together and cut one end off of them.  Adhered them to the card stock.

Also added a 3.25″ square piece of Basic Black card stock behind the main image panel.

Added White brads and here is the finished card measuring 4.25″ x 5.5″.

May you weekend be super fun and filled with family and friends!

Until my next post. . . . .  . .  Because I’ve got to run!!!

Huge Hugs,

Michelle

   Get ready for Brayer Workshops!  I am coming to the following locations, click the location name for more information.     

Wichita, Kansas     

Syracuse (Bridgeport), New York     

St. Peters, Missouri     

La Porte, Indiana     

Orlando (Davenport), Florida     

St. Cloud, Minnesota     

Colorado Springs, Colorado     

Ottumwa, Iowa     

Owings Mills, Maryland (Baltimore Area)    

Cleveland (Euclid), Ohio     

Staley , North Carolina (South of Greensboro)     

Monroe, Connecticut     

Dayton, Ohio   

Leesburg, Florida     

Montreal, Wisconsin     

Savannah, Georgia     

Lincoln, Illinois     

Jefferson, Louisiana (New Orleans Area)     

Here is a link to my workshop calendar where you can see all of my travel schedule and to get info on beginner and advanced Brayer workshops:   http://zindorf.blogs.splitcoaststampers.com/workshop-calendar      

Don’t see a workshop in your State?  Interested in hosting the workshops in your area in 2012?   Click HERE to get hostess information.     

Link to my Stampin’ Up website where you can order all of your must have Stampin’ Up products from me 24-7:  http://michellezindorf.stampinup.net 

 Link to my Scentsy website where you can order the best smelling, safest wickless candles from me 24-7:  https://zindorf.scentsy.us/Home 

 Donate cards to the Give Thanks Project and help out Cancer Patients.   CLICK HERE TO HELP


Mountain Creek – Tutorial #404

Good Morning All,

Just for a change of pace I thought I would use a totally different color combo than my normal blues and greens.  I do love using shades of browns to get an old time feel.   Add a bit of peach and pink and it starts looking like an antique photo that has been tinted.

Let’s get started. . . . . .

Supplies:

Stamps: Stampin’ Up! Lovely As a Tree
Paper: Stampin’ Up! Whisper White, Basic Black and Soft Suede
Ink: Stampin’ Up! Early Espresso, Soft Suede, Sahara Sand and Basic Black
Accessories: Stampin’ Up! Sponges, Brayer, White Gel Pen,Markers – Blush Blossom, Pink Pirouette, Soft Suede, Early Espesso, Gold Brads, Clear Embossing Powder, Heat Gun, 1″ Circle and Word Window Punches, Post it Notes, Piercing Tools

  My Stampin’ Up customers that order $50 in Stampin’ Up merchandise will receive this handmade card though March 31, 2011.

Don’t forget it is Sale-a-bration time at Stampin’ Up.  Receive a free Sale-a-bration set for each $50 in merchandise purchased.   Click HERE to place an order.   Your order will be shipped directly to your door step from Stampin’ Up!

The Stampin’ Up USA Idea book and Catalog is here.   For your copy, please send a check for $9.95 to Michelle Zindorf, P.O. Box 116, West Alexandria, OH 45381 or send it via paypal to mzindorf@aim.com USA only.     My current customers will receive a new Occasions Mini Catalog automatically from me.   Not a current customer and want a free copy of the new Occasions Mini Catalog ?  E-mail your mailing address to mzindorf@aim.com and I will get one in the mail to you.  )  Are you getting inspiration from this blog?   One way you can help support it is to order your Stampin’ Up products through me.   Click HERE to place an order.    Want to become a Stampin’ Up Demonstrator , receive a 20% discount on product and earn instant income on orders?  Consider being part of my Stampin’ Up Team and start your own business or become a Hobby Demo just for the discount.  Click HERE for more information.

Started with a 4″ x 5″ piece of Whisper White card stock, stamped the trees, on each side of the card stock, without inking the grassy area of the stamp using Basic Black Craft ink (Pigment).  Heat embossed the images using clear embossing powder.

Colored the tree tops using a Blush Blossom marker.

Tapped in a bit of Pink Pirouette marker in the middle of the trees.

colored over the marker using a Versamark marker and then heat embossed the images using clear embossing powder and a heat gun.  This potects the color in the trees and will resist ink put on for our background.

Punched a 1″ circle from a scrap piece of card stock.

Put the hole in the card stock where I want my moon and colored the Moon in with Blush Blossom marker.  Added some Pink Pirouette marker to the left side of the moon.  Colored the moon in with Versamark marker and heat embossed the image using clear embossing powder and a heat gun.

Now that our trees and moon are protected with embossing we can brayer over them and they will resist the ink.

Brayered Sahara Sand ink at the top and the bottom of the card stock.

Ripped a post it note in a mountain shape and put it on my card stock to mask the sky.

Sponged Soft Suede ink in the mountain shape.

Added Early Espresso ink to the top of the mountain.

Unmasked the sky.  Ripped a creek shaped piece of post it note and masked the creek area.

Ripped another post it note and masked the sky and mountain.

Sponged Soft Suede in the unmasked area.

Added Early Espresso ink in the top 1/2 of the unmasked area.

Sponged a bit of Basic Black ink at the very top of the unmasked area.

Removed the post it notes and gently wiped my embossed images off using a paper towel.

Put a line of Early Espresso marker at the top of creek and extended the tree trunks.

Lightly Sponged Early Espresso ink at the bottom half of the creek.

Brayered Early Espresso ink at the top of the card stock.  Wiped my embossed images off again.

Added White Gel pen dots to the trees to add a bit of sparkle.

Added a few rock shapes and water lines in the creek using a Soft Suede marker.

Punched 2 Basic Black Word Window punches and held them together and one end off of them.

Added 2 Basic Black panels, 1 Soft Suede panel, word window punches and gold brads.

Here is the finished card measuring 5″ x 6.5″.

May your day be filled with all that pleases you.

Until my next post. . . .  . . . . . . .

Hugs,

Michelle

   Get ready for Brayer Workshops!  I am coming to the following locations, click the location name for more information.    

Wichita, Kansas    

Syracuse (Bridgeport), New York    

St. Peters, Missouri    

La Porte, Indiana    

Orlando (Davenport), Florida    

St. Cloud, Minnesota    

Colorado Springs, Colorado    

Ottumwa, Iowa    

Owings Mills, Maryland (Baltimore Area)   

Cleveland (Euclid), Ohio    

Staley , North Carolina (South of Greensboro)    

Monroe, Connecticut    

Dayton, Ohio  

Leesburg, Florida    

Montreal, Wisconsin    

Savannah, Georgia    

Lincoln, Illinois    

Jefferson, Louisiana (New Orleans Area)    

Here is a link to my workshop calendar where you can see all of my travel schedule and to get info on beginner and advanced Brayer workshops:   http://zindorf.blogs.splitcoaststampers.com/workshop-calendar     

Don’t see a workshop in your State?  Interested in hosting the workshops in your area in 2012?   Click HERE to get hostess information.    

Link to my Stampin’ Up website where you can order all of your must have Stampin’ Up products from me 24-7:  http://michellezindorf.stampinup.net

 Link to my Scentsy website where you can order the best smelling, safest wickless candles from me 24-7:  https://zindorf.scentsy.us/Home

 Donate cards to the Give Thanks Project and help out Cancer Patients.   CLICK HERE TO HELP


Is it Spring Yet – Tutorial #403

I hope your weekend was fabulous.  Mine was, I spent the day yesterday with loved ones, eating, playing, etc.   To me that is the best way to spend time.  In a close second place is stamping, lol.  I’m a bit addicted to ink, stamps and card stock, Dah!

I found something else to be addicted to also, Scentsy Wickless Candle Warmers, love them!   I had an unfortunate event recently with a candle and my dining room table, which long story short, my table is ruined and now needs refinished. 

But I found a wonderful safe, beautiful and totally fragrant solution to my candle delema and I became a consultant in a blink of an eye.   Here is a link to my Scentsy web site if you want to check out their great products:      https://zindorf.scentsy.us/Home  .  This link will be at the left side of my blog permanently, you can order from my Scentsy Site 24/7 and your order will be shipped direct to you from Scentsy.   No sales pressure here folks, I just love their products.

Now, a bit about today’s tutorial.  I created the background using ink spots to create a faux texture.

Let’s get started. . . . . . . . .  . . .

Supplies:

Stamps:   Stampin Up! Upsy Daisy and Dreams du Jour

Card stock:  Stampin’ Up! Whisper White, Early Espresso, River Rock and Not Quite Navy

Ink:  Stampin’ Up! Early Espresso, Soft Suede, Baja Breeze, Marina Mist and River Rock

Accessories:  Stampin’ Up sponge, White Gel Pen, Gold Brads, Markers – Baja Breeze, Marina Mist & Certainly Celery, Curly Label Punch, piercing tools and mat pack.

  My Stampin’ Up customers that order $50 in Stampin’ Up merchandise will receive this handmade card though March 31, 2011.

Don’t forget it is Sale-a-bration time at Stampin’ Up.  Receive a free Sale-a-bration set for each $50 in merchandise purchased.   Click HERE to place an order.   Your order will be shipped directly to your door step from Stampin’ Up!

The Stampin’ Up USA Idea book and Catalog is here.   For your copy, please send a check for $9.95 to Michelle Zindorf, P.O. Box 116, West Alexandria, OH 45381 or send it via paypal to mzindorf@aim.com USA only.     My current customers will receive a new Occasions Mini Catalog automatically from me.   Not a current customer and want a free copy of the new Occasions Mini Catalog ?  E-mail your mailing address to mzindorf@aim.com and I will get one in the mail to you.  )  Are you getting inspiration from this blog?   One way you can help support it is to order your Stampin’ Up products through me.   Click HERE to place an order.    Want to become a Stampin’ Up Demonstrator , receive a 20% discount on product and earn instant income on orders?  Consider being part of my Stampin’ Up Team and start your own business or become a Hobby Demo just for the discount.  Click HERE for more information.

I started with a 4 3/8″ Square piece of Whisper White card stock.    Using the edge of a River Rock ink spot, smeared in a square of color.

Dabbed the corner of the ink spot all over the square of color to create a bit of texture.

Using a Baja Breeze ink spot created another textured spot.

Repeated creating another spot using Marina Mist ink.

The last spot of color was created with Marina Mist ink for the square and then the texture was put in with a Not Quite Navy ink spot.

Using the edge of a Soft Suede ink spot, smeared in strips of color in between the color spots.

Distressed the edges using the same Soft Suede ink spot.

Stamped the Flowers using Soft Suede first and them stamped the same image, only lower, using Early Espresso ink.

On a scrap piece of Whisper White card stock, smeared River Rock ink.

Stamped the Butterfly image using Soft Suede ink.

Lined the butterfly up in the center of the Curly Label Punch and punched it out.

Added Certainly Celery Marker to the body of the butterfly and Baja Breeze ink to it’s wings.

Added White Gel Pen to the center of the wings and Marina Mist marker to outside edges of the wings. 

Sponged Early Espresso ink to the edges of the card stock and the Curly Label Punches.

Aded White gel pen highlights to the flowers.

Added 2 Early Espress, 1 Not Quite Navy and 1 River Rock panels of card stock and 5 Gold Brads.

Here is the finished card measuring 5.5″  square.

May your day be one of pure delight!

Until my next post… . . . . . . .

Hugs,

Michelle

22.1 lbs down, 44.2 to go!

   Get ready for Brayer Workshops!  I am coming to the following locations, click the location name for more information.   


Houston, Texas   

Wichita, Kansas   

Syracuse (Bridgeport), New York   

St. Peters, Missouri   

La Porte, Indiana   

Orlando (Davenport), Florida   

St. Cloud, Minnesota   

Colorado Springs, Colorado   

Ottumwa, Iowa   

Owings Mills, Maryland (Baltimore Area)  

Cleveland (Euclid), Ohio   

Staley , North Carolina (South of Greensboro)   

Monroe, Connecticut   

Dayton, Ohio 

Leesburg, Florida   

Montreal, Wisconsin   

Savannah, Georgia   

Lincoln, Illinois   

Jefferson, Louisiana (New Orleans Area)   

Here is a link to my workshop calendar where you can see all of my travel schedule and to get info on beginner and advanced Brayer workshops:   http://zindorf.blogs.splitcoaststampers.com/workshop-calendar    

Don’t see a workshop in your State?  Interested in hosting the workshops in your area in 2012?   Click HERE to get hostess information.   

Link to my Stampin’ Up website where you can order all of your must have Stampin’ Up products from me 24-7:  http://michellezindorf.stampinup.net


Stampin’ Up Packing Paper Recycled Gift Wrap – Tutorial #402

Hopefully, we are all doing our part these days to save our plant and keep some things out of the land fills for a while longer.  Here is one idea that will help save trees and and your wallet at the same time.  🙂 

If you are a serious Stampin’ Up! product nut like I am, you probably have lots of that brown paper that is packed in the Stampin’ Up! boxes you receive from the UPS man.  You know the cute guy in brown that we all stock, lol.

As you see in the picture below, I flatten the brown paper out and wrap it around an empty cardboard gift wrap tube to store it.  It packs up nicely and doesn’t take much space to store.

Now that we have our paper all rolled up, let’s get started on creating our gift wrap.   By the way, the paper can be used as is.  Just add a rustic looking ribbon and it looks great.

Supplies:

Stamps: Stampin’ Up! Medallion, Ornate Blossom
Paper: Stampin’ Up! Packing Paper
Ink: Stampin’ Up! Baja Breeze & Rich Razzelberry
Accessories: Stampin’ Up! Rich Razzelberry Grosgrain Polka Dot Ribbon


  My Stampin’ Up customers that order $50 in Stampin’ Up merchandise will receive this handmade card though March 31, 2011.

Don’t forget it is Sale-a-bration time at Stampin’ Up.  Receive a free Sale-a-bration set for each $50 in merchandise purchased.   Click HERE to place an order.   Your order will be shipped directly to your door step from Stampin’ Up!

The Stampin’ Up USA Idea book and Catalog is here.   For your copy, please send a check for $9.95 to Michelle Zindorf, P.O. Box 116, West Alexandria, OH 45381 or send it via paypal to mzindorf@aim.com USA only.     My current customers will receive a new Occasions Mini Catalog automatically from me.   Not a current customer and want a free copy of the new Occasions Mini Catalog ?  E-mail your mailing address to mzindorf@aim.com and I will get one in the mail to you.  )  Are you getting inspiration from this blog?   One way you can help support it is to order your Stampin’ Up products through me.   Click HERE to place an order.    Want to become a Stampin’ Up Demonstrator , receive a 20% discount on product and earn instant income on orders?  Consider being part of my Stampin’ Up Team and start your own business or become a Hobby Demo just for the discount.  Click HERE for more information.

First thing I did was cut a piece of paper off  the roll that would fit the box that I wanted to wrap.

You will want to use some big bold stamps for a piece this large.  🙂

I selected the Stampin’ Up Medallion stamp and stamped it in Baja Breeze ink in staggered rows across the paper.

Stamped the Stampin’ Up Ornate Blossom stamp using Rich Razzelberry ink between the Medallion stampings.

Wrapped my gift and added a Rich Razzelberry ribbon.  You will want to watch the ribbon when the gift is opened.  If the recipient does not want the ribbon, snag it before it hits the trash.  🙂  Again to recycle. 

Here is a smaller package, wrap done with Old Olive, Early Espresso and Cajun Craze inks.  🙂

I hope you find value in this tutorial.  Now let’s get to recycling!

May your day be filled with all the gifts this wonderful planet has to offer.

Until my next post. . . . . . .  .

Hugs,

Michelle

   Get ready for Brayer Workshops!  I am coming to the following locations, click the location name for more information.  

Wichita, Kansas  

Syracuse (Bridgeport), New York  

St. Peters, Missouri  

La Porte, Indiana  

Orlando (Davenport), Florida  

St. Cloud, Minnesota  

Colorado Springs, Colorado  

Ottumwa, Iowa  

Owings Mills, Maryland (Baltimore Area) 

Cleveland (Euclid), Ohio  

Staley , North Carolina (South of Greensboro)  

Monroe, Connecticut  

Dayton, Ohio

Leesburg, Florida  

Montreal, Wisconsin  

Savannah, Georgia  

Lincoln, Illinois  

Jefferson, Louisiana (New Orleans Area)  

Here is a link to my workshop calendar where you can see all of my travel schedule and to get info on beginner and advanced Brayer workshops:   http://zindorf.blogs.splitcoaststampers.com/workshop-calendar   

Don’t see a workshop in your State?  Interested in hosting the workshops in your area in 2012?   Click HERE to get hostess information.  

Link to my Stampin’ Up website where you can order all of your must have Stampin’ Up products from me 24-7:  http://michellezindorf.stampinup.net


Hey Soccer Moms – Tutorial #401

Hey Soccer Moms, I have a card tutorial for you today.   Exactly what do you do with that stamp set that has a ball and one sentiment?  Well, you build a scene around that ball. 

Ready?  Let’s get started. . . .  . . .

Supplies:

Stamps: Stampin’ Up! Goal
Paper: Stampin’ Up! Whisper White, Always Artichoke, Tempting Turquoise, Basic Black card stock and Stampin’ Up! Newsprint Designer Paper
Ink: Stampin’ Up! Basic Black, Always Artichoke, Tempting Turquoise, Old Olive
Accessories: Stampin’ Up! Sponges, Versamark Marker, Ruler, Star & Circle punches, Post it Note, Brayer, Clear embossing powder, heat gun, Old Olive brads, Sharpie White Paint Marker


  My Stampin’ Up customers that order $50 in Stampin’ Up merchandise will receive this handmade card though March 31, 2011.

Don’t forget it is Sale-a-bration time at Stampin’ Up.  Receive a free Sale-a-bration set for each $50 in merchandise purchased.   Click HERE to place an order.   Your order will be shipped directly to your door step from Stampin’ Up!

The Stampin’ Up USA Idea book and Catalog is here.   For your copy, please send a check for $9.95 to Michelle Zindorf, P.O. Box 116, West Alexandria, OH 45381 or send it via paypal to mzindorf@aim.com USA only.     My current customers will receive a new Occasions Mini Catalog automatically from me.   Not a current customer and want a free copy of the new Occasions Mini Catalog ?  E-mail your mailing address to mzindorf@aim.com and I will get one in the mail to you.  )  Are you getting inspiration from this blog?   One way you can help support it is to order your Stampin’ Up products through me.   Click HERE to place an order.    Want to become a Stampin’ Up Demonstrator , receive a 20% discount on product and earn instant income on orders?  Consider being part of my Stampin’ Up Team and start your own business or become a Hobby Demo just for the discount.  Click HERE for more information.

Stamped the soccer ball using Craft (pigment) Basic Black ink on a 3.5″ x 4″ piece of Whisper White card stock.

Heat embossed the image using clear embossing powder and a heat gun.

Colored over the image using a Versamark marker and then heat embossed the image again.  This protects the white in the soccer ball from ink I will put on in later steps.

Brayered Old Olive ink from the bottom of the card stock to the top.

Lightly buffed off the image with a paper towel.  You will want to do this anytime you get ink on your embossed image.

Brayered Always Artichoke ink at the bottom of the card stock.

Using a Sharpie White Paint Marker and a ruler, put in the field lines. 

Masked the soccer ball and field with a post it note and sponged basic Black ink at the post it note edge to create a shadow under the soccer ball.

Brayered Tempting Turquoise ink at the top of the card stock.

Punched 3 Basic Black card stock stars.

Cut a 4.75″ x 6.25″ piece of Stampin’ Up News Print Designer paper and sponged Always Artichoke ink around the edges of it.

Crumpled the paper up and then flattened it out and sponged a bit of Always Artichoke ink over the crinkles to enhance them.


Added 2 Always Artichoke panels, 1 Basic Black panel and 1 Tempting Turquoise panel.  Also added Tempting Turquoise circles to the stars and Old Olive brads.

Stamped the Sentiment in the right corner twice using Basic Black ink.

Here is the finished card measuring 5.25″ x 6.75″.

A little funny before I close. This was found on my friend and downlines Face page this morning, hysterical!

OMG! I figured out why Im fat! The shampoo I use in the shower that runs down my body says “For extra volume and body” Im goin to start using “Dawn” dish soap.It says “Dissolves fat that is otherwise difficult to remove” Re post if u have the same issue..its too funny to not share!

May your day be a total winner.

Until my next post. . . . . .

Hugs,

Michelle

Total weight loss to date 20.3 lbs, 45.7 to go.

   Get ready for Brayer Workshops!  I am coming to the following locations, click the location name for more information.  

Houston, Texas  

Wichita, Kansas  

Syracuse (Bridgeport), New York  

St. Peters, Missouri  

La Porte, Indiana  

Orlando (Davenport), Florida  

St. Cloud, Minnesota  

Colorado Springs, Colorado  

Ottumwa, Iowa  

Owings Mills, Maryland (Baltimore Area) 

Cleveland (Euclid), Ohio  

Staley , North Carolina (South of Greensboro)  

Monroe, Connecticut  

Dayton, Ohio

Leesburg, Florida  

Montreal, Wisconsin  

Savannah, Georgia  

Lincoln, Illinois  

Jefferson, Louisiana (New Orleans Area)  

Here is a link to my workshop calendar where you can see all of my travel schedule and to get info on beginner and advanced Brayer workshops:   http://zindorf.blogs.splitcoaststampers.com/workshop-calendar   

Don’t see a workshop in your State?  Interested in hosting the workshops in your area in 2012?   Click HERE to get hostess information.  

Link to my Stampin’ Up website where you can order all of your must have Stampin’ Up products from me 24-7:  http://michellezindorf.stampinup.net


It’s a Little Fishy – Tutorial #400

Here I am at tutorial #400.   Thanks for hanging out with me so far.  Hopefully, I will be around to create many, many more.  It is always so shocking to hit a big milestone though.   If you have missed any of the previous tutorials and want a quick way to look through them, click on the tab at the top of my blog that says “Tutorials”.    You will find thumbnail size pics that you can click on that will take you straight to the tutorial you are looking for.  🙂  Check it out.

Inspiration comes to me from many places.  I never thought it would be from the  pet store though.  But here it is, I was inspired by a fish tank full of Neon Fish.  🙂

Now on with tutorial #400!

Supplies:

Stamps: Stampin’ Up! C is for Cat, Pocket Silhouettes and Apple Blossoms
Paper: Stampin’ Up Desiger paper, Whisper White, Always Artichoke, River Rock and Rose Red card stock
Ink: Stampin’ Up! Pacific Point, Garden Green, Tempting Turquoise, River Rock, Basic Black, Crumb Cake and Always Artichoke
Accessories: Stampin’ Up! Gold Brads, Brayer, Sponge, White Gel Pen, Basic Black marker, Hobby Blade, Versamark Pad, Rose Red Marker, Post it Notes, Clear Embossing Powder and Heat Gun


  My Stampin’ Up customers that order $50 in Stampin’ Up merchandise will receive this handmade card though March 31, 2011.

Don’t forget it is Sale-a-bration time at Stampin’ Up.  Receive a free Sale-a-bration set for each $50 in merchandise purchased.   Click HERE to place an order.   Your order will be shipped directly to your door step from Stampin’ Up!

The Stampin’ Up USA Idea book and Catalog is here.   For your copy, please send a check for $9.95 to Michelle Zindorf, P.O. Box 116, West Alexandria, OH 45381 or send it via paypal to mzindorf@aim.com USA only.     My current customers will receive a new Occasions Mini Catalog automatically from me.   Not a current customer and want a free copy of the new Occasions Mini Catalog ?  E-mail your mailing address to mzindorf@aim.com and I will get one in the mail to you.  )  Are you getting inspiration from this blog?   One way you can help support it is to order your Stampin’ Up products through me.   Click HERE to place an order.    Want to become a Stampin’ Up Demonstrator , receive a 20% discount on product and earn instant income on orders?  Consider being part of my Stampin’ Up Team and start your own business or become a Hobby Demo just for the discount.  Click HERE for more information.

Please bare with me through the first few pictures, lol.  I apparently had hit a setting I should not have on my camera.  🙂  Yep, I’m only human.

Loaded the fish stamp from the Stampin’ Up set C is for Cat with Versamark, Tempting Turquoise ink and then used the brush end of a Rose Red Marker on the bottom half of the fish before stamping it.   Yes that is right, load Versamark, ink and marker all before stamping it.  🙂

Heat emboss the images using Clear embossing powder and a heat gun.

Loaded the Plant from the Stampin’ Up set “Pocket Silhouettes” with Versamark and Old Olive ink before stamping it.  Reloaded for the second stamping.

Heat embossed the images using clear embossing powder and a heat gun.   Ahh, now my pictures are looking better, lol.

Ripped a post it note and used it as a mask for the sand.

Brayered Pacific Point ink at the top of the card stock.

Be sure to lightly buff off your embossed images with a paper towel after putting ink over them.  Be careful not to scrub them.

Brayered Garden Green ink at the top of the card stock, not covering the Pacific Point ink entirely.

Removed the sand mask and brayered River Rock ink at the bottom of the card stock.

Ripped a post it note in a hill shape and used it as a mask.

Sponged Crumb Cake ink at the post it note edge.

Moved the post it note and put in a second little hill.

Stamped the plant using Always Artichoke ink along the bottom of the card stock.

Added White Gel Pen highlights to the tops of the plants and fish.

Added Basic Black marker underneath the leaves and a few of the fish, being careful not to get the marker on the embossed images.

Cut 2 pieces of designer paper 3.5″ x 5.75″.

Put them on a Stampin’ Up glass cutting mat and used my Hobby Blade to cut the two pieces of paper at one time.  This keeps the lay edges the same shape so you can stagger them.

Added an Always Artichoke panel and a River Rock panel.  Stamped the sentiment from the Stampin’ Up set Apple Blossoms using Basic Black ink.

Added a 5″ x 6.5″ Rose Red card stock panel and Gold Brads.   Here is my finished card measuring 5″ x 6.5″. 

I am off to Houston, TX tomorrow to have a grand time teaching my brayering techinques.  You all have a super weekend!

Until my next post. . .  . . . .

Hugs,

Michelle

   Get ready for Brayer Workshops!  I am coming to the following locations, click the location name for more information.  

Houston, Texas  

Wichita, Kansas  

Syracuse (Bridgeport), New York  

St. Peters, Missouri  

La Porte, Indiana  

Orlando (Davenport), Florida  

St. Cloud, Minnesota  

Colorado Springs, Colorado  

Ottumwa, Iowa  

Owings Mills, Maryland (Baltimore Area) 

Cleveland (Euclid), Ohio  

Staley , North Carolina (South of Greensboro)  

Monroe, Connecticut  

Dayton, Ohio

Leesburg, Florida  

Montreal, Wisconsin  

Savannah, Georgia  

Lincoln, Illinois  

Jefferson, Louisiana (New Orleans Area)  

Here is a link to my workshop calendar where you can see all of my travel schedule and to get info on beginner and advanced Brayer workshops:   http://zindorf.blogs.splitcoaststampers.com/workshop-calendar   

Don’t see a workshop in your State?  Interested in hosting the workshops in your area in 2012?   Click HERE to get hostess information.  

Link to my Stampin’ Up website where you can order all of your must have Stampin’ Up products from me 24-7:  http://michellezindorf.stampinup.net


Patriotic Cowboy – Tutorial #399

A few days ago I requested that my readers let me know what they would like to see on my blog.  Well, there were many requests to see more Western themed cards and more Direct To Paper Tutorials.    I think we have those two requests covered with this tutorial. 

Folks, it is so very easy to put in this flag background.  I hope you give this one a try.  🙂

Let’s get started. . . .  . .

Supplies:

Stamps: Stampin’ Up! Out West & Seeing Stars
Paper: Stampin’ Up! Very Vanilla, Bravo Burgundy and Soft Suede
Ink: Stampin’ Up! Ink Spots – Not Quite Navy, Bravo Burgundy, Soft Suede, Early Espresso, Craft ink pad Whisper White
Accessories: Stampin’ Up! Sponges, Basic Black marker, Gold Brads


  My Stampin’ Up customers that order $50 in Stampin’ Up merchandise will receive this handmade card though March 31, 2011.

Don’t forget it is Sale-a-bration time at Stampin’ Up.  Receive a free Sale-a-bration set for each $50 in merchandise purchased.   Click HERE to place an order.   Your order will be shipped directly to your door step from Stampin’ Up!

The Stampin’ Up USA Idea book and Catalog is here.   For your copy, please send a check for $9.95 to Michelle Zindorf, P.O. Box 116, West Alexandria, OH 45381 or send it via paypal to mzindorf@aim.com USA only.     My current customers will receive a new Occasions Mini Catalog automatically from me.   Not a current customer and want a free copy of the new Occasions Mini Catalog ?  E-mail your mailing address to mzindorf@aim.com and I will get one in the mail to you.  )  Are you getting inspiration from this blog?   One way you can help support it is to order your Stampin’ Up products through me.   Click HERE to place an order.    Want to become a Stampin’ Up Demonstrator , receive a 20% discount on product and earn instant income on orders?  Consider being part of my Stampin’ Up Team and start your own business or become a Hobby Demo just for the discount.  Click HERE for more information.

Using a Stampin’ Up Not Quite Navy ink spot, swiped it on the top left corner of a 4″ x 5.5″ piece of Very Vanilla card stock.

Swiped a Bravo Burgundy ink spot on the card stock creating stripes.

Smeared Soft Suede ink around the sides of the card stock.

Swiped Early Espresso ink at the edges of the card stock, not covering the Soft Suede ink entirely.

Ripped a Post it note mask in the shape of a mountain.  Masked the card stock and sponged Soft Suede ink in the mountain shape.

Stamped the Cowboy using Basic Black ink.

Colored the cowboy in to create a silhouette.

Filled the bottom of the card stock in by swiping Soft Suede ink on.

Swiped Basic Black ink at the bottom of the card stock to create the ground.

Stamped the star in the Not Quite Navy ink area using Whisper White ink.

Sponged Basic Black ink around the edges of the card stock.

Cut a 4.75″ x 6.25″ piece of Soft Suede card stock and sponged Basic Black ink around the edges.

Added two Bravo Burgundy card stock panels and gold brads. 

Here is the finished card measuring 5″ x 6.5″.

May your day be one to remember.

Hugs,

Michelle

   Get ready for Brayer Workshops!  I am coming to the following locations, click the location name for more information.  

Houston, Texas  

Wichita, Kansas  

Syracuse (Bridgeport), New York  

St. Peters, Missouri  

La Porte, Indiana  

Orlando (Davenport), Florida  

St. Cloud, Minnesota  

Colorado Springs, Colorado  

Ottumwa, Iowa  

Owings Mills, Maryland (Baltimore Area) 

Cleveland (Euclid), Ohio  

Staley , North Carolina (South of Greensboro)  

Monroe, Connecticut  

Dayton, Ohio

Leesburg, Florida  

Montreal, Wisconsin  

Savannah, Georgia  

Lincoln, Illinois  

Jefferson, Louisiana (New Orleans Area)  

Here is a link to my workshop calendar where you can see all of my travel schedule and to get info on beginner and advanced Brayer workshops:   http://zindorf.blogs.splitcoaststampers.com/workshop-calendar   

Don’t see a workshop in your State?  Interested in hosting the workshops in your area in 2012?   Click HERE to get hostess information.  

Link to my Stampin’ Up website where you can order all of your must have Stampin’ Up products from me 24-7:  http://michellezindorf.stampinup.net


Flowering Spring – Tutorial #398 and Punch Bunch Blog Candy

28 days to Spring.   I’m counting, how about you?    Are you ready to make those welcome Spring and Easter cards.   As you see I’m getting a head start.   This little girl is the perfect image to use and easy too since you don’t have to color her.   I love, love, love silhouettes.


But before I get started on the tutorial how about some Blog Candy.   I have a Cute, cute Stampin’ Up! Punch Bunch stamp set to give away.  

All you have to do to enter for a chance to win this Punch Bunch set is to leave a comment at the bottom of this post.   If you are getting this blog update via e-mail, PLEASE CLICK HERE and then leave a comment at the bottom of the blog post.

I will choose the winner on Tuesday,  February 22, 2011 using a random number generator.   GOOD LUCK TO ALL!

Now on with the Tutorial!

Supplies:

Stamps: Stampin’ Up Easter Blossoms & Apple Blossoms
Paper: Stampin’ Up Whisper White, Tangerine Tango & Crumb Cake
Ink: Stampin’ Up Basic Black, Old Olive, Peach Parfait, Tanergine Tango & Daffodil Delight
Accessories: Stampin’ Up Daffodil Delight & Peach Parfait markers, Brayer, sponges, Daffodil Delight Grosgrain Ribbon

  My Stampin’ Up customers that order $50 in Stampin’ Up merchandise will receive this handmade card though March 31, 2011.

Don’t forget it is Sale-a-bration time at Stampin’ Up.  Receive a free Sale-a-bration set for each $50 in merchandise purchased.   Click HERE to place an order.   Your order will be shipped directly to your door step from Stampin’ Up!

The Stampin’ Up USA Idea book and Catalog is here.   For your copy, please send a check for $9.95 to Michelle Zindorf, P.O. Box 116, West Alexandria, OH 45381 or send it via paypal to mzindorf@aim.com USA only.     My current customers will receive a new Occasions Mini Catalog automatically from me.   Not a current customer and want a free copy of the new Occasions Mini Catalog ?  E-mail your mailing address to mzindorf@aim.com and I will get one in the mail to you.  )  Are you getting inspiration from this blog?   One way you can help support it is to order your Stampin’ Up products through me.   Click HERE to place an order.    Want to become a Stampin’ Up Demonstrator , receive a 20% discount on product and earn instant income on orders?  Consider being part of my Stampin’ Up Team and start your own business or become a Hobby Demo just for the discount.  Click HERE for more information.

Brayered Daffodil Delight ink at an angle on the bottom right corner of a 4.25″ x 5″ piece of Whisper White Card Stock.

Brayered Peach Parfait at an angle on the top left corner.

Brayered Tangerine Tango ink at the top left corner, not covering the Peach Parfait ink entirely.

Stamped the flower from the Stampin’ Up Apple Blossoms set using Peach Parfait ink.

Stamped the girl silhouette stamp from the Stampin’ Up Easter Blossoms set using Basic Black ink.

Sponged Old Olive ink at the bottom of the card stock.

Sponge Basic Black ink at the bottom of the card stock, not covering the Old Olive ink entirely.

Added a Tangarine Tango panel, a Crumb Cake panel and Daffodil Delight Ribbon.

Stamped the blossom twig from the Stampin’ Up Easter Blossoms set using Basic Black ink.

Colored the flowers using a Daffodil Delight marker.  Added Peach Parfait marker to the darker areas of the flowers.

Here is the finished card measuring 5″ x 6.5″.

May your day be filled with early Spring breezes.

Until my next post. . . . .  . ..

Hugs,

Michelle

   Get ready for Brayer Workshops!  I am coming to the following locations, click the location name for more information.  

Houston, Texas  

Wichita, Kansas  

Syracuse (Bridgeport), New York  

St. Peters, Missouri  

La Porte, Indiana  

Orlando (Davenport), Florida  

St. Cloud, Minnesota  

Colorado Springs, Colorado  

Ottumwa, Iowa  

Owings Mills, Maryland (Baltimore Area) 

Cleveland (Euclid), Ohio  

Staley , North Carolina (South of Greensboro)  

Monroe, Connecticut  

Sturgis, South Dakota  

Leesburg, Florida  

Montreal, Wisconsin  

Savannah, Georgia  

Lincoln, Illinois  

Jefferson, Louisiana (New Orleans Area)  

Here is a link to my workshop calendar where you can see all of my travel schedule and to get info on beginner and advanced Brayer workshops:   http://zindorf.blogs.splitcoaststampers.com/workshop-calendar   

Don’t see a workshop in your State?  Interested in hosting the workshops in your area in 2012?   Click HERE to get hostess information.  

Link to my Stampin’ Up website where you can order all of your must have Stampin’ Up products from me 24-7:  http://michellezindorf.stampinup.net