Skate Board Candy Jar – Tutorial #347 and a Blog Candy Winner

dsc04477.JPG

dsc04481.JPG   dsc04480.JPG   dsc04479.JPG

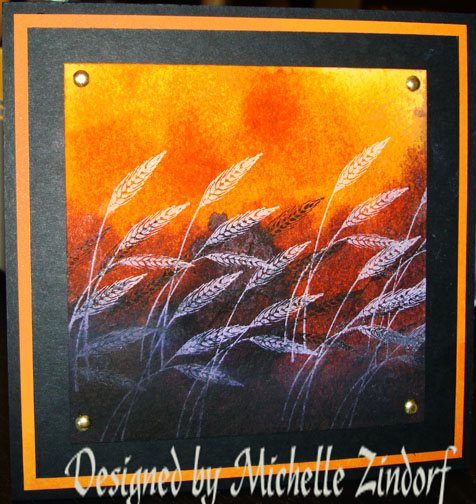
 What about those pre-teen, teenage boys?  Whew! they are hard to craft for, don’t you think?   Well here is a candy jar made out of a mason jar that can also be used as a bank after it is empty or it can hold any number of things.  Stampin’ Up! has this great single stamp called “Extreme Skate Board” which is really fun to create those hard teenage boy things.   Also, doesn’t everyone have a canning jar hiding in the back of the cabinet that needs re-purposed?  If you don’t check out garage sales where you can find them real cheap.

Now before I start the tutorial let me announce this weeks blog candy winner!

dsc04453.JPG  Congrats to . . . . . . .

Gloria Dojlido who wrote “Your card is just so sweet. I look forward to seeing more of your creations using some of the new stamp sets…as always..you inspire so many with your creativity!  Thanks for the chance at the blog candy and very glad to hear your hubby is doing better.”

Gloria, please e-mail your mailing address to me at mzindorf@aim.com with in 30 days and I will get this great Stampin’ Up! “It’s the Thought” to you ASAP.

Thanks to all of you who played along.  Keep playing it may be you next week.

Now on with today’s tutorial. . . . . .
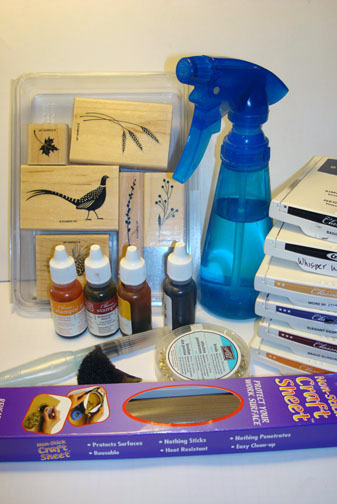
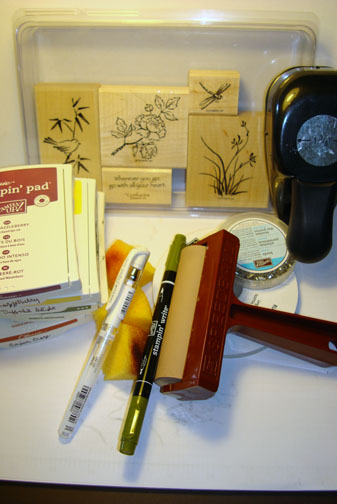
Supplies:

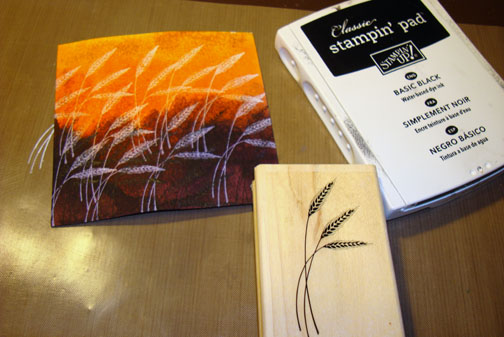
Stamps: Stampin’ Up! Extreme Skateboard and A Little Bit of Magic
Paper: Stampin’ Up! Whisper White, Basic Black, Cajun Craze and Marina Mist
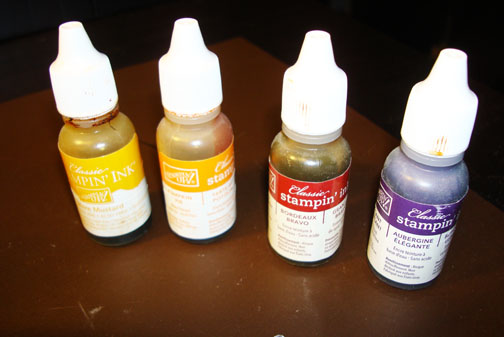
Ink: Stampin’ Up! Cajun Craze, Daffodil Delight, Basic Black, Pumpkin Pie, Marina Mist, Not Quite Navy, Night of Navy and Old Olive
Accessories: Stampin’ Up! Sponges, Stamp-a-ma-jig, Star Punches, 1 3/4″ circle Punch, Crop-a-dile, Basic Black marker, Brayer, Pumpkin Pie and Basic Black ribbon, Mason Jar and Silver Brads

The brand new USA Idea book and Catalog is here.   For your copy, please send a check for $9.95 to Michelle Zindorf, P.O. Box 116, West Alexandria, OH 45381 or send it via paypal to mzindorf@aim.com USA only.     Want a copy of the Summer Mini Catalog?  E-mail your mailing address to mzindorf@aim.com and I will get one in the mail to you.  )  Are you getting inspiration from this blog?   One way you can help support it is to order your Stampin’ Up products through me.   Click HERE to place an order.  Click HERE to check out the Stampin’ Up! catalogs.  Want to become a Stampin’ Up Demonstrator , receive a 20% discount on product and earn instant income on orders?  Consider being part of my Stampin’ Up Team and start your own business.  Click HERE for more information.

dsc04482.JPG

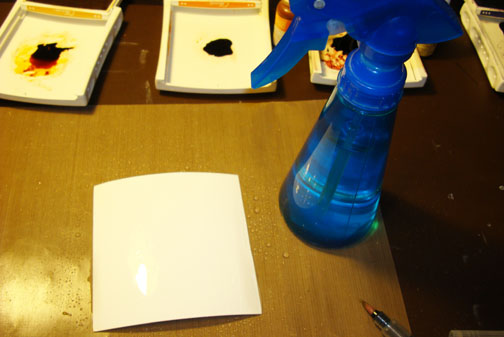
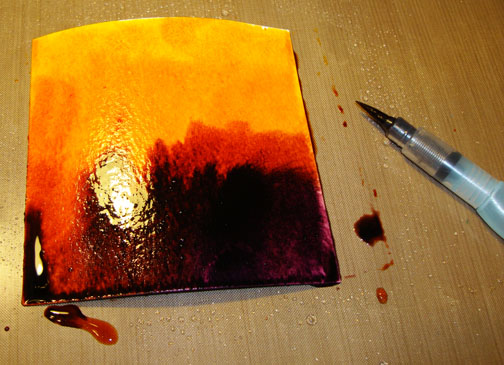
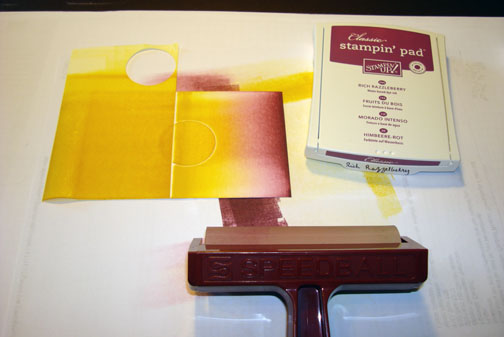
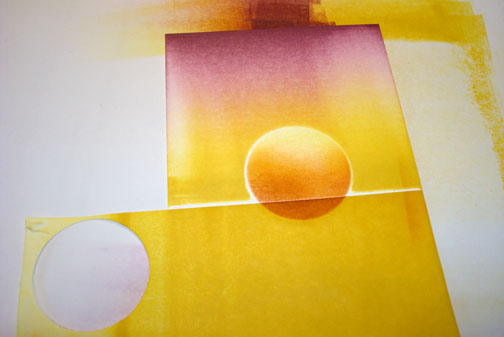
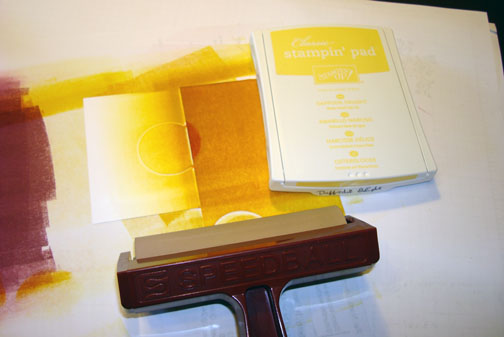
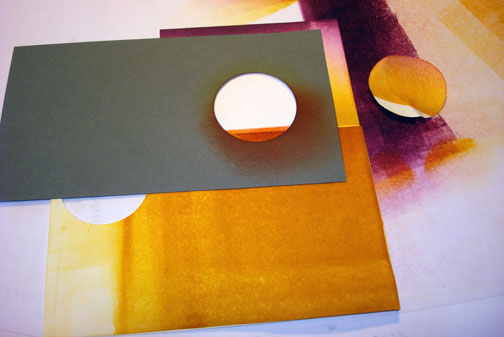
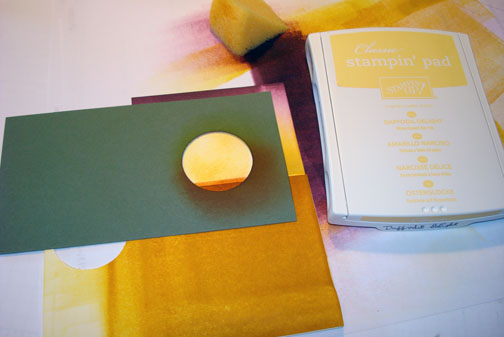
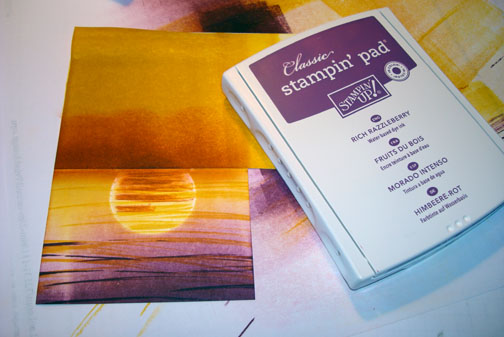
Brayered Daffodil Delight Ink on the right side of a 4″ x 11″ piece of Whisper White card stock.

dsc04454.JPG

Brayered Pumpkin Pie in on, not covering the Daffodil Delight ink entirely.

dsc04455-copy.jpg

Brayered Cajun Craze ink on, not covering the Pumpkin Pie ink entirely.

dsc04456.JPG

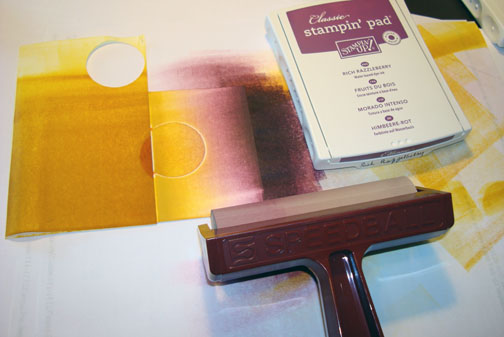
Flipped the card stock around and brayered Marina Mist ink on the card stock, just meeting the Daffodil Delight ink in the middle.

dsc04457.JPG

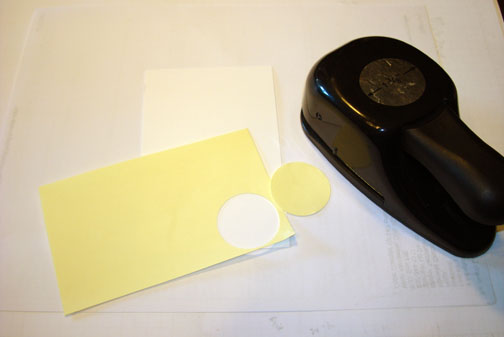
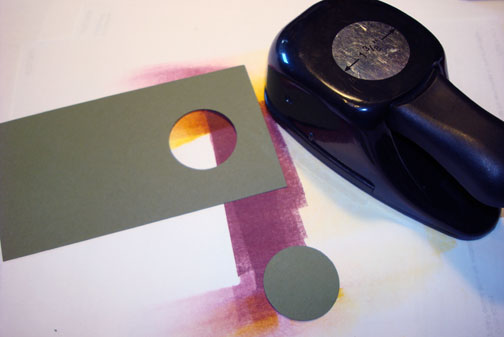
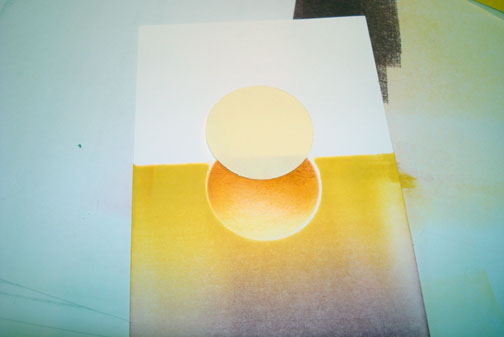
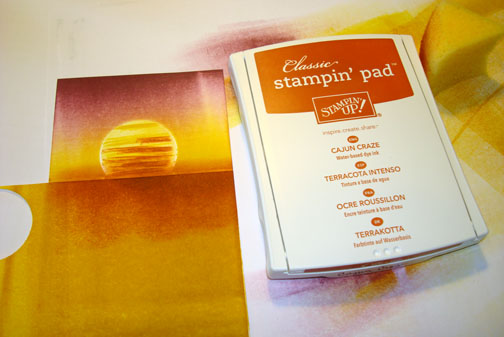
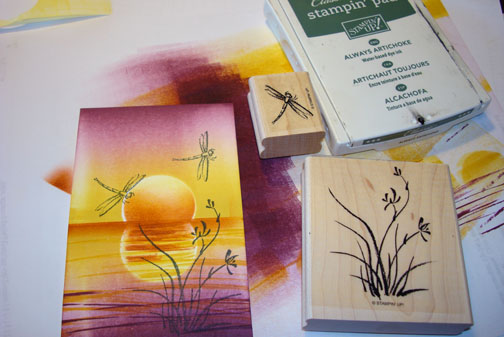
Punched a 1 3/4″ circle from a post it note and used it as a mask for the moon.

dsc04458.JPG

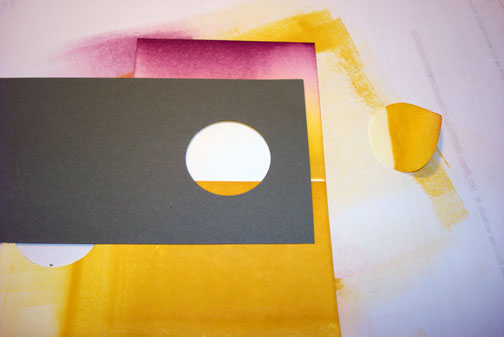
Brayered Not Quite Navy ink on, not covering the Marina Mist ink entirely.

dsc04459.JPG

Brayered Night of Navy ink on, not covering the Not Quite Navy ink entirely.

dsc04460.JPG

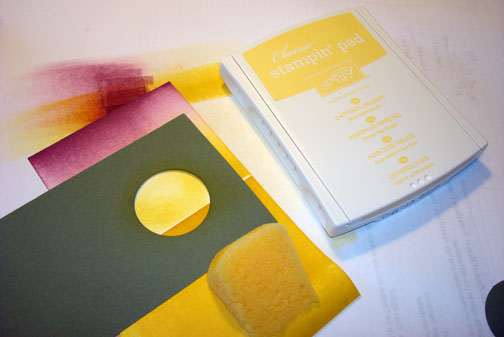
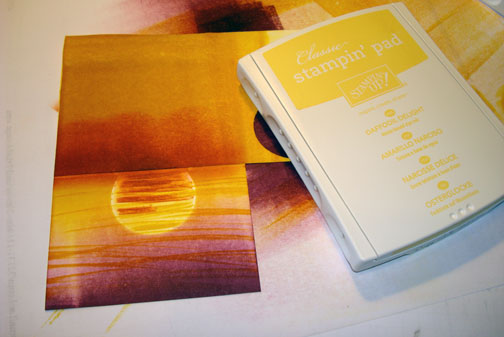
Sponged Old Olive ink on the bottom of the card stock creating some hills.  Also took the moon mask off.

dsc04461.JPG

Sponged Basic Black ink at the bottom of the card stock, not covering the Old Olive ink entirely.

dsc04462.JPG

Using my Stamp-a-ma-jig for placement, stamp the skateboarder 4 times at different angles using Basic Black ink.

dsc04463.JPG

dsc04464.JPG

Stamped the fairy dust from the Stampin’ Up! set A Little Bit of Magic using Basic Black ink.

dsc04465.JPG

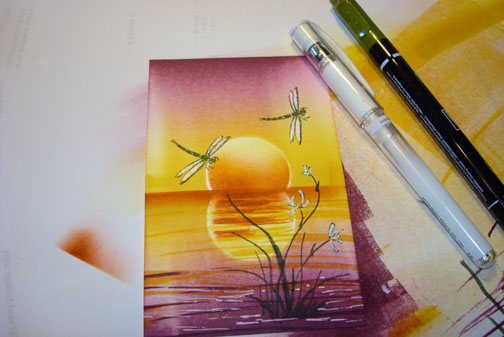
Tore a bit of card stock off of the bottom and the top of the main image panel.

dsc04466.JPG

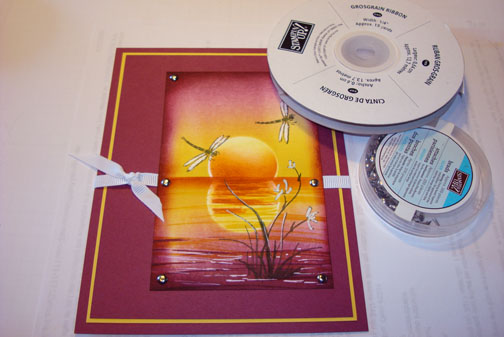
Added Basic Black and Cajun Craze Card stock panels.  Glued them together.

dsc04467.JPG

Held both ends of the panels together and put small holes along the edge using my Crop o dile.

dsc04468.JPG

Wrapped the panels around the Mason Jar and laced Basic Black ribbon up the back.  This panel can is easy to remove in orde to clean the jar.

dsc04470.JPG

Added Basic Black and Pumpkin pie ribbon to the neck of the jar.  Added Basic Black and Cajun Craze star punches using silver brads to hold them on.

dsc04473.JPG

Traced around the inside of the lid on Marina Mist card stock.

dsc04474.JPG

Cut the circle out and added Basic Black and Cajun Craze Star Punches.

dsc04475.JPG

Adhered the Marina Mist circle to the inside of the jar lid using Mini Glue Dots.

dsc04476.JPG

Here is the finished jar.

dsc04477.JPG

These jar covers are fun to make and you could create one for you house and create a different scene for each season.  🙂

I hope this has inspired you to dust off a mason jar and give it a try.

May your day be filled with belly laughs.

Until my next post. . . .  . . . . . . .

Hugs,

Michelle

 dsc03326-2.jpg   Get ready for Brayer Workshops!  I am coming to the following locations, click the location name for more information.

Kenova (Huntington), West Virginia

Middleburg Heights, Ohio 

Venice, Florida

Grinnell, Iowa

Piedmont, Alabama (Near GA border close to Cedartown)

Auburn, Washington (near Seattle)

Elk Grove Village, Illinois

Savannah, Georgia

Atlanta, Georgia

Soledad, California

Fayette, Tennessee

Tucson, Arizona

Virginia Beach, Virginia

Houston, Texas

Wichita, Kansas

Orlando (Davenport), Florida

Here is a link to my workshop calendar where you can see all of my travel schedule and to get info on beginner and advanced Brayer workshops:   http://zindorf.blogs.splitcoaststampers.com/workshop-calendar 

Link to my Stampin’ Up website where you can order all of your must have Stampin’ Up products from me 24-7:  http://michellezindorf.stampinup.net

Frequently asked questions answers:  http://zindorf.blogs.splitcoaststampers.com/frequently-asked-questions/ 


Fifth Avenue Magic – Tutorial #346 and Blog Candy

dsc04448.JPG

Happy Friday!  I’m home this weekend.   With all of the traveling I’ve been doing it seems a little strange.  🙂

After many inquiries, I want to give you an update regarding my husband Russ’ health.  He is doing so much better.  Although he still has an irregular heart beat, his heart rate is where it should be.  He is being treated with medication for now to try to straighten things out.   Thank you again for keeping him in your thoughts.  I just think his heart beats faster when I’m around, lol.  🙂

Now back to business.   Today’s tutorial is quite girly with all the pink and I have been dying to use the Little Bit of Magic set.  So here is my little scene with it.

Before we get started on the tutorial I want to announce today’s blog candy.  Check it out, it is a brand new Stampin’ Up! Clear Mount Hostess set “It’s the Thought. 

       dsc04453.JPG        dsc04393.JPG                 

All you have to do to be enter to win this set is leave me a comment on this blog post telling me to enter you.  If you are getting this blog update via e-mail you will need to click HERE and then leave a comment.  Please no e-mail entries.

I will select the winner on Monday, July 12, 2010 using a Random Number Generator.   Good Luck Everyone!                           

Let’s get started on that tutorial. . . . .  . .

Supplies:

Stamps: Stampin’ Up! Fifth Avenue Floral and Little Bit of Magic
Paper: Stampin’ Up! Whisper White, Old Olive, Marina Mist and Not Quite Navy
Ink: Stampin’ Up! Melon Mambo, Not Quite Navy, Whisper White, Basic Black, Night of Navy, Marina Mist and Old Olive
Accessories: Stampin’ Up! sponges, Pretty in Pink Ribbon, Markers (Pretty in Pink, Pink Pirouette, Regal Rose, Certainly Celery, So Saffron and Old Olive), Versamark Pad, Circle Scissors, Scribble Swirles Die and Bit Shot Machine

The brand new USA Idea book and Catalog is here.   For your copy, please send a check for $9.95 to Michelle Zindorf, P.O. Box 116, West Alexandria, OH 45381 or send it via paypal to mzindorf@aim.com USA only.     Want a copy of the Summer Mini Catalog?  E-mail your mailing address to mzindorf@aim.com and I will get one in the mail to you.  )  Are you getting inspiration from this blog?   One way you can help support it is to order your Stampin’ Up products through me.   Click HERE to place an order.  Click HERE to check out the Stampin’ Up! catalogs.  Want to become a Stampin’ Up Demonstrator , receive a 20% discount on product and earn instant income on orders?  Consider being part of my Stampin’ Up Team and start your own business.  Click HERE for more information.

dsc04450.JPG

On a 3″ x 5.5″ piece of Whisper White stamped the fairy by first loading my stamp with Versamark and then with Basic Black ink before stamping it.

Heat embossed the image using clear embossing powder and a heat gun.

dsc04421.JPG

dsc04422.JPG

Masked over the fairy with a 2.25″ card stock circle.  I cut the circle using my Circle Scissors.

dsc04423.JPG

Holding the mask in place, sponged Marina Mist ink on the card stock.

dsc04424.JPG

Sponged Not Quite Navy ink on, not covering the Marina Mist ink entirely.

dsc04425.JPG

Sponged Night of Navy at the top of the card stock.

dsc04426.JPG

Removed the mask.

dsc04427.JPG

On a separate piece of Whisper White card stock, stamped the rose by first loading my stamp with Versamark and then Melon Mambo ink before stamping it.  Heat embossed the rose using clear embossing powder and a heat gun.

dsc04428.JPG

Colored in the Rose using a Pink Pirouette marker.

dsc04430.JPG

Added Pretty in Pink marker.

dsc04431.JPG

Added Regal Rose Marker.

 dsc04432.JPG

Cut the rose out.

dsc04433.JPG

Added Pink Pirouette Marker to the Fairy and her flower.

dsc04437.JPG

Added Pretty in Pink marker to the folds of her dress and the center of the flower.

dsc04438.JPG

Added a bit of Regal Rose marker to the darkest areas.

dsc04439.JPG

Colored her collar and hair in with a So Saffron Marker.

dsc04440.JPG

Added Certainly Celery marker to the tips of her collar.

dsc04441.JPG

Stamped the fairy dust with Whisper White ink.  Added just a dot of Old Olive ink to the tips of her collar.

dsc04442.JPG

Assembled the card front by adding Old Olive, Marina Mist and Not Quite Navy card stock panels.  Added Pretty in Pink ribbon and Scribbles Swirls Die cuts from Old Olive card stock.   Cut the Scribbles Swirls Dies using my Big Shot Machine.

dsc04443.JPG

Sponged Old Olive ink at the bottom of the card front.

dsc04444.JPG

Sponged Not Quite Navy ink at the top of the card front and finished assembling the card.

Here it is finished measuring 5″ x 6.5″.

dsc04448.JPG

May your weekend be absolutely Magical.

Until my next post. . . . . .

Hugs,

Michelle

 dsc03326-2.jpg   Get ready for Brayer Workshops!  I am coming to the following locations, click the location name for more information.

Kenova (Huntington), West Virginia

Middleburg Heights, Ohio 

Venice, Florida

Grinnell, Iowa

Piedmont, Alabama (Near GA border close to Cedartown)

Auburn, Washington (near Seattle)

Elk Grove Village, Illinois

Savannah, Georgia

Atlanta, Georgia

Soledad, California

Tucson, Arizona

Virginia Beach, Virginia

Houston, Texas

Wichita, Kansas

Orlando (Davenport), Florida

Here is a link to my workshop calendar where you can see all of my travel schedule and to get info on beginner and advanced Brayer workshops:   http://zindorf.blogs.splitcoaststampers.com/workshop-calendar 

Link to my Stampin’ Up website where you can order all of your must have Stampin’ Up products from me 24-7:  http://michellezindorf.stampinup.net

Frequently asked questions answers:  http://zindorf.blogs.splitcoaststampers.com/frequently-asked-questions/ 


Salted Wheat – Tutorial #345

dsc04418.JPG

Let’s try a little Salted Background effect today.  I created this project for my Stampin’ Up! Team Technique Swap.  I don’t know why, but I was a bit scared to try this technique at first.   Now that I have and see the wonderful results you can get, I love it.

I do have to warn you to have all of the supplies needed for this card at arms length because you have to work pretty fast.

Also, no two will look the same.  I made 7, and tried to make them alike, but they are all quite different.  This one is my favorite.  It has a dark spot in the field and it makes me think someone is sneaking around out there.  Probably the children of the corn, I mean wheat, LOL.  I crack myself up!

Let’s get started. . . . .

Supplies:

Stamps: Stampin’ Up! Autumn Days
Paper: Watercolor Paper, Stampin’ Up! Basic Black and Pumpkin Pie
Ink: Stampin’ Up! More Mustard, Pumpkin Pie, Bravo Burgundy, Basic Black and White Craft ink.
Accessories: Non Stick Craft sheet, Aqua Painter, Gold Brads, Sponge, Sea Salt and a heat gun

The brand new USA Idea book and Catalog is here.   For your copy, please send a check for $9.95 to Michelle Zindorf, P.O. Box 116, West Alexandria, OH 45381 or send it via paypal to mzindorf@aim.com USA only.     Want a copy of the Summer Mini Catalog?  E-mail your mailing address to mzindorf@aim.com and I will get one in the mail to you.  )  Are you getting inspiration from this blog?   One way you can help support it is to order your Stampin’ Up products through me.   Click HERE to place an order.  Click HERE to check out the Stampin’ Up! catalogs.  Want to become a Stampin’ Up Demonstrator , receive a 20% discount on product and earn instant income on orders?  Consider being part of my Stampin’ Up Team and start your own business.  Click HERE for more information.

dsc04416.JPG

You will need something to work on, non stick craft sheet, plastic tray etc.   Also, water color paper cut to 4″ square and a spray bottle full of water.

dsc04400.JPG

Reinkers in More Mustard, Pumpkin Pie, Bravo Burgundy and Elegant Eggplant.

dsc04401.JPG

Put some of each color reinker in the coordinating ink pad lid.

dsc04402.JPG

Spray your watercolor paper to get it wet.  Let it dry a bit so there are no puddles on the paper.

dsc04403.JPG

Start by putting More Mustard ink heavy on the top of the paper using an Aqua Painter and dipping it in the ink.

Continue with Pumpkin pie right below the More Mustard.  

Continue with Bravo Burgundy ink, right below the Pumpkin pie.

Contine with Elegant Eggplant ink, right below the Bravo Burgundy.

Make sure you are saturating the paper with ink.  Over lap the colors a bit.

dsc04404.JPG

While the paper is still wet, sprinkle Sea Salt on the paper.  The more you use the more texture you will get.

dsc04405.JPG

Dried the paper with a heat gun, flattening it as it dried.

Stamped the Wheat using Whisper White craft ink and then stamp some in Basic Black at the bottom of the paper.

Also sponged Basic Black ink at the bottom of the card stock to blend in bottom of Wheat Stems.

dsc04408.JPG

This is a close up of the dried background.  See how the salt left little dots all over.

dsc04410.JPG

Finished the card with Basic Black, Pumpkin Pie Panels and Gold Brads.

Here it is finished measuring 5.25″ square.

dsc04418.JPG

I hope you enjoyed this unusual tutorial from me.  Give it a try!

May your day be filled with warm gentle breezes.

Until my next post.. . .  . . . .

Hugs,

Michelle

 dsc03326-2.jpg   Get ready for Brayer Workshops!  I am coming to the following locations, click the location name for more information.

Kenova (Huntington), West Virginia

Middleburg Heights, Ohio 

Venice, Florida

Grinnell, Iowa

Piedmont, Alabama (Near GA border close to Cedartown)

Auburn, Washington (near Seattle)

Elk Grove Village, Illinois

Savannah, Georgia

Atlanta, Georgia

Soledad, California

Tucson, Arizona

Virginia Beach, Virginia

Houston, Texas

Wichita, Kansas

Orlando (Davenport), Florida

Here is a link to my workshop calendar where you can see all of my travel schedule and to get info on beginner and advanced Brayer workshops:   http://zindorf.blogs.splitcoaststampers.com/workshop-calendar 

Link to my Stampin’ Up website where you can order all of your must have Stampin’ Up products from me 24-7:  http://michellezindorf.stampinup.net

Frequently asked questions answers:  http://zindorf.blogs.splitcoaststampers.com/frequently-asked-questions/ 


A Little Crabby – Tutorial #344

dsc04393.JPG

Well I am back from taking a little holiday to spend some quality time with my Grand Daughter, Hailie Jade.   We have been having a blast.  I hope you have been having as much fun as we have been having.   Here are few pics of what I have been up to.  🙂

FISHING!  Hailie Jade was the Queen Fisher Woman, for catching two fish.

dsc04372.JPG   dsc04376.JPG

Hailie Jade also taught her Dad, Mitch how to bake a cake and the proper way to clean the beater, LOL.  I want to be almost seven again.  🙂

dsc04364.JPG

Now don’t laugh but Russ and I are both sporting sparkly tattoos on our arms today.  🙂

Enough about my fun.

How about a tutorial. .. . . . .. . . .  .

Today’s tutorial highlights the Stampin’ Up! Level 1 hostess set, It’s the Thought from the Summer Mini Catalog.  I love this little crab, he just makes me happy.

Let’s get started. . . . .

Supplies:

Stamps: Stampin’ Up! It’s The Thought
Paper: Stampin’ Up! Whisper White, Tempting Turquoise, Pumpkin Pie and So Saffron
Ink: Stampin’ Up! Tempting Turquoise, So Saffron and Cherry Cobbler
Accessories: Stampin’ Up! Pumpkin Pie Ribbon, Pumpkin Pie marker, Cherry Cobbler marker, Pumpkin Pie Brads, Brayer, Sponges, Scalloped Edge Punch and Post it notes.

The brand new USA Idea book and Catalog is here.   For your copy, please send a check for $9.95 to Michelle Zindorf, P.O. Box 116, West Alexandria, OH 45381 or send it via paypal to mzindorf@aim.com USA only.     Want a copy of the Summer Mini Catalog?  E-mail your mailing address to mzindorf@aim.com and I will get one in the mail to you.  )  Are you getting inspiration from this blog?   One way you can help support it is to order your Stampin’ Up products through me.   Click HERE to place an order.  Click HERE to check out the Stampin’ Up! catalogs.  Want to become a Stampin’ Up Demonstrator , receive a 20% discount on product and earn instant income on orders?  Consider being part of my Stampin’ Up Team and start your own business.  Click HERE for more information.

dsc04397.JPG

Brayered So Saffron ink at an angle on a 3.5″ square piece of Whisper White card stock.

dsc04378.JPG

Brayered Tempting Turquoise ink at an angle on the opposite corner.

dsc04379.JPG

Ripped a post it note and sponged Tempting Turquoise ink at the post it note edge to create ripples in the water.   Moved the post it note and repeated two times.

dsc04380.JPG

dsc04381.JPG

dsc04382.JPG

dsc04383.JPG

dsc04384.JPG

Stamped the crab in Cherry Cobbler ink.

dsc04385.JPG

Colored the crab in with a Pumpkin Pie marker.

dsc04386.JPG

Added a bit of Cherry Cobbler ink to the underside of the crabs body, legs and arms.  Softened the shadow of the Cherry Cobbler marker by added a bit of Pumpkin Pie marker.  Now he looks a little more 3 D.

dsc04387.JPG

Using a straight Post it Note, sponged So Saffron ink at the post it notes edge to create a shadow under the crab.

dsc04388.JPG

Ripped the post it note in a hill shape and sponged So Saffron ink at the post it notes torn edge to create a couple of hills in the sand for interest.

dsc04389.JPG

Cut a 3.5″ x 5″ piece of Pumpkin Pie card stock and punched the two edges using the Scalloped edge punch.

dsc04390.JPG

Used my brand new Color Coach today to figure out my layers.  Love this new Color Coach Design.

dsc04391.JPG

Assembled my card and added brads and ribbon. 

Tip:  cut a slit in the edge of your ribbon spool and tuck the ribbon end into it to keep it from unwinding.  🙂

dsc04392.JPG

Here is the finished card measuring 5″ x 6.5″.

dsc04393.JPG

I hope this tutorial has inspired you to create a beach scene.

May your day be filled with warmth and happiness.

I am off to go biking with Hailie Jade.

Until my next post. . . .

Hugs,

Michelle

 dsc03326-2.jpg   Get ready for Brayer Workshops!  I am coming to the following locations, click the location name for more information.

Kenova (Huntington), West Virginia

Middleburg Heights, Ohio 

Venice, Florida

Grinnell, Iowa

Piedmont, Alabama (Near GA border close to Cedartown)

Auburn, Washington (near Seattle)

Elk Grove Village, Illinois

Savannah, Georgia

Atlanta, Georgia

Soledad, California

Tucson, Arizona

Virginia Beach, Virginia

Houston, Texas

Orlando (Davenport), Florida

Here is a link to my workshop calendar where you can see all of my travel schedule and to get info on beginner and advanced Brayer workshops:   http://zindorf.blogs.splitcoaststampers.com/workshop-calendar 

Link to my Stampin’ Up website where you can order all of your must have Stampin’ Up products from me 24-7:  http://michellezindorf.stampinup.net

Frequently asked questions answers:  http://zindorf.blogs.splitcoaststampers.com/frequently-asked-questions/ 


Farewell Asian Artistry – Tutorial #343

dsc043592.jpg

Good Afternoon!  

How about a farewell tutorial for the Stampin’ Up! Level 2 hostess set, Asian Artistry.  I have loved using this set and will be sad to see it retire, but happy to see new and exciting hostess sets in the brand new Idea Book and Catalog that starts July 1, 2010.  So Farewell to all of the 2009-2010 Hostess sets.  I will miss you just like old friends.     Contact me at mzindorf@aim.com if you wish to purchase a new 2010-2011 Idea Book & Catalog for $9.95.

I have a couple things to report before starting today’s tutorial.  

I’m so very happy to announce that I have added Orlando (Davenport), Florida to my Brayer Workshop calendar.  Click HERE for more details. 

Now it is Blog Candy Winner Time!!!! Yeah!!!  I have a winner and it is   . . . . . . . . . .  .. . . .  . . . .

dsc04226.JPG 

linda zaworski who wrote “Unbelievably gorgeous!!! I can not wait for you to come to Baltimore next year. I need to learn from you Obi-wan with-the-brayer! You are amazing!”

Linda you crack me up, lol.     Congratulations!  Please e-mail your address to mzindorf@aim.com within 30 days and I will get this set of Asian Artistry right out to you.

Thank you to all who played along.  Keep trying it may be you that wins next week.  🙂

Now it is tutorial time. . . . . .

Supplies:

Stamps: Stampin’ Up Asian Artistry
Paper: Stampin’ Up Whisper White, Rich Razzleberry and Daffodil Delight
Ink: Stampin’ Up Always Artichoke, Daffodil Delight and Cajun Craze
Accessories: Stampin’ Up White Gel Pen, Brayer, Always Artichoke Marker, Silver Brads, Sponges, Whisper White Ribbon

Live in the USA and need a copy of the Summer Mini Catalog?  E-mail your mailing address to mzindorf@aim.com and I will get one in the mail to you.  )  Are you getting inspiration from this blog?   One way you can help support it is to order your Stampin’ Up products through me.   Click HERE to place an order.  Click HERE to check out the Stampin’ Up! catalogs.  Want to become a Stampin’ Up Demonstrator , receive a 20% discount on product and earn instant income on orders?  Consider being part of my Stampin’ Up Team and start your own business.  Click HERE for more information.

dsc04363.JPG

Punched a 1 3/8″ circle from a double layer of post it notes.

dsc04335.JPG

Put 1 layer of the circle punch on a 3.25″ x 5″ piece of Whisper White card stock.   Used the post it notes that I punched the circles from to mask the bottom of the card stock, covering a bit of the circle.

dsc04336.JPG

Brayered Daffodil Delight ink on the card stock, starting at the post it note and working upward.

dsc04337.JPG

Brayered Rich Razzleberry ink at the top of the card stock.

dsc04338.JPG

Punched the 1 3/8″ circle punch out of a scrap piece of card stock.

dsc04339.JPG

Removed the circle mask and left the post it notes in place.  Placed the card stock with the circle punched out over my main image panel, lining the circle up with the circle on the card stock.

dsc04340.JPG

Sponged Daffodil Delight ink in the circle.

dsc04341.JPG

Sponged Cajun Craze ink at the bottom of the circle.

dsc04342.JPG

Removed the scrap card stock with the circle punched out.  This is what the sun looks like after sponging.

dsc04343.JPG

Removed all the masks. 

Put the remaining post it note circle on the card stock to create the reflection of the sun.

dsc04344.JPG

Masked the sky area of the card stock with the post it notes.  Brayered Daffodil Delight at the top of the water area.

dsc04345.JPG

Brayered Rich Razzleberry ink at the bottom of the water area.

dsc04346.JPG

Removed just the sun mask and put the scrap card stock mask back on.  This time over the reflection of the sun.

dsc04347.JPG

Sponged Daffodil Delight ink in the circle.

dsc04348.JPG

Using the edge of the Daffodil Delight ink pad, swiped it over the circle.

dsc04349.JPG

Using the edge of the Cajan Craze ink pad, swiped the ink over the circle.

dsc04350.JPG

Removed the scrap card stock and sponged Cajun Craze at the post it note edge to darken the horizon line.

dsc04351.JPG

Using the edge of the Daffodil Delight and Rich Razzleberry ink pads, swiped in water lines.

dsc04352.JPG

dsc04353.JPG

Stamped the plant and Dragonfly images using Always Artichoke ink.

dsc04354.JPG

Colored in the dragonfly bodies with an Always Artichoke marker and colored the Dragonfly’s wings, the blossoms on the plant in with a White Gel Pen.  Also added a few water lines using the white gel pen.

dsc04355.JPG

Sponge Rich Razzleberry ink around the edges of the card-stock.

dsc04356.JPG

Added Rich Razzleberry and Daffodil Delight card stock panels, Silver Brads and Whisper White Ribbon.

dsc04357.JPG

Here is the finished card measuring 5″ x 6.5″.

dsc043592.jpg

I hope you have found inspiration in this tutorial.

May your day be delightful in every way.

Until my next post. . . . . . .

Hugs,

Michelle

dsc03326-2.jpg   Get ready for Brayer Workshops!  I am coming to the following locations, click the location name for more information.

Kenova (Huntington), West Virginia

Middleburg Heights, Ohio 

Venice, Florida

Grinnell, Iowa

Piedmont, Alabama (Near GA border close to Cedartown)

Auburn, Washington (near Seattle)

Elk Grove Village, Illinois

Savannah, Georgia

Atlanta, Georgia

Soledad, California

Tucson, Arizona

Virginia Beach, Virginia

Houston, Texas

Orlando (Davenport), Florida

Here is a link to my workshop calendar where you can see all of my travel schedule and to get info on beginner and advanced Brayer workshops:   http://zindorf.blogs.splitcoaststampers.com/workshop-calendar 

Link to my Stampin’ Up website where you can order all of your must have Stampin’ Up products from me 24-7:  http://michellezindorf.stampinup.net

Frequently asked questions answers:  http://zindorf.blogs.splitcoaststampers.com/frequently-asked-questions/ 


Razzleberry Trees – Tutorial #342

dsc04220.JPG

I’m feeling a bit back in my element this morning.  I have my stamp studio all cleaned up.  I don’t know about you but I cannot work in a messy space.  My mind has to be clear of all that.    In fact, I have to clean up my work space entirely before I can start a new project.  Must the Virgo in me, plus I have issues, lol.  🙂

I’ve also been packing and creating some new advanced projects to take with me to North Chili, NY on Thursday.   Woohoo!  I’m going up a day early and my friend, Gail Emmons and I will be taking the day Friday to go to Niagara Falls (Canadian side, of course) to take in the sites and a little R & R.

Oh yeah, about today’s project, I experimented a little with sponging in clouds with a cotton-ball.  The effect is pretty, if i have to say so myself.

Also, I unwrapped my Rich Razzleberry ink pad that I have had for just about a year.  WHAT WAS I WAITING FOR!!!!  Rich Razzelberry is totally yummy.  Check it out!

Let’s get started. . . . . . .  .

Supplies:

Stamps: Stampin’ Up! Lovely as a Tree and Vintage Vouge
Paper: Stampin’ Up! Whisper White, Always Artichoke and Rich Razzelberry
Ink: Stampin’ Up! Always Artichoke, Rich Razzelberry, Pixie Pink, Basic Black, Summer Sun, So Saffron, Close To Cocoa and Whisper White
Accessories: Stampin’ Up! Gold Brads, Brayer, Post it Notes, Basic Black marker and a cotton ball

Live in the USA and need a copy of the Summer Mini Catalog?  E-mail your mailing address to mzindorf@aim.com and I will get one in the mail to you.  )  Are you getting inspiration from this blog?   One way you can help support it is to order your Stampin’ Up products through me.   Click HERE to place an order.  Click HERE to check out the Stampin’ Up! catalogs.  Want to become a Stampin’ Up Demonstrator , receive a 20% discount on product and earn instant income on orders?  Consider being part of my Stampin’ Up Team and start your own business.  Click HERE for more information.

  dsc04224.JPG

Mask the bottom 1″ of a 4″ square piece of Whisper White with a post it note.

dsc04200.JPG

Brayered So Saffron from the top of the card stock down to the post it note.

dsc04202.JPG

Brayered Summer Sun ink at the bottom of the unmasked area.

dsc04203.JPG

Brayered Pixie Pink ink at the top of the card stock.

dsc04204.JPG

Brayered Rich Razzelberry ink at the top of the card stock, not covering the Pixie Pink ink entirely.

dsc04205.JPG

Using a cotton-ball, dabbed Craft White ink in the sky area.

dsc04206.JPG

Using a So Saffron ink spot, streaked some So Saffron ink from the right side into the middle of the card stock.

dsc04207.JPG

Took the mask off and turned it around and masked the sky area.  Brayered Summer Sun ink at the bottom of the card stock.

dsc04208.JPG

Removed the mask.  Using the So Saffron ink spot edge and a upward motion, put in little grasses.

dsc04209.JPG

Using a More Mustard ink spot and a upward motion, put in more grasses.

dsc04210.JPG

Using the edge of a Close to Cocoa ink spot and a side to side motion put in a bit of grasses.

dsc04211.JPG

I wanted to stamp the trees from the Stampin’ Up set Lovely as a Tree with out stamping the bottom of the stamp.  So I covered the bottom of the stamp with a post it note, ink the stamp with Basic Black ink and then removed the post it note and stamped the image.

dsc04212.JPG

dsc04213.JPG

Extended the tree trunks down to the ground with a Basic Black marker.

dsc04214.JPG

Sponged Always Artichoke ink around the edges of the main image panel and a 5.25″ Square panel of Rich Razzelberry card stock.

dsc04217.JPG

Assembled my card front by adding Always Artichoke and Rich Razzelberry panels.  Added 4 silver brads.

Stamped the stamp from the Stampin’ Up! set Vintage Vouge with Always Artichoke ink around the edge of the card front.

dsc04218.JPG

Sponged Always Artichoke ink very heavy around the edges of the card front.

dsc04219.JPG

Here is the finished card measuring 5.5″ square.

dsc04220.JPG

I hope you like this project and are inspired to try putting a few clouds in your scenes.

May your day be full of energy and light.

Until my next post. . . . . . .

Huge Hugs,

dsc03326-2.jpg   Get ready for Brayer Workshops!  I am coming to the following locations, click the location name for more information.

North Chili, New York (near Rochester)

Kenova (Huntington), West Virginia

Middleburg Heights, Ohio 

Venice, Florida

Grinnell, Iowa

Piedmont, Alabama (Near GA border close to Cedartown)

Auburn, Washington (near Seattle)

Elk Grove Village, Illinois

Savannah, Georgia

Atlanta, Georgia

Soledad, California

Tucson, Arizona

Virginia Beach, Virginia

Houston, Texas

Here is a link to my workshop calendar where you can see all of my travel schedule and to get info on beginner and advanced Brayer workshops:   http://zindorf.blogs.splitcoaststampers.com/workshop-calendar 

Link to my Stampin’ Up website where you can order all of your must have Stampin’ Up products from me 24-7:  http://michellezindorf.stampinup.net

Frequently asked questions answers:  http://zindorf.blogs.splitcoaststampers.com/frequently-asked-questions/ 


Starry Night – Tutorial #341

dsc04193.JPG

Hey Everyone, Whew! I’m a bit rusty.  Haven’t stamped in over a week, lol.  Thought I would start my return with a card that is more on the simple side.  In this tutorial I used a set that is everyone’s Stampin’ Up! staple set, Lovely As a Tree.  If you don’t have this set, run and purchase it, lol.

Before we get started on the tutorial, I want to update you on Russ.  He is home and doing well.   Docs have him off work this week and will be doing some out patient tests on him.  Apparently, he has a valve in his heart that is not cooperating.  Anyway, he is well on his way to getting better.  Thank you for all of your thoughts and prayers.  Smooches and Hugs to all of you!

Now let’s get started. . . . .  . . .

Supplies:

Stamps: Stampin’ Up! Lovely As A Tree
Paper: Stampin’ Up! Whisper White, Tempting Turquoise and Basic Black
Ink: Stampin’ Up! Tempting Turquoise, Not Quite Navy and Basic Black
Accessories: Stampin’ Up! Sponge, Brayer, Big Shot Circle Die, Ticket Corner Punch, Piercing Tools, Basic Black marker, silver brads and White Gel Pen

Live in the USA and need a copy of the Summer Mini Catalog?  E-mail your mailing address to mzindorf@aim.com and I will get one in the mail to you.  )  Are you getting inspiration from this blog?   One way you can help support it is to order your Stampin’ Up products through me.   Click HERE to place an order.  Click HERE to check out the Stampin’ Up! catalogs.  Want to become a Stampin’ Up Demonstrator , receive a 20% discount on product and earn instant income on orders?  Consider being part of my Stampin’ Up Team and start your own business.  Click HERE for more information.

dsc04199.JPG

Cut a 3.75″ circle using my Big Shot and Circle Die and scrap card stock.  I used this circle as the mask for the moon and hold it in place while I brayer.  The Whisper White card stock is 4″ x 5.5″.

dsc04176.JPG

Brayered Tempting Turquoise ink on the left side of the card stock.  You have to turn the card stock upside down in order to brayer the left side.

dsc04177.JPG

Brayered Not Quite Navy ink on the left side of the card stock, not covering the Tempting Turquoise ink entirely.

dsc04178.JPG

Removed the moon mask.

dsc04179.JPG

Masked the bottom of the card stock and stamped my trees.   I moved the post it note around so my trees were not on the same level or same height.

dsc04180.JPG

dsc04181.JPG

dsc04182.JPG

Removed the mask and sponged Basic Black ink at the bottom of the card stock.

dsc04183.JPG

Extended the trunks of the trees to reach the ground with a Basic Black marker.

dsc04184.JPG

Added White Gel Pen dots in the sky for stars.

dsc04185.JPG

Cropped the card stock to 3.5″ x 5″.

dsc04186.JPG

Added another tree with Basic Black ink.

dsc04187.JPG

dsc04188.JPG

Used the Ticket Corner Punch on the main image panel and a black panel.

dsc04189.JPG

Added Basic Black panels and Tempting Turquoise panels.

dsc04190.JPG

Added two rows of piercings using the Stampin’ Up! piercing tools.

dsc04191.JPG

Added 3 silver brads.

dsc04192.JPG

Here is the finished card measuring 5″ x 6.5″

dsc04193.JPG

May your day be one of extreme joy!

Until my next post. . . . .  . . . .  .

Hugs,

Michelle

dsc03326-2.jpg   Get ready for Brayer Workshops!  I am coming to the following locations, click the location name for more information.

North Chili, New York (near Rochester)

Kenova (Huntington), West Virginia

Middleburg Heights, Ohio 

Venice, Florida

Grinnell, Iowa

Piedmont, Alabama (Near GA border close to Cedartown)

Auburn, Washington (near Seattle)

Elk Grove Village, Illinois

Savannah, Georgia

Atlanta, Georgia

Soledad, California

Tucson, Arizona

Virginia Beach, Virginia

Houston, Texas

Here is a link to my workshop calendar where you can see all of my travel schedule and to get info on beginner and advanced Brayer workshops:   http://zindorf.blogs.splitcoaststampers.com/workshop-calendar 

Link to my Stampin’ Up website where you can order all of your must have Stampin’ Up products from me 24-7:  http://michellezindorf.stampinup.net

Frequently asked questions answers:  http://zindorf.blogs.splitcoaststampers.com/frequently-asked-questions/ 


Vrrroooommmm! – Tutorial #340

dsc04143.JPG

My tutorial today features a new Stampin’ Up! stamp, Motorcycle.  I have a feeling this will be one of those highly sot after stamps once it retires.  You can find it in Stampin’ Up’s current Summer Mini Catalog.  It is a single stamp, item number 117657.

I am off to Rockville, Maryland tomorrow morning to teach my brayer workshops.  You ladies in Rockville, are you ready to get your Brayer on?  I hope so because I have some really fun and beautiful projects for you.  While I am off gallivanting this weekend I hope you give this tutorial a try.

Let’s get right into the tutorial so I can finish preparing for my trip.. .. . . .  .

Supplies:

Stamps: Stampin’ Up! Motorcycle and From the Crypt
Paper: Stampin’ Up! Elegant Eggplant, Apricot Appeal, Dusty Durango and Whisper White
Ink: Stampin’ Up! Basic Black, Dusty Durango, Apricot Appeal, Lavender Lace and Elegant Eggplant
Accessories: Stampin’ Up! Silver Brads, Silver Gel Pen, More Mustard and Apricot Appeal markers, Brayer and sponges

Live in the USA and need a copy of the Summer Mini Catalog?  E-mail your mailing address to mzindorf@aim.com and I will get one in the mail to you.  )  Are you getting inspiration from this blog?   One way you can help support it is to order your Stampin’ Up products through me.   Click HERE to place an order.  Click HERE to check out the Stampin’ Up! catalogs.  Want to become a Stampin’ Up Demonstrator , receive a 20% discount on product and earn instant income on orders?  Consider being part of my Stampin’ Up Team and start your own business.  Click HERE for more information.

dsc04149.JPG

Brayered Apricot Appeal ink on the bottom of a 4″ square piece of Whisper White card stock.

dsc04124.JPG

Brayer Dusty Durango ink at the bottom of the card stock, not covering the Apricot Appeal ink entirely.

dsc04125.JPG

Mask the card stock with a 3″ circle cut from a scrap of card stock using circle scissors.  Held the circle in place and brayered over the top of the card stock with Apricot Appeal ink.

dsc04126.JPG

Held the mask in place and brayered Elegant Eggplant ink at the top of the card stock.

dsc04127.JPG

Removed the mask and stamped the Motorcycle using Basic Black ink.

dsc04128.JPG

Colored the motorcycle with an Apricot Appeal Marker.

dsc04129.JPG

Added More Mustard marker to the shadow areas of the Apricot Appeal.

dsc04130.JPG

Added some Silver Gel pen the motorcycle to simulate chrome.

dsc04132.JPG

Now that the Apricot Appeal Marker previously put on is dry I can put another layer on to create a shadow on the fenders and gas tank.

dsc04133.JPG

Sponged a bit of Lavender Lace ink in the sky.

dsc04134.JPG

Added Elegant Eggplant ink to the sky with a sponge, not covering all of the Lavender Lace ink.

dsc04135.JPG

Sponged Basic Black ink to the left hand side of the card stock.

dsc04136.JPG

Stamped the Flourish from the Stampin’ Up set From the Crypt using Elegant Eggplant ink.

dsc04137.JPG

Cut Elegant Eggplant and Apricot Appeal panels.  Added a strip of Dusty Durango card stock that has been ripped on one edge.

dsc04138.JPG

Assembled the card adding another panel of Elegant Eggplant and silver brads.

Here is the finished card measuring 5.5″ square.

dsc04143.JPG

May your weekend be filled with much belly laughter.

Until my next post. . . . . . .  . . .

Hugs,

Michelle

dsc03326-2.jpg   Get ready for Brayer Workshops!  I am coming to the following locations, click the location name for more information.

St. Cloud, Minnesota 

Rockville, Maryland

North Chili, New York (near Rochester)

Kenova (Huntington), West Virginia

Helena, Montana

Middleburg Heights, Ohio 

Venice, Florida

Grinnell, Iowa

Piedmont, Alabama (Near GA border close to Cedartown)

Auburn, Washington (near Seattle)

Elk Grove Village, Illinois

Savannah, Georgia

Atlanta, Georgia

Soledad, California

Tucson, Arizona

Virginia Beach, Virginia

Houston, Texas

Here is a link to my workshop calendar where you can see all of my travel schedule and to get info on beginner and advanced Brayer workshops:   http://zindorf.blogs.splitcoaststampers.com/workshop-calendar 

Link to my Stampin’ Up website where you can order all of your must have Stampin’ Up products from me 24-7:  http://michellezindorf.stampinup.net

Frequently asked questions answers:  http://zindorf.blogs.splitcoaststampers.com/frequently-asked-questions/ 


Evening Flight – Tutorial #339

dsc04118.JPG

Boy is my rear dragging today.   Why does that happen when you have such a big list of things to accomplish? lol.   Is it the list that makes your rear drag?  Actually it could be that I had a 12 hour drive home yesterday from Minnesota to Ohio.   It was so well worth it though.  The ladies in my Brayer Workshops in Minnesota were all wonderful people and great stampers.  You all rock!

I have just a couple of things to announce before I start on today’s tutorial. 

Number one, I will be teaching my Brayer Workshops in Virginia Beach, Virginia this February.  Click HERE for more info.

Number Two, I have a blog winner to announce.  The winner of the Stampin’ Up! Nature Silhouettes set is  . . . . . . . . . . . .

dsc04096.JPG

Michelle B. aka JustPaintingAround  who wrote:   “Yes, please enter me in the drawing for this fab set! This is a fabulous piece! I love your direct to paper techniques as much as your brayering! Thanks for the continual inspiration!”

Michelle, congratulations!  Please e-mail your address to mzindorf@aim.com within 30 days and I will get this wonderful set out to you.

Thanks to all who played along.  Wish I had a set for each of you.  Keep playing though.  You just might be the winner next time.

Now let’s get started on today’s tutorial. . . .

Supplies:

Stamps: Stampin’ Up! All a Flutter, Elements of Style and Embrace Life
Paper: Stampin’ Up! Whisper White, Chocolate Chip, Always Artichoke and Brilliant Blue
Ink: Stampin’ Up! Brilliant Blue, Old Olive, Always Artichoke, Apricot Appeal, Dusty Durango and Chocolate Chip
Accessories: Stampin’ Up! sponge, piercing tools, aqua painter, Versamark pad and marker, gold brads, label punch, clear embossing powder, heat gun and brayer

Live in the USA and need a copy of the Summer Mini Catalog?  E-mail your mailing address to mzindorf@aim.com and I will get one in the mail to you.  )  Are you getting inspiration from this blog?   One way you can help support it is to order your Stampin’ Up products through me.   Click HERE to place an order.  Click HERE to check out the Stampin’ Up! catalogs.  Want to become a Stampin’ Up Demonstrator , receive a 20% discount on product and earn instant income on orders?  Consider being part of my Stampin’ Up Team and start your own business.  Click HERE for more information.

dsc04123.JPG

Stamped Butterflies on a 3″ x 5.5″ piece of Whisper White card stock by first loading my stamp with Versamark and then with Brilliant Blue ink before stamping.

Heat embossed the images using clear embossing powder and a heat gun.

dsc04098.JPG

dsc04099.JPG

Colored over the butterflies with Versamark and then heat embossed the images using clear embossing powder and a heat gun.  Now the Butterflies are protected and will resist the ink that is stamped and brayered over them.

dsc04100.JPG

Stamped the foliage by first loading the stamp with Versamark and then with Old Olive ink before stamping it.  Heat embossed the images using clear embossing powder and a heat gun.

dsc04101.JPG

dsc04102.JPG

Colored the leaves in using an Aqua Painter and Always Artichoke ink.

dsc04103.JPG

Colored over the Always Artichoke leafs with a Versamark marker and heat embossed the images using clear embossing powder and a heat gun.

dsc04104.JPG

Brayered Apricot Appeal ink on the top left corner of the card stock.

dsc04105.JPG

Brayered Dusty Durango ink on the bottom left corner of the card stock.

dsc04106.JPG

Brayered Chocolate Chip ink on the bottom left corner of the card stock, not covering all of the Dusty Durango ink.

dsc04107.JPG

Wiped the ink off of the embossed images using a paper towel.

dsc04108.JPG

Stamped the flourish stamp using Chocolate Chip ink.

dsc04109.JPG

Sponged a bit of Chocolate Chip ink on the left side of the card stock.

dsc04110.JPG

Punched a couple labels out of Chocolate Chip card stock.

dsc04111.JPG

Held them together and snipped the end off off one side.

dsc04112.JPG

Added Chocolate Chip and Brilliant Blue panels, the label punches and a thin strip of Brilliant Blue card stock to the top of the punches.

dsc04113.JPG

Pierced holes in the strips of Brilliant Blue using piercing tools.

dsc04114.JPG

Added a couple of gold brads.

dsc04115.JPG

Here is the finished card measuring 5″ x 6.5″.

dsc04118.JPG

May your day be spent doing the things that you love.

Until my next post. . . . . .  . .

Hugs,

Michelle

dsc03326-2.jpg   Get ready for Brayer Workshops!  I am coming to the following locations, click the location name for more information.

St. Cloud, Minnesota 

Rockville, Maryland

North Chili, New York (near Rochester)

Kenova (Huntington), West Virginia

Helena, Montana

Middleburg Heights, Ohio 

Venice, Florida

Grinnell, Iowa

Piedmont, Alabama (Near GA border close to Cedartown)

Auburn, Washington (near Seattle)

Elk Grove Village, Illinois

Savannah, Georgia

Atlanta, Georgia

Soledad, California

Tucson, Arizona

Virginia Beach, Virginia

Houston, Texas

Here is a link to my workshop calendar where you can see all of my travel schedule and to get info on beginner and advanced Brayer workshops:   http://zindorf.blogs.splitcoaststampers.com/workshop-calendar 

Link to my Stampin’ Up website where you can order all of your must have Stampin’ Up products from me 24-7:  http://michellezindorf.stampinup.net

Frequently asked questions answers:  http://zindorf.blogs.splitcoaststampers.com/frequently-asked-questions/ 


Matter of Moments – Tutorial #338 and Blog Candy

dsc04092.JPG

Once again I find myself in need of a guy card and there is no better set out there than Stampin’ Up’s Nature Silhouettes to turn to for just that occasion.  I also teamed it up with the Big Shot Texture Plate, Distressed and some Creamy Caramel card stock and Chocolate chip ink to get this great wood grain look for my background panel.   

Before we start let on the tutorial let me announce the blog candy I am giving away this week.

Check it out!  I am giving a brand new Stampin’ Up! set of Nature Silhouettes to one lucky winner.  All you need to do to enter for a chance to win the set is leave me a comment on this blog post telling me to enter you.  If you are getting this blog update via e-mail you will need to click HERE  and then leave a comment on the blog post.    No e-mail enties please.

dsc04096.JPG

A am taking a little drive to St. Cloud Minnesota (12 hours through beautiful states) tomorrow morning so I can teach my brayer workshops there.  I hope you ladies in Minnesota are ready to create some awesome projects, because here I come!

I will be back on Tuesday, June 8, 2011 and will announce the winner of the Nature Silhouettes set then.  I will use a random number generate to select the winner.  No need to butter me up for a better chance, lol.

Good Luck to all!!

Now let’s get started on the tutorial. . . . . .

Supplies:

Stamps: Stampin’ Up! Nature Silhouettes and Elements of Style
Paper: Stampin’ Up! Whisper White, Basic Black, Bermuda Bay and Creamy Caramel
Ink: Stampin’ Up! Bashful Blue, Bermuda Bay, Basic Black, Chocolate Chip, White, Creamy Caramel and Close to Cocoa
Accessories: Stampin’ Up! Photo Corner Punch, Brayer, White Gel Pen, Distressed Textured Plate and Big Shot Machine

Live in the USA and need a copy of the Summer Mini Catalog?  E-mail your mailing address to mzindorf@aim.com and I will get one in the mail to you.  )  Are you getting inspiration from this blog?   One way you can help support it is to order your Stampin’ Up products through me.   Click HERE to place an order.  Want to become a Stampin’ Up Demonstrator , receive a 20% discount on product and earn instant income on orders?  Consider being part of my Stampin’ Up Team and start your own business.  Click HERE for more information.

dsc04095.JPG

I brayered Bashful Blue ink on a 3.5″ x 4.5″ piece of Whisper White card stock.

dsc04071.JPG

Brayered Bermuda Bay ink at the top of the card stock, not covering the Bashful Blue ink entirely.

dsc04072.JPG

Using a Creamy Caramel Ink Spot, smeared ink in a hill shape on the card stock using the edge of the ink pad.

dsc04073.JPG

Using the edge of a Close To Cocoa ink spot, smeared the ink in a hill shape to create a second hill.

dsc04074.JPG

Added a third layer of hills by smearing ink on the card stock using a Chocolate Chip ink spot.

dsc04075.JPG

Using a Close to Cocoa ink spot, smeared in a little hill on the Creamy Caramel layer of hills.

Also, smeared in a bit of Chocolate Chip ink on the right side of the card stock in the Close to Cocoa layer of hills.

dsc04076.JPG

Stamped the tree from the Nature Silhouettes stamp set at the left hand side of the card stock using Basic Black ink.

dsc04077.JPG

Stamped the deer using Basic Black ink.

dsc04078.JPG

Smeared in a bit of Basic Black ink at the bottom of the card stock.  Just up to the deer’s feet.

dsc04079.JPG

Added White Gel Pen highlights to the grasses, deer and leaves of the tree.

dsc04081.JPG

Smear my Chocolate Chip ink pad on my Distressed Texture plate.  Ran the texture plate through my Big Shot with Creamy Caramel card stock.  This creates the dark areas to be indented and really makes the embossing pop.  Great wood-grain look!

dsc04082.JPG

Punched tabs out of Bermuda Bay and Basic Black card stock.

dsc04084.JPG

Assembled my main image panel with 2 basic Black panels and my wood-grain panel.  Glued the tab punches on my left side of my card front and then chopped the excess tabs off with my paper cutter.  🙂

dsc04085.JPG

Stamped the Sentiment from Elements of Style on the card front using White craft ink.

dsc04086.JPG

Here is the finished card measuring 5″ x 6.5″.

dsc04092.JPG

I hope you enjoyed this manly card tutorial and will give it a try.

Until my next post. . . live in the moment

Hugs,

Michelle

dsc03326-2.jpg   Get ready for Brayer Workshops!  I am coming to the following locations, click the location name for more information.

St. Cloud, Minnesota 

Rockville, Maryland

North Chili, New York (near Rochester)

Kenova (Huntington), West Virginia

Helena, Montana

Middleburg Heights, Ohio 

Venice, Florida

Grinnell, Iowa

Piedmont, Alabama (Near GA border close to Cedartown)

Auburn, Washington (near Seattle)

Elk Grove Village, Illinois

Savannah, Georgia

Atlanta, Georgia

Soledad, California

Tucson, Arizona

Virginia Beach, Virginia

Houston, Texas

Here is a link to my workshop calendar where you can see all of my travel schedule and to get info on beginner and advanced Brayer workshops:   http://zindorf.blogs.splitcoaststampers.com/workshop-calendar 

Link to my Stampin’ Up website where you can order all of your must have Stampin’ Up products from me 24-7:  http://michellezindorf.stampinup.net

Frequently asked questions answers:  http://zindorf.blogs.splitcoaststampers.com/frequently-asked-questions/