Ultimate Sacrifice – Tutorial #337

dsc04068.JPG

Before I start today’s tutorial, please take a moment to read the following.  Thank you

The “Memorial” in Memorial Day has been ignored by too many of us who are beneficiaries of those who have given the ultimate sacrifice. Often we do not observe the day as it should be, a day where we actively remember our ancestors, our family members, our loved ones, our neighbors, and our friends who have given the ultimate sacrifice:

  • by visiting cemeteries and placing flags or flowers on the graves of our fallen heroes.
  • by visiting memorials.
  • by flying the U.S. Flag at half-staff until noon.
  • by flying the ‘POW/MIA Flag’ as well (Section 1082 of the 1998 Defense Authorization Act).
  • by participating in a “National Moment of Remembrance“: at 3 p.m. to pause and think upon the true meaning of the day, and for Taps to be played.
  • by renewing a pledge to aid the widows, widowers, and orphans of our falled dead, and to aid the disabled veterans.

The above was found at:  http://www.usmemorialday.org/observe.htm

A heartfelt thank you from this very proud and grateful American to those who have served and are serving now.  You are all my heroes.

Now let’s get started on today’s tutorial. .. . . .  . .

Supplies:

Stamps: Stampin’ Up! Courage
Paper: Stampin’ Up! Whisper White, Dusty Durango and Basic Black
Ink: Stampin’ Up! Apricot Appeal, Pumpkin Pie, Dusty Durango and Basic Black
Accessories: Stampin’ Up! Big Shot Machine, Clear Circle Die, Basic Black marker and Sponges

Live in the USA and need a copy of the Summer Mini Catalog?  E-mail your mailing address to mzindorf@aim.com and I will get one in the mail to you.  )  Are you getting inspiration from this blog?   One way you can help support it is to order your Stampin’ Up products through me.   Click HERE to place an order.  Want to become a Stampin’ Up Demonstrator , receive a 20% discount on product and earn instant income on orders?  Consider being part of my Stampin’ Up Team and start your own business.  Click HERE for more information.

dsc04069.JPG

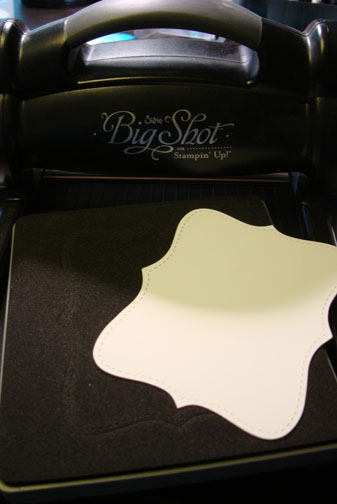
Cut a 4″ circle using the Clear Circle Die and my Big Shot Die Cut Machine.

dsc04059.JPG

Sponged Apricot Appeal ink in the center of the card stock.

dsc04060.JPG

Sponged Pumpkin Pie ink around the edge of the card stock, overlapping the Apricot Appeal ink some.

dsc04061.JPG

Sponged Dusty Durango ink around the edge of the card stock, not covering the Pumpkin Pie ink entirely.

dsc04062.JPG

Stamped the Stampin’ Up! Courage Stamp using Basic Black ink.

dsc04063.JPG

Colored in the saluting soldier, plane and ship using a Basic Black marker.

dsc04064.JPG

Cut a 4.5″ x 5″ Basic Black Panel.  Cut a 1.5″ x 5″ panel and ripped the top edge off.  Glued the circle down on the large Basic Black panel and then the ripped panel over the bottom of the circle.

dsc04065.JPG

Assembled the rest of the card.  Here it is finished measuring 5 1/8″ x 6 1/8″.

dsc04068.JPG

May your day today be one of remembrance and gratitude.

Until my next post.. . . .  . .. . . .  . .

Huge Hugs,

Michelle

dsc03326-2.jpg   Get ready for Brayer Workshops!  I am coming to the following locations, click the location name for more information.

St. Cloud, Minnesota 

Rockville, Maryland

North Chili, New York (near Rochester)

Kenova (Huntington), West Virginia

Helena, Montana

Middleburg Heights, Ohio 

Venice, Florida

Grinnell, Iowa

Piedmont, Alabama (Near GA border close to Cedartown)

Auburn, Washington (near Seattle)

Elk Grove Village, Illinois

Savannah, Georgia

Atlanta, Georgia

Soledad, California

Tucson, Arizona

Houston, Texas

Here is a link to my workshop calendar where you can see all of my travel schedule and to get info on beginner and advanced Brayer workshops:   http://zindorf.blogs.splitcoaststampers.com/workshop-calendar 

Link to my Stampin’ Up website where you can order all of your must have Stampin’ Up products from me 24-7:  http://michellezindorf.stampinup.net

Frequently asked questions answers:  http://zindorf.blogs.splitcoaststampers.com/frequently-asked-questions/ 


Wipe Out – Tutorial #336

dsc04052a.jpg

Happy Memorial Day weekend.  

I have been getting a little R & R in before I hit the road again next week.  It has become a rare weekend indeed for me to be home.    I love traveling, but there is no place like home sometimes. 

Yesterday, I did a bit of laying around.  I ate out every meal and watched two movies, The Lovely Bones and The Time Traveler’s Wife.  Both movies were great and a little out of the ordinary.  Just what I needed.  🙂

But this morning I thought I better offer up a new tutorial before you forgot about me and my little blog. 

Since Memorial Day kicks off Summer for me, I pulled out every swirly flourish item I have in my arsenal and the Stampin’ Up! set Just Surfing to create this card that you can send to any beach-bum that you know.

Before we get started I want to announce two Zindorf Brayer Workshop locations I have added to my calendar.   Check it out, I will be in Tucson, Arizona and Houston, Texas.   

Now let’s get started on that tutorial. . . . . .

Supplies:

Stamps: Stampin’ Up! Just Surfing and Priceless
Paper: Stampin’ Up! Whisper White, Pumpkin Pie and Tempting Turquoise
Ink: Stampin’ Up! Bashful Blue, Brocade Blue and Tempting Turquoise ink spots, Pumpkin Pie and and Craft White ink pads
Accessories: Stampin’ Up! Pumpkin Pie, Tempting Turquoise and Brocade Blue Markers, White Gel Pen, Big Shot Die Cut Machine, Flourish Texture Plate and Swirly Die Cut

Live in the USA and need a copy of the Summer Mini Catalog?  E-mail your mailing address to mzindorf@aim.com and I will get one in the mail to you.  )  Are you getting inspiration from this blog?   One way you can help support it is to order your Stampin’ Up products through me.   Click HERE to place an order.  Want to become a Stampin’ Up Demonstrator , receive a 20% discount on product and earn instant income on orders?  Consider being part of my Stampin’ Up Team and start your own business.  Click HERE for more information.

dsc04056.JPG

Oops!  This first photo is a bit out of focus.  Michelle doesn’t always check her camera settings before starting a project at 5:00 in the morning, lol.

On a 3″ x 4.75″ piece of Whisper White card stock, used the corner of a Bashful Blue Ink Spot pad and made little marks all over the card stock.

dsc04031.JPG

Yep, I changed the settings on my camera.  🙂 

Added some marks with the corner of a Tempting Turquoise ink spot pad.

dsc04033.JPG

Added some more marks with the corner of a Brocade Blue Ink Spot.

dsc04034.JPG

Added more of each color of the three colors of ink spots until the card stock was almost covered.  Note, leave a bit of white showing through.

dsc04035.JPG

Stamped the flourish stamp from the Stampin’ Up! set Priceless using White Craft ink.  The flourish was hard to see in the busy backgrounds so I darkened it with a White Gel Pen.

dsc04036.JPG

dsc04037.JPG

Added some Tempting Turquoise and Bordering Blue marker to the underside of the flourishes to make them more dimensional.

dsc04038.JPG

Stamped the Surf Board from the Stampin’ Up! set Just Surfing with Pumpkin Pie ink.

dsc04039.JPG

Cut it out with a pair of paper snipes.

dsc04040.JPG

Using my Big Shot Die cut machine, embossed a 4.75″ x 6 3/8″ piece of Tempting Turquoise card stock using the Flourish Texture Plate.

Note:   I add a separate piece of card stock to my stack when using the Texture plates.  This gives me a nice deep embossing.

dsc04041.JPG

Using the Swirly Die cut, cut some swirls from Whisper White card stock.

dsc04042.JPG

Rubbed the Tempting Turquoise ink spot on the edges of both the main image panel and the Tempting Turquoise panel.

dsc04044.JPG

Assembled the card front and glued the surf board and swirls to the panels.

dsc04045.JPG

Added Brocade Blue marker to the white swirls undersides to create a shadow and then added Pumpkin Pie marker to the edges of the surf board to give it a bit more dimension.

dsc04046.JPG

Here is the finished card measuring 5″ x 6.5″

dsc04052a.jpg

May your Memorial Day weekend be safe and full of fond memories and fun.

Until my next post. . . .  . . . . .

Hugs,

Michelle

dsc03326-2.jpg   Get ready for Brayer Workshops!  I am coming to the following locations, click the location name for more information.

St. Cloud, Minnesota 

Rockville, Maryland

North Chili, New York (near Rochester)

Kenova (Huntington), West Virginia

Helena, Montana

Middleburg Heights, Ohio 

Venice, Florida

Grinnell, Iowa

Piedmont, Alabama (Near GA border close to Cedartown)

Auburn, Washington (near Seattle)

Elk Grove Village, Illinois

Savannah, Georgia

Atlanta, Georgia

Soledad, California

Tucson, Arizona

Houston, Texas

Here is a link to my workshop calendar where you can see all of my travel schedule and to get info on beginner and advanced Brayer workshops:   http://zindorf.blogs.splitcoaststampers.com/workshop-calendar 

Link to my Stampin’ Up website where you can order all of your must have Stampin’ Up products from me 24-7:  http://michellezindorf.stampinup.net

Frequently asked questions answers:  http://zindorf.blogs.splitcoaststampers.com/frequently-asked-questions/ 


Cherished Flight – Tutorial #335

dsc04024.JPG

Good Afternoon!

I’m hanging out in my PJ’s this afternoon working away.   I had plans to have lunch with my Mother and then dinner out with my Stampin’ Up! Up Line, Karen Barber.  Well both my Mother and Karen are under the weather today so all of my plans have been canceled.   Since I didn’t need to be any where, I am still tooling around in the PJ’s, sorry sight, I tell ya.

I did however manage to stamp this project that I am sharing with you today.  Hope you enjoy it.

Let’s get started. . . . . . .

Supplies:

Stamps: Stampin’ Up! Eastern Influences, Trendy Trees, Baroque Motifs
Paper: Stampin’ Up! Whisper White, Brilliant Blue, Certainly Celery
Ink: Stampin’ Up! Brilliant Blue, Certainly Celery, Night of Navy, Basic Black, Tempting Turquoise and Green Gable
Accessories: Stampin’ Up! Certainly Celery marker, Tempting Turquoise Rhinestone Brad, White Gel Pen, Versamark Pad, Clear embossing Powder, Heat Gun, XL Bird Punch, Flower Punch, Stampin’ Pastels and Brayer

Live in the USA and need a copy of the Summer Mini Catalog?  E-mail your mailing address to mzindorf@aim.com and I will get one in the mail to you.  )  Are you getting inspiration from this blog?   One way you can help support it is to order your Stampin’ Up products through me.   Click HERE to place an order.  Want to become a Stampin’ Up Demonstrator , receive a 20% discount on product and earn instant income on orders?  Consider being part of my Stampin’ Up Team and start your own business.  Click HERE for more information.

dsc04030.JPG

On a 3.5″ x 5″ piece of Whisper White stamped the leaves of the trees by first loading my stamp with Versamark and then with Green Galore ink before stamping them.  Heat embossed the images using clear embossing powder and a heat gun.

dsc03995.JPG

dsc03996.JPG

Stamped the trunks of the trees using Brilliant Blue ink only.

dsc03997.JPG

Brayered Tempting Turquoise ink at the top right corner and bottom left corner of the card stock.

dsc03998.JPG

dsc03999.JPG

Brayered Brilliant Blue ink at the top right corner and bottom of the card stock.

dsc04000.JPG

dsc04001.JPG

Wiped the ink off of the embossed images using a paper towel.

dsc04002.JPG

Stamped the flourish  at the top of the card stock a few times with Tempting Turquoise and stamping off once before stamping each image.

dsc04003.JPG

Stamped the birds using Basic Black ink.

dsc04004.JPG

Colored in the bird using a white gel pen.

dsc04006.JPG

Added a bit of Brilliant Blue Stampin’ Pastel to each tree, in the bottom of the leafy area.

dsc04007.JPG

Added White Gel Pen dots to each tree.

dsc04008.JPG

Brayered Night of Navy ink to the top right corner and the bottom of the card stock.

dsc04009.JPG

Stamped the flourish on a 4.75″ x 6.25″ piece of Certainly Celery card stock using Certainly Celery ink.

dsc04012.JPG

Assembled my card front and added Certainly Celery leaves punched with the bird punch.

dsc04015.JPG

Added Celery marker to the bottom of each leaf to give them some depth.

dsc04017.JPG

Stamped the sentiment using Brilliant Blue ink.

dsc04018.JPG

Added a flower punch and a Tempting Turquoise Rhinestone brad.

dsc04019.JPG

Here is the finished card measuring 5″ x 6.5″.

dsc04024.JPG

May your day be one of leisure. 

Until my next post. . . . .  . . . . . . .

Hugs,

Michelle

dsc03326-2.jpg   Get ready for Brayer Workshops!  I am coming to:

St. Cloud, Minnesota (1 spot available)

Rockville, Maryland

North Chili, New York (near Rochester)

Kenova (Huntington), West Virginia

Helena, Montana

Middleburg Heights, Ohio (Sold Out)

Venice, Florida

Grinnell, Iowa

Piedmont, Alabama (Near GA border close to Cedartown)

Auburn, Washington (near Seattle)

Elk Grove Village, Illinois

Savannah, Georgia

Atlanta, Georgia

Soledad, California

Here is a link to my workshop calendar where you can see all of my travel schedule and to get info on beginner and advanced Brayer workshops:   http://zindorf.blogs.splitcoaststampers.com/workshop-calendar 

Link to my Stampin’ Up website where you can order all of your must have Stampin’ Up products from me 24-7:  http://michellezindorf.stampinup.net

Frequently asked questions answers:  http://zindorf.blogs.splitcoaststampers.com/frequently-asked-questions/ 


A Day at the Pond – Tutorial #334

dsc03982.JPG

I’m back for the second time today.  This time I have a tutorial for you.

Let’s get right into it. . . .

Supplies:

Stamps: Stampin’ Up! Asian Artistry
Paper: Stampin’ Up! Whisper White, Brilliant Blue and Apricot Appeal
Ink: Stampin’ Up! Dusty Durango, Apricot Appeal, Brilliant Blue, Old Olive, Creamy Caramel, Chocolate Chip and Bashful Blue
Accessories: Stampin’ Up Markers – Certainly Celery, Brilliant Blue and Basic Black, White Gel Pen, Whisper White Ribbon, Brayer, Glass Pad, X-acto knife and sponges

Live in the USA and need a copy of the Summer Mini Catalog?  E-mail your mailing address to mzindorf@aim.com and I will get one in the mail to you.  )  Are you getting inspiration from this blog?   One way you can help support it is to order your Stampin’ Up products through me.   Click HERE to place an order.  Want to become a Stampin’ Up Demonstrator , receive a 20% discount on product and earn instant income on orders?  Consider being part of my Stampin’ Up Team and start your own business.  Click HERE for more information.

dsc03985.JPG

Brayered Apricot Appeal ink on a 4″ x 4.5″ piece of Whisper White card stock.

dsc03957.JPG

Brayered Dusty Durango ink at the top of the card stock, not covering the Apricot Appeal ink completely.

dsc03958.JPG

Using a Stampin’ Up glass mat and X-acto knife, cut a scrap piece of card stock.  Keep both pieces.

dsc03956.JPG

Masked the bottom of the card stock using one of the cut pieces.  I am holding this mask in place with my hand and sponging Creamy Caramel ink on .

dsc03959.JPG

Added Chocolate Chip ink right at the masks edge.

dsc03960.JPG

Took the bottom mask off and put the top mask on.

dsc03962.JPG

Sponged Bashful Blue ink in the unmasked area.

dsc03963.JPG

Sponged Brilliant Blue ink at the masks edge.

dsc03964.JPG

Added a few lines of Brilliant Blue marker around the curves.

dsc03965.JPG

Stamped the plant and dragonfly with Old Olive ink.

dsc03966.JPG

dsc03967.JPG

Added some Brilliant Blue marker lines in the water at the base of the plants.

dsc03969.JPG

Colored in the flowers with a Brilliant Blue marker.

dsc03971.JPG

Added Certainly Celery marker tothe middle of the dragonfly.  Also darkened his legs and eyes with a Basic Black marker.

dsc03972.JPG

Added Basic Black marker shadows to the undersides of the leaves and highlights to the tops of them using a White Gel Pen.  Also added White Gel Pen water lines and colored in the dragonfly’s wings.

dsc03975.JPG

Sponged around the edges of the card stock using Brilliant Blue ink.

dsc03976.JPG

Cut a 5.25″ square piece of Apricot Appeal card stock and brayered Dusty Durango ink at the top of it.

dsc03977.JPG

Cut a section of the side of a Top Note Die cut. 

Assembled card and added Whisper White Ribbon.  Here it is finished measuring 5.5″.

dsc03982.JPG

May your day be one of peace and harmony.

Until my next post. . . . . . .

Hugs,

Michelle

dsc03326-2.jpg   Get ready for Brayer Workshops!  I am coming to:

St. Cloud, Minnesota (1 spot available)

Rockville, Maryland

North Chili, New York (near Rochester)

Kenova (Huntington), West Virginia

Helena, Montana

Middleburg Heights, Ohio (Sold Out)

Venice, Florida

Grinnell, Iowa

Piedmont, Alabama (Near GA border close to Cedartown)

Auburn, Washington (near Seattle)

Elk Grove Village, Illinois

Savannah, Georgia

Atlanta, Georgia

Soledad, California

Here is a link to my workshop calendar where you can see all of my travel schedule and to get info on beginner and advanced Brayer workshops:   http://zindorf.blogs.splitcoaststampers.com/workshop-calendar 

Link to my Stampin’ Up website where you can order all of your must have Stampin’ Up products from me 24-7:  http://michellezindorf.stampinup.net

Frequently asked questions answers:  http://zindorf.blogs.splitcoaststampers.com/frequently-asked-questions/ 


Just Beachy – Tutorial #333

dsc03954.JPG

It is still raining at my house today, just like it has been the past couple of days.  I decided to look on the sunny side of things though and created a beach scene using my new favorite tools, the ink spots.  These little cuties are sold as sets.   Each Stampin’ Up! color family has a set.  Of course, I had to have them all.  The little ink spot pads are a mere 1 inch and the pads are raised from the base of the ink pad holder so you can easily use them to apply ink directly to the paper.  They are much easier to control then the larger pads when doing Direct to Paper Techniques.

dsc03932.JPG

Today’s project was also made for my Stampin’ Up! Down Line, Ink To Art Team’s Technique Swap.  This month’s technique is, you guest it, Direct to Paper. 

Let’s get started. . . . . . . . .

Supplies:

Stamps: Stampin’ Up! Tropical Party and In a Word
Paper: Stampin’ Up! Whisper White, Basic Black, More Mustard and Tempting Turquoise
Ink: Stampin’ Up! Ink spots, Tempting Turquoise, Basic Black, Ballet Blue, Bashful Blue, So Saffron and Creamy Caramel
Accessories: Stampin’ Up! Top Note Die, Big Shot Machine, 1/2″ circle Punch, Sponge, Post it Notes

Live in the USA and need a copy of the Summer Mini Catalog?  E-mail your mailing address to mzindorf@aim.com and I will get one in the mail to you.  )  Are you getting inspiration from this blog?   One way you can help support it is to order your Stampin’ Up products through me.   Click HERE to place an order.  Want to become a Stampin’ Up Demonstrator , receive a 20% discount on product and earn instant income on orders?  Consider being part of my Stampin’ Up Team and start your own business.  Click HERE for more information.

dsc03955.JPG

Masked the sun using a 1/2″ punch from the sticky part of a post it note.    Put the mask on a 3.75″ x 4″ piece of Whisper White card stock.

dsc03933.JPG

Swiped the Tempting Turquoise ink spot across the top of the card stock.

dsc03934.JPG

Masked the top of the card stock using a post it note.

dsc03935.JPG

Swiped the Tempting Turquoise ink spot across the card stock right at the post it note edge.

dsc03936.JPG

Swiped the Bashful Blue ink spot across the card stock.

dsc03937.JPG

Swiped the Ballet Blue ink spot onto the card stock using the edge of the pad.

dsc03938.JPG

Swiped the Tempting Turquoise ink spot at the bottom of the water area.

dsc03939.JPG

Swiped the So Saffron ink spot at the bottom of the card stock to create a sandy area.

dsc03940.JPG

Added a marks of Creamy Caramel using the edge of the Ink pad.

dsc03941.JPG

Removed all of the Post it Note Masks.

dsc03942.JPG

swiped in a piece of island using the edge of the Basic Black ink spot.

dsc03943.JPG

Stamped the Palm Tree from the New Stampin’ Up set Tropical Party using Basic Black ink.

dsc03944.JPG

Stamped the Palm Fod using Basic Black ink.

dsc03945.JPG

Sponged around the egde of the main image panel using Tempting Turquoise ink.

dsc03946.JPG

Die Cut a Top Note Die using my Big Shot Die Cut machine and Whisper White card stock.

dsc03947.JPG

Cut the Top Note in half.

dsc03948.JPG

Stamped the word Marvelous on the top note half using Basic Black ink.

dsc03949.JPG

Assembled the card adding Basic-Black, More Mustard and Tempting Turquoise panels.

Here is the finished card measuring 5.5″ square.

dsc03954.JPG

Hey, I am taking off on a road trip to Illinois to teach my Brayer Workshops this weekend, woohoo!  I love road trips, stamping and new friends.  🙂

I will be back on Monday.

May your weekend be filled with lots of fun and laughter.

Until my next post. . . . . . 

Hugs,

Michelle

dsc03326-2.jpg   Get ready for Brayer Workshops!  I am coming to:

Wheaton, Illinois

St. Cloud, Minnesota (2 spots available)

Rockville, Maryland

North Chili, New York (near Rochester)

Kenova (Huntington), West Virginia

Helena, Montana

Middleburg Heights, Ohio (Sold Out)

Venice, Florida

Grinnell, Iowa

Piedmont, Alabama (Near GA border close to Cedartown)

Auburn, Washington (near Seattle)

Elk Grove Village, Illinois

Savannah, Georgia

Atlanta, Georgia

Soledad, California

Here is a link to my workshop calendar where you can see all of my travel schedule and to get info on beginner and advanced Brayer workshops:   http://zindorf.blogs.splitcoaststampers.com/workshop-calendar 

Link to my Stampin’ Up website where you can order all of your must have Stampin’ Up products from me 24-7:  http://michellezindorf.stampinup.net

Frequently asked questions answers:  http://zindorf.blogs.splitcoaststampers.com/frequently-asked-questions/ 


Baby Shower – Tutorial #332

dsc03928.JPG

Rain, rain go away.  Come again another day.  🙂

It is raining, raining, raining here at my house.  My perennial gardens are loving it, but I have a bunch of errands to run and I just might melt.  Because I’m so very sweet, right!   Hahaaaahaaaa!

All is not lost, the rain inspired this baby shower card today. 

Before I start the tutorial I need to announce the winner of the Stampin’ Up!  “C” is for stamp set that I put up for blog candy last Thursday.  And the winner is. . . . .  .. . . . .

dsc03829.JPG

Mary Ann Daughertywho wrote “I really love this card. Please enter me for this set. I have been looking for a cat stamp set but none have said got to have it till this one. Please pick me. I have 3 cats and am excited to put together some scrapbook pages using that stamp set.  Have fun in Oregon. It is a beautiful state have visited 3 times when my in laws lived there. My husband is originally from Portland but he wanted to come to PA. Wish I was going with you. Have a safe trip and looking forward to your next blog”

Mary Ann Daugherty, Congratulations!  Please e-mail your address to mzindorf@aim.com within 30 days and I will ship this wonderful stamp set out to you.

Thank you to all who played along.  It just might be you who wins next time.

Now on with the tutorial. . . . .  . . . .

Supplies:

Stamps: Stampin’ Up! Level one Hostess set “Love Bug” and Autumn Splendor
Paper: Stampin’ Up! Whisper White, Certainly Celery, Brilliant Blue and Tempting Turquoise
Ink: Stampin’ Up! Certainly Celery, Always Artichoke, Tempting Turquoise and Brilliant Blue
Accessories: Stampin’ Up! Markers Real Red, Certainly Celery, Old Olive, Summer Sun, Always Artichoke and Chocolate Chip, Versmark marker and pad, Photo Corner Punch, Tempting Turquoise brads and ribbon, Brayer, sponge, Clear embossing powder and heat gun

Live in the USA and need a copy of the Summer Mini Catalog?  E-mail your mailing address to mzindorf@aim.com and I will get one in the mail to you.  )  Are you getting inspiration from this blog?   One way you can help support it is to order your Stampin’ Up products through me.   Click HERE to place an order.  Want to become a Stampin’ Up Demonstrator , receive a 20% discount on product and earn instant income on orders?  Consider being part of my Stampin’ Up Team and start your own business.  Click HERE for more information.

dsc03931.JPG

On a 3.75″ square piece of Whisper White card stock, stamped the leaf and baby carriage by first loading my stamp with Versamark and then with Always Artichoke ink before stamping.  Heat embossed the images using clear embossing powder and a heat gun.

dsc03904.JPG

dsc03905.JPG

Added Always Artichoke marker to the leaf and carriage.

dsc03906.JPG

Added Certainly Celery marker to the leaf and carriage.

dsc03907.JPG

Added Old Olive marker to the leaf and carriage.

dsc03908.JPG

Colored the bug with Summer Sun, Certainly Celery and Real Red markers.  Colored the wheels of the baby carriage using Always Artichoke marker.

dsc03909.JPG

Added Chocolate Chip marker to the leaf veins and bottom of the carriage.

dsc03910.JPG

Heat set the markers using my heat gun.

dsc03911.JPG

Colored over the leaf and the carriage using a Versamark marker, staying within the embossed design.  Heat embossed the images again using clear embossing powder and a heat gun.  Now the images are completely covered with embossing.

dsc03912.JPG

Brayered Tempting Turquoise ink at the top of the card stock.

dsc03913.JPG

Brayered Brilliant Blue ink at the top of the card stock,not covering the Tempting Turquoise ink entirely.

dsc03914.JPG

Brayered Certainly Celery ink at the bottom of the card stock.

dsc03915.JPG

Brayered Always Artichoke at the bottom of the card stock, not covering the Certainly Celery ink entirely.

dsc03916.JPG

Using a ruler as a guide, made random dashes in the sky area to indicate rain using a white gel pen.

dsc03917.JPG

Sponged Brilliant Blue ink on the egdes of the card stock.

dsc03918.JPG

Added a drop shape at the tip of one of the leaf points using a White Gel Pen.

dsc03919.JPG

Added a straight line under the leaf and carriage using an Old Olive marker to suggest a shadow.

dsc03920.JPG

Added Brilliant Blue, Certainly Celery and Tempting Turquoise layers.  Also added Certainly Celery photo corner punches, Tempting Turquoise brads and ribbon.

dsc03921.JPG

Here is the finished card measuring 5.5″ square.

dsc03928.JPG

Wishing you a lovely day.

Until my next post. . . . . .  ..

Hugs,

Michelle

dsc03326-2.jpg   Get ready for Brayer Workshops!  I am coming to:

Wheaton, Illinois

St. Cloud, Minnesota (2 spots available)

Rockville, Maryland (Sold Out)

North Chili, New York (near Rochester) (Sold Out)

Kenova (Huntington), West Virginia

Helena, Montana

Middleburg Heights, Ohio (Sold Out)

Venice, Florida

Grinnell, Iowa

Piedmont, Alabama (Near GA border close to Cedartown)

Auburn, Washington (near Seattle)

Elk Grove Village, Illinois

Savannah, Georgia

Atlanta, Georgia

Soledad, California

Here is a link to my workshop calendar where you can see all of my travel schedule and to get info on beginner and advanced Brayer workshops:   http://zindorf.blogs.splitcoaststampers.com/workshop-calendar 

Link to my Stampin’ Up website where you can order all of your must have Stampin’ Up products from me 24-7:  http://michellezindorf.stampinup.net

Frequently asked questions answers:  http://zindorf.blogs.splitcoaststampers.com/frequently-asked-questions/ 


Cat’s Night Out – Tutorial #331

dsc03825.JPG

I am leaving on a jet plane, laaaa laaaaa laaaa, tomorrow morning for Salem, Oregon to teach my Brayer Workshops.  Oregon are you ready to get your BRAYER ON!  I hope so because I have some great projects to teach you.  So come prepared to have fun and create.

Now, I didn’t want to forget my blog readers today and I am in the mood today to make a scene, literally, lol.  How about a brayered spotlighted scene?  I also have some fun blog candy this week.  I am giving away a brand new Stampin’ Up! cute, cute set, C is for Cat.  

dsc03829.JPG

Want to throw your hat in the ring to try to win this stamp set?  Just leave a comment on this blog post telling me to enter you.  If you are getting this blog post via e-mail, please click HERE and then leave a comment.  No e-mail entries will be accepted.

I will use a random number generator on Monday, 17, 2010 to select the winner.  Good luck everyone.  Just remember, you can’t win if you don’t play along.  🙂

Let’s get started so I can finish my packing, lol. . . . . . . .

Supplies:

Stamps: Stampin’ Up! C is for Cat
Paper: Stampin’ Up! Whisper White, Basic Black and Apricot Appeal
Ink: Stampin’ Up! Shara Sand, Basic Black, Apricot Appeal, Going Gray, Not Quite Navy and Night of Navy
Accessories: Stampin’ Up! 3/4″ & 1/2″ circle punches, Stamp-a-ma-jig, white gel pen, Basic Black marker, Sahara Sand marker and Brayer

Live in the USA and need a copy of the Summer Mini Catalog?  E-mail your mailing address to mzindorf@aim.com and I will get one in the mail to you.  )  Are you getting inspiration from this blog?   One way you can help support it is to order your Stampin’ Up products through me.   Click HERE to place an order.  Want to become a Stampin’ Up Demonstrator , receive a 20% discount on product and earn instant income on orders?  Consider being part of my Stampin’ Up Team and start your own business.  Click HERE for more information.

dsc03826.JPG

Started with a 4.25″ x 5.75″ piece of Whisper White card stock.  Stamped the cat on my Stamp-a-ma-jig plastic, flipped the plastic over onto the card stock and rubbed the back of the plastic to transfer the image.  This creates a reverse of your stamp.

dsc03801.JPG

Used my Stamp-a-ma-jig, cat stamp and Basic Black ink to stamp the cat image, lining it up with the reverse image.

dsc03802.JPG

dsc03803.JPG

dsc03804.JPG

dsc03805.JPG

Brayered Apricot Appeal ink at the top of the card stock.

 dsc03806.JPG

Brayered Not Quite Navy ink at an angle on both of the top corners of the card stock.

dsc03807.JPG

dsc03808.JPG

Brayered Night of Navy at the same angles using Night of Navy ink, not covering up the Not Quite Navy ink entirely.

dsc03809.JPG

Brayered Going Gray at the bottom of the card stock.

dsc03810.JPG

Punched a 1/2″ circle punch from Whisper White card stock.  Punch a 3/4″ punch from Apricot Appeal card stock. 

dsc03812.JPG

Punched a 3/4″ punch out of Basic Black card stock.  Lined the punch up with the circle in the card stock and punched a sliver of the circle out.

dsc03814.JPG

dsc03813.JPG

dsc03815.JPG

Assembled the light and cut a 1/4″ strip of basic Black card stock and adhered the pieces to the main image panel.

dsc03816.JPG

dsc03817.JPG

Using a Basic Black marker, drew a hook shape to connet the light to the pole.

dsc03818.JPG

Added white gel pen stars, colored in the cats collar and eye.

dsc03820.JPG

Added a shadow for the pole using a Sahara Sand marker.  Also, darkened the cats reflections with the Sahara Sand marker.

dsc03821.JPG

Added Basic Black and Apricot Appeal panels. 

Here is the finished card measuring 5″ x 6.5″.

dsc03825.JPG

May you find time to make a scene of your own today.  🙂

PS  Thank you so much from my entire family for all of your comments and e-mails yesterday congratulating my son, Mitch on his graduation from the Law Enforcement Academy.  SMOOCH!  My blog readers are the best!

Until my next post. . . . . . . .  . . . . . . . .

Hugs,

Michelle

dsc03326-2.jpg   Get ready for Brayer Workshops!  I am coming to:

Salem, Oregon (Sold Out)

Wheaton, Illinois

St. Cloud, Minnesota (2 spots available)

Rockville, Maryland (Sold Out)

North Chili, New York (near Rochester) (Sold Out)

Kenova (Huntington), West Virginia

Helena, Montana

Middleburg Heights, Ohio (Sold Out)

Venice, Florida

Grinnell, Iowa

Piedmont, Alabama (Near GA border close to Cedartown)

Auburn, Washington (near Seattle)

Elk Grove Village, Illinois

Savannah, Georgia

Atlanta, Georgia

Soledad, California

Here is a link to my workshop calendar where you can see all of my travel schedule and to get info on beginner and advanced Brayer workshops:   http://zindorf.blogs.splitcoaststampers.com/workshop-calendar 

Link to my Stampin’ Up website where you can order all of your must have Stampin’ Up products from me 24-7:  http://michellezindorf.stampinup.net

Frequently asked questions answers:  http://zindorf.blogs.splitcoaststampers.com/frequently-asked-questions/ 


Sunny Day – Tutorial #330

dsc03794.JPG

I’m in a sunny mood today, can you tell?   This tutorial features the Stampin’ Up! stamp set, Awash with Flowers that will be in the upcoming Stampin’ Up Idea Book and Catalog that will be out July 1, 2010.  I cannot wait!

This is a two step stamping set with lots of stamps in it, 18 to be exact.  Love these big sets.  🙂

Let’s get started. . . . . . .

Supplies:

Stamps: Stampin’ Up! Awash With Flowers and Medallion
Paper: Stampin’ Up! Whisper White, Summer Sun, Dusty Durango and Always Artichoke
Ink: Stampin’ Up! Dusty Durango, Really Rust, Always Artichoke, Old Olive, Pumpkin Pie, Basic Black, Green Galore and Summer Sun
Accessories: Stampin’ Up Markers, White Gel Pen, sponge, Brayer, Photo corner Punch, Circle Die, Big Shot and Old Olive brads

Live in the USA and need a copy of the Summer Mini Catalog?  E-mail your mailing address to mzindorf@aim.com and I will get one in the mail to you.  )  Are you getting inspiration from this blog?   One way you can help support it is to order your Stampin’ Up products through me.   Click HERE to place an order.  Want to become a Stampin’ Up Demonstrator , receive a 20% discount on product and earn instant income on orders?  Consider being part of my Stampin’ Up Team and start your own business.  Click HERE for more information.

dsc03800.JPG

Started by using my Big Shot Die cut machine and the circle die to cut a circle from Whisper White card stock. dsc03767.JPGBrayered Summer Sun ink on the circle.dsc03768.JPG

Brayered Pumpkin Pie ink on the circle, not covering the Summer Sun ink entirely.

dsc03769.JPG

Brayered Green Galore ink at the bottom of the circle.

dsc03770.JPG

Used the edge of the pad to swipe in some Summer Sun ink grasses.

dsc03771.JPG

Used the edge of the pad to swipe in some Green Galore ink grasses.

dsc03772.JPG

Used the edge of the pad to swipe in some Old Olive ink grasses.

dsc03773.JPG

Stamped two of the outline flower stamps using Basic Black ink.

dsc03774.JPG

Stamped the corresponding stamps using Pumpkin Pie ink and Dusty Durango ink.

dsc03775.JPG

dsc03776.JPG

Stamped the stems using Old Olive ink and then colored them in with an Old Olive marker.

dsc03777.JPG

Added Really Rust marker to the bottom of the buttercup flowers and Pumpkin Pie marker to the tops of the other three flowers.

dsc03778.JPG

Stamped somemore foliage in the scene using Always Artichoke ink.

dsc03779.JPG

Stamped the corresponging stamp using Always Artichoke ink to fill them in.

dsc03780.JPG

Added Always Artichoke ink to the bottom of the foliage and Glorious Green marker to the tops of the foliage.

dsc03781.JPG

dsc03782.JPG

Added Ruby Red marker to the very bottoms of the flowers for shadow.

dsc03783.JPG

Sponged Dusty Durango ink around the edge of the card stock.

dsc03784.JPG

Added White Gel Pen highlights to the flowers and leaves.

dsc03785.JPG

Added Always Artichoke ink grasses using the edge of the ink pad.

dsc03786.JPG

Stamped the Medallion stamp on a 4.5″ square piece of Summer Sun card stock using Dusty Durango ink.  Also sponged around the edges of the card stock using Dusty Durango ink.

dsc03787.JPG

Added Always Artichoke and Dusty Durango panels and Always Artichoke photo corners.

dsc03788.JPG

Added Old Olive brads.

dsc03789.JPG

Here is the finished card measuring 5.25″ square.

dsc03794.JPG

May your day be filled to overflowing with sunshine.

Until my next post. . . . . . . . . . .  . .

dsc03326-2.jpg   Get ready for Brayer Workshops!  I am coming to:

Salem, Oregon (Sold Out)

Wheaton, Illinois

St. Cloud, Minnesota (2 spots available)

Rockville, Maryland (Sold Out)

North Chili, New York (near Rochester) (Sold Out)

Kenova (Huntington), West Virginia

Helena, Montana

Middleburg Heights, Ohio

Venice, Florida

Grinnell, Iowa

Piedmont, Alabama (Near GA border close to Cedartown)

Auburn, Washington (near Seattle)

Elk Grove Village, Illinois

Savannah, Georgia

Atlanta, Georgia

Soledad, California

Here is a link to my workshop calendar where you can see all of my travel schedule and to get info on beginner and advanced Brayer workshops:   http://zindorf.blogs.splitcoaststampers.com/workshop-calendar 

Link to my Stampin’ Up website where you can order all of your must have Stampin’ Up products from me 24-7:  http://michellezindorf.stampinup.net

Frequently asked questions answers:  http://zindorf.blogs.splitcoaststampers.com/frequently-asked-questions/ 


Behind the Garage – Tutorial #229

dsc03761.JPG

Happy Mother’s Day to all you Mothers out there.  🙂

Before I start this tutorial I want to give a heart felt thank you to all of you that sent your condolence to me for the loss of my feathered friend, Phoebe.  Your sentiments were a true blessing.  🙂  They were also so very appreciated.

Now a bit about today’s tutorial.  Check out this new bicycle stamp from the new Stampin’ Up! Pedaling Past set.  This set is in the new Stampin’ Up! Summer Mini Catalog.  Also the sentiment on this card is also from another new set in the same catalog, In a Word is the set name.

I never really know what I will do with my main image panel until I am done with it.  After I finished this main image panel, I thought it looked like a garage door so I went with that idea.  Hope you enjoy this tutorial and will give a try.

Let’s get started. . . . . . . . . . .

Supplies:

Stamps: Stampin’ Up! Pedaling Past, In a Word, Thoughts & Prayers, Itty Bitty Backgrounds
Paper: Stampin’ Up! Whisper White, Going Gray and Basic Black
Ink: Stampin’ Up! Going Gray, Basic Black, Always Artichoke, Basic Black and Old Olive
Accessories: Stampin’ Up! Markers – Old Olive, Rose Red, Always Artichoke, Brocade Blue and Basic Black, Sponges, Silver Gel Pen and Post it Note for masking.

Live in the USA and need a copy of the Summer Mini Catalog?  E-mail your mailing address to mzindorf@aim.com and I will get one in the mail to you.  )  Are you getting inspiration from this blog?   One way you can help support it is to order your Stampin’ Up products through me.   Click HERE to place an order.  Want to become a Stampin’ Up Demonstrator , receive a 20% discount on product and earn instant income on orders?  Consider being part of my Stampin’ Up Team and start your own business.  Click HERE for more information.

dsc03766.JPG

I started out with a 3.75″ x 5″ piece of Whisper White, but cut it down to 3.5″ x 4.5″ later, so I would advise just to start out with the smaller size.  🙂

I masked the panel with a post it note, leaving 1/4″ of the card stock showing at the top.  Sponged Going Gray ink at the post it not edge.  Moved the post it note down another 1/4″ and repeated the sponging.  Kept repeating the sponging and moving of the post it note all the way down the card stock.

dsc03740.JPG

dsc03743.JPG

Stamped the Bicycle using Basic Black ink.

dsc03744.JPG

Added the flower vine from the Stampin’ Up! set Thoughts & Prayers by coloring the stamp with Old Olive and Rose Red markers, huffed my breath on the stamp to moisten and then stamp it.  Repeat this process a second time below the first image.

dsc03745.JPG

Colored the bicycle in with a Brocade Blue Marker.

dsc03746.JPG

Added Basic Black marker to the tires.

dsc03747.JPG

Added some grasses at the bottom of the card stock using the edge of an Old Olive ink pad in a half a “C” motion, top half of the “C”.

dsc03749.JPG

dsc03750.JPG

Added Always Artichoke grasses at the very bottom of the card stock using the same direct to paper motion.

dsc03751.JPG

Added Always Artichoke marker to the bottom of the leaves to add a shadow.

dsc03752.JPG

Sponged Basic Black ink to around the edges of the card stock.

dsc03753.JPG

Stamped the Sentiment using Basic Black ink.

dsc03754.JPG

Adhered the main image panel to a Going Gray 4.75″ x 6.26″ panel.

dsc03755.JPG

Stamped more flower vines using the same technique as I did on the main image panel.

dsc03756.JPG

Sponged Basic Black ink around the edges of the card stock.

dsc03757.JPG

Added a bit of direct to paper grasses using the edge of an Always Artichoke ink pad.

dsc03758.JPG

Add a bit of shine to the chrome of the bicycle using a Silver Gel Pen.  Also added a 5″ x 6.5″ Basic Black panel.

dsc03759.JPG

Added some texture to the Going Gray Panel by stamping this Stamp from the Stampin’ Up set Itty Bitty Backgrounds on it with Going Gray ink.

dsc03760.JPG

Here is the finished card measuring 5″ x 6.5″

dsc03761.JPG

May your Mother’s Day be filled with Family and lots of love.

Until my next post. . . . . . . . . . . . . . . .. . .

Hugs,

Michelle

dsc07090.jpg    Get ready for Brayer Workshops!  I am coming to:

Salem, Oregon (Sold Out)

Wheaton, Illinois

St. Cloud, Minnesota (Sold Out)

Rockville, Maryland (Sold Out)

North Chili, New York (near Rochester) (Sold Out)

Kenova (Huntington), West Virginia

Helena, Montana

Middleburg Heights, Ohio

Venice, Florida

Grinnell, Iowa

Piedmont, Alabama (Near GA border close to Cedartown)

Auburn, Washington (near Seattle)

Elk Grove Village, Illinois

Savannah, Georgia

Atlanta, Georgia

North Liberty, Indiana

Soledad, California

Here is a link to my workshop calendar where you can see all of my travel schedule and to get info on beginner and advanced Brayer workshops:   http://zindorf.blogs.splitcoaststampers.com/workshop-calendar 

Link to my Stampin’ Up website where you can order all of your must have Stampin’ Up products from me 24-7:  http://michellezindorf.stampinup.net

Frequently asked questions answers:  http://zindorf.blogs.splitcoaststampers.com/frequently-asked-questions/ 


My Flourished Laptop – Tutorial #328

dsc03739.JPG

If you know me, you know I am not a girlie, girl.  I wear my hair very short so I don’t have to spend time styling it.  Seriously, I would wear a bur haircut if I could get away with it.  You will find me in jeans, tee shirt and gym shoes more times than not.  I only put makeup on when I am teaching.  Mainly, so I don’t scare people, lol. 

Now when I seen this Pink, Dell Laptop come out a couple of years ago, my deep down inner girlie voice spoke up for probably the first time in my life and said “Mickey, you just have to get that!”.  So, as you see I did.  This laptop is 15″ x 11″ and I love it.

I also love Stampin’ Up’s Decor Elements and purchased the Flourishes in Black.  This afternoon I decided to put the Decor Elements on my computer to jazz it up a bit, just in case you couldn’t see me coming with my computer a mile away now.  🙂  Thought I would show you the simple steps it took.

Let’s get started.. .. .

The Decor Elements come in sheets with a backing sheet on each side.  One backing side has a grid pattern on it to help you line things up.  The other backing side is plain.  I cut out the element that I wanted to put on, took the grid pattern backing sheet off, put it down where I wanted it on the computer top, took the handy Stampin’ Up tool  and smoothed out any air bubbles by scraping the side of the tool across the design.

dsc03735.JPG

Carefully and slowly peeled the backing sheet off of the design.  There it is!  It is just that simple.

dsc03736.JPG

Now I wanted the design to go over that crease in the back of my computer so I used an X-acto knife to cut through the design at the crease.

dsc03737.JPG

Put the remaining Decor Elements on the exact same way.

dsc03738.JPG

Here is the finished project.  This was fast and simple but makes a big statement. 

dsc03739.JPG

If you want to check out all of Stampin’ Up’s Decor Element Designs click HERE.

Until my next post. . . .  . .

Hugs,

Michelle