Chilly Season’s Greetings – Tutorial #277

dsc01424.JPG

I know I just returned home from Colorado a few days ago, but I’m so very excited!  Tomorrow morning (Friday) 3:00 a.m., I am hitting the road again.  This time I am heading to Moore, Oklahoma to teach my brayer workshops.  It’s a good thing that I like to drive.  🙂  I hope you ladies in Moore, OK are ready to brayer!  Because here I come. . . . . .

dsc01362.JPG

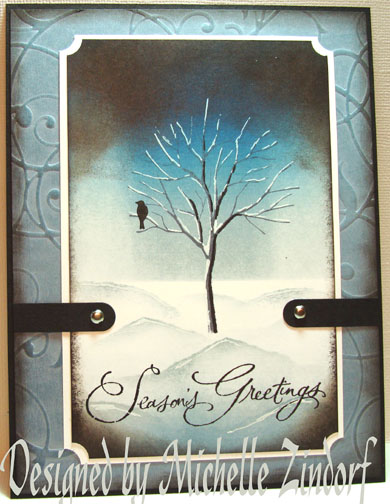
Today’s tutorial is a chilly one.  I used three cool shades of Blue to achieve that chilly look.  You could also use cool shades of purple for this project.   🙂  Did you know there are warm shades and cool shades to every color?  Take a look at your Blue ink pads that you have.  Can you guess which are warm and which are cool?   How about your red shades?  I bet you can.     Now you may not have as many ink pads as I have, because I am a bit sick.  But I bet you have a few, or maybe you have more ink than I have.  I just never know with you stampers.  🙂  Hmmm, I see some empty spots I need to fill.

dsc06118.JPG

Oh yeah, the tutorial, sorry I got a bit off track there. 

Let’s get started. . . . . . .  .

Supplies:

Stamps: Stampin’ Up! Branch Out and Many Merry Messages
Paper: Stampin’ Up! Whisper White, Bordering Blue and Basic Black
Ink: Stampin’ Up! Basic Gray, Night of Navy, Not Quite Navy, Bordering Blue and Basic Black
Accessories: Stampin’ Up! Ticket Corner Punch and Word Window Punch, Basic Black Marker, White Gel Pen, Sponge, Brayer, Post it notes, Big Shot Die Cut Machine and Flourish Texturz Plate, Silver Brads

Want a free 39 page, Stampin’ Up Mini catalog?  If you are a resident of the United States,  just e-mail your mailing address to me and I will get one in the mail to you.  Are you inspired by this Blog?  One way you can help support this blog is by ordering your Stampin’ Up products through me.   You can order from me 24-7 from this link:  http://michellezindorf.stampinup.net or e-mail me at mzindorf@aim.com.  If you are within the United States.  Want a copy of the brand new 2009-2010 Stampin’ Up Catalog for $9.95 with free shipping, just e-mail me at mzindorf@aim.com and I will get one in the mail to you.  Want to become a Stampin’ Up Demonstrator and earn instant income?  Consider being part of my Stampin’ Up Team.  Also check out the Stampin’ Up specials, click this link to check it out:  http://www.stampinup.net/esuite/home/michellezindorf/promotions

dsc01433.JPG

Starting with a 3.5″ x 5.5″ piece of Whisper White Card stock.  I masked the bottom 1/3 of the card stock with a post it note and brayered Bordering Blue ink on the unmasked area.

dsc01404.JPG

Brayered Not Quite Navy at the top of the card stock, not covering the Bordering Blue ink entirely.

dsc01405.JPG

Brayered Night of Navy ink at the top of the card stock, not covering the Not Quite Navy ink entirely.

dsc01406.JPG

Removed the post it note mask and brayered Bordering Blue ink at the bottom of the card stock.

dsc01407.JPG

Stamped the tree from the Stampin’ Up! set Branch Out with Basic Grey ink.

dsc01408.JPG

Ripped a couple of hills in the edge of a post it note and used it to create some mounds of snow in the scene.  This was done by sponging Bordering Blue ink at the post it note edge and then moving it and sponging again for each mound.

dsc01410.JPG

dsc01411.JPG

Sponged Basic Black ink around the edges of the card stock.  Heavier at the top.

dsc01412.JPG

Added White Gel pen to the tree and the mounds of snow.

dsc01413.JPG

Added a shadow in the tree by outlining the right sides to some of the branches and the trunk.

dsc01414.JPG

Ran a 4 7/8″ x 6 3/4″ Bordering Blue Panel through my Big Shot Machine using the Flourish Texture Plate.

dsc01415.JPG

Brayered Bordering Blue ink on the panel to bring out the dry embossing further.

dsc01416.JPG

Sponge Basic Black ink around the outside edges.

dsc01417.JPG

Used the Stampin’ Up! Ticket Corner Punch on a Whisper White Panel and on the main image panel.

dsc01418.JPG

Stamped a lone bird in the tree using Basic Black ink.

dsc01419.JPG

Punched to word windows out of Basic Black card stock.  Cut one end off of each of them.  Adhered them with glue and added a silver brads to each one.

dsc01420.JPG

Stamped the sentiment from the Stampin’ Up! set Many Merry Messages using Basic Black ink.

dsc01422.JPG

Here is the finished card measuring 5″ x 6.5″.

dsc01424.JPG

May your day be filled with peace and harmony.  Please wish me safe travels.

Until my next post. . . . . . . . .

Hugs,
Michelle

dsc01434.jpg  Get ready for Brayer Workshops!  I am coming to:

Moore, Oklahoma

Nashville, Indiana

Portland, Michigan

2010

Dayton, Ohio at Marco Paper

Phoenix, Arizona

Monroe, Louisiana

Jacksonville, Florida

 St. Louis, Missouri

Mechanicsville, Virginia

Raleigh, North Carolina 

Colleyville, Texas

Colorado Springs, Colorado

 Boise area of Meridian, Idaho

Riverside, California (Southern California)

Salem, Oregon

Wheaton, Illinois

St. Cloud, Minnesota

Rockville, Maryland

North Chili, New York (near Rochester)

New Johnsonville, Tennessee

Kenova, West Virginia

Helena, Montana

Middleburg Heights, Ohio

Venice, Florida

Grinnell, Iowa

Piedmont, Alabama

Auburn, Washington (near Seattle)

Elk Grove Village, Illinois

Here is a link to my workshop calendar where you can see all of my travel schedule and to get info on beginner and advanced Brayer workshops:   http://zindorf.blogs.splitcoaststampers.com/workshop-calendar 

Link to my Stampin’ Up website where you can order all of your must have Stampin’ Up products from me 24-7:  http://michellezindorf.stampinup.net

Frequently asked questions answers:  http://zindorf.blogs.splitcoaststampers.com/frequently-asked-questions/ 


Golden Morning – Tutorial #276

dsc01402.JPG

The birds in this project are from the Halloween Stampin’ Up Set “Graveyard Gala”.    I try very hard not to categorize my stamps by season, holiday etc. because so many stamps in the sets can be used all through the year.  It helps me think outside of the box to have a reference sheet for each set in a binder so I can easily flip through the binder to find an image I would like to use in a scene.  For instance, I knew I wanted to put birds on the ground in this scene so I flipped through the binder to find some birds that were the right size.  When I put them in this scene they don’t look scary at all, but instead look like they are just soaking up the morning rays.  🙂

Here is a link to a an earlier post I did on my stamp storage:  http://zindorf.blogs.splitcoaststampers.com/2008/03/14/my-stampin-up-stamp-storage-a-glimps-into-my-world-part-ii/

Let’s get started on the tutorial:

Supplies:

Stamps: Stampin’ Up Graveyard Gala and Pocket Silhouettes
Paper: Stampin’ Up Designer Paper and More Mustard, Whisper White and Basic Black Card Stock
Ink: Stampin’ Up Basic Black, More Mustard, Creay Caramel and So Saffron
Accessories: White Gel Pen, Brayer, White Ribbon, Brads, Photo Corner Punch, Big Shot Die Cut Machine, Damask Texture Plate and a Sponge

Want a free 39 page, Stampin’ Up Mini catalog?  If you are a resident of the United States,  just e-mail your mailing address to me and I will get one in the mail to you.  Are you inspired by this Blog?  One way you can help support this blog is by ordering your Stampin’ Up products through me.   You can order from me 24-7 from this link:  http://michellezindorf.stampinup.net or e-mail me at mzindorf@aim.com.  If you are within the United States.  Want a copy of the brand new 2009-2010 Stampin’ Up Catalog for $9.95 with free shipping, just e-mail me at mzindorf@aim.com and I will get one in the mail to you.  Want to become a Stampin’ Up Demonstrator and earn instant income?  Consider being part of my Stampin’ Up Team.  Also check out the Stampin’ Up specials, click this link to check it out:  http://www.stampinup.net/esuite/home/michellezindorf/promotions

dsc01403.JPG

Started out with a 3.5″ piece of Whisper White card stock and sponged So Saffron ink all over it.

dsc01383.JPG

Punched a 1 1/4″ circle from the sticky part of a post it note and added to the card stock.  Sponged More Mustard ink around the edge of the post it note to define the sun.  Also sponged More Mustard ink at the top and bottom of the card stock.

dsc01384.JPG

dsc01385.JPG

Sponged Creamy Caramel ink on the bottom of the card stock, not covering the More Mustard ink entirely.

dsc01386.JPG

Stamped the two birds using Basic Black ink.  Removed the sun mask.

dsc01387.JPG

Stamped the plant stamp a few times using Basic Black ink.

dsc01388.JPG

Using just the very edge of the ink Basic Black pad and a half of a “C” motion, (that would be the top half of the “C”) I direct to papered some grasses in the scene.  Practice this on scrap paper before trying it on your card stock.  🙂  Also leave some of the background colors showing through on the ground. 

dsc01390.JPG

Sponged Black ink around the edge of the card stock.

dsc01391.JPG

Added some White gel pen highlights to the plants, tops of the birds and the grasses.

dsc01392.JPG

Adhered a torn piece of Stampin’ Up Designer paper to a piece of More Mustard card stock and then ran both of them through my Big Shot Die Cut machine using the Damask Texture Plate.

dsc01393.JPG

dsc01394.JPG

Brayered More Mustard ink over the top of the card stock to define the texture more and to add a bit of grunge.

dsc01395.JPG

Grunged the card stock up more by sponging Basic Black ink around the edges.

dsc01396.JPG

Assembled the card front and added small black photo corners, brads and white ribbon.

dsc01397.JPG

Here is the finished card measuring 5″ x 6.5″.

dsc01402.JPG

I hope this tutorial has inspired you to look at your holiday stamps in a different light.

May your day be golden.

Until my next post. . . . . . . .  .

Hugs,

Michelle

tiny-bird.jpg  Get ready for Brayer Workshops!  I am coming to:

Moore, Oklahoma

Nashville, Indiana

Portland, Michigan

2010

Dayton, Ohio at Marco Paper

Phoenix, Arizona

Monroe, Louisiana

Jacksonville, Florida

 St. Louis, Missouri

Mechanicsville, Virginia

Raleigh, North Carolina 

Colleyville, Texas

Colorado Springs, Colorado

 Boise area of Meridian, Idaho

Riverside, California (Southern California)

Salem, Oregon

Wheaton, Illinois

St. Cloud, Minnesota

Rockville, Maryland

North Chili, New York (near Rochester)

New Johnsonville, Tennessee

Kenova, West Virginia

Helena, Montana

Middleburg Heights, Ohio

Venice, Florida

Grinnell, Iowa

Piedmont, Alabama

Auburn, Washington (near Seattle)

Elk Grove Village, Illinois

Here is a link to my workshop calendar where you can see all of my travel schedule and to get info on beginner and advanced Brayer workshops:   http://zindorf.blogs.splitcoaststampers.com/workshop-calendar Link to my Stampin’ Up website where you can order all of your must have Stampin’ Up products from me 24-7:  http://michellezindorf.stampinup.netFrequently asked questions answers:  http://zindorf.blogs.splitcoaststampers.com/frequently-asked-questions/ 


Christmas Card Time – Tutorial #275

dsc01277.jpg

It’s that time of year when my friend Claire shows up wanting to make Christmas cards.  Claire is my Dear, Evil, Friend that got me into stamping, but does not stamp, lol.  But that is a whole different story.  

A couple of weekends ago we got together and mass produced 40 of these cards in a day, less the time it took us to go out to lunch, gab, harass each other, tease my husband etc, etc.  🙂  I always tailor the card we make each year to what Claire likes and so it varies a bit from my usual style.  Claire likes layers and do-dads.  Things she can feel on a card.  Me, I tend to not care about the do-dads, lol. 

Anyway, here is a tutorial on this years card.  The tutorial may be missing a couple of pictures.  Hard to remember to pick up the camera when you are having a tremendous amount of fun with a friend.

dsc01380.jpg

Supplies:

Stamps: Stampin’ Up Patterned Pines, Snow Swirled & Serene Snowflakes
Paper: Stampin’ Up Whisper White, Bashful Blue, Not Quite Navy and Old Olive
Ink: Stampin’ Up Old Olive, Whisper White and Not Quite Navy
Accessories: Stampin’ Up Real Red Gingham Ribbon, Real Red & Gold Brads, Dazzling Diamonds Glitter, Brayer, Big Shot Die Cut Machine, Top Note Die, Flourish Texture Plate and the Photo Corner Punch

Want a free 39 page, Stampin’ Up Mini catalog?  If you are a resident of the United States,  just e-mail your mailing address to me and I will get one in the mail to you.  Are you inspired by this Blog?  One way you can help support this blog is by ordering your Stampin’ Up products through me.   You can order from me 24-7 from this link:  http://michellezindorf.stampinup.net or e-mail me at mzindorf@aim.com  If you are within the United States.  Want a copy of the brand new 2009-2010 Stampin’ Up Catalog for $9.95 with free shipping, just e-mail me at mzindorf@aim.com and I will get one in the mail to you.  Want to become a Stampin’ Up Demonstrator and earn instant income?  Consider being part of my Stampin’ Up Team.  Also check out the Stampin’ Up specials, click this link to check it out:  http://www.stampinup.net/esuite/home/michellezindorf/promotions

Started out using my Big Shot Die Cut Machine and Top Note Die.  Cut one Whisper White Top Note and one Bashful Blue Top Note.

dsc01281.JPG

Stamped the Greeting from the Stampin’ Up Set Snow Swirled with Real Red ink on the White Top Note.

dsc01282.JPG

Brayered Not Quite Navy ink at the top of the Bashful Blue Top Note.

dsc01283.JPG

Ran the Bashful Blue Top Note through the Big Shot Machine using the Flourish Texture Plate.

dsc01284.JPG

Tore the top and the bottom off of the Whisper White Top Note, discarding the middle portion.  Stacked the two tore pieces at the bottom of the Bashful Blue Top Note to create the snow.

dsc01285.JPG

Used a Heat Gun to dry the brayered on ink and stamped the snowflake stamp from the Stampin’ Up set Serene Snowflakes in the sky area of the Bashful Blue Top Note.

Note:  If you stamp the snowflakes before the Brayered on ink is dry your snowflakes will disappear.  Learned this the hard way, lol.

dsc01286.JPG

Stamped the Tree stamp from the Stampin’ Up set Patterned Pines with Old Olive ink on Whisper White Card stock.

dsc01287.JPG

Cut two of the trees out and adhered them to the front of the card.

dsc01288.JPG

dsc01289.JPG

Assembled Bashful Blue, Old Olive and Not Quite Navy layers, added Real Red Gingham ribbon, Not Quite Navy Photo Corner Punches and Gold Brads.  Also added three Real Red brads to each tree.   It is hard to see, but there is Dazzling Diamonds Glitter on the top of each layer of the snow.

Here is the finished card measuring 5″ x 6.5″.

dsc01380.jpg

Now for a giggle, I was going through a card stash I have.  You know the card stash, we all have one.  Don’t deny it, lol.

Anyhow, found this old card I created back in 2006.  I had to look way back in my Split Coast Stampers gallery to see when it was created.  Poor Santa!  The Stampin’ Up stamp set used for this is a retired set, Star Santa.  Don’t you just love looking at your old stuff.  It always makes me laugh.

dsc01378.jpg

May your day be filled with fond memories.

Huge Hugs,

Michelle

tiny-bird.jpg  Get ready for Brayer Workshops!  I am coming to:

Moore, Oklahoma

Nashville, Indiana

Portland, Michigan

2010

Dayton, Ohio at Marco Paper

Phoenix, Arizona

Monroe, Louisiana

Jacksonville, Florida

 St. Louis, Missouri

Mechanicsville, Virginia

Raleigh, North Carolina 

Colleyville, Texas

Colorado Springs, Colorado

 Boise area of Meridian, Idaho

Riverside, California (Southern California)

Salem, Oregon

Wheaton, Illinois

St. Cloud, Minnesota

Rockville, Maryland

North Chili, New York (near Rochester)

New Johnsonville, Tennessee

Kenova, West Virginia

Helena, Montana

Middleburg Heights, Ohio

Venice, Florida

Grinnell, Iowa

Piedmont, Alabama

Auburn, Washington (near Seattle)

Elk Grove Village, IllinoisHere is a link to my workshop calendar where you can see all of my travel schedule and to get info on beginner and advanced Brayer workshops:   http://zindorf.blogs.splitcoaststampers.com/workshop-calendar 

Link to my Stampin’ Up website where you can order all of your must have Stampin’ Up products from me 24-7:  http://michellezindorf.stampinup.net

Frequently asked questions answers:  http://zindorf.blogs.splitcoaststampers.com/frequently-asked-questions/ 


Birds on a Wire – Tutorial #274

dsc01358.JPG

 Happy Sunday!  I am hiding out in my stamp room this morning while my husband assembles the treadmill that we purchased yesterday.  The sales person told us that it is very easy to assemble, but when the box was opened up when we got it home we are finding it has a bunch of parts.  Hence I am hiding, lol.  This may sound mean but couples can get divorced over putting together projects such as this.  🙂 

Anyhow, enough with my ramblings.  Today’s tutorial shows how you can color and stamp just one part of a stamp image to omit parts that you do not want in your scene.  🙂

Let’s get started. . . .

Supplies:

Stamps: Stampin’ Up Friends 24-7
Paper: Stampin’ Up Designer Series paper “Autumn Meadows”, Basic Black and Whisper White
Ink: Stampin’ UP Crushed Curry, Bermuda Bay, Taken with Teal, Not Quite Navy and Basic Black
Accessories: Versamark marker & Pad, Chocolate Chip Ribbon, Gold Brads, Photo Corner Punch, Sponge, Ruler, Piercing Tool, Stampin’ Up markers Creamy Caramel & Basic Black, White Gel Pen, Clear embossin powder and heat gun.

Want a free 39 page, Stampin’ Up Mini catalog?  If you are a resident of the United States,  just e-mail your mailing address to me and I will get one in the mail to you.  Are you inspired by this Blog?  One way you can help support this blog is by ordering your Stampin’ Up products through me.   You can order from me 24-7 from this link:  http://michellezindorf.stampinup.net or e-mail me at mzindorf@aim.com  If you are within the United States.  Want a copy of the brand new 2009-2010 Stampin’ Up Catalog for $9.95 with free shipping, just e-mail me at mzindorf@aim.com and I will get one in the mail to you.  Want to become a Stampin’ Up Demonstrator and earn instant income?  Consider being part of my Stampin’ Up Team.  Also check out the Stampin’ Up specials, click this link to check it out:  http://www.stampinup.net/esuite/home/michellezindorf/promotions

dsc01361.JPG

On a 4.5″ x 3.5″ piece of Whisper White card stock, stamped the flourish stamp from the Stampin’ Up set “Friends 24-7” by first loading the stamp with Versamark and then with Crushed Curry ink before stamping it.  Heat embossed the image using clear embossing powder and a heat gun.

dsc01334.JPG

dsc01335.JPG

Colored just the bird on the Bird stamp from the Stampin’ Up set “Friends 24-7” in with a Versamark marker and then with a Basic Black marker.  Huffed my breath on the stamp to moisten and then stamped it on the card stock.    I then heat embossed the bird using clear embossing powder and a heat gun. 

I repeated this process 3 times.

dsc01337.JPG

dsc01336.JPG

dsc01338.JPG

Drew a line for the birds to be sitting on with a ruler and a Versamark marker.  Heat embossed the line with clear embossing powder and a heat gun.

dsc01339.JPG

dsc01340.JPG

Added Creamy Caramel marker to the birds.

dsc01341.JPG

Colored over all three birds with a Versamark marker and heat embossed them with clear embossing powder and a heat gun.  All of the images are now heat embossed entirely.

dsc01342.JPG

dsc01343.JPG

Sponged Crushed Curry in the upper left corner of the card stock.

dsc01344.JPG

Sponge Bermuda Bay ink on the card stock working from the right side in.

dsc01345.JPG

Sponged Taken with Teal ink on the right side of the card stock, not covering the Bermuda Bay ink entirely.

dsc01346.JPG

Sponged Not Quite Navy ink on the right side of the card stock, not covering the Taken with Teal ink entirely.

dsc01347.JPG

Sponged Basic Black ink on the bottom right corner of the card stock and all around the edges.

dsc01348.JPG

Wiped off my embossed images with a clean cotton towel.

dsc01350.JPG

Added a black outline to the right sides of the Crushed Curry flourish and bottom of the wire the birds are sitting on to add a shadow.

dsc01353.JPG

Added White gel pen highlights to the tops of the birds, bellies of the birds and flourish.

dsc01354.JPG

Added Chocolate chip small corner punches to the left side of the main image panel.  Chocolate Chip ribbon and gold brads.  My Design paper panel is from the Stampin’ Up Design Series Paper Pack “Autumn Meadows”.

dsc01355.JPG

Here is the finished card measuring 5″ x 6.5″.

dsc01358.JPG

May you have a day free of assembly.  🙂

Hugs,

Michelle

tiny-bird.jpg  Get ready for Brayer Workshops!  I am coming to:

Moore, Oklahoma

Nashville, Indiana

Portland, Michigan

2010

Dayton, Ohio at Marco Paper

Phoenix, Arizona

Monroe, Louisiana

Jacksonville, Florida

 St. Louis, Missouri

Mechanicsville, Virginia

Raleigh, North Carolina 

Colleyville, Texas

Colorado Springs, Colorado

 Boise area of Meridian, Idaho

Riverside, California (Southern California)

Salem, Oregon

Wheaton, Illinois

St. Cloud, Minnesota

Rockville, Maryland

North Chili, New York (near Rochester)New Johnsonville, TennesseeKenova, West VirginiaHelena, MontanaMiddleburg Heights, OhioVenice, Florida

Grinnell, Iowa

Piedmont, Alabama

Auburn, Washington (near Seattle)

Elk Grove Village, Illinois

Here is a link to my workshop calendar where you can see all of my travel schedule and to get info on beginner and advanced Brayer workshops:   http://zindorf.blogs.splitcoaststampers.com/workshop-calendar 

Link to my Stampin’ Up website where you can order all of your must have Stampin’ Up products from me 24-7:  http://michellezindorf.stampinup.net

Frequently asked questions answers:  http://zindorf.blogs.splitcoaststampers.com/frequently-asked-questions/ 


Snowed In – Tutorial #273 and a Blog Candy Winner!

dsc01333.jpg

Well, I finally made it home yesterday evening after being snowed in the last couple of days in Colorado.  If I am going to be snowed in any where, I prefer it be in Colorado.  Let me say, it was breath ta-kingly beautiful!  The first photo below is a shot of my Sister’s deck furniture after just a half a day of the two day Winter Storm. 

dsc01311.JPG

I had such a wonderful time meeting all of my students in Broomfield, Colorado.  Brayer on ladies!  I am so jealous that you get to be inspired by such stunning scenes everyday.

This is a couple of quick photos taken from my Sister’s front yard in the early morning right before I had to get in the car to come home.  Hello!  Early morning light hitting the mountains and tree tops with snow everywhere.  It was sooooo very hard to make myself head to the airport.

dsc01327.JPG

dsc01324.JPG

Although it was hard to come home, once I got off of the plane in Ohio to 80 degree temperatures and the full spectrum of Fall colors surrounding me, I was at peace again and glad to be home.  🙂

I do have a tutorial for you today, but first I have a blog candy winner to announce.  Although I use a Random number generator to select the winner, I had the best time reading through your snowman comments.  If you haven’t read through them, you should.  Some are are heart wrenching, some are hysterical and most just warm your heart.  Thanks to everyone who played along.  Now for the winner.

dsc01280.JPG  The winner of the Stampin’ Up, Snow Buddies Stamp Set is. . . .#487 . . .. .. . . . .

Karen who wrote “Hi, My most memorable and most interesting experience with snowmen was when we were snowed in in North Lake Tahoe. We had gone there to go skiing, but it was snowing so much that we never got to go skiing. Our car was stuck in the driveway, snowed in, since the night before it was literally a couple of inches of snow around it. My father was on top of the car shoveling down to get snow away. My sister and I, I guess, were too little to help, so we played in the snow. We went around the unfamiliar house/cabin and found a place to do our snowmen. Of course, during it not all snow we picked up went on the snowmen, some went on each other. By the time we had our snowmen there were 4 of us there – 2 full-blown and snow-blown snowmen and 2 people snowgirls. We had such fun, especially since we were from Southern California and we didn’t get to build snowmen!!! Karen B.

Congratulations!  Karen B. , please e-mail your mailing address to mzindorf@aim.com within the next 30 days to claim your new Snow Buddies Stamp Set.

Now a bit about today’s tutorial.  This card was created while I was in Colorado using my Sister’s stamping supplies.  She is a brand new stamper and inherits my supplies that are no longer Stampin’ Up current.  I used a couple of retired items, but I will give you the current items that you could substitute for them as I go through this tutorial. 

Let’s get started. . . . .

Supplies:  (Sorry no picture of the supplies today)

Stamps: Stampin’ Up “Winter Post and French Script”
Paper: Stampin’ Up Whisper White and Miscellaneous Designer Paper
Ink: Stampin’ Up Not Quite Navy, Basic Black and Soft Sky
Accessories: Brayer, White Gel Pen, Post it notes

Want a free 39 page, Stampin’ Up Mini catalog?  If you are a resident of the United States,  just e-mail your mailing address to me and I will get one in the mail to you.  Are you inspired by this Blog?  One way you can help support this blog is by ordering your Stampin’ Up products through me.   You can order from me 24-7 from this link:  http://michellezindorf.stampinup.net or e-mail me at mzindorf@aim.com  If you are within the United States.  Want a copy of the brand new 2009-2010 Stampin’ Up Catalog for $9.95 with free shipping, just e-mail me at mzindorf@aim.com and I will get one in the mail to you.  Want to become a Stampin’ Up Demonstrator and earn instant income?  Consider being part of my Stampin’ Up Team.  Also check out the Stampin’ Up specials, click this link to check it out:  http://www.stampinup.net/esuite/home/michellezindorf/promotions

Started out with a 3.5″ piece of Whisper White card stock and masked the bottom of it with a post it note, torn at the top edge.

dsc01299.JPG

Brayered Soft Sky ink (you can substitute this ink for the current color Bashful Blue) at the top of the card stock.

dsc01300.JPG

Sponged Soft Sky ink (you can substitute Bashful Blue ink) at the post it note mask edge to darken the horizon line.

dsc01301.JPG

Stamped the French Script stamp with Soft Sky ink (you can substitute Bashful Blue ink and the current background stamp “En Francais”).

dsc01302.JPG

Brayered Not Quite Navy ink at the top of the card stock.

dsc01303.JPG

Ripped a post it note in the shape of a mountain and sponged Not Quite Navy ink at the post it note edge to create a mountain on the card stock.

dsc01304.JPG

Stamped the Deer from the Stampin’ Up set “Winter Post” with Stazon Jet Black ink (Basic Black ink would work here too).

dsc01305.JPG

Added some white gel pen to the top of the mountain to look like snow.

dsc01306.JPG

Sponged Not Quite Navy ink around the edges of the card stock.

dsc01307.JPG

Layered the main image panel with a Designer paper and Whisper White card stock.

Here is the finished card measuring 5.25″ square.

dsc01333.jpg

May your day be overflowing with warm fuzzies, lol.  

Until my next post. . . . . . . . . .

Hugs,

Michelle

tiny-bird.jpg  Get ready for Brayer Workshops!  I am coming to:

Moore, Oklahoma

Nashville, Indiana

Portland, Michigan

2010

Dayton, Ohio at Marco Paper

Phoenix, Arizona

Monroe, Louisiana

Jacksonville, Florida

 St. Louis, Missouri

Mechanicsville, Virginia

Raleigh, North Carolina 

Colleyville, Texas

Colorado Springs, Colorado

 Boise area of Meridian, Idaho

Riverside, California (Southern California)

Salem, Oregon

Wheaton, Illinois

St. Cloud, Minnesota Rockville, MarylandNorth Chili, New York (near Rochester)New Johnsonville, Tennessee

Kenova, West Virginia

Helena, Montana

Middleburg Heights, Ohio

Venice, Florida

Ginnell, Iowa

Piedmont, Alabama

Auburn, Washington (near Seattle)

Elk Grove Village, Illinois

Here is a link to my workshop calendar where you can see all of my travel schedule and to get info on beginner and advanced Brayer workshops:   http://zindorf.blogs.splitcoaststampers.com/workshop-calendar 

Link to my Stampin’ Up website where you can order all of your must have Stampin’ Up products from me 24-7:  http://michellezindorf.stampinup.net

Frequently asked questions answers:  http://zindorf.blogs.splitcoaststampers.com/frequently-asked-questions/ 


Leaves on Fossil Rock – Tutorial #272

dsc01275-2.jpg

Just when you think you have me pegged, I go and make something a little off the wall, lol.   This is my attempt at a fossil rock with fall leaves on it.  My leaves are stamped, colored, cut out, heat embossed and glued on.  I know, gasp!  I actually cut them out and glued them on, lol.

Anyway, I had fun creating this and hope you enjoy seeing the process.  The leaf images in this project are in the Stampin’ Up! set “Autumn Splendor”, Item number 116503, $20.95.  The set is in the current Holiday Mini Catalog and available until January 4, 2010.  🙂

Let’s get started.. . . .  . .

Supplies:

Stamps: Stampin’ Up Autumn Splendor and Kind & Caring Thoughts
Paper: Stampin’ Up Whisper White and Basic Black
Ink: Stampin’ Up Basic Gray, Going Gray and Basic Black
Accessories: Stampin’ Up Basic Black marker, Aqua Painter, Paper Snips, Watercolor Crayons, Versamark Pad, Clear embossing powder, Heat Gun, Old Olive Ribbon & Sponge

Want a free 39 page, Stampin’ Up Mini catalog?  If you are a resident of the United States,  just e-mail your mailing address to me and I will get one in the mail to you.  Are you inspired by this Blog?  One way you can help support this blog is by ordering your Stampin’ Up products through me.   You can order from me 24-7 from this link:  http://michellezindorf.stampinup.net or e-mail me at mzindorf@aim.com  If you are within the United States.  Want a copy of the brand new 2009-2010 Stampin’ Up Catalog for $9.95 with free shipping, just e-mail me at mzindorf@aim.com and I will get one in the mail to you.  Want to become a Stampin’ Up Demonstrator and earn instant income?  Consider being part of my Stampin’ Up Team.  Also check out the Stampin’ Up specials, click this link to check it out:  http://www.stampinup.net/esuite/home/michellezindorf/promotions

dsc01269.JPG

Stamped large and small leaf stamps on Whisper White card stock, loading my stamp first with Versamark and then with Basic Black ink before stamping.  Loaded and stamped them multiple times and then heat embossed all of them at the same time using clear embossing powder and a heat gun. 

Note:  I will be using these leaves in other projects.  That is why I stamped so many.  🙂

dsc01243.JPG

dsc01244.JPG

Colored the center of the leaf with an Old Olive Stampin’ Up Watercolor Crayon.

dsc01245.JPG

Added More Mustard Watercolor Crayon.

dsc01246.JPG

Added Real Red Water Color Crayon around the edges.

dsc01247.JPG

Used a Stampin’ Up Aqua Painter brush filled with water and brushed over the image from the center outward to blend the colors.   Note:  I cleaned my Aqua Painter brush on my scrap paper frequently so the red did not take over the lighter colors.

dsc01248.JPG

Cut out the leaf using my paper snips.  Love these little super sharp, pointy scissors.  🙂

dsc01249.JPG

Pressed the Versamark pad all over the cut out leaf and then heat embossed the cut out with clear embossing powder and a heat gun.  Repeated this process to create a small leaf cut out also.

dsc01250.JPG

dsc01251.JPG

Sponged Going Gray ink, using a pouncing motion, all over a 4.5″ square piece of Whisper White card stock.

dsc01257.JPG

Stamped small and large leaves using Going Gray ink all on the card stock.

dsc01258.JPG

dsc01259.JPG

Sponged Basic Gray ink on the card stock, making sure to leave some light areas.

dsc01260.JPG

Added a bit of Basic Black ink with the sponge and also sponged Basic Black ink around the edges of the card stock.

dsc01261.JPG

Layed out my design and stamped my sentiment before gluing it all together. 

Note:  I stamp my sentiment before gluing the card together just in case I stamp it crooked.  🙂

dsc01262.JPG

Out lined parts of the Going Gray leaves with the fine end of a Basic Black marker.  This helps them stand out a bit more and gives them a bit of depth.

dsc01263.JPG

Assembled my card and added an Old Olive Ribbon.

Here it is finished measuring 5″ x 6.5″.

dsc01275-2.jpg

May you put on paper whatever comes to your mind today.

Until my next post. . . . . . . . . .

Huge Hugs,

Michelle

tiny-bird.jpg  Get ready for Brayer Workshops!  I am coming to:

Broomfield, Colorado

Moore, Oklahoma

Nashville, Indiana

Portland, Michigan

2010

Dayton, Ohio at Marco Paper

Phoenix, Arizona

Monroe, Louisiana

Jacksonville, Florida

 St. Louis, Missouri

Mechanicsville, Virginia

Raleigh, North Carolina 

Colleyville, Texas

Colorado Springs, Colorado

 Boise area of Meridian, Idaho

Riverside, California (Southern California)

Salem, Oregon Wheaton, Illinois

St. Cloud, Minnesota

Rockville, Maryland

North Chili, New York (near Rochester)

New Johnsonville, Tennessee

Kenova, West Virginia

Helena, Montana

Middleburg Heights, Ohio

Venice, Florida

Ginnell, Iowa

Piedmont, Alabama

Auburn, Washington (near Seattle)

Elk Grove Village, Illinois

Here is a link to my workshop calendar where you can see all of my travel schedule and to get info on beginner and advanced Brayer workshops:   http://zindorf.blogs.splitcoaststampers.com/workshop-calendar 

Link to my Stampin’ Up website where you can order all of your must have Stampin’ Up products from me 24-7:  http://michellezindorf.stampinup.net

Frequently asked questions answers:  http://zindorf.blogs.splitcoaststampers.com/frequently-asked-questions/ 


Pumpkin Patch – Tutorial #271

dsc01242-2.jpg

I have a little Autumn scene for you today.  The main set used today is a Stampin’ Up set Autumn Harvest, item number 110372, $17.95.  I teamed it up with a Stampin’ Up set Baroque Motifs and used the flourish as pumpkin vines.  Check it out.  🙂

Let’s get started. . . .

Supplies:

Stamps: Stampin’ Up Autumn Harvest & Baroque Motifs
Paper: Stampin’ Up Whisper White, Dusty Durango & Tempting Turquoise
Ink: Stampin’ UP Dusty Durango, Tempting Turquoise, Old Olive & Basic Black
Accessories: Stampin’ Up Markers, Sponges, Piercing Tool, Gold Brads, Dusty Durango Polka Dot Ribbon, Big Shot Die Cut Machine, Top Note Die, Versamark Pad & Marker, Clear embossing Powder, Heat Gun

Want a free 39 page, Stampin’ Up Mini catalog?  If you are a resident of the United States,  just e-mail your mailing address to me and I will get one in the mail to you.  Are you inspired by this Blog?  One way you can help support this blog is by ordering your Stampin’ Up products through me.   You can order from me 24-7 from this link:  http://michellezindorf.stampinup.net or e-mail me at mzindorf@aim.com  If you are within the United States.  Want a copy of the brand new 2009-2010 Stampin’ Up Catalog for $9.95 with free shipping, just e-mail me at mzindorf@aim.com and I will get one in the mail to you.  Want to become a Stampin’ Up Demonstrator and earn instant income?  Consider being part of my Stampin’ Up Team.  Also check out the Stampin’ Up specials, click this link to check it out:  http://www.stampinup.net/esuite/home/michellezindorf/promotions

dsc01236.JPG

Used my Big Shot Dye Cut Machine and the Top Note Die to cut out this shape with Whisper White Card stock.

dsc01205.JPG

Stamped the leaf from the Autumn Harvest set by first loading my stamp with Versamark and then with Basic Black ink before stamping it on the card stock.  Stamped all three images loading the stamp each time with Versamark and ink.   Heat embossed the images using clear embossing powder and a heat gun.

dsc01206.JPG

dsc01207.JPG

Colored the leaves in with a Creamy Caramel marker.

dsc01208.JPG

Added More Mustard marker to the leaves.

dsc01209.JPG

Added a bit of Real Red Marker to the center of the leaves.

dsc01210.JPG

Colored over the leaves, staying within the embossed lines with a Versamark marker.  Heat embossed the images using clear embossing powder and a heat gun.

dsc01211.JPG

dsc01212.JPG

Stamped the two pumpkins from the Autumn Harvest set by first loading the stamps with Versamark and then with Dusty Durango ink before stamping them.  Heat embossed the images using clear embossing powder and a heat gun.

dsc01213.JPG

dsc01214.JPG

Colored in the pumpkins with a More Mustard marker.

dsc01215.JPG

Added Pumpkin Pie Marker.

dsc01216.JPG

Added Real Red marker.

dsc01219.JPG

Colored in the Pumpkin stems with an Old Olive marker.

dsc01220.JPG

I wanted to brighten up the Pumpkins a bit so I colored over the pumpkins with a Summer Sun marker.

dsc01221.JPG

Colored over the pumpkins with a Versamark marker and heat embossed the images using clear embossing powder and a heat gun.

dsc01222.JPG

dsc01223.JPG

Masked the bottom of the card stock with a post it note.  Stamped the Flourish from the Stampin’ Up set Baroque Motifs by first loading the stamp with Versamark and then with Old Olive ink before stamping it.  Heat embossed the image using clear embossing powder and a heat gun.  Note I kept the post it note on while heat embossing to keep the embossing powder from sticking to the residue left by the post it note.

dsc01224.JPG

dsc01225.JPG

Sponged Old Olive ink at the bottom of the card stock.

dsc01226.JPG

Sponged Tempting Turquoise ink at the top of the card stock.

dsc01227.JPG

Sponged Dusty Durango ink around the outside edge of the card stock.

dsc01228.JPG

Added Tempting Turquoise and Dusty Durango panels, Dusty Durango Polka Dot Ribbon and two Gold Brads.  Here is the finished card measuring 5″ x 6.5″.

dsc01242-2.jpg

May your day be one of the happiest of your life.

Until my next post. . . . . .

Huge Hugs,

Michelle

tiny-bird.jpg  Get ready for Brayer Workshops!  I am coming to:

Broomfield, Colorado

Moore, Oklahoma

Nashville, Indiana

Portland, Michigan

2010

Dayton, Ohio at Marco Paper

Phoenix, Arizona

Monroe, Louisiana

Jacksonville, Florida St. Louis, MissouriMechanicsville, VirginiaRaleigh, North Carolina Colleyville, Texas

Colorado Springs, Colorado

Boise area of Meridian, Idaho

Riverside, California (Southern California)

 Salem, Oregon

Wheaton, Illinois

St. Cloud, Minnesota

Rockville, Maryland

North Chili, New York (near Rochester)

New Johnsonville, Tennessee

Kenova, West Virginia

Helena, Montana

Middleburg Heights, Ohio

Venice, Florida

Ginnell, Iowa

Piedmont, Alabama

Auburn, Washington (near Seattle)

Elk Grove Village, Illinois

Here is a link to my workshop calendar where you can see all of my travel schedule and to get info on beginner and advanced Brayer workshops:   http://zindorf.blogs.splitcoaststampers.com/workshop-calendar 

Link to my Stampin’ Up website where you can order all of your must have Stampin’ Up products from me 24-7:  http://michellezindorf.stampinup.net

Frequently asked questions answers:  http://zindorf.blogs.splitcoaststampers.com/frequently-asked-questions/ 


Night Time Christmas Cardinal – Tutorial #270

dsc01201.JPG

Here in Ohio we have lots of Cardinals.  It is our state bird, by the way.  I love hearing their cheerful chirp and seeing their bright red feathers when they visit my bird feeders.  Especially love seeing them in the winter when the ground is covered in snow. 

Our temperatures this week are not suppose to get out of the forties.  That is a bit chilly for October here.  So once again my mind is thinking Winter.  That is not all bad, I am getting a head start on my Christmas cards.  Maybe I will get some sent this year.  🙂  Last year I did not even get my Christmas cards made.  You would think with as many cards that I make that would not be a problem. . . . . . where does the time go.  If I could just do without sleep entirely. .. . . . . . . .maybe, just maybe, lol.

Let’s get started.

Supplies:

Stamps: Stampin’ Up! A Cardinal Christmas & Serene Snowflakes
Paper: Stampin’ Up! Whisper White, Bashful Blue & Basic Black
Ink: Stampin’ Up! Basic Black, Not Quite Navy & Night of Navy
Accessories: Stampin’ Up! Markers Old Olive, Always Artichoke, Real Red, Bravo Burgundy, More Mustard & Close to Cocoa, Red Ribbon, Versamark marker & Pad, Clear embossing powder, heat gun, brayer, post it note, sponge

Want a free 39 page, Stampin’ Up Mini catalog?  If you are a resident of the United States,  just e-mail your mailing address to me and I will get one in the mail to you.  Are you inspired by this Blog?  One way you can help support this blog is by ordering your Stampin’ Up products through me.   You can order from me 24-7 from this link:  http://michellezindorf.stampinup.net or e-mail me at mzindorf@aim.com  If you are within the United States.  Want a copy of the brand new 2009-2010 Stampin’ Up Catalog for $9.95 with free shipping, just e-mail me at mzindorf@aim.com and I will get one in the mail to you.  Want to become a Stampin’ Up Demonstrator and earn instant income?  Consider being part of my Stampin’ Up Team.  Also check out the Stampin’ Up specials, click this link to check it out:  http://www.stampinup.net/esuite/home/michellezindorf/promotions

dsc01204.JPG

On a 3.5″ x 5″ piece of Whisper White card stock stamped the snowflakes from the Stampin’ Up set Serene Snowflakes with Versamark only.   Heat embossed the images using clear embossing powder and a heat gun.

dsc01168.JPG

dsc01171.JPG

Stamped the Cardinal from the Stampin’ Up set A Christmas Cardinal by first loading the stamp with Versamark and then with Basic Black ink before stamping it.  Heat embossed the image using clear embossing powder and a heat gun.

dsc01172.JPG

dsc01173.JPG

Colored the leaves in with an Old Olive marker in the light areas and Always Artichoke in the dark areas.

dsc01174.JPG

Colored the Cardinals beak with a More Mustard marker.  Also colored his chest and head with the More Mustard marker.  I wanted the More Mustard under the red I will put on next to warm the red up a bit.

dsc01175.JPG

Colored over the bird with the a Real Red marker.

dsc01176.JPG

Colored over the Cardinal’s back and tail with a Bravo Burgundy marker.

dsc01177.JPG

Now keep in mind that you will need to wipe ink off of your embossed images through out this project.  I use an old cotton towel.

dsc01178.JPG

It is hard to see in this photo, but I colored in the stems with a Close to Cocoa marker, his feet with the More Mustard marker and the Berries with the Bravo Burgundy marker.

dsc01179.JPG

Colored over the image, staying within the embossed lines with a Versamark marker.  Heat embossed the image using clear embossing powder and a heat gun.

dsc01180.JPG

dsc01181.JPG

Now that my image is completely embossed I can put in my back ground and the embossing with resist the ink.

Brayered Not Quite Navy ink from the top of the card stock to the bottom.

We can see the snowflakes now that I stamped in step one.

dsc01183.JPG

Brayered Night of Navy at the top of the card stock.

dsc01184.JPG

Tore a Post It Note and sponged Night of Navy at the post it note edge to create a hill shape.

dsc01186.JPG

Moved the post it note and repeated the last step to create a second hill.

dsc01187.JPG

Stamped the Leaf Shadow stamp from the Stampin’ Up set A Cardinal Christmas a few times using Not Quite Navy ink.

dsc01189.JPG

Remember, I am wiping the ink off of my embossed images each step.

Sponged Night of Navy ink around the edge of the card stock and over the stamped leaf shadows to darken the left side of the panel.

dsc01193.JPG

Added White Gel pen to the branch and leaves to look like snow.

dsc01194.JPG

Lastly, I heated my embossed images to make them shiny again.  They get dual when you wipe them off a few times.  Heating them brings back that shine.

dsc01195.JPG

Sponged Not Quite Navy around the edges of a Bashful Blue card stock panel.

dsc01196.JPG

Assembled my card and added some red ribbon.  I kept this card layout very simple so the main image panel would be the focus.

dsc01201.JPG

I hope you enjoyed this tutorial.  Do you believe this is number 270!

May your day be filled with warmth and love.

Until my next post. . . .  . . . .

Huge Hugs,

Michelle

tiny-bird.jpg  Get ready for Brayer Workshops!  I am coming to:

Broomfield, Colorado

Moore, Oklahoma

Nashville, Indiana

Portland, Michigan

2010Dayton, Ohio at Marco PaperPhoenix, ArizonaMonroe, LouisianaJacksonville, Florida

 St. Louis, Missouri

Mechanicsville, Virginia

Raleigh, North Carolina

 Colleyville, Texas

Colorado Springs, Colorado

Boise area of Meridian, Idaho

Riverside, California (Southern California)

 Salem, Oregon

Wheaton, Illinois

St. Cloud, Minnesota

Rockville, Maryland

North Chili, New York (near Rochester)

New Johnsonville, Tennessee

Kenova, West Virginia

Helena, Montana

Middleburg Heights, Ohio

Venice, Florida

Ginnell, Iowa

Piedmont, Alabama

Auburn, Washington (near Seattle)

Elk Grove Village, Illinois

Here is a link to my workshop calendar where you can see all of my travel schedule and to get info on beginner and advanced Brayer workshops:   http://zindorf.blogs.splitcoaststampers.com/workshop-calendar 

Link to my Stampin’ Up website where you can order all of your must have Stampin’ Up products from me 24-7:  http://michellezindorf.stampinup.net

Frequently asked questions answers:  http://zindorf.blogs.splitcoaststampers.com/frequently-asked-questions/ 


You’re Invited – Tutorial #269

dsc01166.JPG

The Holidays are approaching fast, once again.  Didn’t we just have Christmas, lol.

I have a card for you today that will help you invite friends and family to one of your holiday feasts.  Don’t forget to invite me, lol.

Let’s get started. . . .  .

Supplies:

Stamps: Stampin’ Up! Compliments to the Chef, Christmas Classics & Bella Toile Background
Paper: Stampin’ Up! Whisper White, Bravo Burgundy & Always Artichoke
Ink: Stampin’ Up! Basic Gray, Old Olive and Sahara Sand
Accessories: Stampin’ Up markers Certainly Celery, Sahara Sand, Real Red & Basic Black, Versamark marker & pad, Clear embossing powder, heat gun, Sponge, piercing tool, silver brads, Circle Scissors, Bravo Burgundy ribbon

Want a free 39 page, Stampin’ Up Mini catalog?  If you are a resident of the United States,  just e-mail your mailing address to me and I will get one in the mail to you.  Are you inspired by this Blog?  One way you can help support this blog is by ordering your Stampin’ Up products through me.   You can order from me 24-7 from this link:  http://michellezindorf.stampinup.net or e-mail me at mzindorf@aim.com  If you are within the United States.  Want a copy of the brand new 2009-2010 Stampin’ Up Catalog for $9.95 with free shipping, just e-mail me at mzindorf@aim.com and I will get one in the mail to you.  Want to become a Stampin’ Up Demonstrator and earn instant income?  Consider being part of my Stampin’ Up Team.  Also check out the Stampin’ Up specials, click this link to check it out:  http://www.stampinup.net/esuite/home/michellezindorf/promotions

dsc01167.JPG

Sometimes I can be stubborn, now if you know me well like friends and family do, you are snorting and exclaiming SOMETIMES!  Anyway, I have had an Embossing Buddy for a long time now and it is still new and in the package, at least, until today.  This morning I got my Embossing Buddy out and actually used it.  I have to omit it is a handy little tool.  What you do is rub the little Embossing Buddy bag over your card stock before you stamp on it when you want to heat emboss an image.  What this does is help keep your card stock from attracting stray embossing powder.  Check it out, like Martha says “it’s a good thing”.

dsc01148.JPG

After using my Embossing Buddy on the card stock, I loaded my silverware stamp from the Stampin’ Up set Compliments to the Chef with Versamark and then with Basic Gray ink before stamping it on a 4.75″ square piece of Whisper White card stock.

dsc01146.JPG

Heat embossed the image using clear embossing powder and a heat gun.

dsc01147.JPG

Colored the darker parts of the silverware image with a Sahara Sand marker.

dsc01149.JPG

Colored over the entire image with a Versamark marker being careful to stay within the embossed lines.

dsc01150.JPG

Heat embossed the image again with clear embossing powder and a heat gun.  Now my image is protected and will resist any ink put over it.

dsc01151.JPG

Brayered Old Olive ink on the card stock, working from each side.

dsc01152.JPG

Stamped the Stampin’ Up background stamp with Old Olive ink.

dsc01153.JPG

Took and old cloth and wiped off the Old Olive ink from my embossed image.

dsc01154.JPG

Cut a 4.25″ circle out of Whisper White card stock with my Stampin’ Up Circle Scissors.

Cut another circle that is 2.5″ out of a scrap piece of card stock.

dsc01155.JPG

Put the small circle in the center of the large circle and sponged Sahara Sand ink around the edge of the small circle to create the look of a plate.  Also sponged some Sahara Sand ink around the outside edge of the large circle.

dsc01156.JPG

Glued the plate on the main image panel and then trimmed the excess plate off of the left and bottom sides.

dsc01157.JPG

Stamped the You’re Invited stamp from the Stampin’ Up set Compliments to the Chef with Sahara Sand ink. 

Note:  I did use a Stamp-a-ma-jig for placement of the sentiment.

dsc01158.JPG

Stamped the Holly leaf from the Stampin’ Up set Christmas Classics with Old Olive ink.

Sponged around the outside edge of the main image panel with Old Olive ink, omitting the area that has the plate on it.

dsc01159.JPG

Colored in the berries on the image with a Real Red marker.

dsc01160.JPG

Colored in the holly leaves with a Certainly Celery marker.

dsc01161.JPG

Added two panels of Bravo Burgundy and an Always Artichoke panel, Bravo Burgundy ribbon and 4 silver brads.  I started my brads with a piercing tool.

dsc01162.JPG

Added a shadow on the right side of the plate by outlining it with the brush end of the Sahara sand marker and the fine line end of a Basic Black marker.

dsc01163.JPG

Here is the finished card measuring 5 3/8″ square.

dsc01166.JPG

Before I close today, I have to pass on something that my Aunt sent to me.

NOW THIS IS “FUNNY”.  I DON’T CARE WHAT ANYBODY SAYS.


I GOT THIS NEW DEODORANT TODAY.  THE INSTRUCTIONS SAID REMOVE CAP AND PUSH UP BOTTOM.  I CAN BARELY WALK, BUT WHENEVER I FART, THE ROOM SMELLS AWESOME!
Sorry folks, that just cracked me up. May your day be full of grins and giggles.Until my next post. . . . . .  . . . . Hugs, Michelle

tiny-bird.jpg  Get ready for Brayer Workshops!  I am coming to:

Broomfield, Colorado

Moore, Oklahoma Nashville, Indiana Portland, Michigan2010

Dayton, Ohio at Marco Paper

Phoenix, Arizona

Monroe, Louisiana

Jacksonville, Florida

 St. Louis, Missouri

Mechanicsville, Virginia

Raleigh, North Carolina

 Colleyville, Texas

Colorado Springs, Colorado

Boise area of Meridian, Idaho

Riverside, California (Southern California)

 Salem, Oregon

Wheaton, Illinois

St. Cloud, Minnesota

Rockville, Maryland

North Chili, New York (near Rochester)

New Johnsonville, Tennessee

Kenova, West Virginia

Helena, Montana

Middleburg Heights, Ohio

Venice, Florida

Ginnell, Iowa

Piedmont, Alabama

Auburn, Washington (near Seattle)

Elk Grove Village, Illinois

Here is a link to my workshop calendar where you can see all of my travel schedule and to get info on beginner and advanced Brayer workshops:   http://zindorf.blogs.splitcoaststampers.com/workshop-calendar 

Link to my Stampin’ Up website where you can order all of your must have Stampin’ Up products from me 24-7:  http://michellezindorf.stampinup.net

Frequently asked questions answers:  http://zindorf.blogs.splitcoaststampers.com/frequently-asked-questions/ 


Dirty Bottom Cowgirl Jeans – Tutorial – #268

dsc01141.JPG

This is one of those strange cards that came to me in a dream.  Now don’t laugh you fanatic stampers, you.  You know all about those card dreams I bet, lol.  At least lie to me, please and tell me I am not the only one that dreams about stamping.  🙂

Anyway, I woke at 3:30 a.m. this morning with this card on my mind.  It is strange, because I dreamed about using the Genuine Cowgirl ribbon that I purchased about a 1 1/2 years ago and had tucked it away.   I think it was weighing heavy on my mind because I try to practice the 1 year rule when it comes to craft supplies.  The one year rule goes as follows, if it is not used within one year I have to give it away or throw it away.  I know, GASP!  Of course, there is an exception to the rule, Rubber Stamps. 

I was happy to get an early start on my day today because I am prepping and packing for my brayer workshops that I will be teaching tomorrow in Fairlawn, Ohio.  Fairlawn ladies, are you ready to get inky?  I hope so because I have some new projects just for you!

Let’s get started on this dirty tutorial. . .  .

Supplies:

Stamps: Stampin’ Up Made 2 Last & Wanted
Paper: Stampin’ Up Basic Black and Whisper White
Ink: Stampin’ Up Close to Cocoa, Pretty in Pink, Basic Black, Night of Navy, Not Quite Navy, Bashful Blue and Chocolate Chip
Accessories: Stampin’ UP Markers Close to Cocoa, Not Quite Navy & Bashful Blue, Brayer, Ruler, sponge and (Geuine Cowgirl Ribbon – I have no idea where I purchased this ribbon)

Want a free 39 page, Stampin’ Up Mini catalog?  If you are a resident of the United States,  just e-mail your mailing address to me and I will get one in the mail to you.  Are you inspired by this Blog?  One way you can help support this blog is by ordering your Stampin’ Up products through me.   You can order from me 24-7 from this link:  http://michellezindorf.stampinup.net or e-mail me at mzindorf@aim.com  If you are within the United States.  Want a copy of the brand new 2009-2010 Stampin’ Up Catalog for $9.95 with free shipping, just e-mail me at mzindorf@aim.com and I will get one in the mail to you.  Want to become a Stampin’ Up Demonstrator and earn instant income?  Consider being part of my Stampin’ Up Team.  Also check out the Stampin’ Up specials, click this link to check it out:  http://www.stampinup.net/esuite/home/michellezindorf/promotions

dsc01145.JPG

Brayered Bashful Blue ink at the top of a 3 7/8″ piece of Whisper White card stock.

dsc01126.JPG

I wanted a Pink undertone to this card to help tie the ribbon into the project, so I brayered Pretty in Pink ink at the bottom of the card stock.

dsc01128.JPG

Brayered Not Quite Navy ink at the top of the card stock, not covering the Bashful Blue ink entirely.

dsc01129.JPG

Brayered Close to Cocoa ink at the bottom of the card stock, not covering the Pretty In Pink ink entirely.

dsc01130.JPG

Brayered Chocolate Chip ink at the very bottom of the card stock.

dsc01131.JPG

Stamped pocket stamp twice using Chocolate Chip ink.

dsc01132.JPG

Brayered Not Quite Navy ink on the right and left side of the card stock.

dsc01133.JPG

dsc01134.JPG

Brayered Night of Navy ink on the right, left and top of the card stock, not covering the Not Quite Navy ink entirely.

dsc01136.JPG

Sponged a bit of Close to Cocoa ink in the middle of the card stock to dirty up the card stock a little and to hide my finger print, lol.

Stamped the horse on the left with Close to Cocoa and the medallion on the left with Not Quite Navy ink.

dsc01137.JPG

Added the ribbon at the top of the card stock and sponged Basic Black ink at the bottom of the card stock.

dsc01138.JPG

Added the stitching stamp to the pockets with Close to Cocoa ink.

dsc01139.JPG

Added a faux stitched line down the center of the card stock with a ruler and Stampin’ Up markers Bashful Blue, Not Quite Navy & Close to Cocoa.   Also added Bashful Blue and Not Quite navy marker to the stitched seams of the pockets.

dsc01140.JPG

It is hard to see in the finish project photo, but there is a 4″ x 9″ Basic Black panel behind the main image panel.

Here is the finished card measuring 4″ x 9″.

dsc01141.JPG

May all of your dreams be of fun stamping projects.

tiny-bird.jpg  Get ready for Brayer Workshops!  I am coming to:

Fairlawn, Ohio (Akron area)

Broomfield, Colorado

Moore, Oklahoma

Nashville, Indiana

 Portland, Michigan

2010

Dayton, Ohio at Marco Paper

Phoenix, Arizona

Monroe, Louisiana

Jacksonville, Florida

 St. Louis, Missouri

Mechanicsville, Virginia

Raleigh, North Carolina

 Colleyville, Texas

Colorado Springs, Colorado

Boise area of Meridian, Idaho

Riverside, California (Southern California)

 Salem, Oregon

Wheaton, Illinois

St. Cloud, Minnesota

Rockville, Maryland

North Chili, New York (near Rochester)

New Johnsonville, Tennessee

Kenova, West Virginia

Helena, Montana

Middleburg Heights, Ohio

Venice, Florida

Ginnell, Iowa

Piedmont, Alabama

Auburn, Washington (near Seattle)

Elk Grove Village, Illinois

Here is a link to my workshop calendar where you can see all of my travel schedule and to get info on beginner and advanced Brayer workshops:   http://zindorf.blogs.splitcoaststampers.com/workshop-calendar 

Link to my Stampin’ Up website where you can order all of your must have Stampin’ Up products from me 24-7:  http://michellezindorf.stampinup.net

Frequently asked questions answers:  http://zindorf.blogs.splitcoaststampers.com/frequently-asked-questions/