Spooky Cave – Tutorial #267

dsc01118.JPG

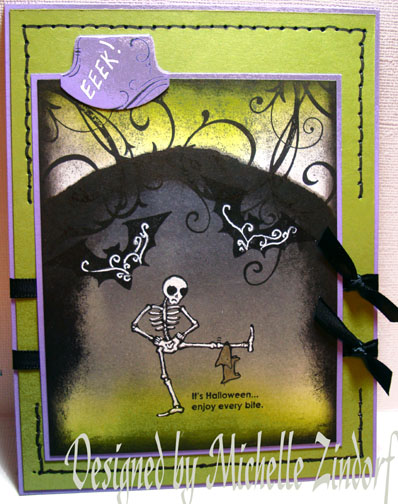
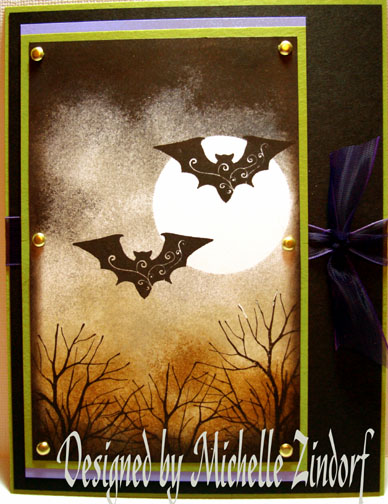
Okay, I just could not go through October without using this cute skeleton stamp from the Stampin’ UP! Holiday Mini Catalog set “Twick or Tweet”.  Love that little dog!  This is my attempt at a cave scene.  🙂  You have got to wonder about my imagination some times, lol.

Let’s get right to the tutorial today. . . . .

Supplies:

Stamps: Stampin’ Up Twick or Tweet, From the Crypt, Baroque Motifs & Totally Tabs
Paper: Stampin’ UP Lovely Lilac, Old Olive and Whisper White
Ink: Stampin’ Up Going Gray, Old Olive, Basic Gray & Basic Black
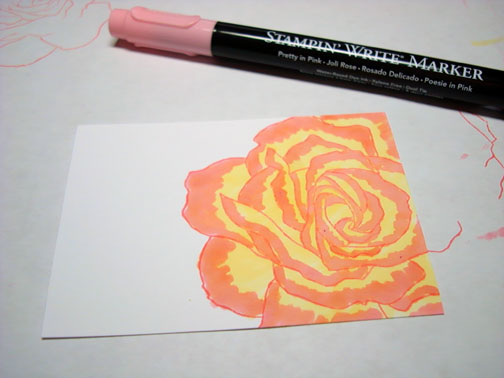
Accessories: Stampin’ UP Mat Pack, Piercing Tool, Brayer, Creamy Caramel marker, White Gel Pen, Tab Punch, Black ribbon, Black marker, Sponge

Want a free 39 page, Stampin’ Up Mini catalog?  If you are a resident of the United States,  just e-mail your mailing address to me and I will get one in the mail to you.  Are you inspired by this Blog?  One way you can help support this blog is by ordering your Stampin’ Up products through me.   You can order from me 24-7 from this link:  http://michellezindorf.stampinup.net or e-mail me at mzindorf@aim.com  If you are within the United States.  Want a copy of the brand new 2009-2010 Stampin’ Up Catalog for $9.95 with free shipping, just e-mail me at mzindorf@aim.com and I will get one in the mail to you.  Want to become a Stampin’ Up Demonstrator and earn instant income?  Consider being part of my Stampin’ Up Team.  Also check out the Stampin’ Up specials, click this link to check it out:  http://www.stampinup.net/esuite/home/michellezindorf/promotions

dsc01123.JPG

Brayered Old Olive ink at the top and bottom of a 4″ x 5″ piece of Whisper White card stock.

dsc01102.JPG

Ripped a hill shape in a post it note and used it to mask the top of the card stock to create the top of the cave.

dsc01103.JPG

Brayered Going Gray ink over the post it note and onto the card stock from the top.

dsc01104.JPG

Brayered Basic Gray ink at the top of the card stock.

dsc01105.JPG

Sponged Basic Black ink at the the post it note edge and the sides of the card stock.

dsc01106.JPG

Removed post it note mask and dabbed Basic Black ink on the top of the card stock with a sponge.

dsc01107.JPG

Stamped the skeleton on with Basic Black ink.

dsc01108.JPG

Colored the dog in with a Creamy Caramel marker.

dsc01109.JPG

Colored in the skeleton with a white gel pen.

dsc01110.JPG

Stamped the Flourish stamp from the Stampin’ Up set Baroque Motifs with Basic Black ink.

dsc01111.JPG

Sponged Basic Black ink around the edge of the card stock.

dsc01112.JPG

Stamped this flourish tab stamp from the Stampin’ Up set Totally Tabs using Basic Black ink on a scrap of Lovely Lilac card stock.  Punched it out using the Stampin’ Up Tab punch.

dsc01113.JPG

Stamped the bat from the Stampin’ Up set From the Crypt twice with Basic Black ink.

dsc01114.JPG

Wrote “Eeek!” on the tab and outlined the design on the bats with a white gel pen.

dsc01115.JPG

Assembled the card front and pierced around the edge of the top and bottom using the Stampin’ Up Mat Pack and Piercing tool.

dsc01116.JPG

Ran a black marker point from pierced hole to pierced hole to create a faux stitched look.

dsc01117.JPG

Here is the finished card measuring 5″ x 6.5″.

dsc01118.JPG

May your day be over flowing with fun images.

Until my next post. . . . .  .

Huge Hugs!

Michelle

tiny-bird.jpg  Get ready for Brayer Workshops!  I am coming to:

Akron, Ohio

Broomfield, Colorado

Moore, Oklahoma

Nashville, Indiana

Portland, Michigan

2010

Dayton, Ohio at Marco Paper

Phoenix, Arizona

Monroe, Louisiana

Jacksonville, Florida

St. Louis, Missouri

Mechanicsville, Virginia

Raleigh, North Carolina 

Colleyville, Texas

Colorado Springs, Colorado

Boise area of Meridian, Idaho

Riverside, California (Southern California)

Salem, Oregon

Wheaton, Illinois

St. Cloud, Minnesota

Rockville, Maryland

North Chili, New York (near Rochester)

New Johnsonville, Tennessee

Kenova, West Virginia

Helena, Montana

Middleburg Heights, Ohio

Venice, Florida

Ginnell, Iowa

Piedmont, Alabama

Auburn, Washington (near Seattle)

Elk Grove Village, Illinois

Here is a link to my workshop calendar where you can see all of my travel schedule and to get info on beginner and advanced Brayer workshops:   http://zindorf.blogs.splitcoaststampers.com/workshop-calendar 

Link to my Stampin’ Up website where you can order all of your must have Stampin’ Up products from me 24-7:  http://michellezindorf.stampinup.net

Frequently asked questions answers:  http://zindorf.blogs.splitcoaststampers.com/frequently-asked-questions/


Christmas Deer – Tutorial #266 and a Blog Candy Winner!

 dsc01092-2.jpg

It is a chilly morning here in Ohio so I put together a little chilly scene for you.  🙂  But first I must announce the winner of the Patterned Pines Blog Candy.

dsc01020.JPG   The winner is. . . . . . . . . . . . ..

Dixie Cravens who wrote “Please enter me! I love this set! Thanks for being so willing to show everything you do. I am always inspired after looking at your work. What beautiful cards you make.”

Thank you to all who played along!

Now on with today’s tutorial .. . .

Supplies:

Stamps: Stampin’ Up Branch Out, Nature Silhouettes, Serene Snowflakes & A Christmas Cardinal
Paper: Stampin’ Up Whisper White, Going Gray and Night of Navy
Ink: Stampin’ Up Going Gray, Basic Black, Night of Navy, Taken with Teal and White Craft
Accessories: Stampin’ Up White Ribbon, Silver Brads, Brayer, Piercing Tool, Stamp-a-ma Jig, 1 3/4″ circle Punch, Post it notes

Want a free 39 page, Stampin’ Up Mini catalog?  If you are a resident of the United States,  just e-mail your mailing address to me and I will get one in the mail to you.  Are you inspired by this Blog?  One way you can help support this blog is by ordering your Stampin’ Up products through me.   You can order from me 24-7 from this link:  http://michellezindorf.stampinup.net or e-mail me at mzindorf@aim.com  If you are within the United States.  Want a copy of the brand new 2009-2010 Stampin’ Up Catalog for $9.95 with free shipping, just e-mail me at mzindorf@aim.com and I will get one in the mail to you.  Want to become a Stampin’ Up Demonstrator and earn instant income?  Consider being part of my Stampin’ Up Team.  Also check out the Stampin’ Up specials, click this link to check it out:  http://www.stampinup.net/esuite/home/michellezindorf/promotions

dsc01090.JPG

Rip a hill in a Post It Note and use it as a mask for the snow.  Stick it to a 4″ x 4.5″ piece of Whisper White card stock.

dsc01068.JPG

Punch a 1 3/4″ circle from the sticky part of a Post it note to mask the Moon.

dsc01069.JPG

Brayer Going Gray ink at the top of the card stock.

dsc01070.JPG

Brayer Taken with Teal at the top of the card stock, not covering all of the Going Gray ink.

dsc01071.JPG

Brayer Night of Navy at the top of the card stock, not covering the Taken with Teal entirely.

dsc01072.JPG

Remove the masks and stamp the Deer from the Stampin’ Up set Nature Silhouettes with Basic Black ink.

dsc01073.JPG

Loaded the tree stamp from the Stampin’ Up Set Branch Out with Basic Black ink omitting the grassy part of the stamp.

Stamped it to the right of the deer.

dsc01074.JPG

Stamped the snowflakes from the Stampin’ UP set Branch Out with White Craft ink.

dsc01075.JPG

Sponged a bit of Going Gray under the deer to create a shadow in the snow.

dsc01076.JPG

Cut a 4 7/8″ x 5 3/8″ piece of Night of Navy for a background panel.   Stamped the large snowflake from the Stampin’ Up Set Serene Snowflakes with Basic Black ink all over the card stock.

dsc01077.JPG

Added a few small snowflakes from the same stamp set with White craft ink.

dsc01078.JPG

Assembled my layers and added white ribbon and silver brads to the bottom of the card.

dsc01079.JPG

Decided to add the sentiment from the Stampin’ Up set A Cardinal Christmas using a Stamp-a-ma-jig and Going Gray ink.

dsc01080.JPG

Here is the finished card measuring 5″ x 6.5″.

dsc01092-2.jpg

I just returned from teaching some fabulous stampers in Maine yesterday so I thought I would share just a few of the pictures I took at the shore. 🙂  It was pretty wet and cloudy my entire visit, but Maine is a site to see if you ever get a chance.

dsc01034.JPG  dsc01030.JPG

dsc01038.JPG  dsc01040.JPG

dsc01055.JPG   dsc01062.JPG

May your day be dry and toasty warm!

Until my next post. . . . .  .

Huge Hugs!

Michelle

tiny-bird.jpg  Get ready for Brayer Workshops!  I am coming to:

Akron, Ohio

Broomfield, Colorado

Moore, Oklahoma

Nashville, Indiana

Portland, Michigan

2010

Dayton, Ohio at Marco Paper

Phoenix, Arizona

Monroe, Louisiana

Jacksonville, Florida

St. Louis, Missouri

Mechanicsville, Virginia

Raleigh, North Carolina 

Colleyville, Texas

Colorado Springs, Colorado

Boise area of Meridian, Idaho

Riverside, California (Southern California)

Salem, Oregon

Wheaton, Illinois

St. Cloud, Minnesota

Rockville, Maryland

North Chili, New York (near Rochester)

New Johnsonville, Tennessee

Kenova, West Virginia

Helena, Montana

Middleburg Heights, Ohio

Venice, Florida

Ginnell, Iowa

Piedmont, Alabama

Auburn, Washington

Elk Grove Village, Illinois

Here is a link to my workshop calendar where you can see all of my travel schedule and to get info on beginner and advanced Brayer workshops:   http://zindorf.blogs.splitcoaststampers.com/workshop-calendar 

Link to my Stampin’ Up website where you can order all of your must have Stampin’ Up products from me 24-7:  http://michellezindorf.stampinup.net

Frequently asked questions answers:  http://zindorf.blogs.splitcoaststampers.com/frequently-asked-questions/


Flowers & Nest – Tutorial #265

dsc01013.JPG

Today’s tutorial is a little lesson on how you can heat emboss over heat embossed images to put images behind one another.  This lesson is a bit long so you will want to get chocolate and coffee to make it through, lol. 

I want to share a couple of things before I start the tutorial.  Last weekend I had the pleasure of joining my Stampin’ Up!  Up Line at an event they put together called Fall Fest.  It was in New Jersey and it was WAY FUN!!  Thanks to everyone, you made me feel so very welcome.  🙂

Of course, at Stampin’ Up events people bring swap cards to trade.  I didn’t bring a card but instead made bookmarks.  This is what I swapped.  🙂

dsc01019.JPG

The swaps I received in return were out of this world wonderful.   Thanks to all!

I also got to teach how to create this card to everyone in attendance.

dsc00471.JPG

My Awesome Stampin’ Up! Down Line Team will be sent the directions for these two projects so they can share them with at their workshops.

Now on with the tutorial. . .  .

Supplies:

Stamps: Stampin’ Up Bloomin’ Beautiful, All Holidays, Priceless & Nature’s Nest
Paper: Stampin’ Up Whisper White, Apricot Appeal, Bashful Blue & Basic Black
Ink: Stampin’ Up Close to Cocoa, Creamy Caramel, Sahara Sand, Bashful Blue, Basic Black & Apricot Appeal
Accessories: Stampin’ Up Markers, Versamark Marker & Pad, Clear embossing powder, heat gun, White Gel Pen & Sponges

Want a free 39 page, Stampin’ Up Mini catalog?  If you are a resident of the United States,  just e-mail your mailing address to me and I will get one in the mail to you.  Are you inspired by this Blog?  One way you can help support this blog is by ordering your Stampin’ Up products through me.   You can order from me 24-7 from this link:  http://michellezindorf.stampinup.net or e-mail me at mzindorf@aim.com  If you are within the United States.  Want a copy of the brand new 2009-2010 Stampin’ Up Catalog for $9.95 with free shipping, just e-mail me at mzindorf@aim.com and I will get one in the mail to you.  Want to become a Stampin’ Up Demonstrator and earn instant income?  Consider being part of my Stampin’ Up Team.  Also check out the Stampin’ Up specials, click this link to check it out:  http://www.stampinup.net/esuite/home/michellezindorf/promotions

dsc01017.JPG

Stamped the Sentiment from the Stampin’ Up All Holidays set by first loading the stamp with Versamark and then Bashful Blue ink before stamping it on a 4.5″ square piece of Whisper White card stock.  I then heat embossed the image with clear embossing powder and a heat gun.

dsc00977.JPG

dsc00978.JPG

Stamped the Flourish from the Stampin’ Up set Priceless by first loading it with Versamark and then Sahara Sand ink before stamping it.  I then heat embossed the image using clear embossing powder and a heat gun.

dsc00979.JPG

Stamped the Nest image from the Stampin’ Up set Nature’s Nest by first loading the stamp with Versamark and then Close to Cocoa ink before stamping the image.  I then heat embossed the nest using clear embossing powder and a heat gun.

dsc00981.JPG

Colored the eggs in with a Bashful Blue marker.

dsc00983.JPG

Added Ballet Blue ink to the eggs.

dsc00984.JPG

Blended the two colors together using the Bashful Blue marker again.

dsc00985.JPG

Colored the nest in with a Creamy Caramel marker.

dsc00986.JPG

Added Close To Cocoa marker to the bottom of the nest.

dsc00987.JPG

Colored in the leaves with an Old Olive Marker.

dsc00988.JPG

Colored over the nest and eggs with a Versamark marker and then heat embossed the image using clear embossing powder and a heat gun.

dsc00989.JPG

Stamped the pot of Flowers from the Stampin’ UP set Bloomin’ Beautiful set by first loading the stamp with Versamark and then Close to Cocoa ink before stamping it.  I then heat embossed the image using clear embossing powder and a heat gun.

dsc00991.JPG

Colored the pot in with a Bashful Blue marker.

dsc00993.JPG

Added Ballet Blue marker to the shadow parts of the pot.

dsc00994.JPG

Blended the colors on the pot together by coloring over them with the Bashful Blue marker.

dsc00995.JPG

Colored in the flowers with a Blush Blossom marker.

dsc00996.JPG

Colored in the leaves with an Old Olive Marker.

dsc00997.JPG

Added Pretty in Pink marker to the flowers.

dsc00998.JPG

Added just a touch of Positively Pink marker to the flowers.

dsc00999.JPG

Colored over the flowers and pot with a Versamark marker and heat embossed the image using clear embossing powder and a heat gun.

dsc01000.JPG

Sponged Apricot Appeal ink all over the card stock using a circular motion.

dsc01001.JPG

Sponged Creamy Caramel ink under the nest and pot and around the edge of the card stock.

dsc01002.JPG

Added Close to Cocoa ink around the edge of the card stock and under the nest and pot without covering up all of the Creamy Caramel ink.

dsc01003.JPG

Added a touch of Basic Black ink around the edge of the card stock and under the nest and pot, not covering up all of the Close to Cocoa ink.

dsc01004.JPG

Time to add some white highlights.

Colored in the centers of the flowers, added touches of white to the sentiment, eggs and flourish.

dsc01006.JPG

Added a bit of Basic Black marker to the flourish and bottom of the flowers, flower pot and nest.

dsc01007.JPG

Lastly, my very wise Up Line, Karen Barber shared this tip with me.  When you finish a heat embossed card, heat it for just a second with your heat gun to bring back that brilliant shine to all of your embossed images. 

dsc01008.JPG

I finished the card off with an Apricot Appeal, Bashful Blue & 2 Basic Black panels, gold brads, and a thin strip of Basic Black card stock.

Here it is finished measuring 5 3/8″ square.

dsc01013.JPG

May your day be filled with things that warm your heart.

Until my next post. .. . . . . . . .

Hugs,

Michelle

tiny-bird.jpg  Get ready for Brayer Workshops!  I am coming to:

Knox, Maine  – I will be in Knox, Maine this Friday & Saturday (October 2 & 3).  There are a couple of spot available if you want to jump in at the last moment.  🙂  Just e-mail me at mzindorf@aim.com and I can give you all the details.

Akron, Ohio

Broomfield, Colorado

Moore, Oklahoma

Nashville, Indiana

Portland, Michigan

2010

Dayton, Ohio at Marco Paper

Phoenix, Arizona

Monroe, Louisiana

Jacksonville, Florida

St. Louis, Missouri

Mechanicsville, Virginia

Raleigh, North Carolina 

Colleyville, Texas

Colorado Springs, Colorado

Boise area of Meridian, Idaho

Riverside, California (Southern California)

Salem, Oregon

Wheaton, Illinois

St. Cloud, Minnesota

Rockville, Maryland

North Chili, New York (near Rochester)

New Johnsonville, Tennessee

Kenova, West Virginia

Helena, Montana

Middleburg Heights, Ohio

Venice, Florida

Ginnell, Iowa

Piedmont, Alabama

Auburn, Washington

Elk Grove Village, Illinois

Here is a link to my workshop calendar where you can see all of my travel schedule and to get info on beginner and advanced Brayer workshops:   http://zindorf.blogs.splitcoaststampers.com/workshop-calendar 

Link to my Stampin’ Up website where you can order all of your must have Stampin’ Up products from me 24-7:  http://michellezindorf.stampinup.net

Frequently asked questions answers:  http://zindorf.blogs.splitcoaststampers.com/frequently-asked-questions/


Direct to paper Mountain Scene – Tutorial #264

dsc00974.JPG

I am currently in New Jersey enjoying myself at a Stampin’ Up Team Function.   I created this project before I left last Thursday so you would have something to mess around with this weekend in my absence.  Enjoy!  I will be back on Monday.  🙂

Supplies:

Stamps: Stampin’ Up Branch Out and Charming
Paper: Stampin’ UP Whisper White, Bordering Blue and Basic Black
Ink: Stampin’ Up Basic Black, Bordering Blue Basic Gray, Old Olive, More Mustard, Certainly Celery, Always Artichoke & So Saffron
Accessories: Stampin’ Up Piercing Tool, Stampin’ Up Basic Black Marker, Sponge, Brayer, White Gel Pen, Silver Brads, Sponge

Want a free 39 page, Stampin’ Up Mini catalog?  If you are a resident of the United States,  just e-mail your mailing address to me and I will get one in the mail to you.  Are you inspired by this Blog?  One way you can help support this blog is by ordering your Stampin’ Up products through me.   You can order from me 24-7 from this link:  http://michellezindorf.stampinup.net or e-mail me at mzindorf@aim.com  If you are within the United States.  Want a copy of the brand new 2009-2010 Stampin’ Up Catalog for $9.95 with free shipping, just e-mail me at mzindorf@aim.com and I will get one in the mail to you.  Want to become a Stampin’ Up Demonstrator and earn instant income?  Consider being part of my Stampin’ Up Team.  Also check out the Stampin’ Up specials, click this link to check it out:  http://www.stampinup.net/esuite/home/michellezindorf/promotions

dsc00976.JPG

Brayered So Saffron ink at the top and bottom of a 4″ square piece of Whisper White card stock.

dsc00956.JPG

dsc00957.JPG

Used the direct to paper method and smeared Bordering Blue ink on the card stock to create some mountains using the corner of the ink pad.

Note:  All you need to do is make the suggestion of the elements.  🙂

dsc00958.JPG

Smeared Always Artichoke ink below the mountains using one edge of the ink pad.

dsc00959.JPG

Smeared Certainly Celery ink at the bottom of the card stock.

dsc00960.JPG

Smeared Old Olive ink on.

dsc00961.JPG

I wanted to add a bit of warmth to the scene so I added the warm color More Mustard using the edge of the ink pad.

dsc00962.JPG

Stamped the Branch Out tree 3 times using Basic Gray ink.

dsc00963.JPG

Extended the trunks of the trees with a Basic Black marker.

dsc00965.JPG

Stamped the Flowers from the Charming Set using Old Olive ink.

dsc00966.JPG

Colored the flowers in with a White Gel pen.

dsc00967.JPG

Stamped a few leaves in the trees with Old Olive ink.

dsc00968.JPG

Stamped the words stamp from the Charming set down the left side of the card stock using Basic  Black ink.

dsc00969.JPG

Added 2 Bordering Blue, 2 Whisper White and one Basic Black background panels and 4 silver Brads.

dsc00970.JPG

Here is the finished card measuring 5 3/8″ square.

dsc00974.JPG

May you have the time to really enjoy your weekend.

Until my next post. . . . .

Huge Hugs,

Michelle

moon-glow-edited-7-tiny.jpg  Get ready for Brayer Workshops!  I am coming to:

Knox, Maine

Akron, Ohio

Broomfield, Colorado

Moore, Oklahoma

Nashville, Indiana

Portland, Michigan

2010

Dayton, Ohio at Marco Paper

Phoenix, Arizona

Monroe, Louisiana

Jacksonville, Florida

St. Louis, Missouri

Mechanicsville, Virginia

Raleigh, North Carolina 

Colleyville, Texas

Colorado Springs, Colorado

Boise area of Meridian, Idaho

Riverside, California (Southern California)

Salem, Oregon

Wheaton, Illinois

St. Cloud, Minnesota

Rockville, Maryland

North Chili, New York (near Rochester)

New Johnsonville, Tennessee

Kenova, West Virginia

Helena, Montana

Middleburg Heights, Ohio

Venice, Florida

Ginnell, Iowa

Piedmont, Alabama

Auburn, Washington

Elk Grove Village, Illinois

Here is a link to my workshop calendar where you can see all of my travel schedule and to get info on beginner and advanced Brayer workshops: 

 http://zindorf.blogs.splitcoaststampers.com/workshop-calendar 

Link to my Stampin’ Up website where you can order all of your must have Stampin’ Up products from me 24-7: 

 http://michellezindorf.stampinup.net

Frequently asked questions answers: 

 http://zindorf.blogs.splitcoaststampers.com/frequently-asked-questions/


Winter Pines – Tutorial #263

dsc00954.JPG

 How about a winter scene for all of you early birds out there that are already working on those Christmas cards.

I really needed to get my embossing powder fix this week, lol.  So here is a project that features embossed images over embossed images.  This project features the brand new Stampin’ Up Level 1 Hostess set “Patterned Pines”.  This set is only available until January 4, 2010 and is featured in the New Holiday mini catalog.  The stamp set is free with an order of $150.  Along with the Patterned Pines Tree, I used my favorite flourish from the Stampin’ Up set Baroque Motifs, item number 113490.  This set was still out on my desk from using it in my last tutorial so I went ahead and used it again.

Let’s get right into the tutorial. . . .

Supplies:

Stamps: Stampin’ Up Patterned Pines and Baroque Motifs
Paper: Stampin’ UP Whisper White, Sahara Sand and Basic Black
Ink: Stampin’ Up Basic Black, Not Quite Navy, Bordering Blue & Sahara Sand
Accessories: Versamark Marker & Pad, Gold Brads, White Ribbon, Stampin’ Up Piercing Tool & Mats, Stampin’ Up markers, Sponge, Brayer, Clear embossing powder and Heat gun

Want a free 39 page, Stampin’ Up Mini catalog?  If you are a resident of the United States,  just e-mail your mailing address to me and I will get one in the mail to you.  Are you inspired by this Blog?  One way you can help support this blog is by ordering your Stampin’ Up products through me.   You can order from me 24-7 from this link:  http://michellezindorf.stampinup.net or e-mail me at mzindorf@aim.com  If you are within the United States.  Want a copy of the brand new 2009-2010 Stampin’ Up Catalog for $9.95 with free shipping, just e-mail me at mzindorf@aim.com and I will get one in the mail to you.  Want to become a Stampin’ Up Demonstrator and earn instant income?  Consider being part of my Stampin’ Up Team.  Also check out the Stampin’ Up specials, click this link to check it out:  http://www.stampinup.net/esuite/home/michellezindorf/promotions

dsc00955.JPG

On a 4.25″ x 5″ piece of Whisper White stamped the Baroque Motifs Flourish with Versamark only.  Heat embossed the image using clear embossing powder. 

dsc00929.JPG

dsc00930.JPG

Stamped the Patterned Pines Trees by first loading my stamp with Versamark and then with Sahara Sand ink before stamping it.  Heat embossed the images using clear embossing powder and a heat gun.

dsc00932.JPG

dsc00933.JPG

Colored over the trees with a Versamark marker and heat embossed the images using clear embossing powder and a heat gun.  This protects the white designs in the tree images.

dsc00934.JPG

dsc00935.JPG

Tore the edge off of a post it note and used it as a mask for the snow area of the scene.

dsc00936.JPG

Brayered Bordering Blue ink at the top of the card stock.

dsc00937.JPG

Brayered Not Quite Navy ink at the top of the card stock, not covering the Bordering Blue ink entirely.

dsc00938.JPG

Sponged Not Quite Navy ink right at the post it note edge to darken the horizon line.

dsc00939.JPG

Removed the post it note mask and wiped the ink off of my heat embossed images.  Be careful not to smear the ink from the embossed images onto your white snow.

dsc00940.JPG

Tore a hill in the post it note mask and held it in place while I sponged Bordering Blue ink at the post it note edge to create a hill in the scene.

dsc00941.JPG

dsc00942.JPG

Outlined the embossed Flourish with a Bordering Blue Marker to make it look more dimensional. 

dsc00943.JPG

Outlined the flourish that is closer to the top of the card stock with a Not Quite Navy marker.

dsc00944.JPG

Put a post it note mask right under the trees and sponged on some Bordering Blue ink to create a shadow for the trees.

dsc00945.JPG

Outlined the right sides of the trees with a Sahara Sand marker.

dsc00946.JPG

Added a thin Basic Black marker line down the right sides of the trees.

dsc00947.JPG

Sponged Not Quite Navy ink around the outside edge of the card stock.

dsc00948.JPG

Sponged Basic Black ink around the outside edges of the card stock.

Added a Basic Black and Sahara Sand panel, White Ribbon and Gold Brads.

dsc00949.JPG

Used my Stampin’ UP Piercing Tool and mats to add the pierced lines at the top and bottom of the card.

dsc00950.JPG

Here is the finished project measuring 5.25″ square.

dsc00954.JPG

I am flying out to New Jersey tomorrow for a Stampin’ Up Team event.  I am sooooo excited!

May your weekend be one of fun and laughter!

Until my next post. . . . .

Huge Hugs,

Michelle

moon-glow-edited-7-tiny.jpg  Get ready for Brayer Workshops!  I am coming to:

Knox, Maine

Akron, Ohio

Broomfield, Colorado

Moore, Oklahoma

Nashville, Indiana

Portland, Michigan

2010

Dayton, Ohio at Marco Paper

Phoenix, Arizona

Monroe, Louisiana

Jacksonville, Florida

St. Louis, Missouri

Mechanicsville, Virginia

Raleigh, North Carolina 

Colleyville, Texas

Colorado Springs, Colorado

Boise area of Meridian, Idaho

Riverside, California (Southern California)

Salem, Oregon

Wheaton, Illinois

St. Cloud, Minnesota

Rockville, Maryland

North Chili, New York (near Rochester)

New Johnsonville, Tennessee

Kenova, West Virginia

Helena, Montana

Middleburg Heights, Ohio

Venice, Florida

Ginnell, Iowa

Piedmont, Alabama

Auburn, Washington

Elk Grove Village, Illinois

Here is a link to my workshop calendar where you can see all of my travel schedule and to get info on beginner and advanced Brayer workshops: 

 http://zindorf.blogs.splitcoaststampers.com/workshop-calendar 

Link to my Stampin’ Up website where you can order all of your must have Stampin’ Up products from me 24-7: 

 http://michellezindorf.stampinup.net

Frequently asked questions answers: 

 http://zindorf.blogs.splitcoaststampers.com/frequently-asked-questions/


Windy Tree – Tutorial #262 and a Blog Candy Winner!

dsc00927.JPG

Happy First Day of Autumn!   In the spirit of Fall here is a card using Stampin’ Up ink pads and the direct to paper technique to swipe in the background quickly.  But before we get into today’s tutorial let me congratulate the lastest blog candy winner.

dsc09913.JPG  Congratulations Carole Philpot who wrote:  “I love your blog, it has been such an inspiration to me. I have been a “technique junkie” for years of cardmaking, mostly folds, never stamped much until I signed up for your blog and now I am attempting to brayer and sponge backgrounds and stamp! Thanks for all the good tutorials”

Carole, please e-mail your mailing address to mzindorf@aim.com within 30 days and I will put this great set in the mail to you.  🙂

Thank you to everyone that played along.

Now on with this mornings Autumn themed tutorial. . . . .

Supplies:

Stamps: Stampin’ Up Branch Out & Baroque Motifs
Paper: Stampin’ Up Whisper White, Bashful Blue & Old Olive
Ink: Stampin’ Up Basic Black, Really Rust, Old Olive, Always Artichoke & Bashful Blue
Accessories: Silver Brads, Sponge, White Gel Pen

Want a free 39 page, Stampin’ Up Mini catalog?  If you are a resident of the United States,  just e-mail your mailing address to me and I will get one in the mail to you.  Are you inspired by this Blog?  One way you can help support this blog is by ordering your Stampin’ Up products through me.   You can order from me 24-7 from this link:  http://michellezindorf.stampinup.net or e-mail me at mzindorf@aim.com  If you are within the United States.  Want a copy of the brand new 2009-2010 Stampin’ Up Catalog for $9.95 with free shipping, just e-mail me at mzindorf@aim.com and I will get one in the mail to you.  Want to become a Stampin’ Up Demonstrator and earn instant income?  Consider being part of my Stampin’ Up Team.  Also check out the Stampin’ Up specials, click this link to check it out:  http://www.stampinup.net/esuite/home/michellezindorf/promotions

dsc00928.JPG

On a 3.5″ x 5″ piece of Whisper White card stock, smeared Bashful Blue Ink on using the short end of the ink pad.

dsc00912.JPG

Stamped the Flourish from the Stampin’ Up Baroque Motifs set with Bashful Blue ink.

dsc00913.JPG

Smeared Bashful Blue ink at the bottom of the card stock.

dsc00914.JPG

Smeared Old Olive ink at the bottom of the card stock.

dsc00915.JPG

Turned the card stock up side down and smeared Always Artichoke ink from the ground toward the sky using the edge of the ink pad.

dsc00916.JPG

Stamped the Stampin’ Up Branch Out sets Tree using Basic Black ink.

dsc00917.JPG

Stamped leaves using Old Olive and Really Rust ink on the tree and to the side of the tree.

dsc00918.JPG

Added White Gel Pen highlights to the Flourish to bring it a bit forward in the scene.

dsc00919.JPG

Sponged Old Olive ink around the outside edges of the card stock.

dsc00920.JPG

Sponged Basic Black ink around the outside edges of the card stock, not covering the Old Olive sponged ink entirely.

dsc00921.JPG

Added Whisper White, Bashful Blue and Old Olive card stock panels.

dsc00922.JPG

Added Silver Brads in the corners of the main image panel using a piercing tool to start the brads.

dsc00923.JPG

Here is the finished card measuring 5″ x 6.5″.

dsc00927.JPG

I just got home last night after spending the weekend in Yardley, PA teaching my brayering techniques to totally terrific groups of ladies.  My drive there and back was wonderful.  I found myself in some very scenic country in Ohio, West Virginia, Maryland and Pennsylvania.

Here is one photo taken just as the sun was rising as I was driving along yesterday morning.

dsc00869.JPG

The traffic was a bit slow going through Philly so I was able to take this photo in bumper to bumper traffic.  

dsc00892.JPG

May your day be smooth sailing!

Until my next post. . . . .

Huge Hugs,

Michelle

moon-glow-edited-7-tiny.jpg  Get ready for Brayer Workshops!  I am coming to:

Knox, Maine

Akron, Ohio

Broomfield, Colorado

Moore, Oklahoma

Nashville, Indiana

Portland, Michigan

2010

Dayton, Ohio at Marco Paper

Phoenix, Arizona

Monroe, Louisiana

Jacksonville, Florida

St. Louis, Missouri

Mechanicsville, Virginia

Raleigh, North Carolina 

Colleyville, Texas

Colorado Springs, Colorado

Boise area of Meridian, Idaho

Riverside, California (Southern California)

Salem, Oregon

Wheaton, Illinois

St. Cloud, Minnesota

Rockville, Maryland

North Chili, New York (near Rochester)

New Johnsonville, Tennessee

Kenova, West Virginia

Helena, Montana

Middleburg Heights, Ohio

Venice, Florida

Ginnell, Iowa

Piedmont, Alabama

Auburn, Washington

Elk Grove Village, Illinois

Here is a link to my workshop calendar where you can see all of my travel schedule and to get info on beginner and advanced Brayer workshops: 

 http://zindorf.blogs.splitcoaststampers.com/workshop-calendar 

Link to my Stampin’ Up website where you can order all of your must have Stampin’ Up products from me 24-7: 

 http://michellezindorf.stampinup.net

Frequently asked questions answers: 

 http://zindorf.blogs.splitcoaststampers.com/frequently-asked-questions/


Black Birds on a Fence – Tutorial #261

dsc00859.JPG

Here is a little Autumn scene for you today.  Every since I purchased this Stampin’ Up stamp set “Branch Out”, Item #113200, I just knew I wanted to see those little birds lined up on a fence.  Today’s lesson teaches how to put a fence in your scene using a ruler and a marker.  Rustic fences are the easiest to create because you don’t have to worry about straight lines.  They look better if they are a bit crooked and gnarly looking.  🙂

Announcement:  I will be teaching Brayer workshops in Kenova, West Virginia on July 17, 2010, Auburn, Washington on September 25-26, 2010 and Elk Grove Village, Illinois on October 1-2, 2010, please contact me for workshop information/registation at mzindorf@aim.com.  🙂

Now let’s get started on the tutorial . . . .

Supplies:

Stamps: Stampin’ Up Branch Out, Autumn Harvest & Sanded Background
Paper: Stampin’ Up Whisper White, Apricot Appeal, Basic Black, Creamy Caramel & Always Artichoke
Ink: Stampin’ Up Apricot Appeal, Basic Black, Always Artichoke, Certainly Celery, Going Gray & Really Rust
Accessories: Stampin’ Up markers, White Gel Pen, Brayer, Sponges, Ruler, Oval & Spiral Punches & post it notes

Want a free 39 page, Stampin’ Up Mini catalog?  If you are a resident of the United States,  just e-mail your mailing address to me and I will get one in the mail to you.  Are you inspired by this Blog?  One way you can help support this blog is by ordering your Stampin’ Up products through me.   You can order from me 24-7 from this link:  http://michellezindorf.stampinup.net or e-mail me at mzindorf@aim.com  If you are within the United States.  Want a copy of the brand new 2009-2010 Stampin’ Up Catalog for $9.95 with free shipping, just e-mail me at mzindorf@aim.com and I will get one in the mail to you.  Want to become a Stampin’ Up Demonstrator and earn instant income?  Consider being part of my Stampin’ Up Team.  Also check out the Stampin’ Up specials, click this link to check it out:  http://www.stampinup.net/esuite/home/michellezindorf/promotionsdsc00862.JPGOn a 3.5″ square piece of Whisper White card stock, brayered Apricot Appeal ink at the top of the card stock.dsc00825.JPGBrayered Certainly Celery at the bottom of the card stock.dsc00826.JPGStamped the Branch Out tree with Basic Black ink.  Note:  I did not ink up the grassy portion of the image.  I did this so I could extend the trunk of the tree with a Basic Black marker after it was stamped.  🙂dsc00827.JPGdsc00828.JPGdsc00829.JPGdsc00830.JPG

Ripped the edge of a Post It Note off to make it jagged and used it as a mask for the ground area.

Sponged Apricot Appeal at the edge of the Post it Note to darken the horizon line.

dsc00831.JPG

dsc00832.JPG

Removed the post it note and sponged Going Gray ink a the bottom of the card stock and below the horizon line.

dsc00833.JPG

Used a Basic Black marker to make the cross bars of my fence. 

dsc00834.JPG

Used a Ruler to draw two straight lines about 1/4 inch apart for each fence post and colored them in with the same marker.

dsc00835.JPG

Stamped the little Birds on the fence using Basic Black ink.

dsc00836.JPG

Added a bit of Really Rust ink with a brayer at the top of the card stock.

dsc00837.JPG

Brayered Always Artichoke ink at the bottom of the card stock.

dsc00838.JPG

Sponged Basic Black ink around the outside edge of the main image panel.

dsc00839.JPG

Stamped some leaves on the tree with Basic Black ink.

dsc00840.JPG

Added feet to the birds with a Basic Black marker.

dsc00841.JPG

Stamped the small Pumpkin stamp from the Stampin’ Up set Autumn Harvest using Basic Black ink on a separate piece of Whisper White card stock.

dsc00842.JPG

Colored the Pumpkin in with an Apricot Appeal marker.

dsc00843.JPG

Added More Mustard marker to the pumpkin.

dsc00844.JPG

Added a bit of Pumpkin Pie ink to the pumpkin.

dsc00845.JPG

Colored over the entire pumpkin with the Apricot Appeal Marker to blend the colors together a bit.

dsc00846.JPG

Colored the Stem with an Always Artichoke marker.

dsc00847.JPG

Punched the Pumpkin out with a large Oval Punch.

dsc00848.JPG

Sponge Certainly Celery ink around the edge of the Oval.

dsc00849.JPG

Sponged Basic Black ink around the edge of the Oval.

dsc00850.JPG

Punched Spiral punch down the side of a piece of Creamy Caramel card stock.  Then used a paper cutter to cut the spiral punched card stock into a strip.

dsc00851.JPG

Glued the main image panel on a Apricot Appeal panel and added a strip of Always Artichoke cardstock.  Put a square Post It Note on the Main image panel to mask the center of it.  This allows me to stamp the Sanded Background stamp over everything and still get a bit of the background image around the edge of main image panel.

dsc00852.JPG

dsc00853.JPG

Sponged Always Artichoke and Basic Black ink around the edge of the card stock.  Also sponged a bit of Basic Black ink on the Spiral punche strip.

dsc00854.JPG

dsc00856.JPG

Added a Black bird at the top left corner of the card with Basic Black ink.

dsc00857.JPG

Time for some White Gel highlights on the Tree, fence, pumpkin and birds. 

dsc00858.JPG

Here is the finished card measuring 5 3/8 square.

dsc00859.JPG

May you have a moment to feel the sun on your face today.

Until my next post. . . . .

Huge Hugs,

Michelle

moon-glow-edited-7-tiny.jpg  Get ready for Brayer Workshops!  I am coming to:

Yardley, Pennsylvania (near Philadelphia) 

Knox, Maine

Akron, Ohio

Broomfield, Colorado

Moore, Oklahoma

Nashville, Indiana

Portland, Michigan

2010

Dayton, Ohio at Marco Paper

Phoenix, Arizona

Monroe, Louisiana

Jacksonville, Florida

St. Louis, Missouri

Mechanicsville, Virginia

Raleigh, North Carolina 

Colleyville, Texas

Colorado Springs, Colorado

Boise area of Meridian, Idaho

Riverside, California (Southern California)

Salem, Oregon

Wheaton, Illinois

St. Cloud, Minnesota

Rockville, Maryland

North Chili, New York (near Rochester)

New Johnsonville, Tennessee

Kenova, West Virginia

Helena, Montana

Middleburg Heights, Ohio

Venice, Florida

Ginnell, Iowa

Piedmont, Alabama

Auburn, Washington

Elk Grove Village, Illinois

Here is a link to my workshop calendar where you can see all of my travel schedule and to get info on beginner and advanced Brayer workshops: 

 http://zindorf.blogs.splitcoaststampers.com/workshop-calendar 

Link to my Stampin’ Up website were you can order all of your must have Stampin’ Up products from me 24-7: 

 http://michellezindorf.stampinup.net

Frequently asked questions answers: 

 http://zindorf.blogs.splitcoaststampers.com/frequently-asked-questions/


Quick Note Card – Tutorial #260

dsc00823.JPG

Here is a quick little note card you can put together in no time at all.  I know some of you are groaning right now saying  “sure, sure, quick card, right.”  Really, once you have your brayering skills up to speed you really can put this card together in about 10 minutes.

Let’s get started. . . .  .

Supplies:

Stamps: Stampin’ Up Hostess Set “Asian Artistry”
Paper: Stampin’ Up Whisper White, Pumpkin Pie, Bashful Blue & Brilliant Blue
Ink: Stampin’ Up Basic Black, Brilliant Blue & Bashful Blue
Accessories: Stampin’ Up Silver Brads, White Gel Pen, Brayer & Piercing tool

Want a free 39 page, Stampin’ Up Mini catalog?  If you are a resident of the United States,  just e-mail your mailing address to me and I will get one in the mail to you.  Are you inspired by this Blog?  One way you can help support this blog is by ordering your Stampin’ Up products through me.   You can order from me 24-7 from this link:  http://michellezindorf.stampinup.net or e-mail me at mzindorf@aim.com  If you are within the United States.  Want a copy of the brand new 2009-2010 Stampin’ Up Catalog for $9.95 with free shipping, just e-mail me at mzindorf@aim.com and I will get one in the mail to you.  Want to become a Stampin’ Up Demonstrator and earn instant income?  Consider being part of my Stampin’ Up Team.  Also check out the Stampin’ Up specials, click this link to check it out:  http://www.stampinup.net/esuite/home/michellezindorf/promotions

dsc00824.JPG

On a 3.5″ x 4.5″ piece of Whisper White card stock, brayered Bashful Blue ink at the bottom of the card stock.

dsc00814.JPG

Turned the card stock and brayered Bashful Blue ink at the top fo the card stock.

dsc00815.JPG

Brayered Brilliant Blue ink at the bottom and top of the card stock.

dsc00816.JPG

dsc00817.JPG

Stamped the Stampin’ Up, Asian Artistry Stamp with Basic Black ink.

dsc00818.JPG

Using just the very edge of a Basic Black ink pad, dragged it in a downward motion to put in the grasses reflection in the background.

dsc00819.JPG

Dragging the edge of Basic Black ink pad in an upward motion, I put in the grasses in the background.

Note:  see next to the ink pad, I try things out on my scrap paper before putting them on the card stock.  🙂

dsc00820.JPG

Added white gel pen highlights to the plant.

Note:  Stampin’ Up sells this great Signo Uniball White Gel pen which is my favorite all time gel pen.  This gel pen is a strong bold white pen.

Tip:  When using your gel pen, take the cap off and hold it in your hand to remind yourself to immediately put the cap back on the pen so it will not dry out at the tip.  All white gel pens will dry out at the tip if left even for a couple of moments laying open.  I have not been successful getting them to write again after they have dried out.  😦

dsc00821.JPG

Keeping this a quick card, I layered the Main image panel with  Pumpkin Pie, Bashful Blue and Brilliant Blue Panels.  I also Added 4 silver brads.

dsc00822.JPG

Here is the finished card measuring 4.25″ x 5.25.  Just a hair smaller than a quarter card.  🙂

dsc00823.JPG

I just returned last night from my Brayer Workshops in Castro Valley, California.  Where I had such a terrific time with some super great stampers.  I was hosted by the fabulous, Wendy Gorton.  Here she is pictured with me on the right.

Love ya Wendy!

  hpim1864-4.jpg

And here are 3 groups of new Master Brayer Queens.  I enjoyed meeting each and everyone of you.  What fun gals!

hpim18621-3.jpg

hpim18611-2.jpg

hpim18591-2.jpg

May your day be overflowing with as much joy and laughter as I had this past weekend.

Until my next post. . . . .

Huge Hugs,

Michelle

moon-glow-edited-7-tiny.jpg  Get ready for Brayer Workshops!  I am coming to:

Yardley, Pennsylvania (near Philadelphia) 

Knox, Maine

Akron, Ohio

Broomfield, Colorado

Moore, Oklahoma

Nashville, Indiana

Portland, Michigan

2010

Dayton, Ohio at Marco Paper

Phoenix, Arizona

Monroe, Louisiana

Jacksonville, Florida

St. Louis, Missouri

Mechanicsville, Virginia

Raleigh, North Carolina 

Colleyville, Texas

Colorado Springs, Colorado

Boise area of Meridian, Idaho

Riverside, California (Southern California)

Salem, Oregon

Wheaton, Illinois

St. Cloud, Minnesota

Rockville, Maryland

North Chili, New York (near Rochester)

New Johnsonville, Tennessee

Helena, Montana

Middleburg Heights, Ohio

Venice, Florida

Grinnell, Iowa

Piedmont, Alabama

Here is a link to my workshop calendar where you can see all of my travel schedule and to get info on beginner and advanced Brayer workshops: 

 http://zindorf.blogs.splitcoaststampers.com/workshop-calendar 

Link to my Stampin’ Up website were you can order all of your must have Stampin’ Up products from me 24-7: 

 http://michellezindorf.stampinup.net

Frequently asked questions answers: 

 http://zindorf.blogs.splitcoaststampers.com/frequently-asked-questions/


Going Batty – Tutorial #259

dsc00808.JPG

Before I hop on a plane to head to sunny Castro Valley, California to teach this weekend I sat down to create another Halloween card.  California, ready or not here I come. . . .

Autumn is my very favorite season to create cards for.  I think it is all the earthy colors, browns, greens, yellows, reds etc. 

Today’s tutorial uses two fun sets that are must haves for Autumn from Stampin’ Up.  First there is the Stampin’ Up creepy set “From the Crypt”  and then there is the Stampin’ Up set “Branched Out” with it’s wonderful naked tree that can be used any season since it has a leaf stamp and snowflake stamp included with it.  Branched out is on the dormant list, but you can still order it with item number 113200.  I know I am such the enabler.  🙂

Today’s card does have deep purple ribbon on it that decided to do a disappearing act when I photographed it, Spooky, lol.

Before we get going today I have an announcement to make.  I have added two wonderful brayer workshop locations to my calendar.  I will be teaching beginner and advanced brayer workshops in Grinnell, Iowa on August 28-29, 2010 and then Piedmont, Alabama September 11-12, 2010.  Join me, won’t you for some great projects and fun.  🙂

Now on with the tutorial. . . . .

Supplies:

Stamps: Stampin’ Up From the Crypt and Branch Out
Paper: Stampin’ Up Whisper White, Old Olive, Lavender Lace and Basic Black
Ink: Stampin’ Up Basic Gray, Soft Suede, Sahara Sand, Going Gray and Basic Black
Accessories: Stampin’ Up 1 3/4″ Circle Punch, Post it Note, Sponges, Deep Purple Ribbon and Gold Brads

Want a free 39 page, Stampin’ Up Mini catalog?  If you are a resident of the United States,  just e-mail your mailing address to me and I will get one in the mail to you.  Are you inspired by this Blog?  One way you can help support this blog is by ordering your Stampin’ Up products through me.   You can order from me 24-7 from this link:  http://michellezindorf.stampinup.net or e-mail me at mzindorf@aim.com  If you are within the United States.  Want a copy of the brand new 2009-2010 Stampin’ Up Catalog for $9.95, just e-mail me at mzindorf@aim.com and I will get one in the mail to you.  Want to become a Stampin’ Up Demonstrator and earn instant income?  Consider being part of my Stampin’ Up Team.  Also check out the Stampin’ Up specials, click this link to check it out:  http://www.stampinup.net/esuite/home/michellezindorf/promotions

dsc00813.JPG

Using a Stampin’ Up 1 3/4″ circle punch, punched a circle from the sticky part of a post it note and used it as the mask for the moon.

dsc00796.JPG

Put the moon mask on a 3.5″ x 5.5″ piece of Whisper White card stock.

Sponged Going Gray ink on the card stock with a Sponge using a pouncing motion.

dsc00797.JPG

Sponged Sahara Sand ink at the bottom of the card stock using a pouncing motion.

dsc00798.JPG

Sponged Soft Suede ink at the bottom of the card stock using a pouncing motion.

dsc00799.JPG

Sponged Basic Gray ink at the top of the card stock using a pouncing motion.

dsc00800.JPG

Sponged Basic Black ink at the very top of the card stock using a pouncing motion.

dsc00801.JPG

Removed the moon mask and stamped the trees at the bottom of the card stock using Basic Black ink.

dsc00802.JPG

Stamped the bats on using Basic Black ink.

dsc00803.JPG

Sponged Basic Black ink around the outside edge of the card stock.

dsc00804.JPG

Added some simple card stock panels in Old Olive, Lavender Lace and Basic Black, Gold Brads and a deep purple ribbon. 

Here is the finished card measuring 5″ x 6.5″.

dsc00808.JPG

May your day be anything but creepy unless, you are creating Halloween cards.  🙂

Until my next post. . . . .

Huge Hugs,

Michelle

moon-glow-edited-7-tiny.jpg  Get ready for Brayer Workshops!  I am coming to:

Castro Valley, California 

Yardley, Pennsylvania (near Philadelphia) 

Knox, Maine

Akron, Ohio

Broomfield, Colorado

Moore, Oklahoma

Nashville, Indiana

Portland, Michigan

2010

Dayton, Ohio at Marco Paper

Phoenix, Arizona

Monroe, Louisiana

Jacksonville, Florida

St. Louis, Missouri

Mechanicsville, Virginia

Raleigh, North Carolina 

Colleyville, Texas

Colorado Springs, Colorado

Boise area of Meridian, Idaho

Riverside, California (Southern California)

Salem, Oregon

Wheaton, Illinois

St. Cloud, Minnesota

Rockville, Maryland

North Chili, New York (near Rochester)

New Johnsonville, Tennessee

Helena, Montana

Middleburg Heights, Ohio

Venice, Florida

Grinnell, Iowa

Piedmont, Alabama

Here is a link to my workshop calendar where you can see all of my travel schedule and to get info on beginner and advanced Brayer workshops: 

 http://zindorf.blogs.splitcoaststampers.com/workshop-calendar 

Link to my Stampin’ Up website were you can order all of your must have Stampin’ Up products from me 24-7: 

 http://michellezindorf.stampinup.net

Frequently asked questions answers: 

 http://zindorf.blogs.splitcoaststampers.com/frequently-asked-questions/


On a Cliff – Tutorial #258

dsc00793-small.jpg

Since there was a long Holiday weekend here in the United States I will be messed up all week, not knowing what day of the week it is.  Like today, I woke up thinking it is Monday.  When in fact it is Tuesday, which my husband was quick to point out when I told him the trash needed to go to the end of the driveway, smarty pants *#@)$.   You cannot change the routine of this old dog without throwing me for a loop, lol. 

Although I cannot blame the holiday for this, last week I stuck the dog’s bowls in the refrigerator instead of in the sink to be washed, don’t ask me why, lol.  Of course, my husband was the one to discover that too.  He found that really amusing.  So I’m losing my mind, as long as I don’t lose my brayer, ink pads and stamps my world will be good in my opinion.  🙂

Enough of my ramblings, let’s start the tutorial already. . . . . .

Supplies:

Stamps: Stampin’ Up Thoughts & Prayers
Paper: Stampin’ Up Whisper White, Basic Black & Bashful Blue
Ink: Stampin’ Up Basic Black, Apricot Appeal, Sahara Sand, Not Quite Navy & Tempting Turquoise
Accessories: White Gel Pen, Silver Brads, Post it Notes, Stampin’ Up Ticket Corner Punch, Brayer, Stampin’ Up 1 1/4″ Circle Punch

Want a free 39 page, Stampin’ Up Mini catalog?  If you are a resident of the United States,  just e-mail your mailing address to me and I will get one in the mail to you.  Are you inspired by this Blog?  One way you can help support this blog is by ordering your Stampin’ Up products through me.   You can order from me 24-7 from this link:  http://michellezindorf.stampinup.net or e-mail me at mzindorf@aim.com  If you are within the United States.  Want a copy of the brand new 2009-2010 Stampin’ Up Catalog for $9.95, just e-mail me at mzindorf@aim.com and I will get one in the mail to you.  Want to become a Stampin’ Up Demonstrator and earn instant income?  Consider being part of my Stampin’ Up Team.  Also check out the Stampin’ Up specials, click this link to check it out:  http://www.stampinup.net/esuite/home/michellezindorf/promotions

dsc00795.JPG

Punched a 1 1/4″ circle from the sticky part of a Post it Note and then used it as a mask for the moon.  I put the mask on a 3.5″ x 5.5″ piece of Whisper White card stock.

dsc00779.JPG

Brayered Tempting Turquoise ink on the card stock, starting at the top of the card stock.

dsc00780.JPG

Brayered Not Quite Navy ink at the top of the card stock, not covering the Tempting Turquoise ink entirely.

dsc00781.JPG

Brayered a bit of Sahara Sand ink at the bottom of the card stock.

dsc00782.JPG

Removed the Post it note mask and stamped the tree from the Stampin’ Up set “Thoughts & Prayers” with Basic Black ink.

dsc00783.JPG

Ripped a cliff shape from a large Post it note.

dsc00784.JPG

Put the Post it note mask on the card stock and sponged Basic Black ink on the create the cliff.

dsc00785.JPG

Sponged in a circular motion Apricot Appeal ink over the moon.

dsc00786.JPG

Colored the leaves on the tree in with a White Gel Pen.

dsc00787.JPG

Used my Big Shot Die Cut Machine and the Dots Texture Plate on a 4 7/8″ x 6 3/8″ piece of Whisper White Card stock.

dsc00788.JPG

Used the Stampin’ Up Ticket Corner punch on my main image panel, a basic Black panel and a Bashful blue panel.

Assembled the panels and added white ribbon.

dsc00789.JPG

Used my Stampin’ Up piercing tool to start my brads.  Added 4 silver brads.

dsc00790.JPG

Assembled the card and here it is finished measuring 5″ x 6.5″.

dsc00793-small.jpg

May your day be filled with the things and people you love most.  🙂

Until my next post. . . . .

Huge Hugs,

Michelle

dsc04306-tiny.jpg Get ready for Brayer Workshops!  I am coming to:

Castro Valley, California 

Yardley, Pennsylvania (near Philadelphia) 

Knox, Maine

Akron, Ohio

Broomfield, Colorado

Moore, Oklahoma

Nashville, Indiana

Portland, Michigan

2010

Dayton, Ohio at Marco Paper

Phoenix, Arizona

Monroe, Louisiana

Jacksonville, Florida

St. Louis, Missouri

Mechanicsville, Virginia

Raleigh, North Carolina 

Colleyville, Texas

Colorado Springs, Colorado

Boise area of Meridian, Idaho

Riverside, California (Southern California)

Salem, Oregon

Wheaton, Illinois

St. Cloud, Minnesota

Rockville, Maryland

North Chili, New York (near Rochester)

New Johnsonville, Tennessee

Helena, Montana

Middleburg Heights, Ohio

Venice, Florida

Here is a link to my workshop calendar where you can see all of my travel schedule and to get info on beginner and advanced Brayer workshops:  http://zindorf.blogs.splitcoaststampers.com/workshop-calendarLink to my Stampin’ Up website were you can order all of your must have Stampin’ Up products from me 24-7:  http://michellezindorf.stampinup.netFrequently asked questions answers:  http://zindorf.blogs.splitcoaststampers.com/frequently-asked-questions/