Sand Castle Kind of Day – Tutorial #217 and Blog Candy

dsc09282.JPG

Is it time to hit the beach?  I love beach scenes.  But, since I live in Ohio I don’t get to see the ocean and sand very often.  I have found I can create one when I want to escape.  So this morning I took a trip to the beach for a little R & R in stamping.

I also have a bit of blog candy for you.  I am giving this Card away along with the Beautiful Inkadinkado Sand Castle Stamp I created it with.

dsc09288.JPG

To throw your hat in the ring for a chance to win this card and stamp, please leave me a comment on this post telling me to enter you.  If you are getting this blog update via e-mail you will need to click this link and then leave a comment on the post:  http://zindorf.blogs.splitcoaststampers.com/2009/05/30/sand-castle-kind-of-day-tutorial-217-and-blog-candy/

I will select the winner on Wednesday, June 3, 2009 using a random number generator.  Good luck everyone!

Now let’s go to the beach!

Supplies:

Stamps: Inkadinkado Sand Castle
Paper: Stampin’ Up Whisper White, Pacific Point & Creamy Caramel
Ink: Stampin’ Up Creamy Caramel, Pacific Point, Baja Breeze, Not Quite Navy, Close to Cocoa
Accessories: Versamark pad & Marker, Prismacolor markers, White Gel Pen, Post it Note, Brayer, Clear embossing powder, heat gun, Sponge, Ribbon, Red Brads

Are you inspired by this Blog?  One way for you can help support this blog is by ordering your Stampin’ Up products through me.   You can order from me 24-7 from this link:  http://michellezindorf.stampinup.net or e-mail me at mzindorf@aim.com if you are within the United States.  Want a copy of the current mini catalog, just e-mail me your address and I will pop one in the mail to you.

Want to become a Stampin’ Up Demonstrator and earn instant income?  Consider being part of my Stampin’ Up Team.

dsc09286.JPG

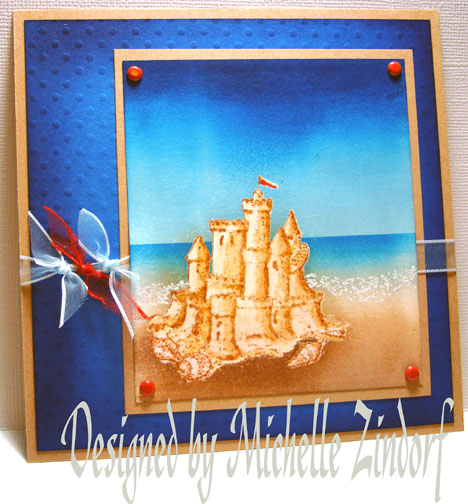
Stamped the Sand Castle on a 3.5″ x 4″ piece of Whisper White card stock by first loading my stamp with Versamark and then Creamy Caramel ink before stamping it.

dsc09258.JPG

Heat embossed the image using clear embossing powder and a heat gun.

dsc09259.JPG

Colored in the castle with an Eggshell Prismacolor marker.

dsc09262.JPG

Added Blondwood Prismacolor Marker to the darker areas of the castle.

dsc09263.JPG

Getting darker yet I added Walnut Prismacolor Marker to the right side of the shadow areas.

dsc09264.JPG

Added a touch of Deco Peach Prismacolor Marker to the shells.

dsc09265.JPG

Colored in the flag with a Crimson Red Prismacolor Marker.

dsc09266.JPG

Colored over the castle and the shells with a Versamark marker and heat embossed the images using clear embossing powder and a heat gun.

dsc09267.JPG

dsc09268.JPG

Now that my images are heat embossed I can brayer my back ground in and the embossing will resist the ink.

Brayered Baja Breeze ink at the top of the card stock.

dsc09269.JPG

Brayered a bit of Pacific Point ink at the top of the card stock.

dsc09270.JPG

Brayered Creamy Caramel ink at the bottom of the card stock.

dsc09271.JPG

Masked the sky area of the scene with a Post it note.

dsc09272.JPG

Sponged Pacific Point ink at the post it note edge and onto the card stock to create a horizon line.

dsc09273.JPG

Wiped the ink off of my embossed images using an old cotton towel.

dsc09274.JPG

Sponged a bit more Pacific Point ink at the top of the card stock to create some interest in the sky area.

dsc09275.JPG

Sponged a bit of Close to Cocoa ink under the castle to create a bit of a shadow.

dsc09276.JPG

Added white gel pen dots at the water edge to create foam.

dsc09277.JPG

Used my Big Shot and the dot Texture plate on my Pacific Point Panel.

dsc09278.JPG

Sponge a bit of Not Quit Navy at the top of the main image panel.  Also sponged Not Quite Navy around the edge of the Textured Pacific Point Panel.

dsc09279.JPG

Assembled the card, added ribbon and red brads. 

dsc09281.JPG

Here it is finished measuring 5.25″ square.

dsc09282.JPG

May your day be filled with relaxing scenes.  If not, make one!

Until my next post. . . . . . . . . . . . . . . . .

Huge Hugs,

Michelle

dsc05791small.jpg  Get ready for Brayer Workshops!  I am coming to:

Dayton, Ohio

Buffalo, Minnesota

Webster, New York

New Johnsonville, Tennessee

Stoughton, Wisconsin

Columbia, Missouri

Lynchburg, Virginia

Greenwood, Indiana

Castro Valley, California

Yardley, Pennsylvania (near Philadelphia)

Knox, Maine

Broomfield, Colorado

Moore, Oklahoma

Nashville, Indiana

Portland, Michigan

2010

Phoenix, Arizona

Jacksonville, Florida

Salem, Oregon

Here is a link to my workshop calendar where you can see all of my travel schedule and to get info on beginner and advanced Brayer workshops:  http://zindorf.blogs.splitcoaststampers.com/workshop-calendar

Link to my Stampin’ Up website were you can order all of your must have Stampin’ Up products from me 24-7:  http://michellezindorf.stampinup.net

Here is a link to all of my tutorials:  http://zindorf.blogs.splitcoaststampers.com/tutorials-ive-written/

Frequently asked questions answers:  http://zindorf.blogs.splitcoaststampers.com/frequently-asked-questions/


Bee at Rest – Tutorial #216

dsc09252.JPG

I am soooo in the gardening mode.  All I can think about is flowers, flowers, flowers.  If you are a gardener, you know what I mean.  I don’t know what type of flower it is on the stamp I used today, but it reminds me of my Peonies that are in bloom right now.  The Peonies I grow in my yard are very special to me.  They grew first in my Grandma, Marie’s yard, she has past now and then they grew in my Mother’s yard for years.  They are now proudly growing in my yard.  I have many flowers that have been past down through my families gardens.  I get all teary eyed just thinking about it.  Not tears of sorrow, but tears of joy.

Before we get into the tutorial today I have an announcement.  I will be teaching my brayer workshops (Beginner and Advanced) one day only, November 14, 2009 in Nashville, Indiana.  I will be hosted by the Papertrix Store there.  E-mail me at mzindorf@aim.com for more information.

dsc09228.JPG

Now about this project.  My poor Prismacolor markers have sat unused for quite some time now.  So today I dusted them off, literally, and used them to add my color to the images.  If you haven’t worked with Alcohol based markers before, give them a try. They are a whole different animal than the water-based markers, such as Stampin’ Up’s makers.

Let’s get started. . . . . .

Supplies:

Stamps:  Stampin’ Up Bloomin’ Beautiful

Paper:  Stampin’ Up Whisper White, Basic Black & Blush Blossom

Ink:  Stampin’ Up Basic Black, Not Quite Navy, Handsome Hunter, Bashful Blue, Sage Shadow, Old Olive & Blush Blossom

Accessories:  Versamark Marker & Pad, Prismacolor Markers, Brayer, Clear embossing powder, Heat Gun, Sponge, Sharpie Metallic Gold Paint Marker, Ribbon & Gold Brads

Are you inspired by this Blog?  One way for you can help support this blog is by ordering your Stampin’ Up products through me.   You can order from me 24-7 from this link:  http://michellezindorf.stampinup.net or e-mail me at mzindorf@aim.com if you are within the United States.  Want a copy of the current mini catalog, just e-mail me your address and I will pop one in the mail to you.

Want to become a Stampin’ Up Demonstrator and earn instant income?  Consider being part of my Stampin’ Up Team.

dsc09256.JPG

I stamped the bee by first loading my stamp with Versamark marker and then Basic Black ink before stamping him on a 4″ x 5.25″ piece of Whisper White Card stock. 

I have to laugh when I look at this bee in the finished project.  I did not intentionally stamp him to look like he is sitting on the flower.  I actually wanted him to look like he was working, gathering pollen.  But the angle in which I stamped him it turned out to look like he is resting, lol.     You will see on the finished piece what I mean.

dsc09229.JPG

Heat embossed the bee with clear embossing powder and a heat gun.  Colored the bee in with a Yellow Ochre Prismacolor marker.

dsc09230.JPG

dsc09231.JPG

Colored over the bee with a Versamark marker and heat embossed it with clear embossing powder and a heat gun.

dsc09232.JPG

dsc09233.JPG

Now that my bee is entirely heat embossed I can over stamp the flowers on and it will look like they are behind the bee.

Stamped the flower by first loading the stamp with Versamark and then added Blush Blossom ink to the flower and Old Olive ink to the stem and leaves before stamping it. 

dsc09234.JPG

Heat embossed the flower using clear embossing powder and a heat gun.

dsc09235.JPG

Repeated the process of stamping and heat embossing the flowers.

dsc09236.JPG

Added a bit of Deco Pink Prismacolor marker to the flowers.

dsc09237.JPG

Colored in the leaves and stems with a Lime Green Prismacolor marker.

dsc09238.JPG

Added Spruce Green Prismacolor marker to the dark areas of the leaves.

dsc09239.JPG

Went over the leaves again with the Lime Green Prismacolor marker to blend the two greens some.

dsc09240.JPG

Colored over the flowers, leaves and stem with a Versamark marker.

 Note: color the lightest areas in first then work your way to the darker areas, cleaning your Versamark maker on your scrap paper often.

dsc09241.JPG

Heat embossed the flowers, stems and leaves with clear embossing powder and a heat gun. 

Note:  my embossing looked a bit pitted so I colored over the flowers a second time with Versamark marker and heat embossed them again with clear embossing powder and a heat gun.

dsc09242.JPG

Now that all of my images are heat embossed I can brayer in my back ground and the embossed images will resist the brayered ink.

Brayered Sage Shadow ink at the bottom of the card stock.

dsc09243.JPG

Brayered Bashful Blue ink at the top of the card stock.

dsc09244.JPG

Brayered Not Quite Navy ink at the top of the card stock, not covering the Bashful Blue ink entirely.

dsc09245.JPG

Brayered on Handsome Hunter ink at the bottom of the card stock, not covering the Sage Shadow ink entirely.

dsc09246.JPG

Wiped the ink off of my embossed images using an old cotton towel.

dsc09247.JPG

Sponged Not Quite Navy around the out side edge of the card stock.

dsc09248.JPG

Sponged Basic Black ink at the top and bottom edges of the card stock.

dsc09249.JPG

Added Cool Grey 60% Prismacolor marker under the flower heads and leaves to add a bit of depth and shadow to the piece.

dsc09250.JPG

Now here is an easy way to add a gold layer to you cards without having the cost of Gold paper.

I use a Sharpie Opaque Paint Marker, Metallic Gold.  This is the wide marker.  They come if various sizes.

Holding the marker half on the card stock edge and half on the scrap paper edge I drag the marker down the side of the card stock.  This is not hard with a bit of practice.

I used this technique on my main image panel and my Blush Blossom Panel.

dsc09251.JPG

Assembled my card and added ribbon and gold brads.  Here it is completed measuring 5″ x 6.5″.

See my bee is taking a rest, lol.

dsc09252.JPG

I hope this tutorial has inspired you to get out your Alcohol based markers today and give them a whirl.

Until my next post. . . . . . . . . . . . . . . . .

Huge Hugs,

Michelle

dsc05791small.jpg  Get ready for Brayer Workshops!  I am coming to:

Dayton, Ohio

Buffalo, Minnesota

Webster, New York

New Johnsonville, Tennessee

Stoughton, Wisconsin

Columbia, Missouri

Lynchburg, Virginia

Greewood, Indiana

Castro Valley, California

Yardley, Pennsylvania (near Philadelphia)

Knox, Maine

Broomfield, Colorado

Moore, Oklahoma

Nashville, Indiana

Portland, Michigan

2010

Phoenix, Arizona

Jacksonville, Florida

Pocatello, Idaho

Salem, Oregon

Here is a link to my workshop calendar where you can see all of my travel schedule and to get info on beginner and advanced Brayer workshops:  http://zindorf.blogs.splitcoaststampers.com/workshop-calendar

Link to my Stampin’ Up website were you can order all of your must have Stampin’ Up products from me 24-7:  http://michellezindorf.stampinup.net

Here is a link to all of my tutorials:  http://zindorf.blogs.splitcoaststampers.com/tutorials-ive-written/

Frequently asked questions answers:  http://zindorf.blogs.splitcoaststampers.com/frequently-asked-questions/


A Little Blue Bird Told Me – Tutorial #215

dsc09225.JPG

I am spending loads of time in my garden, pulling weeds, watering, moving perennials from here to there.  There is always work to be done.  I love being out in the garden when I have the time.  Most of the time I am gripping because I am trying to fit my gardening in around other things and feel rushed.    We got a good soaking rain yesterday so I don’t have to water today and can spend the time playing in the soil, my favorite part! 

Let’s get on with today’s tutorial so I can get out there.  I hear the birds calling me.

 Supplies:

Stamps: Stampin’ Up “Always” and “Thoughts & Prayers”
Paper: Stampin’ Up Whisper White and Brilliant Blue
Ink: Stampin’ Up Brilliant Blue, Chocolate Chip, Sage Shadow, More Mustard, So Saffron, Bashful Blue and Basic Black
Accessories: Versmark marker & Pad, Brayer, Clear embossing powder and a heat gun, Sponge, Ticket Corner Punch and a Post it note

Are you inspired by this Blog?  One way for you can help support this blog is by ordering your Stampin’ Up products through me.   You can order from me 24-7 from this link:  http://michellezindorf.stampinup.net or e-mail me at mzindorf@aim.com if you are within the United States.  Want a copy of the current mini catalog, just e-mail me your address and I will pop one in the mail to you.

Want to become a Stampin’ Up Demonstrator and earn instant income?  Consider being part of my Stampin’ Up Team.

dsc09227.JPG

Stamped this plant stamp on a 4″ square piece of Whisper White card stock by first loading the stamp with Versamark and then with Sage Shadow ink before stamping it.

dsc09203.JPG

Heat embossed the images using clear embossing powder and a heat gun.

dsc09204.JPG

Decisions, decisions, lol.  Here is an example of me not being able to make up my mind on what color to use.  Scrap paper is a lovely thing!

dsc09205.JPG

Made the decision to stamp the bird by first loading the stamp with Versamark, then with Brilliant Blue ink, added a bit of black ink on the stamp where the feet and beak are before stamping it.

dsc09206.JPG

Heat embossed the bird with clear embossing powder and a heat gun.

dsc09207.JPG

I want to retain the white design on the bird, so I colored over the design on the bird with a Versamark marker and then heat embossed it with clear embossing powder and a heat gun.

dsc09208.JPG

Brayered Bashful Blue ink at the top of the card stock.

dsc09209.JPG

Brayered Brilliant Blue ink at the top of the card stock, not covering the Bashful Blue ink entirely.

dsc09210.JPG

Ripped a post it note and masked the sky area and to create a hill.

dsc09211.JPG

Brayered So Saffron ink at the bottom of the unmasked area.

dsc09212.JPG

Brayered just a touch of Chocolate Chip ink at the bottom of the card stock.

dsc09213.JPG

Sponged More Mustard ink at the top of the unmasked area.

dsc09214.JPG

Removed the mask.

dsc09215.JPG

Stamped the tree twice by first loading my stamp with Sage Shadow ink and then patted the Chocolate Chip ink pad on the trunk of the tree stamp before stamping it.   Dada. . . Tree is already colored.

dsc09216.JPG

Stamped a few more of the plant stamp images at the bottom of the card stock using Chocolate Chip ink and stamping off once on my scrap paper before stamping (Second Generation stamping).

dsc09217.JPG

Rubbed in a bit of Chocolate Chip ink under the trees to create a shadow effect.

dsc09218.JPG

Sponged Brilliant Blue ink all around the outside edge of the card stock.

dsc09219.JPG

I seem to be having a bit of trouble deciding colors today.  I first looked at this card stock color combination.

dsc09220.JPG

But decided I like the Brilliant Blue and Whisper White card stock panels better.  I used a Ticket Corner Punch by Stampin’ Up on a couple of the panels.

dsc09221.JPG

Assembled my card and here it is finished measuring 5.25″ square.

dsc09225.JPG

I hope this tutorial has inspired you to get out your clear embossing powder and heat gun today.

May your day be spent listening to the sound of song birds.

Until my next post. . . . . . . . . . . . . . . . .

Huge Hugs,

Michelle

dsc05791small.jpg  Get ready for Brayer Workshops!  I am coming to:

Dayton, Ohio

Buffalo, Minnesota

Webster, New York

New Johnsonville, Tennessee

Stoughton, Wisconsin

Columbia, Missouri

Lynchburg, Virginia

Greewood, Indiana

Castro Valley, California

Yardley, Pennsylvania (near Philadelphia)

Knox, Maine

Broomfield, Colorado

Moore, Oklahoma

Portland, Michigan

2010

Phoenix, Arizona

Jacksonville, Florida

Pocatello, Idaho

Salem, Oregon

Here is a link to my workshop calendar where you can see all of my travel schedule and to get info on beginner and advanced Brayer workshops:  http://zindorf.blogs.splitcoaststampers.com/workshop-calendar

Link to my Stampin’ Up website were you can order all of your must have Stampin’ Up products from me 24-7:  http://michellezindorf.stampinup.net

Here is a link to all of my tutorials:  http://zindorf.blogs.splitcoaststampers.com/tutorials-ive-written/

Frequently asked questions answers:  http://zindorf.blogs.splitcoaststampers.com/frequently-asked-questions/


Depth in Daisies – Tutorial #214 and Card Give-A-Way

dsc09189.JPG

Hello out there!  Hope everyone is having a fabulous holiday weekend.  I took the day off yesterday and spent some quality time with family.  Today I am going to spend the whole day stamping.  Woohoo!  This project I can share with you, but the rest of my stamping today will be projects that will only be unveiled in my advanced brayer workshops.   Actually, I will be spending the week putting them together.  I always want my workshop projects to be over the top.  🙂

A little about today’s tutorial, I added some white gel pen and some over stamping to create depth in this piece.  What do you think?  Did it work?  

TIMES UP – A WINNER HAS BEEN NAMED

I have decided to give this card away as blog candy tomorrow.   So leave a comment telling me to enter you and I will use a random number generator to select the winner.  If you are receiving this blog update via e-mail, please click this link and then leave a comment:

http://zindorf.blogs.splitcoaststampers.com/2009/05/25/depth-in-daisies-tutorial-214/

On with the tutorial. . . . .

Supplies:

Stamps: Stampin’ Up Upsy Daisy & Holdays & Wishes
Paper: Stampin’ Up Whisper White, Apricot Appeal, Old Olive & Pumpkin Pie
Ink: Stampin’ Up Basic Black, Old Olive, Pumpkin Pie, Apricot Appeal & Ruby Red
Accessories: Stampin’ UP 1 3/8″ Circle Punch, Post it note, Sponge, White Gel Pen, Brayer, Versamark Pad, Clear embossing powder, heat gun

Are you inspired by this Blog?  One way for you can help support this blog is by ordering your Stampin’ Up products through me.   You can order from me 24-7 from this link:  http://michellezindorf.stampinup.net or e-mail me at mzindorf@aim.com if you are within the United States.  Want a copy of the current mini catalog, just e-mail me your address and I will pop one in the mail to you.

Want to become a Stampin’ Up Demonstrator and earn instant income?  Consider being part of my Stampin’ Up Team.

dsc09191.JPG

Stamped the Upsy Daisy Silhouette stamp on a 3″ x 4″ piece of Whisper White Card stock by first loading the stamp with Versamark and then Old Olive ink before stamping it.

dsc09172.JPG

Heat embossed the image using clear embossing powder and a heat gun.

dsc09173.JPG

Brayered Apricot Appeal ink at the top of the card stock.

dsc09174.JPG

Used a 1 3/8″ circle punch and punched a mask out of the sticky part of a Post It Note.  Put the mask on my card stock.  Brayered Pumpkin Pie ink at the top of the card stock, not covering the Apricot Appeal ink entirely.

dsc09175.JPG

Brayred Ruby Red ink at the very top of the card stock, not covering the Pumpkin Pie ink entirely.

dsc09176.JPG

Removed the mask and Over stamped the Daisies with Basic Black ink.

dsc09177.JPG

I know not to do this from past experience, but I always end up doing it anyway.

I wiped my black ink off of my embossed images using a circular motion with an old towel, smearing the ink.

What I should have done was pat it off of the emboss images.  Oh well, I will get it right one of these days, lol.

dsc09178.JPG

Over stamped the embossed images with Old Olive ink, stamping off once on my scrap paper.  (Second Generation stamping)

dsc09180.JPG

Patted the Old Olive ink off of my embossed images with a cotton towel.  🙂

dsc09181.JPG

Used a White Gel Pen to added petals to the embossed Silhouette.  Used a heat gun to set the white gel pen into the embossing.

dsc09182.JPG

dsc09183.JPG

Brayered Ruby Red ink at the top of a Pumpkin Pie Panel.

dsc09184.JPG

Sponged Old Olive ink on a 1″ strip of Old Olive card stock.

dsc09185.JPG

Assembled card front and added a sentiment with Black ink on the bottom of the card front.

dsc09186.JPG

Here is the finished card measuring 5″ x 6.5″.

dsc09189.JPG

I hope this tutorial has inspired you to use over stamping in your project today to create depth in your scene.

Have a safe and happy holiday.

Until my next post. . . . . . . . . . . . .  . .

Hugs,

Michelle

dsc04306.jpg  Get ready for Brayer Workshops!  I am coming to:

Dayton, Ohio

Buffalo, Minnesota

Webster, New York

New Johnsonville, Tennessee

Stoughton, Wisconsin

Columbia, Missouri

Lynchburg, Virginia

Greewood, Indiana

Castro Valley, California

Yardley, Pennsylvania (near Philadelphia)

Knox, Maine

Broomfield, Colorado

Moore, Oklahoma

Portland, Michigan

2010

Jacksonville, Florida

Pocatello, Idaho

Salem, Oregon

Here is a link to my workshop calendar where you can see all of my travel schedule and to get info on beginner and advanced Brayer workshops:  http://zindorf.blogs.splitcoaststampers.com/workshop-calendar

Link to my Stampin’ Up website were you can order all of your must have Stampin’ Up products from me 24-7:  http://michellezindorf.stampinup.net

Here is a link to all of my tutorials:  http://zindorf.blogs.splitcoaststampers.com/tutorials-ive-written/

Frequently asked questions answers:  http://zindorf.blogs.splitcoaststampers.com/frequently-asked-questions/


Under the Moon – Tutorial #213

dsc09167.JPG

I love, love, love shades of grey.  Grey is a great neutral color.  One thing about greys, there are warm greys and cool greys.  I used Sahara Sand ink and card stock in this project and Sahara Sand is a warm grey.   The warmer grey went better with the warm color of Apricot Appeal.  It would not have look as good, in my opinion, if I would have used a cool grey such as Going Gray.

Let’s get started. 🙂

Supplies:

Stamps: Stampin’ Up Thoughts & Prayers & Frames with a Flourish
Paper: Stampin’ Up Whisper White, Sahara Sand & Basic Black
Ink: Stampin’ Up Old Olive, Cameo Coral, Bravo Burgundy, Apricot Appeal, Basic Black & Sahara Sand
Accessories: Basic Black marker, White Gel pen, Tim Holtz Distressing Tool, Post it notes, Sponges, Brayer, 1 3/8″ circle punch, Clear embossing powder and a heat gun, Versamark Pad, Brads

Are you inspired by this Blog?  One way for you can help support this blog is by ordering your Stampin’ Up products through me.   You can order from me 24-7 from this link:  http://michellezindorf.stampinup.net or e-mail me at mzindorf@aim.com if you are within the United States.  Want a copy of the current mini catalog, just e-mail me your address and I will pop one in the mail to you.

Want to become a Stampin’ Up Demonstrator and earn instant income?  Consider being part of my Stampin’ Up Team.

  dsc09171.JPG 

Stamped the Tree on a 3.5″ x 5″ piece of Whisper White card stock by first loading my stamp with Versamark, then Old Olive and then patted my Basic Black ink pad on the trunk of the tree before stamping it.

dsc09151.JPG 

Heat embossed the image using fine detail clear embossing powder and a heat gun.

dsc09152.JPG

Punched 1 3/8″ circles from the sticky part of some post it notes. 

Note: I have 3 layers of post it notes, other wise I find they are to thin and will jam my punch.  The extra circles I put a side for later projects.

dsc09153.JPG

Put one of my circle masks where I want the moon to be in my scene and brayered Sahara Sand ink in the sky area.

dsc09154.JPG

Removed the moon mask and brayered Sahara Sand ink lightly over the sky again to reduce the starkness of the white moon a bit.

dsc09155.JPG

Brayered Apricot Appeal ink at the bottom of the card stock.

dsc09156.JPG

Brayered Cameo Coral ink at the bottom of the card stock, not covering the Apricot Appeal ink entirely.

dsc09157.JPG

Ripped a post it note and used it as a mask to create a hill.

dsc09158.JPG

Sponged Sahara Sand heavily at top of the post it note mask and on to the card stock.

dsc09159.JPG

Sponged a bit of Bravo Burgundy at the lower left corner of the card stock.

dsc09160.JPG

Added some black marker outlines to the left side of some of the limbs and the trunk of the tree.

dsc09161.JPG

Added highlights to the tree with a white gel pen.

dsc09162.JPG

Distress the edges of the panel with the Tim Holtz distressing tool. 

dsc09163.JPG

Dragged the card stock edges across the Sahara Sand ink pad to darken the edges.

dsc09164.JPG

Assembled my panels and stamped the Flourish at the top and bottom of the card with Basic Black ink.  Also added two brads.

dsc09165.JPG

Sponged Basic Black ink on the left side of the card front.

dsc09166.JPG

Here is the card completed measuring 4″ x 9″.  This card size fits wonderfully in a #10 size business envelope, which you can pick up at any office supply store at a reasonable price.

dsc09167.JPG

I hope this project has inspired you to get out your gray inks and give them a whirl.

May your day be calm and joyful.

Until my next post. . . . . . . . . . . . .  . .

Hugs,

Michelle

dsc04306.jpg  Get ready for Brayer Workshops!  I am coming to:

Dayton, Ohio

Buffalo, Minnesota

Webster, New York

New Johnsonville, Tennessee

Stoughton, Wisconsin

Columbia, Missouri

Lynchburg, Virginia

Greewood, Indiana

Castro Valley, California

Yardley, Pennsylvania (near Philadelphia)

Knox, Maine

Broomfield, Colorado

Moore, Oklahoma

Portland, Michigan

2010

Jacksonville, Florida

Pocatello, Idaho

Salem, Oregon

Here is a link to my workshop calendar where you can see all of my travel schedule and to get info on beginner and advanced Brayer workshops:  http://zindorf.blogs.splitcoaststampers.com/workshop-calendar

Link to my Stampin’ Up website were you can order all of your must have Stampin’ Up products from me 24-7:  http://michellezindorf.stampinup.net

Here is a link to all of my tutorials:  http://zindorf.blogs.splitcoaststampers.com/tutorials-ive-written/

Frequently asked questions answers:  http://zindorf.blogs.splitcoaststampers.com/frequently-asked-questions/


At the Pond – Tutorial #212

dsc09144.JPG

Good Morning Everyone!  Hey my blog is still a bit wonky from the Site Administrators moving it.  I’ve lost quite a bit of my side bar stuff.  I’m keeping my fingers cross that they will get it back and I won’t have to spend days reconstructing it.  I would rather be stamping.  Send happy wishes my way today, will you?

Today’s tutorial is all about bringing some light to the middle of the scene.  Grab a cup of your favorite beverage and hang out a while.

Supplies:

Stamps: Stampin’ Up Lexicon of Leaves & Pocket Silhouettes
Paper: Stampin’ Up Whisper White, Chocolate Chip & Bashful Blue
Ink: Stampin’ Up Creamy Caramel, Bashful Blue, Basic Brown, Close to Cocoa, Not Quite Navy, Always Artichoke and Distress inks Faded Jeans & Brushed Corduroy
Accessories: Sponges, Brayer, Stampin’ Up Markers, Creamy Caramel, Close to Cocoa & Always Artichoke, Bashful Blue Brads

Are you inspired by this Blog?  One way for you can help support this blog is by ordering your Stampin’ Up products through me.   You can order from me 24-7 from this link:  http://michellezindorf.stampinup.net or e-mail me at mzindorf@aim.com if you are within the United States.  Want to become a Stampin’ Up Demonstrator and earn instant income?  Consider being part of my Stampin’ Up Team. 

dsc09149.JPG

Brayered Bashful Blue ink at the bottom of the 4″ x 5.5″ piece of Whisper White card stock.

dsc09130.JPG

Brayered Creamy Caramel ink at the top of the card stock, at a bit of an angle.

dsc09131.JPG

Stamped the Leaves from the Stampin’ Up set Lexicon of Leaves at the top of the card stock with Always Artichoke ink.

dsc09132.JPG

Colored in the leaves with a Stampin’ Up Creamy Caramel marker.

dsc09133.JPG

Added a bit of Stampin’ Up Always Artichoke marker to some of the leaf tips.

dsc09134.JPG

Stamped the Flower Silhouettes from the Stampin’ Up Pocket Silhouettes set with Creamy Caramel ink and then over stamped them with Close to Cocoa ink.

dsc09135.JPG

Used the edge of a Brushed Corduroy Distress ink pad to add a bit of grasses over the flower silhouettes.

dsc09136.JPG

dsc09137.JPG

Outlined a few of the flowers on the right side with a Close to Cocoa marker to create a shadow on them.

dsc09138.JPG

My piece seems a little flat so I brayered Not Quite Navy ink at the very bottom of the card stock to create a bit more depth.

dsc09139.JPG

Also Brayered Close to Cocoa ink at the top right Corner, at an Angle to create more depth in the sky.

dsc09140.JPG

Sponged Basic Brown ink all around the outside edge of the card stock.

dsc09141.JPG

Adhered my main image panel to a Chocolate Chip panel, then adhered that to a Bashful Blue Panel.  Smeared Brushed Corduroy ink at the top right hand corner of the panels.

dsc09142.JPG

Smeared Faded Jeans Distress ink at the bottom left corner.

dsc09143.JPG

Added another Chocolate Chip panel underneath.  Added some Bashful Blue brads and assembled card.

Here it is finished measuring 5″ x 6.5″.

dsc09144.JPG

I hope your day is filled with peaceful scenes.

Until my next post. . . . . . . . . . . . .  . .

Hugs,

Michelle

Get ready for Brayer Workshops!  I am coming to:

dsc07666supersmall.jpg

Dayton, Ohio

Buffalo, Minnesota

Webster, New York

New Johnsonville, Tennessee

Stoughton, Wisconsin

Columbia, Missouri

Lynchburg, Virginia

Greewood, Indiana

Castro Valley, California

Yardley, Pennsylvania (near Philadelphia)

Knox, Maine

Broomfield, Colorado

Moore, Oklahoma

Portland, Michigan

2010

Jacksonville, Florida

Pocatello, Idaho

Salem, Oregon

Here is a link to my workshop calendar where you can see all of my travel schedule and to get info on beginner and advanced Brayer workshops:  http://zindorf.blogs.splitcoaststampers.com/workshop-calendar

Link to my Stampin’ Up website were you can order all of your must have Stampin’ Up products from me 24-7:  http://michellezindorf.stampinup.net

Here is a link to all of my tutorials:  http://zindorf.blogs.splitcoaststampers.com/tutorials-ive-written/

Frequently asked questions answers:  http://zindorf.blogs.splitcoaststampers.com/frequently-asked-questions/


White Hummingbird – Tutorial #211

dsc09119.JPG

Today’s tutorial gives you another way in which to use White in your projects.  The darker you make your background the more your white image will stand out.

Let’s get right into the tutorial today.

 Supplies:

Stamps: Stampin’ Up “Spring Song” & “Stitched Exotics”
Paper: Stampin’ Up Designer Paper, Whisper White & Chocolate Chip Card stock
Ink: Stampin’ Up Kiwi Kiss, Tim Holtz Distress ink Brushed Corduroy, Frayed Burlap & Old Paper
Accessories: White Gel Pen, Sponge

Are you inspired by this Blog?  One way for you can help support this blog is by ordering your Stampin’ Up products through me.   You can order from me 24-7 from this link:  http://michellezindorf.stampinup.net or e-mail me at mzindorf@aim.com if you are within the United States.  Want to become a Stampin’ Up Demonstrator and earn instant income?  Consider being part of my Stampin’ Up Team. 

dsc09122.JPG

Used the direct to paper technique, by smearing my Old Paper Distress ink pad from top to bottom on a 3.5″ x 4″ piece of Whisper White card stock.

dsc09109.JPG

Stamped the Flourish with Brushed Corduroy on the left side of the card stock twice.

dsc09110.JPG

Stamped the Hummingbird image with Frayed Burlap Distress ink.

dsc09111.JPG

Colored in my images being careful to color inside of the outlines with a white Gel pen.

dsc09112.JPG

dsc09113.JPG

Sponged Kiwi Kiss ink around the outside edge of the card stock.

dsc09114.JPG

Sponged Brushed Corduroy ink around the outside edge of the card stock, not covering the Kiwi Kiss ink entirely.

dsc09115.JPG

Cut a 4.75″ square piece of Stampin’ Up Designer paper and sponged Kiwi Kiss around the edge of it to coordinate with my main image panel.

dsc09116.JPG

Assembled the card and here it is finished measuring 5.25″ square.

dsc09119.JPG

I hope this tutorial has inspired you to try using your white gel pen to add a bit of drama to your creation today.

May you have time today to feel the sun on your face.  I am heading out to my gardens.  🙂

Until my next post. . . . . . . . . . . . .  . .

Hugs,

Michelle

Get ready for Brayer Workshops!  I am coming to:

dsc07666supersmall.jpg

Dayton, Ohio

Buffalo, Minnesota

Webster, New York

New Johnsonville, Tennessee

Stoughton, Wisconsin

Columbia, Missouri

Lynchburg, Virginia

Greewood, Indiana

Castro Valley, California

Yardley, Pennsylvania (near Philadelphia)

Knox, Maine

Broomfield, Colorado

Moore, Oklahoma

Portland, Michigan

2010

Jacksonville, Florida

Pocatello, Idaho

Salem, Oregon

Here is a link to my workshop calendar where you can see all of my travel schedule and to get info on beginner and advanced Brayer workshops:  http://zindorf.blogs.splitcoaststampers.com/workshop-calendar

Link to my Stampin’ Up website were you can order all of your must have Stampin’ Up products from me 24-7:  http://michellezindorf.stampinup.net

Here is a link to all of my tutorials:  http://zindorf.blogs.splitcoaststampers.com/tutorials-ive-written/

Frequently asked questions answers:  http://zindorf.blogs.splitcoaststampers.com/frequently-asked-questions/


Dream a Little – Tutorial #210

dsc09104.JPG

dsc09056.JPG Before we start today’s tutorial I need to announce the winner of the Creative Hot Marks tool.  The random number generator selected. . . . . . . . ..  .. . ..  .

Cledith who wrote “After discovering your website, I’ve bought a brayer. Now I have to use it!”

Congratulations Cledith, please e-mail address to mzindorf@aim.com and I will pop this set in the mail to you.

Thank you to all 459 of you that entered the drawing.  Wish I had a set for each of you.

One other announcement, I will be teaching my Beginner & Advanced workshops for one day only in Greenwood, Indiana (right outside of Indianapolis) at Sharon’s Crop Studio Store on August 29, 2009.   E-mail me at mzindorf@aim.com for information on the workshops or to register.  Warning, these workshops are filling very fast.

Now a bit about today’s project.  This project was done using the direct to paper technique for the background.  I wanted to demonstrate how effective it is to leave the white of the paper showing through on your backgrounds to give the scene a real sparkle of light.  Hang out a few moments with me and check it out.

Let’s get rolling or smearing, lol . . . .

Supplies:

Stamps: Innovative Stamp Creations “Marvels of Nature” & Stampin’ Up Totally Tabs and Dream a Little
Paper: Stampin’ Up Design Paper, Whisper White & Pacific Point card stock
Ink: Distress Inks Peeled Paint, Black Soot, Old Paper, Faded Jeans, Antique Linen
Accessories: Stampin’ Up Basic Black & Close to Cocoa Markers, White Gel Pen, Tim Holtz Distress Tool, Stampin’ Up Old Olive Brads, Tab Punch, Stamp-a-ma-Jig, Piercing Tool

Are you inspired by this Blog?  One way for you can help support this blog is by ordering your Stampin’ Up products through me.   You can order from me 24-7 from this link:  http://michellezindorf.stampinup.net or e-mail me at mzindorf@aim.com if you are within the United States.  Want to become a Stampin’ Up Demonstrator and earn instant income?  Consider being part of my Stampin’ Up Team. 

dsc09108.JPG

Start out with a 3.5″ square piece of Whisper White card stock.

dsc09089.JPG

Mask a little over half the bottom of the card stock with a post it note.

dsc09090.JPG

Drag one edge of the Antique Linen Distress ink pad across the unmask portion of the card stock, LEAVE SOME OF THE WHITE PAPER SHOWING THROUGH.

dsc09091.JPG

Flip your card stock upside down and cover the sky area you just smeared in with the post it note to mask it.

dsc09092.JPG

Smear about 3/4 of an inch of Faded Jeans Distress ink right above the post it note, LEAVE SOME WHITE OF THE PAPER SHOWING THROUGH!

dsc09093.JPG

Smear Old Paper Distress ink on the rest of the card stock that is unmasked, LEAVE SOME OF THE WHITE PAPER SHOWING THROUGH.

dsc09094.JPG

Unmask the scene and turn it around so it is upright.

dsc09095.JPG

Load this great Palm tree from Innovated Stamp Creations with Peeled Paint ink, then load the trunk of the tree with Black Soot ink before stamping it.

dsc09096.JPG

Colored in the trunk of the tree with a Stampin’ Up Basic Black marker.

dsc09097.JPG

Added a bit of Close to Cocoa marker to the leaves of the tree.

dsc09098.JPG

Added White Highlights to some of the leaves on the tree.

dsc09099.JPG

Oops!  Missed a photo, after I applied the White Gel pen Highlights I used a Tim Holtz Distressing Tool to fray the edges of the main image panel.

Next, stamped the Totally Tab image on a piece of Whisper White card stock and then punched it out with the Stampin’ Up Tab Punch.  Folded it in half and adhered it to the main image panel while assembling the card front.

dsc09100.JPG

dsc09101.JPG

Look at this, I’m using pattern paper!  Gasp!  I know, I know, I never use pattern paper.  Well you will probably be seeing me use more of it since I went wild and purchased about every piece of pattern paper Stampin’ Up has.  They have a sale going on right now, buy 3 packs and get one free.  Yep, I love a sale!

I added some Old Olive brads to the tag, by starting the hole for the brad with my piercing tool.

dsc09102.JPG

Stamped the sentiment from the Stampin’ Up “Dream a little set”, using my Stamp-a-ma-jig for placement.

dsc09103.JPG

Here is the finished card measuring 5.25″ square.  Check out that sparkle.

dsc09104.JPG

Now it is your turn to leave a little white showing in your backgrounds!

Until my next post. . . . . . . . . . . . .  . .

Hugs,

Michelle

Get ready for Brayer Workshops!  I am coming to:

dsc07666supersmall.jpg

Dayton, Ohio

Covington, Indiana

Buffalo, Minnesota

Webster, New York

New Johnsonville, Tennessee

Stoughton, Wisconsin

Columbia, Missouri

Lynchburg, Virginia

Greewood, Indiana

Castro Valley, California

Yardley, Pennsylvania (near Philadelphia)

Knox, Maine

Broomfield, Colorado

Moore, Oklahoma

Portland, Michigan

2010

Jacksonville, Florida

Pocatello, Idaho

Salem, Oregon

Here is a link to my workshop calendar where you can see all of my travel schedule and to get info on beginner and advanced Brayer workshops:  http://zindorf.blogs.splitcoaststampers.com/workshop-calendar

Link to my Stampin’ Up website were you can order all of your must have Stampin’ Up products from me 24-7:  http://michellezindorf.stampinup.net

Here is a link to all of my tutorials:  http://zindorf.blogs.splitcoaststampers.com/tutorials-ive-written/

Frequently asked questions answers:  http://zindorf.blogs.splitcoaststampers.com/frequently-asked-questions/


My Racks Bigger Than Your Rack – Tutorial #209

dsc09084.JPG

This is another card that I came up with in my sleep.  Love those dreams that I can put on paper in the morning.  Anyhow, I used the Stampin’ Up set “Backwoods”  which has perfect guy card images.  The guys in my family do not like fluff on their cards so this is only two layers.  Main image panel and black panel.  Can’t get much simpler in a layout than that. 🙂

Let’s get started.  🙂

Supplies:

Stamps: Stampin’ Up Backwoods & Rubber Stampede Mirror Image Stamp
Paper: Stampin’ Up Whisper White & Basic Black
Ink: Stampin’ Up Baja Breeze, Basic Black, Not Quite Navy & Old Olive
Accessories: Versamark Pad & Marker, Stampin’ Up Markers, White Gel Pen, Clear embossing powder & Heat gun, Brayer, Post it notes & Sponges, Brads

Are you inspired by this Blog?  One way for you can help support this blog is by ordering your Stampin’ Up products through me.   You can order from me 24-7 from this link:  http://michellezindorf.stampinup.net or e-mail me at mzindorf@aim.com if you are within the United States.  Want to become a Stampin’ Up Demonstrator and earn instant income?  Consider being part of my Stampin’ Up Team. 

dsc09088.JPG

Stamped the buck on a Rubber Stampede Reverse Image Stamp with Basic Black ink and then stamped the Reverse Image Stamp on a 4.5″ x 5.5″ piece of Whisper White card stock.

Note:  if you wish to get one of these reverse image stamps you can fine one online by doing an online search.

dsc09057.JPG

Stamped the buck stamp with Basic Black ink on the right side of the card stock, first stamping off on my scrap paper once. 

Note:  I stamped off once so my Reverse image and original image would be more of the same intensity of color.

dsc09059.JPG

Stamped the cabin by first loading my stamp with Versamark and then loaded it with Basic Black ink before stamping it.

dsc09060.JPG

Heat embossed the cabin using clear embossing powder and a heat gun.

dsc09061.JPG

Colored the bucks, cabin and one side of the wood with a Creamy Caramel marker.

dsc09062.JPG

Darkened the bottom half’s of the logs on the cabin and added some darker spots on the bucks with a Close to Cocoa marker.

dsc09063.JPG

Added Going Gray Marker to the logs by the bucks and chimney of the cabin.

dsc09065.JPG

Colored over the cabin, bucks and logs by the bucks with a Versamark marker and then heat embossed the images with clear embossing powder and a heat gun.

dsc09066.JPG

dsc09067.JPG

Now that my images are protected I can brayer in my background and the ink will not stick to them.

Brayered on Baja Breeze ink at the top and bottom of the card stock.

dsc09068.JPG

dsc09069.JPG

Brayered Not Quite Navy just at the top of the card stock.

dsc09071.JPG

Created a mask for the sky by tearing a couple of post it notes in the shape of a hill.

dsc09072.JPG

Sponged Baja Breeze ink right at the post it note edge onto the card stock.

dsc09073.JPG

Sponged Not Quite Navy right at the edge of the post it note onto the card stock, not covering up all of the Baja Breeze ink.

dsc09074.JPG

Removed the mask and sponged Old Olive Ink at the bottom of the card stock in the grassy areas.

dsc09075.JPG

Sponged Not Quite Navy ink on the right, left and top of the card stock edges.

dsc09076.JPG

Sponged Basic Black ink around the entire edges of the card stock.

dsc09077.JPG

Added White dots in the sky for stars and white dots in the grasses at the bottom of the card.

dsc09078.JPG

Assembled the main image panel on a 5″ x 6.5″ piece of Basic Black card stock.  Added brads to each corner of the main image panel and here is the completed card.

dsc09084.JPG

I hope this has inspired you do create a card using only two panels for those guys in your life that don’t like fluff.  🙂

May your day be one of peace and joy!

Until my next post. . . . . . . . . . . . .  . .

Hugs,

Michelle

Get ready for Brayer Workshops!  I am coming to:

dsc07666supersmall.jpg

Dayton, Ohio

Covington, Indiana

Buffalo, Minnesota

Webster, New York

New Johnsonville, Tennessee

Stoughton, Wisconsin

Columbia, Missouri

Lynchburg, Virginia

Castro Valley, California

Yardley, Pennsylvania (near Philadelphia)

Knox, Maine

Broomfield, Colorado

Moore, Oklahoma

Portland, Michigan

2010

Jacksonville, Florida

Pocatello, Idaho

Salem, Oregon

Here is a link to my workshop calendar where you can see all of my travel schedule and to get info on beginner and advanced Brayer workshops:  http://zindorf.blogs.splitcoaststampers.com/workshop-calendar

Link to my Stampin’ Up website were you can order all of your must have Stampin’ Up products from me 24-7:  http://michellezindorf.stampinup.net

Here is a link to all of my tutorials:  http://zindorf.blogs.splitcoaststampers.com/tutorials-ive-written/

Frequently asked questions answers:  http://zindorf.blogs.splitcoaststampers.com/frequently-asked-questions/


French Country Rooster – Tutorial #208

dsc09052.JPG

I hope everyone had a super Mother’s Day yesterday.  I know I did.  My tw0 Sons & my Future Daughter-n-Law, Jamie came over and cooked my Mother and me a fantastic Steak dinner, with just a bit of help from my Husband, Russ.   It was yummy and was all the better because we were all together sharing it.  The only thing missing was my Sister who resides in Colorado.  Sis, hope your Mother’s Day was fantastic!

Now about today’s piece.

I love this Rooster from Stampin’ Up’s Hostess set “Rustic Rooster”.  This set has all the elements to make a French Country Style card.

Let’s get started. 🙂

Supplies:

Stamps: Stampin’ Up Rustic Rooster, Lexicon of Leaves
Paper: Stampin’ Up Whisper White, Apricot Appeal, Really Rust & Chocolate Chip
Ink: Stampin’ Up Creamy Caramel, Apricot Appeal, Really Rust, Chocolate Chip ink, Handsome Hunter, Close to Cocoa
Accessories: Stampin’ Up Markers, Checkered Ribbon, Brads, Sponge, Versamark Pad and Marker, Clear embossing Powder & Heat Gun

Are you inspired by this Blog?  One way for you can help support this blog is by ordering your Stampin’ Up products through me.   You can order from me 24-7 from this link:  http://michellezindorf.stampinup.net or e-mail me at mzindorf@aim.com if you are within the United States.  Want to become a Stampin’ Up Demonstrator and earn instant income?  Consider being part of my Stampin’ Up Team. 

dsc09054.JPG

Loaded my Rooster Stamp with Versamark, patted the my Really Rust Colored ink pad on the rooster’s head, loaded the rest of the stamp with Close to Cocoa ink before stamping the image on a 3.5″ square piece of Whisper White card stock.

dsc09026.JPG

dsc09027.JPG

Heat embossed the image using clear embossing powder and a heat gun.

dsc09028.JPG

Added Certainly Celery marker to the Rooster.

dsc09029.JPG

Added a bit of Handsome Hunter marker.

dsc09030.JPG

Added More Mustard Marker.

dsc09031.JPG

Added Creamy Caramel marker to his neck area.

dsc09032.JPG

Added Really Rust Marker over some of the More Mustard marker.

dsc09033.JPG

Added Close to Cocoa marker.

dsc09034.JPG

Added just a touch of Chocolate Chip marker over the Close to Cocoa marker.

dsc09035.JPG

Carefully patted the excess marker off of the embossed areas of the Rooster with an old Cotton cloth.  Be careful with this step.  Try not to smear the ink from one area of the Rooster to the next.

dsc09036.JPG

Colored over the Rooster with a Versamark Marker and then heat embossed it with clear embossing powder and a heat gun.

dsc09037.JPG

dsc09038.JPG

Sponged Creamy Caramel ink on the card stock working from the outside edge with a circular motion and moving into the center so the outside edge is darkest and the inside of the card stock is very light in color.

dsc09039.JPG

Added Apricot Appeal ink with a sponge working in a circular motion around the edge of the card stock. 

dsc09040.JPG

Stamped the Flourish with Creamy Caramel ink around the edge of the card stock.

dsc09041.JPG

Stamped the leaves from the Stampin’ Up Lexicon of Leaves set at the bottom of the card stock with Handsome Hunter ink.

dsc09042.JPG

Colored the leaves in with the Certainly Celery marker.

dsc09043.JPG

Sponged Chocolate Chip ink around the very edges of the card stock.

dsc09044.JPG

Stamped the french writing stamp with Handsome Hunter ink over the entire card stock by first stamping off on my scrap paper first so it would not be very dark.

dsc09045.JPG

Cut my panels and sponged Chocolate Chip ink around the outside edges of them.  Assembled the card adding ribbon and brads.

dsc09047.JPG

Here is the finished card measuring 5″ x 6.5″.

dsc09052.JPG

Hope your day today is filled with joy and laughter.

Until my next post. . . . . . . . . . . . .  . .

Hugs,

Michelle

Get ready for Brayer Workshops!  I am coming to:

dsc07666supersmall.jpg

Dayton, Ohio

Covington, Indiana

Buffalo, Minnesota

Webster, New York

New Johnsonville, Tennessee

Stoughton, Wisconsin

Columbia, Missouri

Lynchburg, Virginia

Castro Valley, California

Yardley, Pennsylvania (near Philadelphia)

Knox, Maine

Broomfield, Colorado

Moore, Oklahoma

Portland, Michigan

2010

Jacksonville, Florida

Pocatello, Idaho

Salem, Oregon

Here is a link to my workshop calendar where you can see all of my travel schedule and to get info on beginner and advanced Brayer workshops:  http://zindorf.blogs.splitcoaststampers.com/workshop-calendar

Link to my Stampin’ Up website were you can order all of your must have Stampin’ Up products from me 24-7:  http://michellezindorf.stampinup.net

Here is a link to all of my tutorials:  http://zindorf.blogs.splitcoaststampers.com/tutorials-ive-written/

Frequently asked questions answers:  http://zindorf.blogs.splitcoaststampers.com/frequently-asked-questions/