Sailing Away – Tutorial #197

dsc08482.JPG

This card I created this morning comes together pretty fast.  For you people who like to sponge, you will like this project. 

Without further ado . . . . . . . Let’s get started.  🙂
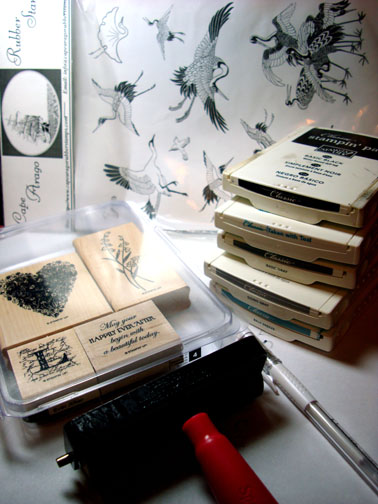
Supplies:

Stamps: Coastal/Maritime by Inkadinkado
Paper: Stampin’ Up Whisper White, Perfect Plum, Elegant Eggplant, Pumpkin Pie
Ink: Stampin’ Up Pumpkin Pie, Basic Black, Elegant Eggplant, Perfect Plum, Summer Sun
Accessories: Black marker, Sponges, Silver Brads, Post it Notes, Big Shot Die Cut “Top Note”

Please don’t forget you can order your Stampin’ Up products from me 24-7 from this link:  http://michellezindorf.stampinup.net or e-mail me at mzindorf@aim.com if you are within the United States.  Also, please consider being part of my Stampin’ Up Team.  We have valuable monthly meetings in Miamisburg, Ohio.

dsc08483.JPG

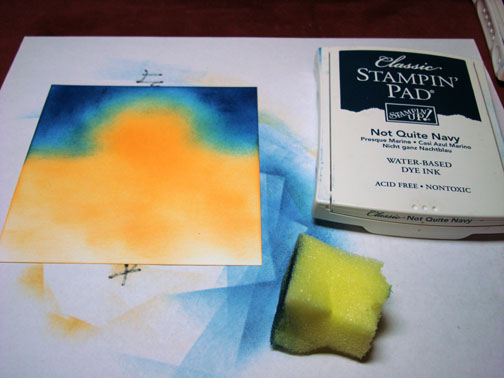
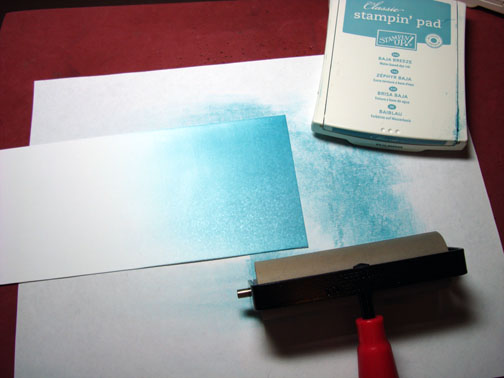
Using the Big Shot Die Cut machine, cut the Top Note Die out of Whisper White card stock.

dsc08467.JPG

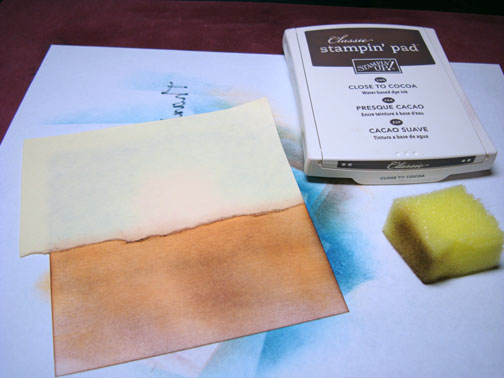
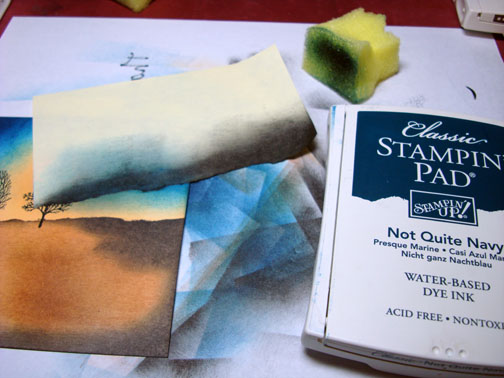
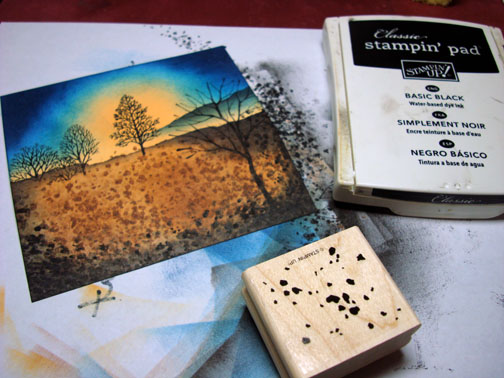
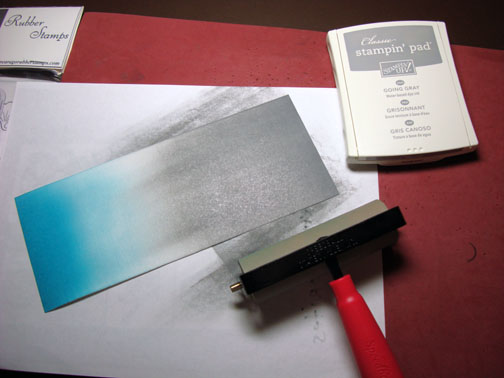
Sponged a spot of Summer Sun ink on the card stock.

dsc08468.JPG

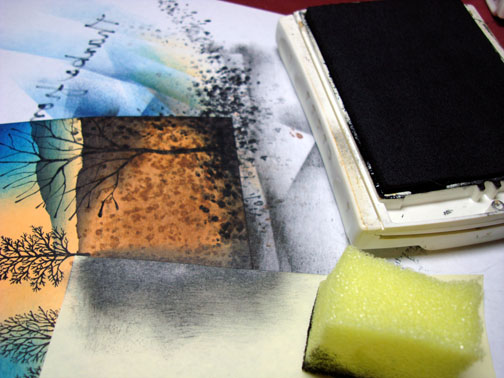
Masked the sky are with a Post It Note.  Sponged Perfect Plum ink around the Summer Sun ink showing.

dsc08469.JPG

Sponged Elegant Eggplant ink around the edge of the card stock showing and a bit right at the Post It Note edge to create the horizon line.
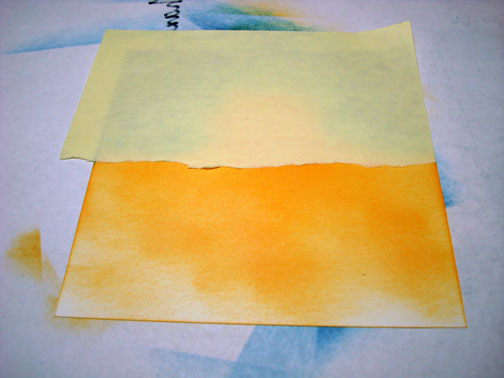
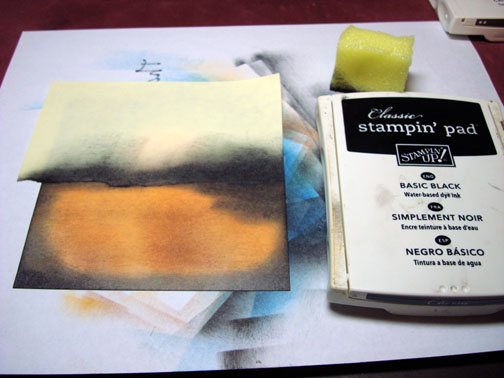
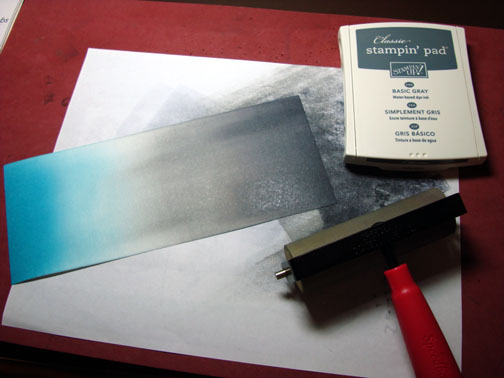
dsc08470.JPG

Removed the mask.

dsc08471.JPG

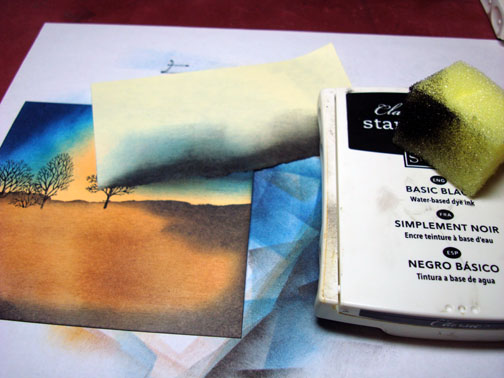
Masked the water with a new Post it Note.

dsc08472.JPG

Sponged Pumpkin Pie ink around the Summer Sun ink in the sky area.

dsc08473.JPG

Sponged Perfect Plum ink around the Pumpkin Pie Ink.

dsc08474.JPG

Sponged Elegant Eggplant ink around the entire edge of the card stock.

dsc08475.JPG

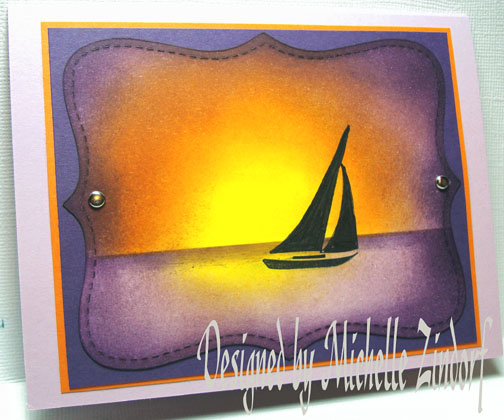
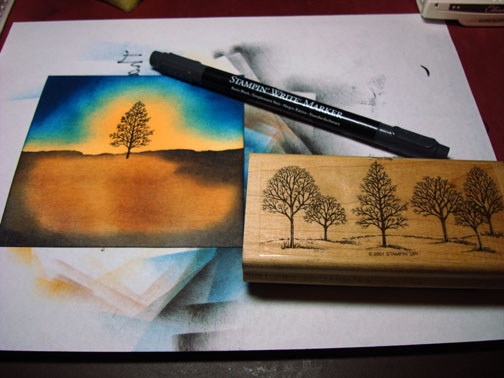
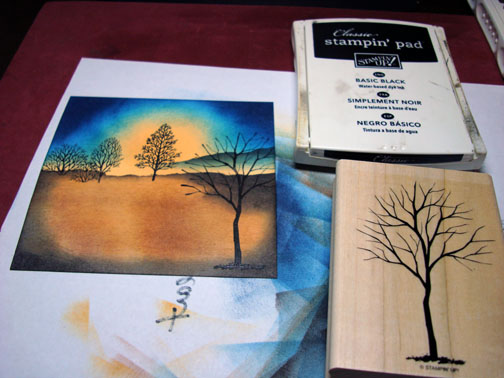
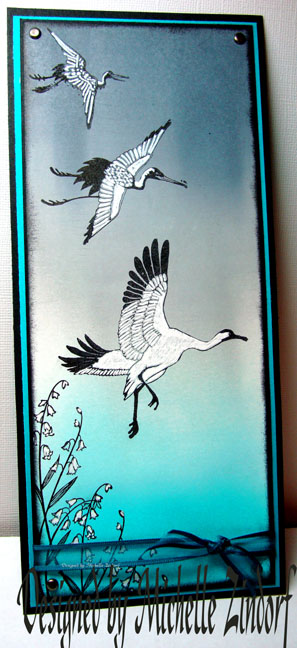
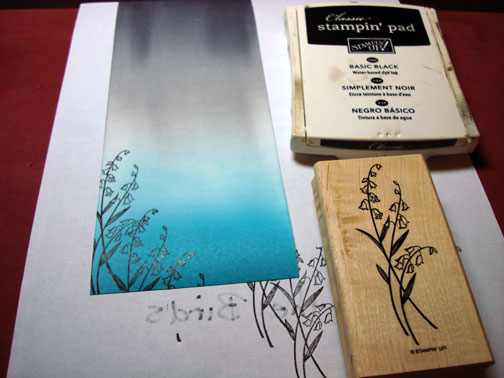
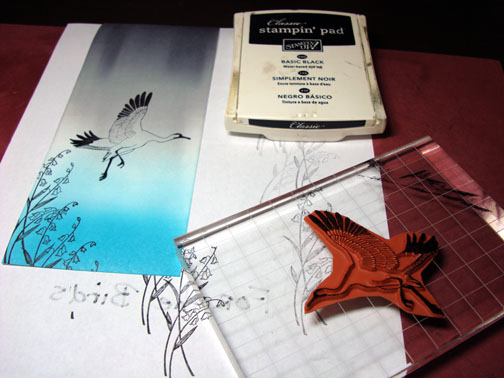
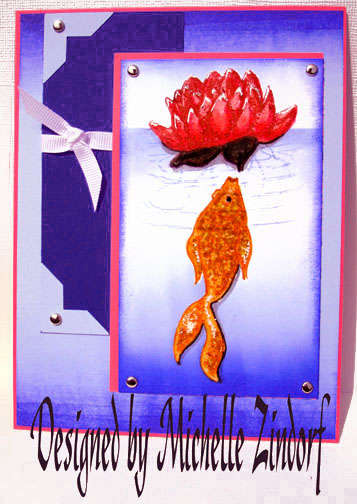
Stamped the Inkadinkado sailboat with Basic Black ink.

dsc08476.JPG

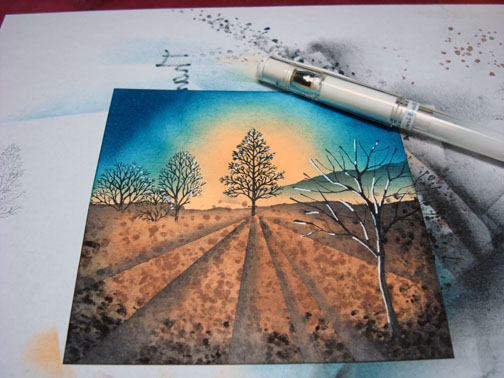
Colored in the sails with a black marker.

dsc08477.JPG

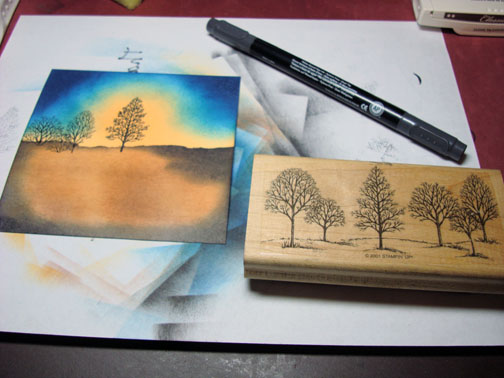
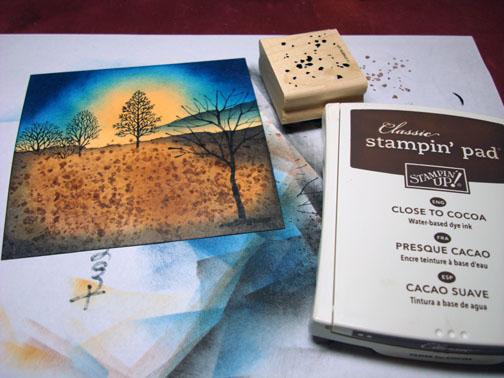
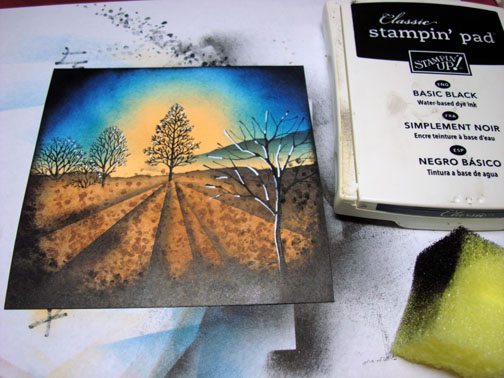
Added a few simple layers and two silver brads.  Here is the finished card measuring 4.25″ x 5.5″.

dsc08482.JPG

May your day be smooth sailing.

Until my next post. . . . . . . . . . . . .

Hugs,

Michelle

Get ready for Brayer Workshops!  I am coming to:

3-small.jpg

Fort Smith, Arkansas

Dayton, Ohio

Savannah, Georgia

Covington, Indiana

Buffalo, Minnesota

Webster, New York

New Johnsonville, Tennessee

Stoughton, Wisconsin

Castro Valley, California

Yardley, Pennsylvania (near Philadelphia)

Knox, Maine

Broomfield, Colorado

Lynchburg, Virginia

Columbia, Missouri

Portland, Michigan

Here is a link to my workshop calendar where you can see all of my travel schedule and to get info on beginner and advanced Brayer workshops:  http://zindorf.blogs.splitcoaststampers.com/workshop-calendar

Link to my Stampin’ Up website were you can order all of your must have Stampin’ Up products from me 24-7:  http://michellezindorf.stampinup.net

Here is a link to all of my tutorials:  http://zindorf.blogs.splitcoaststampers.com/tutorials-ive-written/

Frequently asked questions answers:  http://zindorf.blogs.splitcoaststampers.com/frequently-asked-questions/


Colorful Pots in a Row – Tutorial # 196 and Blog Candy Winner is. . . . .

dsc08428.JPG

Before I get into today’s tutorial it is my pleasure to announce the winner of the Stampin’ Up Yummy Stamp set.   The winner was selected using a Random number generator and the winner is. . . . . . .  . . . ..

dsc08378.JPG 

Barbara Taylor, who wrote “Would love to win this. Grandchildren are great. I have 13 and 9 great grandchildren.”

Congrats Barbara, please e-mail your address to mzindorf@aim.com and I will pop these in the mail to you.

A big thanks to everyone for playing along!

Now on with the tutorial 🙂

Supplies:

Stamps: Stampin’ Up Blooming With Love
Paper: Stampin’ Up Whisper White, More Mustard, Baja Breeze & Not Quite Navy
Ink: Stampin’ Up More Mustard, Close to Cocoa, Creamy Caramel, Not Quite Navy, Baja Breeze & Basic Black
Accessories: Stampin’ Up Markers, Versamark Marker, Clear embossing powder, heat gun, sponges, brayer, white ribbon and silver brads, Tombo Mono Multi Glue, White Gel Pen

Please don’t forget you can order your Stampin’ Up products from me 24-7 from this link:  http://michellezindorf.stampinup.net or e-mail me at mzindorf@aim.com if you are within the United States.  Also, please consider being part of my Stampin’ Up Team.  We have valuable monthly meetings in Miamisburg, Ohio.

dsc08431.JPG

On a 2.75″ x 3″ piece of Whisper White card stock stamped the flower post with Basic Black ink.

dsc08412.JPG

Colored the end pot with a Lavender Lace Marker.  Colored the flowers in the pot and the shadow down the right side of the post with an Almost Amethyst marker.

dsc08413.JPG

Colored the next post and flowers with with an More Mustard marker.  Added Pumpkin Pie marker to the middle petals of the flowers and to create the shadow on the pot.

dsc08414.JPG

Colored the next pot and the tulip with a Ruby Red marker.  Added Bravo Burgundy marker to both the tulip and the pot to create a shadow on the right side of them.

dsc08415.JPG

Colored the leaves of the flowers with an Old Olive marker.   Colored the last pot with a Certainly Celery marker and then added Old Olive for the shadow on the pot’s right side.

dsc08416.JPG

Decided I wanted a darker shadow on the More Mustard pot so I added Really Rust marker to the right side of it.

dsc08417.JPG

Colored over all of the pots and flowers with a Versamark marker and heat embossed the images using clear embossing powder and a heat gun.

dsc08418.JPG

dsc08419.JPG

Masked the top of the card stock with a post it note and sponged Baja Breeze ink on the unmasked card stock.

dsc08420.JPG

Sponged Not Quite Navy ink right at the post it note edge to create a shadow for the pots.

dsc08421.JPG

Took the post it note mask off and put a new one on to mask the bottom of the card stock.  I masked a bit of the white above the Not Quite Navy to create a  white border behind the pots.  Sponged Creamy Carmel ink on the unmasked area of the card stock.

dsc08422.JPG

Sponged Close to Cocoa ink at the right side of the card stock.

dsc08423.JPG

Removed the mask and added White gel pen to the buds on the 3rd pot and the center of the flowers on the fourth pot.

dsc08425.JPG

Used my Big Shot die cut machine and the Dot texture plate emboss two More Mustard panels. 

dsc08426.JPG

Brayered More Mustard over both panels to make the embossing pop more.

dsc08427.JPG

Assembled my card and added ribbon and silver brads.  Here you have the finished card that measures 5.25″ square.

dsc08428.JPG

May your day be filled with blooms!

Until my next post. . . . . . . . . . . . .

Hugs,

Michelle

Get ready for Brayer Workshops!  I am coming to:

3-small.jpg

Fort Smith, Arkansas

Dayton, Ohio

Savannah, Georgia

Covington, Indiana

Buffalo, Minnesota

Webster, New York

New Johnsonville, Tennessee

Stoughton, Wisconsin

Castro Valley, California

Yardley, Pennsylvania (near Philadelphia)

Knox, Maine

Broomfield, Colorado

Lynchburg, Virginia

Columbia, Missouri

Portland, Michigan

Here is a link to my workshop calendar where you can see all of my travel schedule and to get info on beginner and advanced Brayer workshops:  http://zindorf.blogs.splitcoaststampers.com/workshop-calendar

Link to my Stampin’ Up website were you can order all of your must have Stampin’ Up products from me 24-7:  http://michellezindorf.stampinup.net

Here is a link to all of my tutorials:  http://zindorf.blogs.splitcoaststampers.com/tutorials-ive-written/

Frequently asked questions answers:  http://zindorf.blogs.splitcoaststampers.com/frequently-asked-questions/


Sunrise Field – Tutorial #195

dsc08410-finished.jpg

HAPPY FRIDAY!!!

This time of year, in my neck of the woods you see a lot of fields being turned over in preparation for planting.  I think there is nothing more beautiful than farm land during sunrise.  That was the inspiration for this tutorial today.

Stampin’ Up came out with some terrific tree stamps this year.  I used one of the new sets Branch Out and then an old time favorite of mine, Lovely As a Tree to create this scene.

For you people that love to sponge on ink, this tutorial is for you.

Let’s get started. 🙂

Supplies:

Stamps:  Stampin’ Up Branch Out and Lovely as a Tree

Cardstock:  Stampin’ Up Whisper White, Close to Cocoa and Not Quite Navy

Ink:  Stampin’ Up Close to Cocoa, Basic Black, Apricot Appeal, Not Quite Navy and Night of Navy

Accessories:  White Gel Pen, Piercing Tool, Cuttlebug Die, Sponges

Please don’t forget you can order your Stampin’ Up products from me 24-7 from this link:  http://michellezindorf.stampinup.net or e-mail me at mzindorf@aim.com if you are within the United States.  Also, please consider being part of my Stampin’ Up Team.  We have valuable monthly meetings in Miamisburg, Ohio.

dsc08406.JPG

Sponged Apricot Appeal ink on a 4.5″ square piece of Whisper White Card stock.

dsc08379.JPG

Sponged Not Quite Navy At the top of the card stock, getting darker towards the outside of the card stock.

dsc08380.JPG

Sponged Night of Navy ink in each of the top corners.

dsc08381.JPG

Tore a Post it note through the stick edge and used it as a mask to mask my sky area.  I was sure to mask some of the Apricot area under the Not Quite Navy ink so the Apricot Appeal ink would show all across the card stock in the finished piece.

dsc08382.JPG

Sponged on Close to Cocoa ink, using a back and forth motion across the card-stock, letting some of the Apricot Appeal ink show through.

dsc08383.JPG

Sponged Black all around the unmasked area.

dsc08384.JPG

Colored directly on the stamp with a Black marker, just the center tree.  Huffed on the stamp and stamped it on the card stock. 

dsc08385.JPG

Colored directly on the stamp again, just the three left trees, huffed on the stamp and stamped it on the card stock.

Remember, you don’t always have to use the entire stamped image.  🙂

dsc08386.JPG

Used the tore Post it Note Mask again to create a hill in the distance.

dsc08387.JPG

Sponged Not Quite Navy ink along the torn post it note edge.

dsc08388.JPG

Added a bit of Basic Black ink with a sponge, right at the post it note edge, not covering the Not Quite Navy ink entirely.

dsc08389.JPG

Removed mask.

dsc08390.JPG

Stamped Branched Out Tree in the foreground with Basic Black ink.

dsc08391.JPG

Stamped the leaf stamp from the Branched out set on the ground area with Close to Cocoa ink.

dsc08392.JPG

Stamped the same stamp again only with Basic Black ink at the bottom of the card stock.

dsc08393.JPG

Used a post it note to create the shadows on the ground.

dsc08394.JPG

Sponged Basic Black ink lightly at the post it note edge and repeated over and over by moving the post it note to create all of the shadows I wanted.

dsc08395.JPG

dsc08396.JPG

Highlighted the left side of the large tree with a White Gel pen.  I also added a few dots in the small trees for highlights.

dsc08397.JPG

Sponged Black ink all the way around the card stock edge.

dsc08398.JPG

Although you cannot see the Cuttlebug Die cut corners in the photos they are there, lol.  I put one in each corner of the main image panel.

dsc08399.JPG

I also put a copper brad on each Cuttlebug corner.

dsc08400.JPG

Here is a not so good photo of the finished card.  I am in my PJ’s and it is raining outside so I will try later to take a decent photo.  🙂

dsc08410-finished.jpg

May you catch a glimpse of a beautiful sunrise in your neck of the woods.

Until my next post. . . . . . . . . . . . .

Hugs,

Michelle

Get ready for Brayer Workshops!  I am coming to:

3-small.jpg

Fort Smith, Arkansas

Dayton, Ohio

Savannah, Georgia

Covington, Indiana

Buffalo, Minnesota

Webster, New York

New Johnsonville, Tennessee

Stoughton, Wisconsin

Castro Valley, California

Yardley, Pennsylvania (near Philadelphia)

Knox, Maine

Broomfield, Colorado

Lynchburg, Virginia

Columbia, Missouri

Portland, Michigan

Here is a link to my workshop calendar where you can see all of my travel schedule and to get info on beginner and advanced Brayer workshops:  http://zindorf.blogs.splitcoaststampers.com/workshop-calendar

Link to my Stampin’ Up website were you can order all of your must have Stampin’ Up products from me 24-7:  http://michellezindorf.stampinup.net

Here is a link to all of my tutorials:  http://zindorf.blogs.splitcoaststampers.com/tutorials-ive-written/

Frequently asked questions answers:  http://zindorf.blogs.splitcoaststampers.com/frequently-asked-questions/


Swing in Spring – Tutorial #194

dsc08370.JPG

I bet you can guess what gave me the inspiration for this card.  My 5 year old Grand Daughter is visiting me this week for her Spring Break so we have been hanging out in the park a lot.  When making this card I found the Stampin’ Up sets Eastern Influences and A Kind Word work perfectly together.  Don’t you think?  Sure puts me in the mood for Spring.

Let’s get started on the tutorial.

Supplies:

Stamps: Stampin’ Up A Kind Word & Eastern Influences
Paper: Stampin’ Up Whisper White, Not Quite Navy & Baja Breeze
Ink: Stampin’ Up Kiwi Kiss, Night of Navy, Not Quite Navy & Baja Breeze, Palette Noir Black
Accessories: Stampin’ Up Markers Sahara Sand, Bashful Blue, Cameo Coral, Blush Blossom, Barely Banana, Old Olive, Creamy Caramel & Basic Black, Prismacolor Pale Peach Marker, White Ribbon, Silver Brads, Versamark marker, White Gel pen, Sponge, Ruller, Brayer, Clear embossing powder, heat gun, Photo Corner Punch, Horizontal Slot Punch

Please don’t forget you can order your Stampin’ Up products from me 24-7 from this link:  http://michellezindorf.stampinup.net or e-mail me at mzindorf@aim.com if you are within the United States.  Also, please consider being part of my Stampin’ Up Team.  We have valuable monthly meetings in Miamisburg, Ohio.

dsc08376.JPG

Stamped the Girl image on a 3.5″ x 5″ piece of Whisper White Card stock with Palette Noir Black ink.

dsc08349.JPG

Colored the girls hat, dress and flowers with Stampin’ UP markers Creamy Carmel, Blush Blossom & Cameo Coral.

dsc08350.JPG

Added Barely Banana marker to her hair.  Colored the swing seat with Creamy Caramel marker.

dsc08351.JPG

Colored the bird with Bashful Blue.

dsc08352.JPG

Colored her skin with a Pale Peach Prismacolor marker.  This is a great color for skin tones.

dsc08353.JPG

Colored the leaves with an Old Olive marker.

dsc08354.JPG

Created a shadow on her hat with a Creamy Carmel marker.  I went over this a few times to get it good and dark in this area.

dsc08355.JPG

Created a shadow on the bottom of her dress using the Blush Blossom marker.  I went over it a few times to get the color good and dark for the shadow.

dsc08356.JPG

Created a shadow on the bottom sides of her arms and legs using the Pale Peach marker.

dsc08357.JPG

Colored over the entire image using a Versamark marker.

dsc08358.JPG

Heat embossed the image using Fine Detail clear embossing powder and a heat gun.

dsc08359.JPG

Now that my image has been heat embossed it will resist the brayered on ink for the background.

Brayered Kiwi Kiss ink at the bottom of the card stock.

dsc08360.JPG

Brayered Baja Breeze ink at the top of the card stock.

dsc08361.JPG

Brayered Not Quite Navy ink on the top of the card stock, not covering the Baja Breeze ink entirely.

dsc08362.JPG

Sponged Night of Navy at the top of the card stock and then on the card stock edges, all the way around.

dsc08363.JPG

Stamped the Stampin’ Up Eastern Influences Branch twice with Palette Hybrid Noir Black ink.

dsc08364.JPG

Colored the branches in with a Sahara Sand marker.

dsc08365.JPG

Used a white gel pen to dot in the flowers on the branches.  Now we are talking Spring.  🙂

dsc08366.JPG

Drew in the swing rope to connect to the tree branch using a ruler and a Stampin’ Up Black marker.

dsc08367.JPG

Adhered my main image panel to a Whisper White panel and punched a Horizontal Slot on each side of the panel.

dsc08368.JPG

Slide my ribbon through and assembled the rest of the card front.  Added Photo corner punches and silver brads.

dsc08369.JPG

Here is the complete card measuring 5″ x 6.5″.

dsc08370.JPG

May your day be filled with Spring Blossoms!

Until my next post. . . . . . . . . . . . .

Hugs,

Michelle

Get ready for Brayer Workshops!  I am coming to:

3-small.jpg

Fort Smith, Arkansas

Dayton, Ohio

Savannah, Georgia

Covington, Indiana

Buffalo, Minnesota

Webster, New York

New Johnsonville, Tennessee

Stoughton, Wisconsin

Castro Valley, California

Yardley, Pennsylvania (near Philadelphia)

Knox, Maine

Broomfield, Colorado

Lynchburg, Virginia

Columbia, Missouri

Here is a link to my workshop calendar where you can see all of my travel schedule and to get info on beginner and advanced Brayer workshops:  http://zindorf.blogs.splitcoaststampers.com/workshop-calendar

Link to my Stampin’ Up website were you can order all of your must have Stampin’ Up products from me 24-7:  http://michellezindorf.stampinup.net

Here is a link to all of my tutorials:  http://zindorf.blogs.splitcoaststampers.com/tutorials-ive-written/

Frequently asked questions answers:  http://zindorf.blogs.splitcoaststampers.com/frequently-asked-questions/


Fifth Avenue Rose – Tutorial #193

dsc08346.JPG

Good Morning All! 

I have my beautiful, 5 year old Granddaughter, Hailie Jade here with me this week since she is on Spring Break.  I only get to see her a couple times a year since she lives out of state.  This time we have together is so very precious to us.  Over the weekend we went bowling, to the park, movie theater to see Bolt, Flea-market and made a couple of stops to visit relatives.  Whew, she wears me out.  But I love it.

With that being said, my post this week will be hit or miss depending on what us girls have planned for the day, lol.  I believe today we will make a trip to the library and hang out here at the house reading.  🙂  Grandma needs a bit of down time, yawn. . . . . . . . .

Enough yammering from me.

Let’s get started on today’s tutorial.

 Supplies:

Stamps: Stampin’ UP Fifth Avenue Floral, God’s Beauty & Baroque Motifs
Paper: Stampin’ Up Basic Black & Whisper White
Ink: Stampin’ Up Basic Black, Tempting Turquoise, Creamy Caramel, Chocolate Chip & Old Olive, Palette Noir Black
Accessories: Versamark pad & Marker, Prismacolor Markers, Stampin’ Up Close to Cocoa Marker, Clear embossing powder, heat gun, Photo corner Punch, Silver Brads, Sponges

Please don’t forget you can order your Stampin’ Up products from me 24-7 from this link:  http://michellezindorf.stampinup.net or e-mail me at mzindorf@aim.com if you are within the United States.  Also, please consider being part of my Stampin’ Up Team.  We have valuable monthly meetings in Miamisburg, Ohio.

  dsc08348.JPG

Stamped Rose on a 4″ square piece of Whisper White Card stock using Palette Noir Black ink.

dsc08321.JPG

Colored the flower in with a Deco Pink Prismacolor Marker.

dsc08322.JPG

Colored the shadow for each petal with a Clay Rose Prismacolor Marker.

dsc08323.JPG

Added just a fine line of Blush Pink Prismacolor marker to the shadow area to brighten it up a bit.

dsc08324.JPG

Colored over the entire image with a Versamark marker and heat embossed it using clear embossing powder and a heat gun.

dsc08325.JPG

dsc08326.JPG

Stamped the leaves by first loading the stamp with Versamark and then Old Olive ink before stamping.  Heat embossed the image using clear embossing powder and a heat gun.

You do not have to worry about the over stamped leaves on the flower.  When you heat the leaves the ink on the flower will melt away.  🙂

dsc08327.JPG

dsc08328.JPG

Colored the leaves with a Limepeel Prismacolor Marker.

dsc08329.JPG

Added Light Olive Green Prismacolor marker to one side of each of the leaves.

dsc08330.JPG

Colored over the leaves with Versamark marker and then heat embossed them with clear embossing powder and a heat gun.

dsc08331.JPG

dsc08332.JPG

Sponged Chocolate Chip ink all over the card stock.

dsc08333.JPG

Over stamp the flower and leaves with more leaves using Chocolate Chip ink only.

dsc08334.JPG

Used the sponge that I applied the Chocolate chip background with to go over the embossed images to wipe away the stamped ink off of them.

dsc08335.JPG

Colored in the Chocolate Chip leaves with a Close to Cocoa marker to make them look like shadows.

dsc08336.JPG

Stamped the Baroque Motifs Flourish on all four sides of a 5.25″ square piece of Whisper White card stock using Chocolate Chip ink.

dsc08337.JPG

Sponged Creamy Caramel ink on the card stock using a circular motion.

dsc08338.JPG

Sponged Tempting Turquoise ink on the left side of the card stock over the Creamy Caramel ink.

dsc08339.JPG

Sponged Basic Black ink on the edges of both the background panel and the main image panel.

dsc08340.JPG

Punched four small photo corners out.

dsc08341.JPG

Assembled the card front and added the photo corners and a silver brad to each photo corner.  I use my piecing tool to start the brads.

dsc08342.JPG

Here is the finished card measuring 5.5″ square.

dsc08346.JPG

May your day be filled with people you love!

Until my next post. . . . . . . . . . . . .

Hugs,

Michelle

Get ready for Brayer Workshops!  I am coming to:

3-small.jpg

Fort Smith, Arkansas

Dayton, Ohio

Savannah, Georgia

Covington, Indiana

Buffalo, Minnesota

Webster, New York

New Johnsonville, Tennessee

Stoughton, Wisconsin

Castro Valley, California

Yardley, Pennsylvania (near Philadelphia)

Knox, Maine

Broomfield, Colorado

Lynchburg, Virginia

Columbia, Missouri

Here is a link to my workshop calendar where you can see all of my travel schedule and to get info on beginner and advanced Brayer workshops:  http://zindorf.blogs.splitcoaststampers.com/workshop-calendar

Link to my Stampin’ Up website were you can order all of your must have Stampin’ Up products from me 24-7:  http://michellezindorf.stampinup.net

Here is a link to all of my tutorials:  http://zindorf.blogs.splitcoaststampers.com/tutorials-ive-written/

Frequently asked questions answers:  http://zindorf.blogs.splitcoaststampers.com/frequently-asked-questions/


Birds in Landing – Tutorial #192

dsc08318.JPG

I would be so happy to have a stamp collection full of Trees, foliage and birds.  If you follow my blog, you know that already, lol.

I used two neglected shades of gray in today’s tutorial.  I tend to forget how dramatic a dark sky can look when you put white birds in it.

Let’s get started.  🙂

Supplies:

Stamps: Stampin’ Up Ever After, Cape Arago Birds
Paper: Stampin’ Up Whisper White, Taken With Teal and Basic Black
Ink: Stampin’ Up Basic Black, Taken with Teal, Basic Gray, Going Gray & Baja Breeze
Accessories: White Gel Pen, Brayer, Brads, Ribbon, Sponge

Please don’t forget you can order your Stampin’ Up products from me 24-7 from this link:  http://michellezindorf.stampinup.net or e-mail me at mzindorf@aim.com if you are within the United States.  Also, please consider being part of my Stampin’ Up Team.  We have valuable monthly meetings in Miamisburg, Ohio.

dsc08320.JPG

Started this project with a 3.5″ x 8.5″ piece of Whisper White card stock.  Brayered Baja Breeze ink on the bottom of the card stock.

dsc08304.JPG

Brayered Taken with Teal ink at the bottom of the card stock, not covering the Baja Breeze ink entirely.

dsc08305.JPG

Flipped the card stock around and brayered Going Gray ink at the top of the card stock.

dsc08306.JPG

Brayered Basic Gray ink at the top of the card stock, not covering the Going Gray ink entirely.

dsc08307.JPG

Stamped the Stampin’ Up Ever After plant stamp with Basic Black ink at the bottom of the card stock a few times.

dsc08308.JPG

Stamped three different Cape Arago birds that very in size with Basic Black ink.

dsc08310.JPG

dsc08311.JPG

dsc08312.JPG

Colored in the flowers and Birds with a White Gel pen.

dsc08313.JPG

dsc08314.JPG

Sponge Basic Black ink around the edge of the card stock by scrapping the sponge on the edge of the card stock.

dsc08315.JPG

Added Brads, ribbon and a few basic panels and here is my finished card measuring 4″ x 9″.

dsc08318.JPG

I hope this tutorial has inspired you to try putting white objects on dark backgrounds to make them pop!

Have a super great weekend.

Until my next post. . . . . . . . . . . . .

Hugs,

Michelle

Get ready for Brayer Workshops!  I am coming to:

3-small.jpg

Fort Smith, Arkansas

Dayton, Ohio

Savannah, Georgia

Covington, Indiana

Buffalo, Minnesota

Webster, New York

New Johnsonville, Tennessee

Stoughton, Wisconsin

Castro Valley, California

Yardley, Pennsylvania (near Philadelphia)

Knox, Maine

Broomfield, Colorado

Lynchburg, Virginia

Columbia, Missouri

Here is a link to my workshop calendar where you can see all of my travel schedule and to get info on beginner and advanced Brayer workshops:  http://zindorf.blogs.splitcoaststampers.com/workshop-calendar

Link to my Stampin’ Up website were you can order all of your must have Stampin’ Up products from me 24-7:  http://michellezindorf.stampinup.net

Here is a link to all of my tutorials:  http://zindorf.blogs.splitcoaststampers.com/tutorials-ive-written/

Frequently asked questions answers:  http://zindorf.blogs.splitcoaststampers.com/frequently-asked-questions/


Wild Direct to Paper Sky – Tutorial #191

dsc08302.JPG

Okay, I know this is my second tutorial today, but it has been raining all day and I am procrastinating.  I should be out doing my grocery shopping.  Instead I am hanging out in my PJ’s stamping away. 

This is a very easy sky to create with Tim Holtz Distress ink pads.  I used just the corner edge of the pad and smeared in different colors.  I think I like the effect of this.  I bet it would look great with pastels too.

Let’s get started.  🙂

Supplies:

Stamps: Stampin’ Up Branch Out
Paper: Stampin’ Up Whisper White & Basic Black
Ink: Tim Holtz Distress inks Aged Mahogany, Faded Jeans, Dried Marigold, Dusty Concord, Black Soot & Scattered Straw
Accessories: Gray marker, White Gel Pen, Post it Note

Please don’t forget you can order your Stampin’ Up products from me 24-7 from this link:  http://michellezindorf.stampinup.net or e-mail me at mzindorf@aim.com if you are within the United States.  Also, please consider being part of my Stampin’ Up Team.  We have valuable monthly meetings in Miamisburg, Ohio.dsc08303.JPGI started out with a 4.5″ Square piece of Whisper White card stock and smeared the Scatter Straw distress ink directly on the card stock using the raised edge of the ink pad.

dsc08289.JPG

Smeared on a little Dusty Concord distress ink using only the corner of the raised pad.

dsc08290.JPG

Smeared on Aged Mahogany Distress ink using only the corner of the raised pad.

dsc08291.JPG

Smeared on a bit of Faded Jeans Distress ink only using the corner of the raised pad.

dsc08292.JPG

Add a touch of Dried Marigold Distress ink using the only the corner of the raised pad.

dsc08293.JPG

Smeared on more of the Dusty Concord Distress ink at the bottom of the card stock.

dsc08294.JPG

Tore through the stick part of a post it note and used it as a mask at an angle to create my ground area.

dsc08295.JPG

Using the edge of a Black Soot Distress ink pad I smeared the ink on the bottom of the card stock, pulling the pad straight down.  This created those streaky lines.

dsc08296.JPG

Removed the post it note and added some more Black Soot ink at the bottom of the card stock.  I liked the streaky look of the the black ink so I did not cover it all up.  I think it adds some interest to the piece.

dsc08297.JPG

Stamped the tree using Black Soot Distress ink.

dsc08298.JPG

Added White Gel pen highlights to the right side of the tree.

dsc08299.JPG

Assembled card and added a Gray marker outline to the left and bottom sides of the small black card stock panel to add a casted shadow.  I also added a few white gel pen dots to the ground area.

dsc08300.JPG

Here is the finished card measuring 5.5″ square.

dsc08302.JPG

I hope this has inspired you to smear some ink around today.

Until my next post. . . . . . . . . . . . .

Hugs,

Michelle

Get ready for Brayer Workshops!  I am coming to:

3-small.jpg

Fort Smith, Arkansas

Dayton, Ohio

Savannah, Georgia

Covington, Indiana

Buffalo, Minnesota

Webster, New York

New Johnsonville, Tennessee

Stoughton, Wisconsin

Castro Valley, California

Yardley, Pennsylvania (near Philadelphia)

Knox, Maine

Broomfield, Colorado

Lynchburg, Virginia

Columbia, Missouri

Here is a link to my workshop calendar where you can see all of my travel schedule and to get info on beginner and advanced Brayer workshops:  http://zindorf.blogs.splitcoaststampers.com/workshop-calendar

Link to my Stampin’ Up website were you can order all of your must have Stampin’ Up products from me 24-7:  http://michellezindorf.stampinup.net

Here is a link to all of my tutorials:  http://zindorf.blogs.splitcoaststampers.com/tutorials-ive-written/

Frequently asked questions answers:  http://zindorf.blogs.splitcoaststampers.com/frequently-asked-questions/


A Deer For My Youngest Son – Tutorial #190

dsc08284.JPG

This is a no frills card for my Youngest Son, Mitchell’s birthday.  For Masculine cards I try to stay away from ribbon, at least for the men in my life.  Punches come in handy for masculine cards.  They add something to the design without going over the top and they don’t look frilly.  I made use of the Stampin’ Up ticket corner punch and the tab punch today.

Let’s get started.  🙂

Supplies:

Stamps: Stampin’ Up Nature Silhouettes and Totally Tabs
Paper: Stampin’ Up Whisper White, Basic Black, Baja Breeze & Kiwi Kiss
Ink: Stampin Up Kiwi Kiss, Old Olive, Basic Black, Basic Gray, Not Quite Navy, Baja Breeze & Pink Pirquette
Accessories: Sponges, Brayer, Tab Punch, Ticket Corner punch, Silver Brads, Post it notes

Please don’t forget you can order your Stampin’ Up products from me 24-7 from this link:  http://michellezindorf.stampinup.net or e-mail me at mzindorf@aim.com if you are within the United States.  Also, please consider being part of my Stampin’ Up Team.  We have valuable monthly meetings in Miamisburg, Ohio.

dsc08288.JPG

Started with a 4″ x 6″ piece of Whisper White and masked the sky area of the card stock with a post it note.

dsc08263.JPG

dsc08265.JPG

Brayered Pink Pirquette ink at the bottom of the card stock.

dsc08266.JPG

Flipped the card stock around and brayered on Baja Breeze ink at the top of the water area.

dsc08267.JPG

Added another post it note mask, only this time put it on at an angle to create my hill.

dsc08268.JPG

Sponged on Kiwi Kiss ink.

dsc08269.JPG

Flipped the card stock around and sponged Old Olive ink at the top of the hill area.

dsc08270.JPG

Added a touch of Black ink at the top of the hill with a sponge.

dsc08271.JPG

Removed the bottom mask and stamped the deer with Basic Black ink.

dsc08272.JPG

Took the mask off of the sky area and put a Post it Note mask over the water area.  Brayered Pink Pirquette ink at the top of the card stock.

dsc08273.JPG

Brayered Baja Breeze ink at the top of the card stock not covering the Pink Pirquette ink entirely.

dsc08274.JPG

Sponged some simple mountain shapes in at the post it note edge with Basic Gray ink.

dsc08275.JPG

Added Basic Black ink with a sponge at the Post it note edge, not covering the Basic Gray ink entirely.

dsc08276.JPG

Removed the mask and sponged in the reflection mountains with Not Quite Navy ink.

dsc08277.JPG

Sponge Basic Black ink around the edge of the card stock.

dsc08278.JPG

My original mountains were a bit small so I made them a little larger by sponging more Basic Gray ink on.

dsc08279.JPG

Stamped the Totally Tab Stamp on Baja Breeze card stock and punched it out with the tab punch.

dsc08280.JPG

Dragged the bottom of the punched tab over the Kiwi Kiss ink pad to give it a bit of color.

dsc08281.JPG

Used the ticket corner punch on my main image panel and the two panels underneath it.

dsc08282.JPG

Assembled card front and added tab.

dsc08283.JPG

Added brads to the punched tab and finished assembling the card.  Here it is finished measuring 5″ x 6.5″.

dsc08284.JPG

I hope this tutorial has inspired you to get out your punches when making your masculine cards. 

May your day be as calm and peaceful as this scene.

Until my next post. . . . . . . . . . . . .

Hugs,

Michelle  

Get ready for Brayer Workshops!  I am coming to:

3-small.jpg

Fort Smith, Arkansas

Dayton, Ohio

Savannah, Georgia

Covington, Indiana

Buffalo, Minnesota

Webster, New York

New Johnsonville, Tennessee

Stoughton, Wisconsin

Castro Valley, California

Yardley, Pennsylvania (near Philadelphia)

Knox, Maine

Broomfield, Colorado

Lynchburg, Virginia

Columbia, Missouri

Here is a link to my workshop calendar where you can see all of my travel schedule and to get info on beginner and advanced Brayer workshops:  http://zindorf.blogs.splitcoaststampers.com/workshop-calendar

Link to my Stampin’ Up website were you can order all of your must have Stampin’ Up products from me 24-7:  http://michellezindorf.stampinup.net

Here is a link to all of my tutorials:  http://zindorf.blogs.splitcoaststampers.com/tutorials-ive-written/

Frequently asked questions answers:  http://zindorf.blogs.splitcoaststampers.com/frequently-asked-questions/


ISC Goldfish – Tutorial #189

dsc08259.jpg

Ahhhh, Spring is in the air today here in Ohio.  Our temperature is going to get up to 70 degrees and partly sunny.  I would like full sun, but I will settle for partly sunny, lol.  I am one of those people that suffer from Sun Deprivation in the winter.  If you are not familiar with Ohio in the winter, the sky stays pretty much grey and kind of cloudy.   So bring on the Sun and blue skies Baby!

On that note, my tutorial today uses a lot of blue.  It also shows how to color the stamp with markers before stamping and omitting part of the stamp image.

Let’s get started.  🙂

Supplies:

Stamps: Innovative Stamp Creations “Artsy” www.innovativestampcreations.com

Paper: Stampin’ Up Whisper White, Positively Pink, Brilliant Blue, Bashful Blue
Ink: Stampin Up Brilliant Blue and Bashful Blue
Accessories: Brayer, clear embossing powder, heat gun, Versamark marker, Stampin’ Up markers, black fine tip marker, white gel pen, post it note, sponge, brads, white ribbon, silver brads, photo corner punch

Please don’t forget you can order your Stampin’ Up products from me 24-7 from this link:  http://michellezindorf.stampinup.net or e-mail me at mzindorf@aim.com if you are within the United States.  Also, please consider being part of my Stampin’ Up Team.  We have valuable monthly meetings in Miamisburg, Ohio.

dsc08255.JPG

Using Stampin’ Up Water-based markers I colored the parts of the stamp I wanted to use.  This way I could omit the frame and the sentiment that this stamp has to give it little different look.

dsc08228.JPG

I colored the fish with Pumpkin Pie, the flower with Bravo Burgundy and the Waterlines with Bashful Blue.

dsc08229.JPG

Huffed my breath on the stamp to moisten it and then stamped it on a 3″ x 5″ piece of Whisper White Card stock.

dsc08230.JPG

Put dots of color throughout the fish with a More Mustard marker.

dsc08231.JPG

Added Spots of Pumpkin Pie marker to the fish.

dsc08232.JPG

Went over the waterlines that are crossing the fish with the Bashful Blue marker to make them more noticeable.

dsc08233.JPG

Colored the Leaves of the flower with an Artichoke marker and the Flower with a Pretty in Pink marker.

dsc08234.JPG

Outlined the leaves with a black marker.

dsc08235.JPG

Added Pixie Pink to the darker sections of the flower.

dsc08236.JPG

Outlined the fish with a Really Rust Marker.

dsc08237.JPG

Colored over the entire flower with the Pretty in Pink marker to blend the colors.

dsc08238.JPG

Colored over the entire flower, leaves and fish with a Versamark marker and heat embossed them using clear embossing powder and a heat gun.

dsc08239.JPG

dsc08240.JPG

Now that my images are protected with embossing powder I can put ink over them for my background and it will not stick to the embossed images.  This is called emboss resist.

I put a post it note over the 1/4 of the card stock.

dsc08241.JPG

Sponged Bashful blue ink at the post it note edge to create the water line.

dsc08242.JPG

Removed post it note.

Brayered Bashful Blue ink at the bottom and just a touch at the top of the card stock.

dsc08243.JPG

Added Grey marker under the flower and the fish to create a shadow effect.

dsc08244.JPG

Outlined the bottom of the flower and the fish with a fine point black marker.

dsc08245.JPG

Decided I wanted a bit more color in the water so I brayered on Brilliant Blue ink at the bottom of the card stock.

dsc08246.JPG

Sponged Brilliant Blue ink on the card stock edges on loading my sponge with ink and then scrapping it on the edge of the card stock using a downward motion.

dsc08247.JPG

Cut a 4 7/8″ x 6 3/8″ Bashful Blue panel and brayered Brilliant Blue ink at the bottom and top of it.

dsc08248.JPG

Added White Gel pen highlights to the flower tips and the light areas of the fish.

dsc08249.JPG

Assembled the card and added Bashful Blue Punched Photo corners, brads and white ribbon.

dsc08250.JPG

Here is the finished card measuring 5″ x 6.5″.

dsc08259.jpg

I hope this tutorial has inspired you to try coloring a stamp and possibly omitting part of the image to get a different perspective on it.

May you have a very special day!

Until my next post. . . . . . . . . . . . .

Hugs,

Michelle  

Get ready for Brayer Workshops!  I am coming to:

3-small.jpg

Fort Smith, Arkansas

Dayton, Ohio

Savannah, Georgia

Covington, Indiana

Buffalo, Minnesota

Webster, New York

New Johnsonville, Tennessee

Stoughton, Wisconsin

Castro Valley, California

Yardley, Pennsylvania (near Philadelphia)

Knox, Maine

Broomfield, Colorado

Lynchburg, Virginia

Columbia, Missouri

Here is a link to my workshop calendar where you can see all of my travel schedule and to get info on beginner and advanced Brayer workshops:  http://zindorf.blogs.splitcoaststampers.com/workshop-calendar

Link to my Stampin’ Up website were you can order all of your must have Stampin’ Up products from me 24-7:  http://michellezindorf.stampinup.net

Here is a link to all of my tutorials:  http://zindorf.blogs.splitcoaststampers.com/tutorials-ive-written/

Frequently asked questions answers:  http://zindorf.blogs.splitcoaststampers.com/frequently-asked-questions/


Swirly Butterfly – Tutorial #188

dsc08216.JPG 

Spring is in the air and I cannot wait for the return of the butterflies to my garden.  I made use of my Big Shot Die Cut system and the swirly die.  This die would be great for scrap-bookers due to it’s length.  This card finished measures 9″ x 4″ and fits well in a #10 business size envelope.

Let’s get started so I can get out in my garden and start clearing away the dead stuff from last fall, lol.

Supplies:

Stamps: Stampin’ Up Wonderful Wings (retired) and Embrace Life
Paper: Stampin’ Up Whisper White, Lovely Lilac & Basic Black
Ink: Stampin’ Up Night of Navy, Basic Black, Brocade Blue, Bashful Blue
Accessories: Prismacolor Markers, Versamark pad and marker, sponge, white gel pen, clear embossing powder, heat gun, Big Shot Die Cut Machine, Swirly Die

Please don’t forget you can order your Stampin’ Up products from me 24-7 from this link:  http://michellezindorf.stampinup.net or e-mail me at mzindorf@aim.com if you are within the United States.  Also, please consider being part of my Stampin’ Up Team.  We have valuable monthly meetings in Miamisburg, Ohio.

dsc08207.JPG

Stamp the butterfly by first loading my stamp with Versamark and then Basic Black dye based ink before stamping it on a 2 1/4″ x 3 1/4″ piece of Whisper White Card stock.

dsc08180.JPG

Heat embossed the image using clear embossing powder and a heat gun.

dsc08181.JPG

Colored in the Butterfly with Deco Yellow Prismacolor Marker.

dsc08182.JPG

Added Deco Orange marker.

dsc08183.JPG

Added Parma Violet marker.

dsc08184.JPG

Went over the entire butterfly again with Deco Yellow to blend the color together.

dsc08185.JPG

Added Light Olive Green to the body of the butterfly.

dsc08186.JPG

Colored over the entire butterfly with Versamark marker and heat embossed it with clear embossing powder and a heat gun.

dsc08187.JPG

dsc08188.JPG

Sponged Bashful Blue ink over the card stock.

dsc08189.JPG

Sponged on some Brocade Blue ink.

dsc08190.JPG

Got darker yet by sponging on Night of Navy ink around the outside edge of the card stock.

dsc08191.JPG

Used my Big Shot Die Cut machine and the Swirly die with Basic Black Card stock.

dsc08192.JPG

dsc08193.JPG

Stamped The Embrace Life stamp a few times at the bottom of a Lovely Lilac card stock panel.

dsc08194.JPG

Sponged Night of Navy at the left side of the panel.

dsc08195.JPG

Sponged Black at the right bottom corner of the panel.

dsc08196.JPG

Colored the leaves in with Parma Violet marker.

dsc08197.JPG

Highlighted a few of the leaves with a white gel pen.

dsc08198.JPG

Assembled card and here it is finished measuring 4″ x 9″.

dsc08216.JPG

I hope Spring weather has reach you where ever you are.

Until my next post. . . . . . . . . . . .

Hugs,

Michelle

Get ready for Brayer Workshops!  I am coming to:

3-small.jpg

Fort Smith, Arkansas

Dayton, Ohio

Savannah, Georgia

Covington, Indiana

Buffalo, Minnesota

Webster, New York

New Johnsonville, Tennessee

Stoughton, Wisconsin

Castro Valley, California

Yardley, Pennsylvania (near Philadelphia)

Knox, Maine

Broomfield, Colorado

Lynchburg, Virginia

Columbia, Missouri

Here is a link to my workshop calendar where you can see all of my travel schedule and to get info on beginner and advanced Brayer workshops:  http://zindorf.blogs.splitcoaststampers.com/workshop-calendar

Link to my Stampin’ Up website were you can order all of your must have Stampin’ Up products from me 24-7:  http://michellezindorf.stampinup.net

Here is a link to all of my tutorials:  http://zindorf.blogs.splitcoaststampers.com/tutorials-ive-written/

Frequently asked questions answers:  http://zindorf.blogs.splitcoaststampers.com/frequently-asked-questions/