Swap Card – Tutorial #177

dsc07729.JPG

I found out it is OK to show a tutorial on my swap card so here it is for you.

Supplies:

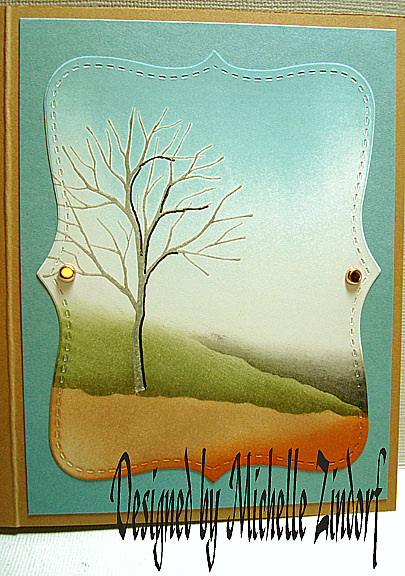
Stamps: Stampin’ Up “Branch Out”
Paper: Stampin’ Up Whisper White, Baja Breeze & Creamy Caramel
Ink: Stampin’ Up Baja Breeze, Creamy Caramel, Really Rust, Always Artichoke, Mellow Moss, Going Gray
Accessories: Big Shot, Top Note Die, Brayer, Clear embossing powder and a heat gun, Copper Brads

Please don’t forget you can order your Stampin’ Up products from me 24-7 from this link:  http://michellezindorf.stampinup.net or e-mail me at mzindorf@aim.com if you are within the United States.

dsc07728.JPG

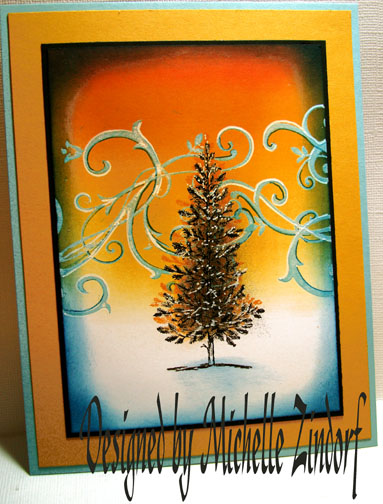
Cut my Whisper White Card stock using the Big Shot Die Cut Machine and the Top Note Die.

Stamped the tree with a Going Grey Craft ink and heat embossed it using clear embossing powder and a heat gun.

dsc07719.JPG

dsc07720.JPG

Brayered Baja Breeze ink at the top of the card stock.

dsc07721.JPG

Tore the very edge of  the sticky part of a post it note and used it as a mask to create my hills.

dsc07722.JPG

Sponged on Going Grey ink.

dsc07723.JPG

Moved the post it note and sponged on Mellow Moss ink.

dsc07724.JPG

Sponged Always Artichoke ink right at the post it note edge.

dsc07725.JPG

Removed the post it note mask and sponged Creamy Caramel ink at the bottom of the card stock.

dsc07726.JPG

Sponged Really Rust ink on the right bottom corner of the card stock.

dsc07727.JPG

Adhered it to a couple of simple panels of card stock and added two copper brads.

Here is the finished card measuring 5.5″ x 4.25.  

dsc07729.JPG

May your day be filled with peaceful scenes and sounds.

Until my next post. . . . . . . . .

Hugs,

Michelle

Link to my Stampin’ Up website were you can order all of your must have Stampin’ Up products from me 24-7:  http://michellezindorf.stampinup.net

Here is a link to all of my tutorials:  http://zindorf.blogs.splitcoaststampers.com/tutorials-ive-written/

Here is a link to my workshop calendar if you want to get info on beginner and advanced Brayer workshops:  http://zindorf.blogs.splitcoaststampers.com/workshop-calendar

Frequently asked questions answers:  http://zindorf.blogs.splitcoaststampers.com/frequently-asked-questions/


Lone Bird – Tutorial #176

dsc07706.JPG

I have fell in love with this Innovative Stamp Creations Stamp Sheet “Tranquil”.  It has these great flower stamps that come with it too, but I chose to make my scene today a winter one.  If you want to check out Innovative Stamp Creations’ site here is the link:  http://www.innovativestampcreations.com/ischomepage.html

Also, I haven’t posted it to my calendar yet, but guess who is going to be holding workshops in Buffalo, MN in June?  I cannot wait!  If you are interested send me an e-mail at mzindorf@aim.com and I will give you all of the details.

By the way, I updated my sales page and added ten more Stampin’ Up retired stamp sets. Here is the link for that:  http://zindorf.blogs.splitcoaststampers.com/things-for-sale/

Ready for this quick tutorial?  Let’s get started.

Supplies:

Stamps: Innovative Stamp Creations “Tranquil”
Paper: Stampin’ Up Whisper White, Basic Black and River Rock
Ink: Adirondack ink, Pitch Black, Pebble & Lake Mist
Accessories: Stampin’ Up Word Window Punch, Sponge, Brads, Brayer

dsc07707.JPG

Brayered Lake Mist ink on the top 2/3rds of a piece of 3″ x 6″ Whisper White card stock.

dsc07694.JPG

Stamped the twig stamp a few times in Pebble ink.  Remember with unmounted stamps you can bend them to make them different in shape when sticking them on your acrylic block.

dsc07695.JPG

Covered the bottom 1″ of the card stock with a scrap piece of paper and stamped the twig much lower on the card stock.   Sorry I missed taking the picture of the actual stamping.

dsc07696.JPG

Turned the scrap piece of paper around so it is masking the top of the card stock and sponged Pebble ink at the edge of the mask.

dsc07697.JPG

Un-masked the card stock and stamped the twig again.  This time bending the stamp quite a bit and stamped in with Black ink.

dsc07698.JPG

Stamped the little twig so it connected to the larger one with black ink.

dsc07699.JPG

Stamped the bird with black ink so it is sitting on the tree.

dsc07700.JPG

Sponged Pebble ink around the outside edge of the card stock.

dsc07701.JPG

Punched two Window punches out of black card stock.  I held them together and cut the curved end off of one side of both at the same time so they would be the same size.

dsc07702.JPG

dsc07703.JPG

Added simple panels of card stock and added the punches and a couple of brads and here you have the finished card measuring 5″ x 6.5″.

dsc07706.JPG

May your weekend be pure delight!

Until my next post. . . . . . . . . . . .

Hugs,

Michelle

to all my tutorials can be found here:  http://zindorf.blogs.splitcoaststampers.com/tutorials-ive-written/

Here is a link to my workshop calendar if you want to get info on beginner and advanced Brayer workshops:  http://zindorf.blogs.splitcoaststampers.com/workshop-calendar

Frequently asked questions answers:  http://zindorf.blogs.splitcoaststampers.com/frequently-asked-questions/


By the Golden Pond – Tutorial #175

dsc07691.JPG


Supplies:

Stamps: Stampin’ Up Lovely as a Tree
Paper: Stampin’ Up Whisper White, Basic Black & More Mustard
Ink: Stampin’ Up So Saffron, Always Artichoke, Real Red, Basic Black, Really Rust & More Mustard
Accessories: Post it notes, Black marker, Brayer & Sponges

dsc07693.JPG

Brayered So Saffron Ink all over a 4″ x 5.5″ piece of Whisper White card stock.

dsc07672.JPG

Brayered More Mustard ink at the top of the card stock.

dsc07673.JPG

Tore some post it notes to mask the sky area, the road and the pond.  Leave the sticky part of the post it note on your mask.

dsc07674.JPG

Brayered Really Rust over the unmask portion of the card stock.

dsc07675.JPG

Sponged dots of Real Red ink around the ground area.

dsc07676.JPG

Sponged some dots of Always Artichoke ink around the ground area and edges of the post it note masks.

dsc07677.JPG

Heavily sponged Basic Black ink at the horizon line edge of the post it note and a bit around the road mask.

dsc07678.JPG

Removed masks.

dsc07679.JPG

Inked my tree stamp up, but only put ink on the trees, not the ground portion of the stamp.

dsc07680.JPG

Stamped the trees.  See how they do not have trunks.

dsc07681.JPG

Put the trunks of the trees in with a black marker.

dsc07682.JPG

Sponged some really rust ink around the road and the pond to soften the hard lines.

dsc07683.JPG

Sponged More Mustard ink heavily at the top of the sky and sponged some More Mustard ink on the road and the pond.


dsc07685.JPG

Held a piece of card stock on for a mask and stamped the very tips of the tree stamp at the bottom of the pond to look like brush.

dsc07686.JPG

dsc07687.JPG

dsc07688.JPG

Assembled the main image panel with some simple black and More Mustard panels and here you have the finished card measuring 5″ x 6.5″.

dsc07691.JPG

I hope the tutorial has inspired you to see what objects you can put in your scenes using torn post it notes.

May your day be golden!

Until my next post. . . . . . . . . . .

Hugs,

Michelle

Links to all my tutorials can be found here:  http://zindorf.blogs.splitcoaststampers.com/tutorials-ive-written/

Here is a link to my workshop calendar if you want to get info on beginner and advanced Brayer workshops:  http://zindorf.blogs.splitcoaststampers.com/workshop-calendar

Frequently asked questions answers:  http://zindorf.blogs.splitcoaststampers.com/frequently-asked-questions/


To a Warmer Place – Tutorial #174

dsc07640.JPG

Here in Ohio we have had a bit of snow of late.  I am ready for some much warmer weather so I created it with this card.  Don’t you wish you were there sitting under an umbrella, drinking your favorite drink and listening to the Ocean?  Ahhh, I think I need a vacation in a much warmer place, lol.   A girl can dream, right?

The stamp set I used today is another I am saying farewell to.  It is Stampin’ Up 2005 Do the Hula.    If you are interested in any of the retired sets I have for sale, please check out my sales page at this link:  http://zindorf.blogs.splitcoaststampers.com/things-for-sale/

3-small.jpgOne more thing before we get started on the tutorial.  The Saturday morning Beginner Brayer Workshop in Wheaton, IL on March 14th has only one more spot available.  There are still a few spots open for the morning and afternoon Beginner Brayer workshops in Wheaton, IL on March 13th.  You can check out all of the locations I will be at this link:  http://zindorf.blogs.splitcoaststampers.com/workshop-calendar/

Now on to warmer weather, lol.

Supplies:

Stamps: Stampin’ Up Do the Hula
Paper: Stampin’ Up Whisper White, So Saffron, Old Olive & Tempting Turquoise
Ink: Stampin’ Up Not Quite Navy, Creamy Caramel, So Saffron, Tempting Turquoise & Basic Black
Accessories: Stampin’ Up Markers, Sponge, Brayer, Versamark Pad and Marker, Clear embossing Powder and a heat gun, Ribbon, Gold Brads, Stampin’ Up Photo Corner Punch

dsc07641.JPG

Stamped the Hula Girl and the Tree by first loading the stamps with Versamark and then Basic Black Dye based ink before stamping them.  Heat embossed both images using clear embossing powder and a heat gun.

Note:  If you use black pigment ink you do not have to use the Versamark with it.  I only do this method because I use all Dye Based inks and embossing powder doesn’t stick well to it.

dsc07616.JPG

dsc07617.JPG

dsc07618.JPG

dsc07619.JPG

Colored the girls skin and the tree with Creamy Caramel marker.

dsc07620.JPG

Colored the leaves of the tree and her skirt with Certainly Celery marker.

dsc07621.JPG

Added some darker tones to the Leaves of the tree and her skirt with an Old Olive Marker.

dsc07622.JPG

Blended the greens together a bit by going over them with the Certainly Celery marker again.

dsc07623.JPG

Added Close to Cocoa marker to the left side of the tree and the shadows on her skin.

dsc07624.JPG

Blended her skin and the tree browns together by going over the hard lines between the two colors with the Creamy caramel marker.

dsc07625.JPG

Colored her top with a Real Red marker.

dsc07626.JPG

Colored her flowers with a Pretty in Pink Marker.

dsc07627.JPG

Added Rose Red marker to the center of the flowers.

dsc07628.JPG

Colored her instrument with a Close to Cocoa marker.

dsc07629.JPG

Added Chocolate Chip marker to the under side of the instrument.

dsc07630.JPG

Colored over both the tree and the Hula Girl with a Versamark Marker and heat embossed the images using clear embossing powder and a heat gun.

dsc07631.JPG

dsc07632.JPG

Now the fun begins, at least for me anyway.

Brayered So Saffron ink at the bottom of the card stock.

Oops!  Missed a shot. I flipped the card stock around and brayered Tempting Turquoise at the top 2/3rds of the card stock.

dsc07633.JPG

Masked the sky area of the card stock with a Post It Note.

dsc07634.JPG

Sponged Not Quite Navy in a circular motion at the edge of the mask, just going onto the card stock.

dsc07635.JPG

Removed the mask.

dsc07636.JPG

Brayered Creamy Caramel ink at the very bottom of the card stock to give the sand some shading.

dsc07637.JPG

Added a few layers of card stock, brads, ribbon and two corner punches and here you have the finished card measuring 6 5/8″ x 5 1/8″.

dsc07640.JPG

I hope this inspires you to warm up your summer stamps today.

May your day be filled with warm thoughts.

Until my next post. . . . . . . . . .

Hugs,

Michelle

Links to all my tutorials can be found here:  http://zindorf.blogs.splitcoaststampers.com/tutorials-ive-written/

Here is a link to my workshop calendar if you want to get info on beginner and advanced Brayer workshops:  http://zindorf.blogs.splitcoaststampers.com/workshop-calendar

Frequently asked questions answers:  http://zindorf.blogs.splitcoaststampers.com/frequently-asked-questions/


Spring Bouquet MZ – Tutorial #173

dsc07604.JPG

I am still saying good by to some very old stamp friends of mine.  For instance this one 😦 Stampin’ Up’s Spring Bouquet from 2000.  Check out my sales page I’ve been trying to put more Stampin’ Up retired sets on there daily.  Here is the link:  http://zindorf.blogs.splitcoaststampers.com/things-for-sale/

Oh yeah, do you believe it, I actually used some embellishments today!  If you follow this blog regularly you know that doesn’t happen often, lol.

Let’s get started.

Supplies:

Stamps: Stampin’ Up Spring Bouquet
Paper: Stampin’ Up Whisper White, Rose Red & Certainly Celery
Ink: Stampin’ Up Basic Black, Tempting Turquoise & Certainly Celery
Accessories: Versamark Pad and Marker, Stampin’ Up Markers, White Gel Pen, Ribbon, Silver Brads, Brayer, Clear embossing powder Heat gun, flower punchers

dsc07605.JPG

Stamped image by first loading the stamp with Versamark and then with Basic Black Dye ink and heat embossed the image using clear embossing powder and a heat gun.

dsc07587.JPG

dsc07588.JPG

Colored the stems and leaves with a Certainly Celery marker.

dsc07589.JPG

Colored the darker areas of the leaves with an Old Olive Marker.

dsc07590.JPG

Colored the bottoms of the flowers with a Pretty in Pink Marker.

dsc07591.JPG

Added a touch of Rose Red marker to the bottoms of the flowers.

dsc07592.JPG

Colored the watering can with a Baroque Burgundy Marker.

dsc07593.JPG

Colored the darker areas of the watering can with a Real Red marker.

dsc07594.JPG

Colored the butterfly with a Barely Banana marker.

dsc07595.JPG

Colored over the entire image with a Versamark marker. Be sure to color your lightest colors first and then middle colores and then dark colors.  They will smear onto one another.  I clean my Versamark marker constantly by coloring on a scrap piece of paper to try not to transfer color where I don’t want it.

dsc07596.JPG

Heat emboss the entire image.

dsc07597.JPG

Example of how much I clean my Versamark marker.

dsc07598.JPG

Brayered Certainly Celery ink at the bottom of the card stock.

dsc07599.JPG

Brayered Tempting Turquoise ink at the top of the card stock.

dsc07600.JPG

Assembled my layers and added ribbon, hmmmm this card needs more!

dsc07601.JPG

Punched some flowers and added them to the card front with Silver Brads as centers.  Now that’s better.

dsc07602.JPG

Added a bit of White Gel pen lines and dots and here it is finished measuring 5.25″ square.

dsc07604.JPG

I hope this brings a bit of Spring to you today!

Until my next post. . . . . . . .  .

Hugs,

Michelle

Links to all my tutorials can be found here:  http://zindorf.blogs.splitcoaststampers.com/tutorials-ive-written/

Here is a link to my workshop calendar if you want to get info on beginner and advanced Brayer workshops:  http://zindorf.blogs.splitcoaststampers.com/workshop-calendar

Frequently asked questions answers:  http://zindorf.blogs.splitcoaststampers.com/frequently-asked-questions/


Windy Sunset Pine – Tutorial #172

dsc07574.JPG

Hello Everyone!  I hope you have been having a very relaxing weekend.  My husband and I have been kicking back watching the mini series John Adams this weekend.  Great show and great United States history lesson at the same time.

I’ve also added a few more retired Stampin’ Up stamp sets to my sales page that can be found here:  http://zindorf.blogs.splitcoaststampers.com/things-for-sale/ 

I have a couple of hundred sets I will be putting on the sales page little by little.  So hard to part with them.  Check it out frequently if you are interested.

OK, a little about today’s tutorial.  I’ve done scenes like this before with this flourish, but not with this color combo.  I have been so inspired by our winter sunsets here in country and all of the snow.  This tree is over stamped with Pumpkin Pie ink to make it look back lite.  Follow along and you will see.

Let’s get started.  🙂

Supplies:

Stamps: Stampin’ Up Lovely As A Tree & Baroque Motifs
Paper: Stampin’ Up Whisper White, Basic Black, More Mustard & Baja Breeze
Ink: Stampin’ Up Not Quite Navy, Really Rust, More Mustard, Baja Breeze, Basic Black, Pumpkin Pie, Riding Hood Red
Accessories: Versamark Pad, Brayer, Fine Detail Clear Embossing Powder, Heat Gun, Not Quite Navy Marker, White Gel Pen, Sponges

dsc07575.JPG

Stamped the tree by first loading the stamp with Versamark and then Basic Black ink before stamping it on a 4″ x 5.5″ piece of Whisper White card-stock.  Heat embossed the image using clear embossing powder and a heat gun.

dsc07556.JPG

dsc07557.JPG

Stamped the flourish first by loading the stamp with Versamark and then with Baja Breeze ink before stamping it.  Heat embossed the image using clear embossing powder and a heat gun.

dsc07558.JPG

dsc07559.JPG

Brayered on More Mustard ink.

dsc07560.JPG

Brayered Pumpkin Pie ink not covering the More Mustard ink entirely.

dsc07561.JPG

Brayered Really Rust ink not covering the Pumpkin Pie ink entirely.

dsc07562.JPG

Brayered on Riding Hood Red at the very top of the card stock.

dsc07563.JPG

Filled in some gaps in my embossed flourish with a White Gel pen.

dsc07564.JPG

Sponged Not Quite Navy around the entire piece of card stock.   Also sponged very lightly a little Not Quite Navy ink under the tree for a shadow.

dsc07565.JPG

Over Stamped just the tree, not the truck by just putting ink on the tree part, omitting the truck of the tree.  I also stamped it a bit higher than the original tree image was stamped.

dsc07566.JPG

Closer look.

dsc07567.JPG

Sponged a bit of Pumpkin Pie ink in the middle of the tree.

dsc07568.JPG

Added White outline to some of the flourishes.

dsc07569.JPG

Decided to darken the middle of the tree a bit by sponging some black ink on it.

dsc07570.JPG

Added dots of White gel pen to the tree to create a snowy look.

dsc07571.JPG

Outlined a few of the flourishes on the opposite side of the White outline with a Not Quite Navy marker.

dsc07572.JPG

Added a few simple layers and here is the finished card measuring 5.25″ x 6.75″.

dsc07574.JPG

I hope this tutorial has inspired you to look at your surroundings and be greatly inspired by the beauty.

May all your skies be of a beautiful hue.

Until my next post.. . . . . . . . . .

Hugs,

Michelle

Links to all my tutorials can be found here:  http://zindorf.blogs.splitcoaststampers.com/tutorials-ive-written/

Here is a link to my workshop calendar if you want to get info on beginner and advanced Brayer workshops:  http://zindorf.blogs.splitcoaststampers.com/workshop-calendar

Frequently asked questions answers:  http://zindorf.blogs.splitcoaststampers.com/frequently-asked-questions/


Skating One Last Time – Tutorial #171

dsc07538.JPG

I’ve always loved this image.  Poor Boy is so out of control!  Just how I’m feeling these days, but that is another story altogether. 

Anyway, I decided to take my brayer approach to this creation.  He is also going on my sales page.  Once a set is gone it is taken off of the sales page.  So if you don’t see it on there it is sold.  Here is the link to the sales page if you want to take a peek at what is on there:  http://zindorf.blogs.splitcoaststampers.com/things-for-sale/

Also, here is a link to my Brayer workshop calendar, I’m going to be in Dayton, Ohio, Wheaton, Illinois and Covington, Indiana.  http://zindorf.blogs.splitcoaststampers.com/workshop-calendar/  I hope you are able to make it to one of them.  I love meeting my blog readers.

Now, on with the tutorial.  🙂

Supplies:

Stamps: Stampin’ Up Snowy Play & Lovely as A Tree, Rubber Stampede Mirror Image Stamp
Paper: Stampin’ Up Whisper White, Real Red and Not Quite Navy
Ink: Stampin’ Up Not Quite Navy, Baja Breeze, Basic Black
Accessories: Stampin’ Up Markers, Post it Notes, Brayer, clear embossing powder, heat gun, White Ribbon, White Gel Pen, Versamark Marker and Pad

dsc07539.JPG

Stamped the skater by first loading my stamp with Versamark and then with Black ink before stamping.  Heat embossed the image using clear embossing powder and a heat gun.

dsc07512.JPG

dsc07513.JPG

Colored his nose with a More Mustard Stampin’ Up marker.

dsc07514.JPG

Colored his skates with a Real Red marker.

dsc07515.JPG

Colored his scarf with a Certainly Celery marker.

dsc07516.JPG

Added a shadow to his scarf with an Old Olive Marker.

dsc07517.JPG

Added a shadow to his skates with a Bravo Burgundy marker.

dsc07518.JPG

Added a shadow on his body with a Bashful Blue marker.

dsc07519.JPG

Colored his arms with a Creamy Caramel marker.

dsc07521.JPG

Out lined the crack in the ice with a Versamark marker and heat embossed it using clear embossing powder and a heat gun.

dsc07522.JPG

dsc07523.JPG

Colored over his body with a Versamark Marker and heat embossed with clear embossing powder and a heat gun.

dsc07525.JPG

Masked the sky with a Post it note and ripped a post it note and masked the bottom right corner.

dsc07526.JPG

Brayered Baja Breeze ink all over the unmasked area.

dsc07527.JPG

Brayered Not Quite Navy at the right corner of the card stock.

dsc07528.JPG

Brayered Not Quite Navy ink at the top of the ice .

dsc07529.JPG

Wiped the ink off of my embossed image using a soft cotton rag.

dsc07530.JPG

Unmasked the card stock.

dsc07531.JPG

Stamped just the trees at the top of the card stock with Basic Black ink by only inking up the trees, not the ground area of the stamp.

dsc07532.JPG

Stamped a reverse image using a mirror image stamp.  To use this stamp you stamp your image on the mirror image stamp and then stamp the mirror image stamp on the card stock.

I only inked the trees and not the ground area before stamping it on the mirror image stamp using Not Quite navy Ink.

dsc07533.JPG

dsc07534.JPG

I wiped the ink from the embossed image again with a soft cotton rag.

I extended the tree trunks so the images looked more natural using a Not Quite Navy marker and a black marker.

Brayered Not Quite Navy Ink at the top of the card stock.

dsc07535.JPG

Assembled the card from and added some White Gel pen to the black trees and to the snowman to light him up a bit.

dsc07536.JPG

Here is my finished card measuring 5″ x 6.5″.

dsc07538.JPG

I hope this tutorial has inspired you to make some sort of snowy scene.

May you be safe and warm where ever you are.

Until my next post . . . . . . . . .

Hugs,

Michelle


Southwestern lizard – Tutorial #170

dsc07503.JPG

I’m feeling so sentimental this week as I start to sort out some of my old, but well loved stamps.  This set I used today is a retired set from Stampin’ Up titled Ancient Art.  Of course, I had to go Southwestern with this creation today!   I hope you enjoy this tutorial.

One more thing, I’ve updated my items for sales page again.  Check it out:  http://zindorf.blogs.splitcoaststampers.com/things-for-sale/

Let’s get started.  🙂

Supplies:

Stamps: Stampin’ Up Retired Set Ancient Art
Paper: Stampin’ Up Whisper White, Chocolate Chip, Really Rust, Brilliant Blue
Ink: Stampin’ Up Really Rust, Basic Black, Brilliant Blue, River Rock, Always Artichoke, More Mustard, Chocolate Chip
Accessories: Brayer, Black marker, Clear embossing powder and a heat gun, Versamark pad and marker, post it notes, Sponges

dsc07506.JPG

Stamped Lizard by first loading the stamp with Versamark and then loading it with Always Artichoke before stamping it on a 4″ x 4.5″ piece of Whisper White card stock.

dsc07483.JPG

Heat embossed the image using clear embossing powder and a heat gun.

dsc07484.JPG

Colored over the white areas of the lizard with a Versamark marker and then heat embossed the image again with clear embossing powder and a heat gun.

dsc07485.JPG

dsc07486.JPG

Brayered Brilliant Blue ink at the top of the card stock.

dsc07487.JPG

Brayered River Rock ink at the bottom 2/3rds of the card stock.

dsc07488.JPG

Brayered More Mustard on the bottom half of the card stock.

dsc07489.JPG

Ripped a couple of post it notes and used them as masks to create an opening that is shaped like a rock.

dsc07490.JPG

Sponged More Mustard heavily around the edge of the post it note masks (top and right side of rock).

dsc07491.JPG

Sponged Really Rust heavily over the rest of the un masked area of the rock, not covering the More Mustard ink entirely.

dsc07492.JPG

Sponged Chocolate Chip at the bottom of the unmasked area and added just a tiny bit around the torn edge area of the masks.

dsc07493.JPG

Took the masks off.

dsc07494.JPG

Put a large post it note on the card stock to mask the bottom 2/3rds of the card stock.

dsc07495.JPG

Sponged a bit of Chocolate Chip ink above the mask to make it look like a mountain range.

Note:  do not put two mountains the same size in your mountain range or it will look like it needs a bra, if you know what I mean, lol.

dsc07496.JPG

Added a bit of black ink to the bottom of my mountain and along the mask edge.

dsc07497.JPG

Took off the mask.

dsc07498.JPG

Sponged heavily some More Mustard ink at the bottom right side of the card stock.

dsc07499.JPG

Sponged Chocolate Chip ink around the edge of the entire card stock to dirty it up a bit.

dsc07500.JPG

Traced the right side of the lizard with a fine tip black marker to create a fine shadow.

dsc07501.JPG

Assembled my panels and here is the finished card measuring 5.25″ Square.

dsc07503.JPG

I hope this tutorial has inspired you to go a little Southwestern in your projects today.

May the sun shine upon you and keep you warm.

Until my next post. . . . . . . . . . . . .

Hugs,

Michelle

Links to all my tutorials can be found here:  http://zindorf.blogs.splitcoaststampers.com/tutorials-ive-written/

Here is a link to my workshop calendar if you want to get info on beginner and advanced Brayer workshops:  http://zindorf.blogs.splitcoaststampers.com/workshop-calendar

Frequently asked questions answers:  http://zindorf.blogs.splitcoaststampers.com/frequently-asked-questions/


Bee My Honey – Tutorial #169

dsc07476.JPG

Farewell to Bees N’ Blossoms. . . . . . . .

This set I am using today is a retired Stampin’ Up set from 1997 titled “Bees N’ Blossoms.  This is my farewell to the set because it is going on my sale page today along with a few others.  Here is a link to the sales page if you are interested in this set or others I will be putting on it http://zindorf.blogs.splitcoaststampers.com/things-for-sale/

I will take the sets off of the sale page as they sale, so please, if you don’t see it, it has sold.

Also, if you haven’t visited my Brayer Workshop calendar page I have added a one day trip to Covington, Indiana for May, 2009.  Check it out here http://zindorf.blogs.splitcoaststampers.com/workshop-calendar/

Let’s get started on the tutorial.  🙂

Supplies:

Stamps: Stampin’ Up Bees N’ Blossoms
Paper: Stampin’ Up Rose Red, Basic Black, Pretty In Pink and Whisper White
Ink: Stampin’ Up Basic Black, Certainly Celery, Always Artichoke, Old Olive, Tempting Turquoise, Bashful Blue
Accessories: Stampin’ Up Markers Old Olive, Always Artichoke, So Saffron, More Mustard, Rose Red, Pretty in Pink, Brayer, Clear embossing Powder and a Heat gun, Versmark Pad & Marker, Brads, White Ribbon, Sponge

dsc07477.JPG

Stamped Flowers by first loading the stamp with Versamark and then loading the stamp with Dye based Black ink before stamping them on  a 3.5″ square piece of Whisper White Card stock.

dsc07457.JPG

I had a little trouble with my camera this morning (I dropped it in other words).   I didn’t realize I dislodged the memory card in it for a few shots, so I will describe what I did next.

I heat embossed the flowers using clear embossing powder and a heat gun.

Stamped the Bee hive by first loading the stamp with Versamark and then Dye based Black ink before stamping it.

Heat embossed the bee hive using clear embossing powder and a heat gun.

I colored some of the flowers with a Pretty in Pink Marker.  

I colored some of the flowers with a Rose Red Marker.

Discovered my camera wasn’t working correctly, lol.

Now back to the pictures.   🙂

Colored the bee hive with a So Saffron marker.

dsc07463.JPG

Colored the left side of the bee hive with a More Mustard marker.

dsc07464.JPG

Colored over all the colored images only with a Versamark marker and heat embossed them using clear embossing powder and a heat gun.

dsc07465.JPG

dsc07466.JPG

Brayered Bashful Blue ink at the top of the card stock.

dsc07467.JPG

OH good Heavens!  I missed a shot here.  I brayered Tempting Turquoise at the top of the card stock not covering the Bashful Blue ink entirely.

Apparently recovered my mental state and Brayered Certainly Celery ink at the bottom of the card stock.

dsc07468.JPG

Brayered Old Olive ink (My favorite Green by the way) at the very bottom of the card stock.

dsc07469.JPG

Colored the lower leaves on the plants with an Always Artichoke marker.

dsc07470.JPG

Although you can’t tell the difference in these photos, I colored the upper leaves on the plants with an Old Olive marker.

dsc07471.JPG

Sponged a bit of Always Artichoke ink at the bottom of the plants and the beehive to create a shadow for them.

dsc07472.JPG

Wiped off my embossed images with an old cotton cloth to remove any ink on them.

dsc07473.JPG

Assembled my card and here it is finished measuring 5″ square.

dsc07476.JPG

Please forgive me for the messed up tutorial today.  I’m apparently having one of those days, if you know what I mean!

I do hope you have been inspired to reach for one of those old stamp sets, dust if off and breath new life into it today.

May your day today be everything you hoped it would be.

Until my next post. . . . . .. .. . . . . .

Hugs,

Michelle Zindorf

Links to all my tutorials can be found here:  http://zindorf.blogs.splitcoaststampers.com/tutorials-ive-written/

Here is a link to my workshop calendar if you want to get info on beginner and advanced Brayer workshops:  http://zindorf.blogs.splitcoaststampers.com/workshop-calendar

Frequently asked questions answers:  http://zindorf.blogs.splitcoaststampers.com/frequently-asked-questions/


Country Home – Tutorial #168

dsc07444.JPG

Hey Everyone!  I hope you are having a terrific Saturday.  I love Saturdays because I get to slow down and take a bit more time playing with stamps and ink.

Before we get started I wanted to say a big hello to you readers in Illinois who have already signed up for my beginner and advanced brayer workshops in March.  I can’t wait to get there! 

I have updated my Brayer Workshop calendar so check it out if you are interested in attending one.  Here is the link:  http://zindorf.blogs.splitcoaststampers.com/workshop-calendar/

Now on with the tutorial.   🙂

Supplies:

Stamps: Stampin’ Up Essence of Love and Holidays & Wishes, and Cornish Hertiage Farms Primitive Beginnings
Paper: Stampin’ Up Whisper White, Really Rust, More Mustard and Baja Breeze
Ink: Stampin’ Up Baja Breeze & More Mustard, Adirondack Ginger, Pebble, Espresso & Lake Mist
Accessories: Versamark Pad and Marker, Brayer, Clear embossing Powder, White Gel Pen, Heat Gun, Black Marker, Prismacolor Markers

dsc07447.JPG

Stamped weeds twice by first loading the stamp with Versamark and then Ginger ink before stamping it.  Heat embossed the images using clear embossing powder and a heat gun.

Note:  When building a scene using emboss resist, remember to start with your foreground images then the middle images and then put in your back ground etc.  In other words work front to back.  🙂

dsc07422.JPG

dsc07423.JPG

Stamped house by first loading the stamp with Versamark and then Pebble ink before stamping it.  Heat embossed the image using clear embossing powder and a heat gun.

dsc07424.JPG

dsc07425.JPG

Colored the front of the house using an Oatmeal Prismacolor marker.

dsc07426.JPG

Colored the right side and the bottom of the house with a Khaki colored Prismacolor Marker.

dsc07428.JPG

Added Light Umber marker to the bottom right side of the house.

dsc07429.JPG

Colored the windows on the right side of the house with a black marker.

dsc07430.JPG

Added Cool Grey 50% marker to the windows at the front of the house and decided to color the right side of the house entirely with Light Umber Marker to make it much darker.

dsc07431.JPG

Colored over the entire house with a Versamark marker and heat embossed it using clear embossing powder and a heat gun.

dsc07432.JPG

dsc07433.JPG

Sponged More Mustard using a circular motion at the bottom of the card stock.

dsc07434.JPG

Brayered Lake Mist ink at the top of the card stock.

dsc07435.JPG

Brayered Baja Breeze ink at the very top of the card stock not covering the Lake Mist ink entirely.

dsc07436.JPG

Sponged some lake mist ink at the top of the More Mustard ink.

dsc07437.JPG

Sponged Espresso ink under the house and in the bottom left corner of the card stock.

dsc07438.JPG

Sponged some Baja Breeze ink at the top of the sky area to give it some interest and a bit above the gray around the house.

dsc07439.JPG

Added some black outlining to just a few of the weeds to bring them forward in the picture.

dsc07440.JPG

Added some white highlights to the weeds with a White Gel Pen.

dsc07441.JPG

Added some simple card stock layers and some brads in each corner.

dsc07442.JPG

Decided to add a sentiment which I hardly ever do.  I stamped it with Espresso ink and I used a Stamp A Ma Jig to make sure I stamped it straight. 

dsc07443.JPG

Here is the finished card measuring 5″ x 6.5″.

dsc07444.JPG

Well I hope this tutorial has inspired you to try doing a scene using the emboss resist technique and layering  the embossed images. 

May your day be filled with tranquility.

Until my next post. . . . . . . . . . .

Hugs,

Michelle

Links to all my tutorials can be found here:  http://zindorf.blogs.splitcoaststampers.com/tutorials-ive-written/

Here is a link to my workshop calendar if you want to get info on beginner and advanced Brayer workshops:  http://zindorf.blogs.splitcoaststampers.com/workshop-calendar

Frequently asked questions answers:  http://zindorf.blogs.splitcoaststampers.com/frequently-asked-questions/