Peaceful Flight – Tutorial #157

dsc07119.JPG

HAPPY NEW YEAR!!!!  2009 wow!  Wasn’t it just yesterday we were worried about Y2K?

The older I get the faster time flies by. . . . . . . . . . . . .

Well December for me was a month of reflection, relaxation and family.  But I’m back to blogging.   My schedule for posting is going to be different.  I probably won’t be able to post before I leave for work in the morning.  I’ve started an exercise program and if I don’t hop right out of bed in the morning and throw on the gym shoes, exercise just isn’t going to happen that day.  So, that being said, 4:00 a.m. to 5:00 a.m. exercise, 5:00 a.m. to 6:30 a.m. stamping, get ready for work, commute to work, work from 8:30 a.m. to 4:30 p.m., arrive home around 5:30, edit my photos and post to the blog.   Hmmm, I need more hours in the day, lol.  I guess my husband will have to do the shopping and house cleaning, yikes! 

Any how, I will post as often as I can. I do want to hear from you, my readers.  Let me know if you are using the tutorials, e-mail me a link to your projects.  I love looking at them.  As you can tell I don’t have a lot of time to browse the stamping galleries, so comments and links sent to me are a blessing and they encourage me to keep on keeping on, grin.

Yak, yak, yak, yak, yak. . . . . . . . let’s get started with the tutorial already!
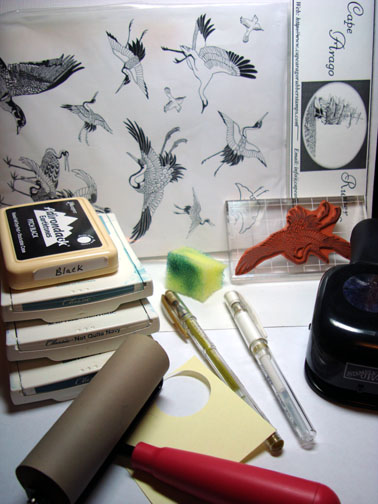
Supplies:

Stamps: Cape Arago Rubber Stamps, www.capearagorubberstamps.com
Paper: Stampin’ Up Whisper White, Basic Black & Blue Bayou
Ink: Stampin’ Up Not Quite Navy, Baja Breeze, Blue Bayou & Adirondack Pitch Black
Accessories: 1 3/8″ Circle Punch, Brayer, Post it notes, White & Gold Gel Pens, Sponge

dsc07121.JPG

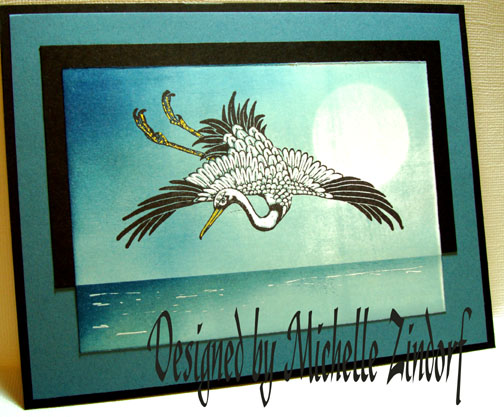
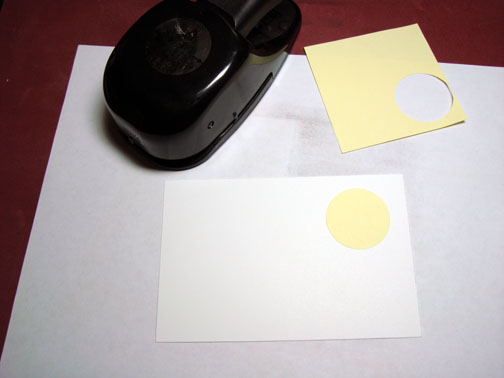
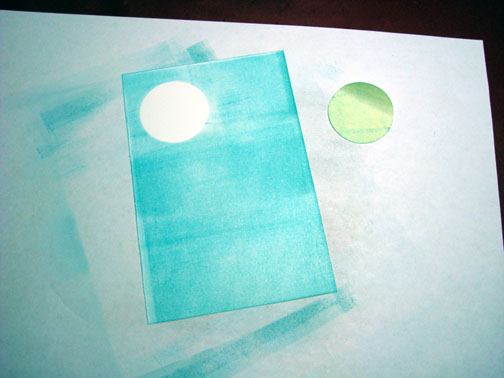
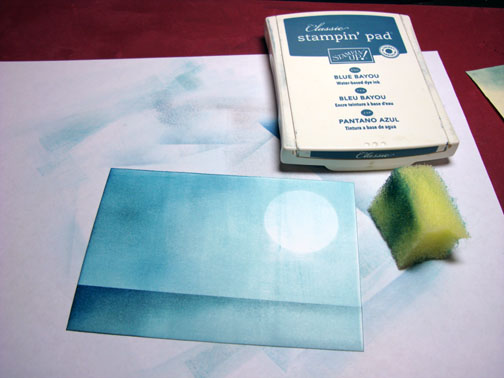
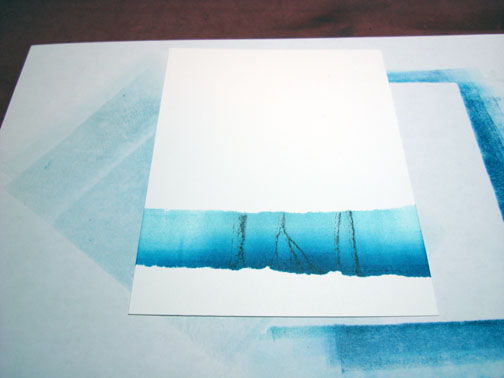
Punched a 1 3/8″ circle from the sticky part of a post it note and used it as a mask for the moon.  I stuck in on a 3.5″ x 5″ piece of Whisper White card stock.

dsc07101.JPG

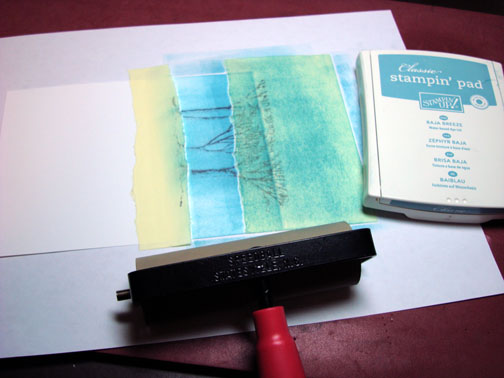
Brayered Baja Breeze ink all over the card stock.

dsc07102.JPG

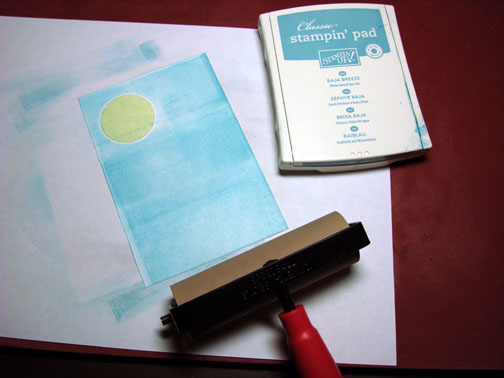
Removed the post it note mask and brayered a bit more Baja Breeze ink over the card stock.  This tones down the brightness of the moon a bit.

dsc07103.JPG

dsc07104.JPG

Masked the top 2/3rds of the card stock with a large post it note.

dsc07105.JPG

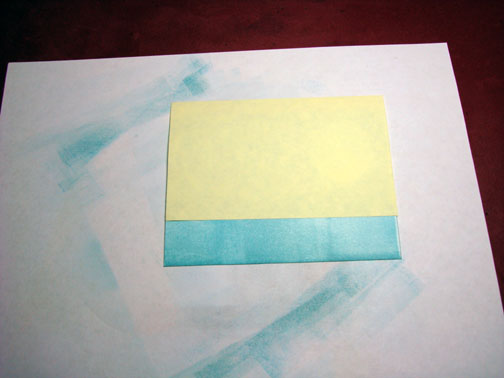
Turned project upside down and sponged Blue Bayou ink right at the post it note edge.  Creating the horizon line here.

dsc07106.JPG

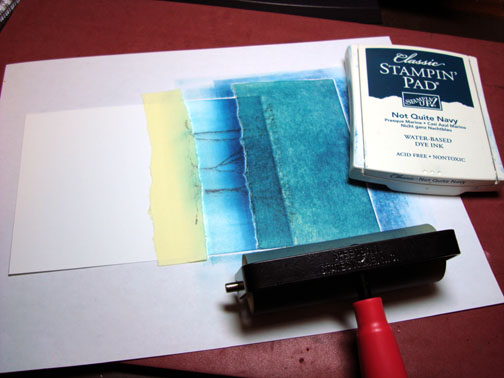
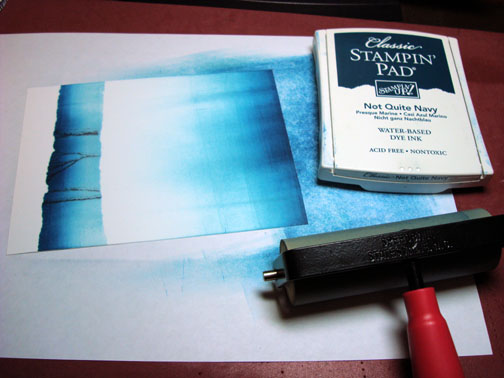
Sponged more Blue Bayou ink at the right side of the card stock.  See the “X” on the post it note.  That is where the moon is.  So the water needs to stay lighter on the side with the moon.  Clear as mud?

dsc07107.JPG

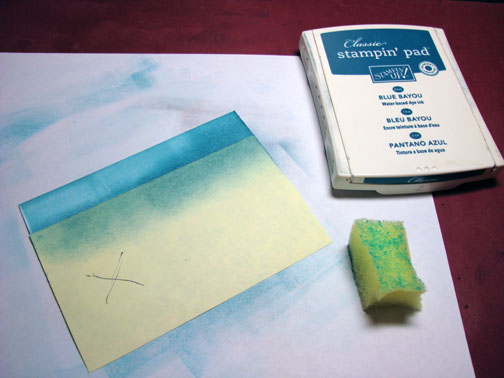
Sponged a bit of Not Quite Navy ink at the right side, not covering the Blue Bayou ink entirely.

dsc07108.JPG

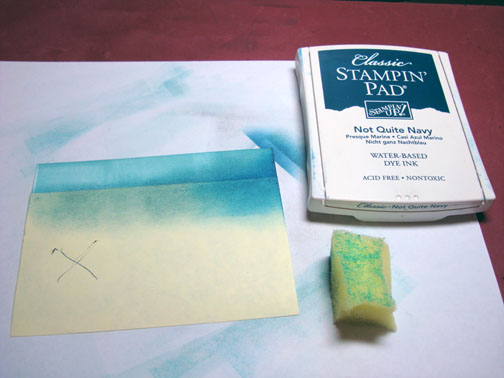
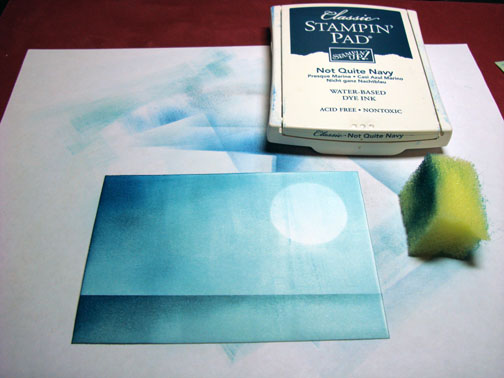
Removed post it note and flipped project right side up.

dsc07109.JPG

Sponged Blue Bayou ink at the left side of the card stock sky area.

dsc07110.JPG

Added Not Quite Navy ink to the left top corner.

dsc07111.JPG

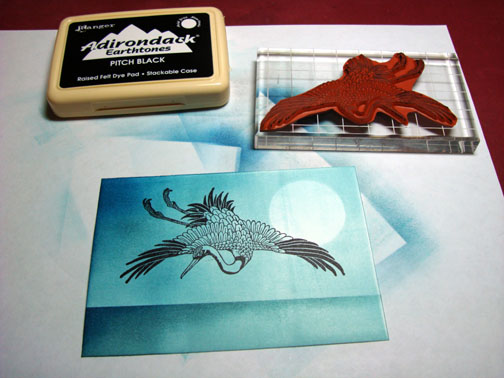
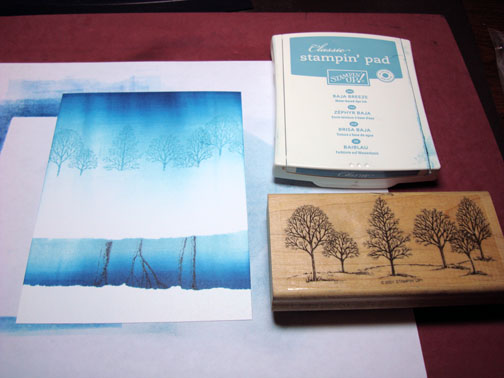
Stamped the bird with Pitch Black ink.

dsc07112.JPG

Colored in the light areas of the bird with a White Gel Pen.

dsc07113.JPG

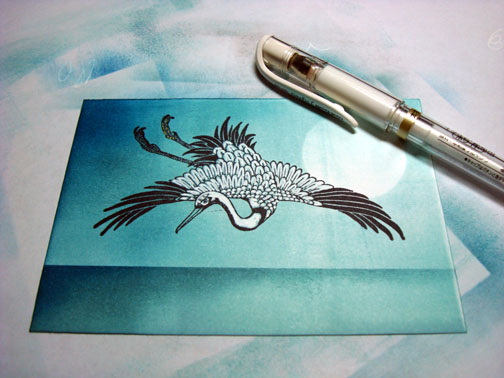
Colored the feet and beak with a Gold Gel Pen.

dsc07114.JPG

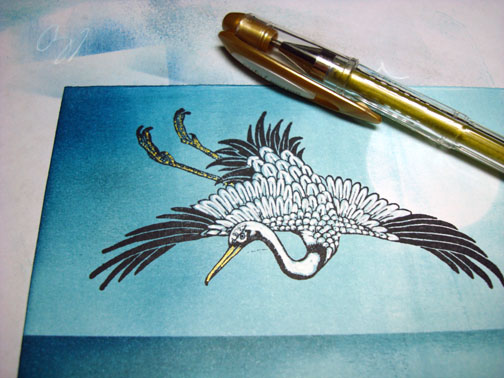
Added a few dashes in the water with a White Gel pen.

dsc07115.JPG

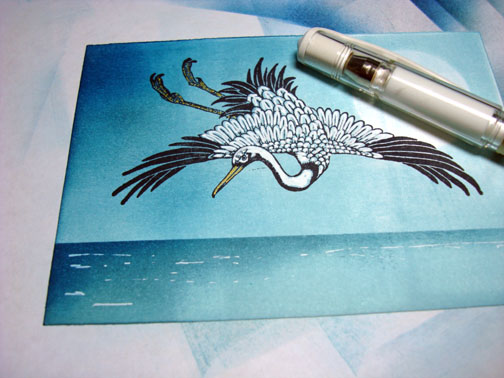
Put the card together with a few panels of card stock and here it is finished measuring 5″ x 6.5″.

dsc07119.JPG

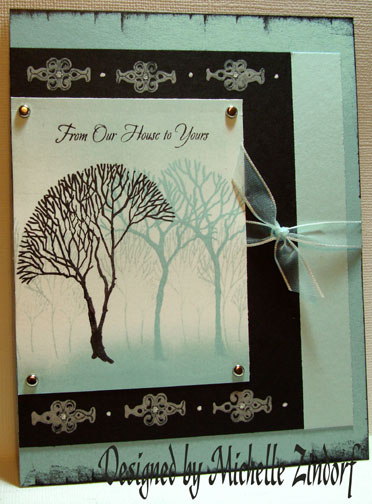
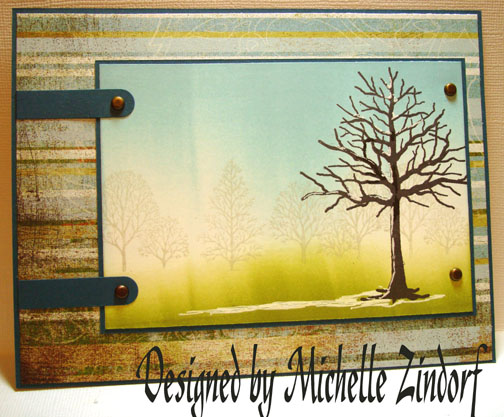
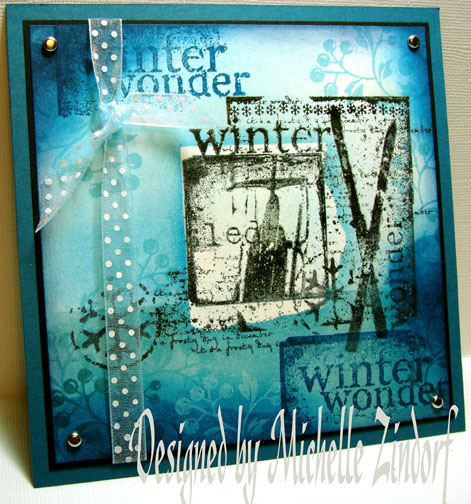
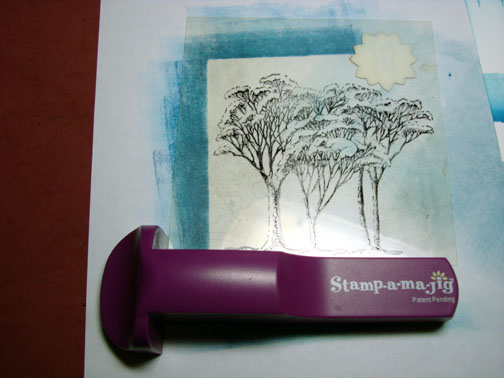
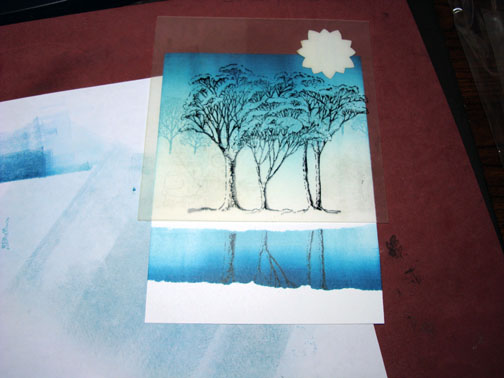
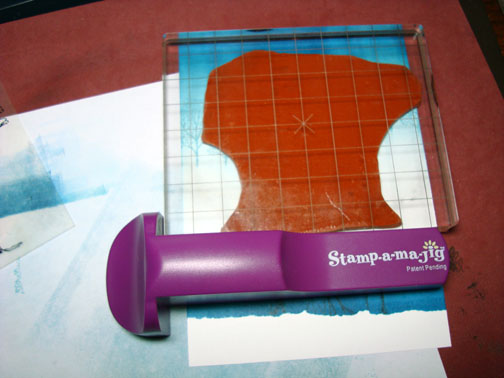
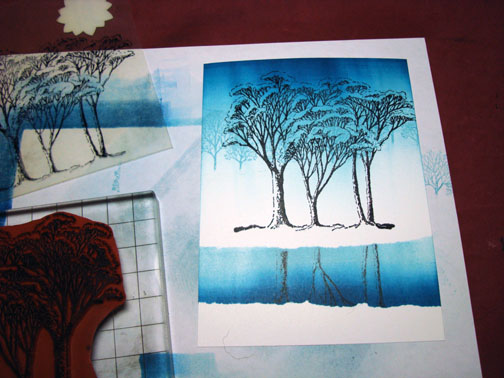
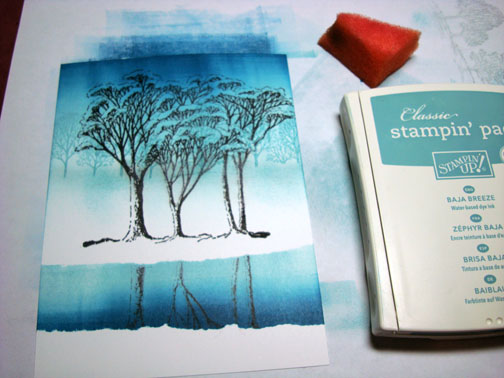
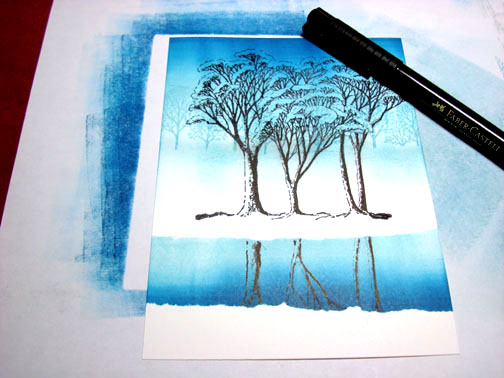
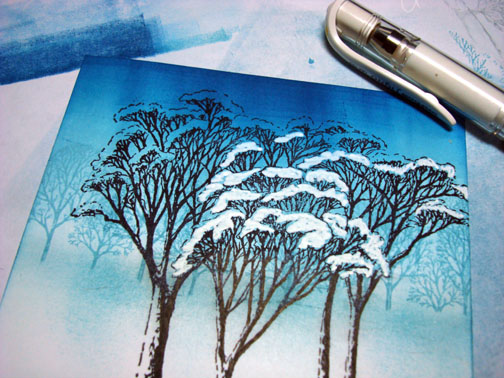
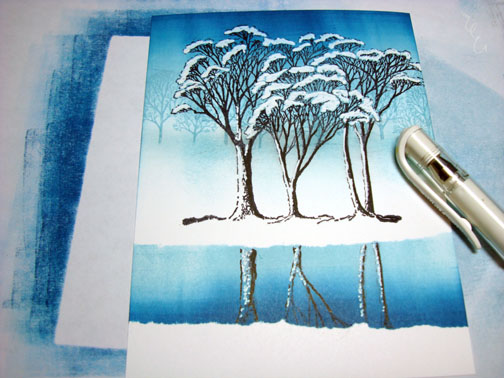
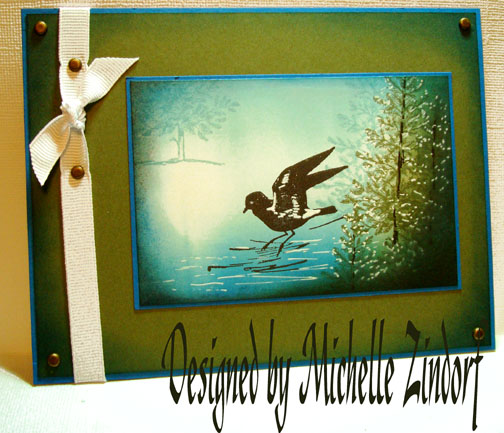
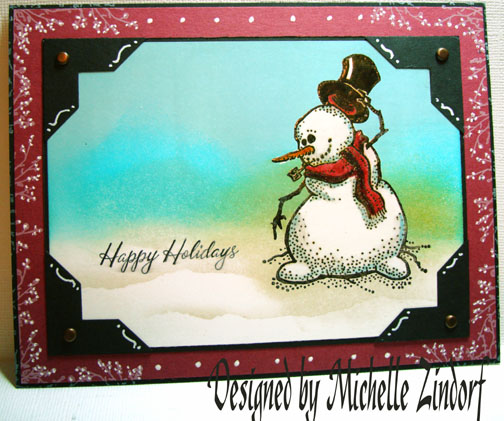
I was a bit rusty from not stamping in December so yesterday I took a look at the New Year’s Eve challenges on Splitcoaststampers.com and here is what I created for two of the challenges.

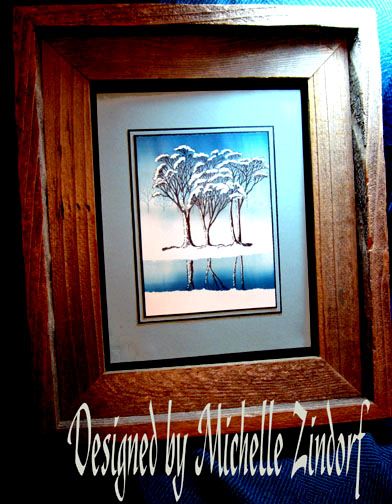
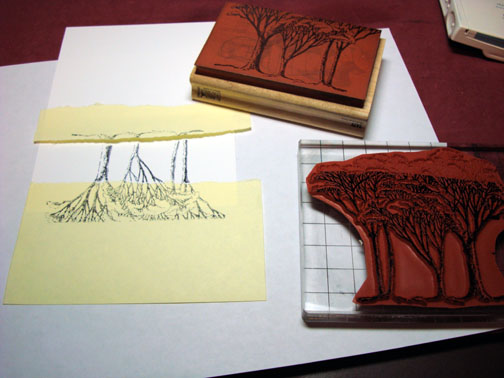
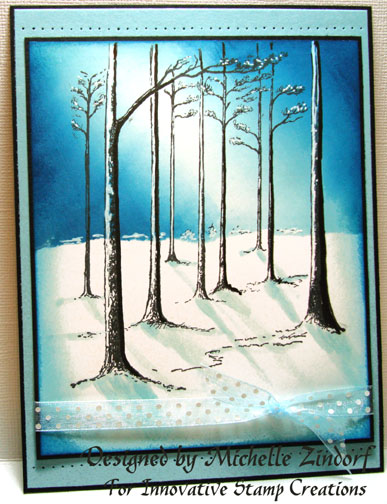
Stamps used:  Stampendous “Winter Trees”

dsc07093.JPG

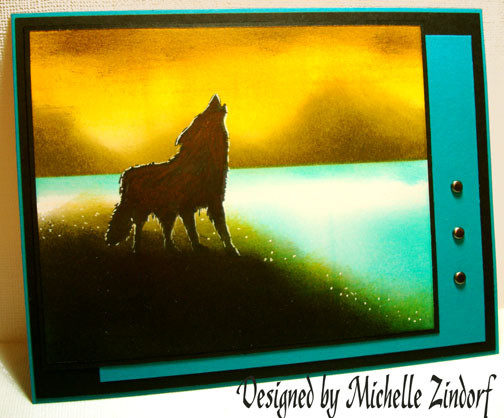
Stamps used:  Paper Trey Ink “Pond Life”

dsc07094.JPG

Well I hope you enjoyed the tutorial today and it encouraged you in some fashion to get out those stamps and use them.

May your day and new year be beyond belief spectacular!

Until my next post. . . . . . . .. . . . . . . .

Hugs,

Michelle

Links to all my tutorials can be found here:  http://zindorf.blogs.splitcoaststampers.com/tutorials-ive-written/

Here is a link to my workshop calendar if you want to get info on beginner and advanced Brayer workshops:  http://zindorf.blogs.splitcoaststampers.com/workshop-calendar

Frequently asked questions answers:  http://zindorf.blogs.splitcoaststampers.com/frequently-asked-questions/


Season’s Greetings and Melting Snow – Tutorial #156

dsc07032.JPG

Season’s Greetings to each and everyone of you!  I have decided to take the presser of blogging off of my plate for the rest of the month of December so I can really enjoy the holidays.  My next post will be after the New Year. 

I’m going to leave you until then with a very quick to put together brayer card.

Let’s get started:

Supplies:

Stamps: Stampin’ Up Lovely as a Tree, Impression Obsession Branches of a Tree
Paper: Stampin’ Up Whisper White & Not Quite Navy, Basic Grey Design Paper
Ink: Stampin’ Up Baja Breeze & Old Olive, Adirondack Lake Mist & Pitch Black
Accessories: Stampin’ Up Word Window Punch, Brads, Brayer, White Gel Pen ********************************************************

Brayered Baja Breeze ink at the top of a 3.25″ x 5″ piece of Whisper White card stock.

dsc07024.JPG

Brayered Old Olive ink at the bottom of the card stock leaving a white section of the card stock showing.

dsc07025.JPG

Stamped the Lovely as a Tree Stamp with Lake Mist ink.

dsc07027.JPG

Stamped the large tree with Pitch Black ink.

dsc07028.JPG

Punched two Word Window Punches from Not Quite Navy Card stock to use as embellishments.  I cut one curved end off of each one.

dsc07029.JPG

Assembled card and added White Gel pen to the large tree branches and white gel pen at the base of the tree on the ground to simulate snow.

dsc07031.JPG

Here is the finished card measuring 5″ x 6.5″.

dsc07032.JPG

May your holidays this season be ones you will remember always.

Until next year. . . . . .. . . . . . . .

Huge Huge Hugs,

Michelle

Links to all my tutorials can be found here:  http://zindorf.blogs.splitcoaststampers.com/tutorials-ive-written/

Here is a link to my workshop calendar if you want to get info on beginner and advanced Brayer workshops:  http://zindorf.blogs.splitcoaststampers.com/workshop-calendar

Frequently asked questions answers:  http://zindorf.blogs.splitcoaststampers.com/frequently-asked-questions/


Winter Wonderland Collage – Tutorial #155

dsc07022.JPG

Today I thought I would try my hand at a collage type card.  Collage cards are wonderful for young adults.  This one is for my future daughter-n-law for Christmas.  I’m safe showing this on the blog because no one in my family actually visits this blog to read my babblings, lol.  They just think I’m a stamp fanatic who spends way to much time and money on my hobby.  🙂  They are probably right, but I’m happy here in my little stamping room and blog world.  I have a feeling I’m not the only stamp fanatic out there!

I wanted to keep this card mellow so I selected all blue shades of ink to use.  This project would have a complete different feel if I added even one color from a different color family, for instance red.  Come to think of it, I would like to try this again with all shades of red.

Let’s get started on today’s tutorial shall we.  🙂

Supplies:

Stamps: Close to My Heart “Winter Wonder” and “Festive Frills”
Paper: Stampin’ Up Not Quite Navy, Whisper White, Basic Black
Ink: Stampin’ Up Very Vanilla, Soft Sky, Blue Bayou, Night of Navy, Baja Breeze, Basic Black & Not Quite Navy
Accessories: Versamark pad, Fine Detail Clear embossing powder, heat gun, Sponges, Post it notes, Ribbon, Silver Brads

dsc07023.JPG

Stamped the main image on a 5″ square piece of Whisper White card stock by first loading the stamp with Versamark and then loading it with Black ink before stamping it.

dsc06999.JPG

Heat embossed the image using clear embossing powder and a heat gun.

dsc07000.JPG

Sponged some Very Vanilla ink over the embossed image.

dsc07001.JPG

Ripped a post it note leaving the sticky part at the top and used it as a mask.

dsc07002.JPG

Sponged Soft Sky ink around the post it note mask.

dsc07003.JPG

Added Some Baja Breeze ink right at the post it note edges to really define the mask shape.

dsc07004.JPG

Masked the top of the card stock with a post it note.

dsc07005.JPG

Sponged Blue Bayou ink at the bottom of the card stock.

dsc07006.JPG

Removed the mask and turned it around to mask the bottom portion of the card stock.  I ripped pieces out of the post it note.

dsc07008.JPG

Sponged Not Quite Navy ink in the open areas.

dsc07009.JPG

Removed the large post it note mask.

dsc07010.JPG

Sponged Baja Breeze ink on the top of the card stock leaving some light areas.

dsc07011.JPG

I decided I didn’t like the hard lines made at the bottom with the Not Quite Navy ink so I added more Not Quite Navy ink around those areas to soften the hard lines and I also added some Not Quite Navy ink at the top of the card stock.

dsc07012.JPG

Randomly stamped the Berry Flourish using Baja Breeze ink.

dsc07013.JPG

Added some more Berry Flourishes with Blue Bayou ink.

dsc07014.JPG

Stamped the Winter Wonder stamp twice using Not Quite Navy ink.

dsc07015.JPG

Stamped the Snowflake using Black ink.

dsc07016.JPG

Sponged some Night of Navy ink around the out side edges of the card stock.

dsc07017.JPG

Assembled the card.  Here it is finished measuring 5.5″ square.

dsc07022.JPG

I hope this tutorial has inspired you to get out those stamps and try a collage card today.  They are fun and simple.

May your day be filled with Crisp images and inks to blend.

Until my next post. . . . . . . .. . . . . . .

Hugs,

Michelle

Links to all my tutorials can be found here:  http://zindorf.blogs.splitcoaststampers.com/tutorials-ive-written/

Here is a link to my workshop calendar if you want to get info on beginner and advanced Brayer workshops:  http://zindorf.blogs.splitcoaststampers.com/workshop-calendar

Frequently asked questions answers:  http://zindorf.blogs.splitcoaststampers.com/frequently-asked-questions/


Morning to Night Coffee – Tutorial #154

dsc06994.JPG

I’m a coffee drinker.  I drink about a pot each morning and I drink it black.  No fancy coffee for me. 

This morning I decided to do a whimsical card using some old retired Stampin’ Up sets.  I will never ever part with these sets. 

This card is done in the emboss resist technique, building the scene from front (foreground) to back (background).

Let’s get started.

Supplies:

Stamps: Stampin’ Up Stardust, What’s Brewin’? and Levely as a Tree
Paper: Stampin’ Up Whisper White, Basic Black & Baja Breeze
Ink: Stampin’ Up Chocolate Chip, Real Red, Really Rust, Night of Navy, Not Quite Navy, Baja Breeze and Palette Noir Black
Accessories: Prismacolor Markers, Stampin’ Up markers, White Gel Pen, Sponges, Versamark Pad and Marker, Fine Detail Clear embossing powder and a Heat Gun, Copper Brads

dsc06998.JPG

Stamped coffee cup with Real Red on a 3.5″ x 8″ piece of Whisper White card stock.

dsc06972.JPG

Colored over the coffee cup with a Real Red marker to create a shadow on the left side and to omit the heart design.

dsc06973.JPG

Colored the coffee in the cup with a Chocolate Chip marker.

dsc06974.JPG

Colored over the entire image with a Versamark marker and heat embossed it using fine detail embossing powder and a heat gun.

dsc06975.JPG

dsc06976.JPG

Stamped the trees by first loading the stamp with Versamark and then loading it with Chocolate Chip ink before stamping.

dsc06977.JPG

Heat embossed the trees using clear embossing powder and a heat gun.

dsc06978.JPG

Stamped the steam using Versamark only and then heat embossed the steam image using clear embossing powder and a heat gun.

dsc06979.JPG

dsc06980.JPG

Stamp the Moon and the sun using Palette Noir Black ink.

dsc06981.JPG

dsc06982.JPG

Colored the moon and the sun with an Eggshell Prismacolor Marker.

dsc06983.JPG

Added Goldenrod Prismacolor Marker to both the moon and the sun.

I wanted a mellow card so I chose warm colors that were not bright in nature.

dsc06984.JPG

Added Sky Blue to the Sun image.

dsc06985.JPG

Added Goldenrod marker to the sun’s face.

dsc06986.JPG

Colored over both the sun and the moon with a Versamark Marker and heat embossed the images using clear embossing powder and a heat gun.

dsc06987.JPG

dsc06988.JPG

Sponge Baja Breeze ink in the sky area of the scene.

dsc06989.JPG

Sponged Not Quite Navy on the left side of the sky.

dsc06990.JPG

Sponged Night of Navy on the left side of the sky not covering the Not Quite Navy ink entirely.

dsc06991.JPG

Sponge Really Rust ink on the Right side of the sky.

dsc06992.JPG

Added White Gel pen dots for stars on around the moon.

dsc06993.JPG

Assembled card and here it is finished measuring 4″ x 9″.

dsc06994.JPG

I hope this tutorial has inspired you to get out some of those old stamps and make new exciting scenes with them.

May your day be filled with things that give you pleasure.

Until my next post. . . . . . . . . ..  .

Hugs,

Michelle

Links to all my tutorials can be found here:  http://zindorf.blogs.splitcoaststampers.com/tutorials-ive-written/

Here is a link to my workshop calendar if you want to get info on beginner and advanced Brayer workshops:  http://zindorf.blogs.splitcoaststampers.com/workshop-calendar

Frequently asked questions answers:  http://zindorf.blogs.splitcoaststampers.com/frequently-asked-questions/


Snow Covered Trees – Tutorial #153

dsc06969.JPG

Hello again, today’s tutorial gives me a chance to show you my two most favorite tools to use while stamping.  The Stamp-a-ma-jig and the reverse image stamp. 

I also used a brand new stamp by Innovative Stamp Creations “Sketch of Nature I”.  Here is a link to their online store:  http://www.innovativestampcreations.com/catalog/item/1516071/6518501.htm

The Rubber Stampede Mirror image Stamp can be found at various places.  Here is a link to a post I did regarding this stamp and there were a lot of great suggestions on different ways to get a mirror image along with where to find this stamp in the comments left on the post:  http://zindorf.blogs.splitcoaststampers.com/2008/03/16/searchink-for-a-mirror-image-stamp/

I framed my piece today, but the finished main image panel is 4.5″ x 6″ so this could easily be a turned into a card.  The 8″ x 10″ frame I used is a barn wood frame I found at a thrift store for $2.00.  Got to love those thrift stores and garage sales.  🙂

Let’s get started on the tutorial.

Supplies:

Stamps: Innovative Stamp Creations “Sketch of Nature I” and Stampin’ Up “Lovely as a Tree”, Rubber Stampede “Mirror Image Stamp”
Paper: Stampin’ Up Whisper White, Baja Breeze and Basic Black
Ink: Stampin’ Up Not Quite Navy, Basic Black and Baja Breeze
Accessories: 8′ x 10″ opening Barn wood Frame (Thrif Store find), White Gel Pen, Black marker, Brayer, Post it notes, Stamp-a-ma-jig, Sponge

dsc06971.JPG

Started with a 4.5″ x 6″ piece of Whisper White Card stock.

dsc06945.JPG

Tore two post it notes through the stick part and used them as masks.

dsc06946.JPG

Stamped my tree stamp with Black ink on my Reverse image stamp and then stamped the reverse image stamp on the card stock creating a reverse image of the original stamp.

dsc06947.JPG

Photo of the reverse image stamp top.

dsc06948.JPG

Turned my card stock and brayered Baja Breeze ink in between the two post it notes.

dsc06949.JPG

Brayered Not Quite Navy ink over the bottom post it note and onto the card stock, not covering the Baja Breeze ink entire.

dsc06950.JPG

Removed the post it note masks.

dsc06951.JPG

Brayered Baja Breeze ink at the top of the card stock.

dsc06952.JPG

Brayered Not Quite Navy at the very top of the card stock not covering the Baja Breeze ink entirely.

dsc06953.JPG

Stamped the Lovely as a Tree image across the card stock using Baja Breeze ink.

dsc06954.JPG

Now it is time to stamp my main (focal) image and I really don’t want to risk stamping it crooked or off center from the reverse image previously stamped so I am going to use my Stamp-a-ma-jig.  I know I have a lot of new stampers that have not experience using some tools so I’m going to show the step by step process of using the Stamp-a-ma-jig.  Bare with us you seasoned stampers.  🙂

I line the plastic piece up in the “L” of the stamp-a-ma-jig.

dsc06956.JPG

Ink my stamp up with Black ink and line the stamp up in the “L” of the Stamp-a-ma-jig as I lower it and stamp the image on the plastic piece.

dsc06957.JPG

dsc06958.JPG

I can now take the plastic piece and move it around on my main image panel to see exactly where I want my image.

dsc06959.JPG

Line the Stamp-a-ma-jig handle “L” up on the Plastic Piece.  Hold the Handle in place and move the plastic piece away from the panel.

dsc06960.JPG

dsc06961.JPG

Ink my stamp up with Black ink.  Hold the Stamp-a-ma-jig handle firmly and line my stamp up with the “L” on the handle as I lower to the card stock.  Press down firmly on the stamp to make my impression.

dsc06962.JPG

Remove stamp and handle.

dsc06963.JPG

Sponged a bit of Baja Breeze ink under the small trees.

dsc06964.JPG

Used a black marker and went down the right sides of the large trees and the right sides of the reverse image to make them stand out a bit more.

dsc06965.JPG

Colored the tops of the trees with a white Gel Pen.

dsc06966.JPG

Used the White Gel pen and went down the Left sides of the large trees and the left sides of the reverse image.

dsc06967.JPG

Layered the main image panel on Black and Baja Breeze card stock panels and framed it. 

dsc06969.JPG

I hope you enjoyed today’s winterly tutorial and find yourself inspired to get out those stamps today.

May your day be filled with peaceful scenes.

Hugs,

Michelle Zindorf

Links to all my tutorials can be found here:  http://zindorf.blogs.splitcoaststampers.com/tutorials-ive-written/

Here is a link to my workshop calendar if you want to get info on beginner and advanced Brayer workshops:  http://zindorf.blogs.splitcoaststampers.com/workshop-calendar

Frequently asked questions answers:  http://zindorf.blogs.splitcoaststampers.com/frequently-asked-questions/


Katzelkraft Bird in Water – Tutorial #152 And New Blog Candy!

dsc06941.JPG

Well hello there everyone!  I’ve been away tooooo long from my stamping room.  A lot has been going on with holiday preparation.

For the Thanksgiving Holiday my small family gets together at our house for the feast.  I still have half of the feast in the frig that needs eaten.  (Just slap it on my thighs, that’s where it is going anyway, lol)    We are not fancy people, this is my table setting for the occasion.  🙂

dsc06906.JPG  dsc06908.JPG

I have to show you the two beast that were underfoot in the kitchen the whole day.  These two both weigh over 100 lbs each.  Abby the Lab and Lucas the German Short Haired Pointer/Great Dane mix.  Both of these babies came from a local shelter after our beloved German Shepherd passed about 5 years ago.   I encourage everyone to adopt their pets and spay and neuter them.  🙂  Sorry, had to throw that in there, it’s too important.


    dsc06914.JPG  dsc06916.JPG

Yesterday was spent, CHRISTMAS SHOPPING!!!!!  After Shopping we started putting up the Christmas lights on the outside of the house.  This is the progress we made before dark.  I then completely passed out on the couch, lol.  I hope those who celebrate Thanksgiving had one filled with the love and Joy of Family and Friends.    


dsc06921.JPG

Enough with the rambling, it’s BLOG CANDY TIME!!!!!  OH, what blog candy I have for you this week. 

How about a full sheet of Bird stamps from Katzelkraft!  Here is a link to their online store so you can check them out:  www.katzelkraft.fr    The bird I used for today’s project is one from this stamp sheet.

To enter to win this Full Stamp Sheet all you have to do is tell me to enter you by commenting on this post.  If you are getting this blog update by e-mail you will need to click this link and then comment at the bottom of the post: http://zindorf.blogs.splitcoaststampers.com/2008/11/29/katzelkraft-bird-in-water-tutorial-152-and-new-blog-candy/

I will use a random number generator on Wednesday, December 3rd to select the winner.  Good luck to all!

dsc06944.JPG

Now on with today’s tutorial.  🙂

Supplies:

Stamps: Katzelkraft Birds, Stampin’ Up Lovely as a Tree 
Paper: Stampin’ Up Whisper White, Pacific Point & Always Artichoke
Ink: Stampin’ Up Baja Breeze, Pacific Point & Always Artichoke, Palette Noir Black
Accessories: Brayer, White Gel Pen, Black marker, White Ribbon, Brads, Sponges

dsc06942.JPG

Brayered Baja Breeze at the top and bottom of a 4.5″ x 3″  piece of Whisper White Card stock.

dsc06924.JPG

Brayered Pacific Point ink at the bottom of the card stock, not covering the Baja Breeze ink entirely.

dsc06925.JPG

Stamped the Katzelkraft Bird image with Palette Nior Black ink.

dsc06926.JPG

Stamped the Pine Tree Twice with Baja Breeze ink.

dsc06928.JPG

Stamped the Pine 3 times with Always Artichoke ink.

dsc06929.JPG

Sponged Always Artichoke ink at the right and bottom of the card stock.

dsc06930.JPG

Sponged black ink at the right, left and bottom of the card stock.

dsc06932.JPG

Added White Gel Pen to the light areas of the bird, made dots in the tree branches and also added white dashes in the water.

dsc06934.JPG

Added dashes of black marker to the tree trunks.

dsc06935.JPG

Sponged Pacific Point ink around the outside of the card stock.

dsc06936.JPG

Cut a 4 7.8″ x 6 3/8″ piece of Always Artichoke card stock and sponged Pacific Point Ink around the outside of the card stock.

dsc06937.JPG

Assembled card and added the ribbon and brads.  Here it is finished measuring 5″ x 6.5″.

dsc06941.JPG

May your day today be one of leisure.

Until my next post. . . . . . . . . . .. . . .

Hugs,

Michelle

Links to all my tutorials can be found here:  http://zindorf.blogs.splitcoaststampers.com/tutorials-ive-written/

Here is a link to my workshop calendar if you want to get info on beginner and advanced Brayer workshops:  http://zindorf.blogs.splitcoaststampers.com/workshop-calendar

Frequently asked questions answers:  http://zindorf.blogs.splitcoaststampers.com/frequently-asked-questions/


Light & Shadows in the Woods – Tutorial #151

dsc06904.JPG

I feel so guilty, part of my weekend was spent Christmas Shopping and creating new Workshop projects for my Beginner Brayer works in February at Marco Paper.  But that’s not where the guilty part comes in.  It’s the new Wii game system I purchased for my husband and I.  If you have never experienced a Wii before, you have to try it.  It will definitely get you up off of the couch and moving.  We spent hours last night bowling and golfing.  It was way to much fun.  If you do own a Wii you know what I’m talking about.  🙂  Dangerously addictive. . . . . . .. . . . . .  Hmmm, I think I need to stop at the store and pick up yet another game. . . .  who needs that retirement fund anyway, lol.

Anyway, let’s talk about stamping.

I showed a glimps of this great new stamp by Innovative Stamp Creations the other day and got flooded by e-mails asking where you can get it.  Here is a link:  http://www.innovativestampcreations.com/ischomepage.html

Don’t you just love trees!  I can’t get enough of them.  🙂

Today’s tutorial shows how to get a great light effect by using your brayer at an angle.  Check it out.

Let ‘s get started. 

Supplies:

Stamps: Innovative Stamp Creations “Presence of Trees”
Paper: Stampin’ Up Whisper White, Basic Black and Baja Breeze
Ink: Stampin’ Up Baja Breeze & Not Quite Navy, Palette Noir Black
Accessories: Ribbon, Post it Notes, Brayer, Aqua Pen, White Gel Pen, Black marker, Tim Holtz Ruler, Push Pin

dsc06905.JPG

Started by tearing through the sticky edge of a post it note and used it as a mask.  Masked the bottom portion of a 4.5″ x 5.5″ piece of Whisper White card stock.

dsc06887.JPG

Brayered Baja Breeze ink at an angle on the unmasked portion of the card stock.

dsc06888.JPG

Turned the card stock upside down and brayered at an angle again leaving a light streak in the middle.  🙂

dsc06889.JPG

Brayered Not Quite Navy using the same angles, but did not cover the Baja Breeze ink entirely.

dsc06890.JPG

dsc06891.JPG

Removed the post it note mask.

dsc06892.JPG

Stamped the trees using Palette Noir Black ink.

dsc06893.JPG

Used a marker to extend some of the trees to the top of the card stock.

dsc06894.JPG

Colored the light side of the trees with a White Gel pen to make them look like they have snow stuck to them.  Also added a few dots of white gel pen in the branches.

dsc06895.JPG

Squeezed the Baja Breeze ink pad to create a pool of ink on the lid of the stamp pad and used the ink along with an Aqua painter to create shadows of the trees on the snow area.

dsc06896.JPG

Closer look.

Note:  your shadows should go in the same direction as your light source.  🙂

dsc06897.JPG

Sponged Baja Breeze ink around the entire edge of the card stock.

dsc06898.JPG

Sponged Not Quite Navy ink around the very outside edge of the card stock.

dsc06899.JPG

Attached a Baja Breeze panel to a black panel and pierced the bottom and top of them using the Tim Holtz ruler and a push pin.  The ruler has little holes in it along one side to use for this purpose.

dsc06900.JPG

Decided to add some fun ribbon.

dsc06901.JPG

Here is the finished card measuring 5″ x 6.5″.

dsc06904.JPG

Well I hope this tutorial has inspired you to get that brayer out and use it to see what interesting light effects you can create with it.

May your day be filled with Peace and harmony.

Until my next post. . . . . . . . . . . . . .. . . . . .

Hugs,

Michelle

Links to all my tutorials can be found here:  http://zindorf.blogs.splitcoaststampers.com/tutorials-ive-written/

Here is a link to my workshop calendar if you want to get info on beginner and advanced Brayer workshops:  http://zindorf.blogs.splitcoaststampers.com/workshop-calendar

Frequently asked questions answers:  http://zindorf.blogs.splitcoaststampers.com/frequently-asked-questions/


Thinking of You Penguin – Tutorial #150!!!!!

dsc06854.JPG

When someone introduces a person to the great craft of Rubber Stamping they should scream, very loudly “Warning, Warning, Warning” just like the robot in the old TV show, Lost in Space (I’m showing my age here folks).  Not only will you want every single stamp that you see and will tell yourself that you need it, yeah right, lol.  But you will need, I mean want, every single tool that you are introduced to also, along with card stock, lots and lots of card stock. 

dsc06832.JPG  This is my personal order for Stampin’ Up paper that was conveniently left on my door step yesterday.  🙂  Folks, I am just restocking too, lol.

Today’s post will show you new stamps from Fire Cracker Designs by Pamela.  Here is the link to her site, because you are going to want this Penguin set, lol.  http://www.safesecurestore.com/stores/merchant.mvc?Screen=SFNT&Store_Code=firecrackerdesignsbypamela

Also, I will show you a Mirror Image Stamp by Rubber Stampede, you can do an Internet search and probably come up with a million places to get this stamp and I will show you how to paint with an Aqua Painter, which I got from Stampin’ Up.

WARNING!  WARNING!  WARNING!!!!!

Let’s get started.  🙂

Supplies:

Stamps: Fire Cracker Designs by Pamela
Paper: Stampin’ Up Whisper White, Basic Black & Not Quite Navy
Ink: Stampin’ Up Basic Black, So Saffron, Riding Hood Red, Not Quite Navy & Baja Breeze
Accessories: Brayer, Versamark pad and marker, fine detail clear embossing powder, Aqua Painter, Going Grey Marker, White Ribbon, Silver Brads, Heat gun, reverse image stamp by Rubber Stampede

dsc06857.JPG

This is the rubber side of the mirror image stamp (ignore the stains from use).  To use the mirror image stamp you will stamp your image on the mirror image stamp and then stamp the mirror image stamp on the card stock.  This creates a mirror image of the original stamp.  Clear as mud? lol

dsc06833.JPG

So, starting out I stamped a mirror image of the penguin using the mirror image stamp and Black ink upside down on my Whisper White card stock.  I chose to not press really hard when stamping the mirror image to keep it light and broken looking.  

I then stamped the original penguin stamp up right and above the mirror image using Black ink.

My Whisper White card stock measures 3.25″ x 6.25″.

dsc06834.JPG

Stamped the star in the sky using Versamark only.

dsc06835.JPG

Using my Aqua Painter and So Saffron ink I painted the Penguin’s sweater and hat.

I use a re-inker and place a drop of ink in the lid of the ink pad, but you can squeeze the ink pad when it is closed and you will get a pool of ink on the lid that you can use to watercolor with.

When painting the mirror image I use water down ink so it is lighter than the original image.

dsc06836.JPG

To clean my Aqua Painter I brush it on my scrap paper until it doesn’t show any color on the paper any longer.

dsc06837.JPG

Next I painted the Riding Hood Red ink on using the same method.

dsc06839.JPG

After the paper has dried all the way, you can go back in and paint your shadows (dark areas) in on the sweater and hat using the Aqua painter and the same colors of ink.  Layering the same color will show darker, but you have to wait for the paper to dry.

I also painted his beak with So Saffron.

dsc06840.JPG

Colored the black areas of the mirror image with a Going Grey marker.

dsc06841.JPG

Colored over my Original image using a Versamark marker and then heat embossed the star and the original image using fine detail embossing powder and a heat gun.

dsc06842.JPG

dsc06843.JPG

Now that my original image and my star are heat embossed I can brayer over them and they will resist the ink.

Brayered Baja Breeze ink at the top and bottom of the card stock.

dsc06844.JPG

dsc06845.JPG

Tore a post it note and used it as a mask.  Sponged Baja Breeze ink at the post it notes torn edge to create the ground.

dsc06846.JPG

dsc06847.JPG

Sponge a little Not Quite Navy ink right at the post it note edge not covering the sponged Baja Breeze ink entirely.

dsc06848.JPG

Removed the post it note mask.

dsc06849.JPG

Brayered Not Quite Navy at the top and bottom of the card stock, not covering the Baja Breeze ink entirely.

dsc06850.JPG

Sponged Not Quite Navy around the edge of the card stock.

dsc06851.JPG

Assembled the card, adding silver brads and white ribbon.  Here it is finished measuring 5″ x 6.5″.  Oh yeah!  This is tutorial number 150!!!! 

dsc06854.JPG

May your skies be full of bright shining stars.

Until my next post. . . . . . .. . . . . . . . .

Hugs,

Michelle

Links to all my tutorials can be found here:  http://zindorf.blogs.splitcoaststampers.com/tutorials-ive-written/

Here is a link to my workshop calendar if you want to get info on beginner and advanced Brayer workshops:  http://zindorf.blogs.splitcoaststampers.com/workshop-calendar

Frequently asked questions answers:  http://zindorf.blogs.splitcoaststampers.com/frequently-asked-questions/


Snowman Greetings – Tutorial #149 and some Basic Grey Blog Candy

dsc06828.JPG

We had our first snow for the season yesterday and it put me in the mood to stamp a holiday greeting card.  I really love snowman stamps and this one is especially wonderful because this snowman by MyPaperMoon.com is not looking straight ahead.    You can have him looking at a multitude of things.  Here is a link to the My Paper Moon’s site www.mypapermoon.com  just in case you want to pick this stamp up.  🙂  I know, I’m an enabler, lol.

dsc06827.JPG

Before we get going on the tutorial, how about some Rubber Stamp Blog Candy.  This set is by Basic Grey “All Natural”.   All you need to do to enter is leave a comment on this post saying you want entered.  If you are getting this blog update by e-mail you will need to click this link and then leave a comment:   http://zindorf.blogs.splitcoaststampers.com/2008/11/18/snowman-greetings-tutorial-149-and-some-basic-grey-blog-candy/

I will pick a winner using a random number generator on Saturday, November 22nd.  Good luck to all!

Now on with this chilly tutorial.  🙂

Supplies:

Stamps: My Paper Moon.Com Snowman, Stampin’ Up Warmest Regards & All Season Wreath
Paper: Stampin’ Up Whisper White, Basic Black & Bravo Burgundy
Ink: Stampin’ Up Basic Black, Baja Breeze, Tempting Turquoise & Craft White, Adirondack Lake Mist & Oregano
Accessories: Versamark Pad and Marker, White Gel Pen, Prismacolor Markers, Stampin’ Up Markers, Post it Note, Clear embossing powder, Heat Gun, Sponges, Stamp-A-ma-Jig, Photo Corner Punch

dsc06831.JPG

Stamped Snowman by first loading my stamp with Versamark and then loading it with black ink before stamping it on a 4″ x 5.5″ piece of Whisper White card stock.

dsc06802.JPG

Heat embossed the image using fine detail clear embossing powder and a heat gun.

dsc06803.JPG

Colored his nose with a More Mustard marker.

dsc06804.JPG

Colored his pipe with a Close to Cocoa marker.

dsc06805.JPG

Colored his scarf and the inside of his hat with a Baroque Burgundy marker.

dsc06806.JPG

Colored the dark parts of his scarf and inside of his hat with a Bravo Burgundy marker.

 dsc06807.JPG

Colored the dark parts of the snowman’s body with a 10% Grey Prismacolor Marker.

dsc06808.JPG

Added Muted Turquoise marker to the shadow parts of his body to give him a blue tint.

dsc06809.JPG

Colored over the entire image with a Versamark marker being careful to color the light sections first and then the colored sections.    Remember lightest to darkest.  🙂

dsc06810.JPG

Heat embossed the image using clear embossing powder and a heat gun.

dsc06811.JPG

Brayered on Baja Breeze ink.

dsc06812.JPG

Sponged Tempting Turquoise ink below the Baja Breeze ink.

dsc06813.JPG

Sponged a little Oregano ink behind the snowman.

dsc06814.JPG

Stamped the sentiment in black ink using a Stamp-a-ma-jig for placement.

dsc06815.JPG

dsc06816.JPG

Tore through the sticky edge of a post it note and then sponged Lake mist ink right at the post it note edge to create some mounts of snow.

dsc06817.JPG

dsc06818.JPG

Moved the post it note and repeated for a second mound.

dsc06819.JPG

dsc06820.JPG

dsc06821.JPG

Assembled card front and added punched black photo corners.

dsc06822.JPG

Stamped the All Season Wreath stamp around the right and left sides of the Burgundy panel using Craft White ink.

dsc06823.JPG

dsc06824.JPG

Added dots for berries with a White Gel pen.

dsc06826.JPG

Added more dots on the Burgundy panel and some doodles on the Photo Corners.  Also added the brads to the photo corners.

Here it is finished measuring 5″ x 6.5″.

dsc06828.JPG

May the snow in your area be wearing a happy face.  🙂

Until my next post. . . . . . .. . . . . ..

Hugs,

Michelle

Links to all my tutorials can be found here:  http://zindorf.blogs.splitcoaststampers.com/tutorials-ive-written/

Here is a link to my workshop calendar if you want to get info on beginner and advanced Brayer workshops:  http://zindorf.blogs.splitcoaststampers.com/workshop-calendar

Frequently asked questions answers:  http://zindorf.blogs.splitcoaststampers.com/frequently-asked-questions/


Lone Wolf – Tutorial #148

dsc06797.JPG

Good morning, it is with great sadness that I must part with my Sister for a little while.  She will be flying back to Colorado this morning.  We had such a wonderful visit together over the weekend.  Thank you to everyone that wished us a good time.  🙂  My blog readers are the very BEST!

I have this Lone Wolf tutorial for you this morning.  It is kind of how I feel today.  😦

But first I have a happy announcement!!!!

dsc06780.JPG   The winner of Friday’s blog candy is . . . . . . . . . .. . . . . . ..  . ..

JenMarie who wrote “Oh how beautiful! STUNNING!”

JenMarie, please e-mail your address to mzindorf@aim.com and I will put this bookmark in the mail to you.

Thanks everyone for playing along.  Wish I had a bookmark to send all 380 of you!

All right then, let’s get going on the tutorial.  🙂

Supplies:

Stamps: Clearly Inspired LCS101 Nature/Father
Paper: Stampin’ Up Whisper White, Basic Black & Taken with Teal
Ink: Stampin’ Up Basic Black, Adirondack Butterscotch, Oregano, Black, Espresso, Pesto, Pool
Accessories: Brayer, Sponges, White Gel Pen, Brads, Post it Notes

dsc06801.JPG

Brayered Pool ink on a 4.25″ x 5.25″ piece of Whisper White Card stock.

dsc06783.JPG

Brayered Butterscotch ink at the top of the card stock.

dsc06784.JPG

Masked the water area of the card stock with a couple of post it notes.

dsc06785.JPG

Sponged in some mountain shapes with Oregano ink.

dsc06786.JPG

Sponged some Pesto ink at the bottom of the mountains.

dsc06787.JPG

Removed the post it notes.

dsc06788.JPG

Put new post it notes on to mask the sky area.  I left just a bit of the mountains showing at the bottom of the post it notes so I would not get a halo effect (white line).

dsc06789.JPG

Sponged on Pool ink right at the post it note edge using a back and forth motion.

dsc06790.JPG

Stamped the Wolf with Black ink.

dsc06791.JPG

Sponged in the hill using Black ink.

dsc06792.JPG

Sponge just a bit of Butterscotch ink around the top of the hill.

dsc06793.JPG

Sponge a bit of Espresso ink at the top of the card stock to create some clouds.

dsc06794.JPG

With a White Gel Pen, added a light broken outline to the wolf and a few dots at the top of the hill to create highlights.

dsc06795.JPG

Assembled card and here it is finished measuring 5″ x 6.5″.

dsc06797.JPG

One more thing before I close today.   My friend Karen Barber, had a wonderful group of ladies come in from the other side of Ohio to stay the night at her house and stamp their little hearts out.  My sister and I were fortunate enough to have lunch at my local tea house with them and then travel back to Karen’s house to stamp for a little while.  Here is a picture of the group. 

karens-gathering.jpg

Thanks Ladies for including me.  I had a wonderful time and it was so nice meeting you!  See you next year.  🙂

Everyone have a Super, Super Monday!

Until my next post. . . . . . . . . . . .

Hugs,

Michelle

Links to all my tutorials can be found here:  http://zindorf.blogs.splitcoaststampers.com/tutorials-ive-written/

Here is a link to my workshop calendar if you want to get info on beginner and advanced Brayer workshops:  http://zindorf.blogs.splitcoaststampers.com/workshop-calendar

Frequently asked questions answers:  http://zindorf.blogs.splitcoaststampers.com/frequently-asked-questions/