Moon Light Cool Cat – Tutorial

dsc05361.JPG

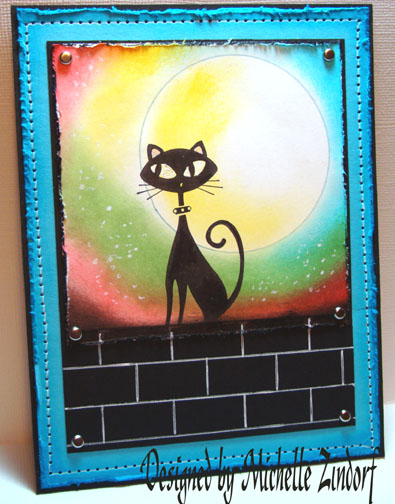
A couple times a year I have to get this old Stampin’ Up set “Cool Cat” out and work with it.  Love this cat!    This morning I felt like getting out the bright colors to liven things up a bit.

Let’s get started.  🙂

Supplies:

Stamps: Stampin’ Up “Cool Cat”
Paper: Stampin’ Up Whisper White, Basic Black & Tempting Turquoise
Ink: Stampin’ Up Tempting Turquoise, Summer Sun, Chocolate Chip, Ruby Red, Basic Black & Wild Wasabi
Accessories: Stamp-a-ma-jig, Coluzzle, Tim Holtz Distressing Tool and Ruler, Piercing Tool, White Gel Pen, Bordering Blue marker, Blush Blossom Marker, Black Marker, Sponges

dsc05364.JPG

Cut a 2.5″ circle with my Coluzzle out of card stock.

Note:  This morning I used a circle cut previously and used in a different project.  Nice to keep these things on hand and re-use them.

dsc05336.JPG

Used the circle as a mask for the moon.  I just held it in place as I worked.

dsc05335.JPG

Traced a fine line around the mask with a Bordering Blue marker on a 4″ x 4″ piece of Whisper White card stock.

dsc05337.JPG

Sponged on some Summer Sun ink.

dsc05338.JPG

Sponged on Some Tempting Turquoise ink.

dsc05339.JPG

Sponged on some Wild Wasabi ink.

dsc05340.JPG

Sponged on some Ruby Red ink.

dsc05341.JPG

Sponged on some Chocolate Chip ink.

dsc05342.JPG

Removed mask.

dsc05343.JPG

Sponged some Summer Sun ink inside of the moon to the left side.

dsc05344.JPG

Using my Stamp-a-ma-jig for placement, stamped Cool Cat with Basic Black ink.

dsc05345.JPG

dsc05346.JPG

Sponged some Black ink at the bottom of the card stock.

dsc05347.JPG

Used a white gel pen to color in the whites of the cat’s eyes.

dsc05348.JPG

Colored in the Cat’s ears with a Blush Blossom Marker.

dsc05349.JPG

Added some dots to the background to look like distant stars.

dsc05350.JPG

Figured out what layout I wanted to use and cut my panels.

dsc05351.JPG

Distressed the main image panel and the Tempting Turquoise panel with a Tim Holtz distress tool.

dsc05354.JPG

Dragged the edges of all sides of the main image panel over the black ink.

dsc05353.JPG

sponged Tempting Turquoise ink around the edges of the Tempting Turquoise panel.

dsc05356.JPG

Drew in lines using a Tim Holtz ruler and White Gel pen to create a look of brick.

dsc05355.JPG

Drew a black line under the cat to create the top of the wall and colored in the top bricks with the black marker to make it flow better from one layer to the next.

dsc05358.JPG

The Tim Holtz ruler has holes in it that you can use your piercing tool with to create a faux stitching look. 

Punched my holes around the edge of the card  stock and then used a white gel pen and ran it from one hole to the next to create the stitching.

dsc05359.JPG

Here you have it the finished card measuring 5″ x 6.5″.

dsc05361.JPG

May your day be sunny and your night sky be bright!

Until my next post. . . . . . . . .

Hugs,

Michelle


Blog Candy Winner and Thinking of Fall-Tutorial

dsc05327.JPG

I’m getting back into the swing of things today after my week off line. 

First things first, we have a blog candy winner!!!

dsc05257.JPG  

The winner is comment number 133 out of 234.   Congratulations to Linda Patti who wrote “please enter me for the blog candy.. LOVE the framed art work!”  Linda, please e-mail me your address so I can get this out to you.

Thanks everyone for playing along.  🙂

Now for today’s tutorial.  I used the stamp sheet from Innovative Stamp Creations “Marvels of Nature” that can be purchased from their online store found here:  http://www.innovativestampcreations.com/ischomepage.html

Supplies:

Stamps: Innovative Stamp Creations “Marvels of Nature”
Paper: Stampin’ Up Whisper White, Very Vanilla, Soft Sky & Not Quite Navy
Ink: Stampin’ Up Really Rust, Not Quite Navy, Soft Sky, Distress inks Old Paper, Antique Linen, Brushed Corduroy & Peeled Paint
Accessories: Brayer, Clear embossing powder, heat gun, Coluzzle Circle Template, Chocolate Chip, Going Gray & Black markers, Post it notes, Ruler

dsc05328.JPG

Loaded tree stamp with Versamark, then Really Rust ink, tapped the brush end of a Chocolate Chip marker on the leaf area of the stamp and colored in the trunk before stamping it on a 4″ x 5.5″ of Whisper White card stock.

dsc05304.JPG

Heat embossed it using clear embossing powder and a heat gun.

dsc05305.JPG

Cover 1/3rd of the bottom of the card stock with a Post it Note to mask it.

dsc05306.JPG

Brayer on Soft Sky ink over the sky area.  Then brayered on Not Quite Navy ink at the top of the card stock, not covering the Soft Sky ink entirely.

dsc05307.JPG

Tore the top of the Post it note to reveal a bit of the white card stock.

dsc05308.JPG

Masked the sky with another Post it note.

dsc05309.JPG

Brayered on Not Quite Navy ink in the unmasked area.   This created the water and horizon line.

dsc05310.JPG

Removed masks.

dsc05311.JPG

Sponged on Antique Linen Distress ink on the ground area using a sideways streaking motion.

dsc05312.JPG

The distress pads are great for direct to paper techniques since the pad is raised up from the plastic case.

dsc05313.JPG

Streaked one edge of the Old Paper ink pad in an upward motion to create grasses.

dsc05314.JPG

Added some Peeled paint grasses in the same manner as the last step.

dsc05315.JPG

Added a few Chocolate Chip marker branches to the center of the tree.

dsc05316.JPG

Added a couple of strokes of the Brushed Corduroy ink pad at the bottom of the Peeled paint grasses.

dsc05317.JPG

Rounded the top of the card stock using a circle Coluzzle template.

dsc05318.JPG

dsc05319.JPG

Assembled card front and added fine lines of Going Gray marker to the corners using a ruler to keep them straight.

dsc05320.JPG

dsc05321.JPG

Using the brush end of the Going Gray marker, added a thick line to the left and bottom of the Very Vanilla panel to create a shadow.

dsc05322.JPG

Added a fine line of black marker to the left and bottom of the Very Vanilla panel to enhance the shadow.

dsc05323.JPG

Here you have it the completed card measuring 5″ x 6.5″.

dsc05327.JPG

Hope your day is filled with cool ocean breezes and sunshine.  🙂

Until my next post. . . . . . .

Hugs,

Michelle


Framed Scene – Tutorial and More Blog Candy

dsc05257.JPG

I’m feeling generous today.  It is my last day at work before my vacation starts.  YIPEEEE!  So today I have a tutorial for you and the finished piece is being given away as blog candy.

So to enter for a chance to win this framed piece, please leave me a comment on this post telling me to enter you.  If you are getting this blog update by e-mail you will need to click this link to leave a comment on this blog post:   http://zindorf.blogs.splitcoaststampers.com/2008/07/25/framed-scene-tutorial-and-more-blog-candy/

I will use a random number generator to pick the winner on the morning of Tuesday, August 5th, which by the way is the next time I will be posting a stamping project.  I will be posting the winner of yesterdays blog candy tomorrow morning before I leave. 🙂

A little about the frame.  I don’t buy new frames for anything.  I like to poke around at thrift stores, flea markets and garage/barn sales for them.  When looking at framed pictures for sale, I’m really looking at the frame.  What is inside of the frame doesn’t matter, because I’m going to throw it away.   The little frame I used today is solid wood and has a nice easel back to it and I paid 25 cents for it.  I also buy really large wood framed pictures, generally not paying more than $2 for them and use them for my pastel paintings.  New they run from $50 to $75.  I found I can pick the frame before I do a painting and then paint it using the dimension I need so it will fit in the frame (cart before the horse I guess, lol).  I also cut my own mats, big savings also.

Ok, enough about that, on with the tutorial.  🙂

Supplies:

Stamps: Stampin’ Up Spring Solitude & Lovely as a Tree
Paper: Stampin Up Whisper White & Basic Black
Ink: Stampin’ Up Blue Bayou, Perfect Plum, Close to Cocoa, More Mustard, Basic Black, Soft Sky & Pale Plum
Accessories: Brayer, Post it Notes, Sponges, White Gel Pen, Fine point Black marker, Frame

dsc05262.JPG

Brayered Soft Sky ink on the top 1/2 of a 6″ x 3″ piece of Whisper White card stock.

dsc05242.JPG

Tore Post it Notes (through the sticky part) to use as a mask for the sky while I put in the horizon line.

dsc05243.JPG

Sponged on More Mustard ink being darkest at the post it note edge.

dsc05244.JPG

Removed mask and stamped bird with Basic Black ink.

dsc05245.JPG

Tore a new piece of post it note to use to mask the sky and create a mountain in the distance.  Sponged Pale Plum ink in the open area.  Opps!  Missed the photo of this.

dsc05246.JPG

Used torn post it notes again for a mask to create another mountain in the distance and sponged on Perfect Plum ink so it is a little darker than the first mountain. 

dsc05247.JPG

Removed masks and used a White Gel pen to define the birds wing and eye.

dsc05249.JPG

Used a fine point marker to put dots on the ground at the birds feet to simulate bird feed.

dsc05250.JPG

Sponged a little Blue Bayou ink at the top of the sky to give it some drama.

dsc05251.JPG

Stamped two pine trees at the left of the piece with Basic Black ink.

dsc05252.JPG

Sponged More Mustard ink on to create a shadow for the trees and for the bird.

dsc05253.JPG

Sponged on a little Close to Cocoa ink in the middle of the tree shadows to give a little more depth.

dsc05254.JPG

Added a Black card stock panel and here it is finished.

dsc05257.JPG

Everyone be safe and have a super pleasant and sunny day! 

Until my next post. . . . . . .

Hugs,

Michelle


SC186 Grapes – Tutorial

dsc05236.JPG

Hello Everyone!  I’m just trying to make it through this week.  Next week I am on vacation from my real job and my husband and I have rented a cabin in the Hocking Hills Region of Ohio for a few days at the beginning of the week and then on July 31st I’m off to sunny California for my first ever workshops.  Let me tell you, I’M EXCITED!!!!

But in the mean time, I checked out the Sketch Challenge SC186 this morning on Split Coast Stampers and decided to play along.  🙂  Here is the link to the challenge if you want to play too:  http://www.splitcoaststampers.com/forums/showthread.php?t=366251

Let’s get started with tutorial 94!  🙂

Supplies:

Stamps: Stampin’ Up Sun Ripened II & Baroque Motifis
Paper: Stampin’ Up Whisper White, Basic Black & Mellow Moss, Basic Grey Design paper
Ink: Stampin’ Up Really Rust, Mellow Moss, More Mustard & Apricot Appeal, Palette Noir Black
Accessories: Black Ribbon, Copper Brads, Clear embossing Powder, Heat Gun, Versamark Marker, Prismacolor Markers, Faber Castell Black fine point maker, Going Gray marker, Sponge, Cuttlebug Corner Die

dsc05239.JPG

Stamped grapes with Palette Noir Black ink on a 3″ x 4″ piece of Whisper White card stock.  Note:  I use Palette ink because it tends not to smear when using solvent based markers.

dsc05216.JPG

Colored the grapes with a Prismacolor Violet Mist Marker.

dsc05217.JPG

Colored the shadow parts of the graps with a Parma Violet marker.

dsc05218.JPG

Colored the leaf with a Mint Cream marker.

dsc05219.JPG

Colored the shadow parts of the leaf with a Light Olive Green marker.

dsc05220.JPG

Went over the entire leaf again with the Mint Cream marker to blend it some.

dsc05221.JPG

Colored the stem with an Eggshell marker and extended the stem some too.

dsc05222.JPG

Added some French Grey 30% marker to the stem.

dsc05223.JPG

Colored over the entire image with a Versamark Marker and then heat embossed the image with clear embossing powder and a heat gun.

dsc05224.JPG

Sponged on Apricot Appeal ink.

dsc05225.JPG

Sponged on More Mustard ink being more heavy with it on the right side.

dsc05226.JPG

Sponged on Really Rust ink being heavy with it on the right side.

dsc05227.JPG

Added a layer of Basic Black card stock and Cuttlebug Corners.

dsc05228.JPG

Added a thick line of Going Gray to the right side of the grapes and leaf to create a shadow.  Then added a very fine line along the right side of the grapes, leaf and under the branch.

dsc05229.JPG

Added highlights to the grapes and leaf with a white gel pen.  (Love white gel pens!)  Now that makes those grapes pop!

dsc05230.JPG

Sponge a bit of Really Rust ink on the left side of my two panels.  Also dragged the card stock across the Really Rust ink pad at the left edge.

dsc05231.JPG

Stamped the flourish with Mellow Moss ink on the left side of the panels.

dsc05232.JPG

Assembled card and added two copper brads.  Here it is finished measuring 5″ x 6.5″.

 dsc05236.JPG

May your day be filled with wonderful highlights and sweet fruit!

Until my next post. . . . . . . . . .

Hugs, 

Michelle


Birds on a Wire – Tutorial

dsc05209.JPG

The idea of birds sitting on a wire has been rattling around in my head for some time.  This morning it finally made it to paper. 

Here is the tutorial.  🙂

Supplies:

Stamps: Stampin’ Up Spring Solitude & Lovely as a Tree
Paper: Stampin’ Up Basic Black, Kiwi Kiss & Whisper White
Ink: Stampin’ Up Baja Breeze, Kiwi Kiss, Old Olive and Basic Black
Accessories: Ruler, Fine point black marker, Old Olive marker, White Gel Pen, Stampin’ Up Piercing Tools, Sponge & Brayer

dsc05215.JPG

Brayered Baja Breeze ink at the top 2/3rds of a 3.5″ x 8″ piece of Whisper White card stock.

dsc05198.JPG

Brayered Kiwi Kiss ink on the bottom 1/4th of the card stock.

dsc05199.JPG

Made a line across the card stock with a fine point black marker and a ruler.

dsc05200.JPG

Stamped birds with Basic Black ink.   I also extended their legs with a fine point black marker so they would reach the black line.

dsc05201.JPG

Inked only the trees, with Basic Black ink, on the tree stamp to omit the ground part of the stamp. Stamp it twice.

dsc05202.JPG

Used a white Gel pen to make the eye and wing of the birds more prominent.

dsc05203.JPG

Sponged Old Olive ink on the trees.

dsc05204.JPG

Made dots with a white gel pen on the left side of the trees to create highlights and show light direction.

dsc05205.JPG

Sponged a shadow under the trees with Old Olive ink that is slanting toward the right side.

dsc05206.JPG

Made dots on the right side of the trees with an Old Olive marker.

dsc05207.JPG

Assembled card front and pierced a line at the bottom of the card stock.

dsc05208.JPG

Added two silver brads and here is the completed card measuring 9″ x 4″.

dsc05209.JPG

On a personal note, I had a great time over the weekend playing, playing and playing some more with my beautiful Grand Daughter.  Here she is pictured with my Husband, Russ being silly.

dsc051971.jpg

Hope your day is filled with snack time and smiles!

Until my next post. . . . . . . .

Hugs,

Michelle


Catching the Light Tutorial and We Have a Blog Candy Winner!

dsc05192.JPG

Wow!  Did I ever have fun reading all of the comments left on yesterdays post telling me where all you readers are from.  May I say, I just want to hop in a car, boat or airplane and visit each and everyone of you.  Thank you so much for your comments.  I now feel like I know a little about all of you.  The Internet sure does make the world a little smaller.

And now for the grand announcement!  The winner, out of 428 entries, for Wednesday’s blog candy is, drum roll, please. . . . . . . . . . . . . . . . . . .

Beth Greco, who was comment number 317 and who left this comment:

This is yet another lovely card. Thanks for sharing on such a regular basis. I have saved a whole bunch of your tutorials onto my laptop so I can take you with me when I go on holidays -) I tried my hand at the Northern Lights one last night and it turned out pretty well.
Thanks for Sharing!
dsc05173.JPG  Beth e-mail me at mzindorf@aim.com your mailing address and I will get these in the mail to you.

Thanks to all for playing along!

Now, I do have a tutorial for you today.

Let’s get started.  🙂

Supplies:

Stamps: Stampin’ Up Art of Life & Baroque Motifs
Paper: Stampin’ Up Whisper White, Soft Sky and Not Quite Navy
Ink: Stampin’ Up Soft Sky, Blue Bayou, Not Quite Navy and Basic Black
Accessories: Sponges, Black marker, White Gel Pen, Versamark marker

dsc05195.JPG

Sponged Soft Sky ink on a 4″ x 4.5″ piece of Whisper White Card stock.  I sponged a bit darker on the right side of the card stock.

dsc05175.JPG

Sponged Blue Bayou ink at the top and right side of the card stock.

dsc05176.JPG

Stamped flowers with Not Quite Navy ink.

dsc05177.JPG

Sponged some Not Quite Navy ink at the top of the card stock.

dsc05178.JPG

Tore through the sticky part of two post it notes to create a mask for the sky area.

dsc05179.JPG

Sponge Not Quite Navy ink heavily on the un-masked ground area.

dsc05180.JPG

Added some Basic Black in at the bottom of the card stock with a sponge.

dsc05181.JPG

Darkened the right side of the flowers and stems with a Faber Castell black marker.

dsc05184.JPG

Put White Gel pen highlights at the top of the flowers and along the left side of the stems and leaves.

dsc05185.JPG

Assembled card front and stamped flourishes with Soft Sky ink. 

Note:  When stamping over multiple layers of card stock your image will have gaps in it, see photo.  I was able to correct the gaps with a Versamark marker since the design was stamp with Soft Sky ink on Soft Sky card stock.

dsc05186.JPG

Now that the image gaps are fixed, I highlighted the flourish with a White Gel pen on the left sides of the design.  

Note:  All of my highlighting with the gel pen was done on the left side of the flowers and flourishes and then along the top of the ground to try to create a sense of where my light source was coming from (right side).

dsc05189.JPG

Here is the finished card measuring 5″ x 6.5″.

dsc05192.JPG

Note:  I will not be posting this weekend due to my, soon to be 5 year old, Grand Daughter’s visit from Fort Campbell, Kentucky.  We are traveling today to get her. 

May your weekend be filled with gentle breezes and the sweet smell of flowers.

Until my next post. . . . . . . .

Hugs to all!

Michelle


In The Nest Tutorial & BLOG CANDY!

dsc05167.JPG

As I said before, I love feeding and watching the birds.  I’m a city girl (spent my first 43 years in the city) and then I moved to a rural town and I’m pretty much surrounded by farm land.   Well being a city girl, I got a lesson at the feed store, yep my town has a feed store, lol.  I went in and asked for bird seed.  I was promptly told you can’t grow birds with seed, what I was looking for was bird feed.  Now how did I make it all these years not knowing the correct term for bird feed. 🙂  Lesson learned!

NOTE:  TIMES UP FOR THE BLOG CANDY! THANKS TO ALL WHO ENTERED. 

Anyway, I have blog candy for you all today!  A set of (16) sixteen, Series 7, Studio G, Clear Stamps.  All you have to do to enter to win these stamps is leave a comment on this post.  If you are getting this by e-mail, please click this link to be able to leave a comment on the post:  http://zindorf.blogs.splitcoaststampers.com/2008/07/16/in-the-nest-tutorial-blog-candy/

I will use a random number generator and will announce the winner on Friday morning, July 18th.  Good Luck everyone!

dsc05173.JPG

Below is a picture of the new Stampin’ Up in colors I just received in the mail.  These colors won’t be available until the new Catty comes out.  I just couldn’t resist playing with them, so I used a couple of them in today’s tutorial.  Please forgive me, I just had to, lol.

Supplies:

Stamps: Stampin’ Up Soft as a Feather, Best Blossoms & French Script
Paper: Stampin’ Up Baja Breeze, Kiwi Kiss & Whisper White
Ink: Stampin’ Up Baja Breeze, Kiwi Kiss & Chocolate Chip
Accessories:Stampin’ Up markers, Versamark pad, 1 1/4 circle punch, Sponges, Stampin’ Dimensionals, Clear embossing powder & heat gun

dsc05141.JPG

dsc05172.JPG

OK, so I was so excited about my new color options, I started this project and realized that I wasn’t taking pictures, lol.  So the first 3 pictures were staged after the fact.  Bare with me it is 4:00 a.m after all. 🙂

Stamped Nest by first loading the stamp with Versamark then with Chocolate Chip ink before stamping on a 4″ x 4″ piece of Whisper White card stock.

dsc05145.JPG

Heat embossed image with clear embossing powder and a heat gun.

dsc05146.JPG

Colored the sides of the nest with a Going Gray marker.

dsc05147.JPG

Stamped the leaves by first loading the stamp with Versamark, then Kiwi Kiss ink, then dabbed a few dots of More Mustard marker on the stamp before stamping.  I like a little texture in my leaves.  🙂

dsc05151.JPG

Heat embossed leaves with clear embossing powder and a heat gun.

dsc05152.JPG

Sponged some Kiwi Kiss ink on the top left side of the card stock.

dsc05153.JPG

Randomly sponged some Baja Breeze ink on the card stock.

dsc05154.JPG

Used a 1 1/4″ circle punch and punched the center out of the nest.

dsc05155.JPG

Flipped the card stock over and stuck on Stampin’ Dimensionals and stuck it to a 4″ x 4″ piece of Black card stock.

dsc05156.JPG

dsc05157.JPG

Glued the punched piece of nest on the black card stock.

dsc05158.JPG

Stamped the French Script Stamp on the card stock using Baja Breeze ink.

dsc05161.JPG

Stamped two eggs on Whisper White card stock using Baja Breeze ink.  Cut them out.

dsc05162.JPG

Lightly pressed eggs on to the Kiwi Kiss ink pad to give them a hint of green.

dsc05164.JPG

Stamped leaves with Baja Breeze ink on a Kiwi Kiss card stock panel.

dsc05165.JPG

Sponged Baja Breeze ink around the card stock edge.

dsc05166.JPG

Assembled card and here it is finished measuring 5.25″ x 5.25″.

dsc05167.JPG

Don’t forget to comment to enter to win the Blog Candy for today!

Hope you feel safe and secure in your own nest today.  🙂

Until my next post. . . . . .

Hugs to all,

Michelle


Stardust Morning MZ – Tutorial

dsc05136.JPG

I decided to check out the Color Challenge on Split Coast Stampers this morning and found Emily had posted a very interesting color combination. 

The color challenge is to use Stampin’ Up So Saffron, Almost Amethyst and Wild Wasabi.  Here is a link to the challenge if you would like to play  along:  http://www.splitcoaststampers.com/forums/showthread.php?t=364002

Here is my attempt and the tutorial for this piece.  🙂

Supplies:

Stamps: Stampin’ Up Stardust & Lovely as a Tree
Paper: Stampin’ Up Whisper White, Basic Black & So Saffron
Ink: Stampin’ Up So Saffron, Wild Wasabi, Almost Amethyst & Basic Black
Accessories: Sponges, Stampin’ Up Markers So Saffron, Almost Amethyst & Basic Black, Gold Brads, Post it Notes, Photo Corner Punch

dsc05140.JPG

Stamped Sun on a 4.5″ x 4.5″ piece of Whisper White Card stock with Basic Black ink.

dsc05120.JPG

Sponged on So Saffron Ink, leaving a light spot in the middle of the sun.

dsc05121.JPG

Sorry about the photos, I can’t believe how blue this Almost Amethyst ink is looking in the photos.  It really is purple, lol.

Sponged Almost Amethyst ink in the sky area of the card stock.

dsc05122.JPG

Tore post it notes through the sticky part to mask the sky area of the card stock.

dsc05123.JPG

Sponged on Wild Wasabi ink on the unmasked area to create a hill.

dsc05124.JPG

Sponged Basic Black in at the torn edge of the post it notes.

dsc05125.JPG

Removed mask.

dsc05126.JPG

Inked only the tree part of the stamp (I didn’t want to stamp the grassy part of the stamp).

Stamped Trees with Basic Black ink on both sides of the sun.

dsc05127.JPG

Extended the tree trunks with a Black marker.

dsc05128.JPG

Added So Saffron Marker to the Sun image.

dsc05130.JPG

Colored a little bit of outline on the sun image with an Almost Amethyst marker.

dsc05131.JPG

Sponged a little Wild Wasabi ink on the trees.

dsc05132.JPG

Attached a panel of So Saffron card stock to a panel of Basic Black card stock and punched small photo corners for each corner out of Basic Black card stock.

dsc05133.JPG

Assembled card front and here it is completed measuring 5.25″ x 5.25″.

dsc05136.JPG

Hope your day if filled with calm skies.

Until my next post. . . . . . . .

Michelle


Pond Life II MZ – Tutorial

dsc05118.JPG

I still had this set by papertreyink.com “Pond Life” on my desk from Friday so I decided to give it another go. 

Here is the tutorial.  🙂

Supplies:

dsc05119.JPG

Stamped Lily with Salmon ink on Whisper White Card stock.  Turned stamp upside down and stamped lily again with Aqua ink.

dsc05087.JPG

Darkened bottom of Salmon lily with a Blush Blossom marker.

dsc05088.JPG

Darkened bottom of reflection lily with a Going Gray and Blush Blossom marker.

dsc05089.JPG

Put Going Gray marker under Salmon Lily to create a shadow.

dsc05090.JPG

Put a fine line of Black marker under the Salmon lily to define shadow.

dsc05091.JPG

Colored over both the lily images with a Versamark marker and heat embossed using clear embossing powder and a heat gun.

dsc05092.JPG

dsc05093.JPG

Using a Mirror Image Stamp (see frequently asked questions in regards to Mirror image stamp) stamp a loose mirror image of the duck with basic black ink. 

Note:  to use mirror image stamp, stamp image on mirror image stamp and the stamp mirror image stamp on card stock.

dsc05094.JPG

Defined mirror image of duck a little with a going gray marker.

dsc05095.JPG

Stamp duck image above mirror image with Basic Black ink.

dsc05096.JPG

Went over both duck images with a Versamark marker and heat embossed using clear embossing powder and a heat gun.

dsc05097.JPG

dsc05098.JPG

Brayer Cloudy Blue ink over card stock, leaving it lighter at the top.

dsc05099.JPG

Brayered Not Quite Navy at the bottom and just a little at the top of the card stock.

dsc05100.JPG

Stamped lily pads with Lettuce ink.

dsc05101.JPG

Stamped more lily pads, but stamped off once on my scrap paper before stamping image (Second generation stamping).  This makes the images lighter in color.

dsc05102.JPG

Sponged on more Not Quite Navy ink at the bottom of the card stock.

dsc05103.JPG

Added gray marker at the bottoms of the lily pads and the bottom of the main image duck.

dsc05104.JPG

Stamped Reeds with Basic Black ink.

dsc05105.JPG

Put white highlights on top lily pad, duck, lily and reeds with a white gel pen.

dsc05108.JPG

Glued main imgage panel to a piece of Basic Grey “Archaic” design paper and swiped some Not Quite Navy ink across the design paper and onto the main image panel.

dsc05110.JPG

Stamped more reeds with Basic Black ink.

dsc05111.JPG

Drew in some of the bottoms of the reeds from the main image panel to the design paper panel with a black marker.  Used a White Gel pen to put highlights on the reeds on the designer paper.

dsc05112.JPG

Assembled card front and added Old Olive Photo Corner punches and copper brads.

dsc05113.JPG

Here is the card finished measuring 5.25″ x 5.25″.

dsc05118.JPG

Hope your day is filled with peace and tranquility.

Until my next post. . . . ..

Michelle


Pond Life MZ Style – Tutorial

dsc05084.JPG

I use stamps from all different companies these days.  My piece today uses Papertreyink.com stamps “Pond Life”.

I use to be stickily a Stampin’ Up girl, but too many fabulous companies have popped up that need my money, lol.  Really, I just can’t resist a great stamp set when I see it.  This is one set I just had to have.  So we are going on a little trip to the pond today with this tutorial.  Grab a cup of your favorite coffee, tea or soda and follow along.

Let’s get started.  🙂

Supplies:

Stamps: Paper Trey Ink “Pond Life” , Stampin’ Up Canvas BG
Paper: Stampin’ Up Whisper White, Blush Blossom and Cool Caribbean
Ink: Stampin’ Up More Mustard, Adirondack Terra Cotta, Peach Bellini, Salmon, Aqua, Lettuce, Ginger, Stream
Accessories: Stampin’ Up Markers Blush Blossom, Going Gray, Barely Banana, More Mustard, Faber Castell Black fine tip marker, White Gel pen, Sponges, Versamark pad and marker, Clear embossing powder, heat gun, Copper Brads

dsc05086.JPG

Stamped Water lily with Salmon ink on a 3.75″ x 3.75″ piece of Whisper White Card stock.

dsc05052.JPG

Add some Blush Blossom marker to the bottom of the images.

dsc05054.JPG

Added Barely Banana marker to the center tip of the images.

dsc05055.JPG

Colored over the images with a Versamark Marker.

dsc05056.JPG

Heat embossed the images with clear embossing powder and a heat gun.

dsc05057.JPG

This set has these great stems in them.  Since these stamps are unmounted you can take this stem and bend it when you stick it on the mount.  Nice to make different shaped stems and grasses.  It looks funny to have straight grasses. 🙂

Stamped stems by first loading stamp with Versamark and then More Mustard ink before stamping.

dsc05058.JPG

Heat embossed stems with clear embossing powder and a heat gun.

dsc05059.JPG

Stamped lily pads, by first loading the stamp with Versamark, then Lettuce ink and then added some More Mustard marker to the edges of the stamp before stamping.

dsc05060.JPG

Heat embossed with clear embossing powder and a heat gun.

dsc05061.JPG

Sponged on Peach Bellini ink.

dsc05062.JPG

Sponged on Aqua Ink.

dsc05063.JPG

Sponged on Terra Cotta ink.

dsc05064.JPG

Sponged on Stream ink.

dsc05065.JPG

Added some more lily pads with Lettuce ink, but stamped off once on my scrap paper before stamping on the card stock (also known as a second generation stamping).

dsc05066.JPG

Added some more stems with Lettuce ink.

dsc05067.JPG

Stamp the Cat tail head stamp with Ginger ink.

dsc05068.JPG

Added a shadow under some of the lily pads and lilies with a Going Grey marker.

dsc05069.JPG

Added a fine line of black marker under the lilies to really give them dimension.

dsc05070.JPG

Added Ginger ink to the bottom left corner of the card stock.

dsc05071.JPG

Stamp some more lily pads with Lettuce ink.

dsc05072.JPG

Added some hand drawn grasses with a black marker and put a fine line of black marker down the right side of the cattails.

dsc05073.JPG

Added White Gel pen highlights to a few of the grasses, tops of the lilies and tops of the cattails.

dsc05074.JPG

Stamped Canvas background stamp on a 5 1/8″ x 5 1/8″ piece of Cool Caribbean card stock with Aqua ink.

Stamped Canvas background stamp on a 4.75″ x 2″ piece of Blush Blossom card stock with Salmon ink.

dsc05075.JPG

Sponged Stream ink on the top right corner of the Cool Caribbean card stock panel.

dsc05076.JPG

Sponged Ginger ink on the bottom left corner of the Blush Blossom panel.

dsc05077.JPG

Assembled card and added Copper Brads.

Here it is finished measuring 5.25″ x 5.25″.

dsc05084.JPG

Hope your day if filled with the wonderful sounds of lapping water and frogs croaking.  🙂

Until my next post. . . . . . .

Michelle