Natures Silhouettes – Tutorial

dsc04422.JPG

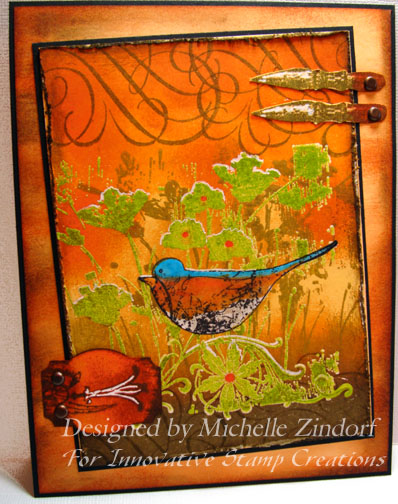
This card was created for SplitCoastStampers.com Color challenge today, CC170 in which we were challenged to use Regal Rose, Real Red and So Saffron.  Hmmmm, that’s a hard combination.  But I will give it a try.

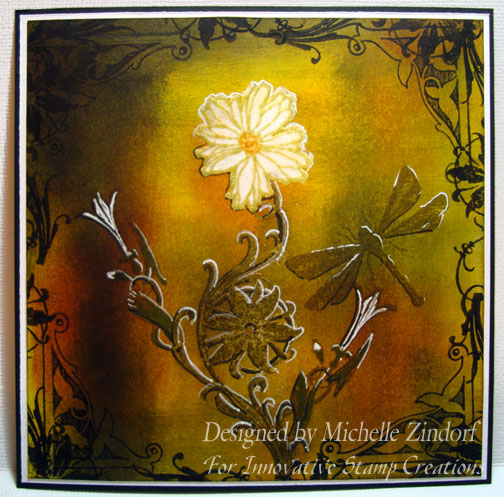
The stamp used in today’s tutorial is by Innovative Stamp Creations from the Natures Silhouettes sheet.  Here is a link to their online store:  http://www.innovativestampcreations.com/ischomepage.html

Let’s get going on the tutorial.  🙂

Supplies:

Stamps: Innovative Stamp Creations – Nature Silhouettes II
Paper: Stampin’ Up Whisper White, Real Red, Regal Rose
Ink: Stampin’ Up Rose Red, Regal Rose & So Saffron
Accessories:Versamark pad, Clear Embossing Powder, Heat Gun, Brayer, Piercing Tools, Sponge, Post it notes, Silver Paint Pen, Black Marker, 1 3/8 circle Punch, Brads, Ribbon, Coluzzle & Circle Template

dsc04427.JPG

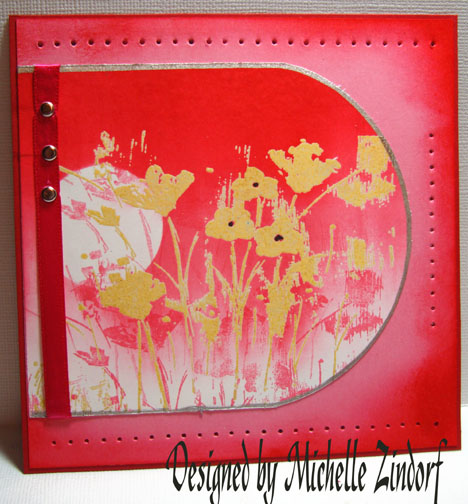
Stamped flower silhouette stamp on Whisper White card stock by first loading the stamp with Versamark and then So Saffron ink before stamping.

Note:  this stamp is an unmounted stamp, but I don’t own a large enough acrylic mount for it so I stuck it to the back of a large mounted stamp I have temporarily.

dsc04409.JPG

Heat embossed using fine detail clear embossing powder and a heat gun.

dsc04410.JPG

Punched from the sticky part of a post it note a 1 3/8 circle to use a mask for the moon.

dsc04411.JPG

Brayered on Regal Rose ink in the sky area, leaving some white card stock showing towards the bottom.

dsc04412.JPG

Brayered Real Red ink at the top of the card stock.

dsc04413.JPG

Used my Coluzzle to cut a curve in the right side of the card stock.

dsc04414.JPG

dsc04415.JPG

Colored the centers of a few of the flowers with a black marker.

dsc04416.JPG

Stamp the silhouette stamp with Regal Rose ink.

dsc04417.JPG

Wiped the ink from the embossed images with an old rag.

dsc04418.JPG

Used a Prismacolor Silver Paint marker to edge the card stock. 

dsc04419.JPG

Sponged Real Red ink on a Regal Rose piece of card stock for one of the layers.

dsc04420.JPG

Assembled card front and used my piercing tools to do the piercing at the bottom, top and right side of the card front.

dsc04421.JPG

Here is the completed card measuring 5.25″ x 5.25″.

dsc04422.JPG

Hope your day if filled with pink flowers and sunsets.

Until my next post. . . . . . . .

Michelle


Flower and Flourishes – Tutorial

dsc04346.jpg

This card was created for the Innovative Stamp Creation’s Color Challenge ISC C5 that can be found here:   http://innovativestampcreations.blogspot.com/

All images are by Innovative Stamp Creations.  Here is a link to their online store:

http://www.innovativestampcreations.com/ischomepage.html

Let’s get started with this morning’s tutorial.  🙂

Supplies:

Stamps: Innovative Stamp Creations – Textures Backgrounds/Sentiments and Fancy Designs
Paper: Stampin’ Up Whisper White, Cool Caribbean, Real Red and Black
Ink: Stampin’ Up Basic Black, Real Red, Taken with Teal, Cool Caribbean, Soft Sky and Palette Noir Black
Accessories: Sponges, White Gel Pen, Versamark Marker, Clear embossing powder, heat gun, Black marker, Prismacolor markers Light Blue & Crimson Red

dsc04350.JPG

Stamped flower with Palette Noir Black ink on Whisper White card stock.

dsc04331.JPG

Colored the middle and center of the flower with a Prismacolor Crimson Red marker.

dsc04332.JPG

Colored ends of the petals and circle in the center with a Prismacolor Light Blue marker.

dsc04333.JPG

Colored over the entire flower with a Versamark marker and heat embossed using fine detail clear embossing powder and a heat gun.

dsc04334.JPG

dsc04335.JPG

Randomly sponged Soft Sky ink on the background.

dsc04336.JPG

Randomly sponged Cool Caribbean ink on background.

dsc04337.JPG

Randomly sponged Taken with Teal ink on the background.

dsc04338.JPG

Randomly sponged Real Red ink on the background.

dsc04339.JPG

Flipped the background stamp over on the table, design side up and inked it using a sponge so I would get a soft impression.

dsc04340.JPG

Flipped my card stock over, face down on the stamp and gentle went over it with my hand to make the impression on the card stock.

dsc04341.JPG

Stamped Flourishes with Palette Noir Black ink around the edges of the card stock.

dsc04342.JPG

Sponged black ink around the edges of the card stock.

dsc04343.JPG

Darkened some of the flourishes with a black marker.

dsc04344.JPG

Missed taking this picture, but I took a white gel pen and accented some of the flourishes.  Now that makes them pop.  I also, make three white dots in each corner of the card stock.

The corners in the finished piece were made with a Photo corner punch and black card stock.  The photo corners are put under the main image panel.

Assembled the card and here it is finished measuring 5.25″ x 5.25″.

dsc04346.jpg

I hope you have some time to get inky and try this tutorial and join in the Innovative Stamp Creations challenge. 

May your day be filled with flowers and flourishes.

Until my next post. . . . . . . .

Michelle


Ocean Ruins – Tutorial

dsc04407.jpg

I got these great images from My Paper Moon.  Here is the link to their online store:  http://www.mypapermoon.com/

There is a great inspiration challenge at Split Coast Stampers today that I used when creating this scene.   The colors in the inspiration pieces are so beautiful together.  Here is a link to the challenge if you would like to play along:  http://www.splitcoaststampers.com/forums/showthread.php?t=353758

Saturday mornings I have a little more time to play around so this piece was done with layers of emboss resist. 

Ready to follow along?  Let’s get started.  🙂

Supplies:

Stamps: My Paper Moon Stamps, palm, rock, bird, pillar
Paper: Stampin’ Up Whisper White, Bashful Blue & Old Olive
Ink: Stampin’ Up Old Olive & Chocolate Chip, Adirondack Watermelon, Aqua & Stonewashed, Palette Noir Black
Accessories: Brayer, Fine Detail Clear Embossing Powder, Heat Gun, Post it Notes, Stamp-a-ma-Jig, Versamark pad & Marker, Prismacolor Markers, Ribbon, Brads

dsc04408.JPG

Stamped Bird Foliage stamp using Palette Noir Black on Whisper White card stock.

dsc04371.JPG

Colored foliage with Prismacolored markers – Light Olive Green & Lime Green.

dsc04372.JPG

Stamp Grassy Rock stamp twice by first loading stamp with Versamark and then Old Olive ink before stamping each time.

dsc04373.JPG

Heat embossed grassy rock images using fine detail clear embossing powder and a heat gun.

dsc04374.JPG

Colored rocks and the bird with a Prismacolor Cool Grey 10% marker.

dsc04375.JPG

Colored the shadow on the bottom of the rocks with a Prismacolor cool Grey 80% marker.   Then went over the rocks again with the Prismacolor cool Grey 10% marker to soften the hard edge of the darker grey.

dsc04376.JPG

dsc04377.JPG

Colored the birds beak and legs with the Prismacolor Cool Grey 80% marker. Colored over birds body with a Prismacolor Blush Pink Marker.

dsc04378.JPG

Colored over the rocks, bird and leafy foliage with a Versamark marker and then heat embossed the images with clear embossing powder and a heat gun.

dsc04379.JPG

Since my foreground images are heat embossed I’m able to now go in and stamp over them to get depth in the scene.

Using a Stamp a ma jig for placement, stamped pillar using by first loading stamp with Versamark and then Old Olive ink before stamping.  Heat embossed the image using clear embossing powder and a heat gun.

dsc04380.JPG

dsc04381.JPG

dsc04382.JPG

Repeated the pillar stamping and embossing 3 more times for the other pillars.

Colored the pillars with a Prismacolor Light Cerulean Blue marker.

dsc04386.JPG

Colored over the pillars with a Versamark marker and heat embossed images using clear embossing powder and a heat gun.

dsc04388.JPG

Since the Pillars are heat embossed I can over stamp them with the palm tree.  So using a Stamp-a-ma-jig for place, I stamp the palm tree by first loading the stamp with Versamark and then Old Olive ink and heat embossed it using clear embossing powder and a heat gun.  Note:  It is not necessary to wipe the ink from the pillars when you stamp the tree, because the ink just melts away when you heat emboss the tree.  Really!  Try it!

dsc04389.JPG

dsc04390.JPG

dsc04391.JPG

Colored the stem of the tree with a Prismacolor Cool Grey 80% marker on the left side to create a shadow.

dsc04392.JPG

Colored the trunk of the tree with a Versamark marker and heat embossed it using clear embossing powder and a heat gun.

dsc04393.JPG

dsc04394.JPG

Now all of my images are heat embossed so I can put in my sky and water.

Used post it notes to mask the sky area.

dsc04395.JPG

Brayered on Aqua ink for the water.

dsc04396.JPG

Sponged Stonewashed ink right at the edge of the post it note to create a darker horizon line.

dsc04397.JPG

Took off the post it notes and put clean ones on to mask the water area.   Note I use clean post it notes so the blue will not smear into my sky area.

dsc04398.JPG

dsc04399.JPG

Brayered on Watermelon ink at the top of the card stock.

dsc04400.JPG

Removed mask and wiped the ink from the embossed images using a soft rag.

dsc04401.JPG

Sponged Chocolate Chip ink at the bottom of the card stock.

dsc04402.JPG

Heavily sponged Watermelon ink at the top of the card stock to make the sky more dramatic.

dsc04403.JPG

Assembled card and here it is finished measuring 5″ x 6.5″.

dsc04407.jpg

Why don’t you give this tutorial a try?  I think you will be amazed at how easy it is to emboss over embossed images and get depth in your stamped scenes.

Hope your day is filled with balmy ocean breezes and beautiful scenery!

Until my next post. . . . . . .

Michelle


Floral Friendship – Tutorial

dsc04367.jpg

Wanted to work on a piece that was not a landscape this morning.  The images used are by Innovative Stamp Creations.  Here is a link to their online store:  http://www.innovativestampcreations.com/ischomepage.html

Let’s get started on the tutorial.  🙂

Supplies:

Stamps: Innovative Stamp Creations – Friendship & Fancy Designs
Paper: Stampin’ Up Whisper White, Chocolate Chip, Cool Caribbean
Ink: Stampin’ Up Soft Sky & Chocolate Chip, Adirondack Ginger & Stream, Palette Noir Black
Accessories: Versamark Pad & Marker, Fine Detail Clear Embossing Powder, Heat Gun, Prismacolor markers Eggshell, Buff, Light Blue & Terra Cotta, Sponge

dsc04370.JPG

Stamped flowers with Palette Noir Black ink on Whisper White Card stock. 

dsc04351.JPG

Colored the outer part of the flower petals with a Prismacolor Eggshell marker.

dsc04352.JPG

Colore the flower centers with a Prismacolor Terra Cotta marker.

dsc04353.JPG

Colored over the flower images with a Versamark marker and heat embossed with fine detail clear embossing powder and a heat gun.

dsc04354.JPG

dsc04355.JPG

Stamped the face image of my Stamp a ma jig plastic sheet and then used it for placement.

dsc04356.JPG

Stamped face image by first loading the stamp with Versamark and then Chocolate Chip ink before stamping.

dsc04357.JPG

Heat embossed image using fine detail clear embossing powder and a heat gun.

dsc04358.JPG

Colored the face using a Prismacolor Buff marker.

dsc04359.JPG

Colored her eyes with a Prismacolor Light Blue marker.

dsc04360.JPG

Sponged on Soft Sky Ink using a circular motion.

dsc04361.JPG

Sponged Ginger ink around the face image using a circular motion.

dsc04362.JPG

Getting darker yet, sponged Chocolate Chip ink around the face image.

dsc04363.JPG

Sponged on Stream ink in a circular motion to the left of the face and a little on the top and bottom.

dsc04364.JPG

Stamped Flourish with Soft Sky ink.

dsc04365.JPG

Assembled card and here it is completed measuring 5″ x 6.5.

dsc04367.jpg

Hope your day is one of sweet smelling flowers!

Until my next post. . . . . . .

Michelle


Red Bird Lake – Tutorial

dsc04324.jpg

This is for the Color Challenge on SCS in which we are challenged to use Real Red, Soft Sky and Blue Bayou.  Here is the link if you would like to play along:  http://www.splitcoaststampers.com/forums/showthread.php?t=352715

Let’s get started with the tutorial.  🙂

Supplies:

Stamps: Basic Grey Figgy Pudding Winterland
Paper: Stampin’ Up Whisper White, Soft Sky and Blue Bayou
Ink: Stampin’ Up Real Red, Soft Sky and Blue Bayou
Accessories: Versamark pad, Clear embossing powder, heat gun, Not Quite Navy & Real Red makers, black fine point marker, White Gel pen, Ribbon, Brayer, 1 3/8″ circle punch, post it note, sponges

dsc04330.JPG

Stamped bird on Whisper White card stock by first loading the stamp with Versamark and then Real Red ink before stamping.

dsc04308.JPG

Made a dot for the birds eye with a very fine tip black marker.

dsc04309.JPG

Heat embossed the bird using clear embossing powder and a heat gun.

dsc04310.JPG

Brayered Soft Sky ink at the top and bottom of the card stock leaving a bit of white space.

dsc04311.JPG

Punched a mask for the moon from the sticky part of a Post it note with a 1 3/8″ punch.

dsc04312.JPG

Brayered Blue Bayou ink at the top of the card stock, not covering the Soft Sky ink entirely.

dsc04313.JPG

Put sticky notes on to mask the sky area.   Sponged Blue Bayou ink right at the edge of the Sticky note onto the card stock using a circular motion.

Also sponged some of the Blue Bayou across the water area using a swiping motion from left to right.

dsc04314.JPG

Removed all the masks.

dsc04315.JPG

Stamped foliage using Blue Bayou Ink.

dsc04316.JPG

Wiped ink from embossed bird use an old rag.

dsc04317.JPG

Stamped foliage a couple of more times with Soft Sky ink creating the look of a shadow on the water.

dsc04318.JPG

Colored the berries one side with a Real Red Marker and the side facing the moon with a white gel pen.

dsc04320.JPG

Outlined the bottom of the foliage with a Not Quite Navy Marker.

dsc04321.JPG

Outlined the top of the foliage with a White Gel Pen.

dsc04322.JPG

Sponge some Blue Bayou ink on the top left corner and bottom right corner of the card stock.

dsc04323.JPG

Assembled card and here it is finished measuring 5.25″ x 5.25″.

dsc04324.jpg

Just one note before I close this post today.  The workshop I’m teaching in San Jose, CA in August is filling up pretty fast.  Here is a link with more information if you would like to attend:  http://flatfishpaperarts.blogspot.com/

Hope your day is filled with lake breezes and red birds.

Until my next post. . . . .. .

Michelle


Gardening with MFT – Tutorial

dsc04259.jpg

Happy Weekend everyone!  I finally got a moment to use this new set, Can You Dig It from My Favorite Things.  Cute, cute images!  Of course I’m a sucker for gardening images this time of year.

Before we get started on this tutorial, I need to apologize in advance for the first 10 photos being blurry.  I was taking photos in the garden and forgot to change my camera setting back again, daaahhh, lol.  Stick with the tutorial, I do finally get my act together!

Let’s get started. . . . . . . 🙂

Supplies:

Stamps: MFT Can you Dig It
Paper: Stampin’ Up Whisper White, Soft Sky, Not Quite Navy & Creamy Caramel
Ink: Stampin’ Up Creamy Caramel, Chocolate Chip, Close to Cocoa, Not Quite Navy, Soft Sky, Old Olive, Night of Navy & Always Artichoke, Palette Noir Black
Accessories: Brayer, Clear Embossing Powder, Heat Gun, Prismacolor markers, Brads, Ribbon, Stampin’ Up Markers, Sponges

dsc04260.JPG

Stamped image with Palette Noir Black ink on Whisper White card stock.

dsc04225.JPG

Colored her hat with Prismacolor Eggshell marker and then put in a shadow around the flower band with a Prismacolor Sand marker.

dsc04226.JPG

Colored her dress with a Prismacolor Cloud Blue marker.

dsc04227.JPG

Put shadows on her dress at the top and on the bottom with a Prismacolor Blue Slate marker.

dsc04228.JPG

Colored her gloves and shoes with a Prismacolor Light Olive Green marker.

dsc04230.JPG

Gave her a tan on her arms and legs with a Prismacolor Sand marker.  Don’t we wish tanning was that easy, lol.

dsc04231.JPG

Put a little darker shadow at the top of her dress and the very bottom with a Prismacolor Periwinkle marker.

dsc04232.JPG

Colored the flowers on her hat with a Prismacolor Blue Slate marker and filled in the centers with a Prismacolor Sunburst Yellow marker.

dsc04234.JPG

Ok, now we are back in focus, lol.

dsc04236.JPG

Colored over the image with a Versamark maker and heat embossed it with clear embossing powder and a heat gun.

dsc04237.JPG

dsc04238.JPG

Masked upper portion of the card stock at an angle with Post it notes.

dsc04239.JPG

Brayered Creamy Caramel ink on un-masked area.

dsc04240.JPG

Sponged Close to Cocoa ink right were the post it note meets the card stock.

dsc04241.JPG

Flipped the post it notes around and lowered them a little.  Sponged Close to Cocoa ink right where the post it note meets the card stock.

dsc04242.JPG

Continued to move the post it notes down and sponge more Close to Cocoa ink making more lines.

dsc04244.JPG

Removed post it notes.

dsc04245.JPG

Made dots in the rows of dirt with an Old Olive Maker.

dsc04254.JPG

Masked Sky area with new post it notes.

Note:  I use new post it notes instead of re-using ones that have ink on them when I change colors, because the ink on the post it notes with mix with the new ink, yuck.

dsc04247.JPG

Sponged Old Olive ink on the grass area, using a circular motion.

dsc04248.JPG

Removed post it note and sponged on Soft Sky ink in a circular motion in the sky areadsc04249.JPG.

Sponged Not Quite Navy ink at the top of the card stock not covering the Soft Sky ink entirely.

dsc04250.JPG

Decided to put a shadow in for the gardener.  Sponged Close to Coca ink around the bottom part of her.

dsc04251.JPG

Getting darker yet with the shadow, sponge a small amount of Chocolate chip ink right around her leg.

dsc04252.JPG

Sponged a little Always Artichoke at the top of the grassy area.

dsc04253.JPG

Used a Chocolate Chip marker and put a hard line between the row of dirt to define them a little more.

dsc04254.JPG

Sponge a bit of Night of Navy ink at the top of the card stock to create some movement in the sky.

dsc04255.JPG

Assembled card and here it is finished measuring 5.5″ x 5.5″.

dsc04259.jpg

This ends the tutorial, but I have a few photos of my garden to share with you today.

My Lilac bush is in bloom and smells heavenly!

dsc04197.JPG

An Iris, I think the colors on this one is unbelievable.

dsc04200.JPG

Peonies have made there appearance.  These are close to my heart because they have been in my Grandmother’s garden and my Mother’s garden, before coming to me.

dsc04217.JPG

dsc04212.JPG

Here is a front view of the house and the split rail fence I was wiening about installing last weekend, lol.  Wave hi to my DH, Russ  who is leaning on the fence and wondering what the heck his wife is doing, lol.   Anyone want to come over and help me dig the flower beds that will go in front of the fence?  Just let me know and I will have a shoval all ready for you.  🙂

dsc04218.JPG

That’s it for now.

Until my next post. . . . . . .

Michelle


Daisies & Dragonfly – Tutorial

dsc04193.jpg

Boy, ever have one of those days you just couldn’t make up your mind on what you wanted to create?  Well that is me today for sure, lol.  So I settled on a project with a background that is as random as my thoughts are!

Enough said, you will see what I’m talking about in a moment.

Let’s get started.  🙂

Supplies:

Stamps: Innovative Stamp Creations Art4Frames II, here is the link to their great store  http://www.innovativestampcreations.com/iscrubberstampsheets.html
Paper: Whisper White, Black
Ink:Adirondack Butterscotch, Lettuce, Oregano, Rust, Stampin Up Black, Shabby Shutters Distress ink
Accessories:Markers, Versmark Pad and marker, Sponges, Clear Embossing powder, heat gun, white gel pen

dsc04184.JPG

Stamped daisy by first loading stamp with Versamark, then Shabby Shutter ink, and then colored in center of the flower with a More Mustard marker before stamping on Whisper White card stock.  Heat embossed image with clear embossing powder and a heat gun.

 dsc04157.JPG

Colored in flower with a Versamark marker and heat embossed it using clear embossing powder and a heat gun.

dsc04158.JPG

dsc04159.JPG

Stamped stem by first loading stamp with Versamark and then Oregano ink before stamping.  Heat embossed using clear embossing powder and a heat gun.

dsc04160.JPG

dsc04161.JPG

Sponged Butterscotch ink on the card stock using a streaking motion and going different directions.  Note to get a warm glow to your project, start out with an layer of a warmed colored yellow and build color on top of it.

dsc04162.JPG

Sponged on Lettuce ink using the a streaking motion and streaking it in random directions.

dsc04163.JPG

Sponged a few spots of Rust ink on.

dsc04164.JPG

Added some sponged streaks of Oregano ink.

dsc04165.JPG

Going darker yet, sponged on black ink in a streaking motion.  Note:  Be careful not to sponge the black onto you embossed images.  It stains it gray, yuck!

dsc04167.JPG

Added more streaks of Butterscotch ink to bring back some of the warmth.

dsc04168.JPG

More Rust sponging, lol.  There is no right or wrong way to do this.  I just keep piling on the color until I like it.  🙂

dsc04169.JPG

Traced the left side of the stems with a black fine tip marker to create a light and dark side.

dsc04170.JPG

Traced the right side of the stems and top of flower with a White Gel pen.

dsc04171.JPG

Stamped corner stamp with black ink in each corner.

dsc04172.JPG

Stamped dragonfly with Oregano ink.

dsc04173.JPG

Stamped flower bud on left side of stem.  Colored stem with an Old Olive marker, used a black marker and traced the left side of the stem,  traced right side of stem & Dragonfly and colored flower buds with a white gel pen.

dsc04174.JPG

dsc04175.JPG

dsc04176.JPG

Repeated the bud stamp and coloring on the left side of stem.

dsc04177.JPG

Stamped stem stamp around the outside edge of the card stock using black ink.

dsc04178.JPG

Assembled card and here it is finished measuring 5.25″ x 5.25″.

dsc04193.jpg

Hope you enjoyed this embossed sponging project and will give it try.

May your day be filled with sunshine and daisies.  🙂

Until my next post. . . . .

Michelle 


Birds & Berries – Tutorial

dsc04152.jpg

Hi Everyone!  I’m apparently still in the mood for birds.  Here is another one only using Stampin’ Up’s set Touch of Nature & Trees Three.  I hope they bring the Trees Three set back in the next catty.  It is definitely one of my favorites.  Funny that it is because the first time I seen it, I really disliked the way the trees are chopped off at the top and waited until the last second to order it.

Yesterday for me was one of home improvements.  My husband and I installed a split rail fence in front of our home.  Let me say, both of us are pretty sore from all the physical labor.  Now I remember why I don’t do Physical labor!

Enough ramblings from me.  Let’s get started! 🙂

Supplies:

Stamps: Stampin’ Up Touch of Nature, Trees Three & Holidays & Wishes
Paper: Stampin’ Up Whisper White, Soft Sky, Blue Bayou
Ink: Stampin’ Up Soft Sky & Blue Bayou, Palette Noir Black
Accessories: Versamark Pad & Marker, White Gel Pen, Clear embossing powder, heat gun, Stamp-a-ma-jig, Prismacolor markers – Wheat, Burnt Ochre, Light Cerulean Blue, True Blue & Light Walnut, Sponge. 

dsc04156.JPG

Stamped bird with Palette Noir Black ink on Whisper White card stock.

dsc04126.JPG

Colored his chest and the leaves with a Prismacolor Wheat marker.

dsc04127.JPG

Colored his upper chest with a Prismacolor Burnt Ochre marker.

dsc04128.JPG

Colored his upper body with a Prismacolor True Blue Marker, leaving some white space.

dsc04129.JPG

Colored in the white spaces of his upper body with a Prismacolor Light Cerulean Blue marker.

dsc04130.JPG

Colored a little Prismacolor Light Walnut marker on the underside of his belly.

dsc04131.JPG

Colored over the bird and the leaves with a Versamark marker and heat embossed using clear embossing powder and a heat gun.

dsc04132.JPG

dsc04133.JPG

Stamped a second bird, using a Stamp-a-ma-jig for placement and Palette Noir Black ink.  Colored, Over colored with a Versamark marker and heat embossed this bird the same way as the first bird.

dsc04134.JPG

dsc04135.JPG

I wanted to disguise the fact that the branches just end under the birds so I stamped a couple of branches using Black ink and the Stamp-a-ma-jig for placement.

dsc04136.JPG

Colored the Berries with a Prismacolor Light Walnut marker and then went over the dark areas of the berries with a Prismacolor Burnt Ochre marker.

dsc04137.JPG

Colored the leaves with a Prismacolor Wheat marker.

dsc04138.JPG

Colored over the berries and leaves with a Versamark marker and heat embossed using clear embossing powder and a heat gun.

dsc04139.JPG

dsc04140.JPG

Stamped Trees by loading the stamp with a Versamark pad.  Heat embossed trees using clear embossing powder and a heat gun.

dsc04141.JPG

dsc04143.JPG

Sponged Soft Sky ink on the background using a circular motion.

dsc04144.JPG

Over stamped embossed trees with tree stamp and Soft Sky ink.

dsc04145.JPG

Wiped ink from embossed images with a rag.dsc04146.JPG

Sponged Blue Bayou ink on using a swiping motion from bottom of card stock toward the top to create the appearance of some grasses.

dsc04147.JPG

Used a white gel pen to make some highlights on the bird, such as a dot on their eyes, beak and colored a bit on their bellies.

dsc04148.JPG

Stamped the blossoms at the top of the trees with Blue Bayou ink.

dsc04149.JPG

As I was figuring out the layout I wanted to use, I stamped the sentiment using a Stamp-a-ma-jig for placement and Blue Bayou ink.   I like to stamp my sentiment before I glue everything together just in case I mess up and stamp it crooked.  Believe me this has happened more than once, lol.

dsc04150.JPG

dsc04151.JPG

Assembled card and here it is finished measuring 5″ x “6.5”. 

dsc04152.jpg

This is tutorial number 60!  Are you all still out there following along?

Hope your day is filled with singing birds and blossoming trees.

Until my next post. . . . . . .

Michelle


Rusty Bird Songs – Tutorial

dsc04120.jpg

Well it’s a beautiful sunny day here in Ohio.  The birds are singing and my bird-feeders are extra busy this morning.   The bird songs I’m hearing are what inspired this creation.  🙂

I used the up and coming sketch challenge that will be posted later at  http://www.innovativestampcreations.blogspot.com/  

and new stamp images from Innovative Stamp Creations – Nature Silhouettes II & Art 4 Frames II.  Here is a link to their online store:  http://www.innovativestampcreations.com/ischomepage.html

Ready for this Rusty Spring Scene Tutorial?  Alright, then let’s get started 🙂

Supplies:

Stamps: Innovative Stamp Creations – Art 4 Frames II & Nature Silhouesttes II
Paper: Stampin’ Up Whisper White, Basic Black, Apricot Appeal
Ink: Stampin’ Up More Mustard, Pumpkin Pie, Really Rust, Adirondack Lettuce & Oregano, Walnut Distress Ink, Palette Noir Black
Accessories: Versamark, Sponges, Brads, Label Punch, Distressing Tool, Versamark Marker & Pad, White Gel Pen, Clear embossing powder & heat gun, Prismacolor Markers – Burnt Ochre, Terra Cotta, Buff, True Blue

dsc04125.JPG

Stamped Bird with Palette Noir Black ink on Whisper White card stock.

dsc04088.JPG

Colored birds belly with a Prismacolor Buff marker.

dsc04089.JPG

Colored the upper half of bird’s belly with a Prismacolor Burnt Ochre marker.

dsc04090.JPG

Colored the very top of the bird’s belly with a Prismacolor Terra Cotta marker.

dsc04092.JPG

Colored the top of the bird with a Prismacolor True Blue marker.

dsc04093.JPG

Colored the Bird’s beak with a Prismacolor Burnt Ochre marker.

dsc04094.JPG

Colored over the bird image with a Versamark Marker and heat embossed with clear embossing powder and a heat gun.

dsc04095.JPG

Stamp Floral Swirl stamp by first loading with Versamark and then with Lettuce Ink before stamping.

dsc04096.JPG

Heat embossed using Clear embossing powder and a heat gun.

dsc04097.JPG

Colored Center of flower with a Terra Cotta marker and went over it with Versamark and then heat embossed it with clear embossing powder and a heat gun.

dsc04098.JPG

dsc04099.JPG

Stamped Floral Silhouette stamp by first loading stamp with Versamark and then Lettuce Ink before stamping.

dsc04100.JPG

Heat embossed with clear embossing powder and a heat gun.

dsc04101.JPG

Starting at the center of the card stock, sponged on More Mustard ink in a circular motion.

dsc04102.JPG

Working from the outside in, sponged Pumpkin Pie Ink in a circular motion not covering all of the More Mustard.  I left a light area behind the bird.

dsc04103.JPG

Sponged Really Rust ink at the top of the card stock and at the bottom of the flowers.

dsc04104.JPG

Stamped the floral silhouette stamp again only using Oregano ink and moving the stamp about 1/2″ over to the right from where I stamp it before.

dsc04105.JPG

Sponged Walnut Stain using a swiping motion from bottom toward top to create the look of grasses.

dsc04107.JPG

Using a rag wiped ink from embossed images.

dsc04108.JPG

Made highlight with white gel pen on the top of the Flowers in the silhouette.

dsc04109.JPG

Distress edges with The Tim Holtz distressing tool.

dsc04110.JPG

Sponged Walnut Distress ink on the edges.

dsc04111.JPG

Stamped pen nib stamp with Oregano ink on Apricot Appeal card stock.  Cut out images wand swiped on end of the images over a Really Rust ink pad.  Colored the nib end of the images in with a white gel pen.

dsc04113.JPG

Stamped flourish with Oregano Ink at the top of the card stock.

dsc04115.JPG

Punched a label shape out of Apricot Appeal card stock.  Sponged Really Rust ink on it.  Drug the ends of the label over the Walnut Distress Ink pad.  Stamped flower on the label shape using Walnut Stain ink.  Colored Flower bud with a white gel pen.

dsc04116.JPG

Cut a panel of Apricot Appeal card stock and sponged on Really Rust ink and Walnut ink around the edges using a swiping motion.  Sorry, no photo.

Assembled card.  Finished card measures 5″ x 6.5″. 

dsc04120.jpg

Hope you enjoyed this tutorial and your day is one filled with bird songs and sunshine.

Until my next post. . . . . . .

Michelle


Moonlight Lake – Tutorial

dsc04083.jpg

Announcement, Announcement!  I’ve been asked to be part of the Creative Architect Design Team for Innovative Stamp Creations.  Woohoo!  and what an honor to get to create with such artistic stamps and along side such artistic designers!

Here is a link to InnovativeStampCreations.com  http://www.innovativestampcreations.com/ischomepage.html

Check them out and you will find that their stamps are so artistic, fresh and wonderful!  I can’t say enough about their quality either, very deeply etched red rubber, MMMMMM.  Sorry, I sound like I’m describing a desert, lol.

I used two stamps in the making of this card.  One from Innovative Stamp Creations new set Flair of Summer and the other stamp from their Fancy Designs set.   This is my very first card with these stamps so I’m just getting my feet wet with this creation. 

This is also for the Innovative Stamp Creations weekly challenge.  These challenges are just starting and they are going to be good ones. 

Here are the details to play along. WIN a FREE ISC stamp sheet To qualify for the FREE stamp sheet of your CHOICE, you must use ISC images only and post your link on the ISC blog   http://innovativestampcreations.blogspot.com/   There will be a deadline for entries very soon.

Colors are:
Soft Sky

Certainly Celery
Sage Shadow

Chocolate Chip

River Rock or Neutral

dsc04078.JPG

Whew!  I’m a bit gabby this morning.  Ready to get going on this tutorial?  Here we go!

Supplies:

Stamps: Innovative Stamp Creations – Fancy Designs & Flair for Summer
Paper: Stampin’ Up Whisper White, River Rock, Chocolate Chip & Sage Shadow
Ink: Stampin’ Up Chocolate Chip, Soft Sky, Certainly Celery, River Rock & Sage Shadow
Accessories: Versamark pad, Clear Embossing powder, heat gun, 1 3/8 circle punch, post it notes, brads

dsc04087.JPG

Started my main image panel scene by stamping four times the Fancy Designs set stamp on Whisper White card stock.  I loaded my stamp first with Versamark and then Chocolate Chip ink before stamping each image. 

dsc04066.JPG

Heat embossed the images with clear embossing powder and a heat gun.

dsc04067.JPG

Now this next stamp was loaded first with Versamark then River Rock ink, then I took the Certainly Celery pad and patted it on the bottom part of the stamp image, then I stamped the stamp on the card stock.  This gave me a variation in color on the image.

dsc04068.JPG

Heat embossed the image using clear embossing powder and a heat gun.

dsc04069.JPG

Punched a 1 3/8″ circle from the sticky part of a post it note and used it as a mask for my moon.

dsc04070.JPG

Brayered Soft Sky ink on the top 2/3rds of the card stock.

dsc04071.JPG

Masked the sky area with post it notes and brayered Sage Shadow ink at the very bottom of the card stock.

dsc04072.JPG

Sponged Sage Shadow ink at a diagonal from the moon, so there is a light spot left under the moon.

dsc04073.JPG

Removed the post it notes and sponged Sage Shadow ink at the top of the card stock.

dsc04074.JPG

Stamped the plant stamp again using Chocolate Chip Ink.

dsc04075.JPG

Sponged Chocolate Chip ink at the bottom of the card stock using a pouncing motion so it looks like grasses.

dsc04076.JPG

I let the ink dry a few moments and then I wiped the ink from the embossed images.

dsc04077.JPG

Here is the assembled card that measures 5″ x 6.5″.

dsc04083.jpg

Hey, I’m so very glad you got to join me today for this tutorial and little introduction to Innovative Stamp Creations.

Hope your day is one of peace.

Until my next post. . . . . .

Michelle