Seedling Sunset

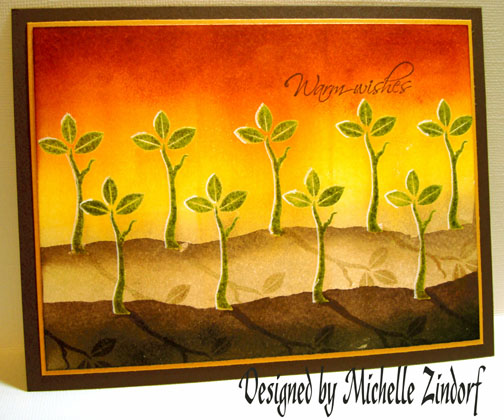
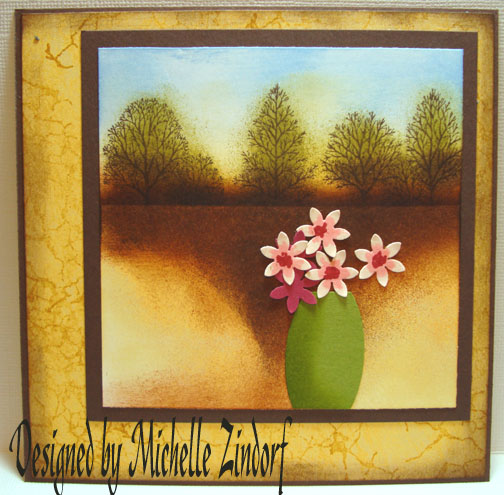
This is for all my fellow gardeners out there.  This branch from Stampin’ Up’s Spring Solitude set has always reminded me of a seedling.  So here it is as such.

dsc03706.jpg

Ready for the tutorial?  Let’s get to it!

Supplies:

Stamps: Stampin’ Up Spring Solitude, Hugs & Wishes
Paper: Stampin’ Up Whisper White, More Mustard & Chocolate Chip
Ink: Stampin’ Up Creamy Caramel, Chocolate Chip & Basic Black, Adirondack Lettuce, Butterscotch & Rust
Accessories: Versamark Pad, Brayer, Clear embossing powder, heat gun, Post it notes, Stamp-a-ma-jig, White Gel Pen, Sponges

dsc03710.JPG

Stamped a row of seedlings on Whisper White card stock by loading my stamp first with a Versamark pad and then with Lettuce ink before stamping.  I had to use a Stamp-a-ma-jig for placement because I cannot for the life of me stamp in a straight line, lol.

dsc03686.JPG

Heat embossed images with clear embossing powder and a heat gun.

dsc03687.JPG

Stamped a second row the same as the first with Versamark and Lettuce ink.  Heat embossed second row with clear embossing powder and a heat gun.

dsc03688.JPG

dsc03689.JPG

Brayered on Butterscotch ink in the sky area.

dsc03690.JPG

Brayered on Rust ink at the top of the card stock, not covering the Butterscotch ink entirely.

dsc03691.JPG

Brayered on Creamy Caramel ink on the ground area.

dsc03692.JPG

Masked the sky area with post it notes that have been torn on the sticky edge side.

dsc03693.JPG

Lightly sponged Chocolate Chip ink in a circular motion at the torn edge of the post it notes.  This will create the horizon line.

dsc03694.JPG

Moved the post it notes down to create the mound of dirt for the seedlings in the foreground.

dsc03695.JPG

Sponged Chocolate Chip ink heavily on the bottom of the card-stock, covering the entire unmasked area.

dsc03696.JPG

Removed mask and sponged Basic Black ink at the very bottom of the card stock.

dsc03697.JPG

Heavily sponge some Rust ink at the top of the card stock to create a little interest in the sky area.

dsc03698.JPG

Time to put in some shadows 🙂

Using my Stamp-a-ma-jig for placement I stamped the seedling again to create the shadow for the back row of seedlings with Creamy Caramel ink.

dsc03699.JPG

dsc03700.JPG

Using the Stamp-a-ma-jig again for placement, stamped the shadows for the first row of seedlings using Chocolate Chip ink.

dsc03701.JPG

Using the Stamp-a-ma-jig again and stamped my sentiment with Chocolate Chip ink.  We’ve gone to far now to stamp the sentiment crooked, lol.

dsc03702.JPG

Used a White Gel Pen to highlight the left sides of the seedlings.  This makes them look like they are back lite.

dsc03704.JPG

Assembled card and here it is complete.  This finished card measures 5″ x 6.5″.

dsc03706.jpg

Hey, I want to thank everyone for visiting my blog.   I am shock to see that my blog counter has went over 100,000!!!!

Also, I broke down and purchased a camcorder.  My hope is to figure out how to use it and do a few technique videos.  Would anyone be interested in seeing a video on Brayering? 🙂

May your day be filled with new growth and sunshine!

Until my next post. . . . .

Huge Hugs,

Michelle


Blue Stampede – Tutorial

dsc03675.jpg

Going a little Moody Western today.  🙂

Supplies:

Stamps: Stampin’ Up Wanted
Paper: Stampin’ Up Whisper White, Brilliant Blue, Tempting Turquoise
Ink: Stampin’ Up Brilliant Blue, Wild Wasabi, Soft Sky, Tempting Turquoise
Accessories: Brayer, Clear Embossing Powder, Heat Gun, Brads, Versamark Marker, Aqua Painter, Sponges

dsc03679.JPG

Stamped two horses on Whisper White card stock using Wild Wasabi & Tempting Turquoise inks.

dsc03652.JPG

Using an Aqua painter, watercolored the horse using the same inks they were stamped in.

Note:  if you squeeze your stamp pads when they are closed they will leave a little pool of ink on the inside of the lid in which to watercolor with.

dsc03656.JPG

Watercolored the back end of the blue horse with Brilliant Blue.

dsc03657.JPG

Colored the horses with a Versamark marker and heat embossed using clear embossing powder and a heat gun.

dsc03658.JPG

dsc03659.JPG

Stamped more horses using Tempting Turquoise ink.

dsc03660.JPG

Watercolored them with Tempting Turquoise ink. 

dsc03661.JPG

Watercolored just a touch of Wild Wasabi ink on the far left horse.

dsc03662.JPG

Watercolored some Brilliant Blue ink on the other two horses.

dsc03663.JPG

Colored the horses in with a Versamark marker and heat embossed them with clear embossing powder and a heat gun.

dsc03664.JPG

Stamped one last horse with Tempting Turquoise.

dsc03665.JPG

Colored the horse with a Versamark marker and heat embossed it with clear embossing powder and a heat gun.

dsc03666.JPG

Brayered Soft Sky ink in the sky area.

dsc03667.JPG

Brayered Tempting Turquoise at the top of the card stock, not covering all of the Soft Sky ink.

dsc03668.JPG

Using a pulling motion from the bottom of the card stock toward the top, sponged in Tempting Turquoise ink at the bottom of the card stock.

dsc03669.JPG

Using that same pulling motion, sponged Brilliant Blue ink at the bottom of the card stock.

dsc03670.JPG

Using the same pulling motion, sponged Wild Wasabi ink at the bottom of the card stock.

dsc03671.JPG

Sponged a bit more Brilliant Blue ink at the bottom of the card stock, still using the pulling motion.  Also sponged some Brilliant Blue ink at the top of the card stock using a circular motion.

dsc03673.JPG

Assembled card and here it is finished, measuring 4″ x 9″.

dsc03675.jpg

Enjoy your day!

Until my next post. . . . . .

Michelle


Night Owls – Tutorial

dsc03634.jpg

I’m interrupting inspiration week because, HELLO!  THERE ARE GINA K. DESIGNS STAMPS IN THE HOUSE!!!!

Do I sound just a tad bit excited? lol   Are these not the cutest little owls you  have ever seen?  These stamps are brand new from Gina K. Designs. Here is the link to check them out:  http://www.shop.ginakdesigns.com/product.sc?categoryId=16&productId=121

Join me today in this tutorial which features using Prismacolor Pencils on a dark background. 

Supplies:

Stamps: Gina K. Designs – Owl Always Love You
Paper: Stampin’ Up Whisper White, Not Quite Navy & Black
Ink: Stampin’ Up Night of Navy, Not Quite Navy, Soft Sky & Black, Adirondack Lettuce & Pesto
Accessories: Prismacolor Pencils, Black Marker, Brads, Brayer, Sponges, Ribbon, Post it Notes

dsc03640.JPG

Brayer on Lettuce ink at the bottom of the card stock.

dsc03612.JPG

Brayer on Soft Sky ink in the sky area.

dsc03613.JPG

Brayer on Not Quite Navy ink over the Soft Sky, but don’t cover the Soft Sky ink completely.

dsc03614.JPG

Brayer on Night of Navy ink over the Not Quite Navy ink, but do not cover the Not Quite  Navy ink completely.

dsc03615.JPG

Brayer on Pesto Ink at the bottom of the card stock, but do not cover the Lettuce ink completely.

dsc03616.JPG

Used Post it notes to mask the ground area. The top of the post it note is placed where I want to create my horizon line.

dsc03617.JPG

Sponged Pesto ink at edge of post it notes, by first using a circular motion right at the post it note edge and then a pouncing motion to make the the appearance of brush.

dsc03618.JPG

Sponged a bit of black ink right at the edge of the post it note to create a shadow at the base of the brush.

dsc03619.JPG

Removed Post it notes.

dsc03620.JPG

Sponge a bit of black ink at the bottom and top of the card stock.

dsc03621.JPG

Stamped the Owls in Black ink using my Stamp-a-ma-jig for placement.

dsc03622.JPG

Colored the image in with a White Prismacolor pencil.  I do this step to give a lighter base to color on and it helps make the colored pencils I will use to stand out more against the dark background.

dsc03623.JPG

Colored in the whites of the owl’s eyes with a white gel pen.

dsc03624.JPG

Colored in the Owl’s feet with a Deco Yellow pencil.

dsc03625.JPG

Colored in the leaves with a Chartreuse pencil.

dsc03626.JPG

Made highlights on the leaves with a white gel pen.

dsc03627.JPG

Colored the Owl’s body with the exception of their stomachs with a Beige Sienna pencil.

dsc03628.JPG

Outlined the Owl’s and darkened some of the detail in their wings with a black marker.

dsc03629.JPG

Lastly, put some highlights on their ears & beaks with a white gel pen.

dsc03630.JPG

Assembled card and here it is completed.  🙂

dsc03634.jpg

Hey, thanks for following along with this tutorial. 

Have a super Saturday!

Michelle


Punched Vases – Tutorial

dsc03611.jpg

Here is a quick card with no stamping.  I stayed up to late watching Survivor and slept in a little this morning.  🙂

Continuing on with Inspiration week, this one was inspired by a  photograph.  I don’t know the artist’s name and the picture was not one I could cut an paste here, sorry.    Wish I would have figured it out before I did the tutorial, but here it is anyway. 🙂

Supplies:

Stamps: None
Paper: Stampin’ Up Whisper White, River Rock & More Mustard
Ink: Stampin’ Up Going Gray, Barely Banana, More Mustard & Bravo Burgundy
Accessories: Large Oval, Large & Small Flower Punches, Sponges

dsc03608.JPG

Punched Ovals from More Mustard, Bravo Burgundy, Barely Banana & Very Vanilla card stock.

dsc03593.JPG

Stacked ovals and cut the bottom & top of them off.  I cut them all at once so they would be the same size.

dsc03594.JPG

Shadowed the left side of the vases with the same color of ink as the card stock they were cut from with the exception of the Very Vanilla vases.  It is shadowed with Going Gray ink.

dsc03595.JPG

dsc03596.JPG

dsc03597.JPG

dsc03598.JPG

Masked the bottom of the card stock with a piece of scrap paper and sponged on Going Gray ink where the two pieces of paper meet.  I used a circular motion when sponging.  🙂

dsc03599.JPG

dsc03600.JPG

dsc03601.JPG

Adhered my vases to the card stock.

dsc03602.JPG

Punched large flowers from So Saffron card stock and adhered them on.

dsc03603.JPG

Punched small flowers from River Rock card stock and adhered them over the large flowers.

dsc03605.JPG

Assembled card and here it is finished.

dsc03611.jpg


Maeve Harris Dragonfly Inspired – Tutorial

dsc03590.jpg

This piece was inspired by Artist, Maeve Harris. 

Here is her piece of art named “Dragonfly” that so inspired me.

Ready for today’s tutorial?  If so, let’s get started.

Supplies:

Stamps: Technique Tuesday BoHo Buzz, Stampin’ Up Essence of Love & Sanded
Paper: Stampin’ Up Whisper White, Soft Sky & Really Rust
Ink: Adirondack Butterscotch, Aqua, Rust, Lake Mist, Ginger and Stonewash, Distress ink Faded Jeans
Accessories: Stampin’ Up markers Not Quite Navy & Pumpkin Pie, Versamark marker, Aqua Painter, Sponges, P80 Sandpaper, Clear embossing powder and heat gun, Paper towel

dsc03591.JPG

I stamped the dragonfly on Whisper White card stock by first loading the stamp with Aqua ink and then coloring the the body  portion of the stamp with a Pumpkin Pie marker before stamping.

dsc03570.JPG

I used my Aqua Painter and Faded Jeans ink to color the wing tips.  Note:  I pressed the Aqua Painter directly on the inked pad to pick up the color for painting.

dsc03572.JPG

Colored over the entire dragonfly image with a Versamark marker and then heat embossed it with clear embossing powder and a heat gun.

dsc03573.JPG

dsc03574.JPG

Sponged on Butterscotch ink using a dragging motion, starting at the bottom of the card stock pulling upward.

dsc03575.JPG

Sponged on Rust ink using a dragging motion again, only this time dragging in a different direction.

dsc03576.JPG

Sponged on Lake Mist ink in the upper left hand corner.  Still using the dragging motion. 🙂

dsc03577.JPG

Sponged on Stonewash ink still using the dragging motion.

dsc03578.JPG

Sponged more Rust ink on using the dragging motion, to get it darker.

dsc03579.JPG

Sponged on Ginger ink  in some of the rust area to get darker yet.

dsc03580.JPG

Swiped a piece of sand paper from my husband’s work bench and sanded the card stock to create the white spot under the dragonfly.  Also, sanded the card stock edges.

The back of the sandpaper says “P80”, I assume that is the grade of the sandpaper.

dsc03581.JPG

Wiped the ink off of the embossed image with a paper towel.

dsc03582.JPG

Stamped the Sanded background stamp on using Faded Jeans ink.

dsc03583.JPG

Attached the main image panel to a panel of Soft Sky card stock and stamped the Essence of Love stamp using Faded Jeans ink.

dsc03584.JPG

See the gapes in the stamped images above, where I stamped over two layers of card stock?  I filled the gapes in with a Not Quite Navy marker by drawing in the missing pieces.

dsc03585.JPG

Sponged Faded Jeans ink on the bottom of the card stock using a circular motion.

dsc03586.JPG

Assembled card and here it is finished.

dsc03590.jpg

This project really taught me how wonderful sandpaper is.  It really distressed the card stock in a hurry.  Love it!

I hope you have been inspired to try this tutorial and give sandpaper a try yourself.

Have a sun filled day!

Until my next post. . . . . . .


Pansies II Inspired – Tutorial

dsc03567.jpg

I’m proclaiming this week “Art Inspiration Week” here on my blog. Why you ask?  Because I can, lol. 

I love art and find so much joy in trying to recreate a masterpiece with rubber stamps, ink and embossing powder.   My pieces always fall short of the original, but I learn tons along the way.  So join me this week and hopefully you will be inspired. 🙂

Today I drew my inspiration from a painting by Anouska Vaskebova titled “Pansies II”.  Here is a picture of the original.

Isn’t it stunning!

Well let’s get started on the tutorial.

Supplies:

Stamps: Stampin’ Up Flower Garden & All Season Wreath, Stampendous Marble Texture Cube, Hero Arts Shadow stamp E2055
Paper: Whisper White, River Rock & Always Artichoke
Ink: Stampin’ Up Barely Banana, More Mustard, Bravo Burgundy, Elegant Eggplant, So Saffron, Always Artichoke, Night of Navy, Not Quite Navy, Adirondack Cloudy Blue & Hazelnut
Accessories: Markers Elegant Eggplant, Apricot Appeal, Black, Bravo Burgundy, Brayer, Sponges, Versamark marker, Aqua Painter, Clear Embossing Powder, Heat Gun, post it notes 

dsc03568.JPG

Stamped two pansies with Elegant Eggplant ink and one with Bravo Burgundy ink on Whisper White card stock.

dsc03519.JPG

Using my Aqua Painter and just plain water I went over the pansies.   The dye ink will bleed so it gives a watercolor effect.

dsc03520.JPG

Colored the center of the flowers with an Apricot Appeal marker.

dsc03521.JPG

Colored dark areas of the stamped images on the Elegant Eggplant flowers with my Aqua Painter and Elegant Eggplant ink.

Note:  Squeeze the closed ink pad and you will get a puddle of ink on the lid in which to use for watercoloring.

dsc03522.JPG

Traced the outline of the Elegant Eggplant flowers with an Elegant Eggplant marker.

dsc03523.JPG

Colored the dark areas of the Bravo Burgundy flower with an Aqua Painter and Bravo Burgundy ink.

dsc03525.JPG

Traced the outline of the Burgundy flower with a Bravo Burgundy marker. 

dsc03526.JPG

Oops, missed taking a photo, added a touch of black marker to the center of the flowers to give a nice contrast to the yellow centers.

Colored over the flower images with a Versamark marker being careful to stay within the image lines.

dsc03528.JPG

Heat embossed images with clear embossing powder and a heat gun.  Note:  heat embossing your images will make them darker 🙂

dsc03530.JPG

Since the flowers are heat embossed they will resist ink stamp over them so we are free to put in a second row of flowers.

Stamped second row of flowers, one in Bravo Burgundy and one in Elegant Eggplant.  Repeated the same coloring steps as in the first row of flowers.

dsc03531.JPG

dsc03534.JPG

Colored over the second row of flowers with a Versamark marker and then heat embossed them with clear embossing powder and a heat gun.

dsc03535.JPG

dsc03536.JPG

Stamped leaves with Always Artichoke ink.

dsc03537.JPG

Colored the leaves lightly with an Aqua Painter and Always Artichoke ink.

dsc03538.JPG

Created a shadow on the leaves by putting more Always Artichoke ink at the bottom half of the leaves with an Aqua Painter.

dsc03539.JPG

Went over the leaves with a Versamark marker and heat embossed them with clear embossing powder and a heat gun.

dsc03540.JPG

dsc03541.JPG

Now it’s time for a flower pot.  I dug out one of my long neglected shadow stamps and stamped the pot with Hazelnut ink, stamping off once on my scrap paper before stamping on my card stock so the image would not be so dark.

dsc03542.JPG

Went over flower pot with a Versamark marker and heat embossed it with clear embossing powder and a heat gun.

dsc03543.JPG

dsc03544.JPG

Now it’s time to put in the counter and wall.

Masked wall area with post it notes.

dsc03545.JPG

Brayered on the counter area with Barely Banana ink.

dsc03546.JPG

Sponged on So Saffron ink using a pouncing motion so the color is broken up little specks.

dsc03547.JPG

Sponged on More Mustard ink, not covering all of the So Saffron ink.

dsc03548.JPG

Lightly sponged a little Always Artichoke ink at the top of the counter area, where it meets the post it note.

dsc03549.JPG

Removed the post it notes and then add new ones to mask the counter area.  Note:  Didn’t mask a little bit of the counter at the top so I wouldn’t get a white line between the wall and the counter and they would blend together better. 🙂

dsc03550.JPG

dsc03551.JPG

Brayered on Cloudy Blue ink.

dsc03552.JPG

Used side “B” of a marble texture cube and Cloudy Blue ink at the bottom of the wall and top corners.

dsc03553.JPG

Stamped side “C” of the marble texture cube with Not Quite Navy ink at the bottom of the wall and the top left corner.

dsc03554.JPG

Sponged, using a pouncing motion, Not Quite Navy ink at the bottom and top corners of the wall.

dsc03555.JPG

Lastly, sponged a little Night of Navy ink not covering all of the Not Quite Navy.  Also, put a few very light spots of Night of Navy in the light areas of the wall to try to create a little texture.

dsc03556.JPG

Removed post it note masks and wiped the ink off of the embossed images with a paper towel being careful to stay on the embossed images with the paper towel.

dsc03557.JPG

Assembled card and here it is finished.

dsc03567.jpg

Thanks and hugs to all of you who left me such wonderful encouraging comments yesterday.  Now that I know so many of you fantastic, big hearted stampers are looking at my tutorials I will continue the best I can in posting them even though the weeds are growing in my gardens.  They do have pretty yellow flowers on them, lol.

Have a fantastic day!

Until tomorrow. . . . . .


Blue Essence Inspired – Tutorial

dsc03517.JPG

Last night I decided to challenge myself and use a fairly complicated piece of art as inspiration.  The original art was created by Megan Aroon and it’s titled Blue Essence.


Isn’t it beautiful!

My card doesn’t even come close, but it was a learning experience.

Here is tutorial #40.

Supplies:

Stamps: Stampin’ Up Trees Three & Simply Circles
Paper: Stampin’ Up Whisper White, Cool Caribbean, Basic Black and More Mustard
Ink: Stampin’ Up More Mustard, Really Rust, Cool Caribbean, Basic Black, Real Red and Brilliant Blue, Broken China Distress Ink, Adirondack Butterscot, Aqua & Hazelnut
Accessories: Brads, Versamark Pad & Marker, Circle Punch, Exacto Knife, Sponges, Post it Notes, Cuttebug Embossing Folder, Clear embossing powder and heat gun

dsc03518.JPG

Stamped trees on Whisper White card stock by first loading stamp with Versamark and the loading it with black ink before stamping.

dsc03485.JPG

Heat embossed image with clear embossing powder and a heat gun.

dsc03486.JPG

I used a glass mat and Exacto knife to cut a curved portion from the post it notes.   I then stuck them to the card stock for a mask for the sky area.

dsc03487.JPG

Sponged Cool Caribbean ink on un-masked area.

dsc03488.JPG

Sponged Brilliant Blue ink just at the edge of the post it note.

dsc03489.JPG

Moved the mask down some and sponged Brilliant Blue ink again right at the post it note masked edge to create another line of Brilliant Blue.

dsc03491.JPG

Moved the post it note masks again so I could create the small hill at the right side.  Sponged Cool Caribbean ink on the open area.

dsc03492.JPG

dsc03493.JPG

Sponged Brilliant Blue ink at the edge of the top post it note.

dsc03494.JPG

Moved the post it note mask down a little and put in a second line of Brilliant Blue ink.

dsc03495.JPG

Removed post it notes and went over hills with a Versamark marker and then heat embossed using clear embossing powder and a heat gun.

dsc03497.JPG

dsc03498.JPG

Cut a circle from the middle of a post it note with a 1 1/4″ circle punch.  Placed mask where I wanted the sun to be and sponged More Mustard ink on using a circular motion.

dsc03499.JPG

dsc03501.JPG

Sponged Really Rust ink around edge of sun using a circular motion.

dsc03502.JPG

Removed post it note mask and went over the sun with a Versamark marker and heat embossed using clear embossing powder and a heat gun.

dsc03503.JPG

dsc03504.JPG

Stamped Dots on sky area by first loading stamp with Versamark, Soft Sky ink and stamping off one time on my scrap paper before stamping on the card stock.  After stamping all of the dots, heat embossed them with clear embossing powder and a heat gun.

dsc03505.JPG

dsc03506.JPG

Randomly in the sky area, applied Real Red ink using direct to paper technique and only using a corner of the stamp pad.  Note:  the corner of the stamp pad makes those little “V” markers.

dsc03507.JPG

Using same technique, applied Hazelnut ink to sky area.

dsc03508.JPG

Using same technique, applied Aqua ink to sky area.

dsc03509.JPG

Using same technique, applied Butterscotch ink to sky area.

dsc03510.JPG.

Using same technique, applied Broken China ink to sky area.

dsc03511.JPG

Using same technique, applied Brilliant Blue ink to sky area.

dsc03512.JPG

Wiped ink from embossed images with a paper towel.

dsc03513.JPG

Assembled card after using a cuttlebug embossing folder on the More Mustard panel.  Here you have it, the complete card.

dsc03517.JPG

This is the 40th tutorial I’ve posted to this blog.  Do you want more or is 40 enough?  Encouragement is greatly appreciated by way of comments, especially during gardening season when I should be weeding, lol.

I hope you find a piece of art today that inspires you and makes you want to recreate it.  It’s such a great learning tool!

Until tomorrow. . . . . .


A Daisy of a Day – Tutorial

dsc03482.jpg

Happy Sunday! 

I took a break from blogging on Saturday in order to meet, for the first time, a fellow Split Coast Stamper, Karen Barber, (aka on SCS as Karen B Barber) .  We started by meeting for lunch at Twin Creek Tea Room in my little country town of West Alexandria, OH.  Here is the link if you want to check it out http://www.twincreektearoom.com/, yum yum.  After that we, of course, did some brayering and stamping at my house.  Here is a shout out to Karen, my new stamping friend!

Ok, on with the tutorial!

Supplies:

Stamps: Cornish Heritage Farms “Who’s That? Horse and Stampin’ Up Trees Three
Paper: Stampin Up Whisper White and Creamy Caramel, Design paper Archaic by Basic Grey
Ink: Stampin’ Up Taken with Teal, Always Artichoke, Cool Caribbean, Old Olive and Creamy Caramel, Walnut Stain Distress Ink
Accessories: Versamark pad and marker, Brads, Ribbon, Distressing Tool, Sponges, Brayer, Clear embossing powder and heat gun, Aqua Painter, paper towel

dsc03484.JPG

Stamped Cornish Heritage Farms stamp “Who’s that? Horse” on Whisper White card stock with Palette Noir Black ink.

dsc03462.JPG

I watercolored the horse using Creamy Caramel ink and an Aqua Painter.   Note:  if you squeeze your ink pad while it is closed it makes a puddle of ink on the lid that you can use for water coloring.  I happened to have a reinker in Creamy Caramel so I put a few drops of reinker on the lid area to work with.

dsc03463.JPG

Using the same ink, Creamy Caramel and the Aqua Painter I went over the image’s shadowed areas to make them darker.

dsc03464.JPG

Went over entire image with a Versamark Marker being very careful to stay within the image lines.   Heat embossed image using clear embossing powder and a heat gun.  Note:  This will make your image darker in color.

dsc03465.JPG

dsc03466.JPG

Stamped flowers on ground area using a Versamark Pad.  Heat embossed flowers using clear embossing powder and a heat gun.

dsc03467.JPG

dsc03468.JPG

Brayered Cool Caribbean ink over sky area.

dsc03469.JPG

Brayered Old Olive ink on the ground area.

dsc03470.JPG

Brayered Always Artichoke ink at the bottom of the card stock.

dsc03471.JPG

Brayered Taken with Teal at the top of the card stock.

dsc03473.JPG

Wiped ink off of embossed images with a paper towel.  I will do this again after I am done with this panel.

dsc03474.JPG

Sponged Taken with Teal ink at the top of the sky to create some interest.

dsc03475.JPG

Decided I wanted my  foreground to be darker, so I sponged on Always Artichoke at the bottom of card stock.

dsc03476.JPG

Used my distressing tool on the card stock edges.

dsc03477.JPG  

Sponged Walnut stain distress ink on edges.

dsc03478.JPG

Also, sponged Walnut Stain Distress ink on the edges of my Creamy Caramel card stock panel.

dsc03479.JPG

Assembled card and here it is completed.

dsc03482.jpg

Hope your day is filled with daisy fields and sunshine.

Until the next post. . . . . . .


Prismacolor Sun on Dark

dsc03458.jpg

I created this card this morning to show you the effect you can get using Prismacolor Pencils & Odorless Paint Thinner on dark colored card stock.  I love this look and it is very easy to achieve. 

Supplies:

Stamps: Stampin’ Up Stardust
Paper: Stampin’ Up Not Quite Navy, Soft Sky & Night of Navy
Ink: Palette Noir Black, Stampin’ Up Night of Navy & Not Quite Navy
Accessories: Prismacolor Pencils, Mona Lisa Odorless Paint Thinner, White Gel Pen, Sponges

dsc03460.JPG

Stamped sun with Palette Noir Black ink on Stampin’ Up Not Quite Navy card stock and then heat set it with my heat gun.  Heating it helps keep the ink from smearing.

dsc03438.JPG

dsc03439.JPG

I use Prismacolor Pencils and Mona Lisa Odorless Paint Thinner and a little plastic cup to put my thinner in.

dsc03440.JPG

I dip my pencil directly into the thinner and then color with it.  The Prismacolor pencil melts like butter on the paper.  It’s wonderful!  Some folks color and then use blending stumps dipped in thinner to blend with.  I just blend with my pencils as I go.  🙂

dsc03441.JPG

Started with a Jasmine pencil.

dsc03442.JPG

Put the Whites of the sun’s eyes in with a white gel pen.

dsc03443.JPG

Added the True Blue pencil to his eyes.

dsc03444.JPG

Colored around the sun with True Blue pencil.

dsc03445.JPG

Add Pale Vermillion pencil.

dsc03446.JPG

Added Jasmine pencil to his face.

dsc03447.JPG

Colored more of his face in with Pale Vermillion pencil.

dsc03448.JPG

Added Poppy Red pencil to the flames, cheeks and outline of circle.

dsc03449.JPG

 Added Deco Yellow Pencil to the outside of the sky area and his eyelids.

dsc03450.JPG

dsc03451.JPG

Added white dots to the sky area with a white gel pen.

dsc03452.JPG

Sponge Not Quite Navy ink to right, top & bottom of card stock.

dsc03453.JPG

Sponged Night of Navy ink over Not Quite Navy ink not covering it completely toward the center.

dsc03454.JPG

Sponged Noir Black ink over Night of Navy ink not covering it completely.

dsc03455.JPG

Sponged Not Quite Navy ink around edge of background panel.

dsc03456.JPG

Assembled card and here it is completed.

dsc03458.jpg

Hope you enjoyed seeing one of the effects you can get using Prismacolor pencils on dark card stock.   Give it a try.

Have a sunshine filled day.

Until tomorrow. . . . . . .


Landscape floral – Tutorial

dsc03434.jpg

Hello fellow stampers!   We have had such beautiful weather here in Ohio, but I’ve not had a chance to be outside this week, so this card represents that feeling.  Let’s start with the tutorial.

Supplies:

Stamps: Stampin’ Up Lovely as a Tree, Marble Texture Cube
Paper: Whisper White, Chocolate Chip, Blush Blossom, Purely Pomagranate & So Saffron
Ink: Stampin’ Up So Saffron, Old Olive, Bashful Blue, More Mustard, Adirondack Espresso, Ginger & Oregano
Accessories: Stampin’ Up Markers, Sponges, Large Oval Punch, Flower Punch

dsc03437.JPG

I’ve put away my brayer for today and decided to do this scene all in sponging. 🙂

Sponged So Saffron ink on 2/3 rd’s of a piece of Whisper White card stock.

dsc03410.JPG

Sponged Bashful Blue ink at top of card stock.

dsc03411.JPG

Used Post it notes as a mask to cover part of the card stock.

dsc03412.JPG

Stamped trees with Espresso ink.

dsc03413.JPG

Sponged Oregano ink on the trees to represent leaves.

dsc03414.JPG

Sponged Ginger ink under the trees.

dsc03415.JPG

Sponged Espresso ink at the horizon line (top of post it notes) and at the bottom of the leaves on the tree.

dsc03416.JPG

Removed post it notes.

dsc03417.JPG

Sponged on Ginger ink over some of the field.

dsc03418.JPG

Sponged Espresso ink over some of the ginger ink.

dsc03419.JPG

Punched an oval out of Old Olive card stock using the large oval punch.   Cut the top and bottom off of the oval.

dsc03420.JPG

dsc03421.JPG

Sponged Old Olive ink on left side of vase to create a shadow.

dsc03422.JPG

Punched flowers out of Blush Blossom and Purely Pomegranate card stock.

dsc03423.JPG

dsc03424.JPG

Colored the centers of the Blush Blossom Flowers with a Pretty in Pink marker.

dsc03425.JPG

Made dots in the very center of the flowers with a Rose Red marker.

dsc03426.JPG

Glued the vase and flowers to the scene.  I put the vase just off center in the scene.  This is more please to the eye.

dsc03427.JPG

Stamped side “A” of the marbling cube on So Saffron card stock using So Saffron ink.

dsc03428.JPG

Stamped side “C” of marbling cube with More Mustard ink.

dsc03429.JPG

Sponged Espresso ink lightly around edge of card stock.

dsc03430.JPG

Assembled card and here it is completed.

dsc03434.jpg

Hope you are able to go outside and enjoy some wonderful weather today.

Until tomorrow. . . . . . . . . .