Summer’s End – Tutorial #113 and Brayer Give away

dsc05844.JPG

Many of you have notice and commented on the fact that I am using a new brayer.  I’m using a new one because I wanted to use the exact one the people attending my brayer workshops get to use and take home with them.   The new brayer is only different from the old brayer due to the handle.  It has the exact same roller.  🙂   There is this crazy rumor that my old Speedball Brayer is magical, lol.  It is not magical, but it still has a great deal of life left in it although it is stained from a few years of use.  Many of you have e-mailed me asking if you could have my old beloved brayer.  Since there is more than one of you asking, I’m going to give it away.  If you wish to enter for a chance at my brayer, please leave a comment on this post and I will use a random number generator to select the winner on the morning of Saturday, September 6th.  If you are receiving my blog update by e-mail you will need to click on this link to enter a comment on this post:   http://zindorf.blogs.splitcoaststampers.com/2008/09/03/summers-end-tutorial-113-and-brayer-give-away/


dsc02568.JPG

Ok, enough about that.   Today’s tutorial is for the SCS Sketch Challenge 192 and I’m using a stamp that I have had for years and has never seen ink.

Let’s get going on the tutorial!
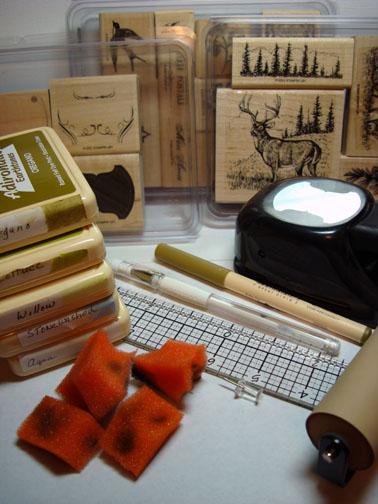
Supplies:

Stamps: Stampin’ Up Summer by the Sea and Canvas Background
Paper: Stampin’ Up Whisper White, Tempting Turquoise, Baja Breeze & Creamy Caramel
Ink: Stampin’ Up Close to Cocoa, Creamy Caramel & Tempting Turquoise, Palette Noir Black & Adirondack Aqua
Accessories: Prismacolor Markers, Sponges, Brayer, Versamark Marker, Fine Detail Clear embossing Powder, Heat gun, Brads, Ribbon, Tim Holtz Ruler, Push Pin, White Gel Pen, Post it Note

dsc05845.JPG

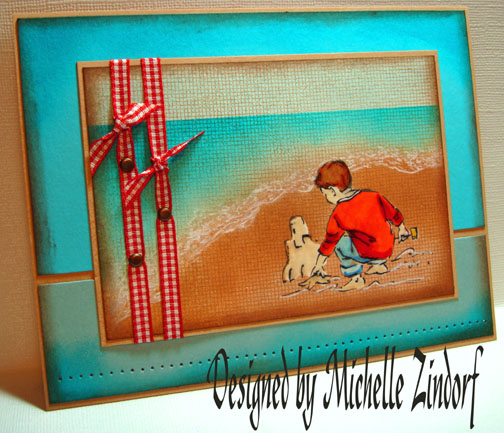
Stamped image on a 3.5″ x 5″ piece of Whisper White card stock with Palette Noir Black ink.

dsc05814.JPG

Colored his shirt in with a Prismacolor Carmine Red Marker.

dsc05815.JPG

Added Crimson Red to the creases of the shirt.

dsc05816.JPG

Colored his pants with Soft Sky Blue.

dsc05817.JPG

Added Periwinkle to the creases of his pants.

dsc05818.JPG

Colored over his pants again with the Sky Blue Light marker to blend them more.

dsc05819.JPG

Colored his shoval with Sunburst Yellow.

dsc05820.JPG

Colored his skin with Pale Peach.

dsc05821.JPG

Colored his hair with Walnut.

dsc05822.JPG

Added some Tuscan Red to the dark areas in his hair.

dsc05823.JPG

Went over all his hair with the walnut marker again to blend.

dsc05824.JPG

Colored the Sand Castle with Eggshell.

dsc05825.JPG

Colored over the boy, starfish and castle with a Versamark marker and heat embossed the images with fine detail clear embossing powder and a heat gun.

dsc05826.JPG

dsc05827.JPG

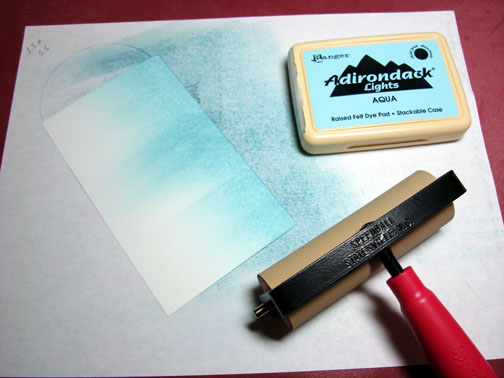
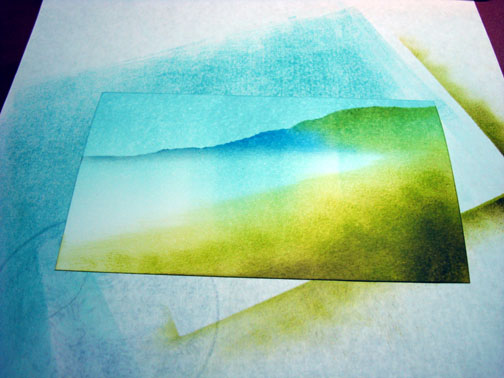
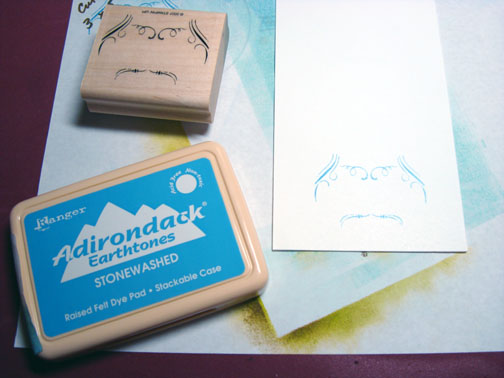
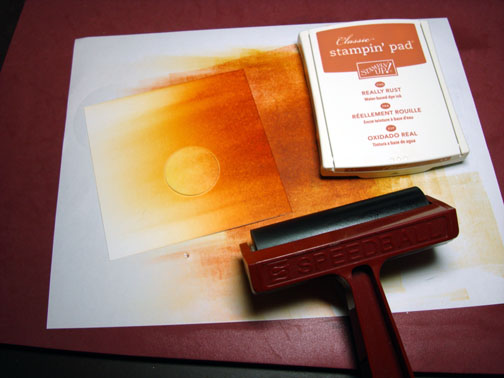
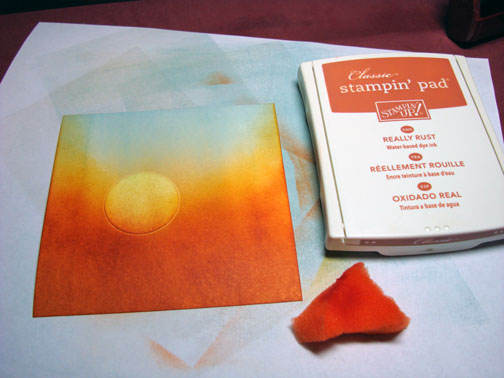
Brayered Adirondack Aqua ink at an angle on the top of the card stock.

dsc05828.JPG

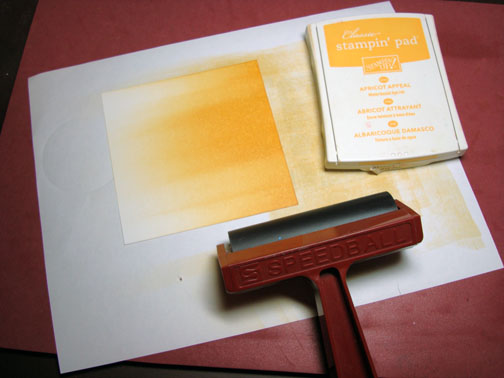
Brayered Creamy Caramel ink at an angle at the bottom of the card stock.

dsc05829.JPG

Brayered more Aqua ink at an angel at the top of the card stock, bringing it down closer to the Creamy caramel ink.

dsc05830.JPG

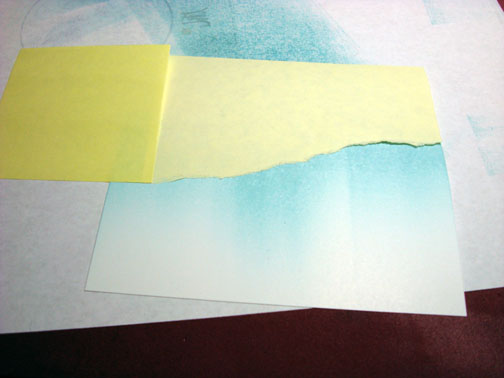
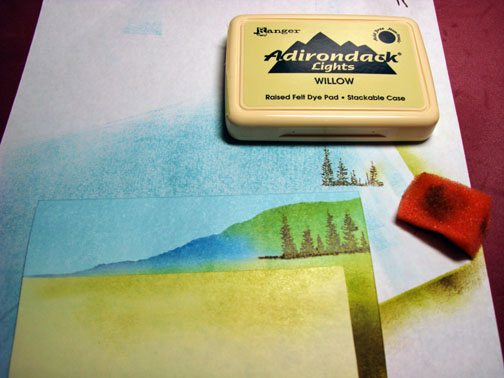
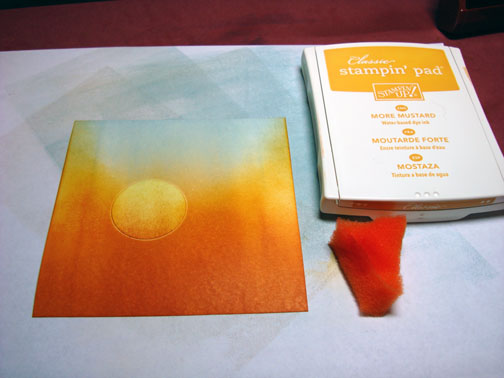
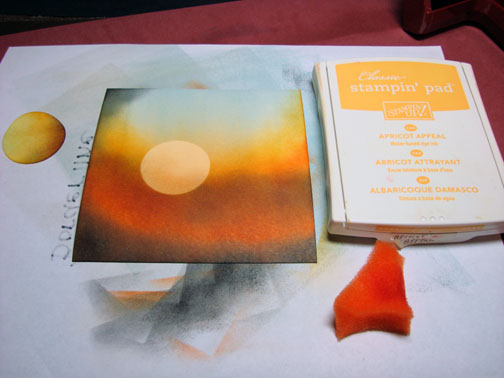
Masked about an inch of the card stock top with a post it note and sponged on Tempting Turquoise ink, not covering the Aqua entirely.  This puts in the horizon line.

dsc05831.JPG

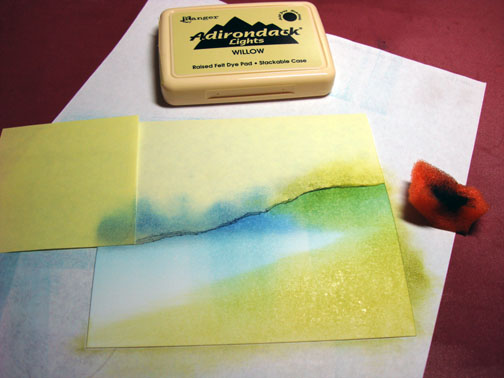
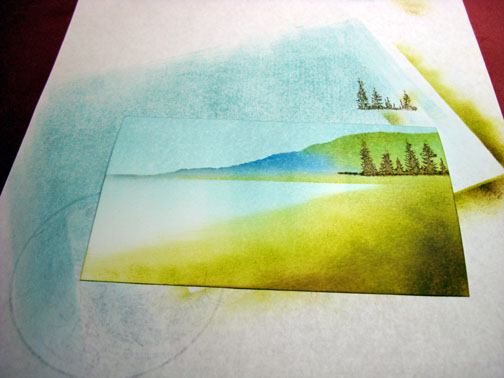
Removed post it note mask and sponged Creamy Caramel ink at the water line.

dsc05832.JPG

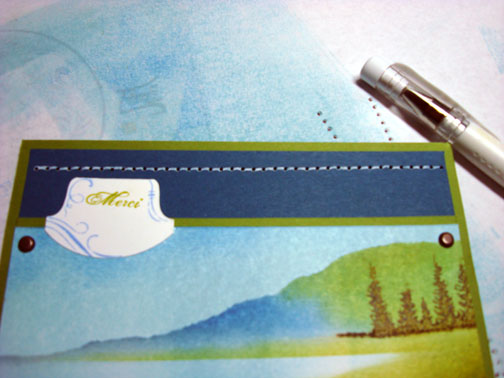
Added a foam look to the water edge with a white gel pen by making dots and dashes.

dsc05833.JPG

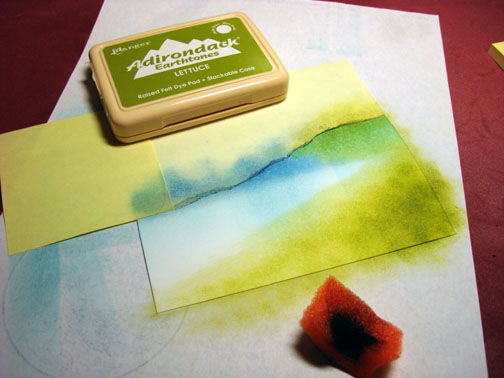
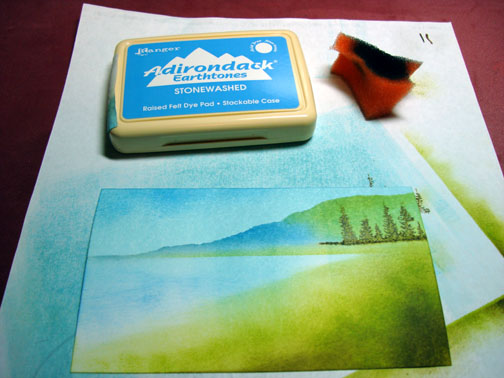
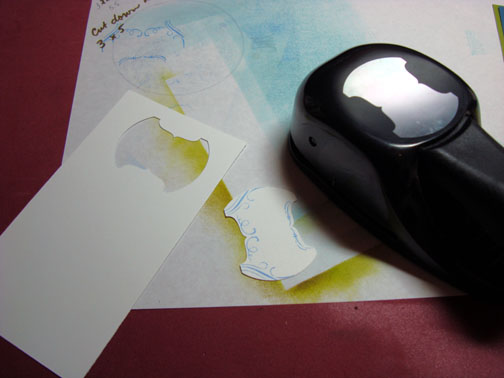
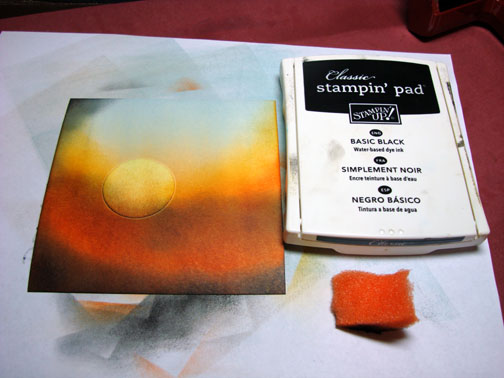
Cut my two panels and sponged Tempting Turquoise ink on 3 edges of the two panels.

dsc05834.JPG

Sponged Close to Cocoa around the edge of the main image panel.

dsc05835.JPG

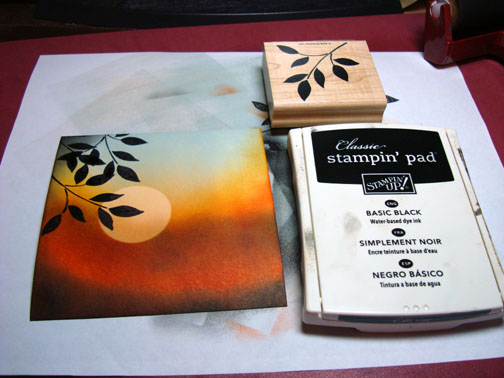
Stamped the Canvas background stamp in Creamy Caramel on the main image panel. 

Note:  I flip my large background stamps over so the rubber side is up and ink them by rubbing my ink pad across them.  I then flip my card stock face down on the stamp and roll my brayer one time over the card stock.  If you roll back and forth you will smear your image.

dsc05836.JPG

dsc05837.JPG

dsc05838.JPG

Wiped the ink from my embossed images with an old rag.

dsc05839.JPG

Sponged Close to Cocoa ink on the edges of the two panels.

dsc05840.JPG

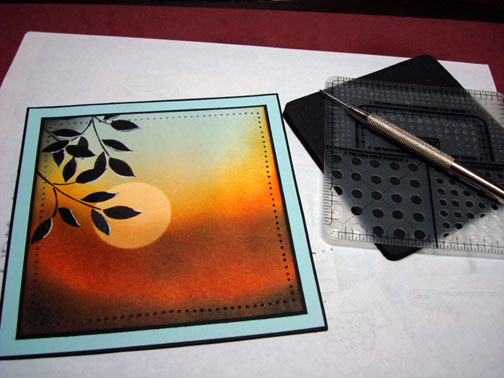
Used my Tim Holtz Ruler and a push pin to add piercings to the bottom panel.

dsc05841.JPG

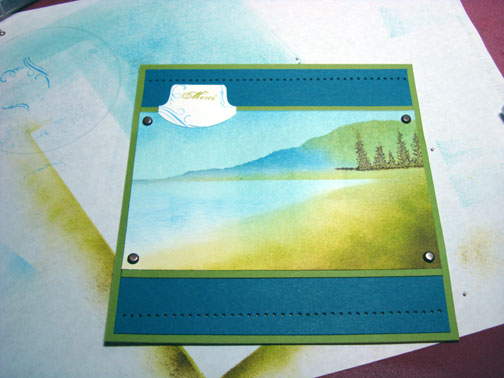
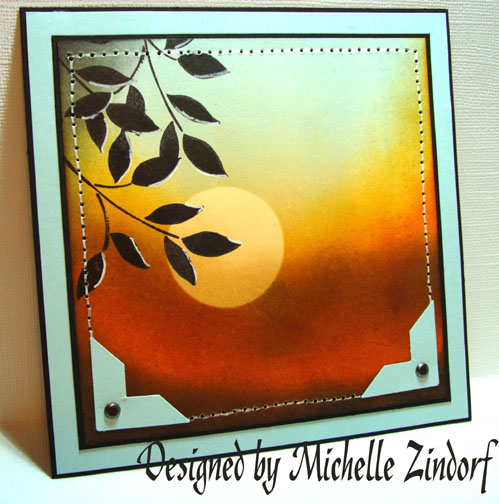
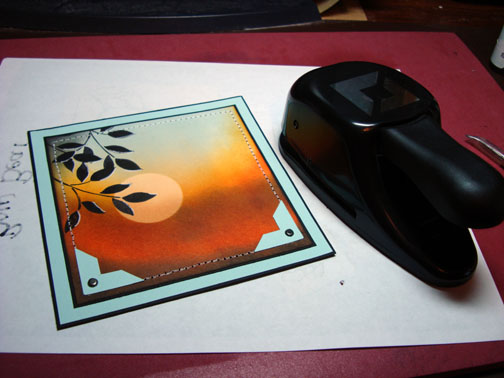
Assembled card and added ribbon and brads.  Here it is finished measuring 5″ x 6.5″.

dsc05844.JPG

Hope you enjoyed this tutorial and are now inspired to try a beach scene of your own. 🙂

May your day be filled with the smell of salt in the air and warm breezes blowing your hair.

Until my next post. . . . . . . . .. .

Hugs,

Michelle

Note:  Links to all my tutorials can be found here:  http://zindorf.blogs.splitcoaststampers.com/tutorials-ive-written/

Here is a link to my workshop calendar if you want to get info on beginner and advanced Brayer workshops:  http://zindorf.blogs.splitcoaststampers.com/workshop-calendar/


Willow Lake – Tutorial #110

dsc05734.JPG

Hello everyone and happy Thursday! 🙂

Just a quick note before we get into the tutorial.  I have scheduled a Brayer workshop on September 13th in Dayton, OH at Marco Paper to accommodate the people that wanted to get into the September 6th workshops but were unable to because they filled up so very fast.  There are a few spots left.  If you wish to sign up and have some fun while taking the mystery out of using your brayer, please contact Marco Paper at 937-433-7030 or 1-888-433-5239 or website at http://marcopaper.com/index.html  

Today’s tutorial features stamps by Fire Cracker Designs by Pamela.  Here is a link to their online store if you wish to check them out:  http://www.safesecurestore.com/stores/merchant.mvc?Screen=SFNT&Store_Code=firecrackerdesignsbypamela

I started this card brayering from an angle and really like the light effects it created. 

Let’s get started.  🙂

Supplies:

Stamps: Fire Cracker Designs by Pamela
Paper: Stampin’ Up Whisper White, Bliss Blue & Old Olive
Ink: Stampin’ Up Always Artichoke, Old Olive, Kiwi Kiss, Lovely Lilac & Bashful Blue
Accessories: Stampin’ UP markers, Faber Castel Grey marker, White Gel Pen, Brayer, Aqua Painter, Sponges

dsc05737.JPG

Brayered Bashful Blue ink at an angle, across one corner of a 4.5″ x 4.5″ piece of Whisper White card stock.

dsc05710.JPG

Flipped the card stock around and brayered a small amount of Bashful Blue ink on the opposite corner.

dsc05711.JPG

Colored the tree and ground below it with an Always Artichoke marker.

dsc05713.JPG

Colored the water lines on the stamp with a Bliss Blue marker.

dsc05714.JPG

Huffed on the stamp to moisten the color and then stamped it on my panel.

dsc05715.JPG

Stamped the Willow Branches with Old Olive ink.

dsc05716.JPG

Masked off the sky area with a Post it Note.

dsc05717.JPG

Sponged in a circular motion Bashful Blue ink at the edge of the Post it Note Mask.  This creates my Horizon Line.

dsc05718.JPG

Squeezed the Kiwi Kiss stamp pad while it was closed to create a pool of ink on the lid of the stamp pad.  Used the pool of ink to water color with an Aqua Painter the Willow Branches and the ground under the tree.

dsc05719.JPG

Added white Gel pen to the tops of the Willow Branches.

dsc05720.JPG

Used the fine point side of a Close to Cocoa marker and drew along the right sides of all of the Willow Branches to create some depth.  Also colored in the tree trunk and around the rocks  under the tree with the same marker.

dsc05723.JPG

Sponged Old Olive ink on the tree.

dsc05724.JPG

Used a gray marker to color in the rocks.

dsc05725.JPG

Colored the ground above the rocks with a Creamy Caramel marker, leaving some of the Kiwi Kiss ink showing at the top of the ground.

dsc05726.JPG

With a White gel pen, added some white dashes in the water area to create some highlights.

dsc05727.JPG

Sponged Lovely Lilac ink around the entire edge of the panel, being more heavy at the top left and bottom right corners.

dsc05728.JPG

Sponged Always Artichoke ink in the very center of the tree and sponged a bit under the tree in the water area to create a shadow for the tree.

dsc05729.JPG

Added more White Gel pen dashed so the water area over the Lovely Lilac ink.

dsc05730.JPG

Assembled card and here it is completed measuring 5.25″ x 5.25″. 

dsc05734.JPG

 You can fine a complete listing of all my tutorials at this link:

http://zindorf.blogs.splitcoaststampers.com/tutorials-ive-written/

I hope you have been inspired to try using your brayer at a different angle to see what fun light effects you will achieve.

May your day be filled with the peaceful sounds of nature.

Until my next post. . . . . . . . . . . . .

Hugs,

Michelle


Distant Pines – Tutorial #109

dsc05704.JPG

I have a little scene for you today.  Created it with a little brayering, a little sponging and just a tad of stamping.  Isn’t stamping wonderful?  You can take the most simplest of stamps and create a whole scene without doing any drawing.  Love it!  

Let’s get started on today’s tutorial.  🙂

Supplies:

Stamps: Stampin’ Up “Noble Deer”, “Carte Postale” & “Totally Tabs”
Paper: Stampin’ Up Whisper White, Old Olive and Not Quite Navy
Ink: Adirondack Oregano, Lettuce, Willow, Stonewashed & Aqua
Accessories: White Gel Pen, Adirondack Oregano marker, Tim Holtz Ruler, Push Pin, Sponges, Brayer, Post It Notes, Tab Punch & Brads

  dsc05709.JPG

Brayered Aqua ink on a piece of 3.25″ x 5.5″ piece of Whisper White card stock.

dsc05686.JPG

Tore through the sticky part of a couple of post it notes and used them as a mask for the sky and to create a hill.

dsc05687.JPG

Sponged on Stonewashed ink, in a circular motion, at the Post it Note edge, getting lighter with the ink at the Right side of the card stock.

dsc05688.JPG

Sponged on Willow ink at the Post it note edge with a circular motion and then using a swiping motion from right to left put in the foreground area.

dsc05689.JPG

Sponged on some Lettuce ink in the foreground area, not covering all of the Willow ink.

dsc05690.JPG

Sponged a bit of the Oregano ink at the lower right corner.

dsc05691.JPG

Removed Post it Note masks.

dsc05692.JPG

Colored just the trees on the stamp with an Oregano marker, huffed on it to moisten it and stamped it.  Remember, you don’t have to use the entire image on a stamp.  🙂  I didn’t want the clouds that are on the stamp, so I omitted them.

dsc05693.JPG

Put a new Post it Note on to mask the water area in the scene.   Sponged Willow ink at the Post It Note edge to create my Shore line.  Be care that your Post it Note is straight or you will have a crooked shore line and your water will look very un-natural.  Water doesn’t run up hill. I’ve learned this lesson the hard way, lol.

dsc05694.JPG

Remove Post it Note mask.

dsc05695.JPG

With a swiping motion from Left to Right with a sponge and Stonewashed ink added a bit of clouds to the sky area and the water area.

dsc05696.JPG

On a separate piece of Whisper White card stock, stamped Tab stamp with Stonewashed ink.

dsc05697.JPG

Punched tab out with a tab punch.

dsc05698.JPG

Stamped Sentiment with Lettuce ink.

dsc05700.JPG

Glued a Not Quite Navy card stock panel on an Old Olive one and used my Tim Holtz Ruler and a push pin to pierce the top and bottom of the panels.

Note:  The Tim Holtz Ruler has holes in it for piercing straight lines.  Very handy in deed!

dsc05701.JPG

Cropped my main image panel down to 3″ x 5″ and assembled card front and added brads.

dsc05702.JPG

Used a white gel pen to create faux stitching by drawing the white pen from pierced hole to pierced hole.

dsc05703.JPG

Here it is finished measuring 5.25″ x 5.25″.

dsc05704.JPG

Hope your day is filled with the peaceful images of mountain lakes and streams.

Until my next post. . . . . . . . . . . . . . .

Hugs,

Michelle

Note:  A page listing all of my tutorials can be found here:  http://zindorf.blogs.splitcoaststampers.com/tutorials-ive-written/


Flourished Trees – Tutorial #106

dsc05628.JPG

I’m feeling a bit foggy today, not enough sleep, allergies kicking in.  That could be why I picked to do a foggy scene, lol.  In real life, this looks a bit more foggier (is that a word?).  🙂

Photographing cards in the wee hours of the morning, when it is pitch black out, is a little difficult, but that is when I do my stamping and posting to this blog, so the photos are what they are.  Thanks for understanding!

Well let’s get on with this foggy tutorial. 🙂

Supplies:

Stamps: Innovative Stamp Creations “Artsy Victorian” & Impression Obession “Branches of a Tree”
Paper: Stampin’ Up River Rock, Not Quite Navy & Whisper White
Ink: Stampin’ Up River Rock, Always Artichoke, Not Quite Navy & Bordering Blue, Adirondack Lake Mist
Accessories: Versamark Pad, Brayer, Fine Detail Clear embossing powder, Brads, Ribbon, Not quite Navy Marker, sponges

dsc05630.JPG

Stamped tree image by first loading my stamp with Versamark and then loading it with River Rock ink before stamping.  Stamped it on a 4.5″ x 6″ piece of Whisper White card stock.

dsc05611.JPG

Heat embossed it using fine detail clear embossing powder and a heat gun.

dsc05612.JPG

Stamp the tree again using Versamark only, no ink.

dsc05613.JPG

Heat embossed it using clear embossing powder and a heat gun.

dsc05614.JPG

Stamped the tree a third time by loading the stamp with Versamark and then Lake Mist ink before stamping.

dsc05615.JPG

Heat embossed it using clear embossing powder and a heat gun.

dsc05616.JPG

Brayered on River Rock ink at the bottom of the card stock.

dsc05617.JPG

Brayered on Bordering Blue at the top of the card stock, leaving a light area showing between the River Rock and the Bordering Blue ink.  This gives a foggy look to the piece.

dsc05618.JPG

Stamped Flourish with Bordering Blue ink at the right and bottom sides of the card stock.

dsc05619.JPG

Sponged Not Quite Navy ink at the top and right side of the card stock.

dsc05621.JPG

Sponged Always Artichoke ink at the bottom of the card stock.

dsc05622.JPG

Assembled card from and stamped the flourish again, only this time stamping it with Not Quite Navy ink.   Note:  When stamping over layers of card stock you will get gaps in your image.  Be sure to stamp in a color that you have a matching marker for so you can fill in those gaps.

dsc05623.JPG

Filled in the gaps in the flourish image with a Not Quite Navy Marker.

dsc05624.JPG

Assembled card and here it is finished measuring 6.5″ x 5″.

dsc05628.JPG

Hope your day is filled with sunshine to take away any fog that may be around.  🙂

Until my next post. . . . . . . . . . .

Hugs,

Michelle


Heart Felt Thank You – Tutorial #100

dsc05460.JPG

Supplies:

Stamps: Stampin’ Up Lovely As a Tree & Holidays & Wishes, Cornish Heritage Farms Hinges
Paper: Stampin’ Up Whisper White, Bashful Blue, Brilliant Blue
Ink: Stampin’ Up Brilliant Blue, Chocolate Chip, Close to Cocoa, Bashful Blue, Basic Black, Barely Banana, More Mustard
Accessories: Stampin Up Black & Gray Markers, Post it Notes, Brayer, Corner Round Punch, Gold Brads


dsc05463.JPG

Starting out with a 4.5″ x 4.5″ piece of Whisper White card stock.

dsc05435.JPG

Mask a little under half of the bottom of the card stock with a post it note.

dsc05436.JPG

Brayered on Bashful Blue ink at the top of the card stock.

dsc05437.JPG

Brayered on Brilliant Blue ink not covering the Bashful blue ink entirely.

dsc05438.JPG

Sponged Brilliant Blue ink at the top of the card stock very heavily to create some drama in the sky.

dsc05439.JPG

Sponged a bit of Black ink at the edge of the Post it Note mask to create a couple of hills in the distance.

dsc05440.JPG

Removed Post it note Mask.

dsc05441.JPG

Masked Sky area with a clean Post it Note.

dsc05442.JPG

Brayered on Barely Banana ink on the unmasked section of the card stock.

dsc05443.JPG

Tore a piece of post it note in a triangle shape to mask a section to create a road.  This is an experiment, I have not tried this before.  The sticky part of the Post it note is at the bottom of the card stock.

dsc05444.JPG

Brayered on More Mustard ink.

dsc05445.JPG

Removed triangle post it note, but left the post it note that is masking the sky on.

dsc05446.JPG

Sponged More Mustard ink in the middle of the Road.

dsc05447.JPG

Sponged Close to Cocoa ink in the middle of the road and the bottom of the card stock, not covering the More Mustard ink entirely.

dsc05448.JPG

Sponged Chocolate Chip ink at the very bottom of the card stock.

dsc05449.JPG

Took the Post it Note off of the Sky.

dsc05450.JPG

Colored in the middle tree with a black marker, huffed on it and stamped it.

dsc05451.JPG

dsc05452.JPG

Colored in the two trees on the right side of the stamp with a black marker, huffed on it and stamped it to the left of the first tree I stamped.

dsc05453.JPG

Sponged a bit of black ink under and to the left side of the trees to create a shadow.

dsc05454.JPG

Used my corner rounder punch on two corners of my main image panel and the Brilliant Blue panel that will go under it.

dsc05455.JPG

Stamped two hinges on with Basic Black ink and colored them in a bit with a gray marker.

dsc05456.JPG

dsc05457.JPG

Assembled card, added a gold brad to each hinge and then stamped my sentiment using Basic Black ink.

dsc05458.JPG

Here you have it, the conclusion of tutorial #100 with the finished card measuring 5.25″ x 5.25″.

dsc05460.JPG

May your day be filled with dreamy scenery.  Thanks again for your encouragement!

Until my next post. . . . . . . . . . . .

Hugs,

Michelle


Pond Life II MZ – Tutorial

dsc05118.JPG

I still had this set by papertreyink.com “Pond Life” on my desk from Friday so I decided to give it another go. 

Here is the tutorial.  🙂

Supplies:

dsc05119.JPG

Stamped Lily with Salmon ink on Whisper White Card stock.  Turned stamp upside down and stamped lily again with Aqua ink.

dsc05087.JPG

Darkened bottom of Salmon lily with a Blush Blossom marker.

dsc05088.JPG

Darkened bottom of reflection lily with a Going Gray and Blush Blossom marker.

dsc05089.JPG

Put Going Gray marker under Salmon Lily to create a shadow.

dsc05090.JPG

Put a fine line of Black marker under the Salmon lily to define shadow.

dsc05091.JPG

Colored over both the lily images with a Versamark marker and heat embossed using clear embossing powder and a heat gun.

dsc05092.JPG

dsc05093.JPG

Using a Mirror Image Stamp (see frequently asked questions in regards to Mirror image stamp) stamp a loose mirror image of the duck with basic black ink. 

Note:  to use mirror image stamp, stamp image on mirror image stamp and the stamp mirror image stamp on card stock.

dsc05094.JPG

Defined mirror image of duck a little with a going gray marker.

dsc05095.JPG

Stamp duck image above mirror image with Basic Black ink.

dsc05096.JPG

Went over both duck images with a Versamark marker and heat embossed using clear embossing powder and a heat gun.

dsc05097.JPG

dsc05098.JPG

Brayer Cloudy Blue ink over card stock, leaving it lighter at the top.

dsc05099.JPG

Brayered Not Quite Navy at the bottom and just a little at the top of the card stock.

dsc05100.JPG

Stamped lily pads with Lettuce ink.

dsc05101.JPG

Stamped more lily pads, but stamped off once on my scrap paper before stamping image (Second generation stamping).  This makes the images lighter in color.

dsc05102.JPG

Sponged on more Not Quite Navy ink at the bottom of the card stock.

dsc05103.JPG

Added gray marker at the bottoms of the lily pads and the bottom of the main image duck.

dsc05104.JPG

Stamped Reeds with Basic Black ink.

dsc05105.JPG

Put white highlights on top lily pad, duck, lily and reeds with a white gel pen.

dsc05108.JPG

Glued main imgage panel to a piece of Basic Grey “Archaic” design paper and swiped some Not Quite Navy ink across the design paper and onto the main image panel.

dsc05110.JPG

Stamped more reeds with Basic Black ink.

dsc05111.JPG

Drew in some of the bottoms of the reeds from the main image panel to the design paper panel with a black marker.  Used a White Gel pen to put highlights on the reeds on the designer paper.

dsc05112.JPG

Assembled card front and added Old Olive Photo Corner punches and copper brads.

dsc05113.JPG

Here is the card finished measuring 5.25″ x 5.25″.

dsc05118.JPG

Hope your day is filled with peace and tranquility.

Until my next post. . . . ..

Michelle


Beginning of the Day – Tutorial

dsc04786.JPG

I’m wrapping up leaf week here on my blog.  I hope you have been inspired this week to get out those leaf stamps and use them for projects other than Fall themed ones.  Now you know I had to wrap the week up with a brayered sky scene!

Let’s get started on the tutorial.  🙂

Supplies:

Stamps: Stampin’ Up Best Blossoms
Paper: Stampin’ Up Whisper White, Basic Black & Soft Sky
Ink: Stampin’ Up Apricot Appeal, Basic Black, Really Rust, More Mustard & Soft Sky
Accessories: Photo Corner Punch, 1 3/8″ Circle Punch, Brayer, Sponges, Piercing Tools & White Gel pen,

dsc04791.JPG

Brayered Apricot Appeal on the bottom 2/3rds of a piece of Whisper White Card stock that measures 4.5″ x 4.5″.

dsc04773.JPG

Punched a 1 3/8″ circle from the sticky part of a post it note and used it as a mask for the sun.

dsc04774.JPG

Brayered More Mustard over the bottom 2/3rds of the card stock.

dsc04775.JPG

Brayered Really Rust ink at the bottom 1/2 of the card stock.

dsc04776.JPG

Brayered Soft Sky ink at the top of the card stock.

dsc04777.JPG

Decided I wanted some more interest to the sky so I sponged More Mustard ink in a “U” shape around the sun.

dsc04778.JPG

Sponged Really Rust ink just under the More Mustard sponging.

dsc04779.JPG

To add more interest, sponged black at the bottom, left top corner and then lightly through the center of the card stock.

dsc04780.JPG

Removed post it note mask and sponged Apricot Appeal ink at the bottom of the sun so it isn’t so stark looking.

dsc04781.JPG

Stamped leaves with Basic Black ink.

dsc04782.JPG

Highlighted the leaves by outlining just the side of the leaf that is facing the sun.

dsc04783.JPG

Assembled my card front and used my piercing tools and a White Gel pen to put in some faux stitching around the main panel edge.

dsc04784.JPG

Added some Soft Sky card stock photo corner punches and a brad to the bottom two corners.

dsc04785.JPG

Here is the finished card, measuring 5.25″ x 5.25″.

dsc04786.JPG

I hope your day today started with a fantastic sunrise and ends with a fantastic sunset!

Until my next post. .. . . . . . . . . . .

Michelle