To Our Heros – Tutorial #256

dsc00756.JPG

This card is dedicated to those brave men and women who are serving our Country. 

Let’s get out our Stampin’ Up Markers and color a while.  That is what I do when I have a ruff day.  Coloring makes me relax. . . . . .Ahhhh.  🙂    I notice during my workshops when my students are coloring they get very quite.  Coloring takes concentration.  I think that is why it is relaxing.  When you are concentrating on coloring you cannot be concentrating on anything else.

If you are like me you have the matching ink pad, marker and card stock for every Stampin’ Up color they have.  It makes it so very easy to coordinate your projects.

Hang out a while with me and relax while I take you through this project.
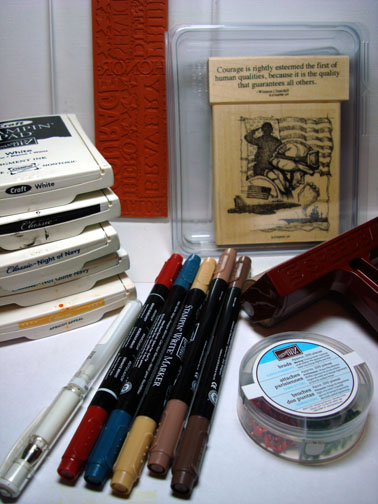
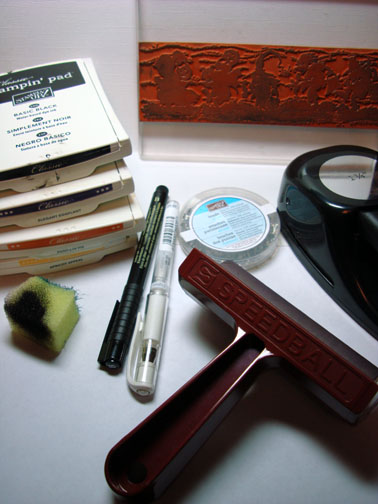
Supplies:

Stamps: Stampin’ Up Courage and Unmounted Wheel Hero
Paper: Stampin’ Up Whisper White and Bravo Burgundy
Ink: Stampin’ Up Basic Black, Night of Navy, Not Quite Navy, Apricot Appeal and Craft White
Accessories: Stampin’ Up Markers, Not Quite Navy, Bravo Burgundy, Creamy Caramel, Close to Cocoa and Chocolate Chip, Brayer, White Gel Pen, Not Quite Navy Brads

Want a free 39 page, Stampin’ Up Mini catalog?  If you are a resident of the United States,  just e-mail your mailing address to me and I will get one in the mail to you. 

Are you inspired by this Blog?  One way you can help support this blog is by ordering your Stampin’ Up products through me.   You can order from me 24-7 from this link:  http://michellezindorf.stampinup.net or e-mail me at mzindorf@aim.com  If you are within the United States.  Want a copy of the brand new 2009-2010 Stampin’ Up Catalog for $9.95, just e-mail me at mzindorf@aim.com and I will get one in the mail to you.  Want to become a Stampin’ Up Demonstrator and earn instant income?  Consider being part of my Stampin’ Up Team.  Also check out the Stampin’ Up specials, click this link to check it out:  http://www.stampinup.net/esuite/home/michellezindorf/promotions

dsc00759.JPG

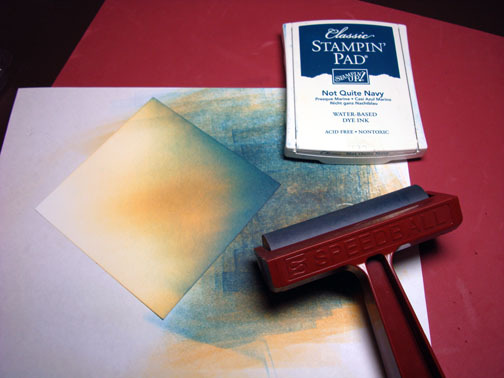
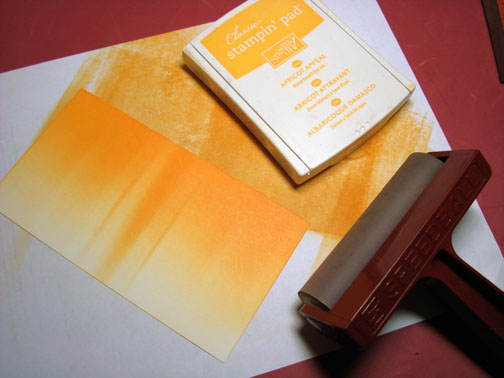
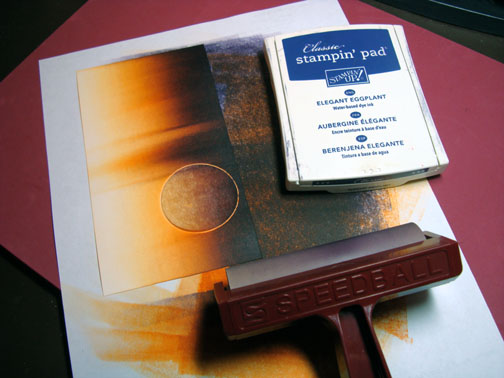
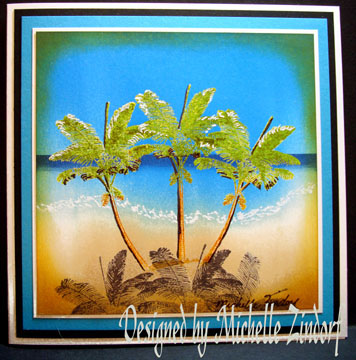
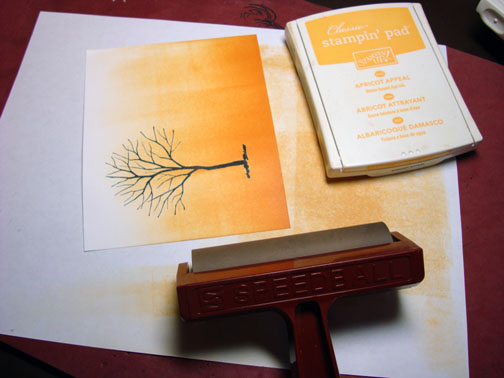
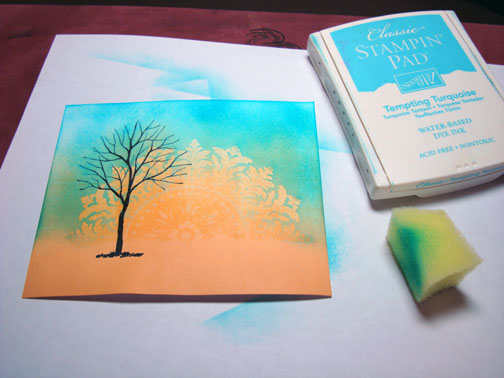
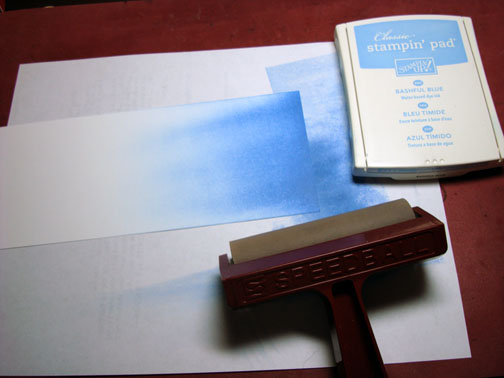
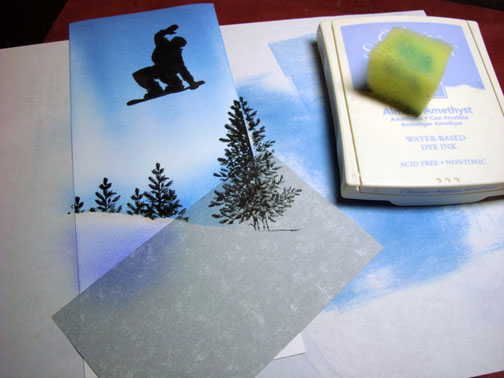
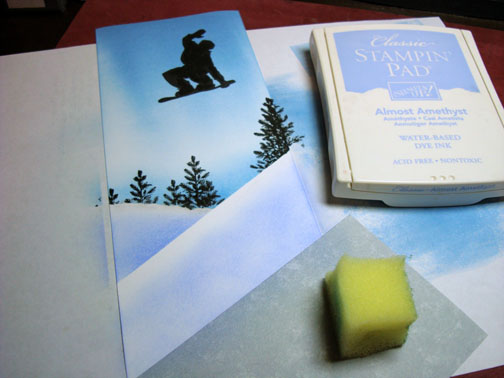
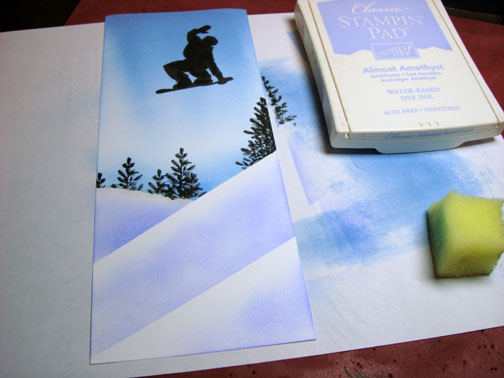
Brayered Apricot Appeal ink at an angle on a 4.5″ square piece of Whisper White.

dsc00737.JPG

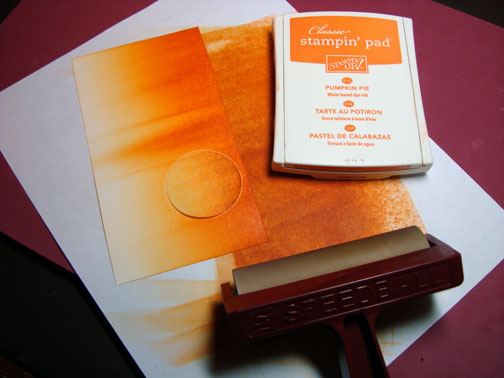
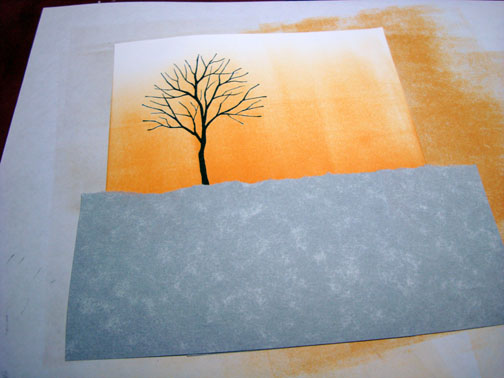
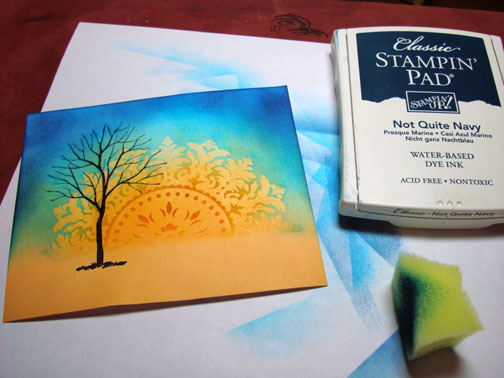
Brayered Not Quite Navy ink at the same angle, not covering the Apricot Appeal ink entirely.

dsc00738.JPG

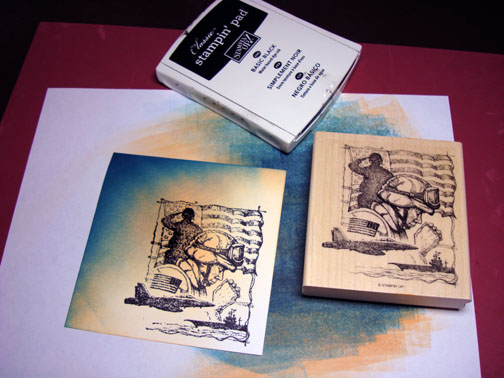
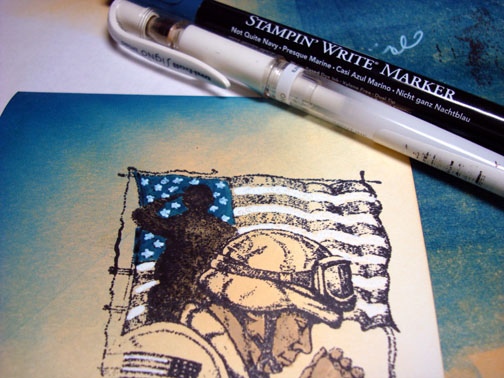
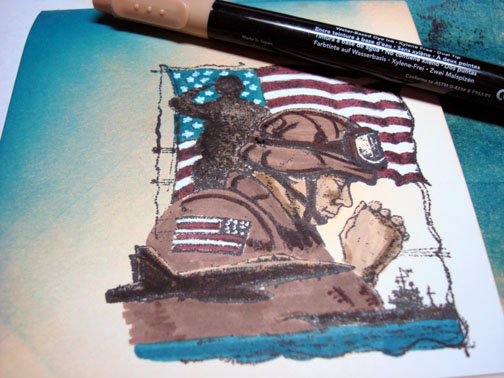
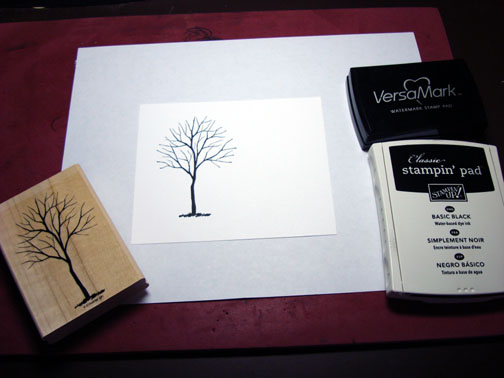
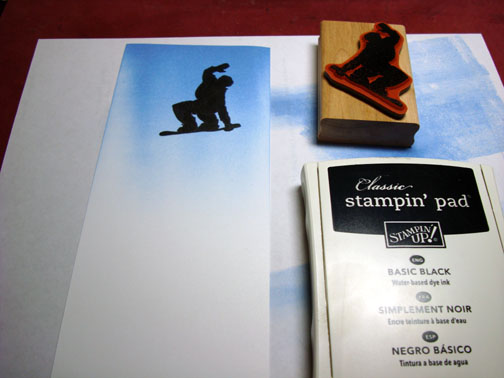
Stamped the Courage Stamp with Basic Black ink.

dsc00739.JPG

Colored The Soldier’s skin, plane, ship and suluting soldier in with Creamy Caramel marker.

dsc00740.JPG

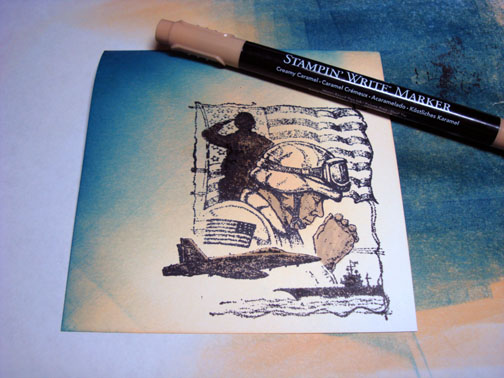
Colored part of the flag with Not Quite Navy marker and then added White Gel pen to the stars and stripes on the flags.

dsc00741.JPG

Colored the other stripes on the flags in with a Bravo Burgundy Marker.

dsc00744.JPG

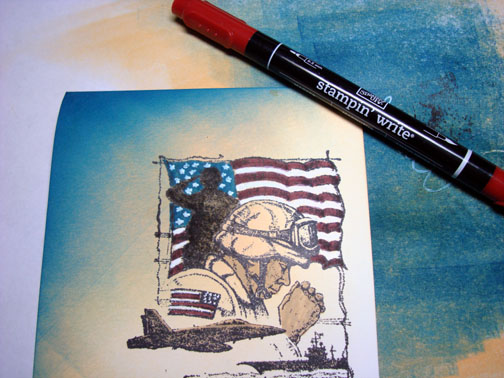
Colored the Soldier’s helmet and uniform in with a Close to Cocoa Marker.

dsc00745.JPG

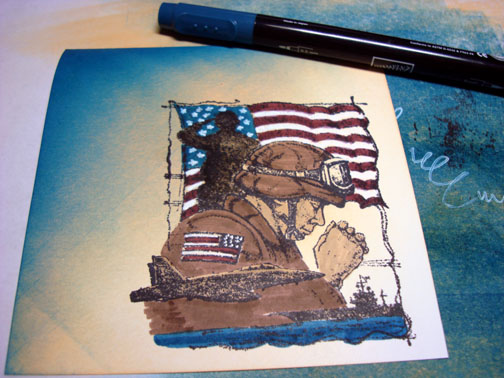
Colored the water in with the Not Quite Navy Marker.

dsc00746.JPG

Added Chocolate Chip marker to the creases in the uniform, the goggles, bottom of the airplane and the ship.

dsc00747.JPG

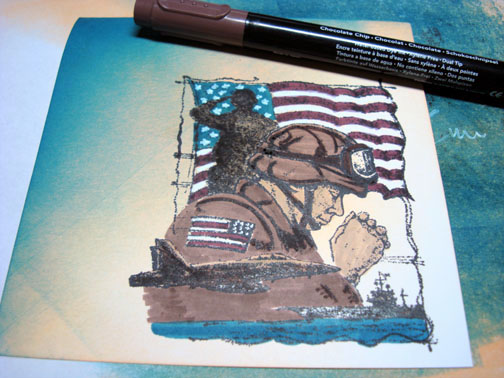
Added Creamy Caramel to the darker places of the Soldier’s face and hands.

Note:  You can shade with these markers by coloring with the same colored marker twice letting the marker dry in between the colorings.

dsc00748.JPG

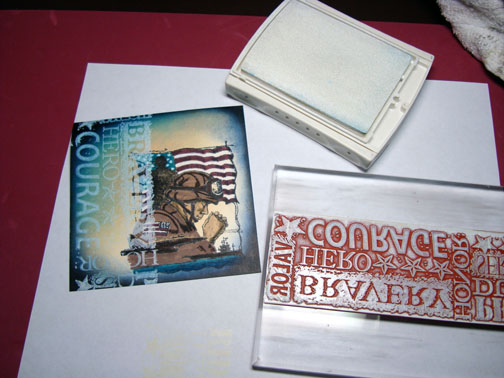
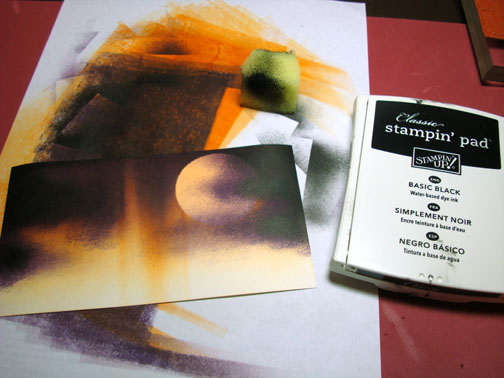
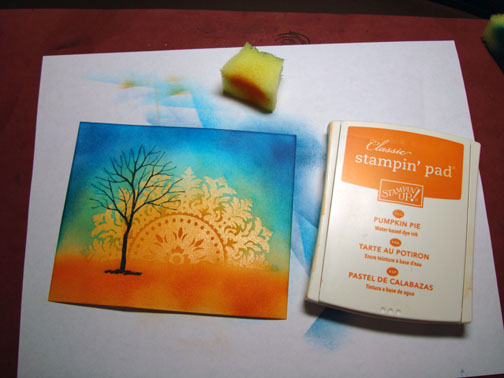
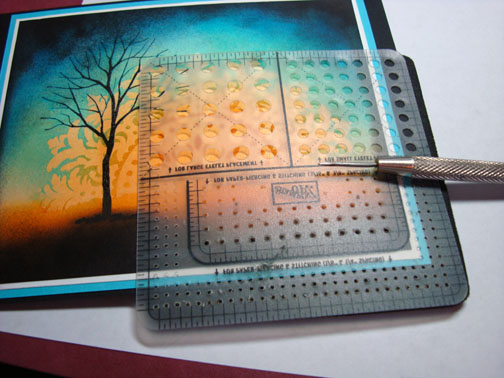
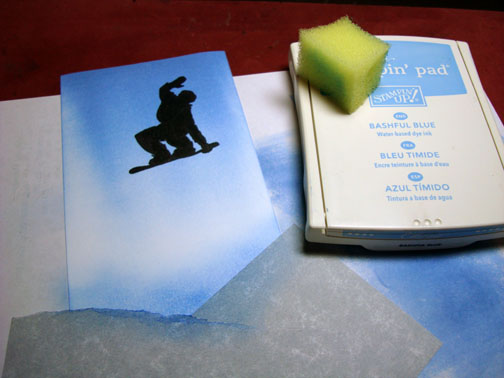
Sponged Night of Navy ink around the edge of the card stock.

dsc00749.JPG

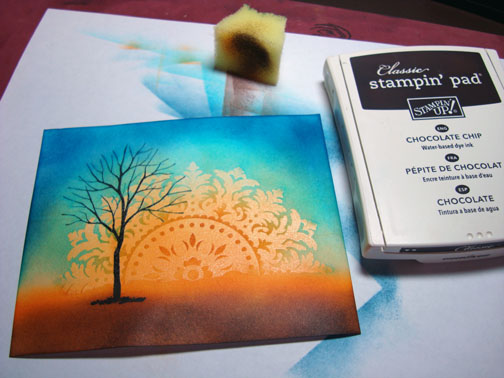
Sponged Basic Black ink around the edge of the card stock, not covering the Night of Navy ink entirely.

dsc00750.JPG

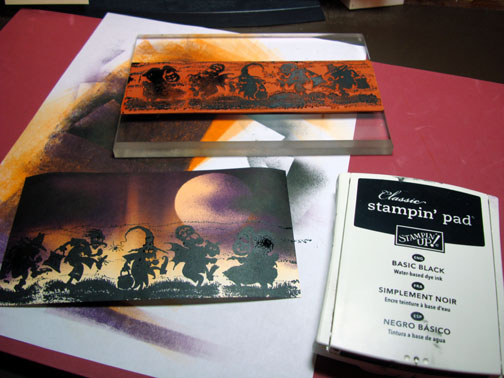
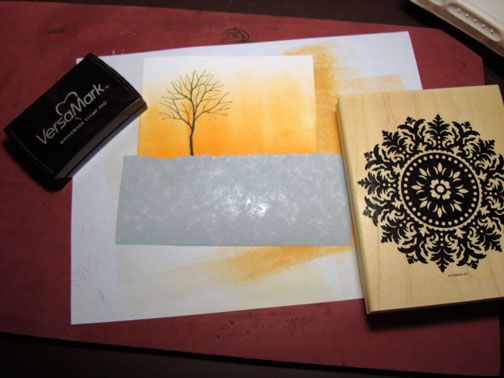
Stamped the unmounted Hero Wheel with Craft White ink.

If you want to know about the unmounted wheels, here is a link about it:    http://zindorf.blogs.splitcoaststampers.com/2009/07/28/tool-time-unmounting-wheels/

dsc00751.JPG

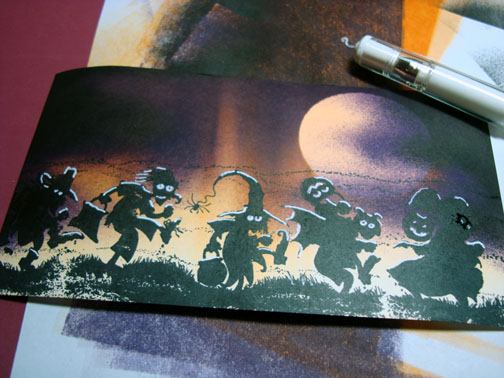
Outlined the word “Bravery” with a White Gel Pen so it would stand out more.

dsc00753.JPG

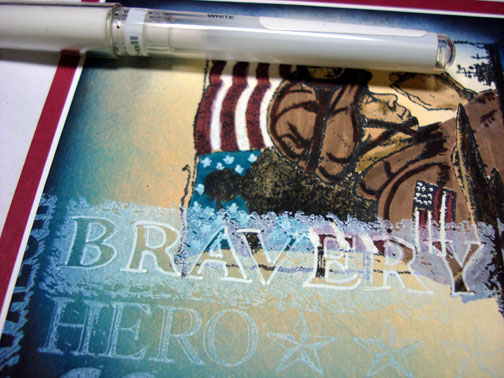
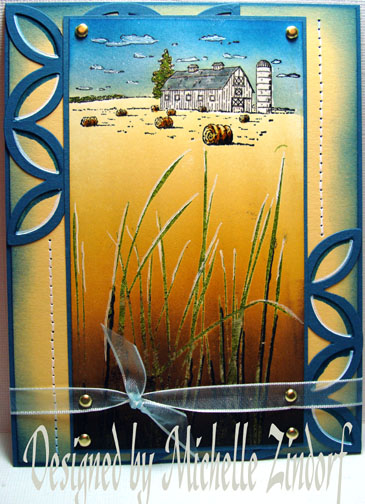
Assembled card front and added Not Quite Navy Brads in each corner of the main image panel.

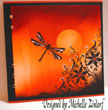
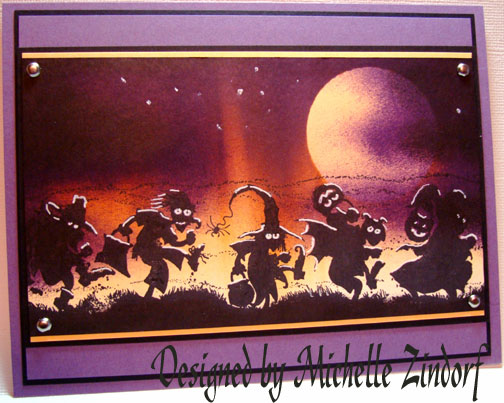
Here is the assembled card measuring 5.25″.

dsc00756.JPG

Until my next post. . . . .

Huge Hugs,

Michelle

dsc04306-tiny.jpg Get ready for Brayer Workshops!  I am coming to:

Castro Valley, California 

Yardley, Pennsylvania (near Philadelphia) 

Knox, Maine

Akron, Ohio

Broomfield, Colorado

Moore, Oklahoma

Nashville, Indiana

Portland, Michigan

2010

Dayton, Ohio at Marco Paper

Phoenix, Arizona

Monroe, Louisiana

Jacksonville, Florida

St. Louis, Missouri

Mechanicsville, Virginia

Raleigh, North Carolina 

Colleyville, Texas

Colorado Springs, Colorado

Boise area of Meridian, Idaho

Riverside, California (Southern California)

Salem, Oregon

Wheaton, Illinois

St. Cloud, Minnesota

Rockville, Maryland

North Chili, New York (near Rochester)New Johnsonville, TennesseeHelena, MontanaMiddleburg Heights, OhioVenice, Florida

Here is a link to my workshop calendar where you can see all of my travel schedule and to get info on beginner and advanced Brayer workshops:  http://zindorf.blogs.splitcoaststampers.com/workshop-calendar

Link to my Stampin’ Up website were you can order all of your must have Stampin’ Up products from me 24-7:  http://michellezindorf.stampinup.net

Frequently asked questions answers:  http://zindorf.blogs.splitcoaststampers.com/frequently-asked-questions/


Late Night Haunting – Tutorial #255

dsc00734.JPG

Thank you so much for all the Birthday wishes yesterday.  🙂  I had a lovely day at the Cincinnati Zoo and then had dinner with loved ones.  So my birthday turned out to be a perfect day.

Now regarding the tutorial today,  I have noticed the weather is turning cooler already here in Ohio and it is only September 1st.  It has put me in the mood for a Halloween scene.  This was created with my unmounted Stampin’ Up Wheel Stamp, Haunting.  Grab you brayer and play along.  🙂

Let’s get started. . . .  . .

Supplies:

Stamps: Stampin’ Up Unmounted Jumbo Wheel Haunting
Paper: Stampin’ Up Whisper White, Apricot Appeal, Basic Black, Perfect Plum
Ink: Stampin’ Up Basic Black, Elegant Eggplant, Pumpkin Pie & Apricot Appeal
Accessories: Silver Brads, Brayer, 1 3/4″ circle Punch, Sponge, White Gel Pen, Acrylic Block, Post it Note

Want a free 39 page, Stampin’ Up Mini catalog?  If you are a resident of the United States,  just e-mail your mailing address to me and I will get one in the amil to you. 

Are you inspired by this Blog?  One way you can help support this blog is by ordering your Stampin’ Up products through me.   You can order from me 24-7 from this link:  http://michellezindorf.stampinup.net or e-mail me at mzindorf@aim.com  If you are within the United States.  Want a copy of the brand new 2009-2010 Stampin’ Up Catalog for $9.95, just e-mail me at mzindorf@aim.com and I will get one in the mail to you.  Want to become a Stampin’ Up Demonstrator and earn instant income?  Consider being part of my Stampin’ Up Team.  Through August 31 you can become a Stampin’ Up Demonstrator for as little as $85 with the mini kit.  Also check out the Stampin’ Up specials, click this link to check it out:  http://www.stampinup.net/esuite/home/michellezindorf/promotions

dsc00736.JPG

Brayered Apricot Appeal ink at the top of a 3.5″ x 6″ piece of Whisper White card stock.

dsc00725.JPG

Masked the moon with a 1 3/4″ circle punch, punched from the stick part of a post it note.

Brayered Pumpkin Pie ink over the mask at the top of the card stock.

dsc00726.JPG

Brayered Elegant Eggplant at the top of the card stock, not covering the Pumpkin Pie ink entirely.

dsc00727.JPG

Removed the post it note mask from the moon and sponged a bit of Elegant Eggplant ink on creating a cloud shape.

dsc00728.JPG

Added a bit of Basic Black ink with a sponge in the center of the cloud shapes.

dsc00729.JPG

Stamped the Unmounted Wheel Stamp, Haunting across the bottom of the card stock with Basic Black ink.

dsc00730.JPG

Added White Gel pen highlights and colored in their eyes with the same white gel pen.

dsc00731.JPG

Added a few dots in the sky with a white gel pen and sponged some Basic Black ink at the bottom of the main image panel before assembling the panel layers.  Also added 4 silver brads.

Here is the finished card measuring 5″ x 6.5″.

dsc00734.JPG

May your day be filled unexpected delights.

Until my next post. . . . .

Huge Hugs,

Michelle

dsc04306-tiny.jpg Get ready for Brayer Workshops!  I am coming to:

Castro Valley, California 

Yardley, Pennsylvania (near Philadelphia) 

Knox, Maine

Akron, Ohio

Broomfield, Colorado

Moore, Oklahoma

Nashville, Indiana

Portland, Michigan

2010

Dayton, Ohio at Marco Paper

Phoenix, Arizona

Monroe, Louisiana

Jacksonville, Florida

St. Louis, Missouri

Mechanicsville, Virginia

Raleigh, North Carolina 

Colleyville, Texas

Colorado Springs, Colorado

Boise area of Meridian, Idaho

Riverside, California (Southern California)

Salem, Oregon

Wheaton, IllinoisSt. Cloud, MinnesotaRockville, MarylandNorth Chili, New York (near Rochester)

New Johnsonville, Tennessee

Helena, Montana

Middleburg Heights, Ohio

Venice, Florida

Here is a link to my workshop calendar where you can see all of my travel schedule and to get info on beginner and advanced Brayer workshops:  http://zindorf.blogs.splitcoaststampers.com/workshop-calendar

Link to my Stampin’ Up website were you can order all of your must have Stampin’ Up products from me 24-7:  http://michellezindorf.stampinup.net

Frequently asked questions answers:  http://zindorf.blogs.splitcoaststampers.com/frequently-asked-questions/


Dawns Light – Tutorial #253

dsc00655.JPG

I used this Stampin’ Up Set “Branched Out’ yesterday and it was still sitting on my desk this morning so here is another piece using this tree, which I love, love, love.  🙂

Before we get started don’t forget to request your free copy of the Stampin’ Up’s new 39 page Mini Catalog which will come into effect September 1st.  Just e-mail your address to mzindorf@aim.com and I will get one out to you.  If you have already requested a copy or you are a Stampin’ Up Customer of mine your copy is on it’s way.  No need to e-mail a request.

Let’s get started. . . . .

Supplies:

Stamps: Stampin’ Up Branched Out
Paper: Stampin’ Up Basic Black, Whisper White, Apricot Appeal , Lavender Lace
Ink: Stampin’ Up Going Gray, Lovely Lilac, Basic Black and Apricot Appeal
Accessories: Brayer, White Gel Pen, White Ribbon, Brads, Stampin’ Up Dots Texture Plate, Big Shot Die Cut Machine, sponge

Are you inspired by this Blog?  One way you can help support this blog is by ordering your Stampin’ Up products through me.   You can order from me 24-7 from this link:  http://michellezindorf.stampinup.net or e-mail me at mzindorf@aim.com  If you are within the United States.  Want a copy of the brand new 2009-2010 Stampin’ Up Catalog for $9.95, just e-mail me at mzindorf@aim.com and I will get one in the mail to you.  Want to become a Stampin’ Up Demonstrator and earn instant income?  Consider being part of my Stampin’ Up Team.  Through August 31 you can become a Stampin’ Up Demonstrator for as little as $85 with the mini kit.  Also check out the Stampin’ Up specials, click this link to check it out:  http://www.stampinup.net/esuite/home/michellezindorf/promotions

dsc00661.JPG

On a 2.5″ x 4.5″ piece of Whisper White card stock brayered Apricot Appeal ink at the top of the card stock.

dsc00641.JPG

Brayered Lovely Lilac ink at the top of the card stock, not covering the Apricot Appeal ink entirely.

dsc00642.JPG

Stamped the tree with Basic Black ink.

dsc00643.JPG

Stamped the leaf stamp with Going Gray ink, leaving the middle of the tree open.

dsc00644.JPG

Added a lot of Basic Black leaves, leaving a bit of the Going Gray leaves showing towards the middle of the tree.

dsc00645.JPG

Sponged Basic Black ink at the top of the card stock and at the bottom of the card stock.

dsc00646.JPG

Added White Gel Pen highlights (dots) in the trees leaves and on the ground.

dsc00647.JPG

Used my Big Shot Die cut machine and the Stampin’ Up Small Dot Texture plate on a piece of Lavender Lace card stock and the other side of the Texture plate, Large Dots on the Apricot Appeal Panel.

dsc00648.JPG

Brayered Apricot Appeal ink over the Apricot Appeal Panel to bring out the texture more.

dsc00649.JPG

Brayered Lovely Lilac ink over the Lavender Lace panel to bring out the texture more.

dsc00650.JPG

Dragged my Basic Black ink pad over one end of the Lavender Lace Lilac panel.

dsc00651.JPG

Assembled the card and added White Ribbon and brads.

Here is the finished card measuring 5″ x 6.5″.

dsc00655.JPG

May your day be super special.  🙂

Until my next post. . . . .  . . . . . . . . . . . . . ..

Huge Hugs,

Michelle

dsc04306-tiny.jpg Get ready for Brayer Workshops!  I am coming to:

Greenwood, Indiana

Castro Valley, California

Yardley, Pennsylvania (near Philadelphia)

Knox, Maine

Akron, Ohio

Broomfield, Colorado

Moore, Oklahoma

Nashville, Indiana

Portland, Michigan2010Dayton, Ohio at Marco PaperPhoenix, ArizonaMonroe, Louisiana

Jacksonville, Florida

St. Louis, Missouri

Mechanicsville, Virginia

Raleigh, North Carolina

Colleyville, Texas

Colorado Springs, Colorado

Boise area of Meridian, Idaho

Riverside, California (Southern California)

Salem, Oregon

Wheaton, Illinois

St. Cloud, Minnesota

Rockville, Maryland

North Chili, New York (near Rochester)

New Johnsonville, Tennessee

Helena, Montana

Middleburg Heights, Ohio

Venice, Florida

Here is a link to my workshop calendar where you can see all of my travel schedule and to get info on beginner and advanced Brayer workshops:  http://zindorf.blogs.splitcoaststampers.com/workshop-calendar

Link to my Stampin’ Up website were you can order all of your must have Stampin’ Up products from me 24-7:  http://michellezindorf.stampinup.net

Frequently asked questions answers:  http://zindorf.blogs.splitcoaststampers.com/frequently-asked-questions/


Monogram Nest – Tutorial #249

dsc00499.JPG

Today’s tutorial shows how to make a panel look like it is receding with a quick outline using two markers.  Let’s get right into it.

Supplies:

Stamps: Stampin’ Up Nature’s Nest, Lovely Letters Alphabet, Forever Flowers Wheel
Paper: Stampin’ Up Designer Paper, Whisper White, Chocolate Chip
Ink: Stampin’ Up So Saffron, Chocolate Chip and More Mustard
Accessories: Stampin’ Up Markers, Prismacolor Markers, Versamark Pad & Marker, Clear embossing powder, heat gun, Sponge, post it notes, White Gel Pen, Ribbon, Gold Brads, Brayer

Are you inspired by this Blog?  One way you can help support this blog is by ordering your Stampin’ Up products through me.   You can order from me 24-7 from this link:  http://michellezindorf.stampinup.net or e-mail me at mzindorf@aim.com  If you are within the United States.  Want a copy of the brand new 2009-2010 Stampin’ Up Catalog for $9.95, just e-mail me at mzindorf@aim.com and I will get one in the mail to you.  Want to become a Stampin’ Up Demonstrator and earn instant income?  Consider being part of my Stampin’ Up Team.  Through August 31 you can become a Stampin’ Up Demonstrator for as little as $85 with the mini kit.  Also check out the Stampin’ Up specials, click this link to check it out:  http://www.stampinup.net/esuite/home/michellezindorf/promotions

dsc00500.JPG

Stamped Nest on a piece of Whisper White by first loading my stamp with Versamark and then loading it with Chocolate Chip ink before stamping it.  I started out with a larger piece of whisper white and cut it down after stamping to 2.5″ x 3.75″.

dsc00472.JPG

Heat embossed the image using clear embossing powder and a heat gun.

dsc00473.JPG

Colored the image in with a Wheat Prismacolor marker.

dsc00474.JPG

Colored the leaves using a Light Olive Green Prismacolor Marker.

dsc00475.JPG

Added Mocha Dark Prismacolor marker to the bottom of the eggs and the bottom of the nest.

dsc00477.JPG

Colored over the image being careful to not go outside the embossed image with a Versamark marker and heat embossed the entire image using clear embossing powder and a heat gun.

dsc00478.JPG

dsc00479.JPG

Brayered the top of the card stock using So Saffon ink.

dsc00480.JPG

Created a Shadow under the nest with a Sand Prismacolor Marker.

dsc00482.JPG

Added Light Tan Prismacolor Marker to the shadow under the nest.

dsc00483.JPG

Added a bit of Mocha Dark Prismacolor Marker right under the nest.

dsc00484.JPG

Brayered a bit of More Mustard ink at the very top of the card stock.

dsc00485.JPG

Sponged More Mustard around the edges of a Designer Paper Panel that measures 4″ x 5.5″.

dsc00486.JPG

Added a 4 7/8″ x 5 7/8″ Whisper White Panel.  Stamped my unmounted Forever Flowers Wheel Stamp with More Mustard on each side of the card stock.  I masked the corners with post it notes at a diagonal each time I stamped a side so my images at the corners would have a mitered look.

Note:  Press hard when stamping since you are stamping over multiple layers of paper.  This helps give you a better image.

dsc00488.JPG

Colored the leaves in with a Certainly Celery marker and Sponged More Mustard around the edges of the card stock.

dsc00489.JPG

Sponged Chocolate Chip ink around the edges of both the large panel and the main image panel.

dsc00490.JPG

Colored the flowers in with a Bashful Blue marker, added Brocade Blue marker to the petals and then colored the Center of the flowers and the dots in the design in with a White Gel Pen.  Also added white Gel pen highlights to the top edges of the eggs in the nest.

dsc00491.JPG

Assembled the card adding a Chocolate Chip panel under the main image panel and a 5″ x 6.5″ chocolate Chip panel at the very back. 

Decided to make the Design paper panel look like it was receded so I outlined it with a Chocolate Chip marker and then used the Wide Chiseled end of a French Grey 30% Prismacolor marker to outline it again.  This creates the illusion by looking like a shadow.

Stamped the Lovely Lettes Alphabet “Z” with Chocolate Chip ink.

dsc00494.JPG

Here is the finished card measuring 5″ x 6.5″.

dsc00499.JPG

I hope this tutorial has inspired you to add a shadow on one of your card panels to create a little depth.   🙂

Let me close today with a quote for you.

Whatever you give a woman, she will make greater.  If you give her a house, she’ll give you a home. If you give her groceries, she’ll give you a meal. If you give her a smile, she’ll give you her heart. She multiplies and enlarges what is given to her.

So, if you give her any crap, be ready to receive a ton of sh**.

Until my next post. . . . .  . . . . . . . . . . . . . .. Huge Hugs,Michelle

dsc04276-tiny.jpg Get ready for Brayer Workshops!  I am coming to:

Greenwood, Indiana

Castro Valley, California

Yardley, Pennsylvania (near Philadelphia)

Knox, Maine

Akron, Ohio

Broomfield, Colorado

Moore, Oklahoma

Nashville, Indiana

Portland, Michigan

2010

Phoenix, Arizona

Monroe, Louisiana

Jacksonville, Florida

St. Louis, Missouri

Mechanicsville, Virginia

Raleigh, North Carolina

Colleyville, Texas

Colorado Springs, Colorado

Boise area of Meridian, Idaho

Riverside, California (Southern California)

Salem, Oregon

Wheaton, Illinois

St. Cloud, Minnesota

Rockville, Maryland

North Chili, New York (near Rochester)

New Johnsonville, Tennessee

Helena, Montana

Middleburg Heights, Ohio

Venice, Florida

Here is a link to my workshop calendar where you can see all of my travel schedule and to get info on beginner and advanced Brayer workshops:  http://zindorf.blogs.splitcoaststampers.com/workshop-calendar

Link to my Stampin’ Up website were you can order all of your must have Stampin’ Up products from me 24-7:  http://michellezindorf.stampinup.net

Frequently asked questions answers:  http://zindorf.blogs.splitcoaststampers.com/frequently-asked-questions/


Dream Garden Reflection – Tutorial #247

dsc00329.JPG

Before I finish packing for my trip to wonderful Lynchburg, Virginia tomorrow morning, I thought I would share with you this little Asian number.  I used a fantastic tool, the opposite stamp from Innovative Stamp Creations to make quick work of making a reflection image in this project.  If you want to pick up this opposite stamp, here is the link to Innovative Stamp Creations online store:  http://www.innovativestampcreations.com/catalog/item/1516071/7057449.htm at $4 this is a terrific tool.

I paired up the opposite stamp with a great Stampin’ Up set “Dream Gardens”.

One thing before I start the tutorial, Stampin’ Up has a new Holiday Mini Catalog coming out and sales from this catalog start September 1st.  If you would like a copy and you resided in the United States, please e-mail me your address at mzindorf@aim.com and I will pop one in the mail to you.  If I am your Stampin’ Up Demonstrator you will receive this catalog automatically, no need to e-mail me.  🙂  Fantastic sets in this 39 page catalog!

Now, on with the tutorial.

Supplies:

Stamps: Stampin’ Up Dream Gardens and Innovative Stamp Creations Opposite Stamp
Paper: Stampin’ Up Whisper White, Basic Black, Apricot Appeal and Tempting Turquoise
Ink: Stampin’ Up Apricot Appeal, Tempting Turquoise, Old Olive and Basic Black
Accessories: Versamark marker and pad, EK Success Flower Punch, Big Shot Die Cut Machine, Swirley Die Cut, Flourish Texture Plate, Brayer, White Gel Pen, Sponge, Clear Embossing Powder, Heat Gun, Post it Note

Are you inspired by this Blog?  One way you can help support this blog is by ordering your Stampin’ Up products through me.   You can order from me 24-7 from this link:  http://michellezindorf.stampinup.net or e-mail me at mzindorf@aim.com  If you are within the United States.  Want a copy of the brand new 2009-2010 Stampin’ Up Catalog for $9.95, just e-mail me at mzindorf@aim.com and I will get one in the mail to you.  Want to become a Stampin’ Up Demonstrator and earn instant income?  Consider being part of my Stampin’ Up Team.  Through August 31 you can become a Stampin’ Up Demonstrator for as little as $85 with the mini kit.  Also check out the Stampin’ Up specials, click this link to check it out:  http://www.stampinup.net/esuite/home/michellezindorf/promotionsdsc00334.JPGStamped the image with Basic Black ink on the Opposite Stamp and then stamped the opposite stamp on a 3″ x 5.5″ piece of Whisper White card stock.

This creates a reverse image of the original stamp.  🙂

Note:  I always start out stamping the reflection first.  It is much, much easier lining the original stamp up with the reflection in stead of lining the reflection up with the original image.  Clear as mud?

dsc00314.JPG

Stamped the original stamp by first loading it with Versamark and then Basic Black Dye Based ink before lining it up with the reflection image and stamping it.

dsc00315.JPG

Heat embossed the image using clear embossing powder and a heat gun.

Note:  The reflection image is not heat embossed.

dsc00316.JPG

Colored over the main image with a Versamark marker and heat embossed it again with clear embossing powder and a heat gun.  This was done in order to protect the open design in her robe.

Note:  Did not do this step on the reflection.

dsc00317.JPG

dsc00318.JPG

Brayered Tempting Turquoise at the top right corner of the card stock, at an angle.

dsc00319.JPG

Brayered Tempting Turquoise ink at the bottom right corner, at an angle.

dsc00320.JPG

Sponged Apricot Appeal ink on the card stock, using a circular motion.

dsc00321.JPG

Masked the bottom of the card stock with a post it note and sponged Old Olive ink on using a circular motion.

dsc00322.JPG

Sponged Basic Black ink over the Old Olive ink, leave a bit of the Old Olive ink showing.

dsc00323.JPG

Un-masked the card stock and then put a new mask on the top of the card stock.

Sponged just a bit of Old Olive ink over the reflection image.

dsc00324.JPG

Unmasked the main image panel and added water lines with a white gel pen.

dsc00325.JPG

Used my Big Shot and the Swirly Die with Basic Black card stock to cut the Swirl die cut image.

dsc00326.JPG

Used the Big Shot and the Flourish texture plate on a panel of Apricot Appeal card stock.  Brayered Apricot Appeal ink over the texturized panel to bring out the design more.

dsc00327.JPG

Assembled the card front and added Tempting Turquoise punched flowers to the flourish and Brads to the center of the flowers.

dsc00328.JPG

Here is the finished card measuring 5″ x 6.5″.  🙂

dsc00329.JPG

I hope this tutorial has inspired you to try a reflection scene.

May your day be filled with wonder.  🙂

Until my next post. . . . .  . . . . . . . . . . . . . ..

Huge Hugs,

Michelle

 dsc09393.jpgGet ready for Brayer Workshops!  I am coming to:

Lynchburg, Virginia

Greenwood, Indiana

Castro Valley, California

Yardley, Pennsylvania (near Philadelphia)

Knox, Maine

Akron, Ohio

Broomfield, Colorado

Moore, Oklahoma

Nashville, Indiana

Portland, Michigan

2010

Phoenix, Arizona

Monroe, Louisiana

Jacksonville, Florida

St. Louis, Missouri

Mechanicsville, Virginia

Raleigh, North Carolina

Colleyville, Texas

Colorado Springs, Colorado

Boise area of Meridian, Idaho

Riverside, California (Southern California)

Salem, Oregon

Wheaton, Illinois

St. Cloud, Minnesota

Rockville, Maryland

North Chili, New York (near Rochester)

New Johnsonville, Tennessee

Helena, Montana

Middleburg Heights, Ohio

Venice, Florida

Here is a link to my workshop calendar where you can see all of my travel schedule and to get info on beginner and advanced Brayer workshops:  http://zindorf.blogs.splitcoaststampers.com/workshop-calendar

Link to my Stampin’ Up website were you can order all of your must have Stampin’ Up products from me 24-7:  http://michellezindorf.stampinup.net

Frequently asked questions answers:  http://zindorf.blogs.splitcoaststampers.com/frequently-asked-questions/


Medallion Sun – Tutorial #246

dsc00310.JPG

Hey Everyone, I am on cloud nine!  I returned home yesterday from teaching some terrific ladies in Columbia, Missouri to find this in my mailbox.   I am the Featured Artist in the September 2009 issue of the Craft Stamper Magazine.  I’m grinning from ear to ear, lol.  I knew it was coming but to see it in print is a real thrill. 

I don’t seek out publication, but I don’t turn it down when asked either, lol.  Anyway, it was a nice return home gift.  🙂  If you are not familiar with the Craft Stamper Magazine it is the United Kingdom’s Number 1 Stamping Magazine.    Here is their website if you want more information:  www.craftstamper.com

dsc00312.JPG

Here are a couple of photos that were taken at the workshops this weekend in Columbia, Missouri.  Just look at those happy stampers!

columbia-1-2.jpg

 columbia-2.JPG

Now about today’s tutorial, when I seen this Medallion stamp in Stampin’ Up’s new catalog I just had to have it and my mind immediately told me to use it as a sun.   So here it is on paper teamed up with the Stampin’ Up set Branch Out, which is on the dormant list and still available under item number 113200.  🙂

Let’s get crankin on this tutorial. . .  . .

Supplies:

Stamps: Stampin’ Up Medallion and Branch Out
Paper: Stampin’ Up Whisper White, Tempting Turquoise and Basic Black
Ink: Stampin’ Up Basic Black, Pumpkin Pie, Chocolate Chip, Not Quite Navy, Tempting Turquoise and Apricot Appeal
Accessories: Stampin’ Up Piercing Tools, Gold Brads, Brayer, Clear embossing powder, Heat Gun, Sponges, Post it notes

Are you inspired by this Blog?  One way you can help support this blog is by ordering your Stampin’ Up products through me.   You can order from me 24-7 from this link:  http://michellezindorf.stampinup.net or e-mail me at mzindorf@aim.com  If you are within the United States.  Want a copy of the brand new 2009-2010 Stampin’ Up Catalog for $9.95, just e-mail me at mzindorf@aim.com and I will get one in the mail to you.  Want to become a Stampin’ Up Demonstrator and earn instant income?  Consider being part of my Stampin’ Up Team.  Through August 31 you can become a Stampin’ Up Demonstrator for as little as $85 with the mini kit.  Also check out the Stampin’ Up specials, click this link to check it out:  http://www.stampinup.net/esuite/home/michellezindorf/promotions

dsc00313.JPG

Stamped Tree on a 4.5″ x 5.5″ piece of Whisper White Card Stock by first loading the stamp with Versamark and then with Basic Black ink before stamping it.

dsc00295.JPG

Heat embossed the image using clear embossing powder and a heat gun.

dsc00296.JPG

Brayered Apricot Appeal ink at the bottom of the card stock.

dsc00297.JPG

Ripped through the sticky part of two post it notes and used them to mask the ground area of the piece.

dsc00298.JPG

Now you will want to make sure you brayered ink is completely dry before going on to this step.

Stamp the medallion stamp with Versamark on to your main image panel.

dsc00299.JPG

Heat emboss it using clear embossing powder and a heat gun.

dsc00300.JPG

Sponged Tempting Turquoise ink around the Medallion image.

dsc00301.JPG

Sponged Pumpkin Pie ink in the middle area of the Medallion.

dsc00302.JPG

Sponged Not Quite Navy ink in the sky area, not covering the Tempting Turquoise ink entirely.

dsc00303.JPG

Sponged Pumpkin Pie ink in the ground area.

dsc00304.JPG

Sponged Chocolate Chip ink at the bottom of the card stock, not covering the Pumpkin Pie ink entirely.

dsc00305.JPG

Sponged Basic Black ink around the edges of the card stock and in the ground area.

dsc00306.JPG

Used my Stampin’ Up Piercing tool and mats to make holes for my Brads.  This really helps to keep them straight.

dsc00307.JPG

Here is the finished card measuring 5″ x 6.5″.

dsc00310.JPG

May your day be filled with awesome light.

Until my next post. . . . .  . . . . . . . . . . . . . ..

Huge Hugs,

Michelle

 dsc09393.jpgGet ready for Brayer Workshops!  I am coming to:

Lynchburg, Virginia

Greenwood, Indiana

Castro Valley, California

Yardley, Pennsylvania (near Philadelphia)

Knox, Maine

Akron, Ohio

Broomfield, Colorado

Moore, Oklahoma

Nashville, Indiana

Portland, Michigan

2010

Phoenix, Arizona

Monroe, Louisiana

Jacksonville, Florida

St. Louis, Missouri

Mechanicsville, Virginia

Raleigh, North Carolina

Colleyville, Texas

Colorado Springs, Colorado

Boise area of Meridian, Idaho

Riverside, California (Southern California)

Salem, Oregon

Wheaton, Illinois

St. Cloud, Minnesota

Rockville, Maryland

North Chili, New York (near Rochester)

New Johnsonville, Tennessee

Helena, Montana

Middleburg Heights, Ohio

Venice, Florida

Here is a link to my workshop calendar where you can see all of my travel schedule and to get info on beginner and advanced Brayer workshops:  http://zindorf.blogs.splitcoaststampers.com/workshop-calendar

Link to my Stampin’ Up website were you can order all of your must have Stampin’ Up products from me 24-7:  http://michellezindorf.stampinup.net

Frequently asked questions answers:  http://zindorf.blogs.splitcoaststampers.com/frequently-asked-questions/


Snail Invasion – Tutorial #245

dsc00291.JPG

I learn something myself with every tutorial I produce.   Today’s project was no exception.   Starting out, I just had in mind to produce a scene with grasses and snails.  When I got that on paper I was not happy with the scene at all, so I just kept adding things until I was happy.  Today’s lesson learned  is don’t give up on an ugly piece.  🙂

Let’s get started. . .  .

Supplies:

Stamps: Stampin’ Up Garden Whimsy & Inspired by Nature
Paper: Stampin’ Up Whisper White and Elegant Eggplant
Ink: Stampin’ Up Close to Cocoa, Perfect Plum, Dusty Durango, Apricot Appeal, Always Artichoke, More Mustard and Old Olive
Accessories: Versamark Pad and Marker, Clear embossing powder, heat gun, Brayer, Sponge, Dusty Durango Polka Dot Ribbon, Gold Brads, Stampin’ Up Markers and Prismacolor Pencils

Are you inspired by this Blog?  One way you can help support this blog is by ordering your Stampin’ Up products through me.   You can order from me 24-7 from this link:  http://michellezindorf.stampinup.net or e-mail me at mzindorf@aim.com  If you are within the United States.  Want a copy of the brand new 2009-2010 Stampin’ Up Catalog for $9.95, just e-mail me at mzindorf@aim.com and I will get one in the mail to you.  Want to become a Stampin’ Up Demonstrator and earn instant income?  Consider being part of my Stampin’ Up Team.  Through August 31 you can become a Stampin’ Up Demonstrator for as little as $85 with the mini kit.  Also check out the Stampin’ Up specials, click this link to check it out:  http://www.stampinup.net/esuite/home/michellezindorf/promotions

dsc00294.JPG

Started out by stamping the Grass stamp from the Stampin’ Up set Inspired by Nature on a 4.25″ square piece of Whisper White card stock by first loading my stamp with Versamark and then with Old Olive ink before stamping it.

dsc00268.JPG

Heat embossed the image using clear embossing powder and a heat gun.

dsc00269.JPG

Stamped the Snails by first loading them with Versamark and then with More Mustard ink, added a bit of Close to Cocoa Marker before stamping them.

dsc00270.JPG

Heat embossed the snails using clear embossing powder and a heat gun.

dsc00271.JPG

dsc00272.JPG

Added Lovely Lilac marker to their shells.

dsc00273.JPG

Colored over the snails with a Versamark marker and heat embossed them a second time with clear embossing powder and a heat gun.

dsc00274.JPG

Now that my images are heat embossed they will resist ink that is put over them.

Brayered Always Artichoke ink at the bottom of the card stock.

dsc00275.JPG

Wiped the ink off of my embossed images using a cotton rag.

dsc00276.JPG

Brayered Apricot Appeal ink at the top of the card stock.

dsc00277.JPG

Brayered Dusty Durango ink at the top of the card stock. 

 This is where I took a look and didn’t like the scene.  It definitely needed something more.

dsc00278.JPG

Flowers are always good.  Stamped the Flowers from the Stampin’ Up Inspired by Nature set using Perfect Plum and Close to Cocoa ink. 

Note:  Don’t waste your time using the Perfect Plum ink, only use the Close to Cocoa ink.  🙂  You will see later.

dsc00279.JPG

Added Black marker outlines to some of the grasses and to the snails.

dsc00281.JPG

Sponged Close to Cocoa ink around the entire edge of the card stock.

dsc00282.JPG

Now, those flowers really need something.  Out come the prismacolor pencils. 

Added Lilac Prismacolor ink to the flower petals.

dsc00283.JPG

Added Orange Prismacolor pencil to the cone portion of the flowers.

dsc00284.JPG

Added Chartreuse Prismacolor Pencil to the stem and leaves.

dsc00285.JPG

Now, beware!  Do not use your White Gel pen to create highlights over your Prismacolored images.  It will most definitely clog your pen and it will be useless.

Added White highlights to the flowers with a White Prismacolor pencil.  🙂

Now that is a much better scene. 

dsc00286.JPG

Assembled the card front and added Stampin’ Up Dusty Durango Polka Dot ribbon and four gold brads.

dsc00287.JPG

Here is the finished card measuring 5.25″ square.

dsc00291.JPG

May you not give up on whatever you decide to tackle today.

Until my next post. . . . .  . . . . . . . . . . . . . ..

Huge Hugs,

Michelle

 dsc09393.jpgGet ready for Brayer Workshops!  I am coming to:

Columbia, Missouri

Lynchburg, Virginia

Greenwood, Indiana

Castro Valley, California

Yardley, Pennsylvania (near Philadelphia)

Knox, Maine

Akron, Ohio

Broomfield, Colorado

Moore, Oklahoma

Nashville, Indiana

Portland, Michigan

2010

Phoenix, Arizona

Monroe, Louisiana

Jacksonville, Florida

St. Louis, Missouri

Mechanicsville, Virginia

Raleigh, North Carolina

Colleyville, Texas

Colorado Springs, Colorado

Boise area of Meridian, Idaho

Riverside, California (Southern California)

Salem, Oregon

Wheaton, Illinois

St. Cloud, Minnesota

Rockville, Maryland

North Chili, New York (near Rochester)

New Johnsonville, Tennessee

Helena, Montana

Middleburg Heights, Ohio

Venice, Florida

Here is a link to my workshop calendar where you can see all of my travel schedule and to get info on beginner and advanced Brayer workshops:  http://zindorf.blogs.splitcoaststampers.com/workshop-calendar

Link to my Stampin’ Up website were you can order all of your must have Stampin’ Up products from me 24-7:  http://michellezindorf.stampinup.net

Frequently asked questions answers:  http://zindorf.blogs.splitcoaststampers.com/frequently-asked-questions/


Black Cat with Flowers – Tutorial #244

dsc00266.JPG

Hey all you cat lovers, here is a card just for you.  The main character in today’s project is the cat out of the new Stampin’ Up set “C is for Cat”.   I also used my Prismacolor pencils on black card stock for the background, love this look!

Let’s get started. . . .

Supplies:

Stamps: Stampin’ Up “C is for Cat”, “Baroque Motifs” and “Pocket Silhouettes”
Paper: Stampin’ Up Whisper White, Old Olive & Basic Black
Ink: Stampin’ Up Basic Black, White Craft ink, Old Olive, Taken with Teal & Tempting Turquoise
Accessories: White Gel Pen, Brayer, Piercing tool, Basic Black marker, Old Olive & Tempting Turquoise Brads, Old Olive Ribbon, Photo Corner Punch, Spell Binders Nestabilities Dies “Labels Four”, Stampin’ Pastels, Prismacolor Pencils

Are you inspired by this Blog?  One way you can help support this blog is by ordering your Stampin’ Up products through me.   You can order from me 24-7 from this link:  http://michellezindorf.stampinup.net or e-mail me at mzindorf@aim.com  If you are within the United States.  Want a copy of the brand new 2009-2010 Stampin’ Up Catalog for $9.95, just e-mail me at mzindorf@aim.com and I will get one in the mail to you.  Want to become a Stampin’ Up Demonstrator and earn instant income?  Consider being part of my Stampin’ Up Team.  Through August 31 you can become a Stampin’ Up Demonstrator for as little as $85 with the mini kit.  Also check out the Stampin’ Up specials, click this link to check it out:  http://www.stampinup.net/esuite/home/michellezindorf/promotions

dsc00267.JPG

I used my Wizard Die cut machine today with on of the Spellbinders Nestabilities, Labels Four.  This was cut out of Whisper White card stock using the second to the largest die in the set.

dsc00237.JPG

Brayered Tempting Turquoise ink at the top of the card stock.

dsc00238.JPG

Added a circle punched out of the sticky part of a post it note to mask for the moon.

dsc00239.JPG

Brayered Taken with Teal ink at the top of the card stock over the moon mask.

dsc00240.JPG

Removed the moon mask and brayered Old Olive ink at the bottom of the card stock.

dsc00241.JPG

Stamped the Cat and added White Gel pen to his collar, eye and whiskers.

dsc00242.JPG

Stamped one of the plants from the Pocket Silhouettes set twice using Old Olive ink.

dsc00243.JPG

Added White Highlights and Black marker shadows to the leaves.

dsc00244.JPG

dsc00245.JPG

Added a shadow underneath of the cat with a Gray marker.

dsc00247.JPG

Put the Spellbinders die back over the card stock and used my finger to apply Garden Green Stampin’ Pastel to the edge next to the die all the way around the card stock.

dsc00248.JPG

dsc00249.JPG

Used my Wizard Die Cut machine again, this time with the largest Label from the set and Old Olive card stock.

dsc00250.JPG

Stamped the Flourish twice from the Stampin’ Up set Baroque Motifs using White Craft ink on a 5.25″ square piece of Basic Black card stock.

dsc00251.JPG

Heated the ink to dry it.  I cannot stand to wait for ink to dry, lol.

dsc00252.JPG

Colored the flowers in with an Aquamarine Prismacolor Pencil.

dsc00253.JPG

Colored over the vine with a Chartreuse Prismacolor Pencil.

dsc00254.JPG

Added some True Blue Prismacolor Pencil to the vines.

dsc00255.JPG

Assembled the card front and added Old Olive Ribbon and Tempting Turquoise Brads.

dsc00256.JPG

Added Old Olive and Tempting Turquoise punched Photo Corners, along with Old Olive Brads.

dsc00257.JPG

Here is the completed card measuring 5.5″ square.

dsc00266.JPG

Keeping with the cat theme today, here is a funny for you.

cat-funny-1jpg.jpg

May your day be spent with your favorite furry friend.  🙂

Until my next post. . . . .  . . . . . . . . . . . . . ..

Huge Hugs,

Michelle

 dsc09393.jpgGet ready for Brayer Workshops!  I am coming to:

Columbia, Missouri

Lynchburg, Virginia

Greenwood, Indiana

Castro Valley, California

Yardley, Pennsylvania (near Philadelphia)

Knox, Maine

Akron, Ohio

Broomfield, Colorado

Moore, Oklahoma

Nashville, Indiana

Portland, Michigan

2010

Phoenix, Arizona

Monroe, Louisiana

Jacksonville, Florida

St. Louis, Missouri

Mechanicsville, Virginia

Raleigh, North Carolina

Colleyville, Texas

Colorado Springs, Colorado

Boise area of Meridian, Idaho

Riverside, California (Southern California)

Salem, Oregon

Wheaton, Illinois

St. Cloud, Minnesota

Rockville, Maryland

North Chili, New York (near Rochester)

New Johnsonville, Tennessee

Helena, Montana

Middleburg Heights, Ohio

Venice, Florida

Here is a link to my workshop calendar where you can see all of my travel schedule and to get info on beginner and advanced Brayer workshops:  http://zindorf.blogs.splitcoaststampers.com/workshop-calendar

Link to my Stampin’ Up website were you can order all of your must have Stampin’ Up products from me 24-7:  http://michellezindorf.stampinup.net

Frequently asked questions answers:  http://zindorf.blogs.splitcoaststampers.com/frequently-asked-questions/


OH Yea, Snowboarding! – Tutorial #242

dsc00211.JPG

Well you just never know what you are going to find from day to day here on this blog, lol.  I go from Spiders to snow scenes.  It keeps life interesting to think about winter in summer and vice a versa.  🙂

Stampin’ Up came out this year with some great stamps.  I call them the Extreme Line.  Extreme Snowboard, Extreme Skateboard etc.  Take another look at those stamps, they are fun to work with.

Let’s get started.. . . . .  .

Supplies:

Stamps: Stampin’ Up Extreme Snowboard, Lovely As a Tree
Paper: Stampin’ Up Whisper White, Elegant Eggplant and Bashful Blue
Ink: Stampin’ Up Basic Black, Almost Amethyst & Bashful Blue
Accessories: Brayer, Sponge, Ribbon, Brads & Post it notes

 Are you inspired by this Blog?  One way you can help support this blog is by ordering your Stampin’ Up products through me.   You can order from me 24-7 from this link:  http://michellezindorf.stampinup.net or e-mail me at mzindorf@aim.com  If you are within the United States.  Want a copy of the brand new 2009-2010 Stampin’ Up Catalog for $9.95, just e-mail me at mzindorf@aim.com and I will get one in the mail to you.  Want to become a Stampin’ Up Demonstrator and earn instant income?  Consider being part of my Stampin’ Up Team.  Through August 31 you can become a Stampin’ Up Demonstrator for as little as $85 with the mini kit.  Also Stampin’ Up is now having a weekly special, click this link to check it out:  http://www.stampinup.net/esuite/home/michellezindorf/promotions

dsc00212.JPG

Brayered Bashful Blue ink at the top of a 3.5″ x 8.5″ piece of Whisper White card stock.

dsc00196.JPG

Stamped the Snowboarder at the top of the card stock with Basic Black ink.

dsc00197.JPG

Masked the bottom of the card stock with a post it note, put on at an angle.

dsc00198.JPG

Ripped another post it note in the shape of a hill and added it over the first post it note to create a second hill.

dsc00199.JPG

Sponged Bashful Blue at the post it note edges and onto the card stock.

dsc00200.JPG

Stamped the top portion of the Lovely as a tree Pine tree stamp just above the post it notes with Basic Black ink.

dsc00201.JPG

Remove the top post it note and sponge Almost Amethyst ink at the bottom of the hill that is revealed.

dsc00202.JPG

Take the remaining post it note mask and move it down to create a third hill and sponge Almost Amethyst on the second hill revealed.

dsc00204.JPG

Remove the post it note mask that is at the bottom and sponge Almost Amethyst ink at the bottom right corner.

dsc00205.JPG

Added two Elegant Eggplant panels and a Bashful Blue panel.   Assemble the card front and add ribbon and brads.  Use a piercing tool to start your holes for the brads.

dsc00206.JPG

Here is the finished card measuring 4″ x 9″.  This size card fits in a standard #10 office size envelope. 🙂

dsc00211.JPG

I hope this tutorial has got you thinking about starting your Winter creations even though it may be 100 degrees outside.

May your day be filled to overflowing with joy.

Until my next post. . . . .  . . . . . . . . . . . . . ..

Huge Hugs,

Michelle

 dsc09393.jpgGet ready for Brayer Workshops!  I am coming to:

Columbia, Missouri

Lynchburg, Virginia

Greenwood, Indiana

Castro Valley, California

Yardley, Pennsylvania (near Philadelphia)

Knox, Maine

Akron, Ohio

Broomfield, Colorado

Moore, Oklahoma

Nashville, Indiana

Portland, Michigan

2010

Phoenix, Arizona

Monroe, Louisiana

Jacksonville, Florida

St. Louis, Missouri

Mechanicsville, Virginia

Raleigh, North Carolina

Colleyville, Texas

Colorado Springs, Colorado

Boise area of Meridian, Idaho

Riverside, California (Southern California)

Salem, Oregon

Wheaton, Illinois

St. Cloud, Minnesota

Rockville, Maryland

North Chili, New York (near Rochester)

New Johnsonville, Tennessee

Helena, Montana

Middleburg Heights, Ohio

Venice, Florida

Here is a link to my workshop calendar where you can see all of my travel schedule and to get info on beginner and advanced Brayer workshops:  http://zindorf.blogs.splitcoaststampers.com/workshop-calendar

Link to my Stampin’ Up website were you can order all of your must have Stampin’ Up products from me 24-7:  http://michellezindorf.stampinup.net

Frequently asked questions answers:  http://zindorf.blogs.splitcoaststampers.com/frequently-asked-questions/


Down on the Farm – Tutorial #240

dsc00152.JPG

Well I hope everyone had a terrific weekend.  I was teaching locally this weekend so I got to sleep in my own bed.  In fact I didn’t want to get up this morning, lol.  I slept in until 6:00 a.m.  This is extremely strange for me since I am normally up around 3:30 a.m.  When a lot of stampers are heading to bed I am getting up.   Most days I am in my stamp room stamping before the coffee gets done brewing.  I know sick, lol.

My tutorial today is a scene that is very familiar in my area.  Right now though you cannot see very far because the cornstalks are so very tall.  If you have not been to Ohio, it is very flat and when the crops have been harvested you can see for miles.  

One of the stamp sets I used today is a new one from Stampin’ Up “Farm Life”.  Terrific set!  I pared it up with another Stampin’ Up set “inspired by Nature” and a new Stampin’ Up Die cut for the Big Shot “Lattice”.  Hope you like it and will hang out a while and check out today’s tutorial.

Let’s get started.. . .

Supplies:

Stamps: Stampin’ Up “Farm Life” and “Inspired by Nature”
Paper: Stampin’ Up Whisper White, Not Quite Navy and So Saffron
Ink: Stampin’ Up Not Quite Navy, More Mustard, So Saffron, Basic Black, Chocolate Chip, Bordering Blue and Old Olive
Accessories: Stampin’ Up Die “Lattice”, Stampin’ Up Markers, Brayer, Sponge, White Gel Pen, Versamark pad and marker, Piercing Tools, Clear embossing powder and a heat gun

 Are you inspired by this Blog?  One way you can help support this blog is by ordering your Stampin’ Up products through me.   You can order from me 24-7 from this link:  http://michellezindorf.stampinup.net or e-mail me at mzindorf@aim.com  If you are within the United States.  Want a copy of the brand new 2009-2010 Stampin’ Up Catalog for $9.95, just e-mail me at mzindorf@aim.com and I will get one in the mail to you.  Want to become a Stampin’ Up Demonstrator and earn instant income?  Consider being part of my Stampin’ Up Team.  Through August 31 you can become a Stampin’ Up Demonstrator for as little as $85 with the mini kit.  Also Stampin’ Up is now having a weekly special, click this link to check it out:  http://www.stampinup.net/esuite/home/michellezindorf/promotions

dsc00155.JPG

Stamped the Inspired by Nature Stamp by first loading it with Versamark, then Old Olive ink and then tapped my Basic Black pad on the bottom of the stamp image before stamping on a 3.25″ x 6″ piece of Whisper White card stock.

Heat embossed the image using clear embossing powder and a heat gun.

dsc00123.JPG

Stamped the Farm scene by first loading the stamp with Versamark and then black ink before stamping it.   Heat embossed the image using clear embossing powder and a heat gun.

dsc00124.JPG

dsc00125.JPG

Colored the barn roof with a Gray marker.

dsc00126.JPG

Colored the hay rolls in with Barely Banana marker.

dsc00127.JPG

Added More Mustard marker to the hay rolls.

dsc00128.JPG

Colored the tree in with an Old Olive marker.

dsc00129.JPG

Colored over the parts of the image I just colored, plus the entire barn to protect the white with a Versamark marker.   Heat embossed the image using clear embossing powder and a heat gun.

dsc00130.JPG

dsc00131.JPG

Tore a bit of post it note to mask under the barn.

dsc00132.JPG

Sponged Bordering Blue ink in the sky area.

dsc00133.JPG

Sponged Not Quite Navy at the top of the card stock.

dsc00134.JPG

Brayer So Saffron ink at the bottom of the card stock up to the sky line.

dsc00136.JPG

Brayered More Mustard ink at the bottom of the card stock not covering the So Saffron ink entirely.

dsc00137.JPG

Brayered Chocolate Chip ink at the bottom of the card stock not covering the More Mustard ink entirely.

dsc00138.JPG

Colored in the clouds with a White Gel pen.

dsc00139.JPG

Out lines some of the grasses at the bottom with a Black marker.

dsc00140.JPG

Added white gel pen highlights to the tops of the grasses.

dsc00141.JPG

Sponged Black at the bottom of the card stock.

dsc00142.JPG

Sponged Not Quite Navy around a 4 7/8″ x 6 3/8″ panel of So Saffron.

dsc00145.JPG

Cut to Lattice Die cuts out of Not Quite Navy.

dsc00144.JPG

After arranging these a couple of hundred times I decided on this format, lol.

dsc00146.JPG

Added the main image panel and piercings to each side of the card stock using the Stampin’ Up Piercing Tool and Mats.

dsc00147.JPG

Add Shadows and highlights to the die cuts that showed on each side with a Not Quite Navy marker and a white gel pen.

dsc00150.JPG

Added Brads and a ribbon and finished assembling it.

Here is is finished measuring 5″ x 6.5″.

dsc00152.JPG

I hope this tutorial has inspired you to get out those down home stamps.  🙂

May you day be blessed.

Until my next post. . . . .  . . . . . . . . . . . . . ..

Huge Hugs,

Michelle

 dsc09393.jpgGet ready for Brayer Workshops!  I am coming to:

Columbia, Missouri

Lynchburg, Virginia

Greenwood, Indiana

Castro Valley, California

Yardley, Pennsylvania (near Philadelphia)

Knox, Maine

Akron, Ohio

Broomfield, Colorado

Moore, Oklahoma

Nashville, Indiana

Portland, Michigan

2010

Phoenix, Arizona

Monroe, Louisiana

Jacksonville, Florida

St. Louis, Missouri

Mechanicsville, Virginia

Raleigh, North Carolina

Colleyville, Texas

Colorado Springs, Colorado

Boise area of Meridian, Idaho

Riverside, California (Southern California)

Salem, Oregon

Wheaton, Illinois

Rockville, Maryland

North Chili, New York (near Rochester)

New Johnsonville, Tennessee

Helena, Montana

Middleburg Heights, Ohio

Venice, Florida

Here is a link to my workshop calendar where you can see all of my travel schedule and to get info on beginner and advanced Brayer workshops:  http://zindorf.blogs.splitcoaststampers.com/workshop-calendar

Link to my Stampin’ Up website were you can order all of your must have Stampin’ Up products from me 24-7:  http://michellezindorf.stampinup.net

Frequently asked questions answers:  http://zindorf.blogs.splitcoaststampers.com/frequently-asked-questions/