
It’s that time of year when my friend Claire shows up wanting to make Christmas cards. Claire is my Dear, Evil, Friend that got me into stamping, but does not stamp, lol. But that is a whole different story.
A couple of weekends ago we got together and mass produced 40 of these cards in a day, less the time it took us to go out to lunch, gab, harass each other, tease my husband etc, etc. 🙂 I always tailor the card we make each year to what Claire likes and so it varies a bit from my usual style. Claire likes layers and do-dads. Things she can feel on a card. Me, I tend to not care about the do-dads, lol.
Anyway, here is a tutorial on this years card. The tutorial may be missing a couple of pictures. Hard to remember to pick up the camera when you are having a tremendous amount of fun with a friend.
Supplies:
| Stamps: Stampin’ Up Patterned Pines, Snow Swirled & Serene Snowflakes |
| Paper: Stampin’ Up Whisper White, Bashful Blue, Not Quite Navy and Old Olive |
| Ink: Stampin’ Up Old Olive, Whisper White and Not Quite Navy |
| Accessories: Stampin’ Up Real Red Gingham Ribbon, Real Red & Gold Brads, Dazzling Diamonds Glitter, Brayer, Big Shot Die Cut Machine, Top Note Die, Flourish Texture Plate and the Photo Corner Punch |
Want a free 39 page, Stampin’ Up Mini catalog? If you are a resident of the United States, just e-mail your mailing address to me and I will get one in the mail to you. Are you inspired by this Blog? One way you can help support this blog is by ordering your Stampin’ Up products through me. You can order from me 24-7 from this link: http://michellezindorf.stampinup.net or e-mail me at mzindorf@aim.com If you are within the United States. Want a copy of the brand new 2009-2010 Stampin’ Up Catalog for $9.95 with free shipping, just e-mail me at mzindorf@aim.com and I will get one in the mail to you. Want to become a Stampin’ Up Demonstrator and earn instant income? Consider being part of my Stampin’ Up Team. Also check out the Stampin’ Up specials, click this link to check it out: http://www.stampinup.net/esuite/home/michellezindorf/promotions
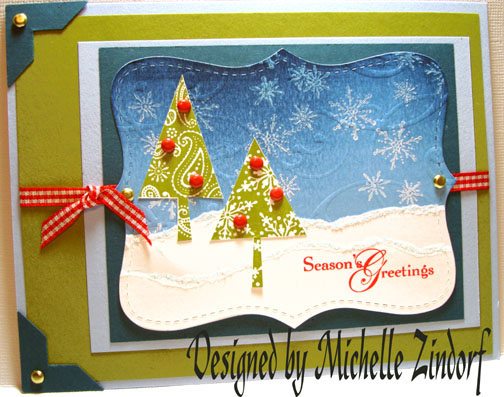
Started out using my Big Shot Die Cut Machine and Top Note Die. Cut one Whisper White Top Note and one Bashful Blue Top Note.

Stamped the Greeting from the Stampin’ Up Set Snow Swirled with Real Red ink on the White Top Note.

Brayered Not Quite Navy ink at the top of the Bashful Blue Top Note.

Ran the Bashful Blue Top Note through the Big Shot Machine using the Flourish Texture Plate.

Tore the top and the bottom off of the Whisper White Top Note, discarding the middle portion. Stacked the two tore pieces at the bottom of the Bashful Blue Top Note to create the snow.

Used a Heat Gun to dry the brayered on ink and stamped the snowflake stamp from the Stampin’ Up set Serene Snowflakes in the sky area of the Bashful Blue Top Note.
Note: If you stamp the snowflakes before the Brayered on ink is dry your snowflakes will disappear. Learned this the hard way, lol.

Stamped the Tree stamp from the Stampin’ Up set Patterned Pines with Old Olive ink on Whisper White Card stock.

Cut two of the trees out and adhered them to the front of the card.


Assembled Bashful Blue, Old Olive and Not Quite Navy layers, added Real Red Gingham ribbon, Not Quite Navy Photo Corner Punches and Gold Brads. Also added three Real Red brads to each tree. It is hard to see, but there is Dazzling Diamonds Glitter on the top of each layer of the snow.
Here is the finished card measuring 5″ x 6.5″.
Now for a giggle, I was going through a card stash I have. You know the card stash, we all have one. Don’t deny it, lol.
Anyhow, found this old card I created back in 2006. I had to look way back in my Split Coast Stampers gallery to see when it was created. Poor Santa! The Stampin’ Up stamp set used for this is a retired set, Star Santa. Don’t you just love looking at your old stuff. It always makes me laugh.

May your day be filled with fond memories.
Huge Hugs,
Michelle
 Get ready for Brayer Workshops! I am coming to:
Moore, Oklahoma
Nashville, Indiana
Portland, Michigan
2010
Dayton, Ohio at Marco Paper
Phoenix, Arizona
Monroe, Louisiana
Jacksonville, Florida
St. Louis, Missouri
Mechanicsville, Virginia
Raleigh, North Carolina
Colleyville, Texas
Colorado Springs, Colorado
Boise area of Meridian, Idaho
Riverside, California (Southern California)
Salem, Oregon
Wheaton, Illinois
St. Cloud, Minnesota
Rockville, Maryland
North Chili, New York (near Rochester)
New Johnsonville, Tennessee
Kenova, West Virginia
Helena, Montana
Middleburg Heights, Ohio
Venice, Florida
Grinnell, Iowa
Piedmont, Alabama
Auburn, Washington (near Seattle)
Elk Grove Village, IllinoisHere is a link to my workshop calendar where you can see all of my travel schedule and to get info on beginner and advanced Brayer workshops: http://zindorf.blogs.splitcoaststampers.com/workshop-calendar
Link to my Stampin’ Up website where you can order all of your must have Stampin’ Up products from me 24-7: http://michellezindorf.stampinup.net
Frequently asked questions answers: http://zindorf.blogs.splitcoaststampers.com/frequently-asked-questions/


