On the Rocks – Tutorial #433

Happy Monday!

Let’s make some waves today using clear embossing powder to protect the white of the card stock.  But before we get started on today’s tutorial I have a blog candy winner to announce.  

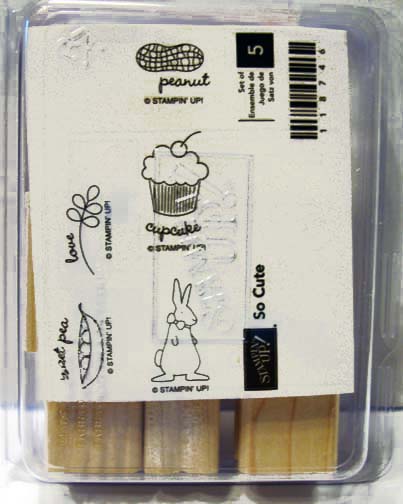
The winner of the Stampin’ Up! Playful Pieces stamp set is. . . . . . . . . .

Sharleen Beresford who wrote “OOH LA LA count me in and enter my name please for this wonderful stamp set!  Thanks for the “blog candy” and as usual thank you for your inspiration and generous artistic spirit!”

Sharleen Beresford, Congratulations!  Please e-mail your mailing address to me at mzindorf@aim.com within 30 days and I will get this great stamp set right out to you.

Thanks to all who played along!

Now on with the tutorial. . . . . .

Supplies:

Stamps: Stampin’ Up! Just Believe
Paper: Stampin’ Up! Whisper White, Pacific Point and Basic Black
Ink: Stampin’ Up! Marina Mist, Basic Black, Pacific Point
Accessories: Stampin’ Up! sponges, Rhinestone Brads, Marina Mist Grosgrain Ribbon, Top Note Die, Big Shot, Photo Corner Punch, Brayer, Clear embossing powder, heat gun, post it note, Versamark pad
Techniques: Emboss Resist, Brayering, Direct to Paper


The Stampin’ Up USA Idea book and Catalog is here.   For your copy, please send a check for $9.95 to Michelle Zindorf, P.O. Box 116, West Alexandria, OH 45381 or send it via paypal to mzindorf@aim.com USA only.     My current customers will receive a new  Summer Mini Catalog automatically from me.   Not a current customer and want a free copy of the new Summer Mini Catalog ?  E-mail your mailing address to mzindorf@aim.com and I will get one in the mail to you.  )  Are you getting inspiration from this blog?   One way you can help support it is to order your Stampin’ Up products through me.   Click HERE to place an order.    Want to become a Stampin’ Up Demonstrator , receive a 20% discount on product and earn instant income on orders?  Consider being part of my Stampin’ Up Team and start your own business or become a Hobby Demo just for the discount.  Click HERE for more information.

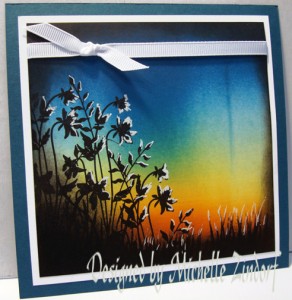
Die cut a Top Note from Whisper White card stock using my Big Shot Machine.

Stamped the plant images using Basic Black ink and heat embossed them using clear embossing powder.

Using a sponge, applied Versamark lightly where I want my wave to be in the scene.  Heat embossed the Versamark using clear embossing powder and a heat gun.   Note:  When you put the embossing powder on you can lightly remove some of it until it looks like what you want before heating it.

Brayered Marina Mist ink on the card stock.  Now you can see where the embossed Versamark is.  🙂

Ripped a post it note and used it as a mask to create my rocks.

Sponged the unmasked area of the card stock using Marina Mist ink.

Smeared Pacific Point ink on the card stock (Direct to paper technique) from the left side of the card stock to the right, lightly.  Leave some of the Marina Mist ink showing through.

Sponged Basic Black ink at the bottom of the card stock.  Buffed the embossed parts of the card stock with a paper towel to remove any excess ink that may be on it.

Cut a 5″ square Whisper White card stock panel and Sponged Marina Mist around the edges.  Distressed edges of the card stock using Basic Black ink.  Also distress the edges of the top note using Basic Black ink.

Assembled the card by adding a 5.5″ square Basic Black panel, 5.25″ square Pacific Point panel, Marina Mist Grosgrain Ribbon, Basic Black and Pacific Point photo corner punches and Rhinestone brads.

Here is the finished card measuring 5.5″ square.

May your

   Get ready for Brayer Workshops!  I am coming to the following locations, click the location name for more information.    

Cleveland (Euclid), Ohio       

Staley , North Carolina (South of Greensboro)       

Monroe, Connecticut       

Dayton, Ohio     

Leesburg, Florida       

Montreal, Wisconsin       

Savannah, Georgia       

Lincoln, Illinois       

Jefferson, Louisiana (New Orleans Area)       

Here is a link to my workshop calendar where you can see all of my travel schedule and to get info on beginner and advanced Brayer workshops:   http://zindorf.blogs.splitcoaststampers.com/workshop-calendar        

Don’t see a workshop in your State?  Interested in hosting the workshops in your area in 2012?   Click HERE to get hostess information.       

Link to my Stampin’ Up website where you can order all of your must have Stampin’ Up products from me 24-7:  http://michellezindorf.stampinup.net   

 Link to my Scentsy website where you can order the best smelling, safest wickless candles from me 24-7:  https://zindorf.scentsy.us/Home


Tumble in the Grass – Tutorial #432


I have another emboss resist card for you this week.  I know this is a bit Fallish, but I love the colors.    Hope you do too.

I really have no time to chat today.  I’m packing for my trip to Ottumwa, Iowa tomorrow.   So let’s get right to the tutorial.

Supplies:

Stamps: Stampin’ Up! Inspired by Nature and Autumn Splendor
Paper: Stampin’ Up! Whisper White, Cajun Craze and Tempting Turquoise
Ink: Stampin’ Up! Basic Black, Not Quite Navy, Tempting Turquoise, Cajun Craze and Old Olive
Accessories: Stampin’ Up! Sponge, Brayer, Clear embossing powder, heat gun, mat pack, piercing tool, linen thread, More Mustard Marker, Versamark pad and marker, buttons, Modern Label punch
Techniques: Emboss Resist and Brayering


The Stampin’ Up USA Idea book and Catalog is here.   For your copy, please send a check for $9.95 to Michelle Zindorf, P.O. Box 116, West Alexandria, OH 45381 or send it via paypal to mzindorf@aim.com USA only.     My current customers will receive a new  Summer Mini Catalog automatically from me.   Not a current customer and want a free copy of the new Summer Mini Catalog ?  E-mail your mailing address to mzindorf@aim.com and I will get one in the mail to you.  )  Are you getting inspiration from this blog?   One way you can help support it is to order your Stampin’ Up products through me.   Click HERE to place an order.    Want to become a Stampin’ Up Demonstrator , receive a 20% discount on product and earn instant income on orders?  Consider being part of my Stampin’ Up Team and start your own business or become a Hobby Demo just for the discount.  Click HERE for more information.

Loaded my Inspired by Nature Stamp with Versamark and then loaded it with Old Olive ink before stamping it on a 4.5″ square piece of Whisper White card stock.  You can use Stampin’ Up Craft Old Olive ink and not use the Versamark for this step.  

Heat embossed the images using clear embossing powder and a heat gun.

Stamped the Autumn Splendor leaf by loading my stamp first with Versamark and then with Cajun Craze before stamping it.  Reloaded for the second image.   Heat embossed both images using clear embossing powder and a heat gun.

Colored the leaves in with a More Mustard marker.

Patted the excess ink off of the embossed images using a paper towel.  (Don’t rub)

Colored over the leaves using a Versamark marker and heat embossed the images using clear embossing powder and a heat gun.

Brayered Tempting Turquoise ink at an angle.

Brayered Not Quite Navy ink at an angle, not covering the Tempting Turquoise ink entirely.

Sponged a bit of Basic Black ink at the bottom of the card stock.  The black ink will stain your embossed images.

Buffed my embossed images off using a paper towel.

Added 2 Cajun Craze panels, 1 Whisper White panel and 1 Tempting Turquoise panel.  Also added 2 Cajune Craze Modern Label punches that have one end cut off. 


Using the mat pack and piercing tool, added 4 holes in each label punch.

Added 2 buttons that have linen thread tied through them.

Here is the finished card measuring 5.75″ square.  This is no little card folks!

May be be able to roll around in the grass today!  Remember doing that as a kid?

Until my next post. . . . .  . .

G

   Get ready for Brayer Workshops!  I am coming to the following locations, click the location name for more information.    

 Ottumwa, Iowa       

Owings Mills, Maryland (Baltimore Area)      

Cleveland (Euclid), Ohio       

Staley , North Carolina (South of Greensboro)       

Monroe, Connecticut       

Dayton, Ohio     

Leesburg, Florida       

Montreal, Wisconsin       

Savannah, Georgia       

Lincoln, Illinois       

Jefferson, Louisiana (New Orleans Area)       

Here is a link to my workshop calendar where you can see all of my travel schedule and to get info on beginner and advanced Brayer workshops:   http://zindorf.blogs.splitcoaststampers.com/workshop-calendar        

Don’t see a workshop in your State?  Interested in hosting the workshops in your area in 2012?   Click HERE to get hostess information.       

Link to my Stampin’ Up website where you can order all of your must have Stampin’ Up products from me 24-7:  http://michellezindorf.stampinup.net   

 Link to my Scentsy website where you can order the best smelling, safest wickless candles from me 24-7:  https://zindorf.scentsy.us/Home


A Day In The Country – Tutorial #431

Hello, hope all is well with you.  Things are busy as usual here, but all is well. 

I have a fun scene for you today.  I live in a rural area and this is a scene that I often get to see in person.  Farms, fields, animals, love it!  The banner at the top of my blog is a photo of a pastel painting I created of the farm directly across the road from my house.  I truly love living in a home that is surrounded by farms.  I get to enjoy the country life without having to work a farm.  🙂  Anyhow, today’s tutorial uses brayering along with the emboss resist technique.  This is a great way to get light colored images in front of dark backgrounds.  It also makes it possible to get depth in your scenes.

Let’s get started. . . .  . . .

Supplies:

Stamps: Stampin’ Up! Farm Life, Inspired by Nature
Paper: Stampin’ Up! Whisper White, Pear Pizzazz and Basic Black
Ink: Stampin’ Up! Whiper White, Basic Black, More Mustard, Chocolate Chip, Cajun Craze and So Saffron
Accessories: Stampin’ Up! sponge, paper snips, Markers (Basic Black, So Saffron, Sahara Sand, Crumb Cake), Ticket Corner Punch, Old Olive Brads, Post it notes, Brayer, Clear embossing powder, heat gun, paper towel


The Stampin’ Up USA Idea book and Catalog is here.   For your copy, please send a check for $9.95 to Michelle Zindorf, P.O. Box 116, West Alexandria, OH 45381 or send it via paypal to mzindorf@aim.com USA only.     My current customers will receive a new  Summer Mini Catalog automatically from me.   Not a current customer and want a free copy of the new Summer Mini Catalog ?  E-mail your mailing address to mzindorf@aim.com and I will get one in the mail to you.  )  Are you getting inspiration from this blog?   One way you can help support it is to order your Stampin’ Up products through me.   Click HERE to place an order.    Want to become a Stampin’ Up Demonstrator , receive a 20% discount on product and earn instant income on orders?  Consider being part of my Stampin’ Up Team and start your own business or become a Hobby Demo just for the discount.  Click HERE for more information.

Colored my Stampin’ Up! Farm Life stamp in with a Versamark marker and then with a Basic Black marker before stamping it on a 3″ x 5.5″ piece of Whisper White card stock.   I did not color the clouds on the stamp.

Heat embossed the image using clear embossing powder and a heat gun.

Colored the right side of the barn and silo using a Sahara Sand marker.  Colored the roofs, twice using the same Sahara Sand marker, letting the marker dry in between coats.  This gives you a darker color.

Colored the hay bales using a So Saffron marker.

Added Crumb Cake marker to the base of the hay bales.

Colored the trees and bushes using a Certainly Celery marker.

Colored over the embossed images (be very careful to stay within the lines) using a Versamark marker.  Heat embossed the images using clear embossing powder and a heat gun to protect the images.

Now that my images are embossed I can brayer over them.

Brayered So Saffron ink at the top of the card stock.

Ripped the edge off of a couple of post it notes and used them to mask the sky area of my scene.

Brayered Cajun Craze ink at the bottom of the card stock.

Removed the mask and gently wiped my embossed images off with a paper towel.

Added Certainly Celery marker to the horizon line.

Stamped the Wheat Stamp using Chocolate Chip ink.

Stamped the Wheat stamp a bit lower using Basic Black ink.

I wanted a bit more drama in the sky area so I brayered More Mustard ink right at the top of the card stock.

Sponged Basic Black ink on the edges of the card stock.

Stamped the stampin’ Up Inspired by Nature Stamp using Whisper White ink on Basic Black card stock.  Cut the images out with Stampin’ Up Paper Snip scissors.

Added a Basic Black panel, Pear Pizzazz panel and a Whisper White Panel.  Used the Stampin’ Up! Ticket Corner punch on the Whisper White panel and the Main Image panel.  Adhered the cut our flowers to the front of the card stock.  Added white Gel Pen highlights to the flowers.

Added a strip of Basic Black card stock and 2 Old Olive brads.

Here is the finished card measuring 5″ x 6.5″.

May your day be filled with peace and sunshine.

Until my next post. . . .  . .

Hugs,

Michelle

   Get ready for Brayer Workshops!  I am coming to the following locations, click the location name for more information.    

 Ottumwa, Iowa       

Owings Mills, Maryland (Baltimore Area)      

Cleveland (Euclid), Ohio       

Staley , North Carolina (South of Greensboro)       

Monroe, Connecticut       

Dayton, Ohio     

Leesburg, Florida       

Montreal, Wisconsin       

Savannah, Georgia       

Lincoln, Illinois       

Jefferson, Louisiana (New Orleans Area)       

Here is a link to my workshop calendar where you can see all of my travel schedule and to get info on beginner and advanced Brayer workshops:   http://zindorf.blogs.splitcoaststampers.com/workshop-calendar        

Don’t see a workshop in your State?  Interested in hosting the workshops in your area in 2012?   Click HERE to get hostess information.       

Link to my Stampin’ Up website where you can order all of your must have Stampin’ Up products from me 24-7:  http://michellezindorf.stampinup.net   

 Link to my Scentsy website where you can order the best smelling, safest wickless candles from me 24-7:  https://zindorf.scentsy.us/Home


Bird & Vines – Tutorial #420

I’m home now.  Been teaching workshops in the sunny state of Florida.   Wish I could have brought some of that sunshine home to Ohio with me.  I think we are in for yet another week of rain. 

Since I don’t have sunshine here, I’ll just create some in my tutorial today.  🙂   How does that sound to you?  It made my step a little lighter.

Announcement:  The Stampin’ Up! new Summer Mini Catalog is now in effect.   Here is a link so you can view it online CLICK HERE.  If you are a customer of mine and haven’t received your Summer Mini Catalog by now, please let me know and I will get one in the mail to you ASAP.    Want to be a customer and get the free mini sent to you, please e-mail your address to mzindorf@aim.com.   Please know you can shop online at my Stampin’ Up! website 24/7 and the products will be shipped directly to you from Stampin’ Up!   CLICK HERE TO SHOP NOW.

Announcement #2:   The Ottumwa, Iowa Zindorf Brayer Workshops were marked sold out in error for a while  until someone mentioned it to me, sheeshhhhhhh!    If you wish to attend, there are seats available.  Please contact me.  

Now on with that sunny tutorial. . . . .

Supplies:

Stamps: Stampin’ Up! Punch Potpourri & Baroque Motifs
Paper: Stampin’ Up! Whisper White, Pear Pizzazz & Early Espresso
Ink: Stampin’ Up! Cajun Craze, Early Espresso, Always Artichoke, More Mustard and Pear Pizzazz
Accessories: Stampin’ Up! Sponges, Ex-Large Bird Punch, Photo Corner Punch, Brayer, Markers (More Mustard, Cajun Craze, Basic Black & Chocolate Chip), Clear Embossing Powder, Heat Gun
Techniques: Brayering, Emboss resist, Punch art

The Stampin’ Up USA Idea book and Catalog is here.   For your copy, please send a check for $9.95 to Michelle Zindorf, P.O. Box 116, West Alexandria, OH 45381 or send it via paypal to mzindorf@aim.com USA only.     My current customers will receive a new  Summer Mini Catalog automatically from me.   Not a current customer and want a free copy of the new Summer Mini Catalog ?  E-mail your mailing address to mzindorf@aim.com and I will get one in the mail to you.  )  Are you getting inspiration from this blog?   One way you can help support it is to order your Stampin’ Up products through me.   Click HERE to place an order.    Want to become a Stampin’ Up Demonstrator , receive a 20% discount on product and earn instant income on orders?  Consider being part of my Stampin’ Up Team and start your own business or become a Hobby Demo just for the discount.  Click HERE for more information.

Stamped the Flourish from the Stampin’ Up! stamp set Baroque Motifs on a 4.25″ square piece of Whisper White card stock by loading it first with Versamark and then loaded it Pear Pizzazz ink before stamping it at the bottom of the card stock.

Heat embossed the image using clear embossing powder and a heat gun.  

Note:  If you use clear embossing powder you can emboss in any color of ink that you have.  🙂

Colored the Bird stamp from the Stampin’ Up! Hostess set Punch Potpourri using Markers, huffed on the stamp and then stamped it on a scrap piece of Whisper White card stock.      Colored the belly with More Mustard, bottom of belly and beak with Cajun Craze head and back with Chocolate Chip.

Made a dot for the bird’s eye after stamping it using a Basic Black marker.

Punched the Bird out using the Stampin’ Up! Ex-Large Bird Punch.

Put Versmark all over the bird and dipped it into the clear embossing powder and then heat it up with the heat gun to emboss the entire bird.

Back to the main image panel.

Brayered More Mustard ink at an angle at the top left side of the card stock.

Brayered Cajun Craze ink at the same angle not covering the More Mustard ink entirely.

Sponged Always Artichoke ink at the bottom of the card stock.

Sponged Early Espresso at the bottom of the card stock.

Stamped the Flourish again using Early Espresso ink.  Then wiped the ink off of my embossed image.

Added 2 Early Espresso panels, 1 Pear Pizzazz panel, 4 Early Espresso Photo Corners.   Glued the bird onto the front of the main image panel.   I then took 2 more Early Espresso photo corners and cut them in half.

Added 1/2 of a photo corner to each side of the card front.

Here is the finished card measuring 5.25″ square.

May  you feel the sun shining on you today.

Until my next post. . . . . .  .

Hugs,

Michelle

   Get ready for Brayer Workshops!  I am coming to the following locations, click the location name for more information.    
   
St. Cloud, Minnesota         

Colorado Springs, Colorado       

Ottumwa, Iowa       

Owings Mills, Maryland (Baltimore Area)      

Cleveland (Euclid), Ohio       

Staley , North Carolina (South of Greensboro)       

Monroe, Connecticut       

Dayton, Ohio     

Leesburg, Florida       

Montreal, Wisconsin       

Savannah, Georgia       

Lincoln, Illinois       

Jefferson, Louisiana (New Orleans Area)       

Here is a link to my workshop calendar where you can see all of my travel schedule and to get info on beginner and advanced Brayer workshops:   http://zindorf.blogs.splitcoaststampers.com/workshop-calendar        

Don’t see a workshop in your State?  Interested in hosting the workshops in your area in 2012?   Click HERE to get hostess information.       

Link to my Stampin’ Up website where you can order all of your must have Stampin’ Up products from me 24-7:  http://michellezindorf.stampinup.net   

 Link to my Scentsy website where you can order the best smelling, safest wickless candles from me 24-7:  https://zindorf.scentsy.us/Home


Terracotta Wall – Tutorial #416


I decided I needed an embossing powder fix this morning.  I got out my clear embossing powder and created this very feminine card using the Stampin’ Up! Hostess set Cute By the Inch and Elements of Style stamp set.  

Ever since I first layed eyes on the block stamp in  the Cute by the Ink set I knew I wanted to create a little wall using it.

Grab a cup of your favorite beverage and take a break for  a few moments to follow along.

Let’s get started. . . . . .

Supplies:

Stamps: Stampin’ Up! Cute by the Inch and Elements of Style
Paper: Stampin’ Up! Baja Breeze, Cajun Craze, Old Olive, Basic Black and Whisper White
Ink: Stampin’ Up! Baja Breeze, Basic Black and Whisper White
Accessories: Stampin’ Up! Baja Breeze Seam Binding, Rhinestone Brads, White Gel Pen, Cajun Craze and Basic Black Markers, Brayer, Stamp-a-ma-jig, Versamark pad, Clear embossing Powder, Heat Gun, Photo Corner Punch, Post it notes
Techniques: Emboss Resist and Brayering


The Stampin’ Up USA Idea book and Catalog is here.   For your copy, please send a check for $9.95 to Michelle Zindorf, P.O. Box 116, West Alexandria, OH 45381 or send it via paypal to mzindorf@aim.com USA only.     My current customers will receive a new Occasions Mini Catalog automatically from me.   Not a current customer and want a free copy of the new Occasions Mini Catalog ?  E-mail your mailing address to mzindorf@aim.com and I will get one in the mail to you.  )  Are you getting inspiration from this blog?   One way you can help support it is to order your Stampin’ Up products through me.   Click HERE to place an order.    Want to become a Stampin’ Up Demonstrator , receive a 20% discount on product and earn instant income on orders?  Consider being part of my Stampin’ Up Team and start your own business or become a Hobby Demo just for the discount.  Click HERE for more information.

Stamp the block from the Stampin’ Up Set Cute by the Inch 3 times on a 3″ square piece of Whisper White  Card stock using Basic Black Craft ink and then heat embossed the images using clear embossing powder and a heat gun.

Masked around the blocks using 3 post it notes.

Smeared ink on the unmasked area using the edge of a Cajun Craze ink pad.

Smeared the edge of a Versamark pad over the unmasked area and heat embossed the unmasked area using clear embossing powder and a heat gun.  Note:  Leave post it notes on during the heat embossing stage.

Brayered Baja Breeze ink at an angle on the top right hand corner.

Brayered Cajun Craze ink at the top right hand corner, not covering the Baja Breeze ink entirely.

Using a Stamp-a-ma-jig tool for placement, stamped flourish from the Stampin’ Up set Elements of Style using Old Olive ink.

Added a Basic Black marker outline under some of the flourish to create a shadow.  Also colored in the dots in the design using the same Basic Black marker.

Colored the flowers in using a Cajun Craze marker.

Added a few highlights to the flourish.

Added a Baja Breeze panel under the main image panel and a 5.25″ square panel under the Baja Breeze panel.  Stamped the flourish four times using Craft Whisper White ink and then dried the ink using a heat gun.

Added a 5.5″ square Baja Breeze panel, Baja Breeze Seam Binding, Rhinestone brads and small Basic Black photo corners.

Here is the finished project measuring 5.5″ square.

May you experience nothing but peace and harmony today.

Until my next post. . . . . . .

Hugs,

Michelle

   Get ready for Brayer Workshops!  I am coming to the following locations, click the location name for more information.       
Orlando (Davenport), Florida       St. Cloud, Minnesota       

Colorado Springs, Colorado       

Ottumwa, Iowa       

Owings Mills, Maryland (Baltimore Area)      

Cleveland (Euclid), Ohio       

Staley , North Carolina (South of Greensboro)       

Monroe, Connecticut       

Dayton, Ohio     

Leesburg, Florida       

Montreal, Wisconsin       

Savannah, Georgia       

Lincoln, Illinois       

Jefferson, Louisiana (New Orleans Area)       

Here is a link to my workshop calendar where you can see all of my travel schedule and to get info on beginner and advanced Brayer workshops:   http://zindorf.blogs.splitcoaststampers.com/workshop-calendar        

Don’t see a workshop in your State?  Interested in hosting the workshops in your area in 2012?   Click HERE to get hostess information.       

Link to my Stampin’ Up website where you can order all of your must have Stampin’ Up products from me 24-7:  http://michellezindorf.stampinup.net   

 Link to my Scentsy website where you can order the best smelling, safest wickless candles from me 24-7:  https://zindorf.scentsy.us/Home


Happy Little Mushrooms – Tutorial #415

Yuck, allergy season.  Like everyone else I am struggling a bit with allergies.  Spring is officially here, lol.     Spent the day yesterday at the doc’s office, getting my presciptions filled and resting.   Today I am feeling a bit more human and I wanted to reflect that feeling by making this cheerful card using the Stampin’ Up! set Funky Four with my much loved Stampin’ Up set Baroque Motifs.   CLICK HERE TO ENTER FOR A CHANCE TO WIN THE FUNKY FOUR STAMP SET.

Let’s get started on today’s tutorial. . . .  . .

Supplies:

Stamps: Stampin’ Up! Funky Four and Baroque Motifs
Paper: Stampin’ Up! Whisper White, Tangerine Tango and Not Quite Navy
Ink: Stampin’ Up! Not Quite Navy, Old Olive, Tempting Turquoise, Tangerine Tango and Always Artichoke
Accessories: Stampin’ Up! Sponges, Brayer, Clear embossing powder, heat gun, White Gel Pen, Old Olive Seam Binding, Markers – Always Artichoke, So Saffron & More Mustard, Versamark pad and marker, post it note, So Saffron brads, color coach

The Stampin’ Up USA Idea book and Catalog is here.   For your copy, please send a check for $9.95 to Michelle Zindorf, P.O. Box 116, West Alexandria, OH 45381 or send it via paypal to mzindorf@aim.com USA only.     My current customers will receive a new Occasions Mini Catalog automatically from me.   Not a current customer and want a free copy of the new Occasions Mini Catalog ?  E-mail your mailing address to mzindorf@aim.com and I will get one in the mail to you.  )  Are you getting inspiration from this blog?   One way you can help support it is to order your Stampin’ Up products through me.   Click HERE to place an order.    Want to become a Stampin’ Up Demonstrator , receive a 20% discount on product and earn instant income on orders?  Consider being part of my Stampin’ Up Team and start your own business or become a Hobby Demo just for the discount.  Click HERE for more information.


To get started today, I pulled out my Stampin’ Up! Color Coach  to be inspired by a color combo.   I found my starting color combo right on the Tangerine Tango card.   This color combo says “happy” to me and that is what I was looking for.

Stamped the mushrooms on a 3.5″ piece of Whisper White card stock by first loading my stamp with Versamark and then with Tangerine Tango ink before stamping it.  Heat embossed the image using clear embossing powder and a heat gun.

Colored the mushrooms in with a So Saffron Marker.  Added More Mustard marker to the dark areas of the mushrooms and then colored over the areas again with the So Saffron marker to blend.

Colored over the mushroom, staying within the embossed image, using a Versamark marker and then heat embossed the images using clear embossing powder and a heat gun.

Brayered Tangerine Tango ink at the top right corner of the card stock.

Ripped a fine edge off of a post it note and used it as a mask for the ground area of my scene.

Brayered Tempting Turquoise ink at the bottom left corner of the sky area.

Removed the mask and wiped the ink off of my embossed images using a paper towel.

Sponged Old Olive ink in the ground area.

Stamped the Baroque Motifs Flourish using Always Artichoke ink and then wiped the ink off of my embossed images using a paper towel.

Stamped the Baroque Motifs flower twice using Tangerine Tango ink.

Sponged Not Quite navy ink at the bottom left corner of the card stock.

Added a little bit of a shadow at the base of the mushrooms using an Always Artichoke marker.

Added a few highlights to the flower with a white gel pen.

Cut a 4.75″ panel from Not Quite Navy card stock and dry embossed it using the Flourish Texture Plate and Big Shot Machine.

Brayered over the embossed card stock with Tempting Turquoise ink to bring out the embossing a bit.

Added Whisper White and Tangerine Tango card stock panels, So Saffron Brads and Old Olive Seam Binding.

Here is my completed card measuring 5.25″ square.

A Little food for thought before I close today.

Imperfection
By Elizabeth Carlson
 
I am falling in love
with my imperfections
The way I never get the sink really clean,
forget to check my oil,
lose my car in parking lots,
miss appointments I have written down,
am just a little late.

I am learning to love the small bumps on my face
the big bump of my nose,
my hairless scalp,
chipped nail polish,
toes that overlap.
Learning to love
the open-ended mystery
of not knowing why

I am learning to fail
to make lists,
use my time wisely,
read the books I should.

Instead I practice inconsistency,
irrationality, forgetfulness.

Probably I should
hang my clothes neatly in the closet
all the shirts together, then the pants,
send Christmas cards, or better yet
a letter telling of
my perfect family.

But I’d rather waste time
listening to the rain,
or lying underneath my cat
learning to purr.

I used to fill every moment
with something I could
cross off later.

Perfect was
the laundry done and folded
all my papers graded
the whole truth and nothing

but

Now the empty mind is what I seek
the formless shape
the strange off center
sometimes fictional me.

May you have good health today and always.

Until my next post. . .  . . .

Hugs,

Michelle

   Get ready for Brayer Workshops!  I am coming to the following locations, click the location name for more information.       

La Porte, Indiana       

Orlando (Davenport), Florida       

St. Cloud, Minnesota       

Colorado Springs, Colorado       

Ottumwa, Iowa       

Owings Mills, Maryland (Baltimore Area)      

Cleveland (Euclid), Ohio       

Staley , North Carolina (South of Greensboro)       

Monroe, Connecticut       

Dayton, Ohio     

Leesburg, Florida       

Montreal, Wisconsin       

Savannah, Georgia       

Lincoln, Illinois       

Jefferson, Louisiana (New Orleans Area)       

Here is a link to my workshop calendar where you can see all of my travel schedule and to get info on beginner and advanced Brayer workshops:   http://zindorf.blogs.splitcoaststampers.com/workshop-calendar        

Don’t see a workshop in your State?  Interested in hosting the workshops in your area in 2012?   Click HERE to get hostess information.       

Link to my Stampin’ Up website where you can order all of your must have Stampin’ Up products from me 24-7:  http://michellezindorf.stampinup.net   

 Link to my Scentsy website where you can order the best smelling, safest wickless candles from me 24-7:  https://zindorf.scentsy.us/Home


Shadowed Tree – Tutorial #411


I’m getting so excited, I’m back on the road this weekend and heading to St. Peters, Missouri, Woohooo!! 

How about a tutorial before I leave.   This tutorial has a bit of everything thrown in, brayering, direct to paper, emboss resist, even a shadow.  🙂

An FYI for you before the tutorial, today is the last day for Stampin’ Up’s Sale-a-bration period.    So if you would like to receive a free stamp set with each $50 in product you purchase check out this link.   http://www.stampinup.net/esuite/home/michellezindorf/promotions   You can order at that link also and your purchase will be shipped directly to you.  🙂

Let’s get started. . . . . . . .

Supplies:

Stamps: Stampin’ Up! Season of Friendship
Paper: Stampin’ Up! Whisper White, Bashful Blue and Early Espresso
Ink: Stampin’ Up! Basic Black, Soft Suede, Sahara Sand, More Mustard, So Saffron, Chocolate Chip, Pacific Point, Bashful Blue
Accessories: Stampin’ Up! Gold Brads, White Gel Pen, Basic Black Marker, Versamark Pad, Sponges, Brayer, Clear Embossing Powder, Heat Gun, Photo Corner Punch
Techniques: Emboss Resist, Brayering, Direct to Paper

  My Stampin’ Up customers that order $50 in Stampin’ Up merchandise will receive this handmade card though March 31, 2011.

Don’t forget it is Sale-a-bration time at Stampin’ Up.  Receive a free Sale-a-bration set for each $50 in merchandise purchased.   Click HERE to place an order.   Your order will be shipped directly to your door step from Stampin’ Up!

The Stampin’ Up USA Idea book and Catalog is here.   For your copy, please send a check for $9.95 to Michelle Zindorf, P.O. Box 116, West Alexandria, OH 45381 or send it via paypal to mzindorf@aim.com USA only.     My current customers will receive a new Occasions Mini Catalog automatically from me.   Not a current customer and want a free copy of the new Occasions Mini Catalog ?  E-mail your mailing address to mzindorf@aim.com and I will get one in the mail to you.  )  Are you getting inspiration from this blog?   One way you can help support it is to order your Stampin’ Up products through me.   Click HERE to place an order.    Want to become a Stampin’ Up Demonstrator , receive a 20% discount on product and earn instant income on orders?  Consider being part of my Stampin’ Up Team and start your own business or become a Hobby Demo just for the discount.  Click HERE for more information.

On with the tutorial. . . .

Stamped the tree on a 3.75″ x 6.25″ piece of Whisper White card stock by first loading the stamp with Versamark and then loaded it with So Saffron ink before stamping it.

Heat embossed the image using clear embossing powder and a heat gun.

Ripped the very edge off of a post it note and then masked the bottom of card stock.

Brayered Bashful Bliss ink at the top of the card stock.

Brayered Pacific Point ink at the bottom of the un-masked area.

Make sure you gently wipe the ink from your embossed image using a paper towel every time you get ink on it.

Sponged a hill in using Chocolate Chip ink.

Sponged a Basic Black hill in, over lapping the Chocolate Chip hill.

Removed the post it note mask.  Using the edge of the So Saffron ink pad, smeared ink across the ground area in the scene.

Using the corner of an More Mustard ink pad, smeared ink across the ground area.

Added a bit of Sahara Sand ink.

Stamped the tree using Basic Black ink to create a shadow for the tree.

Added Basic Black marker to the sides of the branches, next to the embossed image.   The marker will not stick to the embossed image.

Wiped the ink from the embossed image.  Found the Basic Black ink stained the middle of the tree trunk when I put in the hill, so I purposely stained the bottom of the tree trunk by smearing ink on the embossed tree using the corner of the ink pad.  Let the ink sit for a moment and then wiped it off.     Be careful with this step so you don’t get any on your background.

Added Soft Suede ink using the corner of the ink pad.

Added White gel pen to the left side of the tree.

Added a 3 7/8″ x 6 3/8″ Bashful Blue Panel, 5″ x 6.5″ Early Espresso Panel and 6 small Bashful Blue Photo Corner Punches.

Added 6 Gold Brads.  Here is the finished project measuring 5′ x 6.5″.

Have a super weekend!

Until my next post. . . .  . . . . .

Hugs,

Michelle

   Get ready for Brayer Workshops!  I am coming to the following locations, click the location name for more information.       

St. Peters, Missouri       

La Porte, Indiana       

Orlando (Davenport), Florida       

St. Cloud, Minnesota       

Colorado Springs, Colorado       

Ottumwa, Iowa       

Owings Mills, Maryland (Baltimore Area)      

Cleveland (Euclid), Ohio       

Staley , North Carolina (South of Greensboro)       

Monroe, Connecticut       

Dayton, Ohio     

Leesburg, Florida       

Montreal, Wisconsin       

Savannah, Georgia       

Lincoln, Illinois       

Jefferson, Louisiana (New Orleans Area)       

Here is a link to my workshop calendar where you can see all of my travel schedule and to get info on beginner and advanced Brayer workshops:   http://zindorf.blogs.splitcoaststampers.com/workshop-calendar        

Don’t see a workshop in your State?  Interested in hosting the workshops in your area in 2012?   Click HERE to get hostess information.       

Link to my Stampin’ Up website where you can order all of your must have Stampin’ Up products from me 24-7:  http://michellezindorf.stampinup.net   

 Link to my Scentsy website where you can order the best smelling, safest wickless candles from me 24-7:  https://zindorf.scentsy.us/Home   

 Donate cards to the Give Thanks Project and help out Cancer Patients.   CLICK HERE TO HELP


Emboss Resist Bunny Tutorial #410 and a Blog Candy Winner


Gotta create a Bunny card in the Spring, right?    Especially after hanging out at the Tracker Supply Company looking at the baby bunnies, chicks and ducks.  You know they are in the stores right now.   It was so funny when my son, Jesse (age 30) and I popped into the store last week.  Here we are out in farm country looking like city folk, taking pics of the baby bunnies, chicks and ducks using our cell phones, lol.  I’m sure the farmers were thinking, what the heck, as they scratched their heads.

Instead of buying a cute, cute, cute baby bunny to take care of I created this card instead.  🙂   Stay a while and check out this emboss resist card.

But first, I have a blog candy winner to announce. .  . . . . . . . . . And the winner is. . . .. . . . . . .. .

Nina Babcock who wrote “Each week I so look forward to your new creations. I place my cursor on your e-mail and wait with expectancy to see what you have to share with us. I, along with many others, admire your talent and consistancy just so we can have a part of what you do. Thank you.

Nina Babcock, Congratulations!  Please e-mail your address to mzindorf@aim.com within 30 days and I will get this set right out to you.

Thanks to all who played along!

Now let’s start the tutorial. . . . .

Supplies:

 
Stamps: Stampin’ Up! The Nicest Things, Thoughts & Prayers
Paper: Stampin’ Up! Whisper White, Cajun Craze and Old Olive
Ink: Stampin’ Up! Early Espresso, Always Artichoke, Pear Pizzazz, Pacific Point, Tempting Turquoise and Craft Basic Black
Accessories: Stampin’ Up! Sponge, Baja Breeze Seam Binding, Antique Brads, Markers – So Saffron, Peach Parfait, Cajun Craze, Basic Black, River Rock, Soft Suede, Crumb Cake, Brayer, Versamark Marker, Clear embossing powder and Heat gun, 3″ circle Die, Top Note Di
Techniques: Embossed Resist, Brayering


  My Stampin’ Up customers that order $50 in Stampin’ Up merchandise will receive this handmade card though March 31, 2011.

Don’t forget it is Sale-a-bration time at Stampin’ Up.  Receive a free Sale-a-bration set for each $50 in merchandise purchased.   Click HERE to place an order.   Your order will be shipped directly to your door step from Stampin’ Up!

The Stampin’ Up USA Idea book and Catalog is here.   For your copy, please send a check for $9.95 to Michelle Zindorf, P.O. Box 116, West Alexandria, OH 45381 or send it via paypal to mzindorf@aim.com USA only.     My current customers will receive a new Occasions Mini Catalog automatically from me.   Not a current customer and want a free copy of the new Occasions Mini Catalog ?  E-mail your mailing address to mzindorf@aim.com and I will get one in the mail to you.  )  Are you getting inspiration from this blog?   One way you can help support it is to order your Stampin’ Up products through me.   Click HERE to place an order.    Want to become a Stampin’ Up Demonstrator , receive a 20% discount on product and earn instant income on orders?  Consider being part of my Stampin’ Up Team and start your own business or become a Hobby Demo just for the discount.  Click HERE for more information.

Die cut a 3″ circle from Whisper White card stock using my big shot machine and 3″ circle die.

Stamped the bunny using Craft Basic Black ink and then heat embossed it using clear embossing powder and a heat gun.

Colored the bunny using So Saffron marker, then Crumb Cake marker, then Soft Suede marker.

Colored over the whole bunny again using a So Saffron Marker to blend it all together.

Colored the pot label using a River Rock marker.

Colored the pot using So Saffron marker, Peach Parfait marker and Cajun Craze Marker.

Colored over the entire pot with the So Saffron marker to blend all of the colors.

Colored over the colored image with a Versamark marker, making sure to stay inside the lines and then heat embossed the image using clear embossing powder and a heat gun.

Stamped the flowers using Craft Basic Black ink and then heat embossed the images using clear embossing powder and a heat gun.

Colored the center of the flowers using the So Saffron marker and then colored the flowers in with the Versamark marker.  Heat embossed the flowers using clear embossing powder and a heat gun.   Now the images are well protected and will resist the ink that will be put on for the back ground.

Brayered Tempting Turquoise ink at the top of the card stock.   Then Brayered Pacific Point at the top of the card stock, not covering the Tempting Turquoise ink entirely.

 Then Brayered Pacific Point at the top of the card stock, not covering the Tempting Turquoise ink entirely.

Brayered Pear Pizzazz ink at the bottom of the card stock.

Brayered Always Artichoke ink at the bottom of the card stock, not covering the Pear Pizzazz ink entirely.

Wipe embossed images off with a paper towel after you brayer over them.

Stamped the Thoughts and Prayers Tree using Early Espresso ink.

Added highlights to the left side of the tree and dots in the branches using a White Gel Pen.

Added a shadow to the left side of the tree.

Die cut a Top Note Die from Cajun Craze card stock using my Big Shot Machine.

Embossed the Top Note die and a 4.75″ Old Olive panel using the Paisley Texture plate and Big Shot Machine.

Added a 4 7/8″ Cajun Craze Panel and a 5.25″ Old Olive Panel.  Distressed the edges of the card stock panels and the main image panel using Early Espresso ink and a sponge.

Assembled the card adding Baja Breeze Seam Binding and Antique Brads.

Here is the finished card measuring 5.25″ Square.

Before I close, I want to share something that I received via e-mail.   I found it very inspiring.

 
IF I HAD MY LIFE TO LIVE OVER – by Erma Bombeck 
(written after she found out she was dying of cancer).
 

I would have gone to bed when I was sick instead of pretending the earth would go into a holding pattern if I weren’t there for the day. 
  
I would have burned the pink candle sculpted like a rose before it melted in storage. 
  
I would have talked less and listened more. 
  
I would have invited friends over to dinner even if the carpet was stained, or the sofa faded. 
  
I would have eaten the popcorn in the ‘good’ living room and worried much less about the dirt when someone wanted to light a fire in the fireplace. 
  
I would have taken the time to listen to my grandfather ramble about his youth. 
  
I would have shared more of the responsibility carried by my husband. 
  
I would never have insisted the car windows be rolled up on a summer day because my hair had just been teased and sprayed. 
  
I would have sat on the lawn with my grass stains.
 

I would have cried and laughed less while watching television and more while watching life. 
  
I would never have bought anything just because it was practical, wouldn’t show soil, or was guaranteed to last a lifetime. 
  
Instead of wishing away nine months of pregnancy, I’d have cherished every moment and realized that the wonderment growing inside me was the only chance in life to assist God in a miracle.
 

When my kids kissed me impetuously, I would never have said, ‘Later. Now go get washed up for dinner.’ There would have been more ‘I love you’ More ‘I’m sorry’s.’ 

But mostly, given another shot at life, I would seize every minute, look at it, and really see it . . live it and never give it back.       
STOP SWEATING THE SMALL STUFF!!! 

Don’t worry about who doesn’t like you, who has more, or who’s doing what.  Instead, let’s cherish the relationships we have with those who do love us.


May you feel Spring in the air today.

Until my next post. . . . . . .

Hugs,

Michelle

   Get ready for Brayer Workshops!  I am coming to the following locations, click the location name for more information.       

St. Peters, Missouri       

La Porte, Indiana       

Orlando (Davenport), Florida       

St. Cloud, Minnesota       

Colorado Springs, Colorado       

Ottumwa, Iowa       

Owings Mills, Maryland (Baltimore Area)      

Cleveland (Euclid), Ohio       

Staley , North Carolina (South of Greensboro)       

Monroe, Connecticut       

Dayton, Ohio     

Leesburg, Florida       

Montreal, Wisconsin       

Savannah, Georgia       

Lincoln, Illinois       

Jefferson, Louisiana (New Orleans Area)       

Here is a link to my workshop calendar where you can see all of my travel schedule and to get info on beginner and advanced Brayer workshops:   http://zindorf.blogs.splitcoaststampers.com/workshop-calendar        

Don’t see a workshop in your State?  Interested in hosting the workshops in your area in 2012?   Click HERE to get hostess information.       

Link to my Stampin’ Up website where you can order all of your must have Stampin’ Up products from me 24-7:  http://michellezindorf.stampinup.net   

 Link to my Scentsy website where you can order the best smelling, safest wickless candles from me 24-7:  https://zindorf.scentsy.us/Home   

 Donate cards to the Give Thanks Project and help out Cancer Patients.   CLICK HERE TO HELP


Mountain Creek – Tutorial #404

Good Morning All,

Just for a change of pace I thought I would use a totally different color combo than my normal blues and greens.  I do love using shades of browns to get an old time feel.   Add a bit of peach and pink and it starts looking like an antique photo that has been tinted.

Let’s get started. . . . . .

Supplies:

Stamps: Stampin’ Up! Lovely As a Tree
Paper: Stampin’ Up! Whisper White, Basic Black and Soft Suede
Ink: Stampin’ Up! Early Espresso, Soft Suede, Sahara Sand and Basic Black
Accessories: Stampin’ Up! Sponges, Brayer, White Gel Pen,Markers – Blush Blossom, Pink Pirouette, Soft Suede, Early Espesso, Gold Brads, Clear Embossing Powder, Heat Gun, 1″ Circle and Word Window Punches, Post it Notes, Piercing Tools

  My Stampin’ Up customers that order $50 in Stampin’ Up merchandise will receive this handmade card though March 31, 2011.

Don’t forget it is Sale-a-bration time at Stampin’ Up.  Receive a free Sale-a-bration set for each $50 in merchandise purchased.   Click HERE to place an order.   Your order will be shipped directly to your door step from Stampin’ Up!

The Stampin’ Up USA Idea book and Catalog is here.   For your copy, please send a check for $9.95 to Michelle Zindorf, P.O. Box 116, West Alexandria, OH 45381 or send it via paypal to mzindorf@aim.com USA only.     My current customers will receive a new Occasions Mini Catalog automatically from me.   Not a current customer and want a free copy of the new Occasions Mini Catalog ?  E-mail your mailing address to mzindorf@aim.com and I will get one in the mail to you.  )  Are you getting inspiration from this blog?   One way you can help support it is to order your Stampin’ Up products through me.   Click HERE to place an order.    Want to become a Stampin’ Up Demonstrator , receive a 20% discount on product and earn instant income on orders?  Consider being part of my Stampin’ Up Team and start your own business or become a Hobby Demo just for the discount.  Click HERE for more information.

Started with a 4″ x 5″ piece of Whisper White card stock, stamped the trees, on each side of the card stock, without inking the grassy area of the stamp using Basic Black Craft ink (Pigment).  Heat embossed the images using clear embossing powder.

Colored the tree tops using a Blush Blossom marker.

Tapped in a bit of Pink Pirouette marker in the middle of the trees.

colored over the marker using a Versamark marker and then heat embossed the images using clear embossing powder and a heat gun.  This potects the color in the trees and will resist ink put on for our background.

Punched a 1″ circle from a scrap piece of card stock.

Put the hole in the card stock where I want my moon and colored the Moon in with Blush Blossom marker.  Added some Pink Pirouette marker to the left side of the moon.  Colored the moon in with Versamark marker and heat embossed the image using clear embossing powder and a heat gun.

Now that our trees and moon are protected with embossing we can brayer over them and they will resist the ink.

Brayered Sahara Sand ink at the top and the bottom of the card stock.

Ripped a post it note in a mountain shape and put it on my card stock to mask the sky.

Sponged Soft Suede ink in the mountain shape.

Added Early Espresso ink to the top of the mountain.

Unmasked the sky.  Ripped a creek shaped piece of post it note and masked the creek area.

Ripped another post it note and masked the sky and mountain.

Sponged Soft Suede in the unmasked area.

Added Early Espresso ink in the top 1/2 of the unmasked area.

Sponged a bit of Basic Black ink at the very top of the unmasked area.

Removed the post it notes and gently wiped my embossed images off using a paper towel.

Put a line of Early Espresso marker at the top of creek and extended the tree trunks.

Lightly Sponged Early Espresso ink at the bottom half of the creek.

Brayered Early Espresso ink at the top of the card stock.  Wiped my embossed images off again.

Added White Gel pen dots to the trees to add a bit of sparkle.

Added a few rock shapes and water lines in the creek using a Soft Suede marker.

Punched 2 Basic Black Word Window punches and held them together and one end off of them.

Added 2 Basic Black panels, 1 Soft Suede panel, word window punches and gold brads.

Here is the finished card measuring 5″ x 6.5″.

May your day be filled with all that pleases you.

Until my next post. . . .  . . . . . . .

Hugs,

Michelle

   Get ready for Brayer Workshops!  I am coming to the following locations, click the location name for more information.    

Wichita, Kansas    

Syracuse (Bridgeport), New York    

St. Peters, Missouri    

La Porte, Indiana    

Orlando (Davenport), Florida    

St. Cloud, Minnesota    

Colorado Springs, Colorado    

Ottumwa, Iowa    

Owings Mills, Maryland (Baltimore Area)   

Cleveland (Euclid), Ohio    

Staley , North Carolina (South of Greensboro)    

Monroe, Connecticut    

Dayton, Ohio  

Leesburg, Florida    

Montreal, Wisconsin    

Savannah, Georgia    

Lincoln, Illinois    

Jefferson, Louisiana (New Orleans Area)    

Here is a link to my workshop calendar where you can see all of my travel schedule and to get info on beginner and advanced Brayer workshops:   http://zindorf.blogs.splitcoaststampers.com/workshop-calendar     

Don’t see a workshop in your State?  Interested in hosting the workshops in your area in 2012?   Click HERE to get hostess information.    

Link to my Stampin’ Up website where you can order all of your must have Stampin’ Up products from me 24-7:  http://michellezindorf.stampinup.net

 Link to my Scentsy website where you can order the best smelling, safest wickless candles from me 24-7:  https://zindorf.scentsy.us/Home

 Donate cards to the Give Thanks Project and help out Cancer Patients.   CLICK HERE TO HELP


Hey Soccer Moms – Tutorial #401

Hey Soccer Moms, I have a card tutorial for you today.   Exactly what do you do with that stamp set that has a ball and one sentiment?  Well, you build a scene around that ball. 

Ready?  Let’s get started. . . .  . . .

Supplies:

Stamps: Stampin’ Up! Goal
Paper: Stampin’ Up! Whisper White, Always Artichoke, Tempting Turquoise, Basic Black card stock and Stampin’ Up! Newsprint Designer Paper
Ink: Stampin’ Up! Basic Black, Always Artichoke, Tempting Turquoise, Old Olive
Accessories: Stampin’ Up! Sponges, Versamark Marker, Ruler, Star & Circle punches, Post it Note, Brayer, Clear embossing powder, heat gun, Old Olive brads, Sharpie White Paint Marker


  My Stampin’ Up customers that order $50 in Stampin’ Up merchandise will receive this handmade card though March 31, 2011.

Don’t forget it is Sale-a-bration time at Stampin’ Up.  Receive a free Sale-a-bration set for each $50 in merchandise purchased.   Click HERE to place an order.   Your order will be shipped directly to your door step from Stampin’ Up!

The Stampin’ Up USA Idea book and Catalog is here.   For your copy, please send a check for $9.95 to Michelle Zindorf, P.O. Box 116, West Alexandria, OH 45381 or send it via paypal to mzindorf@aim.com USA only.     My current customers will receive a new Occasions Mini Catalog automatically from me.   Not a current customer and want a free copy of the new Occasions Mini Catalog ?  E-mail your mailing address to mzindorf@aim.com and I will get one in the mail to you.  )  Are you getting inspiration from this blog?   One way you can help support it is to order your Stampin’ Up products through me.   Click HERE to place an order.    Want to become a Stampin’ Up Demonstrator , receive a 20% discount on product and earn instant income on orders?  Consider being part of my Stampin’ Up Team and start your own business or become a Hobby Demo just for the discount.  Click HERE for more information.

Stamped the soccer ball using Craft (pigment) Basic Black ink on a 3.5″ x 4″ piece of Whisper White card stock.

Heat embossed the image using clear embossing powder and a heat gun.

Colored over the image using a Versamark marker and then heat embossed the image again.  This protects the white in the soccer ball from ink I will put on in later steps.

Brayered Old Olive ink from the bottom of the card stock to the top.

Lightly buffed off the image with a paper towel.  You will want to do this anytime you get ink on your embossed image.

Brayered Always Artichoke ink at the bottom of the card stock.

Using a Sharpie White Paint Marker and a ruler, put in the field lines. 

Masked the soccer ball and field with a post it note and sponged basic Black ink at the post it note edge to create a shadow under the soccer ball.

Brayered Tempting Turquoise ink at the top of the card stock.

Punched 3 Basic Black card stock stars.

Cut a 4.75″ x 6.25″ piece of Stampin’ Up News Print Designer paper and sponged Always Artichoke ink around the edges of it.

Crumpled the paper up and then flattened it out and sponged a bit of Always Artichoke ink over the crinkles to enhance them.


Added 2 Always Artichoke panels, 1 Basic Black panel and 1 Tempting Turquoise panel.  Also added Tempting Turquoise circles to the stars and Old Olive brads.

Stamped the Sentiment in the right corner twice using Basic Black ink.

Here is the finished card measuring 5.25″ x 6.75″.

A little funny before I close. This was found on my friend and downlines Face page this morning, hysterical!

OMG! I figured out why Im fat! The shampoo I use in the shower that runs down my body says “For extra volume and body” Im goin to start using “Dawn” dish soap.It says “Dissolves fat that is otherwise difficult to remove” Re post if u have the same issue..its too funny to not share!

May your day be a total winner.

Until my next post. . . . . .

Hugs,

Michelle

Total weight loss to date 20.3 lbs, 45.7 to go.

   Get ready for Brayer Workshops!  I am coming to the following locations, click the location name for more information.  

Houston, Texas  

Wichita, Kansas  

Syracuse (Bridgeport), New York  

St. Peters, Missouri  

La Porte, Indiana  

Orlando (Davenport), Florida  

St. Cloud, Minnesota  

Colorado Springs, Colorado  

Ottumwa, Iowa  

Owings Mills, Maryland (Baltimore Area) 

Cleveland (Euclid), Ohio  

Staley , North Carolina (South of Greensboro)  

Monroe, Connecticut  

Dayton, Ohio

Leesburg, Florida  

Montreal, Wisconsin  

Savannah, Georgia  

Lincoln, Illinois  

Jefferson, Louisiana (New Orleans Area)  

Here is a link to my workshop calendar where you can see all of my travel schedule and to get info on beginner and advanced Brayer workshops:   http://zindorf.blogs.splitcoaststampers.com/workshop-calendar   

Don’t see a workshop in your State?  Interested in hosting the workshops in your area in 2012?   Click HERE to get hostess information.  

Link to my Stampin’ Up website where you can order all of your must have Stampin’ Up products from me 24-7:  http://michellezindorf.stampinup.net