Winter Pine – Tutorial #284 and a Blog Candy Winner

dsc01885.JPG

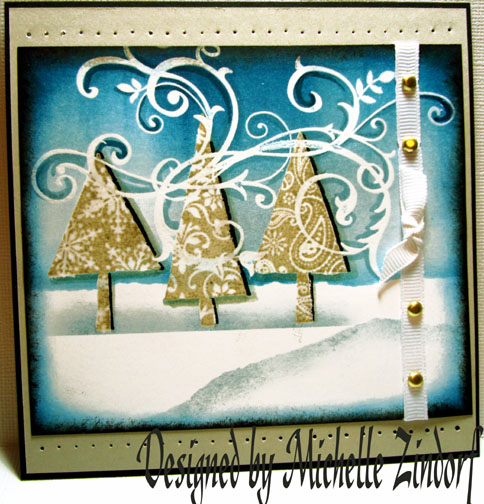
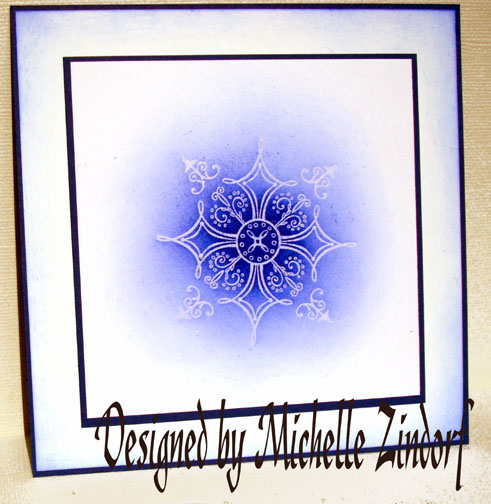
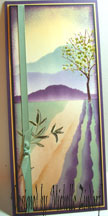
We have a few flurries in my area today so it put me in the mood for another chilly card.  I love these 3 Stampin’ Up! blue ink colors together, Brilliant Blue, Tempting Turquoise and Night of Navy.  They remind me of northern lights.  But before we get into the tutorial I have a Blog Candy winner to announce.

dsc01020.JPG  The Blog Candy Winner is. . . . . . . . . . . .

csalt47, who wrote “Oh please please please pick me! I love this set.  (Wish I were on your down line team — what a pretty card).”  

csalt47 e-mail your address to mzindorf@aim.com within the next 30 days and I will pop this great set in the mail to you.    Congratulations!

Thanks to all who played along.  Maybe next week it will be you!

Now let’s get started on this tutorial.  🙂

Supplies:

Stamps: Stampin’ Up! Season of Joy, Serene Snowflakes
Paper: Stampin’ Up! Tempting Turquoise, Basic Black and Whisper White
Ink: Stampin’ Up! Brilliant Blue, Tempting Turquoise, Night of Navy, Craft White
Accessories: Stampin’ Up! Basic Black marker, White Gel pen, Piercing Tools, Sponges, Paper Snips, Versamark Pad, Clear embossing powder, Heat Gun and Post it notes

Want a free 39 page, Stampin’ Up Mini catalog?  If you are a resident of the United States,  just e-mail your mailing address to me and I will get one in the mail to you.  Are you inspired by this Blog?  One way you can help support this blog is by ordering your Stampin’ Up products through me.   You can order from me 24-7 from this link:  http://michellezindorf.stampinup.net or e-mail me at mzindorf@aim.com.  If you are within the United States.  Want a copy of the brand new 2009-2010 Stampin’ Up Catalog for $9.95 with free shipping, just e-mail me at mzindorf@aim.com and I will get one in the mail to you.  Want to become a Stampin’ Up Demonstrator and earn instant income?  Consider being part of my Stampin’ Up Team.  Also check out the Stampin’ Up specials, click this link to check it out:  http://www.stampinup.net/esuite/home/michellezindorf/promotions

dsc01886.JPG

Stamped on a 4″ x 5.5″ piece of Whisper White card stock the tree from the Stampin’ Up! set Season of Joy using Versamark.

dsc01865.JPG

Stamped the snowflakes from the Stampin’ Up! set Serene Snowflakes using Versamark.

dsc01867.JPG

Heat embossed the images using clear embossing powder and a heat gun.

dsc01868.JPG

Cut two “upside down” hills in a post it note and used it to mask the snow area in the scene.

dsc01869.JPG

Sponged Tempting Turquoise ink in the middle of the card stock.

dsc01870.JPG

Sponged Brilliant Blue ink around the Tempting Turquoise ink, not covering the Tempting Turquoise ink entirely.

dsc01871.JPG

Sponged Night of Navy ink around the Brilliant Blue ink, not covering the Brilliant Blue ink entirely.

dsc01872.JPG

Removed the post it note mask and wiped the ink from the embossed images using a soft cotton towel.  You can use a paper towel for this also.

dsc01873.JPG

Added a Tempting Turquoise, Whisper White and Basic Black panels.

Using my piercing tools, added some piercings to the bottom of the card stock.

dsc01875.JPG

Added White Gel pen dots in the sky area and dashes around the star on the tree.

dsc01877.JPG

Masked along side of one hill using a post it note.  Stamped the flourish from the Stampin’ Up! set Season of Joy using White Craft ink.

dsc01879.JPG

Added Basic Black marker outline to the left side of the tree, hill and to the flouish.  Also added a bit of white gel pen highlights to the flourish.

dsc01880.JPG

Here is the complete card measuring 5″ x 6.5″.

dsc01885.JPG

I hope you are tucked away in a cozy place today.  🙂

Until my next post. . . . . .  . . . .

Huge Hugs,

Michelle

dsc00599.jpg  Get ready for Brayer Workshops!  I am coming to:

2010

Dayton, Ohio at Marco Paper

Phoenix, Arizona

Monroe, Louisiana

Jacksonville, Florida

 St. Louis, Missouri

Mechanicsville, Virginia

Raleigh, North Carolina 

Colleyville, Texas

Colorado Springs, Colorado

 Boise area of Meridian, Idaho

Riverside, California (Southern California)

Salem, Oregon

Wheaton, Illinois

St. Cloud, Minnesota

Rockville, Maryland

North Chili, New York (near Rochester)

New Johnsonville, Tennessee

Kenova (Huntington), West Virginia

Helena, Montana

Middleburg Heights, Ohio

Venice, Florida

Grinnell, Iowa

Piedmont, Alabama (Near GA border close to Cedartown)

Auburn, Washington (near Seattle)

Elk Grove Village, Illinois

Savannah, Georgia

Atlanta, Georgia

North Liberty, Indiana

Saledad, California

Here is a link to my workshop calendar where you can see all of my travel schedule and to get info on beginner and advanced Brayer workshops:   http://zindorf.blogs.splitcoaststampers.com/workshop-calendar 

Link to my Stampin’ Up website where you can order all of your must have Stampin’ Up products from me 24-7:  http://michellezindorf.stampinup.net

Frequently asked questions answers:  http://zindorf.blogs.splitcoaststampers.com/frequently-asked-questions/ 


Pumpkin Patch – Tutorial #271

dsc01242-2.jpg

I have a little Autumn scene for you today.  The main set used today is a Stampin’ Up set Autumn Harvest, item number 110372, $17.95.  I teamed it up with a Stampin’ Up set Baroque Motifs and used the flourish as pumpkin vines.  Check it out.  🙂

Let’s get started. . . .

Supplies:

Stamps: Stampin’ Up Autumn Harvest & Baroque Motifs
Paper: Stampin’ Up Whisper White, Dusty Durango & Tempting Turquoise
Ink: Stampin’ UP Dusty Durango, Tempting Turquoise, Old Olive & Basic Black
Accessories: Stampin’ Up Markers, Sponges, Piercing Tool, Gold Brads, Dusty Durango Polka Dot Ribbon, Big Shot Die Cut Machine, Top Note Die, Versamark Pad & Marker, Clear embossing Powder, Heat Gun

Want a free 39 page, Stampin’ Up Mini catalog?  If you are a resident of the United States,  just e-mail your mailing address to me and I will get one in the mail to you.  Are you inspired by this Blog?  One way you can help support this blog is by ordering your Stampin’ Up products through me.   You can order from me 24-7 from this link:  http://michellezindorf.stampinup.net or e-mail me at mzindorf@aim.com  If you are within the United States.  Want a copy of the brand new 2009-2010 Stampin’ Up Catalog for $9.95 with free shipping, just e-mail me at mzindorf@aim.com and I will get one in the mail to you.  Want to become a Stampin’ Up Demonstrator and earn instant income?  Consider being part of my Stampin’ Up Team.  Also check out the Stampin’ Up specials, click this link to check it out:  http://www.stampinup.net/esuite/home/michellezindorf/promotions

dsc01236.JPG

Used my Big Shot Dye Cut Machine and the Top Note Die to cut out this shape with Whisper White Card stock.

dsc01205.JPG

Stamped the leaf from the Autumn Harvest set by first loading my stamp with Versamark and then with Basic Black ink before stamping it on the card stock.  Stamped all three images loading the stamp each time with Versamark and ink.   Heat embossed the images using clear embossing powder and a heat gun.

dsc01206.JPG

dsc01207.JPG

Colored the leaves in with a Creamy Caramel marker.

dsc01208.JPG

Added More Mustard marker to the leaves.

dsc01209.JPG

Added a bit of Real Red Marker to the center of the leaves.

dsc01210.JPG

Colored over the leaves, staying within the embossed lines with a Versamark marker.  Heat embossed the images using clear embossing powder and a heat gun.

dsc01211.JPG

dsc01212.JPG

Stamped the two pumpkins from the Autumn Harvest set by first loading the stamps with Versamark and then with Dusty Durango ink before stamping them.  Heat embossed the images using clear embossing powder and a heat gun.

dsc01213.JPG

dsc01214.JPG

Colored in the pumpkins with a More Mustard marker.

dsc01215.JPG

Added Pumpkin Pie Marker.

dsc01216.JPG

Added Real Red marker.

dsc01219.JPG

Colored in the Pumpkin stems with an Old Olive marker.

dsc01220.JPG

I wanted to brighten up the Pumpkins a bit so I colored over the pumpkins with a Summer Sun marker.

dsc01221.JPG

Colored over the pumpkins with a Versamark marker and heat embossed the images using clear embossing powder and a heat gun.

dsc01222.JPG

dsc01223.JPG

Masked the bottom of the card stock with a post it note.  Stamped the Flourish from the Stampin’ Up set Baroque Motifs by first loading the stamp with Versamark and then with Old Olive ink before stamping it.  Heat embossed the image using clear embossing powder and a heat gun.  Note I kept the post it note on while heat embossing to keep the embossing powder from sticking to the residue left by the post it note.

dsc01224.JPG

dsc01225.JPG

Sponged Old Olive ink at the bottom of the card stock.

dsc01226.JPG

Sponged Tempting Turquoise ink at the top of the card stock.

dsc01227.JPG

Sponged Dusty Durango ink around the outside edge of the card stock.

dsc01228.JPG

Added Tempting Turquoise and Dusty Durango panels, Dusty Durango Polka Dot Ribbon and two Gold Brads.  Here is the finished card measuring 5″ x 6.5″.

dsc01242-2.jpg

May your day be one of the happiest of your life.

Until my next post. . . . . .

Huge Hugs,

Michelle

tiny-bird.jpg  Get ready for Brayer Workshops!  I am coming to:

Broomfield, Colorado

Moore, Oklahoma

Nashville, Indiana

Portland, Michigan

2010

Dayton, Ohio at Marco Paper

Phoenix, Arizona

Monroe, Louisiana

Jacksonville, Florida St. Louis, MissouriMechanicsville, VirginiaRaleigh, North Carolina Colleyville, Texas

Colorado Springs, Colorado

Boise area of Meridian, Idaho

Riverside, California (Southern California)

 Salem, Oregon

Wheaton, Illinois

St. Cloud, Minnesota

Rockville, Maryland

North Chili, New York (near Rochester)

New Johnsonville, Tennessee

Kenova, West Virginia

Helena, Montana

Middleburg Heights, Ohio

Venice, Florida

Ginnell, Iowa

Piedmont, Alabama

Auburn, Washington (near Seattle)

Elk Grove Village, Illinois

Here is a link to my workshop calendar where you can see all of my travel schedule and to get info on beginner and advanced Brayer workshops:   http://zindorf.blogs.splitcoaststampers.com/workshop-calendar 

Link to my Stampin’ Up website where you can order all of your must have Stampin’ Up products from me 24-7:  http://michellezindorf.stampinup.net

Frequently asked questions answers:  http://zindorf.blogs.splitcoaststampers.com/frequently-asked-questions/ 


Night Time Christmas Cardinal – Tutorial #270

dsc01201.JPG

Here in Ohio we have lots of Cardinals.  It is our state bird, by the way.  I love hearing their cheerful chirp and seeing their bright red feathers when they visit my bird feeders.  Especially love seeing them in the winter when the ground is covered in snow. 

Our temperatures this week are not suppose to get out of the forties.  That is a bit chilly for October here.  So once again my mind is thinking Winter.  That is not all bad, I am getting a head start on my Christmas cards.  Maybe I will get some sent this year.  🙂  Last year I did not even get my Christmas cards made.  You would think with as many cards that I make that would not be a problem. . . . . . where does the time go.  If I could just do without sleep entirely. .. . . . . . . .maybe, just maybe, lol.

Let’s get started.

Supplies:

Stamps: Stampin’ Up! A Cardinal Christmas & Serene Snowflakes
Paper: Stampin’ Up! Whisper White, Bashful Blue & Basic Black
Ink: Stampin’ Up! Basic Black, Not Quite Navy & Night of Navy
Accessories: Stampin’ Up! Markers Old Olive, Always Artichoke, Real Red, Bravo Burgundy, More Mustard & Close to Cocoa, Red Ribbon, Versamark marker & Pad, Clear embossing powder, heat gun, brayer, post it note, sponge

Want a free 39 page, Stampin’ Up Mini catalog?  If you are a resident of the United States,  just e-mail your mailing address to me and I will get one in the mail to you.  Are you inspired by this Blog?  One way you can help support this blog is by ordering your Stampin’ Up products through me.   You can order from me 24-7 from this link:  http://michellezindorf.stampinup.net or e-mail me at mzindorf@aim.com  If you are within the United States.  Want a copy of the brand new 2009-2010 Stampin’ Up Catalog for $9.95 with free shipping, just e-mail me at mzindorf@aim.com and I will get one in the mail to you.  Want to become a Stampin’ Up Demonstrator and earn instant income?  Consider being part of my Stampin’ Up Team.  Also check out the Stampin’ Up specials, click this link to check it out:  http://www.stampinup.net/esuite/home/michellezindorf/promotions

dsc01204.JPG

On a 3.5″ x 5″ piece of Whisper White card stock stamped the snowflakes from the Stampin’ Up set Serene Snowflakes with Versamark only.   Heat embossed the images using clear embossing powder and a heat gun.

dsc01168.JPG

dsc01171.JPG

Stamped the Cardinal from the Stampin’ Up set A Christmas Cardinal by first loading the stamp with Versamark and then with Basic Black ink before stamping it.  Heat embossed the image using clear embossing powder and a heat gun.

dsc01172.JPG

dsc01173.JPG

Colored the leaves in with an Old Olive marker in the light areas and Always Artichoke in the dark areas.

dsc01174.JPG

Colored the Cardinals beak with a More Mustard marker.  Also colored his chest and head with the More Mustard marker.  I wanted the More Mustard under the red I will put on next to warm the red up a bit.

dsc01175.JPG

Colored over the bird with the a Real Red marker.

dsc01176.JPG

Colored over the Cardinal’s back and tail with a Bravo Burgundy marker.

dsc01177.JPG

Now keep in mind that you will need to wipe ink off of your embossed images through out this project.  I use an old cotton towel.

dsc01178.JPG

It is hard to see in this photo, but I colored in the stems with a Close to Cocoa marker, his feet with the More Mustard marker and the Berries with the Bravo Burgundy marker.

dsc01179.JPG

Colored over the image, staying within the embossed lines with a Versamark marker.  Heat embossed the image using clear embossing powder and a heat gun.

dsc01180.JPG

dsc01181.JPG

Now that my image is completely embossed I can put in my back ground and the embossing with resist the ink.

Brayered Not Quite Navy ink from the top of the card stock to the bottom.

We can see the snowflakes now that I stamped in step one.

dsc01183.JPG

Brayered Night of Navy at the top of the card stock.

dsc01184.JPG

Tore a Post It Note and sponged Night of Navy at the post it note edge to create a hill shape.

dsc01186.JPG

Moved the post it note and repeated the last step to create a second hill.

dsc01187.JPG

Stamped the Leaf Shadow stamp from the Stampin’ Up set A Cardinal Christmas a few times using Not Quite Navy ink.

dsc01189.JPG

Remember, I am wiping the ink off of my embossed images each step.

Sponged Night of Navy ink around the edge of the card stock and over the stamped leaf shadows to darken the left side of the panel.

dsc01193.JPG

Added White Gel pen to the branch and leaves to look like snow.

dsc01194.JPG

Lastly, I heated my embossed images to make them shiny again.  They get dual when you wipe them off a few times.  Heating them brings back that shine.

dsc01195.JPG

Sponged Not Quite Navy around the edges of a Bashful Blue card stock panel.

dsc01196.JPG

Assembled my card and added some red ribbon.  I kept this card layout very simple so the main image panel would be the focus.

dsc01201.JPG

I hope you enjoyed this tutorial.  Do you believe this is number 270!

May your day be filled with warmth and love.

Until my next post. . . .  . . . .

Huge Hugs,

Michelle

tiny-bird.jpg  Get ready for Brayer Workshops!  I am coming to:

Broomfield, Colorado

Moore, Oklahoma

Nashville, Indiana

Portland, Michigan

2010Dayton, Ohio at Marco PaperPhoenix, ArizonaMonroe, LouisianaJacksonville, Florida

 St. Louis, Missouri

Mechanicsville, Virginia

Raleigh, North Carolina

 Colleyville, Texas

Colorado Springs, Colorado

Boise area of Meridian, Idaho

Riverside, California (Southern California)

 Salem, Oregon

Wheaton, Illinois

St. Cloud, Minnesota

Rockville, Maryland

North Chili, New York (near Rochester)

New Johnsonville, Tennessee

Kenova, West Virginia

Helena, Montana

Middleburg Heights, Ohio

Venice, Florida

Ginnell, Iowa

Piedmont, Alabama

Auburn, Washington (near Seattle)

Elk Grove Village, Illinois

Here is a link to my workshop calendar where you can see all of my travel schedule and to get info on beginner and advanced Brayer workshops:   http://zindorf.blogs.splitcoaststampers.com/workshop-calendar 

Link to my Stampin’ Up website where you can order all of your must have Stampin’ Up products from me 24-7:  http://michellezindorf.stampinup.net

Frequently asked questions answers:  http://zindorf.blogs.splitcoaststampers.com/frequently-asked-questions/ 


Flowers & Nest – Tutorial #265

dsc01013.JPG

Today’s tutorial is a little lesson on how you can heat emboss over heat embossed images to put images behind one another.  This lesson is a bit long so you will want to get chocolate and coffee to make it through, lol. 

I want to share a couple of things before I start the tutorial.  Last weekend I had the pleasure of joining my Stampin’ Up!  Up Line at an event they put together called Fall Fest.  It was in New Jersey and it was WAY FUN!!  Thanks to everyone, you made me feel so very welcome.  🙂

Of course, at Stampin’ Up events people bring swap cards to trade.  I didn’t bring a card but instead made bookmarks.  This is what I swapped.  🙂

dsc01019.JPG

The swaps I received in return were out of this world wonderful.   Thanks to all!

I also got to teach how to create this card to everyone in attendance.

dsc00471.JPG

My Awesome Stampin’ Up! Down Line Team will be sent the directions for these two projects so they can share them with at their workshops.

Now on with the tutorial. . .  .

Supplies:

Stamps: Stampin’ Up Bloomin’ Beautiful, All Holidays, Priceless & Nature’s Nest
Paper: Stampin’ Up Whisper White, Apricot Appeal, Bashful Blue & Basic Black
Ink: Stampin’ Up Close to Cocoa, Creamy Caramel, Sahara Sand, Bashful Blue, Basic Black & Apricot Appeal
Accessories: Stampin’ Up Markers, Versamark Marker & Pad, Clear embossing powder, heat gun, White Gel Pen & Sponges

Want a free 39 page, Stampin’ Up Mini catalog?  If you are a resident of the United States,  just e-mail your mailing address to me and I will get one in the mail to you.  Are you inspired by this Blog?  One way you can help support this blog is by ordering your Stampin’ Up products through me.   You can order from me 24-7 from this link:  http://michellezindorf.stampinup.net or e-mail me at mzindorf@aim.com  If you are within the United States.  Want a copy of the brand new 2009-2010 Stampin’ Up Catalog for $9.95 with free shipping, just e-mail me at mzindorf@aim.com and I will get one in the mail to you.  Want to become a Stampin’ Up Demonstrator and earn instant income?  Consider being part of my Stampin’ Up Team.  Also check out the Stampin’ Up specials, click this link to check it out:  http://www.stampinup.net/esuite/home/michellezindorf/promotions

dsc01017.JPG

Stamped the Sentiment from the Stampin’ Up All Holidays set by first loading the stamp with Versamark and then Bashful Blue ink before stamping it on a 4.5″ square piece of Whisper White card stock.  I then heat embossed the image with clear embossing powder and a heat gun.

dsc00977.JPG

dsc00978.JPG

Stamped the Flourish from the Stampin’ Up set Priceless by first loading it with Versamark and then Sahara Sand ink before stamping it.  I then heat embossed the image using clear embossing powder and a heat gun.

dsc00979.JPG

Stamped the Nest image from the Stampin’ Up set Nature’s Nest by first loading the stamp with Versamark and then Close to Cocoa ink before stamping the image.  I then heat embossed the nest using clear embossing powder and a heat gun.

dsc00981.JPG

Colored the eggs in with a Bashful Blue marker.

dsc00983.JPG

Added Ballet Blue ink to the eggs.

dsc00984.JPG

Blended the two colors together using the Bashful Blue marker again.

dsc00985.JPG

Colored the nest in with a Creamy Caramel marker.

dsc00986.JPG

Added Close To Cocoa marker to the bottom of the nest.

dsc00987.JPG

Colored in the leaves with an Old Olive Marker.

dsc00988.JPG

Colored over the nest and eggs with a Versamark marker and then heat embossed the image using clear embossing powder and a heat gun.

dsc00989.JPG

Stamped the pot of Flowers from the Stampin’ UP set Bloomin’ Beautiful set by first loading the stamp with Versamark and then Close to Cocoa ink before stamping it.  I then heat embossed the image using clear embossing powder and a heat gun.

dsc00991.JPG

Colored the pot in with a Bashful Blue marker.

dsc00993.JPG

Added Ballet Blue marker to the shadow parts of the pot.

dsc00994.JPG

Blended the colors on the pot together by coloring over them with the Bashful Blue marker.

dsc00995.JPG

Colored in the flowers with a Blush Blossom marker.

dsc00996.JPG

Colored in the leaves with an Old Olive Marker.

dsc00997.JPG

Added Pretty in Pink marker to the flowers.

dsc00998.JPG

Added just a touch of Positively Pink marker to the flowers.

dsc00999.JPG

Colored over the flowers and pot with a Versamark marker and heat embossed the image using clear embossing powder and a heat gun.

dsc01000.JPG

Sponged Apricot Appeal ink all over the card stock using a circular motion.

dsc01001.JPG

Sponged Creamy Caramel ink under the nest and pot and around the edge of the card stock.

dsc01002.JPG

Added Close to Cocoa ink around the edge of the card stock and under the nest and pot without covering up all of the Creamy Caramel ink.

dsc01003.JPG

Added a touch of Basic Black ink around the edge of the card stock and under the nest and pot, not covering up all of the Close to Cocoa ink.

dsc01004.JPG

Time to add some white highlights.

Colored in the centers of the flowers, added touches of white to the sentiment, eggs and flourish.

dsc01006.JPG

Added a bit of Basic Black marker to the flourish and bottom of the flowers, flower pot and nest.

dsc01007.JPG

Lastly, my very wise Up Line, Karen Barber shared this tip with me.  When you finish a heat embossed card, heat it for just a second with your heat gun to bring back that brilliant shine to all of your embossed images. 

dsc01008.JPG

I finished the card off with an Apricot Appeal, Bashful Blue & 2 Basic Black panels, gold brads, and a thin strip of Basic Black card stock.

Here it is finished measuring 5 3/8″ square.

dsc01013.JPG

May your day be filled with things that warm your heart.

Until my next post. .. . . . . . . .

Hugs,

Michelle

tiny-bird.jpg  Get ready for Brayer Workshops!  I am coming to:

Knox, Maine  – I will be in Knox, Maine this Friday & Saturday (October 2 & 3).  There are a couple of spot available if you want to jump in at the last moment.  🙂  Just e-mail me at mzindorf@aim.com and I can give you all the details.

Akron, Ohio

Broomfield, Colorado

Moore, Oklahoma

Nashville, Indiana

Portland, Michigan

2010

Dayton, Ohio at Marco Paper

Phoenix, Arizona

Monroe, Louisiana

Jacksonville, Florida

St. Louis, Missouri

Mechanicsville, Virginia

Raleigh, North Carolina 

Colleyville, Texas

Colorado Springs, Colorado

Boise area of Meridian, Idaho

Riverside, California (Southern California)

Salem, Oregon

Wheaton, Illinois

St. Cloud, Minnesota

Rockville, Maryland

North Chili, New York (near Rochester)

New Johnsonville, Tennessee

Kenova, West Virginia

Helena, Montana

Middleburg Heights, Ohio

Venice, Florida

Ginnell, Iowa

Piedmont, Alabama

Auburn, Washington

Elk Grove Village, Illinois

Here is a link to my workshop calendar where you can see all of my travel schedule and to get info on beginner and advanced Brayer workshops:   http://zindorf.blogs.splitcoaststampers.com/workshop-calendar 

Link to my Stampin’ Up website where you can order all of your must have Stampin’ Up products from me 24-7:  http://michellezindorf.stampinup.net

Frequently asked questions answers:  http://zindorf.blogs.splitcoaststampers.com/frequently-asked-questions/


Winter Pines – Tutorial #263

dsc00954.JPG

 How about a winter scene for all of you early birds out there that are already working on those Christmas cards.

I really needed to get my embossing powder fix this week, lol.  So here is a project that features embossed images over embossed images.  This project features the brand new Stampin’ Up Level 1 Hostess set “Patterned Pines”.  This set is only available until January 4, 2010 and is featured in the New Holiday mini catalog.  The stamp set is free with an order of $150.  Along with the Patterned Pines Tree, I used my favorite flourish from the Stampin’ Up set Baroque Motifs, item number 113490.  This set was still out on my desk from using it in my last tutorial so I went ahead and used it again.

Let’s get right into the tutorial. . . .

Supplies:

Stamps: Stampin’ Up Patterned Pines and Baroque Motifs
Paper: Stampin’ UP Whisper White, Sahara Sand and Basic Black
Ink: Stampin’ Up Basic Black, Not Quite Navy, Bordering Blue & Sahara Sand
Accessories: Versamark Marker & Pad, Gold Brads, White Ribbon, Stampin’ Up Piercing Tool & Mats, Stampin’ Up markers, Sponge, Brayer, Clear embossing powder and Heat gun

Want a free 39 page, Stampin’ Up Mini catalog?  If you are a resident of the United States,  just e-mail your mailing address to me and I will get one in the mail to you.  Are you inspired by this Blog?  One way you can help support this blog is by ordering your Stampin’ Up products through me.   You can order from me 24-7 from this link:  http://michellezindorf.stampinup.net or e-mail me at mzindorf@aim.com  If you are within the United States.  Want a copy of the brand new 2009-2010 Stampin’ Up Catalog for $9.95 with free shipping, just e-mail me at mzindorf@aim.com and I will get one in the mail to you.  Want to become a Stampin’ Up Demonstrator and earn instant income?  Consider being part of my Stampin’ Up Team.  Also check out the Stampin’ Up specials, click this link to check it out:  http://www.stampinup.net/esuite/home/michellezindorf/promotions

dsc00955.JPG

On a 4.25″ x 5″ piece of Whisper White stamped the Baroque Motifs Flourish with Versamark only.  Heat embossed the image using clear embossing powder. 

dsc00929.JPG

dsc00930.JPG

Stamped the Patterned Pines Trees by first loading my stamp with Versamark and then with Sahara Sand ink before stamping it.  Heat embossed the images using clear embossing powder and a heat gun.

dsc00932.JPG

dsc00933.JPG

Colored over the trees with a Versamark marker and heat embossed the images using clear embossing powder and a heat gun.  This protects the white designs in the tree images.

dsc00934.JPG

dsc00935.JPG

Tore the edge off of a post it note and used it as a mask for the snow area of the scene.

dsc00936.JPG

Brayered Bordering Blue ink at the top of the card stock.

dsc00937.JPG

Brayered Not Quite Navy ink at the top of the card stock, not covering the Bordering Blue ink entirely.

dsc00938.JPG

Sponged Not Quite Navy ink right at the post it note edge to darken the horizon line.

dsc00939.JPG

Removed the post it note mask and wiped the ink off of my heat embossed images.  Be careful not to smear the ink from the embossed images onto your white snow.

dsc00940.JPG

Tore a hill in the post it note mask and held it in place while I sponged Bordering Blue ink at the post it note edge to create a hill in the scene.

dsc00941.JPG

dsc00942.JPG

Outlined the embossed Flourish with a Bordering Blue Marker to make it look more dimensional. 

dsc00943.JPG

Outlined the flourish that is closer to the top of the card stock with a Not Quite Navy marker.

dsc00944.JPG

Put a post it note mask right under the trees and sponged on some Bordering Blue ink to create a shadow for the trees.

dsc00945.JPG

Outlined the right sides of the trees with a Sahara Sand marker.

dsc00946.JPG

Added a thin Basic Black marker line down the right sides of the trees.

dsc00947.JPG

Sponged Not Quite Navy ink around the outside edge of the card stock.

dsc00948.JPG

Sponged Basic Black ink around the outside edges of the card stock.

Added a Basic Black and Sahara Sand panel, White Ribbon and Gold Brads.

dsc00949.JPG

Used my Stampin’ UP Piercing Tool and mats to add the pierced lines at the top and bottom of the card.

dsc00950.JPG

Here is the finished project measuring 5.25″ square.

dsc00954.JPG

I am flying out to New Jersey tomorrow for a Stampin’ Up Team event.  I am sooooo excited!

May your weekend be one of fun and laughter!

Until my next post. . . . .

Huge Hugs,

Michelle

moon-glow-edited-7-tiny.jpg  Get ready for Brayer Workshops!  I am coming to:

Knox, Maine

Akron, Ohio

Broomfield, Colorado

Moore, Oklahoma

Nashville, Indiana

Portland, Michigan

2010

Dayton, Ohio at Marco Paper

Phoenix, Arizona

Monroe, Louisiana

Jacksonville, Florida

St. Louis, Missouri

Mechanicsville, Virginia

Raleigh, North Carolina 

Colleyville, Texas

Colorado Springs, Colorado

Boise area of Meridian, Idaho

Riverside, California (Southern California)

Salem, Oregon

Wheaton, Illinois

St. Cloud, Minnesota

Rockville, Maryland

North Chili, New York (near Rochester)

New Johnsonville, Tennessee

Kenova, West Virginia

Helena, Montana

Middleburg Heights, Ohio

Venice, Florida

Ginnell, Iowa

Piedmont, Alabama

Auburn, Washington

Elk Grove Village, Illinois

Here is a link to my workshop calendar where you can see all of my travel schedule and to get info on beginner and advanced Brayer workshops: 

 http://zindorf.blogs.splitcoaststampers.com/workshop-calendar 

Link to my Stampin’ Up website where you can order all of your must have Stampin’ Up products from me 24-7: 

 http://michellezindorf.stampinup.net

Frequently asked questions answers: 

 http://zindorf.blogs.splitcoaststampers.com/frequently-asked-questions/


Blowing in the Wind – Tutorial #257

dsc00773-small.jpg

Oh, these cool mornings here in West Alexandria, Ohio have my mind thinking of an Autumn day and a walk through the wood with leaves crunching under foot while looking at clear blue skies.  Autumn is my favorite time of year.  Leaf images rate right up there in my favorite images to work with.  Stampin’ Up came out with this new set “Autumn Splendor” in their New Holiday Mini catalog.  I love the fine lines running through the leaf images and coloring them is a breeze.

But before I start this tutorial I want to tell you about two new Dynamite Stampin’ Up Demonstrators that joined the Stampin’ Up Family and my team.  So if you are looking for a Stampin’ Demonstrator in or near Fort Bend, Texas contact Jody Devine at jedjem71@yahoo.com or if you are in or near Branchville, New Jersey contact Melba Beisley at mbeis07@gmail.com

Now on with today’s tutorial.  🙂

Supplies:

Stamps: Stampin’ Up “Autumn Splendor” and “Baroque Motifs”
Paper: Stampin’ Up Whisper White and Not Quite Navy
Ink: Stampin’ Up Dusty Durango, Bashful Blue and Not Quite Navy
Accessories: Stampin’ Up Markers Old Olive and Apricot Appeal, Versamark marker and pad, Sponge, Clear embossing powder, heat gun

Want a free 39 page, Stampin’ Up Mini catalog?  If you are a resident of the United States,  just e-mail your mailing address to me and I will get one in the mail to you.  Are you inspired by this Blog?  One way you can help support this blog is by ordering your Stampin’ Up products through me.   You can order from me 24-7 from this link:  http://michellezindorf.stampinup.net or e-mail me at mzindorf@aim.com  If you are within the United States.  Want a copy of the brand new 2009-2010 Stampin’ Up Catalog for $9.95, just e-mail me at mzindorf@aim.com and I will get one in the mail to you.  Want to become a Stampin’ Up Demonstrator and earn instant income?  Consider being part of my Stampin’ Up Team.  Also check out the Stampin’ Up specials, click this link to check it out:  http://www.stampinup.net/esuite/home/michellezindorf/promotionsdsc00778.JPG

On a 4″ square piece of Whisper White card stock stamped the flourish from the Baroque Motifs set using Versamark only.  Heat embossed the image using clear embossing powder and a heat gun.

dsc00760.JPG

dsc00761.JPG

Over Stamped the flourish with the leaf from the new Autumn Splendor set by first loading the stamp with Versamark and then loading the Stamp with Dusty Durango ink.  Heat embossed the leaf image using clear embossing powder and a heat gun.

dsc00762.JPG

dsc00763.JPG

Colored the leaf in with an a Stampin’ Up Apricot Appeal marker.  The color will bead up on the embossed images so I wipe the images off with a paper towel after I apply each color.

dsc00764.JPG

dsc00765.JPG

Added a bit of Stampin’ Up Old Olive marker to the tips of the leaf.

dsc00766.JPG

Went over the leaf again with the Apricot Appeal marker to blend things a bit.

dsc00767.JPG

Colored over the leaf with a Versamark Marker and heat embossed the image using clear embossing powder and a heat gun.

dsc00768.JPG

dsc00769.JPG

Now the magic really happens.  Sponged Bashful Blue ink starting at the bottom of the card stock and working in a circular motion.   I left some white paper showing at the top.

dsc00770.JPG

Sponged Not Quite Navy ink at the bottom of the card stock working in a circular motion and not covering all of the Bashful Blue ink up.

dsc00771.JPG

I assembled the main image panel with a few simple card stock panels.  Here is the finished card measuring 5.25″ square.

dsc00773-small.jpg

May your day be one of peace and harmony.

Until my next post. . . . .

Huge Hugs,

Michelle

dsc04306-tiny.jpg Get ready for Brayer Workshops!  I am coming to:

Castro Valley, California 

Yardley, Pennsylvania (near Philadelphia) 

Knox, Maine

Akron, Ohio

Broomfield, Colorado

Moore, Oklahoma

Nashville, Indiana

Portland, Michigan

2010

Dayton, Ohio at Marco Paper

Phoenix, Arizona

Monroe, Louisiana

Jacksonville, Florida

St. Louis, Missouri

Mechanicsville, Virginia

Raleigh, North Carolina 

Colleyville, Texas

Colorado Springs, Colorado

Boise area of Meridian, Idaho

Riverside, California (Southern California)

Salem, Oregon

Wheaton, Illinois

St. Cloud, Minnesota

Rockville, Maryland

North Chili, New York (near Rochester)

New Johnsonville, Tennessee

Helena, Montana

Middleburg Heights, Ohio

Venice, FloridaHere is a link to my workshop calendar where you can see all of my travel schedule and to get info on beginner and advanced Brayer workshops:  http://zindorf.blogs.splitcoaststampers.com/workshop-calendarLink to my Stampin’ Up website were you can order all of your must have Stampin’ Up products from me 24-7:  http://michellezindorf.stampinup.netFrequently asked questions answers:  http://zindorf.blogs.splitcoaststampers.com/frequently-asked-questions/


Fifth Avenue Peace Rose – Tutorial #251

dsc00620.JPG

dsc00569.JPG

dsc00538.JPG

Hey there, I am back from playing around in Put-in-bay.  I had a wonderful couple of days drinking and eating my way around the Island.  🙂 

 But now I need to get back to the real world.  So I am starting my day off with a little coloring fun with the stunning Stampin’ Up set “Fifth Avenue Floral”.  My favorite Rose is the “Peace Rose” which is a Rose with a color combination of Pinks and Yellows and so here is my interpretation of that wonderful rose.

Let’s get started. . . .

Supplies:

Stamps: Stampin’ Up Fifth Avenue Floral
Paper: Stampin’ Up Whisper White, Apricot Appeal, Cameo Coral, Chocolate Chip, Basic Black
Ink: Stampin’ Up Apricot Appeal, Chocolate Chip and Cameo Coral
Accessories: Stampin’ Up Markers, Metal Gold Sharpie Paint Marker, Versamark Marker, Clear embossing powder and a heat gun, sponge, Melon Mambo

Are you inspired by this Blog?  One way you can help support this blog is by ordering your Stampin’ Up products through me.   You can order from me 24-7 from this link:  http://michellezindorf.stampinup.net or e-mail me at mzindorf@aim.com  If you are within the United States.  Want a copy of the brand new 2009-2010 Stampin’ Up Catalog for $9.95, just e-mail me at mzindorf@aim.com and I will get one in the mail to you.  Want to become a Stampin’ Up Demonstrator and earn instant income?  Consider being part of my Stampin’ Up Team.  Through August 31 you can become a Stampin’ Up Demonstrator for as little as $85 with the mini kit.  Also check out the Stampin’ Up specials, click this link to check it out:  http://www.stampinup.net/esuite/home/michellezindorf/promotions

dsc00621.JPG

Stamped the rose on a 2.5″ x 3.5″ piece of Whisper White card stock with Cameo Coral ink.

dsc00600.JPG

Colored in the rose with a Barely Banana Marker.

dsc00601.JPG

Added Pretty in Pink marker.

dsc00602.JPG

Added Apricot Appeal marker where the Pink and yellow meet in on the petals.

dsc00603.JPG

Outlined the petals with Cameo Coral marker.

dsc00604.JPG

Blended the colors together by coloring over the entire rose again with Barely Banana marker.

dsc00605.JPG

Colored over the rose with Versamark marker and heat embossed the image using clear embossing powder and a heat gun.

dsc00607.JPG

dsc00608.JPG

Sponged Chocolate Chip ink in a circular motion on the card stock.

dsc00609.JPG

Sponged Apricot Appeal ink at the upper left hand corner of the card stock.

dsc00610.JPG

Used a Metallic Gold Sharpie Marker on the edge of the main image panel and a 5.25″ square Chocolate Chip panel.

dsc00612.JPG

Added an Apricot Appeal and Cameo Corner Panel and Melon Mambo polka dot ribbon.

dsc00613.JPG

Added a shadow around the rose image with a Close to Cocoa marker.

dsc00615.JPG

Added a 5.5″ Basic Black panel and here is the finished card measuring 5.5″ square.

dsc00620.JPG

I hope this tutorial put you in a coloring mood. 

Until my next post. . . . .  . . . . . . . . . . . . . ..

Huge Hugs,

Michelle

dsc04276-tiny.jpg Get ready for Brayer Workshops!  I am coming to:

Greenwood, IndianaCastro Valley, CaliforniaYardley, Pennsylvania (near Philadelphia)Knox, Maine

Akron, Ohio

Broomfield, Colorado

Moore, Oklahoma

Nashville, Indiana

Portland, Michigan

2010

Phoenix, Arizona

Monroe, Louisiana

Jacksonville, Florida

St. Louis, Missouri

Mechanicsville, Virginia

Raleigh, North Carolina

Colleyville, Texas

Colorado Springs, Colorado

Boise area of Meridian, Idaho

Riverside, California (Southern California)

Salem, Oregon

Wheaton, Illinois

St. Cloud, Minnesota

Rockville, Maryland

North Chili, New York (near Rochester)

New Johnsonville, Tennessee

Helena, Montana

Middleburg Heights, Ohio

Venice, Florida

Here is a link to my workshop calendar where you can see all of my travel schedule and to get info on beginner and advanced Brayer workshops:  http://zindorf.blogs.splitcoaststampers.com/workshop-calendar

Link to my Stampin’ Up website were you can order all of your must have Stampin’ Up products from me 24-7:  http://michellezindorf.stampinup.net

Frequently asked questions answers:  http://zindorf.blogs.splitcoaststampers.com/frequently-asked-questions/


In The Spotlight – Tutorial #250

dsc00522.JPG

I am currently vacationing on Put-in-Bay Island getting some much needed R & R, but before I left I put together this tutorial for you.  I set it to post while I was gone so hopefully it posted when I wanted it to.  🙂  Woohoo, this is my 250th tutorial by the way.

Anyway, enjoy and I will be back on Monday.

Supplies:

Stamps:  Stampin’ Up Animal Stories and Circle Circus

Ink:  Stampin’ Up Tempting Turquoise, Going Gray, Chocolate Chip, Really Rust, Night of Navy, Bashful Blue

Card stock:  Stampin’ Up Whisper White, Bashful Blue, Night of Navy and Cameo Coral

Accessories:  Versamark marker and pad, Brayer, clear embossing powder, heat gun, Stampin’ Up Piercing tools, post it notes, Bashful Blue Brads, Sponge, White Gel pen and Cameo Coral marker

Are you inspired by this Blog?  One way you can help support this blog is by ordering your Stampin’ Up products through me.   You can order from me 24-7 from this link:  http://michellezindorf.stampinup.net or e-mail me at mzindorf@aim.com  If you are within the United States.  Want a copy of the brand new 2009-2010 Stampin’ Up Catalog for $9.95, just e-mail me at mzindorf@aim.com and I will get one in the mail to you.  Want to become a Stampin’ Up Demonstrator and earn instant income?  Consider being part of my Stampin’ Up Team.  Through August 31 you can become a Stampin’ Up Demonstrator for as little as $85 with the mini kit.  Also check out the Stampin’ Up specials, click this link to check it out:  http://www.stampinup.net/esuite/home/michellezindorf/promotions

dsc00524.JPG

On a 2.5″ x 4″ piece of Whisper White stamped the Elephant by first loading my stamp with Versamark and then with Going Gray ink before stamping it.  Heat embossed the image using clear embossing powder and a heat gun.

dsc00501.JPG

Colored over the image with a Versamark marker to protect the white parts showing through the image and heat embossed the image again with clear embossing powder and a heat gun.

dsc00502.JPG

dsc00503.JPG

Stamped the Circle design by first loading the stamp with Versamark and then loading it with Tempting Turquoise before stamping it.  Heat embossed the image using clear embossing powder and a heat gun.

dsc00504.JPG

dsc00505.JPG

Colored the flowers in the circle in with a Cameo Coral marker.

dsc00506.JPG

Colored over the entire ball with a Versamark marker to protect the flowers on it.  Heat embossed the image again with clear embossing powder and a heat gun.

dsc00507.JPG

dsc00508.JPG

Masked the bottom of the card stock with a post it note.

dsc00509.JPG

Brayered Bashful Blue at an angle on the right and left side of the card stock.

dsc00510.JPG

dsc00511.JPG

Brayered a little bit of Night of Navy ink at the same angles as in the last step, but not covering all of the Bashful Blue ink.

dsc00512.JPG

dsc00513.JPG

Removed the inky mask and added a fresh one, this time masking the top of the card stock.

dsc00514.JPG

Brayered Really Rust ink in the unmasked area.

dsc00515.JPG

Wiped the ink off of the embossed images with a cotton cloth.

dsc00516.JPG

Added a shadow underneath the ball using a sponge and Chocolate chip ink.

dsc00517.JPG

Assembled the card and added strips of Cameo Coral card stock.  Put Bashful Blue brads on each end of the strips and used my Stamping up piercing tools to added pierced lines on each strip.

dsc00518.JPG

dsc00519.JPG

Used my white gel pen to go from pierced hole to pierced hole creating some faux stitching.  Also added a bit of white gel pen to the top of the elephant as a highlight.

dsc00520.JPG

Here is the finished card measuring 5″ x 6.5″. 

dsc00522.JPG

I hope you get a bit of R &R yourself this weekend.

Until my next post. . . . .  . . . . . . . . . . . . . ..

Huge Hugs,

Michelledsc04276-tiny.jpg Get ready for Brayer Workshops!  I am coming to:Greenwood, Indiana

Castro Valley, California

Yardley, Pennsylvania (near Philadelphia)

Knox, Maine

Akron, Ohio

Broomfield, Colorado

Moore, Oklahoma

Nashville, Indiana

Portland, Michigan

2010

Phoenix, Arizona

Monroe, Louisiana

Jacksonville, Florida

St. Louis, Missouri

Mechanicsville, Virginia

Raleigh, North Carolina

Colleyville, Texas

Colorado Springs, Colorado

Boise area of Meridian, Idaho

Riverside, California (Southern California)

Salem, Oregon

Wheaton, Illinois

St. Cloud, Minnesota

Rockville, Maryland

North Chili, New York (near Rochester)

New Johnsonville, Tennessee

Helena, Montana

Middleburg Heights, Ohio

Venice, Florida

Here is a link to my workshop calendar where you can see all of my travel schedule and to get info on beginner and advanced Brayer workshops:  http://zindorf.blogs.splitcoaststampers.com/workshop-calendar

Link to my Stampin’ Up website were you can order all of your must have Stampin’ Up products from me 24-7:  http://michellezindorf.stampinup.net

Frequently asked questions answers:  http://zindorf.blogs.splitcoaststampers.com/frequently-asked-questions/


Monogram Nest – Tutorial #249

dsc00499.JPG

Today’s tutorial shows how to make a panel look like it is receding with a quick outline using two markers.  Let’s get right into it.

Supplies:

Stamps: Stampin’ Up Nature’s Nest, Lovely Letters Alphabet, Forever Flowers Wheel
Paper: Stampin’ Up Designer Paper, Whisper White, Chocolate Chip
Ink: Stampin’ Up So Saffron, Chocolate Chip and More Mustard
Accessories: Stampin’ Up Markers, Prismacolor Markers, Versamark Pad & Marker, Clear embossing powder, heat gun, Sponge, post it notes, White Gel Pen, Ribbon, Gold Brads, Brayer

Are you inspired by this Blog?  One way you can help support this blog is by ordering your Stampin’ Up products through me.   You can order from me 24-7 from this link:  http://michellezindorf.stampinup.net or e-mail me at mzindorf@aim.com  If you are within the United States.  Want a copy of the brand new 2009-2010 Stampin’ Up Catalog for $9.95, just e-mail me at mzindorf@aim.com and I will get one in the mail to you.  Want to become a Stampin’ Up Demonstrator and earn instant income?  Consider being part of my Stampin’ Up Team.  Through August 31 you can become a Stampin’ Up Demonstrator for as little as $85 with the mini kit.  Also check out the Stampin’ Up specials, click this link to check it out:  http://www.stampinup.net/esuite/home/michellezindorf/promotions

dsc00500.JPG

Stamped Nest on a piece of Whisper White by first loading my stamp with Versamark and then loading it with Chocolate Chip ink before stamping it.  I started out with a larger piece of whisper white and cut it down after stamping to 2.5″ x 3.75″.

dsc00472.JPG

Heat embossed the image using clear embossing powder and a heat gun.

dsc00473.JPG

Colored the image in with a Wheat Prismacolor marker.

dsc00474.JPG

Colored the leaves using a Light Olive Green Prismacolor Marker.

dsc00475.JPG

Added Mocha Dark Prismacolor marker to the bottom of the eggs and the bottom of the nest.

dsc00477.JPG

Colored over the image being careful to not go outside the embossed image with a Versamark marker and heat embossed the entire image using clear embossing powder and a heat gun.

dsc00478.JPG

dsc00479.JPG

Brayered the top of the card stock using So Saffon ink.

dsc00480.JPG

Created a Shadow under the nest with a Sand Prismacolor Marker.

dsc00482.JPG

Added Light Tan Prismacolor Marker to the shadow under the nest.

dsc00483.JPG

Added a bit of Mocha Dark Prismacolor Marker right under the nest.

dsc00484.JPG

Brayered a bit of More Mustard ink at the very top of the card stock.

dsc00485.JPG

Sponged More Mustard around the edges of a Designer Paper Panel that measures 4″ x 5.5″.

dsc00486.JPG

Added a 4 7/8″ x 5 7/8″ Whisper White Panel.  Stamped my unmounted Forever Flowers Wheel Stamp with More Mustard on each side of the card stock.  I masked the corners with post it notes at a diagonal each time I stamped a side so my images at the corners would have a mitered look.

Note:  Press hard when stamping since you are stamping over multiple layers of paper.  This helps give you a better image.

dsc00488.JPG

Colored the leaves in with a Certainly Celery marker and Sponged More Mustard around the edges of the card stock.

dsc00489.JPG

Sponged Chocolate Chip ink around the edges of both the large panel and the main image panel.

dsc00490.JPG

Colored the flowers in with a Bashful Blue marker, added Brocade Blue marker to the petals and then colored the Center of the flowers and the dots in the design in with a White Gel Pen.  Also added white Gel pen highlights to the top edges of the eggs in the nest.

dsc00491.JPG

Assembled the card adding a Chocolate Chip panel under the main image panel and a 5″ x 6.5″ chocolate Chip panel at the very back. 

Decided to make the Design paper panel look like it was receded so I outlined it with a Chocolate Chip marker and then used the Wide Chiseled end of a French Grey 30% Prismacolor marker to outline it again.  This creates the illusion by looking like a shadow.

Stamped the Lovely Lettes Alphabet “Z” with Chocolate Chip ink.

dsc00494.JPG

Here is the finished card measuring 5″ x 6.5″.

dsc00499.JPG

I hope this tutorial has inspired you to add a shadow on one of your card panels to create a little depth.   🙂

Let me close today with a quote for you.

Whatever you give a woman, she will make greater.  If you give her a house, she’ll give you a home. If you give her groceries, she’ll give you a meal. If you give her a smile, she’ll give you her heart. She multiplies and enlarges what is given to her.

So, if you give her any crap, be ready to receive a ton of sh**.

Until my next post. . . . .  . . . . . . . . . . . . . .. Huge Hugs,Michelle

dsc04276-tiny.jpg Get ready for Brayer Workshops!  I am coming to:

Greenwood, Indiana

Castro Valley, California

Yardley, Pennsylvania (near Philadelphia)

Knox, Maine

Akron, Ohio

Broomfield, Colorado

Moore, Oklahoma

Nashville, Indiana

Portland, Michigan

2010

Phoenix, Arizona

Monroe, Louisiana

Jacksonville, Florida

St. Louis, Missouri

Mechanicsville, Virginia

Raleigh, North Carolina

Colleyville, Texas

Colorado Springs, Colorado

Boise area of Meridian, Idaho

Riverside, California (Southern California)

Salem, Oregon

Wheaton, Illinois

St. Cloud, Minnesota

Rockville, Maryland

North Chili, New York (near Rochester)

New Johnsonville, Tennessee

Helena, Montana

Middleburg Heights, Ohio

Venice, Florida

Here is a link to my workshop calendar where you can see all of my travel schedule and to get info on beginner and advanced Brayer workshops:  http://zindorf.blogs.splitcoaststampers.com/workshop-calendar

Link to my Stampin’ Up website were you can order all of your must have Stampin’ Up products from me 24-7:  http://michellezindorf.stampinup.net

Frequently asked questions answers:  http://zindorf.blogs.splitcoaststampers.com/frequently-asked-questions/


Frosted Pane – Tutorial #248

dsc00460.jpg

Surprise, surprise, my tutorial today is not the typical one you see here on my blog.  It only has a few steps so it whips up in no time at all.   The snowflake stamp I used is from a new set coming out by Stampin’ Up “Serene Snowflakes”.  It will be available for sale in the new Stampin’ Up Holiday Mini catalog starting September 1, 2009.   If you would like a copy of the new mini catalog, please e-mail your address to me at mzindorf@aim.com and I will put one in the mail to you.  If you are customer of mine already you do not have to request one.  It will automatically be sent to you.  🙂

Let’s get started on the tutorial. . .

Supplies:

Stamps: Stampin’ U Serene Snowflakes
Paper: Stampin’ Up Whisper White and Brilliant Blue
Ink: Stampin’ Up Brilliant Blue
Accessories: Versamark pad, Sponge, Clear embossing powder, heat gun

Are you inspired by this Blog?  One way you can help support this blog is by ordering your Stampin’ Up products through me.   You can order from me 24-7 from this link:  http://michellezindorf.stampinup.net or e-mail me at mzindorf@aim.com  If you are within the United States.  Want a copy of the brand new 2009-2010 Stampin’ Up Catalog for $9.95, just e-mail me at mzindorf@aim.com and I will get one in the mail to you.  Want to become a Stampin’ Up Demonstrator and earn instant income?  Consider being part of my Stampin’ Up Team.  Through August 31 you can become a Stampin’ Up Demonstrator for as little as $85 with the mini kit.  Also check out the Stampin’ Up specials, click this link to check it out:  http://www.stampinup.net/esuite/home/michellezindorf/promotions

dsc00457.JPG

Stamped snowflake on a 4″ square piece of Whisper White card stock using Versamark only.  Heat embossed the image using clear embossing powder and a heat gun to protect the white of the card stock under the image.

dsc00450.JPG

Sponged Brilliant Blue ink on the snowflake starting in the middle and working in a circular motion gradually working outward.  Every time I re-inked my sponge I started back in the middle.  This helps keep the center dark and then it fades outward.

dsc00452.JPG

Sponged Brilliant Blue ink around the outside edge of a 5 1/8″ piece of Whisper White.

dsc00453.JPG

Layered by white panels with Brilliant Blue Panels.   That’s all there is to it.  🙂

dsc00460.jpg

I hope you have been inspired to try a simple, but elegant card today.

On a different note, I traveled to Lynchburg Virginia on Thursday, August 13th and just returned yesterday.  I was there teaching workshops to some extremely fun ladies.  I drive to most of my workshop location, unless they are more than 13 hours away, then I fly.   I have the very best job in the world right now going from one location in the United States to another.  This time I went through Ohio, West Virginia and then Virginia.  Here are a few sites I seen along the way on the scenic Byway Route 64.

dsc00360.JPG 

Seen lots of Deer.  I past one group that were standing on the road in a circle having a conversation, lol.

dsc00372.JPG

These last photos were taken early morning on my return trip.  I hit the road at 3:00 a.m. to beat the traffic.  🙂  My very early starts also give me a chance to view this.

dsc00382.JPG

dsc00417.JPG

Where did the road go?

dsc00402.JPG

Okay, enough already with the trip photos.  🙂

How about a funny before I close. . . . .  . .

cow-poop.jpg

Until my next post. . . . .  . . . . . . . . . . . . . ..

Huge Hugs,

Michelle

dsc04276-tiny.jpg Get ready for Brayer Workshops!  I am coming to:

Greenwood, Indiana

Castro Valley, California

Yardley, Pennsylvania (near Philadelphia)

Knox, Maine

Akron, Ohio

Broomfield, Colorado

Moore, Oklahoma

Nashville, Indiana

Portland, Michigan

2010

Phoenix, Arizona

Monroe, Louisiana

Jacksonville, Florida

St. Louis, Missouri

Mechanicsville, Virginia

Raleigh, North Carolina

Colleyville, Texas

Colorado Springs, Colorado

Boise area of Meridian, Idaho

Riverside, California (Southern California)

Salem, Oregon

Wheaton, Illinois

St. Cloud, Minnesota

Rockville, Maryland

North Chili, New York (near Rochester)

New Johnsonville, Tennessee

Helena, Montana

Middleburg Heights, Ohio

Venice, Florida

Here is a link to my workshop calendar where you can see all of my travel schedule and to get info on beginner and advanced Brayer workshops:  http://zindorf.blogs.splitcoaststampers.com/workshop-calendar

Link to my Stampin’ Up website were you can order all of your must have Stampin’ Up products from me 24-7:  http://michellezindorf.stampinup.net

Frequently asked questions answers:  http://zindorf.blogs.splitcoaststampers.com/frequently-asked-questions/