Winter Cardinal – Tutorial #124 and Blog Candy!

dsc06162.JPG

Happy Saturday!  I love the weekends when I can take my time doing a project in the morning as I drink my pot of coffee.  No rushing off to work today.

I’ve had some requests to do some winter type scenes so I got out this great set of stamps by Fire Cracker Designs by Pamela.  Here is a link if you want to check out their great online store:  http://www.safesecurestore.com/stores/merchant.mvc?Screen=SFNT&Store_Code=firecrackerdesignsbypamela

For those people already making their Christmas cards, MORE POWER TO YOU!  I won’t be starting mine until November at the earliest, lol.

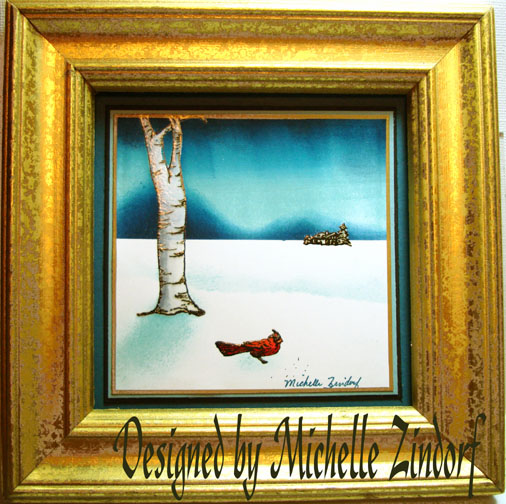
The frame I used in this project is one I picked up at a garage sale for 75 cents.  It had a horrible picture in it, but that’s all the better.  I didn’t feel bad throwing the picture in the trash.  I get frames and then make stamped pieces to go inside.  It’s easier to know what frame you are going to use and then cut your cardstock to fit it, instead of making the piece a certain size and trying to find a frame to fit the piece.  Clear as mud?  🙂

I’m giving this framed piece away as blog candy.  I will use a random number generator next Saturday, October 4th to select the winner.  To enter all you need to do is leave a comment on this post telling me an item you like to re-purpose.  It could be anything.  If you are getting this post update by e-mail, you will need to click this link and then leave a comment on the post:  http://zindorf.blogs.splitcoaststampers.com/2008/09/27/winter-cardinal-tutorial-124-and-blog-candy/

Good Luck!

Let’s get started on today’s tutorial.  🙂
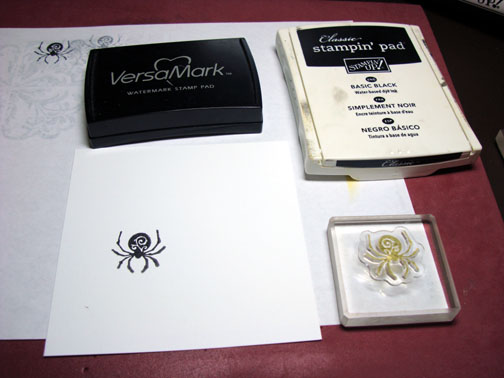
Supplies:

Stamps: Fire Cracker Designs by Pamela
Paper: Stampin’ Up Whisper White, Basic Black, Baja Breeze & Not Quite Navy
Ink: Stampin’ Up Not Quite Navy, Baja Breeze, Basic Black, Night of Navy
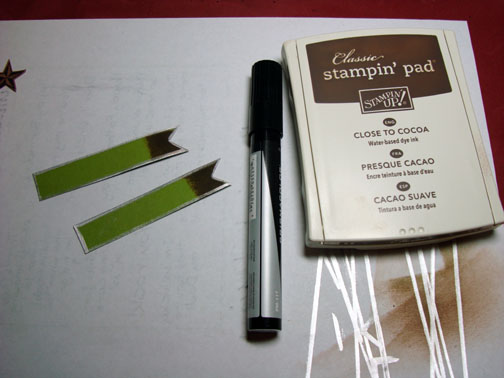
Accessories: Versmark Pad and marker, Fine Detail Clear Embossing Powder, Heat Gun, Brayer, Sponges, Sharpie Gold Paint Marker, Prismacolor Markers, Fine Black marker, Garage Sale Frame, Post it Notes

dsc06172.JPG

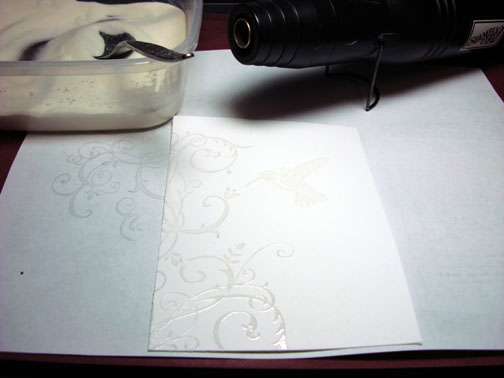
Stamped tree by first loading stamp with Versamark and then loading it with Black ink before stamping it on a piece of 4″ square Whisper White card stock.

dsc06136.JPG

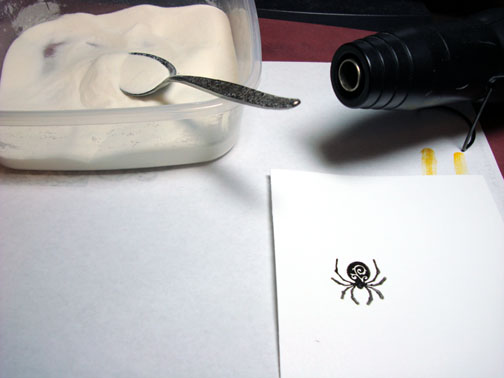
Heat embossed tree using fine detail clear embossing powder and a heat gun.

dsc06137.JPG

Stamped Cardinal by first loading the stamp with Versamark and then loading it with Black ink before stamping it.

dsc06138.JPG

Heat embossed the cardinal using fine detail clear embossing powder and a heat gun.

dsc06139.JPG

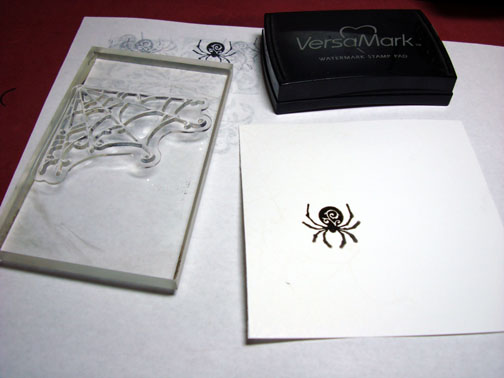
Stamped the house in the distance by first loading the stamp with Versamark and then loading it with black ink before stamping it.

dsc06140.JPG

Heat embossed the house using fine detail clear embossing powder and a heat gun.

dsc06141.JPG

Colored the Left half of the tree with a Prismacolor 10% Cool Grey marker.

dsc06142.JPG

Colored Left side of the tree using a Prismacolor 30% Cool Grey marker, but did not cover the 10% Cool Grey entirely.

dsc06143.JPG

Colored the top part of the cardinal using a Prismacolor Scarlet Lake marker.

dsc06144.JPG

Colored the cardinal’s underside and tail using a Prismacolor Crimson Red marker.

dsc06145.JPG

Colored the Cardinal’s beak using a Prismacolor Burnt Ochre marker.

dsc06146.JPG

Colored the very left side of the tree using a Prismacolor 50% Cool Grey marker, not covering the 30% Cool Grey entirely.

dsc06147.JPG

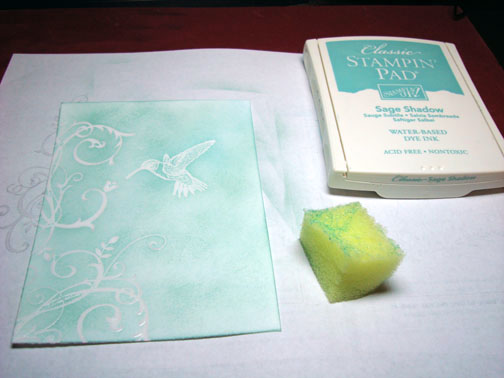
Colored over all the images with a Versmark marker, making sure not to go outside the lines.   🙂

dsc06149.JPG

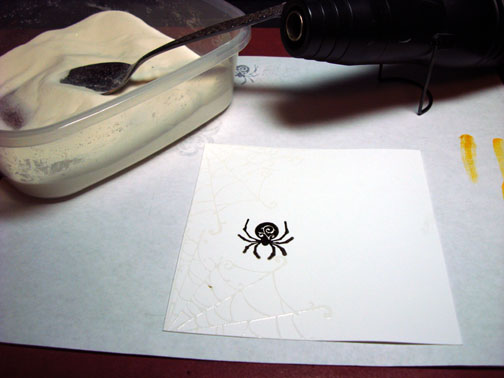
Heat embossed all the images using fine detail clear embossing powder and a heat gun.

dsc06150.JPG

Covered the bottom of the card stock with a post it note to mask it.

dsc06151.JPG

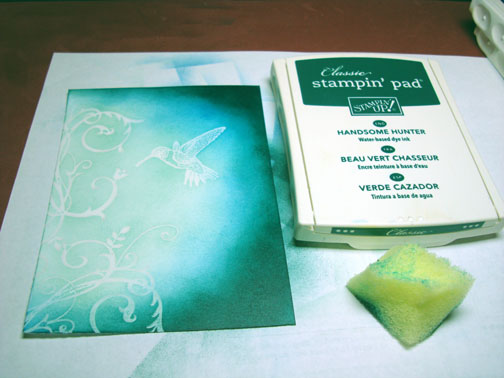
Brayered on Baja Breeze ink at the top of the card stock.  The embossed images will resist the brayered ink “emboss resist”.

dsc06152.JPG

Brayered on Not Quite Navy at the top of the card stock, not covering the Baja Breeze ink entirely.

dsc06153.JPG

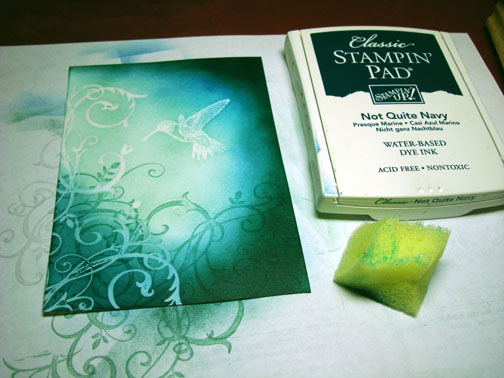
Sponged on some mountain shapes using Not Quite Navy ink.

Note:  If putting in two mountains make one mountain much smaller than the other one so it doesn’t look like your mountains need a bra, lol. 

dsc06154.JPG

Sponged on some Night of Navy ink at the top of the card stock and at the mountain bases.

dsc06155.JPG

Remove the post it note and throw it away.  Using a new post it note, rip through the sticky part of the post it note to create a hill shape.  Put in on the card stock to mask the bottom of the card stock.

dsc06156.JPG

Sponged lightly Baja Breeze ink at the post it notes torn edge.

dsc06157.JPG

Remove post it note.

dsc06158.JPG

Sponge Baja Breeze ink under the tree  and the cardinal to create a shadow for them.

dsc06159.JPG

Add a few specks of black marker around the bird.  Gotta feed the bird!

dsc06160.JPG

Held a Sharpie Gold Paint marker tip, half on the card stock and half on my scrap paper and ran down each edge of the main image panel.  

Note:  Try this out before doing it on your finished panel.  🙂

dsc06161.JPG

Panels are as follows from top to bottom:  Main image panel, Baja Breeze Panel, Basic Black panel, Not Quite Navy Panel.

dsc06162.JPG

One more thing before you run to craft room to start making your Christmas cards, lol, yeah right, I want to give you a great link to a Creativity Survey.  Fill the survey out and you get $10 off of your Craft DVD order and it also enters you to win $300 Full Library of PageSage Craft DVDs produced by Page Sage for Artists like Tim Holtz (my hero) and Carol Duvall.   Check it out:   http://pagesage.com/

Well it’s time to go do some Autumn clean up in my garden, I’ve played long enough this morning.

May your Saturday be filled with really good times to remember.

Until my next post. . . . . . .. . . . . . .

Hugs,

Michelle

Links to all my tutorials can be found here:  http://zindorf.blogs.splitcoaststampers.com/tutorials-ive-written/

Here is a link to my workshop calendar if you want to get info on beginner and advanced Brayer workshops:  http://zindorf.blogs.splitcoaststampers.com/workshop-calendar


Peaceful Hummingbird – Tutorial #123

dsc06110.JPG

This is a farewell to the hummingbirds here in Ohio.  I’m always so sad when then leave.  But I can hardly blame them for heading for warmer climates in preparation for the Autumn and Winter to come.

I feel this card would be a good Sympathy card.  Sympathy cards are always so hard for me to come up with.  I try to create a peaceful scene that is not sad.

Let’s get started.  🙂

Supplies:

Stamps: Stampin’ Up “Baroque Motifs” & Cornish Heritage Farms “Hummingbird”
Paper: Stampin’ Up Whisper White, Handsome Hunter & Sage Shadow
Ink: Stampin’ Up Sage Shadow, Handsome Hunter & Not Quite Navy
Accessories: Versamark Pad, Fine detail clear embossing powder, heat gun, sponge, ribbon, silver brads

dsc06116.JPG

Stamped Baroque Motifs Flourish twice on a 4″ x 5.5″ piece of Whisper White card stock using Versamark.

dsc06097.JPG

Stamped Hummingbird using Versamark.

dsc06098.JPG

Heat embossed images using fine detail clear embossing powder and a heat gun.

dsc06099.JPG

Sponged Sage Shadow ink all over the card stock using a circular motion.

dsc06101.JPG

Sponged Not Quite Navy ink on the card stock using a circular motion.

dsc06102.JPG

Wow, I can’t remember the last time I used the ink color Handsome Hunter, but I pulled it out this morning and sponged it over the Not Quite Navy ink, not covering it entirely.

dsc06103.JPG

Stamped Flourish at the bottom of the card stock using Sage Shadow ink.

dsc06104.JPG

Wiped the ink from the embossed images using a soft rag.

dsc06105.JPG

Sponged some more Not Quite Navy ink at the bottom left corner of the card stock.

dsc06106.JPG

Assembled card and here it is finished measuring 5″ x 6.5″.   

dsc06110.JPG

I hope your day is filled with peaceful scenes and peaceful thoughts.

Until my next post. . . . . . . . . . . .

Hugs,

Michelle

Links to all my tutorials can be found here:  http://zindorf.blogs.splitcoaststampers.com/tutorials-ive-written/

Here is a link to my workshop calendar if you want to get info on beginner and advanced Brayer workshops:  http://zindorf.blogs.splitcoaststampers.com/workshop-calendar


You Rock – Tutorial #122

dsc06093.JPG

Switching gears this morning so I can crank out a Birthday card for my musician brother-in-law.  Hard to drag myself away from using all the great Autumn images I have in stamps.

But, I love these images too.  This set is “Rock Star” by Inkadinkadoo.  I pick this up at Michael’s Craft store. 

Well let’s get rock’n on this tutorial, yeah corny I know, lol.  🙂  Had to say, just had to!

Supplies:

Stamps: “Rock Star” by Inkadinkado & Nightingale by See D’s
Paper: Stampin’ Up Whisper White, Old Olive, Basic Black
Ink: Stampin’ Up Basic Black & Close to Cocoa, Adirondack Lettuce, Bottle, Pebble & Willow, Palette Noir Black
Accessories: Star Punch, Prismacolor Metallic Silver Marker, Prismacolor Walnut marker, Tim Holtz ruler & distressing tool, White Gel Pen, Versamark marker, fine detail embossing powder, heat gun, post it note, sponge, push pin, silver brads 

dsc06096.JPG

Stamped image with Palette Nior Black on a 3″ x 5″ piece of Whisper White card stock.

dsc06072.JPG

Colored in the open areas on the base of the guitar with a Prismacolor Walnut marker.

dsc06073.JPG

Colored over the entire guitar with a Versamark marker.

dsc06074.JPG

Heat embossed the image using fine detail clear embossing powder and a heat gun.

dsc06075.JPG

Masked about an inch of the bottom of the card stock with a post it note and sponged Willow ink at the top of the card stock using a circular motion.

dsc06076.JPG

Sponged on Lettuce ink at the top, left and bottom of the area to create the illusion of a light source.

dsc06077.JPG

Sponged Bottle ink at the left side corners.

dsc06078.JPG

Stamped the flourish over the guitar using bottle ink.

dsc06079.JPG

Carefully wiped the bottle ink off of the guitar. 

dsc06080.JPG

With the post it note mask removed, sponged Pebble ink at the left side of the bottom of the guitar image to create a shadow.

dsc06081.JPG

Cut a 5.75″ square panel of Old Olive card stock and used a Prismacolor Metallic Silver marker and run it down all the sides.

dsc06082.JPG

Stamped two stars with black ink on Close to Cocoa card stock, colored the inside of the stars in with a Prismacolor Walnut marker and punched them out with a star punch.

dsc06083.JPG

Distress the edges of my main image panel and a 5.25″ square panel of black card stock using the Tim Holtz distress tool.

dsc06084.JPG

Cut to strips of Old Olive card stock, cut one end on each in a “V” shape.  Ran the Silver marker down the sides of each one and then dragged the ends of the strips across my Close to Cocoa ink pad to add color to the tips.

dsc06085.JPG

Assembled the card front.

dsc06086.JPG

Used the Tim Holtz ruler and a push pin to add piercings to the card stock strips.

dsc06088.JPG

Added punched stars and silver brads.

dsc06089.JPG

Made a highlight at the right side of the guitar with a white gel pen by drawing down the whole right side of the guitar.  This makes the guitar appear to be 3 dimensional.

dsc06090.JPG

Here you have it the finished card measuring 5.75″ square.

dsc06093.JPG

Hope you enjoyed this tutorial and will give the emboss resist grunge look a try.  🙂

May your day be filled with lively music.

Until my next post. . . . . . . . . . .

Hugs,

Michelle

Links to all my tutorials can be found here:  http://zindorf.blogs.splitcoaststampers.com/tutorials-ive-written/

Here is a link to my workshop calendar if you want to get info on beginner and advanced Brayer workshops:  http://zindorf.blogs.splitcoaststampers.com/workshop-calendar


No More Leaves Rabbit – Tutorial #121

dsc06063.JPG

Happy Tuesday!  I’m back to the regularly scheduled program today since I have all that traveling business out of the way, lol.  So I’m coming to you with another Autumn themed tutorial.

I found some great rabbit images by Stamp La Jolla at a Stamp convention this year.  I purchased mine unmounted.  I bought mine as single stamps, not sets.  Here is a link to their web page:  www.stamplajolla.com

I’m dedicating this tutorial to my new friend Lydia, who told me she loves my long tutorials.  Girl, I’ve got a long one for you today, lol.  Anywho, let’s get started.  🙂

Supplies:

Stamps: Stamp La Jolla Rabbit, Inkadinkadoo Fall Season
Paper: Stampin’ Up Whisper White, Basic Black & Orchid Opulence
Ink: Stampin’ Up White, Basic Black, More Mustard, Elegant Eggplant, Old Olive, Summer Sun & Orchid Opulence, Palette Noir Black
Accessories: Versmark Marker, Fine Detail Clear embossing powder, heat gun, brayer, sponges, Prismacolor markers & Pencils, White Gel Pen, Coluzzle for cutting mask, Green & Purple Ribbon, Brads

dsc06071.JPG

Stamped my Rabbit image on a 3″ x 6.25″ piece of Whisper White card stock with Palette Noir Black ink.

Note:  I used this Palette black ink because it doesn’t smear when using alcohol based markers, such as Prismacolor.

dsc06032.JPG

I’ve shown this before, but I think they are pretty all together.  This is my organization system for my Prismacolor markers.  Not fancy, but functional.  🙂  You can find more detail on my marker organization in the tools section of this blog. 

dsc06038.JPG

My marker sheets showing the color number, name and a stripe of marker color for easy selection.

dsc06036.JPG

Anyway, back to the tutorial, focus Michelle!

Colored the rabbits hat and robe in with a Prismacolor 30% Warm Grey marker.

dsc06033.JPG

Colored in the shadow areas with a  Prismacolor 40% Warm Grey marker.

dsc06034.JPG

Added some Prismacolor 60% Warm Grey marker to the folds shadows in the hat and robe.

dsc06035.JPG

Colored in his inner ear with a Prismacolor Deco Peach marker.

dsc06037.JPG

Colored the broom handle with a Prismacolor Light Walnut marker.

dsc06039.JPG

Added more color to the left side of the broom handle with a Prismacolor Sienna Brown marker.

dsc06040.JPG

Colored the Rabbits nose and bottom of his feet with a Prismacolor Deco Peach marker.

dsc06041.JPG

Colored the broom bristles with a Prismacolor Yellow Ochre marker.

dsc06042.JPG

Colored the darker areas of the broom bristles with a Prismacolor Goldenrod marker.

dsc06043.JPG

Colored over the entire image with a Versamark marker being very careful to stay inside the lines of the image.

dsc06044.JPG

Heat embossed the image using fine detail clear embossing powder and a heat gun. 

Note:  I heat embossed the image so it will resist the inks I am going to use for the back ground.  This is called emboss resist.

dsc06045.JPG

Brayered on Summer Sun ink.

dsc06046.JPG

Used a 2.5″ circle of card stock to mask for the sun.  Held the mask in place as I brayered on Orchid Opulence ink at the top of the card stock.

dsc06047.JPG

Brayered Old Olive ink at the bottom of the card stock.

dsc06048.JPG

Used a 3 5/8″ card stock circle to mask so I could sponge Elegant Eggplant at the edge of it to create a interesting sky area. 

dsc06049.JPG

I masked, sponged Elegant Eggplant ink at edge and then moved the masked and repeated.

dsc06050.JPG

dsc06051.JPG

Once I got to where the sun mask is I made sure to hold both masks in place so I was sponging around the sun mask at the same time.

dsc06052.JPG

dsc06053.JPG

Removed card stock masks.

dsc06054.JPG

Sponged More Mustard ink around the edge of the sun leaving the middle bright.

dsc06055.JPG

Sponged Basic Black ink around the edge of the card stock.

dsc06056.JPG

Glued the main image panel to a 5″ x 6.5″ panel of black card stock.

dsc06057.JPG

Stamped the Inkadinkado leaf flourish with White Craft ink over both panels.

dsc06058.JPG

Colored the leaves in with Chartreuse & Pumpkin Orange Prismacolor pencils.

dsc06059.JPG

Added White Highlights to the flourish with a White Gel Pen.

dsc06060.JPG

dsc06061.JPG

Added some ribbon and here you have the finished card measuring 5 1/8″ x 6 5/8″.

dsc06063.JPG

Now that’s a rabbit with attitude! But he sure is stinking cute, lol.

May your day be filled with the spectacular colors of a sunset.

Until my next post. . . . . . .. . . . . . . .

Hugs,

Michelle

Links to all my tutorials can be found here:  http://zindorf.blogs.splitcoaststampers.com/tutorials-ive-written/

Here is a link to my workshop calendar if you want to get info on beginner and advanced Brayer workshops:  http://zindorf.blogs.splitcoaststampers.com/workshop-calendar


Autumn Day – Tutorial #120

dsc06019.JPG

I’m packing things up for my beginner brayer workshops in Austin, Texas this weekend on September 20 & 21.  If you would like join me there are a few spots available, no prior brayer experience necessary and you will leave the workshop feeling you have mastered this mystery tool.   If interested, please contact Lisa Itatani to sign up at litatani@pacbell.net or http://flatfishpaperarts.blogspot.com/ 

I’ve never been to Texas before and I’m very excited to have this opportunity to visit this great state.  I even get to meet a few of my fellow Split Coast Stamper Dirty Dozen Alumi that have signed up for my workshops, way kewl!

Anyhow, between packing things up for my trip I managed to get this card tutorial completed for your viewing and hopefully doing pleasure.  🙂

Let’s get started. . . . .

Supplies:

Stamps: Inkadinkado “Fall Season”
Paper: Stampin’ Up Whisper White, Soft Sky, Not Quite Navy, Old Olive
Ink: Stampin’ Up Pumpkin Pie, Kiwi Kiss, Always Artichoke, Baja Breeze, Old Olive & Not Quite Navy
Accessories: Versamark pad, fine detail clear embossing powder, heat gun, Curvy Cutter & glass mat, Sponges, Brayer, Stampin’ Up markers Really Rust & Black, copper brads

dsc06023.JPG

Stamped Leaves by first loading stamp with Versamark and then with Pumpkin Pie ink before stamping.

dsc05999.JPG

Heat embossed the image using fine detail clear embossing powder and a heat gun.

dsc06000.JPG

Stamped Tree by first loading the stamp with Versamark, then Old Olive ink, then I colored the leaves on the stamp with a Really Rust marker and the trunk on the stamp with a Black marker before stamping. 

Note: It helps to huff your breath on the stamp before stamping to moisten all the ink a bit when coloring the stamp in with markers.  🙂

Heat embossed the tree image using clear embossing powder and a heat gun.

dsc06001.JPG

Tore a post it note along the sticky edge and used it to mask the sky area of the card stock.  Brayered on Kiwi Kiss ink in the unmasked area.

dsc06002.JPG

Brayered Always Artichoke ink at the bottom of the card stock.

dsc06003.JPG

With the post it note mask still in place, stamped leaves image two more times, but this time stamped them using Always Artichoke ink only.

dsc06004.JPG

Took post it note off.

dsc06005.JPG

Brayered Baja Breeze ink at top of the card stock.

dsc06006.JPG

Brayered Not Quite Navy ink at the very top of the card stock, not covering the Baja Breeze ink entirely.

dsc06007.JPG

Stamped Leaf flourish stamp with Baja Breeze in the sky area.

dsc06008.JPG

Now for a little Curvy Cutter lesson.  🙂

Taped my main image panel down on a glass mat.

dsc06009.JPG

Put my Curvy Cutter over the card stock and determined where I wanted my cut to be.

The cutter comes with this template so you can see exactly where your cut will be when you line up your cutter tip.

dsc06010.JPG

Removed the inside template without moving my cutter and made my cut by moving my cutter around the track on the Curvy Cutter.

dsc06011.JPG

Sponged the edge of the card stock with Not Quite Navy ink.

dsc06013.JPG

Stamped part of the leaf flourish stamp around the edge of a Soft Sky card stock panel using Not Quite Navy ink.

dsc06014.JPG

Sponged Not Quite Navy around the edge of the panel.

dsc06015.JPG

Sponged Not Quite Navy ink on the corners of a 4 5/8″ square Not Quite Navy Panel.

dsc06016.JPG

Assembled card and here it is measuring 5.5″ x 5.5″.

dsc06019.JPG

Hope this tutorial has inspired you to MAKE A SCENE today.

May your day be filled with all that your heart desires.

Until my next post. . . . . . . . . .

Hugs,

Michelle

Note:  Links to all my tutorials can be found here:  http://zindorf.blogs.splitcoaststampers.com/tutorials-ive-written/

Here is a link to my workshop calendar if you want to get info on beginner and advanced Brayer workshops:  http://zindorf.blogs.splitcoaststampers.com/workshop-calendar/


Autumn Spider – Tutorial #119

dsc05997.JPG

Hello, hello, hello!  I’m in Autumn mode again today and probably will be for a while now.  This is my favorite season to stamp. 

Today’s tutorial takes a look at the spider in a whole new light.  Usually we depict the spider as a scary creature, but I happen to be fond of the spider because he helps keep the bad destructive bugs in check in my garden.  This time of year the spiders really get busy and build their webs every where around my yard, home etc.    We live together peacefully, most of the time.  That is until I walk through one of their web creations, YUCK! 

Let’s get started.  🙂

Supplies:

Stamps: Inkadinkado “All Hallow’s Eve” & “Fall Season” also by Inkadinkado
Paper: Stampin’ Up Whisper White, Pumpkin Pie & Taken with Teal
Ink: Stampin’ Up Really Rust, Cool Caribbean, Baja Breeze, Old Olive, Basic Black, So Saffron, Pumpkin Pie, Adirondack Stream
Accessories: Tim Holtz Ruler, Push Pin, Black fine point marker, Stampin’ Up markers Pumpkin Pie & More Mustard, White Gel Pen, Sponges, Versamark Pad, Fine Detail Clear Embossing Powder, Heat Gun

dsc05998.JPG

Stamped spider by first loading my stamp with Versamark and then loading it with black ink before stamping it on a 4.5″ x 4.5″ piece of Whisper White card stock.

dsc05977.JPG

Heat embossed the image with clear embossing powder and a heat gun.

dsc05978.JPG

Stamped the Web in two corners of the card stock with Versamark only.

dsc05979.JPG

Heat embossed the webs using clear embossing powder and a heat gun.

dsc05980.JPG

Stamped the leaves by loading the stamp with Old Olive ink and then tapping the paintbrush tip of my More Mustard & Pumpkin Pie markers on the stamp before stamping.   This give a variation in color to the image.

dsc05981.JPG

dsc05982.JPG

Sponged in a circular motion So Saffron ink.

dsc05983.JPG

Sponged in a circular motion Pumpkin Pie ink, not covering the So Saffron ink entirely.

dsc05984.JPG

Sponged in a circular motion Really Rust ink, not covering the Pumpkin Pie ink entirely.

dsc05985.JPG

Sponged in a circular motion Baja Breeze ink.

dsc05986.JPG

Sponged in a circular motion Cool Caribbean ink, not covering the Baja Breeze ink entirely.

dsc05987.JPG

Stamped leaf flourish with Really Rust ink.

dsc05988.JPG

Used a ruler and a fine point black marker to draw the line for the spider.

dsc05989.JPG

Sponged Stream ink on the right side of the card stock.

dsc05990.JPG

Pierced two sides of a Pumpkin Pie Panel using the Tim Holtz ruler and a push pin.

Note:  This is a handy ruler.  It has holes in it so you can do your piercing in a straight line.

dsc05991.JPG

Assembled the card front and added highlights to some of the flourishes with a white gel pen.

dsc05992.JPG

Darkened the bottom side of the leaf flourish with a Black fine line marker to make it stand out more.

dsc05993.JPG

Here you have it the finished card measuring 5.5″ square.

dsc05997.JPG

I hope this tutorial has inspired you to look at the spider in a new light.

May your day be filled with pleasant breezes and sunshine.

Until my next post. . . . . . . . . . . . .

Hugs,

Michelle

Note:  Links to all my tutorials can be found here:  http://zindorf.blogs.splitcoaststampers.com/tutorials-ive-written/

Here is a link to my workshop calendar if you want to get info on beginner and advanced Brayer workshops:  http://zindorf.blogs.splitcoaststampers.com/workshop-calendar/


Pumpkins by the Lake – Tutorial #117 and Blog Candy

dsc05950.JPG

This set “All Hallow’s Eve” by Inkadinkado was still out on my desk from Yesterday’s piece so I gave it another go.  This time throwing a purple cast on the pumpkins and using a teal color and purple together, which I love by the way.

I’m also going to give this card away as blog candy.  I’ll use a random number generator on Saturday, September 13th to select the winner.  To enter to win this card, please leave a comment on this post telling me your favorite color combination to use in fall creations.  If you are getting this blog update by e-mail you will need to click this link to leave a comment on this post:  http://zindorf.blogs.splitcoaststampers.com/2008/09/10/pumpkins-by-the-lake-tutorial-117-and-blog-candy/

One more thing, I have scheduled an Advanced brayer workshop in Dayton, Ohio on November 1st.  For more info on my Beginner and advanced Brayer workshops, please check out this link:  http://zindorf.blogs.splitcoaststampers.com/workshop-calendar/

Let’s get started on the tutorial.  🙂

Supplies:

Stamps: Inkadinkado “All Hallow’s Eve” & Stampin’ Up “Baroque Motifs”
Paper: Stampin’ Up Whisper White, Tempting Turquoise, Black & Elegant Eggplant
Ink: Adirondack Eggplant, Black, Stream, Hazelnut, Purple Twilight, Aqua
Accessories: Versamark marker & pad, Prismacolor markers, Sponges, White gel pen, black marker, Brayer, Fine detail clear embossing powder, heat gun, photo corner punch

dsc05951.JPG

Stamped the Pumpkins on Whisper White card stock by first loading my stamp with Versamark and then Black ink before stamping the image. 

Note:  I started out with a much too large piece of card stock.  I later cut this down to measure 3.5″ x 3.5″. 

dsc05924.JPG

Heat emboss the image using fine detail clear embossing powder and a heat gun.

dsc05925.JPG

Colored some Prismacolor Violet Mist marker on the pumpkins.

dsc05926.JPG

Colored over the pumpkins with Wheat.

dsc05927.JPG

Colored some Yellow Orange marker on the pumpkins.

dsc05928.JPG

Went over the entire image with the Wheat marker to blend the colors together a bit.

dsc05929.JPG

Used the Violet Mist marker again at the bottom and top of the pumpkins to darken.

dsc05930.JPG

Colored over the entire image with a Versamark marker.

dsc05931.JPG

Heat embossed using clear embossing powder and a heat gun.

dsc05932.JPG

Cropped my paper down to 3.5″ x 3.5″. 

I also made a few dots with a Versamark marker in the sky area of the card stock and then heat embossed them using clear embossing powder and a heat gun.  You won’t be able to see them until the next step.

dsc05933.JPG

Brayered on Aqua ink at the top of the card stock.

dsc05936.JPG

Brayered on Purple Twilight ink at the top of the card stock, but not covering the Aqua ink entirely.

dsc05937.JPG

Sponged Hazelnut ink on in a swiping motion going from left to right.

dsc05938.JPG

Sponged on Stream ink in a swiping motion going from right to left.

dsc05939.JPG

Sponged on some Black ink to the left of the pumpkins and under them.

dsc05940.JPG

Sponged Eggplant ink around the edge of the card stock.

dsc05941.JPG

Added to layers to the card front and adhered them together.  Stamp Flourish with Black ink.  Note:  I have a gap in my design since I stamped over multiple layers of card stock.  When doing this step make sure you have a marker that matches the color of ink you stamped in so you can fill in the gaps.

dsc05942.JPG

Filled in the gaps of the flourish with a black marker.

dsc05943.JPG

Sponged Eggplant ink at the left and bottom of the Eggplant card stock.

dsc05944.JPG

Added a bottom layer, corner punches and brads.

dsc05945.JPG

Added White Gel pen to the right side of some of the flourishes to make them stamp out more.

dsc05946.JPG

Here you have it the finished card measuring 5.25″ x 5.25″.

dsc05950.JPG

I hope this tutorial has inspired you to create a scene that is a little out of the ordinary. 

May your day be filled with joy & love!

Until my next post. . . . . . . . .

Hugs,

Michelle

Note:  Links to all my tutorials can be found here:  http://zindorf.blogs.splitcoaststampers.com/tutorials-ive-written/

Here is a link to my workshop calendar if you want to get info on beginner and advanced Brayer workshops:  http://zindorf.blogs.splitcoaststampers.com/workshop-calendar/


Is It Autumn Yet? – Tutorial #116

dsc05918.JPG

I love Autumn and would create cards of a Fall nature all year around if I could use them all.  The Earthy colors of Autumn are my favorite to use. 

Is there a Stamp Buyers Anonymous Group?   I really need some help to stay out of the craft stores.  Here lately I have been buying stamps like mad.  This set I picked up yesterday.  The set name is “All Hallow’s Eve” and it is by Inkadinkado.  Don’t you just love the name Inkadinkado.  Isn’t it fun to say, INKADINKADO, LOL.  Ok, I’m a bit punchy this morning.  🙂  Anyhoo, I got it from Michael’s Craft Store.

It’s raining here in Ohio and I tend to get out every color of ink I own for some reason when it is raining.  Today was no exception.

Grab a cup of your favorite beverage and join me for this Autumn scene tutorial.  Let’s get started.

Supplies:

Stamps:Inkadinkado “All Hallow’s Eve, Stampin’ Up “Lovely As a Tree”
Paper: Stampin’ Up Whisper White, Really Rust, Basic Black
Ink:Stampin’ Up Basic Black, Elegant Eggplant, Certainly Celery, Close to Cocoa, Pumpkin Pie, Really Rust, Barely Banana, Apricot Appeal, Old Olive
Accessories:Versamark Pad and Marker, Prismacolor Markers Orange & Yellow Orange, White Gel Pen, Brayer, Fine Detail Clear embossing Powder, Heat Gun, Brads, Sponges, Circle Coluzzle Template, Post it Note

dsc05923.JPG

Stamped pumpkins on a 5″ x 5″ piece of Whisper White card stock by first loading my stamp with Versamark and then with Black ink.  I then heat embossed the image using clear embossing powder and a heat gun.

dsc05890.JPG

dsc05891.JPG

Colored the pumpkins in with a Prismacolor Yellow Orange marker.

dsc05892.JPG

Added Orange marker to them along the left sides of each section of pumpkin.

dsc05893.JPG

Went over the pumpkins again with the Yellow Orange marker to blend the two colors together.

dsc05894.JPG

Colored over the pumpkins with a Versamark marker.  Heat embossed the image with clear embossing powder and a heat gun.

dsc05895.JPG

dsc05896.JPG

Brayered on Barely Banana ink.

dsc05897.JPG

Brayered on Apricot Appeal ink, not covering the Barely banana ink entirely.

dsc05898.JPG

Cut a 2.5″ circle with my Coluzzle and held it in place as a mask.

dsc05899.JPG

Brayered over the mask as I held it in place with Pumpkin Pie Ink.

dsc05900.JPG

Brayered over the mask with Really Rust ink, not covering the Pumpkin Pie ink entirely.

dsc05901.JPG

Brayered on Elegant Eggplant ink, not covering the Really Rust ink entirely.

dsc05902.JPG

Removed the mask.

dsc05903.JPG

Tore through the sticky part of a post it note and used it as a mask for the sky area.

OK, so you think I don’t make mistakes?  Check this out.  I put my post it note too far down and I ended up with a levitating pumpkin.  That’s OK for a spooky scene I guess, but watch out for this, lol.

dsc05904.JPG

Brayered on Certainly Celery ink in the ground area.

dsc05905.JPG

Brayered on Old Olive ink at the bottom of the card stock, not covering the Certainly Celery ink entirely.

dsc05907.JPG

Sponged Old Olive ink along the post it note edge to create a horizon line.

dsc05908.JPG

Removed post it note mask and stamp the trees with Close to Cocoa ink.  Note:  I only inked the tree portion of the stamp.  I did not ink the ground portion so it would be omitted.

dsc05909.JPG

Wiped the embossed pumpkins off with an old soft rag to get the Close to Cocoa ink off of them.

dsc05910.JPG

Stamped the Witch with Basic Black ink.

dsc05912.JPG

Sponged Elegant Eggplant around the outside edges of the card stock.

dsc05913.JPG

Sponge Basic Black ink around the very outside edges of the card stock, not covering the Elegant Eggplant ink entirely.

dsc05914.JPG

Sponged on Elegant Eggplant under the pumpkins to create a shadow for them.  Colored in the stars on the Witch with a White Gel pen.

dsc05915.JPG

Assembled my layers of card stock.

dsc05916.JPG

Added black photo-corners in each corner and copper brads.   Here is the completed card measuring 5 3/8″ x 5 3/8″.

dsc05918.JPG

So are you in the mood for Autumn too?  If so, give this type of Autumn scene a whirl.  Just watch out for levitating Pumpkins, lol.

May your day be one of peace and joy.

Until my next post. . . . .. . . . .

Hugs,

Michelle

Note:  Links to all my tutorials can be found here:  http://zindorf.blogs.splitcoaststampers.com/tutorials-ive-written/

Here is a link to my workshop calendar if you want to get info on beginner and advanced Brayer workshops:  http://zindorf.blogs.splitcoaststampers.com/workshop-calendar/


Coffee Anyone? – Tutorial #115

dsc05887.JPG

I apparently have Java on my mind this morning.  I drink a pot of it each day. 

Stamp set I used today is by Impression Obsession “Smell the Coffee”.   I don’t normally use bright colors, but these cups just screamed “make me bright”.

Let’s get going on the tutorial.  🙂

Supplies:

Stamps: Impression Obsession “Smell the Coffee”
Paper: Stampin’ Up Whisper White, Old Olive, Brilliant Blue & Chocolate Chip
Ink: Palette Noir Black, STampin’ Up Creamy Caramel, Adirondack Ginger, Sail Boat Blue, Peach Bellini, Aqua, Espresso
Accessories: Versamark Marker, Fine Detail Clear embossing powder, heat gun, Prismacolor markers, White Gel Pen, Faber Castell fine point marker, Sponge, Brads, Cuttlebug embossing folder

dsc05889.JPG

Stamped image with Palette Noir Black ink.

dsc05866.JPG

Colored image with Prismacolor markers, starting with Yellow Orange.

dsc05867.JPG

Added Magenta

dsc05868.JPG

Added Chartreuse

dsc05869.JPG

Colored over the bottom of the coffee cups with the same colors used already.  This creates a darker shadow effect.

dsc05870.JPG

Colored coffee Light Tan.

dsc05871.JPG

Went over the coffee cup handles to make them darker by using a fine point black marker.

dsc05872.JPG

Colored over the cups with a Versamark marker and heat embossed using fine detail clear embossing powder and a heat gun.

dsc05873.JPG

dsc05874.JPG

Sponged on Creamy Carmel. 

Note:  The embossed image will resist the ink put on it now, hence the name of the technique emboss resist.

dsc05875.JPG

Used the direct to paper technique by dragging the Aqua ink pad edge over the card stock. 

dsc05876.JPG

Used the direct to paper technique with a Peach Bellini ink pad.

dsc05877.JPG

Used the direct to paper technique using a Sail Boat Blue pad.

dsc05879.JPG

Sponged on Ginger ink below the coffee cups and around the edge of the card stock.

dsc05880.JPG

Sponged on Espresso ink right under the cups to give them a really dark shadow and then added some Espresso ink with a sponge along the edges of the card stock.

dsc05881.JPG

Out lined the right side of the steam with a fine point black marker.

dsc05882.JPG

Added white gel pen to the right side of the steam.

dsc05884.JPG

Embossed two of my panels with a Cuttlebug folder.

dsc05885.JPG

Assembled card and added brads.  Here it is finished measuring 5″ x 6.5″.

dsc05887.JPG

I hope this tutorial will inspire you to use the emboss resist technique along with the direct to paper technique to come up with interesting backgrounds in your projects.

May your day start off right and stay bright all day.

Until my next post. . . . . . . . . . . .

Hugs,

Michelle

Note:  Links to all my tutorials can be found here:  http://zindorf.blogs.splitcoaststampers.com/tutorials-ive-written/

Here is a link to my workshop calendar if you want to get info on beginner and advanced Brayer workshops:  http://zindorf.blogs.splitcoaststampers.com/workshop-calendar/


Summer’s End – Tutorial #113 and Brayer Give away

dsc05844.JPG

Many of you have notice and commented on the fact that I am using a new brayer.  I’m using a new one because I wanted to use the exact one the people attending my brayer workshops get to use and take home with them.   The new brayer is only different from the old brayer due to the handle.  It has the exact same roller.  🙂   There is this crazy rumor that my old Speedball Brayer is magical, lol.  It is not magical, but it still has a great deal of life left in it although it is stained from a few years of use.  Many of you have e-mailed me asking if you could have my old beloved brayer.  Since there is more than one of you asking, I’m going to give it away.  If you wish to enter for a chance at my brayer, please leave a comment on this post and I will use a random number generator to select the winner on the morning of Saturday, September 6th.  If you are receiving my blog update by e-mail you will need to click on this link to enter a comment on this post:   http://zindorf.blogs.splitcoaststampers.com/2008/09/03/summers-end-tutorial-113-and-brayer-give-away/


dsc02568.JPG

Ok, enough about that.   Today’s tutorial is for the SCS Sketch Challenge 192 and I’m using a stamp that I have had for years and has never seen ink.

Let’s get going on the tutorial!

Supplies:

Stamps: Stampin’ Up Summer by the Sea and Canvas Background
Paper: Stampin’ Up Whisper White, Tempting Turquoise, Baja Breeze & Creamy Caramel
Ink: Stampin’ Up Close to Cocoa, Creamy Caramel & Tempting Turquoise, Palette Noir Black & Adirondack Aqua
Accessories: Prismacolor Markers, Sponges, Brayer, Versamark Marker, Fine Detail Clear embossing Powder, Heat gun, Brads, Ribbon, Tim Holtz Ruler, Push Pin, White Gel Pen, Post it Note

dsc05845.JPG

Stamped image on a 3.5″ x 5″ piece of Whisper White card stock with Palette Noir Black ink.

dsc05814.JPG

Colored his shirt in with a Prismacolor Carmine Red Marker.

dsc05815.JPG

Added Crimson Red to the creases of the shirt.

dsc05816.JPG

Colored his pants with Soft Sky Blue.

dsc05817.JPG

Added Periwinkle to the creases of his pants.

dsc05818.JPG

Colored over his pants again with the Sky Blue Light marker to blend them more.

dsc05819.JPG

Colored his shoval with Sunburst Yellow.

dsc05820.JPG

Colored his skin with Pale Peach.

dsc05821.JPG

Colored his hair with Walnut.

dsc05822.JPG

Added some Tuscan Red to the dark areas in his hair.

dsc05823.JPG

Went over all his hair with the walnut marker again to blend.

dsc05824.JPG

Colored the Sand Castle with Eggshell.

dsc05825.JPG

Colored over the boy, starfish and castle with a Versamark marker and heat embossed the images with fine detail clear embossing powder and a heat gun.

dsc05826.JPG

dsc05827.JPG

Brayered Adirondack Aqua ink at an angle on the top of the card stock.

dsc05828.JPG

Brayered Creamy Caramel ink at an angle at the bottom of the card stock.

dsc05829.JPG

Brayered more Aqua ink at an angel at the top of the card stock, bringing it down closer to the Creamy caramel ink.

dsc05830.JPG

Masked about an inch of the card stock top with a post it note and sponged on Tempting Turquoise ink, not covering the Aqua entirely.  This puts in the horizon line.

dsc05831.JPG

Removed post it note mask and sponged Creamy Caramel ink at the water line.

dsc05832.JPG

Added a foam look to the water edge with a white gel pen by making dots and dashes.

dsc05833.JPG

Cut my two panels and sponged Tempting Turquoise ink on 3 edges of the two panels.

dsc05834.JPG

Sponged Close to Cocoa around the edge of the main image panel.

dsc05835.JPG

Stamped the Canvas background stamp in Creamy Caramel on the main image panel. 

Note:  I flip my large background stamps over so the rubber side is up and ink them by rubbing my ink pad across them.  I then flip my card stock face down on the stamp and roll my brayer one time over the card stock.  If you roll back and forth you will smear your image.

dsc05836.JPG

dsc05837.JPG

dsc05838.JPG

Wiped the ink from my embossed images with an old rag.

dsc05839.JPG

Sponged Close to Cocoa ink on the edges of the two panels.

dsc05840.JPG

Used my Tim Holtz Ruler and a push pin to add piercings to the bottom panel.

dsc05841.JPG

Assembled card and added ribbon and brads.  Here it is finished measuring 5″ x 6.5″.

dsc05844.JPG

Hope you enjoyed this tutorial and are now inspired to try a beach scene of your own. 🙂

May your day be filled with the smell of salt in the air and warm breezes blowing your hair.

Until my next post. . . . . . . . .. .

Hugs,

Michelle

Note:  Links to all my tutorials can be found here:  http://zindorf.blogs.splitcoaststampers.com/tutorials-ive-written/

Here is a link to my workshop calendar if you want to get info on beginner and advanced Brayer workshops:  http://zindorf.blogs.splitcoaststampers.com/workshop-calendar/