Bird’s Eye View Bookmark – Tutorial #406

Drive home 😦


Wow, my drive home yesterday from Wichita, Kansas was a bit different than my lovely drive there, lol.

Drive there  🙂


It took quite a bit longer also.  So today I am completely exhausted.  My body hurts also from griping the steering wheel so tight in the icy conditions I found myself driving in.  Thank goodness there was only 2 states that looked like this and the others where fine.   Anyhow, I am so happy to be home safe and sound, but miss my friends in Wichita already.

Before I get to the tutorial today, I have a blog candy winner to announce.

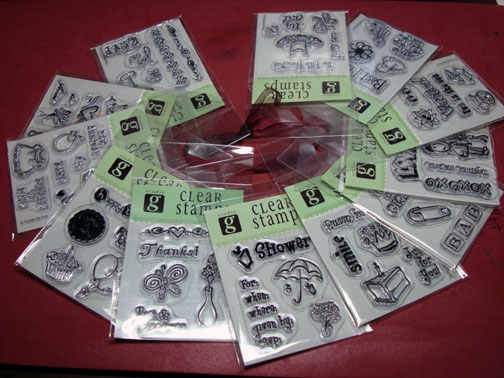
  The winner of the Stampin’ Up! Extreme Stamp package is. . . . . . . . . . . . . . .

Kim Burmeister who wrote “Your card is awesome! I would love to be entered into the blog candy drawing. Thanks so much. These would be great for brayer cards.”   

Kim Burmeister, Congratulations!   Please e-mail your address to me at mzindorf@aim.com within 30 days and I will get this set right out to you.

Thanks to everyone who played along!  Maybe you will be the winner next week.

About the tutorial

Today’s tutorial project was created for a Stampin’ Up Team Event Swap that I will be attending in New Jersey this weekend.    I’m looking so forward to attending an event that I am not putting on, know what I mean, lol.  🙂  Also, I will be meeting new friends and hanging out with current friends.  Besides the creative release that stamping gives you that’s what stamping is all about, friendship, don’t you think?

So let’s dive right into this tutorial so I can get to making 60 of these beauties.
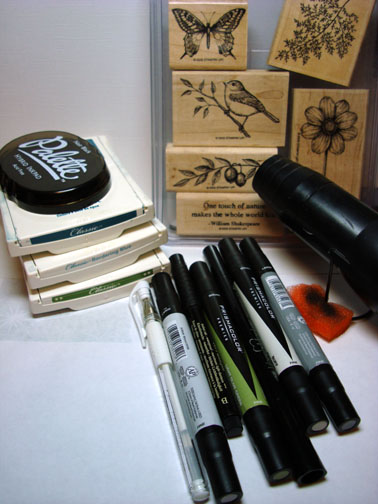
Supplies:

Stamps: Stampin’ Up Aviary, Lovely as a Tree
Paper: Stampin’ Up Whisper White, Basic Black and Old Olive
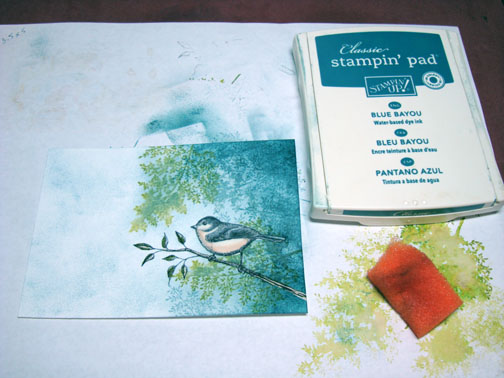
Ink: Stampin’ Up Basic Black, Always Artichoke, Old Olive, Baja Breeze
Accessories: Stampin’ Up Sponge, Old Olive Ribbon, 1 1/4″ circle punch, Ruler, Brayer, Crop-o-dile, Piercing Tools, Basic Black marker


  My Stampin’ Up customers that order $50 in Stampin’ Up merchandise will receive this handmade card though March 31, 2011.

Don’t forget it is Sale-a-bration time at Stampin’ Up.  Receive a free Sale-a-bration set for each $50 in merchandise purchased.   Click HERE to place an order.   Your order will be shipped directly to your door step from Stampin’ Up!

The Stampin’ Up USA Idea book and Catalog is here.   For your copy, please send a check for $9.95 to Michelle Zindorf, P.O. Box 116, West Alexandria, OH 45381 or send it via paypal to mzindorf@aim.com USA only.     My current customers will receive a new Occasions Mini Catalog automatically from me.   Not a current customer and want a free copy of the new Occasions Mini Catalog ?  E-mail your mailing address to mzindorf@aim.com and I will get one in the mail to you.  )  Are you getting inspiration from this blog?   One way you can help support it is to order your Stampin’ Up products through me.   Click HERE to place an order.    Want to become a Stampin’ Up Demonstrator , receive a 20% discount on product and earn instant income on orders?  Consider being part of my Stampin’ Up Team and start your own business or become a Hobby Demo just for the discount.  Click HERE for more information.

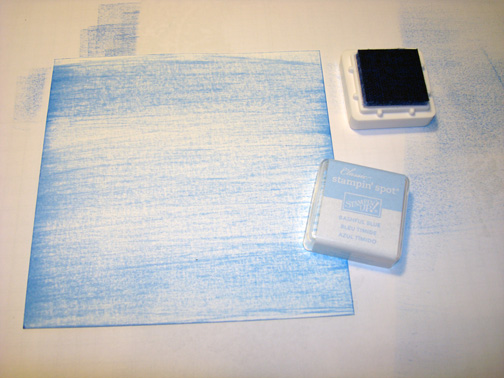
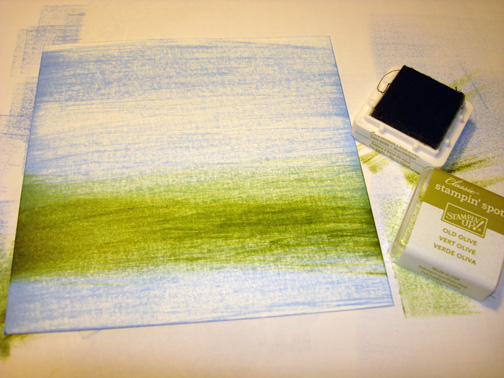
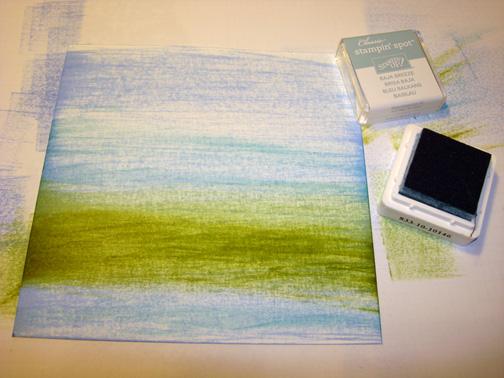
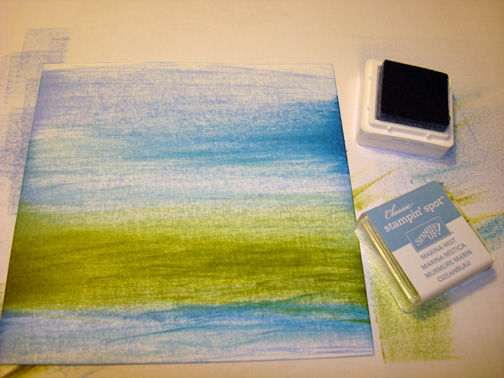
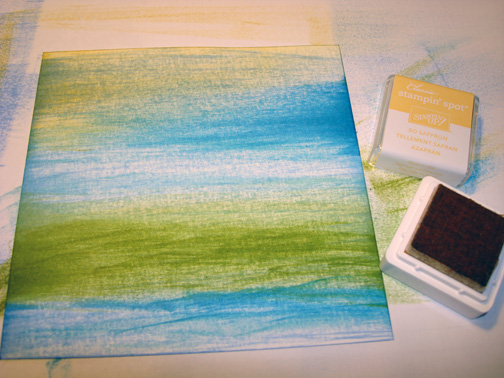
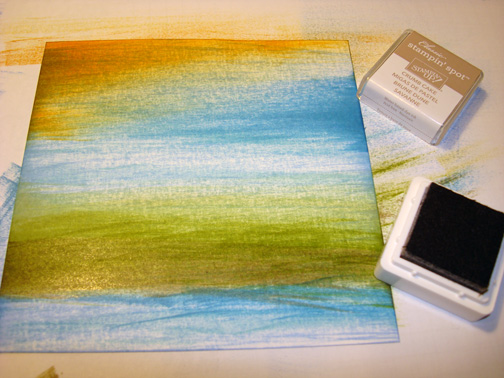
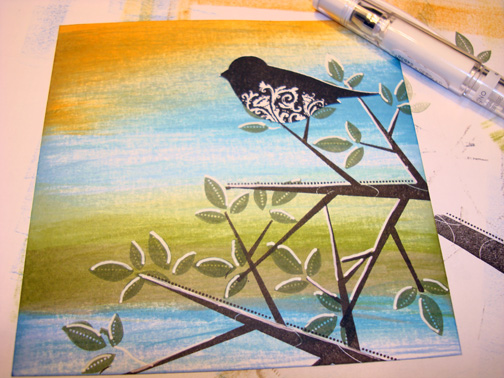
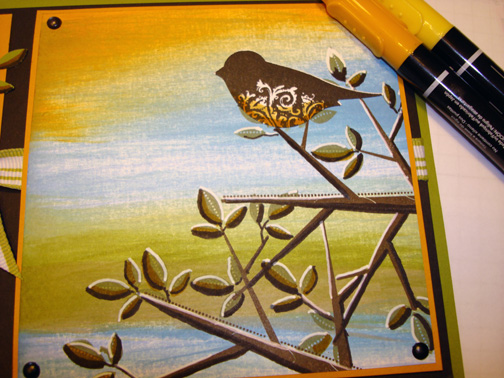
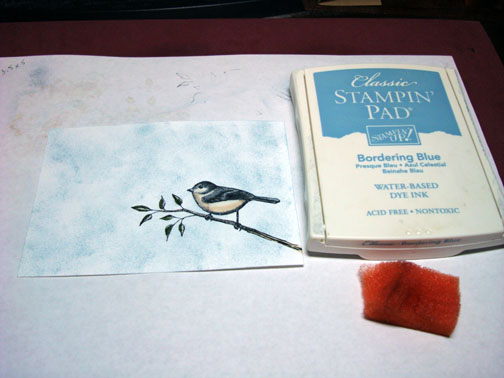
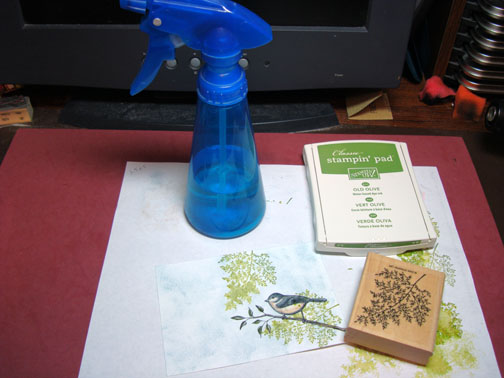
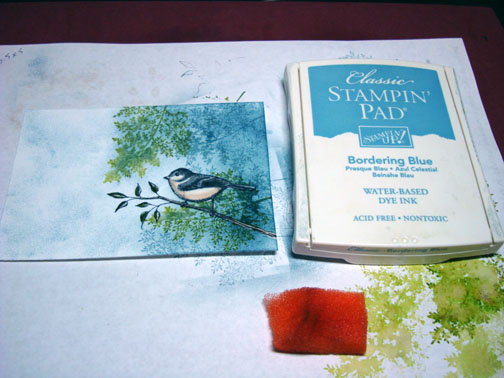
Brayered Baja Breeze ink at the top of a 3″ x 5″ piece of Whisper White card stock.

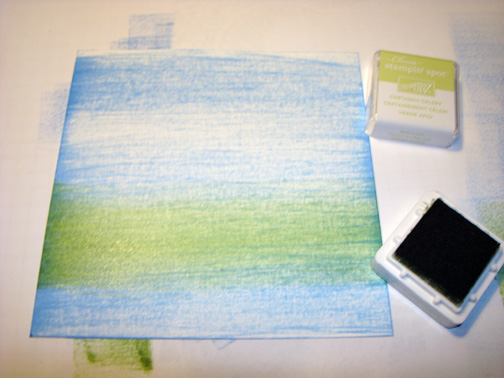
Brayered Old Olive ink at the bottom of the card stock.

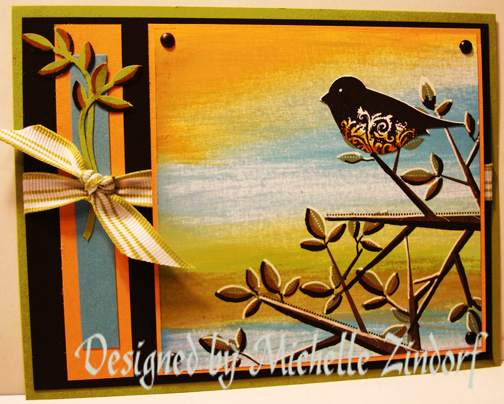
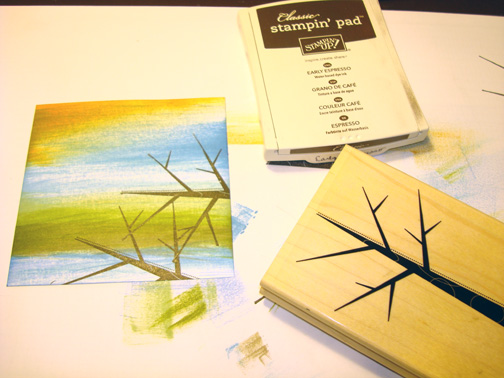
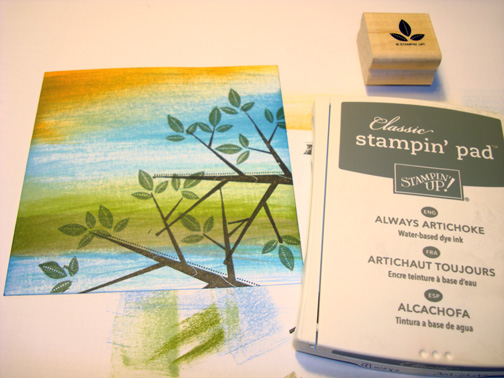
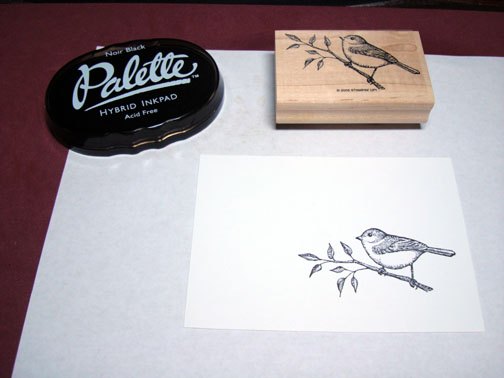
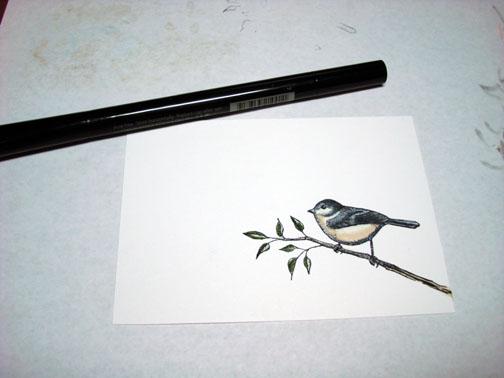
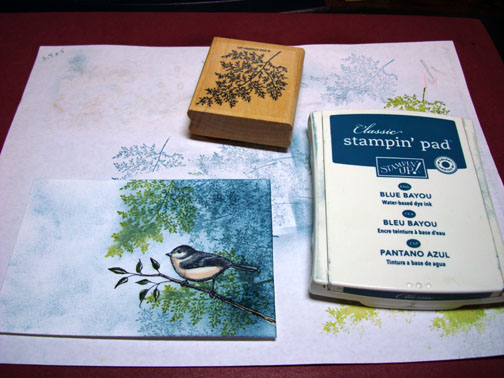
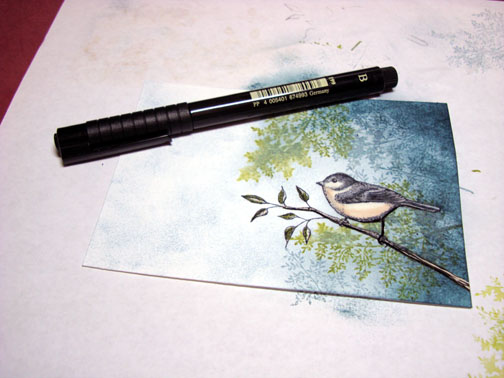
Inked up the trees only on this Lovely As A Tree stamp with Basic Black ink, omitting the grassy areas of the image.  Stamped the image.

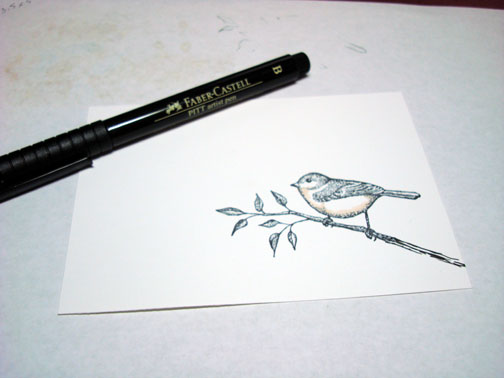
Extended the tree trunks a bit using a Basic Black marker.

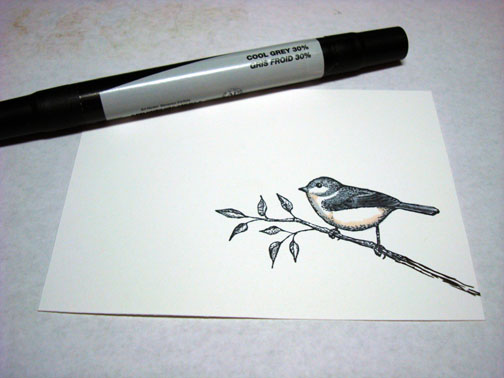
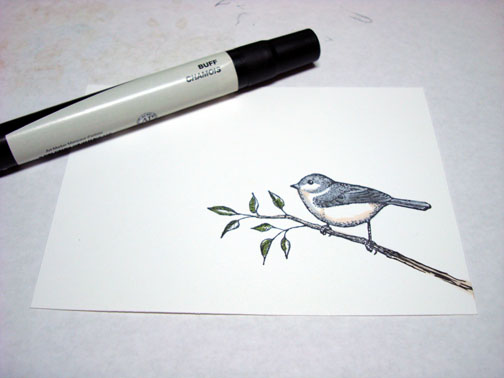
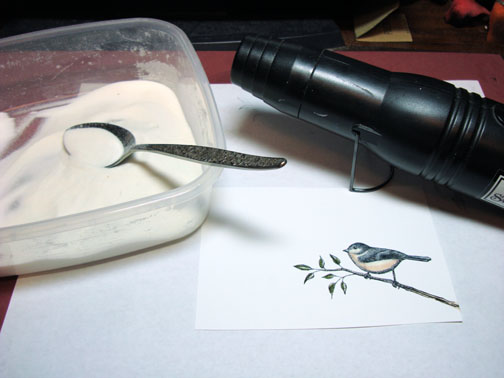
Sponged in a shadow for each tree.

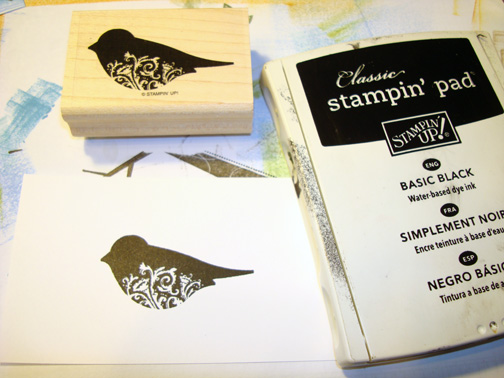
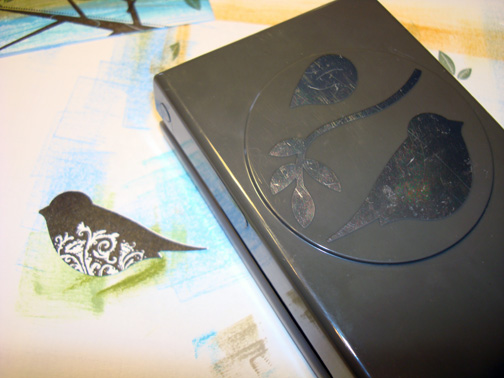
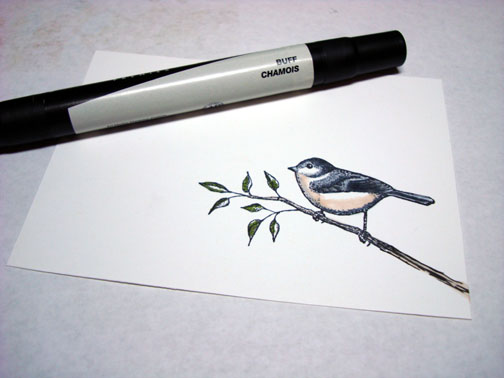
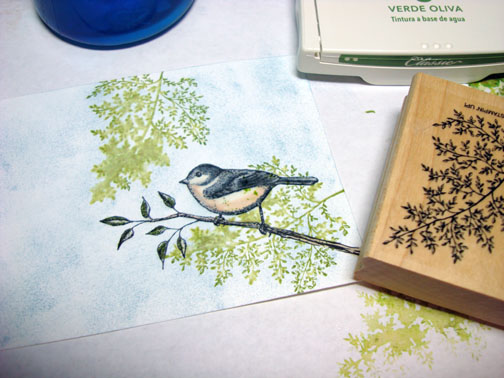
Stamped 2 birds from the Stampin’ Up Aviary set using Basic Black ink.

Drew in a wire using a Basic Black marker and a ruler.

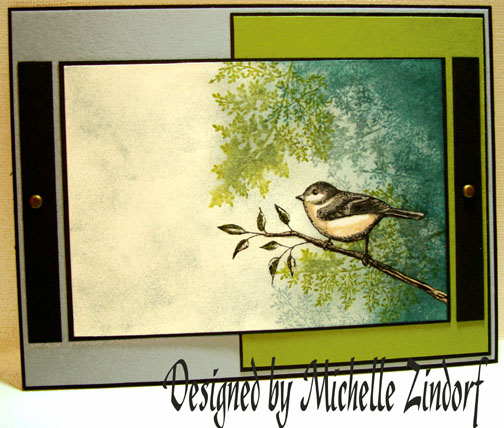
Punched a 1 1/4″ circle from Basic Black card stock and folded it in half.

Adhered my main image panel to a 3 1/8″ x 5 1/8″ piece of Basic Black card stock.   Wrapped the circle around the top of the card stock and adhered it on both sides.

Pierced holes along the bottom of the card stock using Stampin’ Up piercing tools.

Added a 3 3/4″ x 5 3/4″ piece of Old Olive card stock.  Punched a hole in the top of the bookmark and added an Old Olive ribbon.

Here is the finished bookmark.

May your day be one of peace and love.

Until my next post. . . . .  ..  . . . . .

Hugs,

Michelle

   Get ready for Brayer Workshops!  I am coming to the following locations, click the location name for more information.      

Wichita, Kansas      

Syracuse (Bridgeport), New York      

St. Peters, Missouri      

La Porte, Indiana      

Orlando (Davenport), Florida      

St. Cloud, Minnesota      

Colorado Springs, Colorado      

Ottumwa, Iowa      

Owings Mills, Maryland (Baltimore Area)     

Cleveland (Euclid), Ohio      

Staley , North Carolina (South of Greensboro)      

Monroe, Connecticut      

Dayton, Ohio    

Leesburg, Florida      

Montreal, Wisconsin      

Savannah, Georgia      

Lincoln, Illinois      

Jefferson, Louisiana (New Orleans Area)      

Here is a link to my workshop calendar where you can see all of my travel schedule and to get info on beginner and advanced Brayer workshops:   http://zindorf.blogs.splitcoaststampers.com/workshop-calendar       

Don’t see a workshop in your State?  Interested in hosting the workshops in your area in 2012?   Click HERE to get hostess information.      

Link to my Stampin’ Up website where you can order all of your must have Stampin’ Up products from me 24-7:  http://michellezindorf.stampinup.net  

 Link to my Scentsy website where you can order the best smelling, safest wickless candles from me 24-7:  https://zindorf.scentsy.us/Home  

 Donate cards to the Give Thanks Project and help out Cancer Patients.   CLICK HERE TO HELP


Mountain Creek – Tutorial #404

Good Morning All,

Just for a change of pace I thought I would use a totally different color combo than my normal blues and greens.  I do love using shades of browns to get an old time feel.   Add a bit of peach and pink and it starts looking like an antique photo that has been tinted.

Let’s get started. . . . . .

Supplies:

Stamps: Stampin’ Up! Lovely As a Tree
Paper: Stampin’ Up! Whisper White, Basic Black and Soft Suede
Ink: Stampin’ Up! Early Espresso, Soft Suede, Sahara Sand and Basic Black
Accessories: Stampin’ Up! Sponges, Brayer, White Gel Pen,Markers – Blush Blossom, Pink Pirouette, Soft Suede, Early Espesso, Gold Brads, Clear Embossing Powder, Heat Gun, 1″ Circle and Word Window Punches, Post it Notes, Piercing Tools

  My Stampin’ Up customers that order $50 in Stampin’ Up merchandise will receive this handmade card though March 31, 2011.

Don’t forget it is Sale-a-bration time at Stampin’ Up.  Receive a free Sale-a-bration set for each $50 in merchandise purchased.   Click HERE to place an order.   Your order will be shipped directly to your door step from Stampin’ Up!

The Stampin’ Up USA Idea book and Catalog is here.   For your copy, please send a check for $9.95 to Michelle Zindorf, P.O. Box 116, West Alexandria, OH 45381 or send it via paypal to mzindorf@aim.com USA only.     My current customers will receive a new Occasions Mini Catalog automatically from me.   Not a current customer and want a free copy of the new Occasions Mini Catalog ?  E-mail your mailing address to mzindorf@aim.com and I will get one in the mail to you.  )  Are you getting inspiration from this blog?   One way you can help support it is to order your Stampin’ Up products through me.   Click HERE to place an order.    Want to become a Stampin’ Up Demonstrator , receive a 20% discount on product and earn instant income on orders?  Consider being part of my Stampin’ Up Team and start your own business or become a Hobby Demo just for the discount.  Click HERE for more information.

Started with a 4″ x 5″ piece of Whisper White card stock, stamped the trees, on each side of the card stock, without inking the grassy area of the stamp using Basic Black Craft ink (Pigment).  Heat embossed the images using clear embossing powder.

Colored the tree tops using a Blush Blossom marker.

Tapped in a bit of Pink Pirouette marker in the middle of the trees.

colored over the marker using a Versamark marker and then heat embossed the images using clear embossing powder and a heat gun.  This potects the color in the trees and will resist ink put on for our background.

Punched a 1″ circle from a scrap piece of card stock.

Put the hole in the card stock where I want my moon and colored the Moon in with Blush Blossom marker.  Added some Pink Pirouette marker to the left side of the moon.  Colored the moon in with Versamark marker and heat embossed the image using clear embossing powder and a heat gun.

Now that our trees and moon are protected with embossing we can brayer over them and they will resist the ink.

Brayered Sahara Sand ink at the top and the bottom of the card stock.

Ripped a post it note in a mountain shape and put it on my card stock to mask the sky.

Sponged Soft Suede ink in the mountain shape.

Added Early Espresso ink to the top of the mountain.

Unmasked the sky.  Ripped a creek shaped piece of post it note and masked the creek area.

Ripped another post it note and masked the sky and mountain.

Sponged Soft Suede in the unmasked area.

Added Early Espresso ink in the top 1/2 of the unmasked area.

Sponged a bit of Basic Black ink at the very top of the unmasked area.

Removed the post it notes and gently wiped my embossed images off using a paper towel.

Put a line of Early Espresso marker at the top of creek and extended the tree trunks.

Lightly Sponged Early Espresso ink at the bottom half of the creek.

Brayered Early Espresso ink at the top of the card stock.  Wiped my embossed images off again.

Added White Gel pen dots to the trees to add a bit of sparkle.

Added a few rock shapes and water lines in the creek using a Soft Suede marker.

Punched 2 Basic Black Word Window punches and held them together and one end off of them.

Added 2 Basic Black panels, 1 Soft Suede panel, word window punches and gold brads.

Here is the finished card measuring 5″ x 6.5″.

May your day be filled with all that pleases you.

Until my next post. . . .  . . . . . . .

Hugs,

Michelle

   Get ready for Brayer Workshops!  I am coming to the following locations, click the location name for more information.    

Wichita, Kansas    

Syracuse (Bridgeport), New York    

St. Peters, Missouri    

La Porte, Indiana    

Orlando (Davenport), Florida    

St. Cloud, Minnesota    

Colorado Springs, Colorado    

Ottumwa, Iowa    

Owings Mills, Maryland (Baltimore Area)   

Cleveland (Euclid), Ohio    

Staley , North Carolina (South of Greensboro)    

Monroe, Connecticut    

Dayton, Ohio  

Leesburg, Florida    

Montreal, Wisconsin    

Savannah, Georgia    

Lincoln, Illinois    

Jefferson, Louisiana (New Orleans Area)    

Here is a link to my workshop calendar where you can see all of my travel schedule and to get info on beginner and advanced Brayer workshops:   http://zindorf.blogs.splitcoaststampers.com/workshop-calendar     

Don’t see a workshop in your State?  Interested in hosting the workshops in your area in 2012?   Click HERE to get hostess information.    

Link to my Stampin’ Up website where you can order all of your must have Stampin’ Up products from me 24-7:  http://michellezindorf.stampinup.net

 Link to my Scentsy website where you can order the best smelling, safest wickless candles from me 24-7:  https://zindorf.scentsy.us/Home

 Donate cards to the Give Thanks Project and help out Cancer Patients.   CLICK HERE TO HELP


Hey Soccer Moms – Tutorial #401

Hey Soccer Moms, I have a card tutorial for you today.   Exactly what do you do with that stamp set that has a ball and one sentiment?  Well, you build a scene around that ball. 

Ready?  Let’s get started. . . .  . . .

Supplies:

Stamps: Stampin’ Up! Goal
Paper: Stampin’ Up! Whisper White, Always Artichoke, Tempting Turquoise, Basic Black card stock and Stampin’ Up! Newsprint Designer Paper
Ink: Stampin’ Up! Basic Black, Always Artichoke, Tempting Turquoise, Old Olive
Accessories: Stampin’ Up! Sponges, Versamark Marker, Ruler, Star & Circle punches, Post it Note, Brayer, Clear embossing powder, heat gun, Old Olive brads, Sharpie White Paint Marker


  My Stampin’ Up customers that order $50 in Stampin’ Up merchandise will receive this handmade card though March 31, 2011.

Don’t forget it is Sale-a-bration time at Stampin’ Up.  Receive a free Sale-a-bration set for each $50 in merchandise purchased.   Click HERE to place an order.   Your order will be shipped directly to your door step from Stampin’ Up!

The Stampin’ Up USA Idea book and Catalog is here.   For your copy, please send a check for $9.95 to Michelle Zindorf, P.O. Box 116, West Alexandria, OH 45381 or send it via paypal to mzindorf@aim.com USA only.     My current customers will receive a new Occasions Mini Catalog automatically from me.   Not a current customer and want a free copy of the new Occasions Mini Catalog ?  E-mail your mailing address to mzindorf@aim.com and I will get one in the mail to you.  )  Are you getting inspiration from this blog?   One way you can help support it is to order your Stampin’ Up products through me.   Click HERE to place an order.    Want to become a Stampin’ Up Demonstrator , receive a 20% discount on product and earn instant income on orders?  Consider being part of my Stampin’ Up Team and start your own business or become a Hobby Demo just for the discount.  Click HERE for more information.

Stamped the soccer ball using Craft (pigment) Basic Black ink on a 3.5″ x 4″ piece of Whisper White card stock.

Heat embossed the image using clear embossing powder and a heat gun.

Colored over the image using a Versamark marker and then heat embossed the image again.  This protects the white in the soccer ball from ink I will put on in later steps.

Brayered Old Olive ink from the bottom of the card stock to the top.

Lightly buffed off the image with a paper towel.  You will want to do this anytime you get ink on your embossed image.

Brayered Always Artichoke ink at the bottom of the card stock.

Using a Sharpie White Paint Marker and a ruler, put in the field lines. 

Masked the soccer ball and field with a post it note and sponged basic Black ink at the post it note edge to create a shadow under the soccer ball.

Brayered Tempting Turquoise ink at the top of the card stock.

Punched 3 Basic Black card stock stars.

Cut a 4.75″ x 6.25″ piece of Stampin’ Up News Print Designer paper and sponged Always Artichoke ink around the edges of it.

Crumpled the paper up and then flattened it out and sponged a bit of Always Artichoke ink over the crinkles to enhance them.


Added 2 Always Artichoke panels, 1 Basic Black panel and 1 Tempting Turquoise panel.  Also added Tempting Turquoise circles to the stars and Old Olive brads.

Stamped the Sentiment in the right corner twice using Basic Black ink.

Here is the finished card measuring 5.25″ x 6.75″.

A little funny before I close. This was found on my friend and downlines Face page this morning, hysterical!

OMG! I figured out why Im fat! The shampoo I use in the shower that runs down my body says “For extra volume and body” Im goin to start using “Dawn” dish soap.It says “Dissolves fat that is otherwise difficult to remove” Re post if u have the same issue..its too funny to not share!

May your day be a total winner.

Until my next post. . . . . .

Hugs,

Michelle

Total weight loss to date 20.3 lbs, 45.7 to go.

   Get ready for Brayer Workshops!  I am coming to the following locations, click the location name for more information.  

Houston, Texas  

Wichita, Kansas  

Syracuse (Bridgeport), New York  

St. Peters, Missouri  

La Porte, Indiana  

Orlando (Davenport), Florida  

St. Cloud, Minnesota  

Colorado Springs, Colorado  

Ottumwa, Iowa  

Owings Mills, Maryland (Baltimore Area) 

Cleveland (Euclid), Ohio  

Staley , North Carolina (South of Greensboro)  

Monroe, Connecticut  

Dayton, Ohio

Leesburg, Florida  

Montreal, Wisconsin  

Savannah, Georgia  

Lincoln, Illinois  

Jefferson, Louisiana (New Orleans Area)  

Here is a link to my workshop calendar where you can see all of my travel schedule and to get info on beginner and advanced Brayer workshops:   http://zindorf.blogs.splitcoaststampers.com/workshop-calendar   

Don’t see a workshop in your State?  Interested in hosting the workshops in your area in 2012?   Click HERE to get hostess information.  

Link to my Stampin’ Up website where you can order all of your must have Stampin’ Up products from me 24-7:  http://michellezindorf.stampinup.net


It’s a Little Fishy – Tutorial #400

Here I am at tutorial #400.   Thanks for hanging out with me so far.  Hopefully, I will be around to create many, many more.  It is always so shocking to hit a big milestone though.   If you have missed any of the previous tutorials and want a quick way to look through them, click on the tab at the top of my blog that says “Tutorials”.    You will find thumbnail size pics that you can click on that will take you straight to the tutorial you are looking for.  🙂  Check it out.

Inspiration comes to me from many places.  I never thought it would be from the  pet store though.  But here it is, I was inspired by a fish tank full of Neon Fish.  🙂

Now on with tutorial #400!

Supplies:

Stamps: Stampin’ Up! C is for Cat, Pocket Silhouettes and Apple Blossoms
Paper: Stampin’ Up Desiger paper, Whisper White, Always Artichoke, River Rock and Rose Red card stock
Ink: Stampin’ Up! Pacific Point, Garden Green, Tempting Turquoise, River Rock, Basic Black, Crumb Cake and Always Artichoke
Accessories: Stampin’ Up! Gold Brads, Brayer, Sponge, White Gel Pen, Basic Black marker, Hobby Blade, Versamark Pad, Rose Red Marker, Post it Notes, Clear Embossing Powder and Heat Gun


  My Stampin’ Up customers that order $50 in Stampin’ Up merchandise will receive this handmade card though March 31, 2011.

Don’t forget it is Sale-a-bration time at Stampin’ Up.  Receive a free Sale-a-bration set for each $50 in merchandise purchased.   Click HERE to place an order.   Your order will be shipped directly to your door step from Stampin’ Up!

The Stampin’ Up USA Idea book and Catalog is here.   For your copy, please send a check for $9.95 to Michelle Zindorf, P.O. Box 116, West Alexandria, OH 45381 or send it via paypal to mzindorf@aim.com USA only.     My current customers will receive a new Occasions Mini Catalog automatically from me.   Not a current customer and want a free copy of the new Occasions Mini Catalog ?  E-mail your mailing address to mzindorf@aim.com and I will get one in the mail to you.  )  Are you getting inspiration from this blog?   One way you can help support it is to order your Stampin’ Up products through me.   Click HERE to place an order.    Want to become a Stampin’ Up Demonstrator , receive a 20% discount on product and earn instant income on orders?  Consider being part of my Stampin’ Up Team and start your own business or become a Hobby Demo just for the discount.  Click HERE for more information.

Please bare with me through the first few pictures, lol.  I apparently had hit a setting I should not have on my camera.  🙂  Yep, I’m only human.

Loaded the fish stamp from the Stampin’ Up set C is for Cat with Versamark, Tempting Turquoise ink and then used the brush end of a Rose Red Marker on the bottom half of the fish before stamping it.   Yes that is right, load Versamark, ink and marker all before stamping it.  🙂

Heat emboss the images using Clear embossing powder and a heat gun.

Loaded the Plant from the Stampin’ Up set “Pocket Silhouettes” with Versamark and Old Olive ink before stamping it.  Reloaded for the second stamping.

Heat embossed the images using clear embossing powder and a heat gun.   Ahh, now my pictures are looking better, lol.

Ripped a post it note and used it as a mask for the sand.

Brayered Pacific Point ink at the top of the card stock.

Be sure to lightly buff off your embossed images with a paper towel after putting ink over them.  Be careful not to scrub them.

Brayered Garden Green ink at the top of the card stock, not covering the Pacific Point ink entirely.

Removed the sand mask and brayered River Rock ink at the bottom of the card stock.

Ripped a post it note in a hill shape and used it as a mask.

Sponged Crumb Cake ink at the post it note edge.

Moved the post it note and put in a second little hill.

Stamped the plant using Always Artichoke ink along the bottom of the card stock.

Added White Gel Pen highlights to the tops of the plants and fish.

Added Basic Black marker underneath the leaves and a few of the fish, being careful not to get the marker on the embossed images.

Cut 2 pieces of designer paper 3.5″ x 5.75″.

Put them on a Stampin’ Up glass cutting mat and used my Hobby Blade to cut the two pieces of paper at one time.  This keeps the lay edges the same shape so you can stagger them.

Added an Always Artichoke panel and a River Rock panel.  Stamped the sentiment from the Stampin’ Up set Apple Blossoms using Basic Black ink.

Added a 5″ x 6.5″ Rose Red card stock panel and Gold Brads.   Here is my finished card measuring 5″ x 6.5″. 

I am off to Houston, TX tomorrow to have a grand time teaching my brayering techinques.  You all have a super weekend!

Until my next post. . .  . . . .

Hugs,

Michelle

   Get ready for Brayer Workshops!  I am coming to the following locations, click the location name for more information.  

Houston, Texas  

Wichita, Kansas  

Syracuse (Bridgeport), New York  

St. Peters, Missouri  

La Porte, Indiana  

Orlando (Davenport), Florida  

St. Cloud, Minnesota  

Colorado Springs, Colorado  

Ottumwa, Iowa  

Owings Mills, Maryland (Baltimore Area) 

Cleveland (Euclid), Ohio  

Staley , North Carolina (South of Greensboro)  

Monroe, Connecticut  

Dayton, Ohio

Leesburg, Florida  

Montreal, Wisconsin  

Savannah, Georgia  

Lincoln, Illinois  

Jefferson, Louisiana (New Orleans Area)  

Here is a link to my workshop calendar where you can see all of my travel schedule and to get info on beginner and advanced Brayer workshops:   http://zindorf.blogs.splitcoaststampers.com/workshop-calendar   

Don’t see a workshop in your State?  Interested in hosting the workshops in your area in 2012?   Click HERE to get hostess information.  

Link to my Stampin’ Up website where you can order all of your must have Stampin’ Up products from me 24-7:  http://michellezindorf.stampinup.net


Happy Little Black Bird – Tutorial #397


Well, well, well, I’m approaching another tutorial milestone here on Freedom to Create.   I hope you are still with me and enjoying the tutorials as I make my way to the 400th tutorial!   Where does the time go.  I could swear I just started this blog yesterday.   How about cheering me on by leaving a comment on this post telling me things you would like to see used or done in one of my tutorials?  Let me hear from you, my cyber friends!  If you are receiving this post via e-mail CLICK HERE TO LEAVE A COMMENT.

Let’s get started. . . . .  .

Supplies:

Stamps: Stampin’ Up! Punch Potpourri and Season of Friendship
Paper: Stampin’ Up! Whisper White, More Mustard, Old Olive, Marina Mist and Basic Black
Ink: Stampin’ Up! Bashful Blue, Marina Mist, More Mustard, So Saffron, Crumb Cake, Certainly Celery, Old Olive, Baja Breeze, Basic Black, Always Artichoke & Early Espresso
Accessories: White Gel Pen, Markers – Basic Black, So Saffron & More Mustard, White Gel Pen, Old Olive Striped Grosgrain Ribbon, Basic Black Brads, Bird Punch
Techniques: Direct to Paper

  My Stampin’ Up customers that order $50 in Stampin’ Up merchandise will receive this handmade card though March 31, 2011.

Don’t forget it is Sale-a-bration time at Stampin’ Up.  Receive a free Sale-a-bration set for each $50 in merchandise purchased.   Click HERE to place an order.   Your order will be shipped directly to your door step from Stampin’ Up!

The Stampin’ Up USA Idea book and Catalog is here.   For your copy, please send a check for $9.95 to Michelle Zindorf, P.O. Box 116, West Alexandria, OH 45381 or send it via paypal to mzindorf@aim.com USA only.     My current customers will receive a new Occasions Mini Catalog automatically from me.   Not a current customer and want a free copy of the new Occasions Mini Catalog ?  E-mail your mailing address to mzindorf@aim.com and I will get one in the mail to you.  )  Are you getting inspiration from this blog?   One way you can help support it is to order your Stampin’ Up products through me.   Click HERE to place an order.    Want to become a Stampin’ Up Demonstrator , receive a 20% discount on product and earn instant income on orders?  Consider being part of my Stampin’ Up Team and start your own business or become a Hobby Demo just for the discount.  Click HERE for more information.

I love creating direct to paper projects using the Stampin’ Spots Ink pads.  They are so very easy to control for this type of work.

On a 4 3/8″ Square piece of Whisper White card stock, smeared the edge of the Bashful Blue ink spot across the card stock.

Smeared Certainly Celery ink across the card stock.

Smeared Old Olive ink across the card stock.

Smeared Baja Breeze ink across the card stock.

Smeared Marina Mist ink across the card stock from the right side only.

Smeared So Saffron ink across the card stock from the left side only.

Smeared More Mustard ink across the top of the card stock from the left side only.

Smeared Crumb Cake ink across the card stock at the bottom of the green area.

Stamped the branch twice using Early Espresso ink.

Stamped the leaves using Always Artichoke ink.

Stamped the bird using Basic Black ink on a separate piece of Whisper White card stock and then punched it out using the bird punch.

Adhered the bird to the card stock and added White Gel Pen highlights to the leaves and branches.

Added Basic Black marker shadows under the leaves and branches.

Added an Old Olive panel, Basic Black panel and a More Mustard panel.  Added Old Olive Striped Grosgrain ribbon and Basic Black brads.

I felt the card was a little out of balance so I added a strip of More Mustard and Marina Mist card stock under the ribbon.  Also added two leave punches from Old Olive card stock.

Added Basic Black and More Mustard marker to the punched leaves.

Added More Mustard marker to some of the leaves and to the bottom of the bird’s belly.  Also added So Saffron Marker to the bird’s belly.

Here is the completed card measuring 5″ x 6.5″.

May your day be filled with all of the people and things that you love.

Until my next post. . . .  . . . .

Hugs,

Michelle

   Get ready for Brayer Workshops!  I am coming to the following locations, click the location name for more information.  

Houston, Texas  

Wichita, Kansas  

Syracuse (Bridgeport), New York  

St. Peters, Missouri  

La Porte, Indiana  

Orlando (Davenport), Florida  

St. Cloud, Minnesota  

Colorado Springs, Colorado  

Ottumwa, Iowa  

Owings Mills, Maryland (Baltimore Area) 

Cleveland (Euclid), Ohio  

Staley , North Carolina (South of Greensboro)  

Monroe, Connecticut  

Sturgis, South Dakota  

Leesburg, Florida  

Montreal, Wisconsin  

Savannah, Georgia  

Lincoln, Illinois  

Jefferson, Louisiana (New Orleans Area)  

Here is a link to my workshop calendar where you can see all of my travel schedule and to get info on beginner and advanced Brayer workshops:   http://zindorf.blogs.splitcoaststampers.com/workshop-calendar   

Don’t see a workshop in your State?  Interested in hosting the workshops in your area in 2012?   Click HERE to get hostess information.  

Link to my Stampin’ Up website where you can order all of your must have Stampin’ Up products from me 24-7:  http://michellezindorf.stampinup.net


Silver Tree – Tutorial #393


Wow!  It feels so very good to get to hang out in my stamping room and create something today.  I’ve not had the chance here lately.   With the ice storm that came through our power was touch and go.  Brrrr, the house gets cold fast without heat, let me tell you.  It did look really romantic here with all the candles a blaze, lol. 

I’m considering running out today to get some sort of wood burning stove, hmmmm.  I feel a purchase coming on.  🙂

I hope you are warm, snug in your home with heat and lights. 

Ready for a tutorial?  Let’s get started. . . . .  .

Supplies:

Stamps: Stampin’ Up! Trendy Trees
Paper: Stampin’ Up! Whisper White, Tempting Turquoise and Basic Black card stock
Ink: Stampin’ Up! Metallic Silver, Tempting Turquoise, Not Quite Navy, Night of Navy and Basic Gray
Accessories: Stampin’ Up! Sponges, Brayer, White Gel Pen, Photo Corner Punch, Silver Brads and post it notes

The Stampin’ Up USA Idea book and Catalog is here.   For your copy, please send a check for $9.95 to Michelle Zindorf, P.O. Box 116, West Alexandria, OH 45381 or send it via paypal to mzindorf@aim.com USA only.     My current customers will receive a new Occasions Mini Catalog automatically from me.   Not a current customer and want a free copy of the new Occasions Mini Catalog ?  E-mail your mailing address to mzindorf@aim.com and I will get one in the mail to you.  )  Are you getting inspiration from this blog?   One way you can help support it is to order your Stampin’ Up products through me.   Click HERE to place an order.    Want to become a Stampin’ Up Demonstrator , receive a 20% discount on product and earn instant income on orders?  Consider being part of my Stampin’ Up Team and start your own business or become a Hobby Demo just for the discount.  Click HERE for more information.

Punched a 1 3/4″ circle from a post it note.

Re-lined up the punch as shown below and punched the quarter moon mask from the sticky part of the post it note.

Started with a 4″ x 4.75″ piece of Whisper White card stock.  Masked the moon and added a post it note to mask the bottom half of the card stock.

Brayered Not Quite Navy ink at the top of the card stock.

Brayered Night of Navy ink at the top of the card stock, not covering the Not Quite Navy ink entirely.

Removed the masks and then masked the the top half of the card stock.

Brayered Tempting Turquoise ink at the bottom of the card stock.

Brayered Not Quite Navy ink at the bottom of the card stock, not covering the Tempting Turquoise ink entirely.

Sponged Tempting Turquoise ink at the post it note edge to darken the horizon line.

Removed all the masks.

Put a post it note mask 1/2″ from the horizon line.  Added a torn post it note mask to create a hill shape.

Sponged Basic Gray ink in the hill area.

Sponged Silver Metallic ink in the hill area getting lighter towards the bottom of the hill.

Ripped another post it note mask and sponged Basic Gray ink at the new masks edge to create a second hill.

Removed the post it note masks and Stamped the Stampin’ Up Trendy Tree Trunk and leaves stamps upside down using Tempting Turquoise ink.

Stamped Trendy Tree Trunk using Basic Black ink.

Stamped the Leaves using Silver Metallic ink.

Added White Gel Pen water lines.

Added White Gel Pen dots in the sky for stars.

Punched 5 small photo corner punches out of Tempting Turquoise card stock.

Added 2 Tempting Turquoise card stock panels and 1 Basic Black panel.  Assembled and added 4 silver brads and the photo corner punches.

Here is the finished card measuring 5″ x 6.5″.

May your day be one of complete bliss.

Until my next post. . . . .  . .

Hugs,

Michelle

   Get ready for Brayer Workshops!  I am coming to the following locations, click the location name for more information.  

Virginia Beach, Virginia  

Houston, Texas  

Wichita, Kansas  

Syracuse (Bridgeport), New York  

St. Peters, Missouri  

La Porte, Indiana  

Orlando (Davenport), Florida  

St. Cloud, Minnesota  

Colorado Springs, Colorado  

Ottumwa, Iowa  

Owings Mills, Maryland (Baltimore Area) 

Cleveland (Euclid), Ohio  

Staley , North Carolina (South of Greensboro)  

Monroe, Connecticut  

Sturgis, South Dakota  

Leesburg, Florida  

Montreal, Wisconsin  

Savannah, Georgia  

Lincoln, Illinois  

Jefferson, Louisiana (New Orleans Area)  

Here is a link to my workshop calendar where you can see all of my travel schedule and to get info on beginner and advanced Brayer workshops:   http://zindorf.blogs.splitcoaststampers.com/workshop-calendar   

Don’t see a workshop in your State?  Interested in hosting the workshops in your area in 2012?   Click HERE to get hostess information.  

Link to my Stampin’ Up website where you can order all of your must have Stampin’ Up products from me 24-7:  http://michellezindorf.stampinup.net  

Frequently asked questions answers:  http://zindorf.blogs.splitcoaststampers.com/frequently-asked-questions/


The Bench – Tutorial #388


Good Afternoon  🙂

I’m taking a break from my mass producing of swap cards.  Thought I would put together a little scene using the Stampin’ Up Set “Have a Seat”.   

Grab a cup of your favorite hot beverage and check out the tutorial below.

Let’s get started. . . . .

Supplies:

Stamps: Stampin’ Up Have a Seat
Paper: Stampin’ Up Whisper White, River Rock and Basic Black
Ink: Stampin’ Up Early Espresso, River Rock, Basic Black and Sahara Sand
Accessories: Stampin’ Up Sponges, Stamp-a-ma-jig, markers (Sahara Sand and Crumb Cake), post it notes

The Stampin’ Up USA Idea book and Catalog is here.   For your copy, please send a check for $9.95 to Michelle Zindorf, P.O. Box 116, West Alexandria, OH 45381 or send it via paypal to mzindorf@aim.com USA only.     My current customers will receive a new Occasions Mini Catalog automatically from me.   Not a current customer and want a free copy of the new Occasions Mini Catalog ?  E-mail your mailing address to mzindorf@aim.com and I will get one in the mail to you.  )  Are you getting inspiration from this blog?   One way you can help support it is to order your Stampin’ Up products through me.   Click HERE to place an order.    Want to become a Stampin’ Up Demonstrator , receive a 20% discount on product and earn instant income on orders?  Consider being part of my Stampin’ Up Team and start your own business or become a Hobby Demo just for the discount.  Click HERE for more information.

Masked the top of a 3.5″ square piece of Whisper White card stock using two post it notes put on at different levels.  The right post it note is a bit higher then the left one.

Sponged the unmasked area of the card stock using River Rock ink.

Repositioned the post it notes so that the floor of the scene and the right wall are still masked. 

Sponged Sahara Sand ink on the unmasked area.  This is the Left wall area.

Removed all the masks.  Using a Stamp-a-ma-jig, stamped the bench using Early Espresso ink.

Toned down the right wall using just a hint of Sahara Sand on it.

Masked the walls with a post it note and sponged Sahara Sand ink at the post it note edge and under the bench. 

Added a shadow for the right legs of the bench using a Sahara Sand marker (lightly).

Repositioned the mask to create a window on the wall.  Used 3 post it notes here.

Sponged Basic Black ink on the unmasked area.

Removed the masks and added Crumb Cake marker the the bench.

Added Basic Black and River Rock panels.

Here is the finished card measuring 5.25″ Square.

Hope your not sitting on the bench today.  🙂

Until my next post. . . . . . .

Hugs,

Michelle

   Get ready for Brayer Workshops!  I am coming to the following locations, click the location name for more information. 


Columbus, Ohio 

Fayetteville, Tennessee near Nashville, TN & Huntsville, AL 

Tucson, Arizona 

Virginia Beach, Virginia 

Houston, Texas 

Wichita, Kansas 

Syracuse (Bridgeport), New York 

St. Peters, Missouri 

La Porte, Indiana 

Orlando (Davenport), Florida 

St. Cloud, Minnesota 

Colorado Springs, Colorado 

Ottumwa, Iowa 

Owings Mills, Maryland (Baltimore Area)

Cleveland (Euclid), Ohio 

Staley , North Carolina (South of Greensboro) 

Monroe, Connecticut 

Sturgis, South Dakota 

Leesburg, Florida 

Montreal, Wisconsin 

Savannah, Georgia 

Lincoln, Illinois 

Jefferson, Louisiana (New Orleans Area) 

Here is a link to my workshop calendar where you can see all of my travel schedule and to get info on beginner and advanced Brayer workshops:   http://zindorf.blogs.splitcoaststampers.com/workshop-calendar  

Don’t see a workshop in your State?  Interested in hosting the workshops in your area in 2012?   Click HERE to get hostess information. 

Link to my Stampin’ Up website where you can order all of your must have Stampin’ Up products from me 24-7:  http://michellezindorf.stampinup.net 

Frequently asked questions answers:  http://zindorf.blogs.splitcoaststampers.com/frequently-asked-questions/


Chickadee in the Woods – Tutorial

dsc04915.JPG

Here it is Thursday already!  Wow, the older I get the faster time flies.  Am I the only one that feels this way?

Anyway, today I got back to nature with the Stampin’ Up’s Set “Touch of Nature”.  I love this little Chickadee.  Isn’t he the cutest little bird?  I have Chickadees all over my yard.  They are such happy little souls.  I can’t help but smile when I see and hear them.

Also, today I’m giving BLOG CANDY!  Anyone miss out on the Studio G Series 8 stamps?  I have 12 packs here just waiting for some lucky stamper.

Well here is your chance to get them.  All you need to do to enter is leave me a comment here on this post.  If you are getting this blog update by e-mail and you wish to comment, please click this link that will take you to my blog so you can comment for a chance to win these stamps:  http://zindorf.blogs.splitcoaststampers.com/2008/07/03/chickadee-in-the-woods-tutorial/

I’ll use a random number generator to pick a number on Saturday morning, July 5th.

dsc04921.JPG

Ready for the tutorial?  Let’s get started 🙂

Supplies:

Stamps: Stampin’ Up Touch of Nature
Paper: Stampin’ Up Whisper White, Basic Black, Old Olive & Bordering Blue
Ink: Stampin’ Up Bordering Blue, Old Olive & Blue Bayou, Palette Noir Black
Accessories: Prismacolor Markers, White Gel Pen, Versamark Marker, Clear embossing Powder, Sponge, heat tool, Black maker

dsc04920.JPG

Stamped the bird with Palette Noir Black ink on a piece of 3.5″ x 5″ Whisper White card stock.  I’m using the Palette ink because it doesn’t smear with the Solvent based Prismacolor markers.

dsc04895.JPG

Colored the bottom of the birds belly with a Buff marker.

dsc04896.JPG

Extended the limb to the edge of the card stock with a Fabe Castell black marker.

dsc04897.JPG

Colored the birds head, very bottom of the belly and back with a Cool Grey 30% marker.

dsc04898.JPG

Colored the dark parts of the leaves with a Light Olive Green marker.

dsc04899.JPG

Colored the Branch with a Buff colored marker.

dsc04900.JPG

Added some Cool Grey 80% colored marker to the dark parts of the birds head and back.

dsc04901.JPG

Added a bit more Buff marker to the birds belly.

dsc04902.JPG

Colored over the bird with a Versamark marker, being very careful to stay within the lines.

dsc04903.JPG

Heat embossed using clear embossing powder and a heat gun.

dsc04904.JPG

Sponged Bordering Blue ink in a pouncing motion all over the card stock.  I want it to look splotchy.

dsc04905.JPG

Stamped leaves by first loading my stamp with Old Olive ink and then misting the stamp a tiny bit so it would look a bit out of focus when I stamp it.  Note:  I tried this out on scrap paper first to see how much misting to do for the effect I wanted.

dsc04906.JPG

dsc04907.JPG

Stamped some Bordering Blue Leaves, some I misted, some I didn’t.

dsc04908.JPG

Sponged Bordering Blue ink at the right side of the card stock using a circular motion for good coverage.

dsc04909.JPG

Stamped a few leaves using Blue Bayou ink at the right side of the card stock.

dsc04910.JPG

Sponged Blue Bayou ink at the right side of the card stock, not covering all of the Bordering Blue ink. 

dsc04911.JPG

Traced the underside of the Bird and the branch with a Black marker.

dsc04912.JPG

Added White Gel pen highlights to the leaves on the branch and a dot on the birds eye.

dsc04913.JPG

Assembled card and here it is finished measuring 5″ x 6.5″.

dsc04915.JPG

Don’t forget to comment to enter to win the blog candy for today.  🙂

Hope your day is filled with the sights and sounds of birds singing their happy little tunes.

Until my next post. . . . . . .

Michelle