Powerful Tree – Tutorial #205

dsc08791.JPG

Sometimes a simple design can be very powerful.  This is an example of such a design. 

Of course I gravitate to trees when I want to do a simple design.  Who am I kidding I gravitate to trees all the time, lol.  Anyway,  this tree from the Stampin’ Up’s set Thoughts & Prayers just screams “Tree of Life” to me.  That’s right my stamps speak to me.  Don’t yours?  Now you do think I am crazy, lol.

There is not very many steps to this project, but it is one that can be used for many occasions.

There is a reason I picked a simpler design today.  I am busy packing for my trip to Savannah, Georgia Baby!  I cannot wait to head down South and teach my brayer workshops.   This is my first trip to Savannah so I am especially excited.  Watch out Savannah, here I come!

One more thing before I get started on today’s tutorial.  Please check out these fantastic stamps which 100% of the profit will go to Bernie Berlin’s no kill animal shelter  ” A Place to Bark and Meow. ”   http://www.scrapbookingsuppliesrus.com/?action=product1

Let’s get started on the tutorial.

Supplies:

Stamps: Stampin’ Up Thoughts & Prayers
Paper: Stampin’ Up Whisper White, Baja Breeze & Pacific Point
Ink: Stampin’ Up Classic Ink Basic Gray, Going Gray, Pacific Point & Baja Breeze
Accessories: Post it Note, Sponges, Curvy Cutter

Are you inspired by this Blog?  One way for you can help support this blog is by ordering your Stampin’ Up products through me.   You can order from me 24-7 from this link:  http://michellezindorf.stampinup.net or e-mail me at mzindorf@aim.com if you are within the United States.  Want to become a Stampin’ Up Demonstrator and earn instant income?  Consider being part of my Stampin’ Up Team.  My Upline, Karen Barber and I have valuable monthly meetings in Miamisburg, Ohio.

dsc08792.JPG

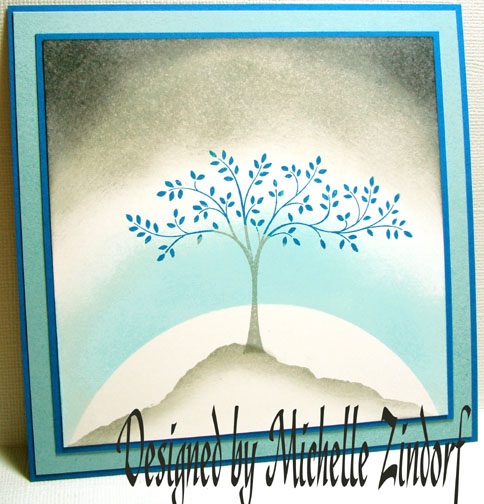
Cut a 4.5″ circle out of scrap card stock to use as a mask for the moon.

dsc08779.JPG

Held the circle mask at the bottom of a 4.5″ square piece of Whisper White card-stock and sponged on Baja Breeze ink around the mask.

dsc08780.JPG

dsc08781.JPG

Removed the mask.

dsc08782.JPG

Sponged Going Gray ink at the top of the card stock leaving white area in between the Baja Breeze ink and the Going Brayer ink.

dsc08783.JPG

Stamped the tree by first loading it with Going Gray ink and then tapping a Pacific Point ink pad on the leaves before stamping it.

dsc08784.JPG

Tore a post it note in the shape of a hill and used it as a mask.

dsc08785.JPG

Flipped the card stock upside down and sponged Going Gray ink right at the post it note’s torn edge to create the hill.

dsc08786.JPG

Sponged Basic Gray ink at the very top of the card stock.

dsc08787.JPG

I used a very simple layout with no embellishments.  Here it is finished measuring 5.25″ square.

dsc08791.JPG

May your life be one of simplicity!

Until my next post. . . . . . . . . . . . .

Hugs,

Michelle

Get ready for Brayer Workshops!  I am coming to:

dsc07666supersmall.jpg

Dayton, Ohio

Savannah, Georgia

Covington, Indiana

Buffalo, Minnesota

Webster, New York

New Johnsonville, Tennessee

Stoughton, Wisconsin

Castro Valley, California

Yardley, Pennsylvania (near Philadelphia)

Knox, Maine

Broomfield, Colorado

Lynchburg, Virginia

Columbia, Missouri

Portland, Michigan

Here is a link to my workshop calendar where you can see all of my travel schedule and to get info on beginner and advanced Brayer workshops:  http://zindorf.blogs.splitcoaststampers.com/workshop-calendar

Link to my Stampin’ Up website were you can order all of your must have Stampin’ Up products from me 24-7:  http://michellezindorf.stampinup.net

Here is a link to all of my tutorials:  http://zindorf.blogs.splitcoaststampers.com/tutorials-ive-written/

Frequently asked questions answers:  http://zindorf.blogs.splitcoaststampers.com/frequently-asked-questions/


I need a Chef – Tutorial #178

dsc07755.JPG

Today I created a little different scene for you using a masking technique with Post it Notes.  Grab your favorite beverage and hang out a while with me.

Let’s get started.  🙂

Supplies:

Stamps: Stampin’ Up Voil`a & Voil`a to Go
Paper: Stampin’ Up Whisper White, Basic Black & Pumpkin Pie
Ink: Stampin’ Up Kiwi Kiss, So Saffron, Always Artichoke & Basic Black
Accessories: Sponges, Post it Notes, Stampin’ Up Markers, Black Ribbon, Copper Brads & a Brayer

Please don’t forget you can order your Stampin’ Up products from me 24-7 from this link:  http://michellezindorf.stampinup.net or e-mail me at mzindorf@aim.com if you are within the United States.

dsc07756.JPG

Stamped the Chef with Basic Black ink on a 4.5″ x 6″ piece of Whisper White card stock.

dsc07732.JPG

Stamped the coffee cup with basic black ink.

dsc07733.JPG

Stamped the Chef and the coffee cup again on post it notes and cut them out to use as mask.  Try to stamp as much of the image as you can on the sticky part of the post it note.  When cutting your mask out cut inside the design area a bit so you don’t end up with a white shadow around your image after coloring in the background.

dsc07734.JPG

dsc07735.JPG

dsc07736.JPG

dsc07737.JPG

Sponged So Saffron ink all over the background of the card stock using a pouncing up and down motion to get a speckled look.

dsc07738.JPG

Sponged Kiwi Kiss ink on the card stock, not covering the So Saffron ink all the way.

dsc07739.JPG

Masked the top of the card stock with a post it note right over the other masks.

dsc07740.JPG

Brayered Kiwi Kiss ink at the bottom of the card stock.

dsc07741.JPG

Sponged Basic Black ink at the edge of the post it note mask.

dsc07742.JPG

Removed all the masks.

dsc07744.JPG

Colored the chef’s skin, cup and outlined his suit with a Creamy Caramel marker.

dsc07745.JPG

Did some outlining with a Close to Cocoa Marker.

dsc07746.JPG

Colored his scarf and part of the cup with a Pumpkin Pie marker.

dsc07747.JPG

Outlined the scarf and the detail on the cup with a Really Rust marker.

dsc07748.JPG

Colored the tray and the bottom of the chef’s feet with a black marker.

dsc07749.JPG

Sponged Always Artichoke around the outside of the card stock.

dsc07750.JPG

Sponged Basic Black ink around the edge of the card stock not covering the Always Artichoke ink entirely.  If you get really dark around the edge of your card stock the lighter center of the card stock pops!

dsc07751.JPG

Added a few simple layers and stamped the sentiment with Basic Black ink.  Added the ribbon and 3 copper brads.

Here it is finished measuring 5″ x 6.5″.

dsc07755.JPG

I hope this tutorial has inspired you to try masking with post it notes.  It is an easy way to create a scene.

P.S. I have updated my sales page with more retired Stamp Sets.

May you be content in whatever you are doing today!

Until my next post. . . . . . . . .

Hugs,

Michelle

Link to my Stampin’ Up website were you can order all of your must have Stampin’ Up products from me 24-7:  http://michellezindorf.stampinup.net

Here is a link to all of my tutorials:  http://zindorf.blogs.splitcoaststampers.com/tutorials-ive-written/

Here is a link to my workshop calendar if you want to get info on beginner and advanced Brayer workshops:  http://zindorf.blogs.splitcoaststampers.com/workshop-calendar

Frequently asked questions answers:  http://zindorf.blogs.splitcoaststampers.com/frequently-asked-questions/