Lone Bird – Tutorial #176

dsc07706.JPG

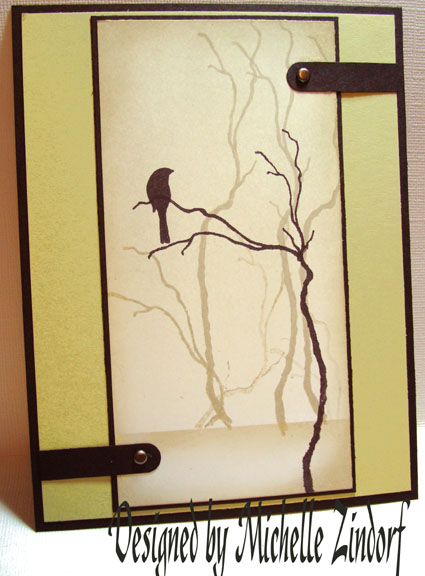
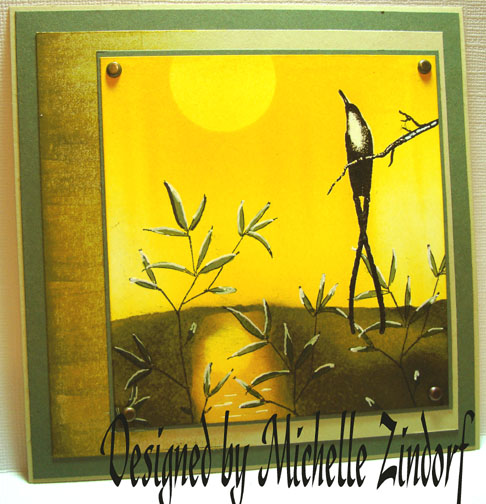
I have fell in love with this Innovative Stamp Creations Stamp Sheet “Tranquil”.  It has these great flower stamps that come with it too, but I chose to make my scene today a winter one.  If you want to check out Innovative Stamp Creations’ site here is the link:  http://www.innovativestampcreations.com/ischomepage.html

Also, I haven’t posted it to my calendar yet, but guess who is going to be holding workshops in Buffalo, MN in June?  I cannot wait!  If you are interested send me an e-mail at mzindorf@aim.com and I will give you all of the details.

By the way, I updated my sales page and added ten more Stampin’ Up retired stamp sets. Here is the link for that:  http://zindorf.blogs.splitcoaststampers.com/things-for-sale/

Ready for this quick tutorial?  Let’s get started.

Supplies:

Stamps: Innovative Stamp Creations “Tranquil”
Paper: Stampin’ Up Whisper White, Basic Black and River Rock
Ink: Adirondack ink, Pitch Black, Pebble & Lake Mist
Accessories: Stampin’ Up Word Window Punch, Sponge, Brads, Brayer

dsc07707.JPG

Brayered Lake Mist ink on the top 2/3rds of a piece of 3″ x 6″ Whisper White card stock.

dsc07694.JPG

Stamped the twig stamp a few times in Pebble ink.  Remember with unmounted stamps you can bend them to make them different in shape when sticking them on your acrylic block.

dsc07695.JPG

Covered the bottom 1″ of the card stock with a scrap piece of paper and stamped the twig much lower on the card stock.   Sorry I missed taking the picture of the actual stamping.

dsc07696.JPG

Turned the scrap piece of paper around so it is masking the top of the card stock and sponged Pebble ink at the edge of the mask.

dsc07697.JPG

Un-masked the card stock and stamped the twig again.  This time bending the stamp quite a bit and stamped in with Black ink.

dsc07698.JPG

Stamped the little twig so it connected to the larger one with black ink.

dsc07699.JPG

Stamped the bird with black ink so it is sitting on the tree.

dsc07700.JPG

Sponged Pebble ink around the outside edge of the card stock.

dsc07701.JPG

Punched two Window punches out of black card stock.  I held them together and cut the curved end off of one side of both at the same time so they would be the same size.

dsc07702.JPG

dsc07703.JPG

Added simple panels of card stock and added the punches and a couple of brads and here you have the finished card measuring 5″ x 6.5″.

dsc07706.JPG

May your weekend be pure delight!

Until my next post. . . . . . . . . . . .

Hugs,

Michelle

to all my tutorials can be found here:  http://zindorf.blogs.splitcoaststampers.com/tutorials-ive-written/

Here is a link to my workshop calendar if you want to get info on beginner and advanced Brayer workshops:  http://zindorf.blogs.splitcoaststampers.com/workshop-calendar

Frequently asked questions answers:  http://zindorf.blogs.splitcoaststampers.com/frequently-asked-questions/


To a Warmer Place – Tutorial #174

dsc07640.JPG

Here in Ohio we have had a bit of snow of late.  I am ready for some much warmer weather so I created it with this card.  Don’t you wish you were there sitting under an umbrella, drinking your favorite drink and listening to the Ocean?  Ahhh, I think I need a vacation in a much warmer place, lol.   A girl can dream, right?

The stamp set I used today is another I am saying farewell to.  It is Stampin’ Up 2005 Do the Hula.    If you are interested in any of the retired sets I have for sale, please check out my sales page at this link:  http://zindorf.blogs.splitcoaststampers.com/things-for-sale/

3-small.jpgOne more thing before we get started on the tutorial.  The Saturday morning Beginner Brayer Workshop in Wheaton, IL on March 14th has only one more spot available.  There are still a few spots open for the morning and afternoon Beginner Brayer workshops in Wheaton, IL on March 13th.  You can check out all of the locations I will be at this link:  http://zindorf.blogs.splitcoaststampers.com/workshop-calendar/

Now on to warmer weather, lol.

Supplies:

Stamps: Stampin’ Up Do the Hula
Paper: Stampin’ Up Whisper White, So Saffron, Old Olive & Tempting Turquoise
Ink: Stampin’ Up Not Quite Navy, Creamy Caramel, So Saffron, Tempting Turquoise & Basic Black
Accessories: Stampin’ Up Markers, Sponge, Brayer, Versamark Pad and Marker, Clear embossing Powder and a heat gun, Ribbon, Gold Brads, Stampin’ Up Photo Corner Punch

dsc07641.JPG

Stamped the Hula Girl and the Tree by first loading the stamps with Versamark and then Basic Black Dye based ink before stamping them.  Heat embossed both images using clear embossing powder and a heat gun.

Note:  If you use black pigment ink you do not have to use the Versamark with it.  I only do this method because I use all Dye Based inks and embossing powder doesn’t stick well to it.

dsc07616.JPG

dsc07617.JPG

dsc07618.JPG

dsc07619.JPG

Colored the girls skin and the tree with Creamy Caramel marker.

dsc07620.JPG

Colored the leaves of the tree and her skirt with Certainly Celery marker.

dsc07621.JPG

Added some darker tones to the Leaves of the tree and her skirt with an Old Olive Marker.

dsc07622.JPG

Blended the greens together a bit by going over them with the Certainly Celery marker again.

dsc07623.JPG

Added Close to Cocoa marker to the left side of the tree and the shadows on her skin.

dsc07624.JPG

Blended her skin and the tree browns together by going over the hard lines between the two colors with the Creamy caramel marker.

dsc07625.JPG

Colored her top with a Real Red marker.

dsc07626.JPG

Colored her flowers with a Pretty in Pink Marker.

dsc07627.JPG

Added Rose Red marker to the center of the flowers.

dsc07628.JPG

Colored her instrument with a Close to Cocoa marker.

dsc07629.JPG

Added Chocolate Chip marker to the under side of the instrument.

dsc07630.JPG

Colored over both the tree and the Hula Girl with a Versamark Marker and heat embossed the images using clear embossing powder and a heat gun.

dsc07631.JPG

dsc07632.JPG

Now the fun begins, at least for me anyway.

Brayered So Saffron ink at the bottom of the card stock.

Oops!  Missed a shot. I flipped the card stock around and brayered Tempting Turquoise at the top 2/3rds of the card stock.

dsc07633.JPG

Masked the sky area of the card stock with a Post It Note.

dsc07634.JPG

Sponged Not Quite Navy in a circular motion at the edge of the mask, just going onto the card stock.

dsc07635.JPG

Removed the mask.

dsc07636.JPG

Brayered Creamy Caramel ink at the very bottom of the card stock to give the sand some shading.

dsc07637.JPG

Added a few layers of card stock, brads, ribbon and two corner punches and here you have the finished card measuring 6 5/8″ x 5 1/8″.

dsc07640.JPG

I hope this inspires you to warm up your summer stamps today.

May your day be filled with warm thoughts.

Until my next post. . . . . . . . . .

Hugs,

Michelle

Links to all my tutorials can be found here:  http://zindorf.blogs.splitcoaststampers.com/tutorials-ive-written/

Here is a link to my workshop calendar if you want to get info on beginner and advanced Brayer workshops:  http://zindorf.blogs.splitcoaststampers.com/workshop-calendar

Frequently asked questions answers:  http://zindorf.blogs.splitcoaststampers.com/frequently-asked-questions/


Windy Sunset Pine – Tutorial #172

dsc07574.JPG

Hello Everyone!  I hope you have been having a very relaxing weekend.  My husband and I have been kicking back watching the mini series John Adams this weekend.  Great show and great United States history lesson at the same time.

I’ve also added a few more retired Stampin’ Up stamp sets to my sales page that can be found here:  http://zindorf.blogs.splitcoaststampers.com/things-for-sale/ 

I have a couple of hundred sets I will be putting on the sales page little by little.  So hard to part with them.  Check it out frequently if you are interested.

OK, a little about today’s tutorial.  I’ve done scenes like this before with this flourish, but not with this color combo.  I have been so inspired by our winter sunsets here in country and all of the snow.  This tree is over stamped with Pumpkin Pie ink to make it look back lite.  Follow along and you will see.

Let’s get started.  🙂

Supplies:

Stamps: Stampin’ Up Lovely As A Tree & Baroque Motifs
Paper: Stampin’ Up Whisper White, Basic Black, More Mustard & Baja Breeze
Ink: Stampin’ Up Not Quite Navy, Really Rust, More Mustard, Baja Breeze, Basic Black, Pumpkin Pie, Riding Hood Red
Accessories: Versamark Pad, Brayer, Fine Detail Clear Embossing Powder, Heat Gun, Not Quite Navy Marker, White Gel Pen, Sponges

dsc07575.JPG

Stamped the tree by first loading the stamp with Versamark and then Basic Black ink before stamping it on a 4″ x 5.5″ piece of Whisper White card-stock.  Heat embossed the image using clear embossing powder and a heat gun.

dsc07556.JPG

dsc07557.JPG

Stamped the flourish first by loading the stamp with Versamark and then with Baja Breeze ink before stamping it.  Heat embossed the image using clear embossing powder and a heat gun.

dsc07558.JPG

dsc07559.JPG

Brayered on More Mustard ink.

dsc07560.JPG

Brayered Pumpkin Pie ink not covering the More Mustard ink entirely.

dsc07561.JPG

Brayered Really Rust ink not covering the Pumpkin Pie ink entirely.

dsc07562.JPG

Brayered on Riding Hood Red at the very top of the card stock.

dsc07563.JPG

Filled in some gaps in my embossed flourish with a White Gel pen.

dsc07564.JPG

Sponged Not Quite Navy around the entire piece of card stock.   Also sponged very lightly a little Not Quite Navy ink under the tree for a shadow.

dsc07565.JPG

Over Stamped just the tree, not the truck by just putting ink on the tree part, omitting the truck of the tree.  I also stamped it a bit higher than the original tree image was stamped.

dsc07566.JPG

Closer look.

dsc07567.JPG

Sponged a bit of Pumpkin Pie ink in the middle of the tree.

dsc07568.JPG

Added White outline to some of the flourishes.

dsc07569.JPG

Decided to darken the middle of the tree a bit by sponging some black ink on it.

dsc07570.JPG

Added dots of White gel pen to the tree to create a snowy look.

dsc07571.JPG

Outlined a few of the flourishes on the opposite side of the White outline with a Not Quite Navy marker.

dsc07572.JPG

Added a few simple layers and here is the finished card measuring 5.25″ x 6.75″.

dsc07574.JPG

I hope this tutorial has inspired you to look at your surroundings and be greatly inspired by the beauty.

May all your skies be of a beautiful hue.

Until my next post.. . . . . . . . . .

Hugs,

Michelle

Links to all my tutorials can be found here:  http://zindorf.blogs.splitcoaststampers.com/tutorials-ive-written/

Here is a link to my workshop calendar if you want to get info on beginner and advanced Brayer workshops:  http://zindorf.blogs.splitcoaststampers.com/workshop-calendar

Frequently asked questions answers:  http://zindorf.blogs.splitcoaststampers.com/frequently-asked-questions/


Bee My Honey – Tutorial #169

dsc07476.JPG

Farewell to Bees N’ Blossoms. . . . . . . .

This set I am using today is a retired Stampin’ Up set from 1997 titled “Bees N’ Blossoms.  This is my farewell to the set because it is going on my sale page today along with a few others.  Here is a link to the sales page if you are interested in this set or others I will be putting on it http://zindorf.blogs.splitcoaststampers.com/things-for-sale/

I will take the sets off of the sale page as they sale, so please, if you don’t see it, it has sold.

Also, if you haven’t visited my Brayer Workshop calendar page I have added a one day trip to Covington, Indiana for May, 2009.  Check it out here http://zindorf.blogs.splitcoaststampers.com/workshop-calendar/

Let’s get started on the tutorial.  🙂

Supplies:

Stamps: Stampin’ Up Bees N’ Blossoms
Paper: Stampin’ Up Rose Red, Basic Black, Pretty In Pink and Whisper White
Ink: Stampin’ Up Basic Black, Certainly Celery, Always Artichoke, Old Olive, Tempting Turquoise, Bashful Blue
Accessories: Stampin’ Up Markers Old Olive, Always Artichoke, So Saffron, More Mustard, Rose Red, Pretty in Pink, Brayer, Clear embossing Powder and a Heat gun, Versmark Pad & Marker, Brads, White Ribbon, Sponge

dsc07477.JPG

Stamped Flowers by first loading the stamp with Versamark and then loading the stamp with Dye based Black ink before stamping them on  a 3.5″ square piece of Whisper White Card stock.

dsc07457.JPG

I had a little trouble with my camera this morning (I dropped it in other words).   I didn’t realize I dislodged the memory card in it for a few shots, so I will describe what I did next.

I heat embossed the flowers using clear embossing powder and a heat gun.

Stamped the Bee hive by first loading the stamp with Versamark and then Dye based Black ink before stamping it.

Heat embossed the bee hive using clear embossing powder and a heat gun.

I colored some of the flowers with a Pretty in Pink Marker.  

I colored some of the flowers with a Rose Red Marker.

Discovered my camera wasn’t working correctly, lol.

Now back to the pictures.   🙂

Colored the bee hive with a So Saffron marker.

dsc07463.JPG

Colored the left side of the bee hive with a More Mustard marker.

dsc07464.JPG

Colored over all the colored images only with a Versamark marker and heat embossed them using clear embossing powder and a heat gun.

dsc07465.JPG

dsc07466.JPG

Brayered Bashful Blue ink at the top of the card stock.

dsc07467.JPG

OH good Heavens!  I missed a shot here.  I brayered Tempting Turquoise at the top of the card stock not covering the Bashful Blue ink entirely.

Apparently recovered my mental state and Brayered Certainly Celery ink at the bottom of the card stock.

dsc07468.JPG

Brayered Old Olive ink (My favorite Green by the way) at the very bottom of the card stock.

dsc07469.JPG

Colored the lower leaves on the plants with an Always Artichoke marker.

dsc07470.JPG

Although you can’t tell the difference in these photos, I colored the upper leaves on the plants with an Old Olive marker.

dsc07471.JPG

Sponged a bit of Always Artichoke ink at the bottom of the plants and the beehive to create a shadow for them.

dsc07472.JPG

Wiped off my embossed images with an old cotton cloth to remove any ink on them.

dsc07473.JPG

Assembled my card and here it is finished measuring 5″ square.

dsc07476.JPG

Please forgive me for the messed up tutorial today.  I’m apparently having one of those days, if you know what I mean!

I do hope you have been inspired to reach for one of those old stamp sets, dust if off and breath new life into it today.

May your day today be everything you hoped it would be.

Until my next post. . . . . .. .. . . . . .

Hugs,

Michelle Zindorf

Links to all my tutorials can be found here:  http://zindorf.blogs.splitcoaststampers.com/tutorials-ive-written/

Here is a link to my workshop calendar if you want to get info on beginner and advanced Brayer workshops:  http://zindorf.blogs.splitcoaststampers.com/workshop-calendar

Frequently asked questions answers:  http://zindorf.blogs.splitcoaststampers.com/frequently-asked-questions/


Country Home – Tutorial #168

dsc07444.JPG

Hey Everyone!  I hope you are having a terrific Saturday.  I love Saturdays because I get to slow down and take a bit more time playing with stamps and ink.

Before we get started I wanted to say a big hello to you readers in Illinois who have already signed up for my beginner and advanced brayer workshops in March.  I can’t wait to get there! 

I have updated my Brayer Workshop calendar so check it out if you are interested in attending one.  Here is the link:  http://zindorf.blogs.splitcoaststampers.com/workshop-calendar/

Now on with the tutorial.   🙂

Supplies:

Stamps: Stampin’ Up Essence of Love and Holidays & Wishes, and Cornish Hertiage Farms Primitive Beginnings
Paper: Stampin’ Up Whisper White, Really Rust, More Mustard and Baja Breeze
Ink: Stampin’ Up Baja Breeze & More Mustard, Adirondack Ginger, Pebble, Espresso & Lake Mist
Accessories: Versamark Pad and Marker, Brayer, Clear embossing Powder, White Gel Pen, Heat Gun, Black Marker, Prismacolor Markers

dsc07447.JPG

Stamped weeds twice by first loading the stamp with Versamark and then Ginger ink before stamping it.  Heat embossed the images using clear embossing powder and a heat gun.

Note:  When building a scene using emboss resist, remember to start with your foreground images then the middle images and then put in your back ground etc.  In other words work front to back.  🙂

dsc07422.JPG

dsc07423.JPG

Stamped house by first loading the stamp with Versamark and then Pebble ink before stamping it.  Heat embossed the image using clear embossing powder and a heat gun.

dsc07424.JPG

dsc07425.JPG

Colored the front of the house using an Oatmeal Prismacolor marker.

dsc07426.JPG

Colored the right side and the bottom of the house with a Khaki colored Prismacolor Marker.

dsc07428.JPG

Added Light Umber marker to the bottom right side of the house.

dsc07429.JPG

Colored the windows on the right side of the house with a black marker.

dsc07430.JPG

Added Cool Grey 50% marker to the windows at the front of the house and decided to color the right side of the house entirely with Light Umber Marker to make it much darker.

dsc07431.JPG

Colored over the entire house with a Versamark marker and heat embossed it using clear embossing powder and a heat gun.

dsc07432.JPG

dsc07433.JPG

Sponged More Mustard using a circular motion at the bottom of the card stock.

dsc07434.JPG

Brayered Lake Mist ink at the top of the card stock.

dsc07435.JPG

Brayered Baja Breeze ink at the very top of the card stock not covering the Lake Mist ink entirely.

dsc07436.JPG

Sponged some lake mist ink at the top of the More Mustard ink.

dsc07437.JPG

Sponged Espresso ink under the house and in the bottom left corner of the card stock.

dsc07438.JPG

Sponged some Baja Breeze ink at the top of the sky area to give it some interest and a bit above the gray around the house.

dsc07439.JPG

Added some black outlining to just a few of the weeds to bring them forward in the picture.

dsc07440.JPG

Added some white highlights to the weeds with a White Gel Pen.

dsc07441.JPG

Added some simple card stock layers and some brads in each corner.

dsc07442.JPG

Decided to add a sentiment which I hardly ever do.  I stamped it with Espresso ink and I used a Stamp A Ma Jig to make sure I stamped it straight. 

dsc07443.JPG

Here is the finished card measuring 5″ x 6.5″.

dsc07444.JPG

Well I hope this tutorial has inspired you to try doing a scene using the emboss resist technique and layering  the embossed images. 

May your day be filled with tranquility.

Until my next post. . . . . . . . . . .

Hugs,

Michelle

Links to all my tutorials can be found here:  http://zindorf.blogs.splitcoaststampers.com/tutorials-ive-written/

Here is a link to my workshop calendar if you want to get info on beginner and advanced Brayer workshops:  http://zindorf.blogs.splitcoaststampers.com/workshop-calendar

Frequently asked questions answers:  http://zindorf.blogs.splitcoaststampers.com/frequently-asked-questions/


Sweet Baby Seal – Tutorial #166

dsc07393.JPG

Happy Sunday!  If you haven’t notice this week I have been working with some old retired sets from Stampin’ Up.  Some I will be parting with shortly.  This baby seal from the 2003 Stampin’ Up set Cold Weather Friends is a favorite of mine, but I am saying farewell to it.  Check out my sale page, there is a tab at the top of my blog or you can click this link:  http://zindorf.blogs.splitcoaststampers.com/things-for-sale/  First come first serve.

That being said, let’s get stamping!

Supplies:

Paper: Stampin’ Up Whisper White, Baja Breeze, Lavender Lace, Elegant Eggplant
Ink: Stampin’ Up Almost Amethyst, Baja Breeze, Palette Noir Black
Accessories: Prismacolor Markers, Brayer, White Gel Pen, Versamark marker, Purple Ribbon, Sponge, Post it Note, Fine Detail Clear Embossing Powder, Heat Gun

dsc07395.JPG

Stamped the image with Palette Hybrid Noir Black ink on a 3.5″ square piece of Whisper White card stock.

dsc07378.JPG

Colored the image with a Buff Prismacolor Marker.

dsc07379.JPG

Added Eggshell Prismacolor marker to the underside of the seal and to the dark areas.

dsc07380.JPG

Colored over the entire image with a Versamark Marker and heat embossed using fine detail clear embossing powder and a heat gun.

dsc07381.JPG

dsc07382.JPG

Brayered the top half of the card stock with Baja Breeze ink.

dsc07383.JPG

Ripped through the stick edge of a post it note and used it as a mask for the bottom half of the card stock.

dsc07384.JPG

Sponged Baja Breeze ink right at the post it note edge.

dsc07385.JPG

Removed the post it note.  Ahhhhh,  just look at him. .. . . . . . , lol.

dsc07386.JPG

Sponge a bit of Baja Breeze ink around the bottom of the seal to create a shadow effect.

dsc07387.JPG

Decided to Brayer Almost Amethyst ink at the top of the card stock not covering the Baja Breeze ink entirely to give a bit of interest to the sky.

dsc07388.JPG

Cut a 2″ x 5.25″ piece of Baja Breeze card stock and used the swirl cuttlebug folder to emboss it.

dsc07389.JPG

Brayered Almost Amethyst ink over the card stock to make the swirls stand out more.

dsc07390.JPG

Assembled card and added some white back to the main image with a White Gel pen.  Yes that’s right, you can use white gel pen on top of an embossed image.  🙂

dsc07391.JPG

Here is the finished card measuring 5 1/8″ x 6 5/8″.

dsc07393.JPG

May your day be filled with sweet images that make you happy.

Until my next post. . . . ..

Hugs,

Michelle

Links to all my tutorials can be found here:  http://zindorf.blogs.splitcoaststampers.com/tutorials-ive-written/

Here is a link to my workshop calendar if you want to get info on beginner and advanced Brayer workshops:  http://zindorf.blogs.splitcoaststampers.com/workshop-calendar

Frequently asked questions answers:  http://zindorf.blogs.splitcoaststampers.com/frequently-asked-questions/


Skateboarder’s Shadow – Tutorial #165

dsc07363.JPG

Hey, thanks everyone for the great tips, leads, prayers and kind word yesterday.  I really needed lifted up and you all came through for me.  Huge Hugs!

Enough with me and my personal problems.  Let’s Stamp!!!!

Today’s project is for that teen that you just can’t give that sappy, mushy greeting card to.  This card even came out to look a little like a comic book picture, bonus!  

I decided to add a shadow today, which I love!

Let’s get started. 🙂

Supplies:

Stamps: Stampin’ Up Over The Top
Paper: Stampin’ Up Whisper White, More Mustard & Basic Black
Ink: Stampin’ Up Brilliant Blue, Distress Ink Black Soot & Palette Noir Black
Accessories: Prismacolor Markers, Brayer, Fine Detail Clear embossing Powder, Heat Gun, Versamark marker, White Gel Pen, Black Faber Castell Marker

dsc07366.JPG

Stamped image using Palette Hybrid Noir Black ink.  I chose this ink because it works well with solvent based coloring mediums like the Prismacolor Markers I will be using.

dsc07346.JPG

Colored his shirt with a Blush Pink Prismacolor Marker.

dsc07347.JPG

Added Crimson Red to his shirt.

dsc07348.JPG

Went over his entire shirt with the Blush Pink marker to blend the harsh lines between the two colors.

dsc07349.JPG

Colored his board, gloves and stripes on his socks with Goldenrod.

dsc07350.JPG

Colored his knee pads & helmet with Cool Grey 50%.

dsc07351.JPG

Colored his Shorts with Sepia.

dsc07352.JPG

Colored his skin with Buff.

dsc07353.JPG

Colored over the entire image with a Versamark marker.

dsc07354.JPG

Heat embossed the image using clear embossing powder and a heat gun.

dsc07355.JPG

Now that my image is heat embossed I can brayer over the image and the embossing will resist the brayered ink (emboss resist technique).

Brayered over the entire card stock with Brilliant Blue ink.  I only brayered back and forth a couple of times.  It came out streaked and I liked the look so I left it that way.

dsc07356.JPG

Wiped the ink off of the embossed image with an old soft rag.

dsc07357.JPG

Smeared a Black Soot Distress Ink Pad directly on the card stock to create a ramp.

dsc07358.JPG

Stamped the image again with Palette Noir Black ink.

dsc07359.JPG

Colored the image in with a black marker creating the shadow.

dsc07360.JPG

Added a few white highlights to the right side of the original image with a White Gel Pen.

dsc07362.JPG

Add a couple of simple panels and some brads, no frills for this card.

Here it is finished measuring 5″ x 6.5″.

dsc07363.JPG

I hope this gets you looking at your stamps to see if you can come up with some sort of scene using a shadow in it.

May your day be filled with only good things.

Until my next post.. . . . . . . . .

Hugs,

Michelle

Links to all my tutorials can be found here:  http://zindorf.blogs.splitcoaststampers.com/tutorials-ive-written/

Here is a link to my workshop calendar if you want to get info on beginner and advanced Brayer workshops:  http://zindorf.blogs.splitcoaststampers.com/workshop-calendar

Frequently asked questions answers:  http://zindorf.blogs.splitcoaststampers.com/frequently-asked-questions/


Thinking – Tutorial #164

dsc07317.JPG

I’m in the mood again for a little coloring fun with my Prismacolor Markers.  Coloring really relaxes me.  I can just while away the hours playing with markers.  Today’s tutorial also has a reverse image in it.  You can do a reverse image in quite a few different ways.  I used a reverse image stamp by Rubber Stampeded to create my reverse image.

Let’s get started.  🙂

Supplies:

Stamps: Stampin’ Up “Summer by The Sea” & “Embrace Life”, Rubber Stampeded “Reverse Image Stamp”
Paper: Stampin’ Up Whisper White, Kiwi Kiss & Baja Breeze
Ink: Stampin’ Up Baja Breeze & Kiwi Kiss, Palette Hybrid Noir Black
Accessories: Prismacolor Markers, Brayer, Fine Detail Embossing Powder, Heat Gun, Versamark Marker, White Gel Pen, Aqua Painter

dsc07322.JPG

Stamped onto my reverse image stamp with Palette Noir Black ink and then stamped the reverse image stamp onto my Whisper White card stock. 

I like to start out stamping my reverse image first.  It’s easier for me to line the original image up with the reversed one instead of lining the reversed image up with the original one.

dsc07292.JPG

Stamped the Original image right side up with Palette Noir Black ink having the feet of the two images meet.

I used Palette Noir Black  Hybrid ink because it won’t smear as much with solvent based coloring mediums, such as Prismacolor markers.

dsc07293.JPG

Colored the images pants with Cloud Blue Prismacolor Marker.

dsc07295.JPG

Added Teal Blue to the pants.

dsc07296.JPG

Colored over the pants again with the Cloud Blue to blend  the colors together.

dsc07297.JPG

Colored the Shirts, hats and rim of boats with Eggshell.

dsc07298.JPG

Added Burnt Ochre to the shirts.

dsc07299.JPG

Blended the Burnt Ochre in with the Eggshell marker.

dsc07300.JPG

Added a bit of dark to the shirt creases with a Sienna Brown Marker.

dsc07301.JPG

Added Cloud Blue to the band of the hats.

dsc07302.JPG

Went over the shadow parts of the hats with the eggshell marker again.

Tip you can add shadow by using the same color of marker over itself, just let it dry a bit between colorings.

dsc07303.JPG

Added a bit of Sienna Brown to the hats.

dsc07304.JPG

Colored the boat with Cold Stone marker.

dsc07305.JPG

Added Teal Blue to the bottom of the boats.

dsc07306.JPG

Went over the boat again with Cold Stone marker to blend the colors together.

dsc07307.JPG

Colored the skin in the two images with Buff marker.

dsc07308.JPG

Colored over the original image with a Versamark marker and heat embossed it using fine detail clear embossing powder and a heat gun.

Note:  I did not use Versmark on or emboss the reverse image.

dsc07309.JPG

dsc07310.JPG

Brayered Baja Breeze ink at the bottom and very top of the card stock.

dsc07311.JPG

dsc07312.JPG

Highlighted the ripples in the water with a White Gel pen.

dsc07313.JPG

Yikes!  I missed a photo here.  I brayered Kiwi Kiss at the bottom of the card stock not covering the Baja Breeze ink entirely.

Assembled card front with a couple of simple panels.

Stamped the Weed from the Embrace Life set over all the panels.

dsc07314.JPG

Used my Aqua Painter and Kiwi Kiss ink to color in the leaves of the weeds.

Note:  If you squeeze an ink pad when it closed, pressing the lid down onto the ink pad it will make a puddle of ink on the lid.  You can use the puddle of  ink to watercolor with.

dsc07315.JPG

Here is the completed card measuring 5″ x 6.5″.

dsc07317.JPG

May your day be filled with great reflection.

Until my next post. . . . . . . . . .

Hugs,

Michelle

Links to all my tutorials can be found here:  http://zindorf.blogs.splitcoaststampers.com/tutorials-ive-written/

Here is a link to my workshop calendar if you want to get info on beginner and advanced Brayer workshops:  http://zindorf.blogs.splitcoaststampers.com/workshop-calendar

Frequently asked questions answers:  http://zindorf.blogs.splitcoaststampers.com/frequently-asked-questions/


Tranquil Bookmarker – Tutorial #162

dsc07258.JPG

Happy Saturday!   I thought I would start my post out with a little peak at my stamping attire in the morning, lol.  If you have ever envisioned me as a well dress fancy person, well let me tell you, you are dead wrong.  I would live in my flannel JP’s Twenty Four Seven if I could get away with it.  I get cleaned up every workday and head to work, but the very moment I get home, the work clothes come off and the sweat clothes or the JP’s go on.  I’m not above cooking dinner for my husband and I in my JP’s.

Yep, those are snowflake flannels, lol.  I have way to much more on my mind to think about other than clothing.  Like what stamp am I going to use today?  Will I create a tutorial for my wonderful readers?  Folks, I’m just keeping it real for you. 🙂

dsc07226.JPG

Ok, that’s enough about what a slob I am.  Let’s get started on today’s tutorial.

Supplies:

Stamps: Innovative Stamp Creations “Tranquil” :  http://www.innovativestampcreations.com/ischomepage.html
Paper: Stampin’ Up Whisper White, Chocolate Chip
Ink: Stampin’ Up Basic Black, Apricot Appeal, More Mustard, Chocolate Chip, Tangerine Tango, Riding Hood Red & Kiwi Kiss
Accessories: Versmark Pad and Marker, Tim Holtz Charm Fragments, Ribbon,Brad, Flower, Brayer, Clear embossing powder and heat gun, Sponge, Fine tip Black marker, Ticket Corner Punch, Eyelet and Cropodile, Sharpie Gold Paint Marker

dsc07262.JPG

I’m going to start this tutorial by creating the embellishment for the ribbon first and we will set it aside to dry.

Brayered Tangarine Tango ink at the top of a piece of scrap paper.

Stamped the twig stamp in Kiwi Kiss ink.  Stamped the two birds (I’m making two embellishments) in black ink.

Put Crystal Effects on the one side of the Tim Holtz Fragment charm and then put it Crystal Effects side done on top of the bird image.

dsc07245.JPG

dsc07246.JPG

dsc07247.JPG

dsc07248.JPG

dsc07249.JPG

Let these dry for a while and then I cut the paper away from around the fragment and used a piercing tool to open up the hole in the top of the charm.

dsc07253.JPG

Used direct to paper with Apricot Appeal ink and Chocolate Chip ink to give the back some interest.

dsc07254.JPG

Now for the Bookmark.

Stamped the block image by first loading my stamp with Versamark and then loading it with Riding Hood Red ink before stamping it.  I repeated this again for the second block image.  They were both stamped on a 3″ x 5″ piece of Whisper White Card stock.

dsc07229.JPG

Heat embossed the images using clear embossing powder and a heat gun.

dsc07230.JPG

Colored over the block images with a Versamark marker so the white showing in the images would be heat embossed also.  Covered the Versamark image with clear embossing powder and heat with a heat gun to emboss.

dsc07231.JPG

dsc07232.JPG

Stamped bird by first loading the stamp with Versamark and then with Basic Black ink before stamping.

dsc07233.JPG

Heat embossed the image using clear embossing powder and a heat gun.

dsc07234.JPG

Stamped Twig by first loading the stamp with Versamark and then Kiwi Kiss ink before stamping it.  I didn’t worry about it getting on my previously embossed images.  When it gets heat embossed it melts away.

dsc07235.JPG

Heat embossed the twig using clear embossing powder and a heat gun.

dsc07236.JPG

Brayered Apricot Appeal ink at the top half of the card stock.

dsc07237.JPG

Brayered More Mustard ink at the top of the card stock not covering the Apricot Appeal ink entirely.

dsc07238.JPG

Getting darker yet, I brayered Tangerine Tango ink at the very top of the card stock.

dsc07239.JPG

Covered the top 2/3rds of the card stock with a post it note to mask it.

dsc07240.JPG

Brayered Tangerine Tango ink at the bottom of the card stock.

dsc07241.JPG

Sponged Chocolate chip ink at the post it note edge and at the bottom right hand corner to create a shadow for the vase.

dsc07243.JPG

Removed the mask.

dsc07244.JPG

Used a ticket corner punch at the top two corners of the main image panel.  Used a Gold Paint maker and dragged in down each edge of the main image panel.

dsc07250.JPG

Used a very fine tip black marker and outlined the top right side of the branch and the bottom and right side of the vase.

dsc07251.JPG

Adhered the main image panel to a Chocolate Chip panel and used the ticket corner punch on the Chocolate Chip panel’s top corners.

Used a Cropodile to add a gold eyelet at the top of the bookmark.

dsc07255.JPG

Added my ribbon through the eyelet, tied a knot in the ribbon and then added my embellishment to the ribbon end with a gold brad.  I don’t like to see any Brad butts showing (except for maybe Brad Pitt butts) so I flipped the embellishment over and covered the brad but with a flower.

dsc07256.JPG

Here is the finished bookmark measuring 3 1/4″ x 5.5″. 

dsc07258.JPG

Hope this tutorial inspires you to make some bookmakers you will be proud to use and give as gifts.

May your day be filled with enchanting stores.

Until my next post. .. . . . . . . . . . .

Hugs,

Michelle

Links to all my tutorials can be found here:  http://zindorf.blogs.splitcoaststampers.com/tutorials-ive-written/

Here is a link to my workshop calendar if you want to get info on beginner and advanced Brayer workshops:  http://zindorf.blogs.splitcoaststampers.com/workshop-calendar

Frequently asked questions answers:  http://zindorf.blogs.splitcoaststampers.com/frequently-asked-questions/


Golden Day – Tutorial #161

dsc07224.JPG

Here is a tutorial using another bird from a stamp sheet by Katzelkraft at www.katzelkraft.fr  I’ve seen this bird before in other people’s projects and I just love it, love it, love it!

This is my attempt as showing the suns reflection in a puddle.  It didn’t turn out the way I had envisioned it, but I like it just the same.

Before we get started I wanted to let everyone know that I am teaching my Beginner and Advanced Brayer workshops at Marcos Paper in Dayton, OH the month of February.  If you are interested you can get more information on Marcos Paper website http://www.marcopaper.com/classzindorf2.htm   .

The beginner class will take the mystery out of how to use the brayer.  You will come away confident in your new skill and with some really great projects too.   If you have already taken the beginner class and want to take your new brayering skill further I encourage you to take the Advanced class.  I have revamped the Advanced class and have come up with some great new projects.

Ok, let’s get started on today’s tutorial.

Supplies:

Stamps: Katzelkraft “Bird” & Stampin’ Up “Embrace Life”
Paper: Stampin’ Up Whisper White, River Rock & Always Artichoke
Ink: Stampin’ Up Basic Black, Adirondack Oregano & Butterscotch
Accessories: Brads, White Gel Pen, Clear embossing powder, Heat Gun, Brayer, Olive Marker, Versmark pad and Marker, Post it notes, sponges, 1/2″ & 1 1/4″ Circle Punches

 dsc07225.JPG

Stamped bird by first loading the stamp with Versamark marker then loading it with Black ink before stamping it.  I stamped it on a 4 1/8″ x 4 3/8″ piece of Whisper White Card stock.

dsc07201.JPG

Heat embossed the image using clear embossing powder and a heat gun.

dsc07202.JPG

Went over the white part of the bird’s chest with a Versamark marker.

dsc07203.JPG

Heat embossed the image using clear embossing powder and a heat gun.

dsc07204.JPG

Brayered Butterscotch ink at the top and at the bottom of the card stock leaving it light in the middle.

dsc07205.JPG

Punched a 1 1/4 circle and 1/2″ circle from the sticky part of a post it note and used them as masks for the sun and the sun’s reflection.

dsc07206.JPG

Brayered more Butterscotch ink at the top and bottom of the card stock.

dsc07207.JPG

Removed the masks.

dsc07208.JPG

Ripped through the stick part of a post it note and masked the sky area of the card stock.

dsc07209.JPG

Tore another post it note and masked the water area.

dsc07210.JPG

Sponged Oregano ink on the unmasked portion of the card stock.

dsc07211.JPG

Added some black sponging on the unmasked area of the ground leaving a few light areas.

dsc07212.JPG

Removed the post it note masks.

dsc07213.JPG

Sponged some Oregano ink around the edges of the water area to soften them.

dsc07214.JPG

Extended the branch the bird is sitting on to the edge of the card stock with a black marker.

dsc07215.JPG

Stamped the plants with Black in a few times staggering the heights of the plants.

dsc07216.JPG

dsc07217.JPG

Colored the leaves in with an Olive marker.

dsc07218.JPG

Added White highlights to the leaves with a White Gel pen.

dsc07219.JPG

Used the direct to paper technique and streaked the left side of a River Rock card stock panel with Butterscotch ink.

dsc07220.JPG

Over streaked the panel with Oregano ink not covering the Butterscotch ink entirely.

dsc07221.JPG

Assembled the card and added brads.  Here it is finished measuring 5.5″ square.

dsc07224.JPG

May your day be a golden one.

Until my next post. . . . . . . . . . . ..

Hugs,

Michelle

Links to all my tutorials can be found here:  http://zindorf.blogs.splitcoaststampers.com/tutorials-ive-written/

Here is a link to my workshop calendar if you want to get info on beginner and advanced Brayer workshops:  http://zindorf.blogs.splitcoaststampers.com/workshop-calendar

Frequently asked questions answers:  http://zindorf.blogs.splitcoaststampers.com/frequently-asked-questions/