Snowed In – Tutorial #273 and a Blog Candy Winner!

dsc01333.jpg

Well, I finally made it home yesterday evening after being snowed in the last couple of days in Colorado.  If I am going to be snowed in any where, I prefer it be in Colorado.  Let me say, it was breath ta-kingly beautiful!  The first photo below is a shot of my Sister’s deck furniture after just a half a day of the two day Winter Storm. 

dsc01311.JPG

I had such a wonderful time meeting all of my students in Broomfield, Colorado.  Brayer on ladies!  I am so jealous that you get to be inspired by such stunning scenes everyday.

This is a couple of quick photos taken from my Sister’s front yard in the early morning right before I had to get in the car to come home.  Hello!  Early morning light hitting the mountains and tree tops with snow everywhere.  It was sooooo very hard to make myself head to the airport.

dsc01327.JPG

dsc01324.JPG

Although it was hard to come home, once I got off of the plane in Ohio to 80 degree temperatures and the full spectrum of Fall colors surrounding me, I was at peace again and glad to be home.  🙂

I do have a tutorial for you today, but first I have a blog candy winner to announce.  Although I use a Random number generator to select the winner, I had the best time reading through your snowman comments.  If you haven’t read through them, you should.  Some are are heart wrenching, some are hysterical and most just warm your heart.  Thanks to everyone who played along.  Now for the winner.

dsc01280.JPG  The winner of the Stampin’ Up, Snow Buddies Stamp Set is. . . .#487 . . .. .. . . . .

Karen who wrote “Hi, My most memorable and most interesting experience with snowmen was when we were snowed in in North Lake Tahoe. We had gone there to go skiing, but it was snowing so much that we never got to go skiing. Our car was stuck in the driveway, snowed in, since the night before it was literally a couple of inches of snow around it. My father was on top of the car shoveling down to get snow away. My sister and I, I guess, were too little to help, so we played in the snow. We went around the unfamiliar house/cabin and found a place to do our snowmen. Of course, during it not all snow we picked up went on the snowmen, some went on each other. By the time we had our snowmen there were 4 of us there – 2 full-blown and snow-blown snowmen and 2 people snowgirls. We had such fun, especially since we were from Southern California and we didn’t get to build snowmen!!! Karen B.

Congratulations!  Karen B. , please e-mail your mailing address to mzindorf@aim.com within the next 30 days to claim your new Snow Buddies Stamp Set.

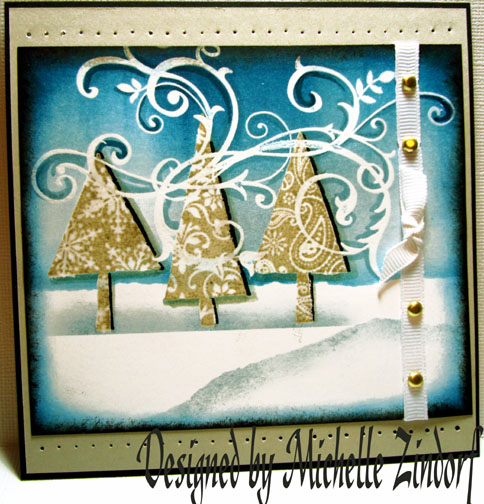
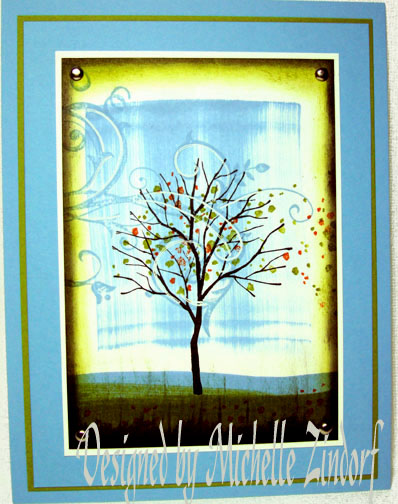
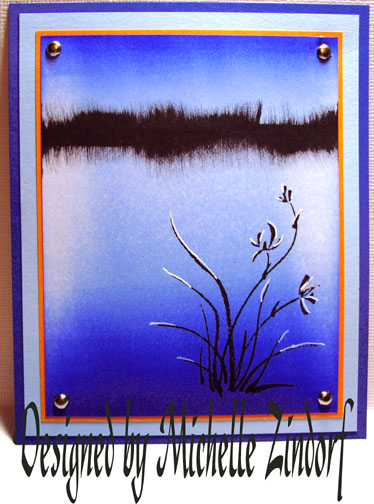
Now a bit about today’s tutorial.  This card was created while I was in Colorado using my Sister’s stamping supplies.  She is a brand new stamper and inherits my supplies that are no longer Stampin’ Up current.  I used a couple of retired items, but I will give you the current items that you could substitute for them as I go through this tutorial. 

Let’s get started. . . . .

Supplies:  (Sorry no picture of the supplies today)

Stamps: Stampin’ Up “Winter Post and French Script”
Paper: Stampin’ Up Whisper White and Miscellaneous Designer Paper
Ink: Stampin’ Up Not Quite Navy, Basic Black and Soft Sky
Accessories: Brayer, White Gel Pen, Post it notes

Want a free 39 page, Stampin’ Up Mini catalog?  If you are a resident of the United States,  just e-mail your mailing address to me and I will get one in the mail to you.  Are you inspired by this Blog?  One way you can help support this blog is by ordering your Stampin’ Up products through me.   You can order from me 24-7 from this link:  http://michellezindorf.stampinup.net or e-mail me at mzindorf@aim.com  If you are within the United States.  Want a copy of the brand new 2009-2010 Stampin’ Up Catalog for $9.95 with free shipping, just e-mail me at mzindorf@aim.com and I will get one in the mail to you.  Want to become a Stampin’ Up Demonstrator and earn instant income?  Consider being part of my Stampin’ Up Team.  Also check out the Stampin’ Up specials, click this link to check it out:  http://www.stampinup.net/esuite/home/michellezindorf/promotions

Started out with a 3.5″ piece of Whisper White card stock and masked the bottom of it with a post it note, torn at the top edge.

dsc01299.JPG

Brayered Soft Sky ink (you can substitute this ink for the current color Bashful Blue) at the top of the card stock.

dsc01300.JPG

Sponged Soft Sky ink (you can substitute Bashful Blue ink) at the post it note mask edge to darken the horizon line.

dsc01301.JPG

Stamped the French Script stamp with Soft Sky ink (you can substitute Bashful Blue ink and the current background stamp “En Francais”).

dsc01302.JPG

Brayered Not Quite Navy ink at the top of the card stock.

dsc01303.JPG

Ripped a post it note in the shape of a mountain and sponged Not Quite Navy ink at the post it note edge to create a mountain on the card stock.

dsc01304.JPG

Stamped the Deer from the Stampin’ Up set “Winter Post” with Stazon Jet Black ink (Basic Black ink would work here too).

dsc01305.JPG

Added some white gel pen to the top of the mountain to look like snow.

dsc01306.JPG

Sponged Not Quite Navy ink around the edges of the card stock.

dsc01307.JPG

Layered the main image panel with a Designer paper and Whisper White card stock.

Here is the finished card measuring 5.25″ square.

dsc01333.jpg

May your day be overflowing with warm fuzzies, lol.  

Until my next post. . . . . . . . . .

Hugs,

Michelle

tiny-bird.jpg  Get ready for Brayer Workshops!  I am coming to:

Moore, Oklahoma

Nashville, Indiana

Portland, Michigan

2010

Dayton, Ohio at Marco Paper

Phoenix, Arizona

Monroe, Louisiana

Jacksonville, Florida

 St. Louis, Missouri

Mechanicsville, Virginia

Raleigh, North Carolina 

Colleyville, Texas

Colorado Springs, Colorado

 Boise area of Meridian, Idaho

Riverside, California (Southern California)

Salem, Oregon

Wheaton, Illinois

St. Cloud, Minnesota Rockville, MarylandNorth Chili, New York (near Rochester)New Johnsonville, Tennessee

Kenova, West Virginia

Helena, Montana

Middleburg Heights, Ohio

Venice, Florida

Ginnell, Iowa

Piedmont, Alabama

Auburn, Washington (near Seattle)

Elk Grove Village, Illinois

Here is a link to my workshop calendar where you can see all of my travel schedule and to get info on beginner and advanced Brayer workshops:   http://zindorf.blogs.splitcoaststampers.com/workshop-calendar 

Link to my Stampin’ Up website where you can order all of your must have Stampin’ Up products from me 24-7:  http://michellezindorf.stampinup.net

Frequently asked questions answers:  http://zindorf.blogs.splitcoaststampers.com/frequently-asked-questions/ 


Leaves on Fossil Rock – Tutorial #272

dsc01275-2.jpg

Just when you think you have me pegged, I go and make something a little off the wall, lol.   This is my attempt at a fossil rock with fall leaves on it.  My leaves are stamped, colored, cut out, heat embossed and glued on.  I know, gasp!  I actually cut them out and glued them on, lol.

Anyway, I had fun creating this and hope you enjoy seeing the process.  The leaf images in this project are in the Stampin’ Up! set “Autumn Splendor”, Item number 116503, $20.95.  The set is in the current Holiday Mini Catalog and available until January 4, 2010.  🙂

Let’s get started.. . . .  . .

Supplies:

Stamps: Stampin’ Up Autumn Splendor and Kind & Caring Thoughts
Paper: Stampin’ Up Whisper White and Basic Black
Ink: Stampin’ Up Basic Gray, Going Gray and Basic Black
Accessories: Stampin’ Up Basic Black marker, Aqua Painter, Paper Snips, Watercolor Crayons, Versamark Pad, Clear embossing powder, Heat Gun, Old Olive Ribbon & Sponge

Want a free 39 page, Stampin’ Up Mini catalog?  If you are a resident of the United States,  just e-mail your mailing address to me and I will get one in the mail to you.  Are you inspired by this Blog?  One way you can help support this blog is by ordering your Stampin’ Up products through me.   You can order from me 24-7 from this link:  http://michellezindorf.stampinup.net or e-mail me at mzindorf@aim.com  If you are within the United States.  Want a copy of the brand new 2009-2010 Stampin’ Up Catalog for $9.95 with free shipping, just e-mail me at mzindorf@aim.com and I will get one in the mail to you.  Want to become a Stampin’ Up Demonstrator and earn instant income?  Consider being part of my Stampin’ Up Team.  Also check out the Stampin’ Up specials, click this link to check it out:  http://www.stampinup.net/esuite/home/michellezindorf/promotions

dsc01269.JPG

Stamped large and small leaf stamps on Whisper White card stock, loading my stamp first with Versamark and then with Basic Black ink before stamping.  Loaded and stamped them multiple times and then heat embossed all of them at the same time using clear embossing powder and a heat gun. 

Note:  I will be using these leaves in other projects.  That is why I stamped so many.  🙂

dsc01243.JPG

dsc01244.JPG

Colored the center of the leaf with an Old Olive Stampin’ Up Watercolor Crayon.

dsc01245.JPG

Added More Mustard Watercolor Crayon.

dsc01246.JPG

Added Real Red Water Color Crayon around the edges.

dsc01247.JPG

Used a Stampin’ Up Aqua Painter brush filled with water and brushed over the image from the center outward to blend the colors.   Note:  I cleaned my Aqua Painter brush on my scrap paper frequently so the red did not take over the lighter colors.

dsc01248.JPG

Cut out the leaf using my paper snips.  Love these little super sharp, pointy scissors.  🙂

dsc01249.JPG

Pressed the Versamark pad all over the cut out leaf and then heat embossed the cut out with clear embossing powder and a heat gun.  Repeated this process to create a small leaf cut out also.

dsc01250.JPG

dsc01251.JPG

Sponged Going Gray ink, using a pouncing motion, all over a 4.5″ square piece of Whisper White card stock.

dsc01257.JPG

Stamped small and large leaves using Going Gray ink all on the card stock.

dsc01258.JPG

dsc01259.JPG

Sponged Basic Gray ink on the card stock, making sure to leave some light areas.

dsc01260.JPG

Added a bit of Basic Black ink with the sponge and also sponged Basic Black ink around the edges of the card stock.

dsc01261.JPG

Layed out my design and stamped my sentiment before gluing it all together. 

Note:  I stamp my sentiment before gluing the card together just in case I stamp it crooked.  🙂

dsc01262.JPG

Out lined parts of the Going Gray leaves with the fine end of a Basic Black marker.  This helps them stand out a bit more and gives them a bit of depth.

dsc01263.JPG

Assembled my card and added an Old Olive Ribbon.

Here it is finished measuring 5″ x 6.5″.

dsc01275-2.jpg

May you put on paper whatever comes to your mind today.

Until my next post. . . . . . . . . .

Huge Hugs,

Michelle

tiny-bird.jpg  Get ready for Brayer Workshops!  I am coming to:

Broomfield, Colorado

Moore, Oklahoma

Nashville, Indiana

Portland, Michigan

2010

Dayton, Ohio at Marco Paper

Phoenix, Arizona

Monroe, Louisiana

Jacksonville, Florida

 St. Louis, Missouri

Mechanicsville, Virginia

Raleigh, North Carolina 

Colleyville, Texas

Colorado Springs, Colorado

 Boise area of Meridian, Idaho

Riverside, California (Southern California)

Salem, Oregon Wheaton, Illinois

St. Cloud, Minnesota

Rockville, Maryland

North Chili, New York (near Rochester)

New Johnsonville, Tennessee

Kenova, West Virginia

Helena, Montana

Middleburg Heights, Ohio

Venice, Florida

Ginnell, Iowa

Piedmont, Alabama

Auburn, Washington (near Seattle)

Elk Grove Village, Illinois

Here is a link to my workshop calendar where you can see all of my travel schedule and to get info on beginner and advanced Brayer workshops:   http://zindorf.blogs.splitcoaststampers.com/workshop-calendar 

Link to my Stampin’ Up website where you can order all of your must have Stampin’ Up products from me 24-7:  http://michellezindorf.stampinup.net

Frequently asked questions answers:  http://zindorf.blogs.splitcoaststampers.com/frequently-asked-questions/ 


Pumpkin Patch – Tutorial #271

dsc01242-2.jpg

I have a little Autumn scene for you today.  The main set used today is a Stampin’ Up set Autumn Harvest, item number 110372, $17.95.  I teamed it up with a Stampin’ Up set Baroque Motifs and used the flourish as pumpkin vines.  Check it out.  🙂

Let’s get started. . . .

Supplies:

Stamps: Stampin’ Up Autumn Harvest & Baroque Motifs
Paper: Stampin’ Up Whisper White, Dusty Durango & Tempting Turquoise
Ink: Stampin’ UP Dusty Durango, Tempting Turquoise, Old Olive & Basic Black
Accessories: Stampin’ Up Markers, Sponges, Piercing Tool, Gold Brads, Dusty Durango Polka Dot Ribbon, Big Shot Die Cut Machine, Top Note Die, Versamark Pad & Marker, Clear embossing Powder, Heat Gun

Want a free 39 page, Stampin’ Up Mini catalog?  If you are a resident of the United States,  just e-mail your mailing address to me and I will get one in the mail to you.  Are you inspired by this Blog?  One way you can help support this blog is by ordering your Stampin’ Up products through me.   You can order from me 24-7 from this link:  http://michellezindorf.stampinup.net or e-mail me at mzindorf@aim.com  If you are within the United States.  Want a copy of the brand new 2009-2010 Stampin’ Up Catalog for $9.95 with free shipping, just e-mail me at mzindorf@aim.com and I will get one in the mail to you.  Want to become a Stampin’ Up Demonstrator and earn instant income?  Consider being part of my Stampin’ Up Team.  Also check out the Stampin’ Up specials, click this link to check it out:  http://www.stampinup.net/esuite/home/michellezindorf/promotions

dsc01236.JPG

Used my Big Shot Dye Cut Machine and the Top Note Die to cut out this shape with Whisper White Card stock.

dsc01205.JPG

Stamped the leaf from the Autumn Harvest set by first loading my stamp with Versamark and then with Basic Black ink before stamping it on the card stock.  Stamped all three images loading the stamp each time with Versamark and ink.   Heat embossed the images using clear embossing powder and a heat gun.

dsc01206.JPG

dsc01207.JPG

Colored the leaves in with a Creamy Caramel marker.

dsc01208.JPG

Added More Mustard marker to the leaves.

dsc01209.JPG

Added a bit of Real Red Marker to the center of the leaves.

dsc01210.JPG

Colored over the leaves, staying within the embossed lines with a Versamark marker.  Heat embossed the images using clear embossing powder and a heat gun.

dsc01211.JPG

dsc01212.JPG

Stamped the two pumpkins from the Autumn Harvest set by first loading the stamps with Versamark and then with Dusty Durango ink before stamping them.  Heat embossed the images using clear embossing powder and a heat gun.

dsc01213.JPG

dsc01214.JPG

Colored in the pumpkins with a More Mustard marker.

dsc01215.JPG

Added Pumpkin Pie Marker.

dsc01216.JPG

Added Real Red marker.

dsc01219.JPG

Colored in the Pumpkin stems with an Old Olive marker.

dsc01220.JPG

I wanted to brighten up the Pumpkins a bit so I colored over the pumpkins with a Summer Sun marker.

dsc01221.JPG

Colored over the pumpkins with a Versamark marker and heat embossed the images using clear embossing powder and a heat gun.

dsc01222.JPG

dsc01223.JPG

Masked the bottom of the card stock with a post it note.  Stamped the Flourish from the Stampin’ Up set Baroque Motifs by first loading the stamp with Versamark and then with Old Olive ink before stamping it.  Heat embossed the image using clear embossing powder and a heat gun.  Note I kept the post it note on while heat embossing to keep the embossing powder from sticking to the residue left by the post it note.

dsc01224.JPG

dsc01225.JPG

Sponged Old Olive ink at the bottom of the card stock.

dsc01226.JPG

Sponged Tempting Turquoise ink at the top of the card stock.

dsc01227.JPG

Sponged Dusty Durango ink around the outside edge of the card stock.

dsc01228.JPG

Added Tempting Turquoise and Dusty Durango panels, Dusty Durango Polka Dot Ribbon and two Gold Brads.  Here is the finished card measuring 5″ x 6.5″.

dsc01242-2.jpg

May your day be one of the happiest of your life.

Until my next post. . . . . .

Huge Hugs,

Michelle

tiny-bird.jpg  Get ready for Brayer Workshops!  I am coming to:

Broomfield, Colorado

Moore, Oklahoma

Nashville, Indiana

Portland, Michigan

2010

Dayton, Ohio at Marco Paper

Phoenix, Arizona

Monroe, Louisiana

Jacksonville, Florida St. Louis, MissouriMechanicsville, VirginiaRaleigh, North Carolina Colleyville, Texas

Colorado Springs, Colorado

Boise area of Meridian, Idaho

Riverside, California (Southern California)

 Salem, Oregon

Wheaton, Illinois

St. Cloud, Minnesota

Rockville, Maryland

North Chili, New York (near Rochester)

New Johnsonville, Tennessee

Kenova, West Virginia

Helena, Montana

Middleburg Heights, Ohio

Venice, Florida

Ginnell, Iowa

Piedmont, Alabama

Auburn, Washington (near Seattle)

Elk Grove Village, Illinois

Here is a link to my workshop calendar where you can see all of my travel schedule and to get info on beginner and advanced Brayer workshops:   http://zindorf.blogs.splitcoaststampers.com/workshop-calendar 

Link to my Stampin’ Up website where you can order all of your must have Stampin’ Up products from me 24-7:  http://michellezindorf.stampinup.net

Frequently asked questions answers:  http://zindorf.blogs.splitcoaststampers.com/frequently-asked-questions/ 


Night Time Christmas Cardinal – Tutorial #270

dsc01201.JPG

Here in Ohio we have lots of Cardinals.  It is our state bird, by the way.  I love hearing their cheerful chirp and seeing their bright red feathers when they visit my bird feeders.  Especially love seeing them in the winter when the ground is covered in snow. 

Our temperatures this week are not suppose to get out of the forties.  That is a bit chilly for October here.  So once again my mind is thinking Winter.  That is not all bad, I am getting a head start on my Christmas cards.  Maybe I will get some sent this year.  🙂  Last year I did not even get my Christmas cards made.  You would think with as many cards that I make that would not be a problem. . . . . . where does the time go.  If I could just do without sleep entirely. .. . . . . . . .maybe, just maybe, lol.

Let’s get started.

Supplies:

Stamps: Stampin’ Up! A Cardinal Christmas & Serene Snowflakes
Paper: Stampin’ Up! Whisper White, Bashful Blue & Basic Black
Ink: Stampin’ Up! Basic Black, Not Quite Navy & Night of Navy
Accessories: Stampin’ Up! Markers Old Olive, Always Artichoke, Real Red, Bravo Burgundy, More Mustard & Close to Cocoa, Red Ribbon, Versamark marker & Pad, Clear embossing powder, heat gun, brayer, post it note, sponge

Want a free 39 page, Stampin’ Up Mini catalog?  If you are a resident of the United States,  just e-mail your mailing address to me and I will get one in the mail to you.  Are you inspired by this Blog?  One way you can help support this blog is by ordering your Stampin’ Up products through me.   You can order from me 24-7 from this link:  http://michellezindorf.stampinup.net or e-mail me at mzindorf@aim.com  If you are within the United States.  Want a copy of the brand new 2009-2010 Stampin’ Up Catalog for $9.95 with free shipping, just e-mail me at mzindorf@aim.com and I will get one in the mail to you.  Want to become a Stampin’ Up Demonstrator and earn instant income?  Consider being part of my Stampin’ Up Team.  Also check out the Stampin’ Up specials, click this link to check it out:  http://www.stampinup.net/esuite/home/michellezindorf/promotions

dsc01204.JPG

On a 3.5″ x 5″ piece of Whisper White card stock stamped the snowflakes from the Stampin’ Up set Serene Snowflakes with Versamark only.   Heat embossed the images using clear embossing powder and a heat gun.

dsc01168.JPG

dsc01171.JPG

Stamped the Cardinal from the Stampin’ Up set A Christmas Cardinal by first loading the stamp with Versamark and then with Basic Black ink before stamping it.  Heat embossed the image using clear embossing powder and a heat gun.

dsc01172.JPG

dsc01173.JPG

Colored the leaves in with an Old Olive marker in the light areas and Always Artichoke in the dark areas.

dsc01174.JPG

Colored the Cardinals beak with a More Mustard marker.  Also colored his chest and head with the More Mustard marker.  I wanted the More Mustard under the red I will put on next to warm the red up a bit.

dsc01175.JPG

Colored over the bird with the a Real Red marker.

dsc01176.JPG

Colored over the Cardinal’s back and tail with a Bravo Burgundy marker.

dsc01177.JPG

Now keep in mind that you will need to wipe ink off of your embossed images through out this project.  I use an old cotton towel.

dsc01178.JPG

It is hard to see in this photo, but I colored in the stems with a Close to Cocoa marker, his feet with the More Mustard marker and the Berries with the Bravo Burgundy marker.

dsc01179.JPG

Colored over the image, staying within the embossed lines with a Versamark marker.  Heat embossed the image using clear embossing powder and a heat gun.

dsc01180.JPG

dsc01181.JPG

Now that my image is completely embossed I can put in my back ground and the embossing with resist the ink.

Brayered Not Quite Navy ink from the top of the card stock to the bottom.

We can see the snowflakes now that I stamped in step one.

dsc01183.JPG

Brayered Night of Navy at the top of the card stock.

dsc01184.JPG

Tore a Post It Note and sponged Night of Navy at the post it note edge to create a hill shape.

dsc01186.JPG

Moved the post it note and repeated the last step to create a second hill.

dsc01187.JPG

Stamped the Leaf Shadow stamp from the Stampin’ Up set A Cardinal Christmas a few times using Not Quite Navy ink.

dsc01189.JPG

Remember, I am wiping the ink off of my embossed images each step.

Sponged Night of Navy ink around the edge of the card stock and over the stamped leaf shadows to darken the left side of the panel.

dsc01193.JPG

Added White Gel pen to the branch and leaves to look like snow.

dsc01194.JPG

Lastly, I heated my embossed images to make them shiny again.  They get dual when you wipe them off a few times.  Heating them brings back that shine.

dsc01195.JPG

Sponged Not Quite Navy around the edges of a Bashful Blue card stock panel.

dsc01196.JPG

Assembled my card and added some red ribbon.  I kept this card layout very simple so the main image panel would be the focus.

dsc01201.JPG

I hope you enjoyed this tutorial.  Do you believe this is number 270!

May your day be filled with warmth and love.

Until my next post. . . .  . . . .

Huge Hugs,

Michelle

tiny-bird.jpg  Get ready for Brayer Workshops!  I am coming to:

Broomfield, Colorado

Moore, Oklahoma

Nashville, Indiana

Portland, Michigan

2010Dayton, Ohio at Marco PaperPhoenix, ArizonaMonroe, LouisianaJacksonville, Florida

 St. Louis, Missouri

Mechanicsville, Virginia

Raleigh, North Carolina

 Colleyville, Texas

Colorado Springs, Colorado

Boise area of Meridian, Idaho

Riverside, California (Southern California)

 Salem, Oregon

Wheaton, Illinois

St. Cloud, Minnesota

Rockville, Maryland

North Chili, New York (near Rochester)

New Johnsonville, Tennessee

Kenova, West Virginia

Helena, Montana

Middleburg Heights, Ohio

Venice, Florida

Ginnell, Iowa

Piedmont, Alabama

Auburn, Washington (near Seattle)

Elk Grove Village, Illinois

Here is a link to my workshop calendar where you can see all of my travel schedule and to get info on beginner and advanced Brayer workshops:   http://zindorf.blogs.splitcoaststampers.com/workshop-calendar 

Link to my Stampin’ Up website where you can order all of your must have Stampin’ Up products from me 24-7:  http://michellezindorf.stampinup.net

Frequently asked questions answers:  http://zindorf.blogs.splitcoaststampers.com/frequently-asked-questions/ 


Spooky Cave – Tutorial #267

dsc01118.JPG

Okay, I just could not go through October without using this cute skeleton stamp from the Stampin’ UP! Holiday Mini Catalog set “Twick or Tweet”.  Love that little dog!  This is my attempt at a cave scene.  🙂  You have got to wonder about my imagination some times, lol.

Let’s get right to the tutorial today. . . . .

Supplies:

Stamps: Stampin’ Up Twick or Tweet, From the Crypt, Baroque Motifs & Totally Tabs
Paper: Stampin’ UP Lovely Lilac, Old Olive and Whisper White
Ink: Stampin’ Up Going Gray, Old Olive, Basic Gray & Basic Black
Accessories: Stampin’ UP Mat Pack, Piercing Tool, Brayer, Creamy Caramel marker, White Gel Pen, Tab Punch, Black ribbon, Black marker, Sponge

Want a free 39 page, Stampin’ Up Mini catalog?  If you are a resident of the United States,  just e-mail your mailing address to me and I will get one in the mail to you.  Are you inspired by this Blog?  One way you can help support this blog is by ordering your Stampin’ Up products through me.   You can order from me 24-7 from this link:  http://michellezindorf.stampinup.net or e-mail me at mzindorf@aim.com  If you are within the United States.  Want a copy of the brand new 2009-2010 Stampin’ Up Catalog for $9.95 with free shipping, just e-mail me at mzindorf@aim.com and I will get one in the mail to you.  Want to become a Stampin’ Up Demonstrator and earn instant income?  Consider being part of my Stampin’ Up Team.  Also check out the Stampin’ Up specials, click this link to check it out:  http://www.stampinup.net/esuite/home/michellezindorf/promotions

dsc01123.JPG

Brayered Old Olive ink at the top and bottom of a 4″ x 5″ piece of Whisper White card stock.

dsc01102.JPG

Ripped a hill shape in a post it note and used it to mask the top of the card stock to create the top of the cave.

dsc01103.JPG

Brayered Going Gray ink over the post it note and onto the card stock from the top.

dsc01104.JPG

Brayered Basic Gray ink at the top of the card stock.

dsc01105.JPG

Sponged Basic Black ink at the the post it note edge and the sides of the card stock.

dsc01106.JPG

Removed post it note mask and dabbed Basic Black ink on the top of the card stock with a sponge.

dsc01107.JPG

Stamped the skeleton on with Basic Black ink.

dsc01108.JPG

Colored the dog in with a Creamy Caramel marker.

dsc01109.JPG

Colored in the skeleton with a white gel pen.

dsc01110.JPG

Stamped the Flourish stamp from the Stampin’ Up set Baroque Motifs with Basic Black ink.

dsc01111.JPG

Sponged Basic Black ink around the edge of the card stock.

dsc01112.JPG

Stamped this flourish tab stamp from the Stampin’ Up set Totally Tabs using Basic Black ink on a scrap of Lovely Lilac card stock.  Punched it out using the Stampin’ Up Tab punch.

dsc01113.JPG

Stamped the bat from the Stampin’ Up set From the Crypt twice with Basic Black ink.

dsc01114.JPG

Wrote “Eeek!” on the tab and outlined the design on the bats with a white gel pen.

dsc01115.JPG

Assembled the card front and pierced around the edge of the top and bottom using the Stampin’ Up Mat Pack and Piercing tool.

dsc01116.JPG

Ran a black marker point from pierced hole to pierced hole to create a faux stitched look.

dsc01117.JPG

Here is the finished card measuring 5″ x 6.5″.

dsc01118.JPG

May your day be over flowing with fun images.

Until my next post. . . . .  .

Huge Hugs!

Michelle

tiny-bird.jpg  Get ready for Brayer Workshops!  I am coming to:

Akron, Ohio

Broomfield, Colorado

Moore, Oklahoma

Nashville, Indiana

Portland, Michigan

2010

Dayton, Ohio at Marco Paper

Phoenix, Arizona

Monroe, Louisiana

Jacksonville, Florida

St. Louis, Missouri

Mechanicsville, Virginia

Raleigh, North Carolina 

Colleyville, Texas

Colorado Springs, Colorado

Boise area of Meridian, Idaho

Riverside, California (Southern California)

Salem, Oregon

Wheaton, Illinois

St. Cloud, Minnesota

Rockville, Maryland

North Chili, New York (near Rochester)

New Johnsonville, Tennessee

Kenova, West Virginia

Helena, Montana

Middleburg Heights, Ohio

Venice, Florida

Ginnell, Iowa

Piedmont, Alabama

Auburn, Washington (near Seattle)

Elk Grove Village, Illinois

Here is a link to my workshop calendar where you can see all of my travel schedule and to get info on beginner and advanced Brayer workshops:   http://zindorf.blogs.splitcoaststampers.com/workshop-calendar 

Link to my Stampin’ Up website where you can order all of your must have Stampin’ Up products from me 24-7:  http://michellezindorf.stampinup.net

Frequently asked questions answers:  http://zindorf.blogs.splitcoaststampers.com/frequently-asked-questions/


Flowers & Nest – Tutorial #265

dsc01013.JPG

Today’s tutorial is a little lesson on how you can heat emboss over heat embossed images to put images behind one another.  This lesson is a bit long so you will want to get chocolate and coffee to make it through, lol. 

I want to share a couple of things before I start the tutorial.  Last weekend I had the pleasure of joining my Stampin’ Up!  Up Line at an event they put together called Fall Fest.  It was in New Jersey and it was WAY FUN!!  Thanks to everyone, you made me feel so very welcome.  🙂

Of course, at Stampin’ Up events people bring swap cards to trade.  I didn’t bring a card but instead made bookmarks.  This is what I swapped.  🙂

dsc01019.JPG

The swaps I received in return were out of this world wonderful.   Thanks to all!

I also got to teach how to create this card to everyone in attendance.

dsc00471.JPG

My Awesome Stampin’ Up! Down Line Team will be sent the directions for these two projects so they can share them with at their workshops.

Now on with the tutorial. . .  .

Supplies:

Stamps: Stampin’ Up Bloomin’ Beautiful, All Holidays, Priceless & Nature’s Nest
Paper: Stampin’ Up Whisper White, Apricot Appeal, Bashful Blue & Basic Black
Ink: Stampin’ Up Close to Cocoa, Creamy Caramel, Sahara Sand, Bashful Blue, Basic Black & Apricot Appeal
Accessories: Stampin’ Up Markers, Versamark Marker & Pad, Clear embossing powder, heat gun, White Gel Pen & Sponges

Want a free 39 page, Stampin’ Up Mini catalog?  If you are a resident of the United States,  just e-mail your mailing address to me and I will get one in the mail to you.  Are you inspired by this Blog?  One way you can help support this blog is by ordering your Stampin’ Up products through me.   You can order from me 24-7 from this link:  http://michellezindorf.stampinup.net or e-mail me at mzindorf@aim.com  If you are within the United States.  Want a copy of the brand new 2009-2010 Stampin’ Up Catalog for $9.95 with free shipping, just e-mail me at mzindorf@aim.com and I will get one in the mail to you.  Want to become a Stampin’ Up Demonstrator and earn instant income?  Consider being part of my Stampin’ Up Team.  Also check out the Stampin’ Up specials, click this link to check it out:  http://www.stampinup.net/esuite/home/michellezindorf/promotions

dsc01017.JPG

Stamped the Sentiment from the Stampin’ Up All Holidays set by first loading the stamp with Versamark and then Bashful Blue ink before stamping it on a 4.5″ square piece of Whisper White card stock.  I then heat embossed the image with clear embossing powder and a heat gun.

dsc00977.JPG

dsc00978.JPG

Stamped the Flourish from the Stampin’ Up set Priceless by first loading it with Versamark and then Sahara Sand ink before stamping it.  I then heat embossed the image using clear embossing powder and a heat gun.

dsc00979.JPG

Stamped the Nest image from the Stampin’ Up set Nature’s Nest by first loading the stamp with Versamark and then Close to Cocoa ink before stamping the image.  I then heat embossed the nest using clear embossing powder and a heat gun.

dsc00981.JPG

Colored the eggs in with a Bashful Blue marker.

dsc00983.JPG

Added Ballet Blue ink to the eggs.

dsc00984.JPG

Blended the two colors together using the Bashful Blue marker again.

dsc00985.JPG

Colored the nest in with a Creamy Caramel marker.

dsc00986.JPG

Added Close To Cocoa marker to the bottom of the nest.

dsc00987.JPG

Colored in the leaves with an Old Olive Marker.

dsc00988.JPG

Colored over the nest and eggs with a Versamark marker and then heat embossed the image using clear embossing powder and a heat gun.

dsc00989.JPG

Stamped the pot of Flowers from the Stampin’ UP set Bloomin’ Beautiful set by first loading the stamp with Versamark and then Close to Cocoa ink before stamping it.  I then heat embossed the image using clear embossing powder and a heat gun.

dsc00991.JPG

Colored the pot in with a Bashful Blue marker.

dsc00993.JPG

Added Ballet Blue marker to the shadow parts of the pot.

dsc00994.JPG

Blended the colors on the pot together by coloring over them with the Bashful Blue marker.

dsc00995.JPG

Colored in the flowers with a Blush Blossom marker.

dsc00996.JPG

Colored in the leaves with an Old Olive Marker.

dsc00997.JPG

Added Pretty in Pink marker to the flowers.

dsc00998.JPG

Added just a touch of Positively Pink marker to the flowers.

dsc00999.JPG

Colored over the flowers and pot with a Versamark marker and heat embossed the image using clear embossing powder and a heat gun.

dsc01000.JPG

Sponged Apricot Appeal ink all over the card stock using a circular motion.

dsc01001.JPG

Sponged Creamy Caramel ink under the nest and pot and around the edge of the card stock.

dsc01002.JPG

Added Close to Cocoa ink around the edge of the card stock and under the nest and pot without covering up all of the Creamy Caramel ink.

dsc01003.JPG

Added a touch of Basic Black ink around the edge of the card stock and under the nest and pot, not covering up all of the Close to Cocoa ink.

dsc01004.JPG

Time to add some white highlights.

Colored in the centers of the flowers, added touches of white to the sentiment, eggs and flourish.

dsc01006.JPG

Added a bit of Basic Black marker to the flourish and bottom of the flowers, flower pot and nest.

dsc01007.JPG

Lastly, my very wise Up Line, Karen Barber shared this tip with me.  When you finish a heat embossed card, heat it for just a second with your heat gun to bring back that brilliant shine to all of your embossed images. 

dsc01008.JPG

I finished the card off with an Apricot Appeal, Bashful Blue & 2 Basic Black panels, gold brads, and a thin strip of Basic Black card stock.

Here it is finished measuring 5 3/8″ square.

dsc01013.JPG

May your day be filled with things that warm your heart.

Until my next post. .. . . . . . . .

Hugs,

Michelle

tiny-bird.jpg  Get ready for Brayer Workshops!  I am coming to:

Knox, Maine  – I will be in Knox, Maine this Friday & Saturday (October 2 & 3).  There are a couple of spot available if you want to jump in at the last moment.  🙂  Just e-mail me at mzindorf@aim.com and I can give you all the details.

Akron, Ohio

Broomfield, Colorado

Moore, Oklahoma

Nashville, Indiana

Portland, Michigan

2010

Dayton, Ohio at Marco Paper

Phoenix, Arizona

Monroe, Louisiana

Jacksonville, Florida

St. Louis, Missouri

Mechanicsville, Virginia

Raleigh, North Carolina 

Colleyville, Texas

Colorado Springs, Colorado

Boise area of Meridian, Idaho

Riverside, California (Southern California)

Salem, Oregon

Wheaton, Illinois

St. Cloud, Minnesota

Rockville, Maryland

North Chili, New York (near Rochester)

New Johnsonville, Tennessee

Kenova, West Virginia

Helena, Montana

Middleburg Heights, Ohio

Venice, Florida

Ginnell, Iowa

Piedmont, Alabama

Auburn, Washington

Elk Grove Village, Illinois

Here is a link to my workshop calendar where you can see all of my travel schedule and to get info on beginner and advanced Brayer workshops:   http://zindorf.blogs.splitcoaststampers.com/workshop-calendar 

Link to my Stampin’ Up website where you can order all of your must have Stampin’ Up products from me 24-7:  http://michellezindorf.stampinup.net

Frequently asked questions answers:  http://zindorf.blogs.splitcoaststampers.com/frequently-asked-questions/


Winter Pines – Tutorial #263

dsc00954.JPG

 How about a winter scene for all of you early birds out there that are already working on those Christmas cards.

I really needed to get my embossing powder fix this week, lol.  So here is a project that features embossed images over embossed images.  This project features the brand new Stampin’ Up Level 1 Hostess set “Patterned Pines”.  This set is only available until January 4, 2010 and is featured in the New Holiday mini catalog.  The stamp set is free with an order of $150.  Along with the Patterned Pines Tree, I used my favorite flourish from the Stampin’ Up set Baroque Motifs, item number 113490.  This set was still out on my desk from using it in my last tutorial so I went ahead and used it again.

Let’s get right into the tutorial. . . .

Supplies:

Stamps: Stampin’ Up Patterned Pines and Baroque Motifs
Paper: Stampin’ UP Whisper White, Sahara Sand and Basic Black
Ink: Stampin’ Up Basic Black, Not Quite Navy, Bordering Blue & Sahara Sand
Accessories: Versamark Marker & Pad, Gold Brads, White Ribbon, Stampin’ Up Piercing Tool & Mats, Stampin’ Up markers, Sponge, Brayer, Clear embossing powder and Heat gun

Want a free 39 page, Stampin’ Up Mini catalog?  If you are a resident of the United States,  just e-mail your mailing address to me and I will get one in the mail to you.  Are you inspired by this Blog?  One way you can help support this blog is by ordering your Stampin’ Up products through me.   You can order from me 24-7 from this link:  http://michellezindorf.stampinup.net or e-mail me at mzindorf@aim.com  If you are within the United States.  Want a copy of the brand new 2009-2010 Stampin’ Up Catalog for $9.95 with free shipping, just e-mail me at mzindorf@aim.com and I will get one in the mail to you.  Want to become a Stampin’ Up Demonstrator and earn instant income?  Consider being part of my Stampin’ Up Team.  Also check out the Stampin’ Up specials, click this link to check it out:  http://www.stampinup.net/esuite/home/michellezindorf/promotions

dsc00955.JPG

On a 4.25″ x 5″ piece of Whisper White stamped the Baroque Motifs Flourish with Versamark only.  Heat embossed the image using clear embossing powder. 

dsc00929.JPG

dsc00930.JPG

Stamped the Patterned Pines Trees by first loading my stamp with Versamark and then with Sahara Sand ink before stamping it.  Heat embossed the images using clear embossing powder and a heat gun.

dsc00932.JPG

dsc00933.JPG

Colored over the trees with a Versamark marker and heat embossed the images using clear embossing powder and a heat gun.  This protects the white designs in the tree images.

dsc00934.JPG

dsc00935.JPG

Tore the edge off of a post it note and used it as a mask for the snow area of the scene.

dsc00936.JPG

Brayered Bordering Blue ink at the top of the card stock.

dsc00937.JPG

Brayered Not Quite Navy ink at the top of the card stock, not covering the Bordering Blue ink entirely.

dsc00938.JPG

Sponged Not Quite Navy ink right at the post it note edge to darken the horizon line.

dsc00939.JPG

Removed the post it note mask and wiped the ink off of my heat embossed images.  Be careful not to smear the ink from the embossed images onto your white snow.

dsc00940.JPG

Tore a hill in the post it note mask and held it in place while I sponged Bordering Blue ink at the post it note edge to create a hill in the scene.

dsc00941.JPG

dsc00942.JPG

Outlined the embossed Flourish with a Bordering Blue Marker to make it look more dimensional. 

dsc00943.JPG

Outlined the flourish that is closer to the top of the card stock with a Not Quite Navy marker.

dsc00944.JPG

Put a post it note mask right under the trees and sponged on some Bordering Blue ink to create a shadow for the trees.

dsc00945.JPG

Outlined the right sides of the trees with a Sahara Sand marker.

dsc00946.JPG

Added a thin Basic Black marker line down the right sides of the trees.

dsc00947.JPG

Sponged Not Quite Navy ink around the outside edge of the card stock.

dsc00948.JPG

Sponged Basic Black ink around the outside edges of the card stock.

Added a Basic Black and Sahara Sand panel, White Ribbon and Gold Brads.

dsc00949.JPG

Used my Stampin’ UP Piercing Tool and mats to add the pierced lines at the top and bottom of the card.

dsc00950.JPG

Here is the finished project measuring 5.25″ square.

dsc00954.JPG

I am flying out to New Jersey tomorrow for a Stampin’ Up Team event.  I am sooooo excited!

May your weekend be one of fun and laughter!

Until my next post. . . . .

Huge Hugs,

Michelle

moon-glow-edited-7-tiny.jpg  Get ready for Brayer Workshops!  I am coming to:

Knox, Maine

Akron, Ohio

Broomfield, Colorado

Moore, Oklahoma

Nashville, Indiana

Portland, Michigan

2010

Dayton, Ohio at Marco Paper

Phoenix, Arizona

Monroe, Louisiana

Jacksonville, Florida

St. Louis, Missouri

Mechanicsville, Virginia

Raleigh, North Carolina 

Colleyville, Texas

Colorado Springs, Colorado

Boise area of Meridian, Idaho

Riverside, California (Southern California)

Salem, Oregon

Wheaton, Illinois

St. Cloud, Minnesota

Rockville, Maryland

North Chili, New York (near Rochester)

New Johnsonville, Tennessee

Kenova, West Virginia

Helena, Montana

Middleburg Heights, Ohio

Venice, Florida

Ginnell, Iowa

Piedmont, Alabama

Auburn, Washington

Elk Grove Village, Illinois

Here is a link to my workshop calendar where you can see all of my travel schedule and to get info on beginner and advanced Brayer workshops: 

 http://zindorf.blogs.splitcoaststampers.com/workshop-calendar 

Link to my Stampin’ Up website where you can order all of your must have Stampin’ Up products from me 24-7: 

 http://michellezindorf.stampinup.net

Frequently asked questions answers: 

 http://zindorf.blogs.splitcoaststampers.com/frequently-asked-questions/


Windy Tree – Tutorial #262 and a Blog Candy Winner!

dsc00927.JPG

Happy First Day of Autumn!   In the spirit of Fall here is a card using Stampin’ Up ink pads and the direct to paper technique to swipe in the background quickly.  But before we get into today’s tutorial let me congratulate the lastest blog candy winner.

dsc09913.JPG  Congratulations Carole Philpot who wrote:  “I love your blog, it has been such an inspiration to me. I have been a “technique junkie” for years of cardmaking, mostly folds, never stamped much until I signed up for your blog and now I am attempting to brayer and sponge backgrounds and stamp! Thanks for all the good tutorials”

Carole, please e-mail your mailing address to mzindorf@aim.com within 30 days and I will put this great set in the mail to you.  🙂

Thank you to everyone that played along.

Now on with this mornings Autumn themed tutorial. . . . .

Supplies:

Stamps: Stampin’ Up Branch Out & Baroque Motifs
Paper: Stampin’ Up Whisper White, Bashful Blue & Old Olive
Ink: Stampin’ Up Basic Black, Really Rust, Old Olive, Always Artichoke & Bashful Blue
Accessories: Silver Brads, Sponge, White Gel Pen

Want a free 39 page, Stampin’ Up Mini catalog?  If you are a resident of the United States,  just e-mail your mailing address to me and I will get one in the mail to you.  Are you inspired by this Blog?  One way you can help support this blog is by ordering your Stampin’ Up products through me.   You can order from me 24-7 from this link:  http://michellezindorf.stampinup.net or e-mail me at mzindorf@aim.com  If you are within the United States.  Want a copy of the brand new 2009-2010 Stampin’ Up Catalog for $9.95 with free shipping, just e-mail me at mzindorf@aim.com and I will get one in the mail to you.  Want to become a Stampin’ Up Demonstrator and earn instant income?  Consider being part of my Stampin’ Up Team.  Also check out the Stampin’ Up specials, click this link to check it out:  http://www.stampinup.net/esuite/home/michellezindorf/promotions

dsc00928.JPG

On a 3.5″ x 5″ piece of Whisper White card stock, smeared Bashful Blue Ink on using the short end of the ink pad.

dsc00912.JPG

Stamped the Flourish from the Stampin’ Up Baroque Motifs set with Bashful Blue ink.

dsc00913.JPG

Smeared Bashful Blue ink at the bottom of the card stock.

dsc00914.JPG

Smeared Old Olive ink at the bottom of the card stock.

dsc00915.JPG

Turned the card stock up side down and smeared Always Artichoke ink from the ground toward the sky using the edge of the ink pad.

dsc00916.JPG

Stamped the Stampin’ Up Branch Out sets Tree using Basic Black ink.

dsc00917.JPG

Stamped leaves using Old Olive and Really Rust ink on the tree and to the side of the tree.

dsc00918.JPG

Added White Gel Pen highlights to the Flourish to bring it a bit forward in the scene.

dsc00919.JPG

Sponged Old Olive ink around the outside edges of the card stock.

dsc00920.JPG

Sponged Basic Black ink around the outside edges of the card stock, not covering the Old Olive sponged ink entirely.

dsc00921.JPG

Added Whisper White, Bashful Blue and Old Olive card stock panels.

dsc00922.JPG

Added Silver Brads in the corners of the main image panel using a piercing tool to start the brads.

dsc00923.JPG

Here is the finished card measuring 5″ x 6.5″.

dsc00927.JPG

I just got home last night after spending the weekend in Yardley, PA teaching my brayering techniques to totally terrific groups of ladies.  My drive there and back was wonderful.  I found myself in some very scenic country in Ohio, West Virginia, Maryland and Pennsylvania.

Here is one photo taken just as the sun was rising as I was driving along yesterday morning.

dsc00869.JPG

The traffic was a bit slow going through Philly so I was able to take this photo in bumper to bumper traffic.  

dsc00892.JPG

May your day be smooth sailing!

Until my next post. . . . .

Huge Hugs,

Michelle

moon-glow-edited-7-tiny.jpg  Get ready for Brayer Workshops!  I am coming to:

Knox, Maine

Akron, Ohio

Broomfield, Colorado

Moore, Oklahoma

Nashville, Indiana

Portland, Michigan

2010

Dayton, Ohio at Marco Paper

Phoenix, Arizona

Monroe, Louisiana

Jacksonville, Florida

St. Louis, Missouri

Mechanicsville, Virginia

Raleigh, North Carolina 

Colleyville, Texas

Colorado Springs, Colorado

Boise area of Meridian, Idaho

Riverside, California (Southern California)

Salem, Oregon

Wheaton, Illinois

St. Cloud, Minnesota

Rockville, Maryland

North Chili, New York (near Rochester)

New Johnsonville, Tennessee

Kenova, West Virginia

Helena, Montana

Middleburg Heights, Ohio

Venice, Florida

Ginnell, Iowa

Piedmont, Alabama

Auburn, Washington

Elk Grove Village, Illinois

Here is a link to my workshop calendar where you can see all of my travel schedule and to get info on beginner and advanced Brayer workshops: 

 http://zindorf.blogs.splitcoaststampers.com/workshop-calendar 

Link to my Stampin’ Up website where you can order all of your must have Stampin’ Up products from me 24-7: 

 http://michellezindorf.stampinup.net

Frequently asked questions answers: 

 http://zindorf.blogs.splitcoaststampers.com/frequently-asked-questions/


Quick Note Card – Tutorial #260

dsc00823.JPG

Here is a quick little note card you can put together in no time at all.  I know some of you are groaning right now saying  “sure, sure, quick card, right.”  Really, once you have your brayering skills up to speed you really can put this card together in about 10 minutes.

Let’s get started. . . .  .

Supplies:

Stamps: Stampin’ Up Hostess Set “Asian Artistry”
Paper: Stampin’ Up Whisper White, Pumpkin Pie, Bashful Blue & Brilliant Blue
Ink: Stampin’ Up Basic Black, Brilliant Blue & Bashful Blue
Accessories: Stampin’ Up Silver Brads, White Gel Pen, Brayer & Piercing tool

Want a free 39 page, Stampin’ Up Mini catalog?  If you are a resident of the United States,  just e-mail your mailing address to me and I will get one in the mail to you.  Are you inspired by this Blog?  One way you can help support this blog is by ordering your Stampin’ Up products through me.   You can order from me 24-7 from this link:  http://michellezindorf.stampinup.net or e-mail me at mzindorf@aim.com  If you are within the United States.  Want a copy of the brand new 2009-2010 Stampin’ Up Catalog for $9.95 with free shipping, just e-mail me at mzindorf@aim.com and I will get one in the mail to you.  Want to become a Stampin’ Up Demonstrator and earn instant income?  Consider being part of my Stampin’ Up Team.  Also check out the Stampin’ Up specials, click this link to check it out:  http://www.stampinup.net/esuite/home/michellezindorf/promotions

dsc00824.JPG

On a 3.5″ x 4.5″ piece of Whisper White card stock, brayered Bashful Blue ink at the bottom of the card stock.

dsc00814.JPG

Turned the card stock and brayered Bashful Blue ink at the top fo the card stock.

dsc00815.JPG

Brayered Brilliant Blue ink at the bottom and top of the card stock.

dsc00816.JPG

dsc00817.JPG

Stamped the Stampin’ Up, Asian Artistry Stamp with Basic Black ink.

dsc00818.JPG

Using just the very edge of a Basic Black ink pad, dragged it in a downward motion to put in the grasses reflection in the background.

dsc00819.JPG

Dragging the edge of Basic Black ink pad in an upward motion, I put in the grasses in the background.

Note:  see next to the ink pad, I try things out on my scrap paper before putting them on the card stock.  🙂

dsc00820.JPG

Added white gel pen highlights to the plant.

Note:  Stampin’ Up sells this great Signo Uniball White Gel pen which is my favorite all time gel pen.  This gel pen is a strong bold white pen.

Tip:  When using your gel pen, take the cap off and hold it in your hand to remind yourself to immediately put the cap back on the pen so it will not dry out at the tip.  All white gel pens will dry out at the tip if left even for a couple of moments laying open.  I have not been successful getting them to write again after they have dried out.  😦

dsc00821.JPG

Keeping this a quick card, I layered the Main image panel with  Pumpkin Pie, Bashful Blue and Brilliant Blue Panels.  I also Added 4 silver brads.

dsc00822.JPG

Here is the finished card measuring 4.25″ x 5.25.  Just a hair smaller than a quarter card.  🙂

dsc00823.JPG

I just returned last night from my Brayer Workshops in Castro Valley, California.  Where I had such a terrific time with some super great stampers.  I was hosted by the fabulous, Wendy Gorton.  Here she is pictured with me on the right.

Love ya Wendy!

  hpim1864-4.jpg

And here are 3 groups of new Master Brayer Queens.  I enjoyed meeting each and everyone of you.  What fun gals!

hpim18621-3.jpg

hpim18611-2.jpg

hpim18591-2.jpg

May your day be overflowing with as much joy and laughter as I had this past weekend.

Until my next post. . . . .

Huge Hugs,

Michelle

moon-glow-edited-7-tiny.jpg  Get ready for Brayer Workshops!  I am coming to:

Yardley, Pennsylvania (near Philadelphia) 

Knox, Maine

Akron, Ohio

Broomfield, Colorado

Moore, Oklahoma

Nashville, Indiana

Portland, Michigan

2010

Dayton, Ohio at Marco Paper

Phoenix, Arizona

Monroe, Louisiana

Jacksonville, Florida

St. Louis, Missouri

Mechanicsville, Virginia

Raleigh, North Carolina 

Colleyville, Texas

Colorado Springs, Colorado

Boise area of Meridian, Idaho

Riverside, California (Southern California)

Salem, Oregon

Wheaton, Illinois

St. Cloud, Minnesota

Rockville, Maryland

North Chili, New York (near Rochester)

New Johnsonville, Tennessee

Helena, Montana

Middleburg Heights, Ohio

Venice, Florida

Grinnell, Iowa

Piedmont, Alabama

Here is a link to my workshop calendar where you can see all of my travel schedule and to get info on beginner and advanced Brayer workshops: 

 http://zindorf.blogs.splitcoaststampers.com/workshop-calendar 

Link to my Stampin’ Up website were you can order all of your must have Stampin’ Up products from me 24-7: 

 http://michellezindorf.stampinup.net

Frequently asked questions answers: 

 http://zindorf.blogs.splitcoaststampers.com/frequently-asked-questions/


Going Batty – Tutorial #259

dsc00808.JPG

Before I hop on a plane to head to sunny Castro Valley, California to teach this weekend I sat down to create another Halloween card.  California, ready or not here I come. . . .

Autumn is my very favorite season to create cards for.  I think it is all the earthy colors, browns, greens, yellows, reds etc. 

Today’s tutorial uses two fun sets that are must haves for Autumn from Stampin’ Up.  First there is the Stampin’ Up creepy set “From the Crypt”  and then there is the Stampin’ Up set “Branched Out” with it’s wonderful naked tree that can be used any season since it has a leaf stamp and snowflake stamp included with it.  Branched out is on the dormant list, but you can still order it with item number 113200.  I know I am such the enabler.  🙂

Today’s card does have deep purple ribbon on it that decided to do a disappearing act when I photographed it, Spooky, lol.

Before we get going today I have an announcement to make.  I have added two wonderful brayer workshop locations to my calendar.  I will be teaching beginner and advanced brayer workshops in Grinnell, Iowa on August 28-29, 2010 and then Piedmont, Alabama September 11-12, 2010.  Join me, won’t you for some great projects and fun.  🙂

Now on with the tutorial. . . . .

Supplies:

Stamps: Stampin’ Up From the Crypt and Branch Out
Paper: Stampin’ Up Whisper White, Old Olive, Lavender Lace and Basic Black
Ink: Stampin’ Up Basic Gray, Soft Suede, Sahara Sand, Going Gray and Basic Black
Accessories: Stampin’ Up 1 3/4″ Circle Punch, Post it Note, Sponges, Deep Purple Ribbon and Gold Brads

Want a free 39 page, Stampin’ Up Mini catalog?  If you are a resident of the United States,  just e-mail your mailing address to me and I will get one in the mail to you.  Are you inspired by this Blog?  One way you can help support this blog is by ordering your Stampin’ Up products through me.   You can order from me 24-7 from this link:  http://michellezindorf.stampinup.net or e-mail me at mzindorf@aim.com  If you are within the United States.  Want a copy of the brand new 2009-2010 Stampin’ Up Catalog for $9.95, just e-mail me at mzindorf@aim.com and I will get one in the mail to you.  Want to become a Stampin’ Up Demonstrator and earn instant income?  Consider being part of my Stampin’ Up Team.  Also check out the Stampin’ Up specials, click this link to check it out:  http://www.stampinup.net/esuite/home/michellezindorf/promotions

dsc00813.JPG

Using a Stampin’ Up 1 3/4″ circle punch, punched a circle from the sticky part of a post it note and used it as the mask for the moon.

dsc00796.JPG

Put the moon mask on a 3.5″ x 5.5″ piece of Whisper White card stock.

Sponged Going Gray ink on the card stock with a Sponge using a pouncing motion.

dsc00797.JPG

Sponged Sahara Sand ink at the bottom of the card stock using a pouncing motion.

dsc00798.JPG

Sponged Soft Suede ink at the bottom of the card stock using a pouncing motion.

dsc00799.JPG

Sponged Basic Gray ink at the top of the card stock using a pouncing motion.

dsc00800.JPG

Sponged Basic Black ink at the very top of the card stock using a pouncing motion.

dsc00801.JPG

Removed the moon mask and stamped the trees at the bottom of the card stock using Basic Black ink.

dsc00802.JPG

Stamped the bats on using Basic Black ink.

dsc00803.JPG

Sponged Basic Black ink around the outside edge of the card stock.

dsc00804.JPG

Added some simple card stock panels in Old Olive, Lavender Lace and Basic Black, Gold Brads and a deep purple ribbon. 

Here is the finished card measuring 5″ x 6.5″.

dsc00808.JPG

May your day be anything but creepy unless, you are creating Halloween cards.  🙂

Until my next post. . . . .

Huge Hugs,

Michelle

moon-glow-edited-7-tiny.jpg  Get ready for Brayer Workshops!  I am coming to:

Castro Valley, California 

Yardley, Pennsylvania (near Philadelphia) 

Knox, Maine

Akron, Ohio

Broomfield, Colorado

Moore, Oklahoma

Nashville, Indiana

Portland, Michigan

2010

Dayton, Ohio at Marco Paper

Phoenix, Arizona

Monroe, Louisiana

Jacksonville, Florida

St. Louis, Missouri

Mechanicsville, Virginia

Raleigh, North Carolina 

Colleyville, Texas

Colorado Springs, Colorado

Boise area of Meridian, Idaho

Riverside, California (Southern California)

Salem, Oregon

Wheaton, Illinois

St. Cloud, Minnesota

Rockville, Maryland

North Chili, New York (near Rochester)

New Johnsonville, Tennessee

Helena, Montana

Middleburg Heights, Ohio

Venice, Florida

Grinnell, Iowa

Piedmont, Alabama

Here is a link to my workshop calendar where you can see all of my travel schedule and to get info on beginner and advanced Brayer workshops: 

 http://zindorf.blogs.splitcoaststampers.com/workshop-calendar 

Link to my Stampin’ Up website were you can order all of your must have Stampin’ Up products from me 24-7: 

 http://michellezindorf.stampinup.net

Frequently asked questions answers: 

 http://zindorf.blogs.splitcoaststampers.com/frequently-asked-questions/