Spring Time – Tutorial #313

dsc03231.JPG

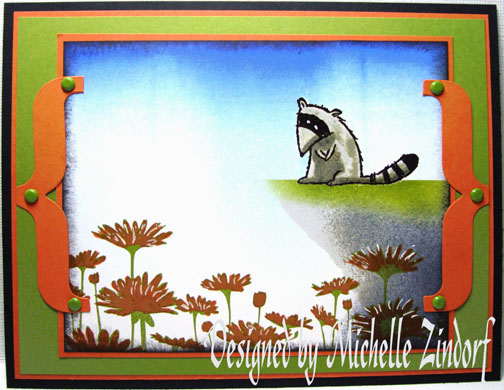
We are getting some really great, 60 degree temperatures here in Ohio.  Along with sunny, sunny days.  I know it won’t last but while it is here it is making me want to stamp Spring stuff.  🙂  So today I created another Spring card using the Stampin’ Up! set “Thoughts and Prayers”.  Gotta love this tree.  Of course, I have never met a tree I didn’t like.  I know, TREE HUGGER!

Let’s get started. . . . .  . .

Supplies:

Stamps: Stampin’ Up! Thoughts & Prayers
Paper: Stampin’ Up Whisper White, Basic Black and Rose Red
Ink: Stampin’ Up! Summer Sun, Cameo Coral, Pink Passion, Rose Red and Basic Black
Accessories: Stampin’ Up White Gel Pen, Brayer, Barely Banana Brads, Flower and Word Window Punches, Big Shot Machine and Alphabet Die

Don’t forget to request your copy of the new Stampin’ Up Occasions Mini Catalog and Sale-a-bration Mini Catalog.   Just e-mail me your address and I will be glad to mail you a set for free.  

Are you getting inspiration from this blog?   One way you can help support it is to order your Stampin’ Up products through me.   Click HERE to place an order. 

 Want to become a Stampin’ Up Demonstrator and earn instant income?  Consider being part of my Stampin’ Up Team and start your own business.  Click HERE for more information.

dsc03237.JPG

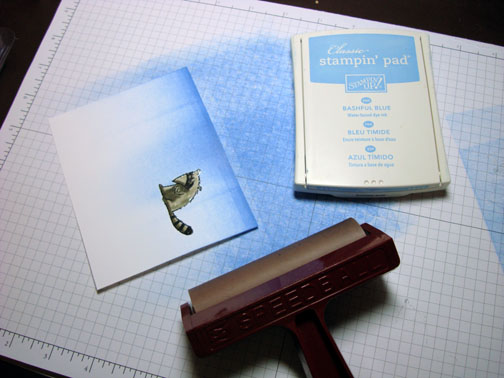
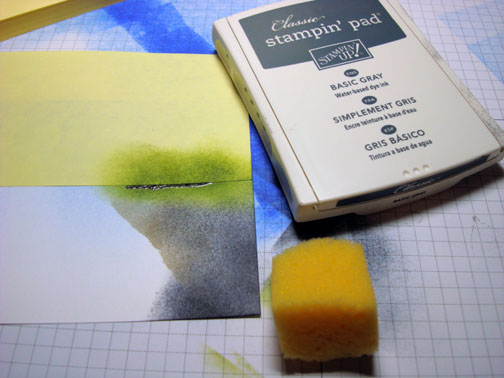
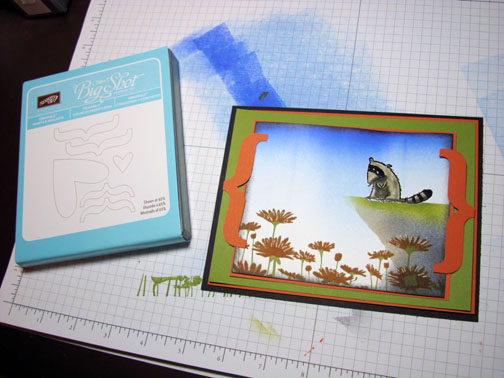
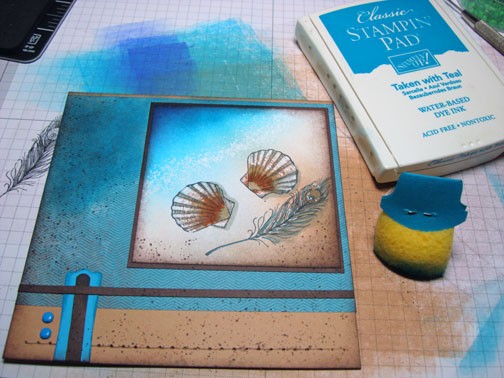
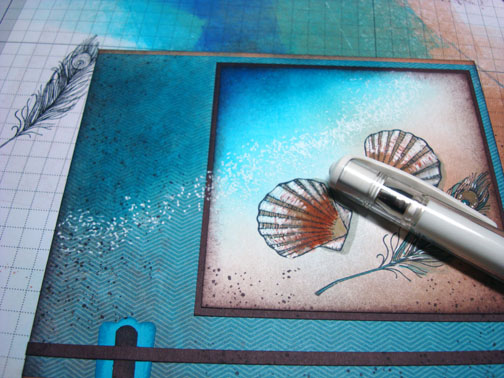
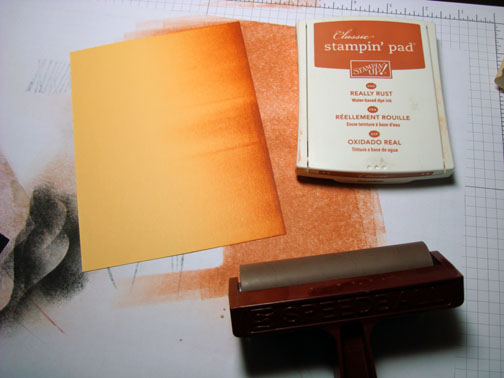
Brayered Summer Sun at the bottom of a 4″ x 5″ piece of Whisper White card stock.

dsc03213.JPG

Added a 1″ circle punched from the sticky part of a post it note as a mask for the sun.

dsc03214.JPG

Brayered more Summer Sun ink at the bottom of the card stock, just until the sun shape shows up.

dsc03215.JPG

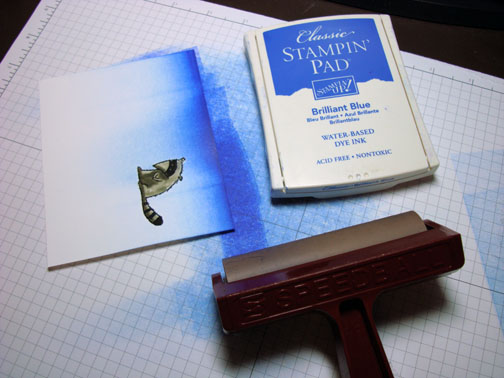
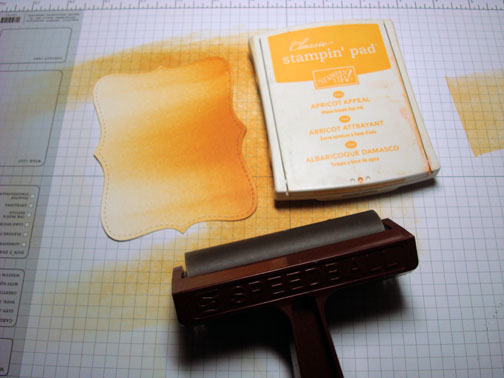
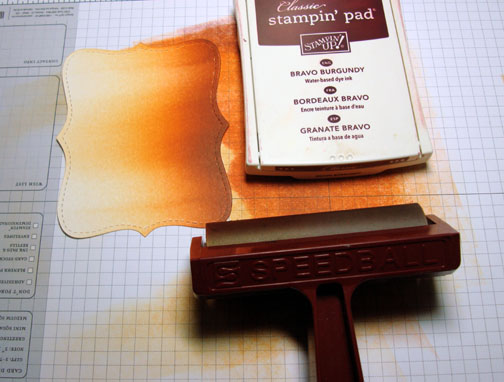
Brayered Cameo Coral ink at the top of the card stock.

dsc03216.JPG

Brayered Pink Passion at the top of the card stock, not covering the Cameo Coral ink entirely.

dsc03217.JPG

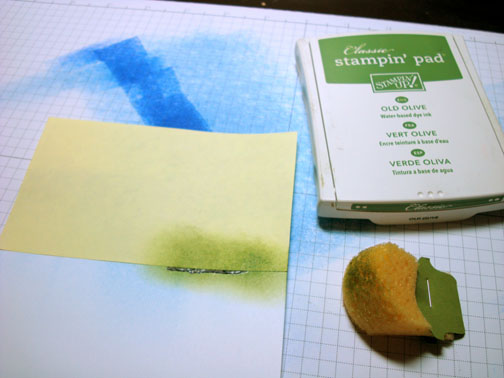
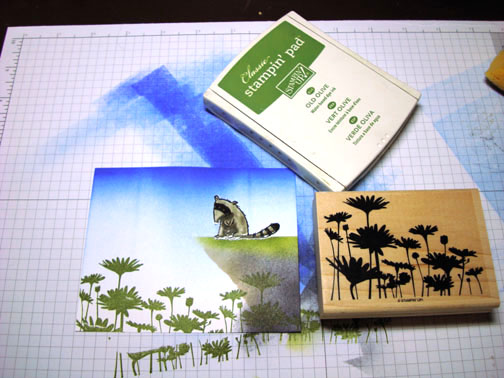
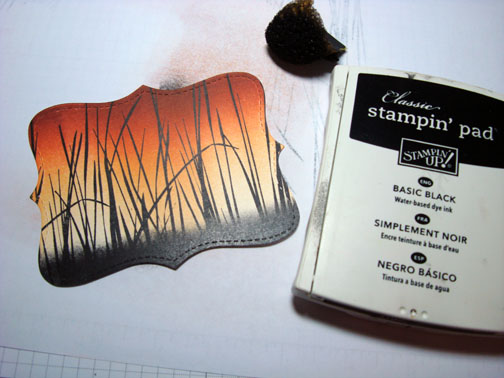
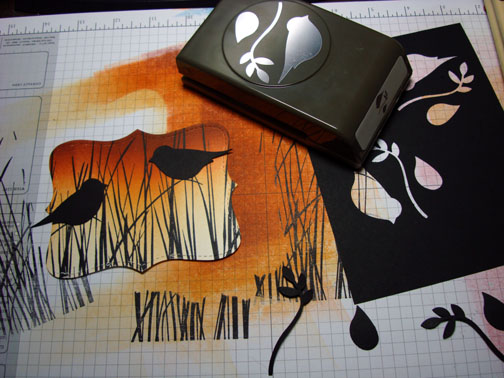
Stamped the tree from the Stampin’ Up set Thoughts and Prayers using Basic Black ink.

dsc03218.JPG

Turned the card stock upside down and dragged the Basic Black ink pad from the bottom of the card stock up toward the tree base.  This creates a grassy/rocky type ground area.

dsc03219.JPG

dsc03221.JPG

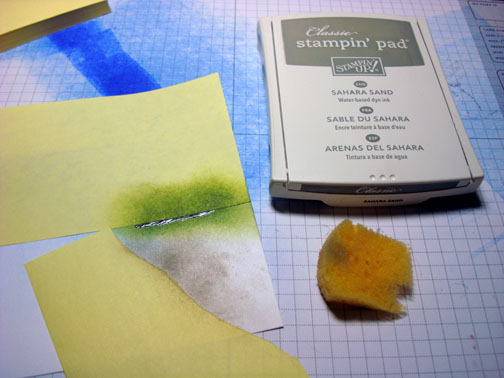
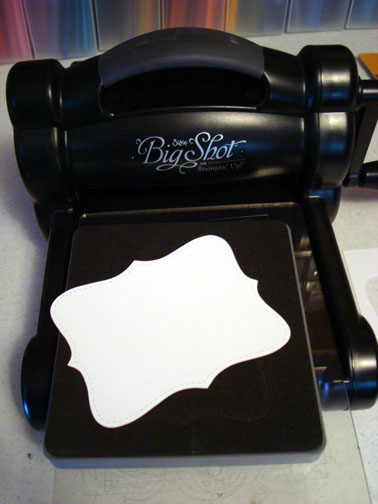
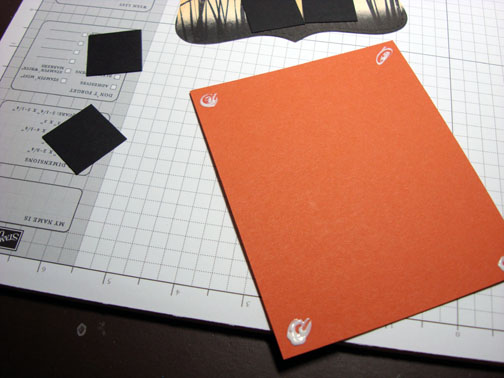
Using my Big Shot Machine and the alphabet die, die cut the letters Spring, using Summer Sun card stock.

dsc03222.JPG

Sponged Cameo Coral at the bottom of each letter.

dsc03223.JPG

Lined a post it note up so it would be straight across the card stock where I wanted the lettering to be.  This was easy using the Stampin’ Up Grid pad underneath the panel.  Glued my lettering in place using the post it note as a guide to keep my letter straight.

dsc03224.JPG

Sponged Rose Red ink at the top and sides of the panel.

dsc03225.JPG

Added White Gel pen highlights to the tree and the grasses.

dsc03226.JPG

Punched two word window punches from Basic Black card stock and cut the very end of them off.

dsc03227.JPG

Punched some flowers from cameo coral card stock.

dsc03228.JPG

Added Basic Black and Rose Red panels.  Also added the punches and Barely Banana brads.

dsc03229.JPG

Here is the finished card measuring 5.5″ square.

dsc03231.JPG

I hope you are seeing mild tempatures and sunshine in your area also.

Until my next post. . . . . . . .

Hugs,

Michelle

dsc09200-small.jpg  Get ready for Brayer Workshops!  I am coming to:

Colleyville, Texas (Sold Out)

Colorado Springs, Colorado (Sold Out)

Boise area of Meridian, Idaho

Riverside, California (Southern California)

Salem, Oregon

Wheaton, Illinois

St. Cloud, Minnesota

Rockville, Maryland (Sold Out)

North Chili, New York (near Rochester) (Sold Out)

New Johnsonville, Tennessee

Kenova (Huntington), West Virginia

Helena, Montana

Middleburg Heights, Ohio

Venice, Florida

Grinnell, Iowa

Piedmont, Alabama (Near GA border close to Cedartown)

Auburn, Washington (near Seattle)

Elk Grove Village, Illinois

Savannah, Georgia

Atlanta, Georgia

North Liberty, Indiana

Saledad, California

Here is a link to my workshop calendar where you can see all of my travel schedule and to get info on beginner and advanced Brayer workshops:   http://zindorf.blogs.splitcoaststampers.com/workshop-calendar 

Link to my Stampin’ Up website where you can order all of your must have Stampin’ Up products from me 24-7:  http://michellezindorf.stampinup.net

Frequently asked questions answers:  http://zindorf.blogs.splitcoaststampers.com/frequently-asked-questions/ 


Out on a limb – Tutorial #312

dsc03207.JPG

I thought a Spring type reflection card would be nice to create today.  I am so very ready for Spring.  🙂

It took me a while to put this together since I have my supplies all over the place.  I am in the process of moving it all to the new room and organizing it along the way.  So without further ado, let’s get started.

Supplies:

Stamps: Stampin’ Up Bird on a Branch
Paper: Stampin’ Up Whisper White, Pretty in Pink and Brilliant Blue
Ink: Stampin’ Up, Basic Black, Sahara Sand, Regal Rose, Pink Passion, Tempting Turquoise and Brilliant Blue
Accessories: Stamp-a-ma-jig, White Ribbon, Pink Crystal Brads, Ticket Corner Punch, Mat Pack and Piercing Tool, Brayer, White Gel Pen, Basic Black Marker, Certainly Celery marker, Old Olive Marker

Don’t forget to request your copy of the new Stampin’ Up Occasions Mini Catalog and Sale-a-bration Mini Catalog.   Just e-mail me your address and I will be glad to mail you a set for free.  

Are you getting inspiration from this blog?   One way you can help support it is to order your Stampin’ Up products through me.   Click HERE to place an order. 

 Want to become a Stampin’ Up Demonstrator and earn instant income?  Consider being part of my Stampin’ Up Team and start your own business.  Click HERE for more information.

dsc03212.JPG

Brayered Tempting Turquoise ink at the top of a 3.5″ x 5″ piece of Whisper White card stock.

dsc03179.JPG

Brayered Brilliant Blue ink at the top of the card stock, not covering the Tempting Turquoise ink entirely.

dsc03181.JPG

Stamped the flower stamp using Regal Rose ink on the plastic piece of my Stamp-a-ma-jig and then flipped it over onto the card stock and rubbed the back of the plastic to transfer the image.  This produces a reverse image.

dsc03183.JPG

Stamped the branch stamp using Sahara Sand ink on the plastic piece of my Stamp-a-ma-jig and then flipped it over onto the card stock and rubbed the back of the plastic to transfer the image.  This produces a reverse image of the branch.

dsc03184.JPG

Stamped the branch using Basic Black ink in the sky area matching it up with the reflection image.

Note:  it is easier to match up your original image with the reflection image than it is to match up the reflection image with the original image.

dsc03185.JPG

Using my Stamp-a-ma-jig for placement, stamped the flowers on the Basic Black branch using Pink Passion ink.

dsc03187.JPG

dsc03188.JPG

Colored in the Pink Passion flowers using a white gel pen.

dsc03190.JPG

Used a Basic Black marker to connect the branches to some of the flowers so they made more sense in the scene.

dsc03191.JPG

Stamped a reverse image of the bird by stamping the image with Sahara Sand ink on the plastic piece of my Stamp-a-ma-jig and then flipped it over onto the card stock and rubbed the back of the plastic to transfer the image. 

dsc03192.JPG

Stamped the Bird on the top branch using Basic Black ink.

dsc03193.JPG

Holding my Old Olive marker sideways, touched the brush end of it down to create little leaves on the top branch.

dsc03194.JPG

Holding a Certainly Celery marker sideways, touched the brush end of the marker down to create leaves on the reflection branch.

dsc03195.JPG

Using my Stamp-a-ma-jig for placement, stamped the Sentiment using Brilliant Blue ink.

dsc03196.JPG

Sponged Brilliant Blue ink around the edge of the card stock.

dsc03197.JPG

Added White gel pen and Tempting Turquoise marker water lines.

dsc03198.JPG

dsc03199.JPG

Used a Ticket Corner Punch on the panels.

dsc03201.JPG

Added a white ribbon.

dsc03202.JPG

Added Pink crystal brads to the ribbon using a piercing tool to start the brads.

dsc03203.JPG

Pierced holes using the mat pack and piercing tool.

dsc03206.JPG

Here is the finished card measuring 5″ x 6.5″.

dsc03207.JPG

I hope this tutorial has inspired you to try a reflection card today.

May your day be warm and cheerful.

Until my next post. . . .  . . . . . .

dsc09200-small.jpg  Get ready for Brayer Workshops!  I am coming to:

Colleyville, Texas (Sold Out)

Colorado Springs, Colorado (Sold Out)

Boise area of Meridian, Idaho

Riverside, California (Southern California)

Salem, Oregon

Wheaton, Illinois

St. Cloud, Minnesota

Rockville, Maryland (Sold Out)

North Chili, New York (near Rochester) (Sold Out)

New Johnsonville, Tennessee

Kenova (Huntington), West Virginia

Helena, Montana

Middleburg Heights, Ohio

Venice, Florida

Grinnell, Iowa

Piedmont, Alabama (Near GA border close to Cedartown)

Auburn, Washington (near Seattle)

Elk Grove Village, Illinois

Savannah, Georgia

Atlanta, Georgia

North Liberty, Indiana

Saledad, California

Here is a link to my workshop calendar where you can see all of my travel schedule and to get info on beginner and advanced Brayer workshops:   http://zindorf.blogs.splitcoaststampers.com/workshop-calendar 

Link to my Stampin’ Up website where you can order all of your must have Stampin’ Up products from me 24-7:  http://michellezindorf.stampinup.net

Frequently asked questions answers:  http://zindorf.blogs.splitcoaststampers.com/frequently-asked-questions/ 


On Top of the World – Tutorial #311 and Blog Candy!

dsc03161.JPG

Some may think I am a bit strange, but one of my favorite sets is the Stampin’ Up! set House of Haunts.  It is just because of this stamp with the tree that has the owl in it.   The rest of the set is wonderful too.  In fact, that haunted house looks a little like the old Victorian house I use to own, lol.  But that little owl, he  just speaks to me.   Yeah, I know, Michelle is hearing voices again, lol.   I think I love it so much because it can be used out of season.

I thought one of you may want to have this set too, so I am offering it for Blog candy this week.

dsc03166.JPG

If you would like to enter to try to win this House of Haunts stamp set, please leave a comment on this blog post telling me to enter you.  If you are getting this blog update via e-mail you will need to click HERE and then leave a comment on the blog post. I will select the winner via random number generator on Monday, March 8, 2010.

Good Luck!

Now let’s get started on the tutorial. . . . . .

Supplies:

Stamps: Stampin’ Up House of Haunts and Season of Joy
Paper: Stampin’ Up Whisper White and Always Artichoke
Ink: Stampin’ Up Bravo Burgundy, Basic Black, Craft White, Really Rust and Summer Sun
Accessories: Stampin’ Up Shimmer Paint Frost White, Brayer, Sponges, 1 3/4″ circle punch, white gel pen and post it notes

Don’t forget to request your copy of the new Stampin’ Up Occasions Mini Catalog and Sale-a-bration Mini Catalog.   Just e-mail me your address and I will be glad to mail you a set for free.  

Are you getting inspiration from this blog?   One way you can help support it is to order your Stampin’ Up products through me.   Click HERE to place an order. 

 Want to become a Stampin’ Up Demonstrator and earn instant income?  Consider being part of my Stampin’ Up Team and start your own business.  Click HERE for more information.

dsc03162.JPG

Punched a 1 3/4″ circle from a post it note and used it as a mask for the sun.  I stick it to a 3.5″ x 7″ piece of Whisper White card stock.

dsc03136.JPG

Brayered Summer Sun ink at the top of the card stock.

dsc03137.JPG

Brayered Really Rust ink at the bottom and at the top of the card stock.

dsc03138.JPG

Brayered Bravo Burgundy ink at the top and bottom of the card stock.

dsc03139.JPG

Removed the post it note sun mask and sponged Summer Sun ink in the middle of the sun.

dsc03140.JPG

Sponged just a bit of Really Rust ink in the sun, leaving the middle light.

dsc03141.JPG

Stamped the tree/Owl stamp using Basic Black ink.

dsc03142.JPG

Ripped a couple of post it notes and used them as a mask so I could create the cliff.

dsc03143.JPG

Sponged Basic Black ink in between the post it notes to make the cliff.

dsc03144.JPG

Stamped the flourish stamp from the Stampin’ Up set Season of Joy using White Craft ink.

dsc03145.JPG

Added highlights to the tree, Owl, grasses and some dots around the sun using a White Gel Pen.

dsc03148.JPG

Added a Whisper White and Always Artichoke panels and then stamp some more Flourishes with White Craft ink at the bottom of the Always Artichoke panel.

dsc03149.JPG

High lighted some of  of the flourishes so they would pop using a white gel pen.

dsc03150.JPG

Pounced a bit of the Frost White Shimmer Paint at the bottom of the card stock.  These photos do not due the shimmer paint justice.  It is really very pretty in real life.

dsc03151.JPG

Sponged Basic Black ink at the bottom of the card stock.

dsc03152.JPG

Here is the finished card measuring 4″ x 9″.  This will fit in a #10 size office envelope.

dsc03161.JPG

I hope this tutorial has inspired you to take a different look at your holiday stamps today.

Until my next post. . . . . . . .

Hugs,

Michelle

dsc09200-small.jpg  Get ready for Brayer Workshops!  I am coming to:

Mechanicsville, Virginia (Sold Out)

Raleigh, North Carolina (Sold Out)

Colleyville, Texas (Sold Out)

Colorado Springs, Colorado (Sold Out)

Boise area of Meridian, Idaho

Riverside, California (Southern California)

Salem, Oregon

Wheaton, Illinois

St. Cloud, Minnesota

Rockville, Maryland (Sold Out)

North Chili, New York (near Rochester) (Sold Out)

New Johnsonville, Tennessee

Kenova (Huntington), West Virginia

Helena, Montana

Middleburg Heights, Ohio

Venice, Florida

Grinnell, Iowa

Piedmont, Alabama (Near GA border close to Cedartown)

Auburn, Washington (near Seattle)

Elk Grove Village, Illinois

Savannah, Georgia

Atlanta, Georgia

North Liberty, Indiana

Saledad, California

Here is a link to my workshop calendar where you can see all of my travel schedule and to get info on beginner and advanced Brayer workshops:   http://zindorf.blogs.splitcoaststampers.com/workshop-calendar 

Link to my Stampin’ Up website where you can order all of your must have Stampin’ Up products from me 24-7:  http://michellezindorf.stampinup.net

Frequently asked questions answers:  http://zindorf.blogs.splitcoaststampers.com/frequently-asked-questions/ 


Dreamy Raccoon – Tutorial #309

dsc03110.JPG

Hello there, I am back from the fabulous City of St. Louis, Missouri. 

Although I love to travel, it means I have to leave my stamping room behind for a while.  I think I go into withdrawal, lol.  Creating keeps a sense of balance in my life and it is hard to explain to non-crafting people.  But I have a feeling that you may just understand what I am talking about.

On my last post I left you guessing where I was by showing you pictures of “Lincoln Log Cabin and Farm” in Greenup, Illinois.  It is the last home of Abraham Lincoln’s father and stepmother.  I am totally amazed at how many people guessed right, in fact, nobody guessed wrong.  I’m glad a lot of you enjoyed seeing the photos.  It was my pleasure to share them with you.   If you are in Illinois or visiting Illinois I highly recommend stopping there and taking in a bit of the 1800’s way of life.  Here is a link if you wish to view a few of the photos I took:  http://zindorf.blogs.splitcoaststampers.com/2010/02/26/where-on-earth/

Now that I am home for a few days, I am ready to share a tutorial with you.  I don’t normally gravitate to cartoony stamps, but how cute is this little raccoon from the Stampin’ Up set “Under the Stars”.  I paired it up with the Upsy Daisy set that is also by Stampin’ Up.

Let’s get started. . . . .  .

Supplies:

Stamps: Stampin’ UP! Under the Stars and Upsy Daisy
Paper: Stampin’ Up! Basic Black, Really Rust, Old Olive and Whisper White
Ink: Stampin’ Up Basic Black, Old Olive, Basic Gray, Sahara Sand, Bashful Blue and Brilliant Blue
Accessories: Stampin’ Up! Sponges, Hearts & Brackets Die, Big Shot Machine, Old Olive Brads, Really Rust and Sahara Sand Markers, Versamark Marker and pad, White Gel Pen, Brayer and Post it notes

Don’t forget to request your copy of the new Stampin’ Up Occasions mini catalog and Sale-a-bration mini.   Just e-mail me your address and I will be glad to send you a set for free.  The new Occasions mini catalog can also be viewed on-line here:  http://204.228.150.61/catalogs/20091231/OccasionsMini10_US.pdfThe New Sale-a-Bration Mini Catalog can also be viewed on-line here:http://204.228.150.61/catalogs/20091231/SAB_10_US.pdfAre you getting inspired and enjoying this blog.   One way you can help support it is to order your Stampin’ Up products through me.   You can order from me 24-7 from this link:  http://michellezindorf.stampinup.net or e-mail me at mzindorf@aim.com.  Want to become a Stampin’ Up Demonstrator and earn instant income?  Consider being part of my Stampin’ Up Team and start your own business

dsc03113.JPG

Stamped the raccoon by loading the stamp with Versamark and then Basic Black ink before stamping it on a 4″ x 5″ piece of Whisper White card stock.

dsc03090.JPG

Heat embossed the image using clear embossing powder and a heat gun.

dsc03091.JPG

Colored in the raccoon with a Sahara Sand marker.

dsc03092.JPG

Let the image dry and then shadowed his belly and the bottom of his feet and tail with the same Sahara Sand marker.   

dsc03093.JPG

Colored over the image with a Versamark marker and then heat embossed the image with clear embossing powder and a heat gun.  Now my image is protected and I can brayer ink over it.

dsc03094.JPG

Brayered Bashful Blue ink at the top of the card stock.

dsc03095.JPG

Brayered Brilliant Blue ink at the top of the card stock, not covering the Bashful Blue ink entirely.

dsc03096.JPG

Wiped the ink off of my embossed image using an old cotton towel.

dsc03097.JPG

Mask the top of the card stock, leaving a bit of the raccoon showing below the mask and sponged in a bit of Old Olive ink to start the making of the little cliff for the raccoon to sit on.

dsc03098.JPG

Ripped a post it note to use as a mask to define the side of the cliff.  Sponged Sahara Sand ink on.

dsc03099.JPG

Removed the bottom mask and sponged a bit of Basic Gray ink at the right side and bottom of the cliff.

dsc03101.JPG

Stamped the Upsy Daisy stamp using Old Olive ink.

dsc03103.JPG

Colored the flower petals with a Really Rust marker.

dsc03104.JPG

Added white gel pen highlights to the flower petals and the raccoon’s eyes.

dsc03105.JPG

Sponged Basic Black ink around the edges of the card stock.

dsc03106.JPG

Cut two “}” out of Really Rust card stock using the Hearts & Brackets Die and my Big Shot Machine. 

dsc03107.JPG

Assembled the card and added a few Old Olive brads.  Here is the finished card measuring 5″ x 6.5″.

dsc03110.JPG

May your day today be filled with joy!

Until my next post. . . . . . . .  . .

Hugs,

Michelle

dsc09200-small.jpg  Get ready for Brayer Workshops!  I am coming to:

Mechanicsville, Virginia (Sold Out)

Raleigh, North Carolina (Sold Out)

Colleyville, Texas (Sold Out)

Colorado Springs, Colorado

Boise area of Meridian, Idaho

Riverside, California (Southern California)

Salem, Oregon

Wheaton, Illinois

St. Cloud, Minnesota

Rockville, Maryland

North Chili, New York (near Rochester)

New Johnsonville, Tennessee

Kenova (Huntington), West Virginia

Helena, Montana

Middleburg Heights, Ohio

Venice, Florida

Grinnell, Iowa

Piedmont, Alabama (Near GA border close to Cedartown)

Auburn, Washington (near Seattle)

Elk Grove Village, Illinois

Savannah, Georgia

Atlanta, Georgia

North Liberty, Indiana

Saledad, California

Here is a link to my workshop calendar where you can see all of my travel schedule and to get info on beginner and advanced Brayer workshops:   http://zindorf.blogs.splitcoaststampers.com/workshop-calendar 

Link to my Stampin’ Up website where you can order all of your must have Stampin’ Up products from me 24-7:  http://michellezindorf.stampinup.net

Frequently asked questions answers:  http://zindorf.blogs.splitcoaststampers.com/frequently-asked-questions/ 


Jacksonville, FL Beach Inspired – Tutorial #308

dsc03079.JPG

Good Afternoon,  I arrived home to Ohio from Jacksonville, Florida late last night.  I was excited to get into my craft room and create something that was inspired by Jacksonville Beach.  It amazes me that I can be strolling the beach in the morning and be home in cold Ohio in the evening to see snow on the ground.  Airplanes are the best thing! 

I won’t be home long though.  I have today and tomorrow to pack for the brayer workshops I will be teaching in ST. Louis on Friday and Saturday.  I have driven through ST. Louis before, but have not had the pleasure to stop.  I’m very excited!

But before I start packing I wanted to created this card.  This card was inspired by my stroll on the beach yesterday and a couple of photos that I took as a reminder.  I never realized how many feathers are on the beach, but it makes perfect sense with all the birds that are scurrying to and fro.

dsc02988.JPGdsc03004-2.jpg

I took many photos and will edit them  and save them for future inspiration.  If you want to see more pics, here is a link:  http://zindorf.blogs.splitcoaststampers.com/travel-photos/

Before I get into the tutorial, I have a blog candy winner to announce!!!!!  The winner of this Stampin’ Up! set Wanted is . . . . . . . . . . . drum roll please. . . .  . .. . . . . . . . . . . . .

dsc02895.JPG

Peggy S from Ohio who wrote “YeeHaw! Count me in the drawing for this set I should have got, but didn’t. Hope you have a great class and some warmer weather! Thanks for the chance to win!

Peggy S, please e-mail your shipping address to mzindorf@aim.com within 30 days to claim your stamp set!

Thanks everyone for playing along.  Hope it is you next time!

Now, without further ado, let’s start the tutorial. . . . . .

Supplies:

Stamps: Stampin’ Up! Nature’s Nest and Itty Bitty Backgrounds
Paper: Stampin’ Up Designer Paper Autumn Meadows, Card Stock Whisper White, Chocolate Chip and Creamy Caramel.
Ink: Stampin’ Up! Taken with Teal, Chocolate Chip, Creamy Caramel, Basic Black, Brilliant Blue, Tempting Turquoise
Accessories: Stampin’ Up! Markers Blush Blossom, Really Rust, Creamy Caramel, Chocolate Chip and Sahara Sand, Modern Label Punch, Piercing Tools, Tempting Turquoise Brads, Sponges, Brayer and White Gel Pen

Don’t forget to request your copy of the new Stampin’ Up Occasions mini catalog and Sale-a-bration mini.   Just e-mail me your address and I will be glad to send you a set for free.  The new Occasions mini catalog can also be viewed on-line here:  http://204.228.150.61/catalogs/20091231/OccasionsMini10_US.pdfThe New Sale-a-Bration Mini Catalog can also be viewed on-line here:http://204.228.150.61/catalogs/20091231/SAB_10_US.pdfAre you getting inspired and enjoying this blog.   One way you can help support it is to order your Stampin’ Up products through me.   You can order from me 24-7 from this link:  http://michellezindorf.stampinup.net or e-mail me at mzindorf@aim.com.  Want to become a Stampin’ Up Demonstrator and earn instant income?  Consider being part of my Stampin’ Up Team and start your own business

dsc03089.JPG

Brayered Tempting Turquoise at an angle on a 3.5″ square piece of Whisper White card stock.

dsc03055.JPG

At the same angle, brayered Brilliant Blue ink, not covering the Tempting Turquoise ink entirely.

dsc03056.JPG

Brayered Creamy Caramel ink on the opposite corner of the card stock.

dsc03057.JPG

Stamped the shell and feather stamps from the Stampin’ Up set Nature’s Nest with Basic Black ink.

dsc03058.JPG

Added Creamy Caramel and Tempting Turquoise marker to the feather and the shells.

dsc03060.JPG

Added Blush Blossom marker to the shells.

dsc03061.JPG

Added White Gel Pen to the feather as highlights, to the shell and also made dots with it to indicate sea foam where the Tempting Turquoise and Creamy Caramel meet.

dsc03062.JPG

Added a bit of Really Rust Marker tot he shells.

dsc03063.JPG

Blended the Really Rust marker in with a Creamy Caramel marker.  This softens the hard lines.

dsc03064.JPG

Added a shadow on the shells and feather with a Sahara Sand Marker.

dsc03065.JPG

Sponged the edges of the card stock with Chocolate Chip ink.

dsc03066.JPG

Added a bit more Sahara Sand marker to the right sides of the shell to add a bit of depth.

dsc03067.JPG

Punch a Modern Label out of Tempting Turquoise and Chocolate Chip card stock.

dsc03068.JPG

Cut the sides off of the Chocolate Chip punch and glued it to the Tempting Turquoise one.  It is not show in the photo, but I sponged Taken with Teal ink around the edge of the label.

dsc03069.JPG

Glued a piece of Designer paper to a 5.5″ piece of Creamy Caramel card stock.

Using my piercing tools, pierced holes in the bottom of the Creamy Caramel card stock.

dsc03070.JPG

Drew a line from pierce hole to hole with a Chocolate Chip marker to create some faux stitching.

dsc03071.JPG

Assembled the rest to the card front, adding the punched label and a very skinny piece of Chocolate Chip card stock.

dsc03072.JPG

Added to Tempting Turquoise brads.

dsc03073.JPG

Sponged Chocolate Chip ink around the edges of the card front.

dsc03074.JPG

Stamped the speckle stamp from the Itty Bitty Backgrounds set with Creamy Caramel and Chocolate Chip ink on the card front.

dsc03076.JPG

Sponge Taken with Teal ink on the top left corner of the card stock to extend the scene into the background panels.

dsc03077.JPG

Added White Gel pen dots on the background panels to extend the sea foam.

dsc03078.JPG

Here is the finished card measuring 5.5″ square.

dsc03079.JPG

I hope you enjoy this beaching scene even though it is the middle of winter.  🙂

Before I close today, here is a funny that was sent to me by a dear friend in New York.


I was in the restaurant yesterday when I suddenly realized I desperately
needed to pass gas. The music was really, really loud, so I timed my
gas with the beat of the music.After a couple of songs, I started to feel better. I finished my coffee,
and noticed that everybody was staring at me….

Then I suddenly remembered that I was listening to my iPod.
 
…and how was your day?

Until my next post. . . .  . .

Huge Hugs,

Michelle

dsc09200-small.jpg  Get ready for Brayer Workshops!  I am coming to:

St. Louis, Missouri (Sold Out)

Mechanicsville, Virginia

Raleigh, North Carolina (Sold Out)

Colleyville, Texas

Colorado Springs, Colorado

Boise area of Meridian, Idaho

Riverside, California (Southern California)

Salem, Oregon

Wheaton, Illinois

St. Cloud, Minnesota

Rockville, Maryland

North Chili, New York (near Rochester)

New Johnsonville, Tennessee

Kenova (Huntington), West Virginia

Helena, Montana

Middleburg Heights, Ohio

Venice, Florida

Grinnell, Iowa

Piedmont, Alabama (Near GA border close to Cedartown)

Auburn, Washington (near Seattle)

Elk Grove Village, Illinois

Savannah, Georgia

Atlanta, Georgia

North Liberty, Indiana

Saledad, California

Here is a link to my workshop calendar where you can see all of my travel schedule and to get info on beginner and advanced Brayer workshops:   http://zindorf.blogs.splitcoaststampers.com/workshop-calendar 

Link to my Stampin’ Up website where you can order all of your must have Stampin’ Up products from me 24-7:  http://michellezindorf.stampinup.net

Frequently asked questions answers:  http://zindorf.blogs.splitcoaststampers.com/frequently-asked-questions/ 


Warm Day In the Field – Tutorial #307

dsc02893.JPG

I am getting a slow start today.  I started out drinking my coffee in front of the dining room window where I can see the birds at my bird feeders.  Next thing I know I have my camera in hand taking photos, for about 2 hours, of all my little feathered friends.  I knew I had been taking photos for some time since my arms are tired from holding up my camera with a telephoto lens, which is very heavy.  I need to edit the photos and hopefully there is something there worth sharing with you and to use as reference in my paintings.   Long story short, Since I got a late start today, I decided to use the new Stampin’ Up Extra Large Two Step Bird Punch (item #117191) and Stampin’ Up Inspired by Nature Stamp Set (item #111656) that I had used in a winter scene on my last tutorial, since they were still out on my desk.  dsc02875.JPG   Today’s tutorial is using all warm colors to get an entirely different look.  Don’t you just love supplies you can use in a bunch of different ways.  🙂 

Let’s get started. . . . . . . .

Supplies:

Stamps: Stampin’ Up! Inspired by Nature
Paper: Stampin’ Up! Basic Black, Whisper White, Really Rust and Apricot Appeal
Ink: Stampin’ Up! Really Rust, Basic Black, Bravo Burgundy and Apricot Appeal
Accessories: Stampin’ Up Sponge, Brayer, Top Note Die, Big Shot Machine, Extra Large Two Step Bird Punch

Don’t forget to request your copy of the new Stampin’ Up Occasions mini catalog and Sale-a-bration mini.   Just e-mail me your address and I will be glad to send you a set for free.  The new Occasions mini catalog can also be viewed on-line here:  http://204.228.150.61/catalogs/20091231/OccasionsMini10_US.pdfThe New Sale-a-Bration Mini Catalog can also be viewed on-line here:http://204.228.150.61/catalogs/20091231/SAB_10_US.pdfAre you getting inspired and enjoying this blog.   One way you can help support it is to order your Stampin’ Up products through me.   You can order from me 24-7 from this link:  http://michellezindorf.stampinup.net or e-mail me at mzindorf@aim.com.  Want to become a Stampin’ Up Demonstrator and earn instant income?  Consider being part of my Stampin’ Up Team and start your own business

dsc02894.JPG

Using my Big Shot Die Cut Machine and the Top Note Die, cut a Top Note out of Whisper White card stock.

dsc02879.JPG

Brayered Apricot Appeal ink at the top of the panel.

dsc02880.JPG

Brayered Really Rust ink at the top of the panel, not covering the Apricot Appeal ink entirely.

dsc02881.JPG

Brayered Bravo Burgundy ink at the very top of the panel.

dsc02882.JPG

Stamped the Inspired by Nature Grass stamp using Basic Black ink.  I paid close attention to where the bent piece of grass would be in the scene.

dsc02883.JPG

Sponged Basic Black ink at the bottom of the card stock.

dsc02885.JPG

Punched the Extra Large Two Step Bird Punch twice out of Basic Black card stock.

dsc02884.JPG

Cut a 4.75″ x 6.25″ panel out of Apricot Appeal and Brayered Really Rust at the top of it.

dsc02886.JPG

Layered the main image panel with an Apricot Appeal Panel, and then a Really Rust Panel.  Cut 4, 1″ squares from Basic Black card stock and adhered them to the back side of the corners of the  Really Rust Panel so that about 1/8″ of the squares showed on the from side of the panel.

dsc02887.JPG

Assembled the card and adhered the birds on the front.  Here is the finished card measuring 5″ x 6.5″.

dsc02893.JPG

May you have some time to enjoy nature today.  Even if it is just from a window.  🙂

Until my next post. . . . . . .  . .

Huge Hugs,

Michelle

dsc09200-small.jpg  Get ready for Brayer Workshops!  I am coming to:

Jacksonville, Florida (Sold Out)

 St. Louis, Missouri (Sold Out)

Mechanicsville, Virginia

Raleigh, North Carolina (Sold Out)

Colleyville, Texas

Colorado Springs, Colorado

Boise area of Meridian, Idaho

Riverside, California (Southern California)

Salem, Oregon

Wheaton, Illinois

St. Cloud, Minnesota

Rockville, Maryland

North Chili, New York (near Rochester)

New Johnsonville, Tennessee

Kenova (Huntington), West Virginia

Helena, Montana

Middleburg Heights, Ohio

Venice, Florida

Grinnell, Iowa

Piedmont, Alabama (Near GA border close to Cedartown)

Auburn, Washington (near Seattle)

Elk Grove Village, Illinois

Savannah, Georgia

Atlanta, Georgia

North Liberty, Indiana

Saledad, California

Here is a link to my workshop calendar where you can see all of my travel schedule and to get info on beginner and advanced Brayer workshops:   http://zindorf.blogs.splitcoaststampers.com/workshop-calendar 

Link to my Stampin’ Up website where you can order all of your must have Stampin’ Up products from me 24-7:  http://michellezindorf.stampinup.net

Frequently asked questions answers:  http://zindorf.blogs.splitcoaststampers.com/frequently-asked-questions/ 


Out in the Frosty Field – Tutorial #306

dsc02875.JPG

It’s another wintry morning here in Ohio.  We are expecting 8 more inches of snow today.  Woohoo!  It is an American Holiday, President’s Day, so Russ and I are going to stay home today and do some work on my new Stamping Room/Office, which totally thrills me! 

Yesterday we emptied the room and painted the ceilings.  Today I believe we will get the walls painted.  Next thing, will be to put brand new carpet down.  🙂  I cannot wait.  I will share some pictures when it is all complete.  But in the mean time I will continue to stamp away in my tiny stamping room.  🙂

I have a frosty card for you today.  But I need to announce the Stampin’ Up! Winter Post set Blog Candy winner first.    The winner is. . . . . . . . . .  dsc02846.JPG

Windy Ellard who wrote”Thank you for the offer and i love that stamp set but do not own it. Please enter me. Have a great weekend. Happy Valentine’s!!!”

Windy, you were number “1” and the random number generator selected you!  I never thought it would fall on “1”.  Congratulations!  Please e-mail you shipping address to mzindorf@aim.com within 30 days and I will get this set out to you.

Thanks go out to all of you who participate.  Hopefully, it will be you next time.  🙂

Now let’s get started on the tutorial. . . . . . .

Supplies:

Stamps: Stampin’ Up! Inspired by Nature
Paper: Stampin’ Up! Whisper White, Basic Black, Not Quite Navy
Ink: Stampin’ Up! Bordering Blue and Not Quite Navy
Accessories: Stampin’ Up Two Step Bird Punch, Ticket Corner Punch, Curly Label Punch, Bashful Blue Brads, Stampin’ Pastels, Brayer, Basic Black Marker, Sahara Sand Marker, White Gel Pen, Clear Embossing Powder, Heat Gun, Versamark Pad

Don’t forget to request your copy of the new Stampin’ Up Occasions mini catalog and Sale-a-bration mini.   Just e-mail me your address and I will be glad to send you a set for free.  The new Occasions mini catalog can also be viewed on-line here:  http://204.228.150.61/catalogs/20091231/OccasionsMini10_US.pdfThe New Sale-a-Bration Mini Catalog can also be viewed on-line here:http://204.228.150.61/catalogs/20091231/SAB_10_US.pdfAre you getting inspired and enjoying this blog.   One way you can help support it is to order your Stampin’ Up products through me.   You can order from me 24-7 from this link:  http://michellezindorf.stampinup.net or e-mail me at mzindorf@aim.com.  Want to become a Stampin’ Up Demonstrator and earn instant income?  Consider being part of my Stampin’ Up Team and start your own business

dsc02878.JPG

Stamped the Stampin’ Up! Inspired by Nature Grass Stamp twice using Versamark on a 4″ x 5.75″ piece of Whisper White card stock.  Then heat embossed it using clear embossing powder and a heat gun.

dsc02847.JPG

dsc02848.JPG

Sponged some Versamark on the bottom of the card stock and heat embossed the Versamark with clear embossing powder and heat gun.

dsc02850.JPG

Brayered Bordering Blue ink at the top of card stock, down to the bottom.

dsc02851.JPG

Brayered Not Quite Navy ink at the top of the card stock.

dsc02852.JPG

Wiped the ink off of my embossed images with an old cotton towel that I keep at my desk for this very purpose.  🙂  Trying to stay green here.

dsc02853.JPG

I’m excited to use this new Stampin’ Up! Punch “Two step Bird”.  This punch punches out the bird, bird wing and branch all in one step.  🙂

I punched these things out a couple of times from Whisper White card stock.

dsc02854.JPG

Stamped the grasses again with Bordering Blue ink and then wiped the ink off of the embossed images.

dsc02855.JPG

dsc02856.JPG

Trimmed the leaves off of the punched branches.

dsc02857.JPG

Used my Stampin’ Pastels to color in the bird.  Started with So Saffron pastel on the bird’s belly.

dsc02858.JPG

Added Going Gray Pastel to the top of the bird.

dsc02859.JPG

Added a bit of Basic Black pastel to the very top of the bird.

dsc02860.JPG

Colored the birds wing first with Going Gray pastel and then added a bit of Basic Black pastel to the top of the wing.

dsc02861.JPG

Added a shadow to the bird and the wing by edging the bottom of the wing and bird with a Sahara Sand Marker.

dsc02862.JPG

Added Basic Black marker to the top of the bird, beak, top of the wing and then added an eye on the bird.

dsc02863.JPG

Glued the branches, bird and bird wing onto the main image panel.

dsc02865.JPG

Used the Stampin’ Up Ticket Corner Punch on the main image panel and a Whisper White Panel that will go under the main image panel.

dsc02867.JPG

Punched two Stampin’ Up Curly Label Punches for Basic Black card stock and folded them in half.

dsc02868.JPG

Added Basic Black marker to the bottom of the branches and a White Gel Pen dot the the bird’s eye.   Also, the scene looked a little out of balance so I added another branch in the left corner.

dsc02871.JPG

dsc02872.JPG

Assembled the card front and added the Curly label punches and Bashful Blue brads.

dsc02873.JPG

Here is the finished card measuring 5″ x 6.5″.

dsc02875.JPG

I hope you enjoyed this tutorial and will give it a try.  🙂

May you be happy where ever you are today!

Until my next post. . . . . . .  . .

Huge Hugs,

Michelle

dsc09200-small.jpg  Get ready for Brayer Workshops!  I am coming to:

Jacksonville, Florida (Sold Out)

 St. Louis, Missouri (Sold Out)

Mechanicsville, Virginia

Raleigh, North Carolina (Sold Out)

Colleyville, Texas

Colorado Springs, Colorado

Boise area of Meridian, Idaho

Riverside, California (Southern California)

Salem, Oregon

Wheaton, Illinois

St. Cloud, Minnesota

Rockville, Maryland

North Chili, New York (near Rochester)

New Johnsonville, Tennessee

Kenova (Huntington), West Virginia

Helena, Montana

Middleburg Heights, Ohio

Venice, Florida

Grinnell, Iowa

Piedmont, Alabama (Near GA border close to Cedartown)

Auburn, Washington (near Seattle)

Elk Grove Village, Illinois

Savannah, Georgia

Atlanta, Georgia

North Liberty, Indiana

Saledad, California

Here is a link to my workshop calendar where you can see all of my travel schedule and to get info on beginner and advanced Brayer workshops:   http://zindorf.blogs.splitcoaststampers.com/workshop-calendar 

Link to my Stampin’ Up website where you can order all of your must have Stampin’ Up products from me 24-7:  http://michellezindorf.stampinup.net

Frequently asked questions answers:  http://zindorf.blogs.splitcoaststampers.com/frequently-asked-questions/ 


Will He Make It? – Tutorial #305 and Blog Candy!

dsc02842.JPG

Baby it’s cold outside. . . . .  So I am still hold up in my nice warm cozy house.  Although, I do have to venture out today to pick up some groceries and to check my P.O. Box in town, brrrrrrr.  Before I bundle up, I want to share this card that I put together this morning.  It features one of the Extreme stamps from Stampin’ Up!, Extreme Dirt Bike to be exact.  🙂 

At the bottom of this post you will find a few pictures of the view from my kitchen window very early this morning.  Too darn cold to step out to take pictures, lol.

Before we get started on the tutorial though, how about a bit of sugar free blog candy!  Yeah!!!! 

dsc02846.JPG

All you need to do to throw your hat in the ring to try to win this Stampin’ Up! set Winter Post is leave a comment here on this blog post telling me to enter you.  If you are getting this blog update via e-mail, please click this link and then leave your comment at the bottom of the Blog Post:  http://zindorf.blogs.splitcoaststampers.com/2010/02/12/will-he-make-it-tutorial-305/

Please no e-mail entries.  😦

I will select the winner via random number generator on Monday, February 15, 2010.  Good luck everyone!  Remember, you can’t win if you don’t enter.

Now let’s get started on the tutorial. . . .  . . . . . . . .

Supplies:

Stamps: Stampin’ Up! Extreme Dirt Bike and Sanded Background Stamp
Paper: Stampin’ Up! Whisper White, Basic Black, Tempting Turquoise and Pumpkin Pie
Ink: Stampin’ Up! Summer Sun, Really Rust, Basic Black and Pumpkin Pie
Accessories:Stampin’ Up! Sponges, Brayer, Basic Black marker, Star Punch, Label Punch, Gold Brads, Post it notes and Brayer

Don’t forget to request your copy of the new Stampin’ Up Occasions mini catalog and Sale-a-bration mini.   Just e-mail me your address and I will be glad to send you a set for free.  The new Occasions mini catalog can also be viewed on-line here:  http://204.228.150.61/catalogs/20091231/OccasionsMini10_US.pdfThe New Sale-a-Bration Mini Catalog can also be viewed on-line here:http://204.228.150.61/catalogs/20091231/SAB_10_US.pdfAre you getting inspired and enjoying this blog.   One way you can help support it is to order your Stampin’ Up products through me.   You can order from me 24-7 from this link:  http://michellezindorf.stampinup.net or e-mail me at mzindorf@aim.com.  Want to become a Stampin’ Up Demonstrator and earn instant income?  Consider being part of my Stampin’ Up Team and start your own businessdsc02845.JPGBrayered Summer Sun ink at the top of a 4.5″ x 6″ piece of Whisper White card stock.

dsc02825.JPG

Brayered Pumpkin Pie ink at an angle on both the right and left top corners.

dsc02826.JPG

dsc02827.JPG

Tore a post it note and used it as a mask to sponge in a hill with Summer Sun ink.

dsc02828.JPG

Moved the post it note down a little and sponged in another hill using Pumpkin Pie ink.

dsc02829.JPG

Flipped the post it note over and moved it down a bit and sponged in a hill using Really Rust ink.

dsc02830.JPG

Stamped the Biker using Basic Black ink.

dsc02831.JPG

Sponged in some cliffs using Basic Black ink.

dsc02832.JPG

Added some dots behind the back tire with a Basic Black marker.

dsc02833.JPG

Stamped the Sanded Background stamp over the entire panel using Pumpkin Pie ink.

dsc02834.JPG

Cropped the left side of the panel and then cut the right side of the panel in to slices.

dsc02835.JPG

Punched the label punch out of Pumpkin Pie (2) and Basic Black (1) card stock.  Punched a star out of Tempting Turquoise (2) card stock.

dsc02836.JPG

Cut the left ends off of the Pumpkin pie pieces and the both ends off of the black label.

dsc02837.JPG

Grunged them up a bit with a sponge and Basic Black ink.

dsc02838.JPG

Assembled the card front and added silver brads, a few more dots behind the front tire with a Basic Black marker and then Grunged the whole card front using Basic Black ink and a sponged around all the edges.

dsc02839.JPG

Here is the finished card measuring 5″ x 6.5″.

dsc02842.JPG

This is the end of the tutorial.  Enjoy!

Now this is what it looked like early this morning from my kitchen window.  I love that we have views of farms but don’t have to work one.  🙂  Yep, the barn you see in the first photo is the one you see at the top of my blog that I painted in the Fall.

dsc02820.JPG

dsc02819.JPG

dsc02816.JPG

dsc02824.JPG

Stay Warm and drink some hot chocolate with marsh-mellows!

Until my next post. . . . . . . . . . .

Huge Hugs,

Michelle

dsc09393-teeny-tiny.jpg  Get ready for Brayer Workshops!  I am coming to:

Jacksonville, Florida (One beginner spot open)

 St. Louis, Missouri (Sold Out)

Mechanicsville, Virginia

Raleigh, North Carolina (Sold Out)

Colleyville, Texas

Colorado Springs, Colorado

Boise area of Meridian, Idaho

Riverside, California (Southern California)

Salem, Oregon

Wheaton, Illinois

St. Cloud, Minnesota

Rockville, Maryland

North Chili, New York (near Rochester)

New Johnsonville, Tennessee

Kenova (Huntington), West Virginia

Helena, Montana

Middleburg Heights, Ohio

Venice, Florida

Grinnell, Iowa

Piedmont, Alabama (Near GA border close to Cedartown)

Auburn, Washington (near Seattle)

Elk Grove Village, Illinois

Savannah, Georgia

Atlanta, Georgia

North Liberty, Indiana

Saledad, California

Here is a link to my workshop calendar where you can see all of my travel schedule and to get info on beginner and advanced Brayer workshops:   http://zindorf.blogs.splitcoaststampers.com/workshop-calendar 

Link to my Stampin’ Up website where you can order all of your must have Stampin’ Up products from me 24-7:  http://michellezindorf.stampinup.net

Frequently asked questions answers:  http://zindorf.blogs.splitcoaststampers.com/frequently-asked-questions/ 


In the Mountains – Tutorial #304

dsc02801.JPG

Good morning 🙂  I am kinda snowed in, not really, but there is a whole heck of a lot of snow out there, lol.  We probably got a 1 1/2 feet, but with the drifting we get out here in the country it seems like 15 feet.  I’m not complaining because I have a wonderful husband that clears the driveway and walks so I can teeter out to my van if I want to go some where.  Since I just drove for 14 hours to get home from Louisiana on Monday, I’m just not inclined to venture out. 

Instead, I decided to get caught up on some paper work and then stamp a little.  This is what I came up with this morning.  Hope you enjoy it as much as I enjoyed staying snug and warm in my stamp room making it.

Let’s get started. . . . . .  . . .

Supplies:

Stamps: Stampin’ Up! Of the Earth (Hostess Set) and En Francais Background Stamp
Paper: Stampin’ Up! Basic Black, Whisper White, Apricot Appeal and Almost Amethyst
Ink: Stampin’ Up! Apricot Appeal, Basic Black, Elegant Eggplant, Close to Cocoa, Almost Amethyst and Lavender Lace
Accessories: Stampin’ Up! Cutter Kit, 1/2″ circle Punch, Brayer, Sponges, Silver Brads, White Gel Pen, Basic Black marker, Piercing Tools and Post it Notes

Don’t forget to request your copy of the new Stampin’ Up Occasions mini catalog and Sale-a-bration mini.   Just e-mail me your address and I will be glad to send you a set for free.  

The new Occasions mini catalog can also be viewed on-line here:  http://204.228.150.61/catalogs/20091231/OccasionsMini10_US.pdf

The New Sale-a-Bration Mini Catalog can also be viewed on-line here:http://204.228.150.61/catalogs/20091231/SAB_10_US.pdf

Are you getting inspired and enjoying this blog.   One way you can help support it is to order your Stampin’ Up products through me.   You can order from me 24-7 from this link:  http://michellezindorf.stampinup.net or e-mail me at mzindorf@aim.com.  

Want to become a Stampin’ Up Demonstrator and earn instant income?  Consider being part of my Stampin’ Up Team and start your own business.  

dsc02810.JPG

Punched from a 1/2″ circle from the sticky part of a post it note and used it as a mask for the moon.   Put the mask on a 4.5″ square piece of Whisper White card stock.

dsc02773.JPG

Brayered Apricot Appeal ink at the top of the card stock.

dsc02774.JPG

Brayered Lavender Lace ink at the top of the card stock, not covering the Apricot Appeal ink entirely.

dsc02775.JPG

Brayered a little bit of Elegant Eggplant ink at the top of the card stock.

dsc02776.JPG

Brayered Almost Amethyst ink at the bottom of the card stock.

dsc02777.JPG

Tore a mountain shape in a post it note and sponged on some Lavender Lace ink to create a mountain. 

dsc02779.JPG

Sponged some Elegant Eggplant ink right at the post it note edge to darken the top of the mountain.

dsc02780.JPG

Moved the post it note and sponged on some Almost Amethyst ink to create some mountains in the background.

dsc02781.JPG

Moved the Post it note again and sponged on Elegant Eggplant to create another mountain.

dsc02782.JPG

Tore the edge of another post it note and used it to put some slight hills in the middle ground with Almost Amethyst ink.

dsc02783.JPG

Moved the post it note again and sponge Lavender Lace ink.

dsc02784.JPG

Moved the post it note down again and sponged on Elegant Eggplant ink.

dsc02785.JPG

Removed the post it note masks.

dsc02786.JPG

Stamped the Flower stamp from the Stampin’ Up! set Of the Earth 4 times loading the flower head of the stamp with Elegant Eggplant and the stem of the stamp with Basic Black ink before stamping it each time.

dsc02788.JPG

Stamped some more of the flowers using Basic Black ink only.

dsc02789.JPG

Colored the Butterfly on the stamp with a Basic Black marker and then huffed on the stamp and stamped it. 

dsc02790.JPG

Added some highlights on the flower heads and butterfly with a White Gel Pen.

dsc02791.JPG

Underlined the Eggplant Flower heads with a Basic Black marker to create some depth in the flowers.

dsc02792.JPG

Tore a couple of chunks out of the corners of a post it note and masked the middle of the main image panel.  Brayered Almost Amethyst ink over the entire card stock.

dsc02795.JPG

Removed the post it note mask and distressed the edges with the Stampin’ Up Cutter kit.

dsc02796.JPG

Sponged Close to Cocoa ink on the distress edges.

dsc02797.JPG

Stamped the Stampin’ Up! Stamp En Francais on the left side of the main image panel lightly using Elegant Eggplant ink.

dsc02799.JPG

Added Basic Black, Apricot Appeal and Almost Amethyst panels, Silver Brads and Basic Black large photo corner punches.

dsc02800.JPG

Assembled the card and here it is completed measuring 5.5″ square.

dsc02801.JPG

May you experience only love and joy today.

Until my next post. . . .  . . . .

Hugs,

Michelle

dsc09393-teeny-tiny.jpg  Get ready for Brayer Workshops!  I am coming to:

Jacksonville, Florida (Sold Out)

 St. Louis, Missouri (Sold Out)

Mechanicsville, Virginia

Raleigh, North Carolina (Sold Out)

Colleyville, Texas

Colorado Springs, Colorado

Boise area of Meridian, Idaho

Riverside, California (Southern California)

Salem, Oregon

Wheaton, Illinois

St. Cloud, Minnesota

Rockville, Maryland

North Chili, New York (near Rochester)

New Johnsonville, Tennessee

Kenova (Huntington), West Virginia

Helena, Montana

Middleburg Heights, Ohio

Venice, Florida

Grinnell, Iowa

Piedmont, Alabama (Near GA border close to Cedartown)

Auburn, Washington (near Seattle)

Elk Grove Village, Illinois

Savannah, Georgia

Atlanta, Georgia

North Liberty, Indiana

Saledad, California

Here is a link to my workshop calendar where you can see all of my travel schedule and to get info on beginner and advanced Brayer workshops:   http://zindorf.blogs.splitcoaststampers.com/workshop-calendar 

Link to my Stampin’ Up website where you can order all of your must have Stampin’ Up products from me 24-7:  http://michellezindorf.stampinup.net

Frequently asked questions answers:  http://zindorf.blogs.splitcoaststampers.com/frequently-asked-questions/ 


Feeling Bright and Funky – Tutorial #303

dsc02702.JPG

How about this little Funky number?  You are either going to love it or hate it.  I actually love it.  🙂  But I find the pieces that I really, really love, nobody else does, lol. 

On a personal note, thank you to all of you that gave me advice regarding my dog Lucas and his anxiety attacks.  I read every comment and e-mail and so appreciate that you took the time to help me out.  Lucas thanks you too.  🙂

Now on with this Bright Funky Tutorial. . . . . .

Supplies:

Stamps: Stampin’ Up! Vitage Vogue, Thoughts & Prayers, Boho Backgrounds
Paper: Stampin’ Up! Brilliant Blue, Whisper White and Apricot Appeal
Ink: Stampin’ Up! Basic Black, Elegant Eggplant, Tempting Turquoise, Summer Sun, Pumpkin Pie, Sahara Sand, Metallic Gold and Brilliant Blue
Accessories: Stampin’ Up! Pumpkin Pie and Summer Sun Markers, Sponges, Circle #2 Die and Big Shot Machine, Stamp-a-ma-jig, Post it notes, Clear embossing Powder, Heat Gun, Ruler, Gold Metallic Marker

Don’t forget to request your copy of the new Stampin’ Up Occasions mini catalog and Sale-a-bration mini.   Just e-mail me your address and I will be glad to send you a set for free.  

The new Occasions mini catalog can also be viewed on-line here:  http://204.228.150.61/catalogs/20091231/OccasionsMini10_US.pdf

The New Sale-a-Bration Mini Catalog can also be viewed on-line here:http://204.228.150.61/catalogs/20091231/SAB_10_US.pdf

Are you getting inspired and enjoying this blog.   One way you can help support it is to order your Stampin’ Up products through me.   You can order from me 24-7 from this link:  http://michellezindorf.stampinup.net or e-mail me at mzindorf@aim.com.  

Want to become a Stampin’ Up Demonstrator and earn instant income?  Consider being part of my Stampin’ Up Team and start your own business.  

dsc02711.JPG

Cut a 3″ square of Whisper White card stock on the diagonal to get two triangles.

dsc02671.JPG

Using a Stamp-a-ma-jig for placement, stamped the Tree from the Thoughts & Prayers Set using Metallic Gold ink. 

dsc02672.JPG

Heat embossed the image using clear embossing powder and a heat gun.

dsc02674.JPG

Using the left over triangle, masked the middle of the triangle with the tree on it.

dsc02675.JPG

Sponged Sahara Sand ink on the edges holding the triangle mask in place.

dsc02676.JPG

Removed the mask and used two post it notes to mask the Sahara Sand ink I just put on the edges.  Sponged Tempting Turquoise ink in the unmasked area.

dsc02678.JPG

Sponged Brilliant Blue ink at the top of the unmasked area.

dsc02679.JPG

Removed the masks and wiped the ink off of the embossed image with a cotton rage.

dsc02680.JPG

Used the Circles #2 Die Cut and my Big Shot Machine to cut the largest circle out of Apricot Appeal card stock.

dsc02681.JPG

Using the Stamp-a-ma-jig for placement, stamped the medallion from the Boho Backgrounds stamp set in the middle of the circle using Pumpkin Pie ink.

dsc02683.JPG

Sponged Pumpkin Pie ink on the edges.

dsc02685.JPG

Sponged Summer Sun ink in the middle of the circle to brighten things up.

dsc02687.JPG

Using a Ruler drew a line from the points on the medallion to the edge using a Pumpkin Pie marker.

dsc02689.JPG

Sponged  a bit of Elegant Eggplant ink on.

dsc02690.JPG

Sponged Tempting Turquoise ink on a 5″ square piece of Whisper White card stock.

dsc02693.JPG

Adhered the circle and triangle to the panel and sponged Elegant Eggplant ink around the outside of the panel, not covering all of the Tempting Turquoise ink.  I awanted the middle images to have a glowing effect.

dsc02695.JPG

Sponged Basic Black ink around the outside edges.

dsc02696.JPG

Stamped The Flower Flourish from the Stampin’ Up! Vintage Vogue set (love this image) using metallic Gold ink.

dsc02698.JPG

Using a Metallic Gold Paint Marker, edged the panel.

dsc02699.JPG

Added a Brilliant Blue Panel and here is the finished card measuring 5.5″ Square.

dsc02702.JPG

May your day be extremely bright and cheerful.  🙂

Until my next post.  . . .  . . . . . . . . ..

Hugs,

Michelle

dsc09393-teeny-tiny.jpg  Get ready for Brayer Workshops!  I am coming to:

Monroe, Louisiana (just a couple of seats left)

Jacksonville, Florida

 St. Louis, Missouri

Mechanicsville, Virginia

Raleigh, North Carolina 

Colleyville, Texas

Colorado Springs, Colorado

Boise area of Meridian, Idaho

Riverside, California (Southern California)

Salem, Oregon

Wheaton, Illinois

St. Cloud, Minnesota

Rockville, Maryland

North Chili, New York (near Rochester)

New Johnsonville, Tennessee

Kenova (Huntington), West Virginia

Helena, Montana

Middleburg Heights, Ohio

Venice, Florida

Grinnell, Iowa

Piedmont, Alabama (Near GA border close to Cedartown)

Auburn, Washington (near Seattle)

Elk Grove Village, Illinois

Savannah, Georgia

Atlanta, Georgia

North Liberty, Indiana

Saledad, California

Here is a link to my workshop calendar where you can see all of my travel schedule and to get info on beginner and advanced Brayer workshops:   http://zindorf.blogs.splitcoaststampers.com/workshop-calendar 

Link to my Stampin’ Up website where you can order all of your must have Stampin’ Up products from me 24-7:  http://michellezindorf.stampinup.net

Frequently asked questions answers:  http://zindorf.blogs.splitcoaststampers.com/frequently-asked-questions/