Artsy Victorian Tile – Tutorial

dsc04862.JPG

I love to color.  It is so relaxing to me.  Last night I sat down to color and came up with this creation.  This is a variation on Karen Barber’s Black and White Magic technique that I did a post on last week.  The technique of coloring with Prismacolor Pencils and then outlining the image with a White gel pen apparently can be done on any color of card stock other than white with wonderful results.  It even showed up very well on SU River Rock card stock. 

I love making cards that look like tiles, they are so versatile you can use them for so many different occasions.

The images used in todays tutorial are from Innovative Stamp Creations “Artsy Victorian Sheet”.  Here is a link to their online store:  http://www.innovativestampcreations.com/ischomepage.html

Let’s get started on the tutorial.  🙂

Supplies:

Stamps: Innovative Stamp Creations “Artsy Victorian”
Paper: Stampin’ Up Basic Black & River Rock
Ink: Stampin’ UP Craft White and Basic Black
Accessories: Prismacolor Pencils, Odorless Paint Thinner, Flower Punches, White Gel Pen, Stamp-A-Ma-Jig, Piercing Tools, Copper Brad

dsc04865.JPG

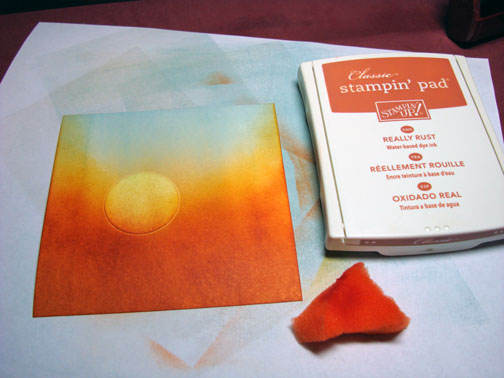
Stamped image on Basic Black card stock with White Craft ink.

dsc04842.JPG

Dried the ink with a heat gun.  You can also just wait for it to dry, but I’m not that patient.

dsc04843.JPG

When I color with Prismacolor Pencils, I dip my pencil point in Odorless Paint Thinner and then color.  The pencil melts like butter on the card stock and blends very nicely.

dsc04845.JPG

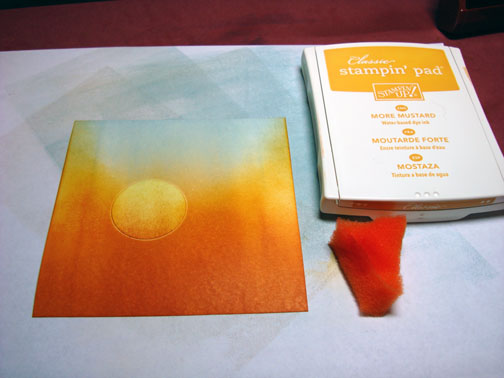
Started coloring with a Yellow Ochre pencil.

dsc04846.JPG

Then added Pumpkin Orange Pencil.

dsc04847.JPG

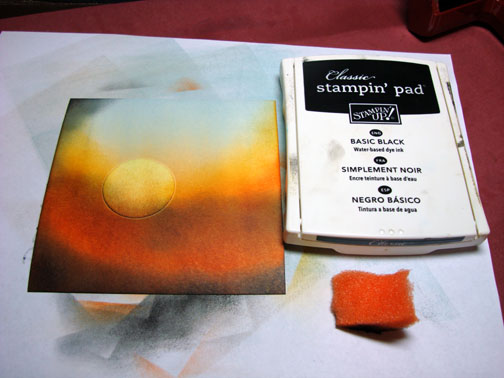
Colored part of the center of the image with a Warm Grey 30% pencil.

dsc04848.JPG

Then colored the rest of the center image with a True Blue pencil.

dsc04849.JPG

Colored around the center image with a Poppy Red pencil.

dsc04850.JPG

Used the True Blue pencil again on the outer frame of the design.

dsc04851.JPG

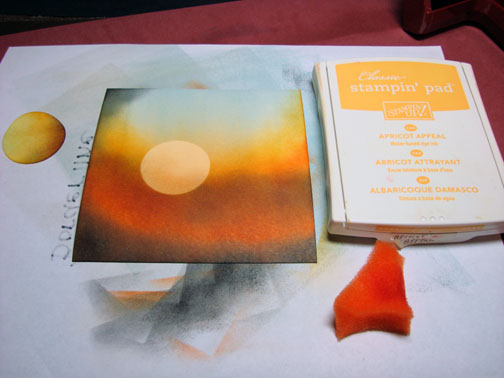
Here is where the magic happens.  Outlined the image with a white gel pen.  Wow!  That makes it come to life.

dsc04852.JPG

Trimmed the image down, leaving a bit of black card stock showing all the way around.

dsc04853.JPG

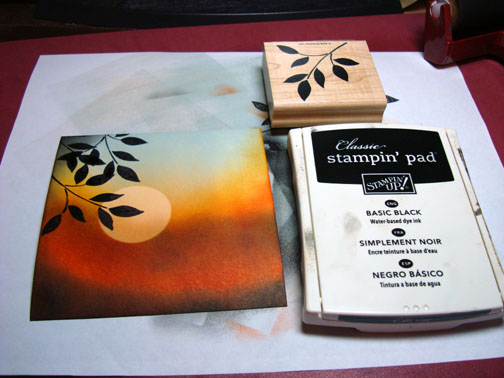
Stamped with Black ink part of the flourish image at each corner of a 4.5″ x 4.5″ piece of River Rock card stock using a Stamp-a-ma-jig for placement.

dsc04854.JPG

dsc04855.JPG

Colored the flourish with the Yellow Ochre and the True Blue pencils.

dsc04856.JPG

Outlined the images with the White Gel Pen.

dsc04857.JPG

Assembled card front and then felt the corners needed a bit more pop, so I added some of the Pumpkin Orange pencil to the center of the flowers.

dsc04858.JPG

Add some punched flowers to the center.

dsc04859.JPG

Added a copper colored brad to the center and used my piercing tools to add piercings in between the corner images.

dsc04860.JPG

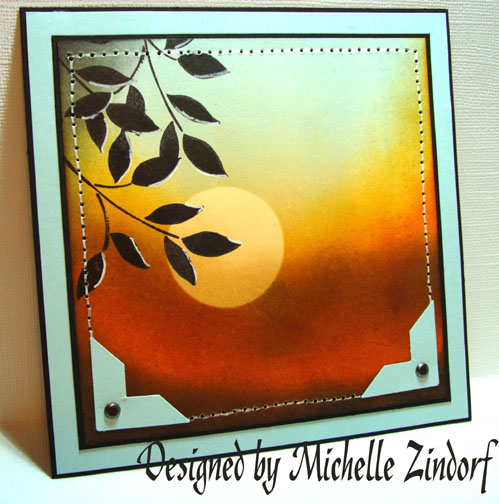
And here you have it, the finished card measuring 5.25″ x 5.25″.

dsc04862.JPG

Hope your day if filled with warm rich colors!

Until my next post. . . . . . . . . . . . .

Michelle


Beginning of the Day – Tutorial

dsc04786.JPG

I’m wrapping up leaf week here on my blog.  I hope you have been inspired this week to get out those leaf stamps and use them for projects other than Fall themed ones.  Now you know I had to wrap the week up with a brayered sky scene!

Let’s get started on the tutorial.  🙂

Supplies:

Stamps: Stampin’ Up Best Blossoms
Paper: Stampin’ Up Whisper White, Basic Black & Soft Sky
Ink: Stampin’ Up Apricot Appeal, Basic Black, Really Rust, More Mustard & Soft Sky
Accessories: Photo Corner Punch, 1 3/8″ Circle Punch, Brayer, Sponges, Piercing Tools & White Gel pen,

dsc04791.JPG

Brayered Apricot Appeal on the bottom 2/3rds of a piece of Whisper White Card stock that measures 4.5″ x 4.5″.

dsc04773.JPG

Punched a 1 3/8″ circle from the sticky part of a post it note and used it as a mask for the sun.

dsc04774.JPG

Brayered More Mustard over the bottom 2/3rds of the card stock.

dsc04775.JPG

Brayered Really Rust ink at the bottom 1/2 of the card stock.

dsc04776.JPG

Brayered Soft Sky ink at the top of the card stock.

dsc04777.JPG

Decided I wanted some more interest to the sky so I sponged More Mustard ink in a “U” shape around the sun.

dsc04778.JPG

Sponged Really Rust ink just under the More Mustard sponging.

dsc04779.JPG

To add more interest, sponged black at the bottom, left top corner and then lightly through the center of the card stock.

dsc04780.JPG

Removed post it note mask and sponged Apricot Appeal ink at the bottom of the sun so it isn’t so stark looking.

dsc04781.JPG

Stamped leaves with Basic Black ink.

dsc04782.JPG

Highlighted the leaves by outlining just the side of the leaf that is facing the sun.

dsc04783.JPG

Assembled my card front and used my piercing tools and a White Gel pen to put in some faux stitching around the main panel edge.

dsc04784.JPG

Added some Soft Sky card stock photo corner punches and a brad to the bottom two corners.

dsc04785.JPG

Here is the finished card, measuring 5.25″ x 5.25″.

dsc04786.JPG

I hope your day today started with a fantastic sunrise and ends with a fantastic sunset!

Until my next post. .. . . . . . . . . . .

Michelle


ISC Leaf in Pond – Tutorial and Blog Candy

dsc04690.JPG

Ok, after an over whelming response I recreated this card so you can see how it was done.  🙂  But, this also leaves me with two of the same card, so I’ll give one away here as blog candy.  If you would like a chance at getting it, please leave a comment on this post.  If you are getting this blog update by e-mail and you wish to comment, please click this link that will take you to my blog so you can comment for a chance to win this card http://zindorf.blogs.splitcoaststampers.com/2008/06/25/isc-leaf-in-pond-tutorial/

I’ll use a random number generator to pick a number on Friday morning.

The images used on this card are by Innovative Stamp Creations, Stamp Sheets “Summer Flair” and “Fall Leaves”.  Here is a link to their online store:

http://www.innovativestampcreations.com/ischomepage.html

Let’s get started on the tutorial.   🙂

Supplies:

Stamps: Innovative Stamp Creations “Flair of Summer” & “Fall Leaves”
Paper:SU Whisper White, Old Olive & Taken with Teal
Ink: Adirondack Lettuce, Stream & Pool
Accessories:Prismacolor Markers, Versamark Marker and pad, Clear embossing powder, heat gun, Coluzzle Circle Template, Sponges, brayer

dsc04718.JPG

Stamped Leaf image on Whisper White card stock by first loading the stamp with Versamark and then Lettuce ink before stamping.

dsc04692.JPG

Heat embossed image using clear embossing powder and a heat gun.

dsc04693.JPG

Colored in the open area of the leaf with a Prismacolor Chartreuse marker.

dsc04694.JPG

Colored the leaf with a Prismacolor Light Olive Green marker leaving some of the leaf points light green.

dsc04695.JPG

Colored over the entire image with a Versamark Marker and heat embossed using clear embossing powder and a heat gun.

dsc04696.JPG

dsc04697.JPG

Stamped half of the grasses image by loading only part of the stamp with Versamark and then lettuce ink before stamping.

dsc04698.JPG

Heat embossed grasses using clear embossing powder and a heat gun.

dsc04699.JPG

Brayered over the card stock with Pool ink.

dsc04700.JPG

Cut various sizes of circle with a Coluzzle out of card stock to use as mask.

dsc04701.JPG

Using the largest circle (3 5/8″) I held it in place as I sponged Stream ink around it.  I tried to have the darkest ink area right at the mask edge.

dsc04702.JPG

dsc04703.JPG

dsc04704.JPG

Using a smaller circle (2.5″), I put it in the middle and sponged Stream ink around the outside edge of it.

dsc04705.JPG

dsc04706.JPG

dsc04707.JPG

Using the smallest circle (2″), I put it in the middle and sponged Stream ink around the outside edge of it.

dsc04708.JPG

dsc04709.JPG

dsc04710.JPG

I created a larger circle on the outside of the others by sponging Stream ink in the corners of the card stock.  You could use a larger circle mask for this step.

dsc04711.JPG

Stamped the black grasses in the upper left corner by loading Basic Black ink on half of the stamp.

dsc04712.JPG

To give the illusion of part of the leaf being under water I made a line between the dark green and the light green areas on the image with a White Gel pen.

dsc04713.JPG

There you have it!  The finished cards all assembled, measuring 5.25″ x 5.25″.

dsc04716.JPG

Hope your day is filled with peace and cool pond breezes.  🙂

Until my next post . . . . . . . . .

Michelle


ISC Wood and Leaf – Tutorial

dsc04685.JPG

I’m continuing on with the ways to use a leaf image week here on my blog.  Why Leaf week, because I can, lol.  No, really I love leaf/nature images.  There is something comforting and peaceful about an image of a leaf.  At least that is how I view them.  🙂  They shouldn’t just be used for fall cards, as I have been so very guilty of in the past.  This creation ended up looking masculine to me, which is a plus in my world, since I’m surround by men.

The images used today are from Innovative Stamp Creations.  Here is a link to their online store:  http://www.innovativestampcreations.com/ischomepage.html

I also made this card, but I don’t have a tutorial for it.  My camera battery died after the first shot when I was making it.  I would probably be willing to recreate it, but only if there is enough interest in the tutorial.  So if you are interested in the tutorial, please leave a comment on this post or if you are getting this by e-mail click on this link to leave a comment.  http://zindorf.blogs.splitcoaststampers.com/2008/06/23/isc-wood-and-leaf-tutorial/

dsc04690.JPG

Let’s get started on the tutorial.  🙂

Supplies:

Stamps:  Innovative Stamp Creations “Wood Grain” & Fall Leaves

Paper:  SU Whisper White, Basic Black, Blush Blossom & Really Rust

Ink:  Palette Noir Black, SU Basic Black & Handsome Hunter, Adirondack Peach Bellini & Ginger

Assessories:  Prismacolor Markers Forest Green & Spearmint, Brayer, Versamark Marker, Clear embossing Powder, heat gun, Sponges, Brads, ticket corner punch, Piercing tools, White Gel pen, Grunge board hinges.

dsc04687.JPG

Stamped leaf on Whisper White card stock with Palette Noir Black ink. 

Note:  I used this ink because I am going to color the image with solvent based markers and the Palette ink will not smear with this medium.

dsc04664.JPG

Colored the leaf image in with a Prismacolor Spearmint marker.

dsc04665.JPG

Colored part of the leaf with a Prismacolor Forest Green marker.

dsc04666.JPG

Colored over the entire image again with the Spearmint marker to soften and blend the colors together.

dsc04667.JPG

Added a bit more Forest green at the bottom of the leaf.    I love these solvent based Prismacolor markers because, just like I’ve shown here with just two markers, you can layer the colors to get a whole lot of variation in shading.  Fun huh?

dsc04668.JPG

Colored over the entire image with a Versamark marker and heat embossed using clear embossing powder and a heat gun.

dsc04669.JPG

dsc04670.JPG

Brayered over the entire card stock with Peach Bellini ink.

dsc04671.JPG

Brayered Ginger ink on the right side of the card stock.

dsc04672.JPG

Using a large unmounted stamp, such as this Wood Grain stamp, is so very easy.  I just put them on my work surface face side up.  Ink them by swiping my ink pad across the top.  Put my card stock face down on the rubber stamp.  Put a scrap piece of paper over it and rub it with my hand to transfer the image onto the card stock.

Note:  After inking the wood grain stamp, I used a sponge and swiped from top to bottom on the rubber stamp to get more of a stripe in the wood image.

dsc04674.JPG

Sponged Basic Black ink heavily at the Right side of the card stock.

dsc04675.JPG

Sponged a little Handsome Hunter ink at the left side of the black ink to soften the black edge.

dsc04676.JPG

Sponged Ginger ink at the bottom of the leaf image to create a shadow.

dsc04677.JPG

Outlined the top of the leaf image with a white gel pen to add some highlight.

dsc04678.JPG

I got this Grunge board by Tim Holtz from Innovative Stamp Creations and decided to give it a try today.  First of all, this is not like chip board it is so flexible.  I was amazed at how it took ink too.  I inked my hinge pieces with basic black ink.

dsc04680.JPG

dsc04681.JPG

Used a ticket corner punch on the corners of my main image panel.

dsc04682.JPG

Assembled the card and pierced along the top, bottom and left side of the Really Rust Panel with my piercing tools.

dsc04683.JPG

Here is my finished card measuring 5″ x 6.5″.

dsc04685.JPG

Thanks for hanging out with me today while I continue on with my Leaf excursion.  Hopefully, you will start to see leaves in a whole new light too.

May your day be filled with the tinkling sound of  Aspen leaves.

Until my next post. . . . . . .

Michelle


Bloomin Cart – Tutorial

dsc04019.jpg

I’m still feeling under the weather here.  Thought a bright cheerful card might make me feel a little better.  This Blooming With Love set from Stampin’ Up had not seen ink yet so I decided to use it for today’s tutorial.

Supplies:

dsc04023.JPG

Stamped Flowers with Palette Noir Black ink on Whisper White card stock.

dsc03991.JPG

Colored some of the flowers with a Prismacolor Sunburst Yellow Marker and some with a Prismacolor Yellow Orange marker.

dsc03992.JPG

dsc03993.JPG

Colored over the flowers with a Versamark Marker and heat embossed them using clear embossing powder and a heat gun.

dsc03994.JPG

dsc03995.JPG

Stamped the stamp from Watercolor Minis set randomly over the flowers by first loading the stamp with Versamark and then with Cool Caribbean ink.  Heat embossed them using clear embossing powder and a heat gun.

dsc03996.JPG

dsc03997.JPG

Repeated last step, but used Brilliant Blue ink and Versamark, heat embossed using clear embossing powder and a heat gun.

dsc03998.JPG

Same steps again, but used Versamark and black ink and only stamped a couple of times in the middle of the flowers.  Heat embossed with clear embossing powder and a heat gun.

dsc03999.JPG

dsc04000.JPG

Using my Stamp-a-ma-Jig for placement, I stamp the cart with Noir Black ink.

dsc04001.JPG

dsc04002.JPG

Colored the cart with a Prismacolor Sunburst Yellow marker.

dsc04003.JPG

Went over part of the cart with a Prismacolor Yellow Orange Marker.

dsc04004.JPG

Added some Prismacolor Pumpkin Orange Marker at the left side of cart.

dsc04005.JPG

Lastly added Prismacolor Brun Sienne along left side and bottom of cart.

dsc04006.JPG

Went over the cart with a Prismacolor Colorless Blender to blend the colors.

dsc04007.JPG

Colored the Wheel with Brun Sienna. 

dsc04008.JPG

Added Cool Grey 50% to wheel.

dsc04009.JPG

Added Cool Grey 90% around the outer edge of the wheel and used the blender marker to blend the two grey colors a bit.

dsc04010.JPG

Note:  I missed taking photos of this but I colored the cart with a Versamark marker and heat embossed it using clear embossing powder and a heat gun.

Sponged Lettuce ink at the bottom of the card stock.

dsc04011.JPG

Sponged Oregano ink at the bottom of the card stock, not covering the Lettuce ink entirely.

dsc04012.JPG

Sponge Stonewashed ink in the sky area.

dsc04014.JPG

Sponged Brilliant Blue ink on the left 2/3rds of the sky area.

dsc04015.JPG

Sponged Oregano ink under the cart as a shadow.

dsc04017.JPG

Wiped ink from embossed images.

dsc04018.JPG

Assembled card measures 5.25″ x 5.25″.

dsc04019.jpg


Feeling Blue Landscape – Tutorial

dsc03985.jpg

I’m feeling a bit under the weather today with allergies, hence the blue landscape.  🙂

It’s very calming don’t you think?   I thought this would be a nice sympathy card for a man.

Let’s get started on today’s tutorial.

Supplies:

dsc03988.JPG

Brayered Soft Sky ink all over a Whisper White piece of card stock.

dsc03971.JPG

Put post it notes on the card stock where I want my horizon line to be and sponged in a circular motion Blue Bayou ink to form a mountain in the distance.

dsc03972.JPG

Sponge on Night of Navy ink in a circular motion to create a mountain that over laps the one in the distance.

dsc03973.JPG

Sponged Night of Navy ink on the mountain in the fore ground, not covering the Not Quite Navy ink entirely.

dsc03974.JPG

Sponged a little Basic Black right at the post it note edge to really get dark at the horizon line.

dsc03975.JPG

Took the post it note mask off and put new ones on to cover the sky and mountains.  I also masked a very small part of the water area right at the foot of the mountains to create a light beach area.

dsc03976.JPG

With my mask in place, I traced where my foreground mountain is on the post it notes so I can envision where I want my mountain reflection to be in the water area.

dsc03977.JPG

I turned the card stock up side down so I could work better.  I sponged on Not Quite Navy ink to create the mountain reflection using a circular motion.

dsc03978.JPG

Sponged Night of Navy on the mountain reflection not covering the Not Quite Navy ink entirely.

dsc03979.JPG

Removed the post it note masks.

dsc03980.JPG

Using a gentle swiping motion with the sponge from left to right, I sponged on Blue Bayou ink in the water area.

dsc03981.JPG

Stamp trees with Basic Black ink.

dsc03982.JPG

Stamped Canvas stamp over main image panel to create the illusion of a painting with Soft Sky Ink.  Sorry, it is very hard to see this in the picture.

dsc03983.JPG

Assembled card and here it is finished.  The finished card measures 5″ x 6.5″.

dsc03985.jpg

This ends the tutorial part of today’s post, but if you are interested keep reading to see a bit of my Spring garden in bloom.  😉

These pictures were taken yesterday in the few hours of sunshine we have had here in a few days. 

dsc03954-pw.jpg

You just have to love Iris when they are blooming.  They are so very elegant with their ruffled petals.

dsc03939-pw.jpg

dsc03931-pw.jpg

I have these Early blooming Daylilies blooming away also.  Love them too!

dsc03957-pw.jpg

I have these half Barrels turned over in the garden for interest. 

dsc03963-pw.jpg

dsc03962-pw.jpg

Strawberry jar, I can’t wait to get some berries!

dsc03942-pw.jpg

Just another garden ornament.

dsc03966-pw.jpg

That’s all for now folks.  Thanks for sticking around for a little bit of a garden tour.

Hope your Sunday is one of peace.

Until my next post. . . . .

Michelle