Sweet Bunny – Tutorial #496

Hey There,

I’m working on Wedding Invitations for my youngest Son’s wedding but, I took some time out this morning to do a little recreational stamping.  The Stampin’ Up! set “Everybunny” that I used here is too stinking cute!  I think this card could be used both for a baby card or for Easter.

Anyhow, I’m itching to get out in my garden since our temperatures here in Ohio have been a wonderful 70 degrees.  Along with the daffodils popping up I’m also seeing some weeds.  I best get out there this afternoon and start heading them off before they take over.     So how has your temperatures been?  Mild I hope.

Reminders before I start on the tutorial:

Last month to pick up those free Sale-a-bration sets.  Stampin’ Up! Sale-a-bration sales period runs from January 24 – March 31, 2012. During this sales period you will receive your choice of a free stamp set from the Sale-a-bration catalog for every $50 in product you order.   CLICK HERE TO CHECK OUT THIS YEAR’S SALE-A-BRATION CATALOG! You won’t want to miss out on the sale-a-bration sets, paper and embellishments.

Don’t miss out on my Customer free stamp set program. Check it out!  Along with a thank you card from me for your order you will receive a token for each $50 in product you order using me as your demonstrator.  After you have collected 10 tokens you will receive a free current stamp set of your choosing, a value of $39 or less.   Here is a link to my online shopping page that you can shop at 24/7 (from the comfort of your home, even in your pj’s) and the products will be shipped directly to your door step from Stampin’ Up:   CLICK HERE TO SHOP.   My free stamp set program will be an on going program.  :)

Don’t forget the Stampin’ Up! new Occasions Mini Catalog CLICK HERE TO TAKE A LOOK AT IT. I know you will fall in love with the new stamp sets, dies and accessories.   They are to die for. . .

Now on with today’s tutorial. . . . .  . .

Supplies:

Stamps: Stampin’ Up! Everybunny (item number 122707)

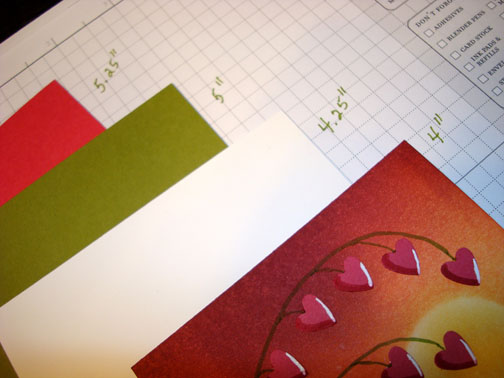
Card Stock: Stampin’ Up! Whisper White, Blushing Bride and Bashful Blue

Ink: Stampin’ Up! Lucky Limeade, Bashful Blue and Stazon Jet Black

Accessories: Stampin’ Up!  Whisper White Organza Ribbon, White Gel Pen, Markers (Sahara Sand, Blush Blossom, Blushing Bride and Regal Rose), Big Shot Machine, Small Dots Texture Plate, Word Window Punch, 2.5″ Circle Punch, Brayer, Silver Brads.

Want a free copy of the current Stampin’ Up! Occasions Mini Catalog?  Just e-mail your address to mzindorf@aim.com and I will get one right out to you.  Get your copy of the 2011-2012 Stampin’ Up! Idea Book & Catalog by sending $9.95 to me at P.O. box 116, West Alexandria, Ohio 45381 or via paypal to mzindorf@aim.com, shipping is free. Are you getting inspiration from this blog?   One way you can help support it is to order your Stampin’ Up products through me.   Click HEREto place an order and have your order delivered directly to your door step from Stampin’ Up!    Want to become a Stampin’ Up Demonstrator , receive a 20% discount on product and earn instant income on orders, get to purchase products before they are released to the public?  Consider being part of my Stampin’ Up Team and start your own business or become a Hobby Demo just for the discount.  Click HERE for more information.


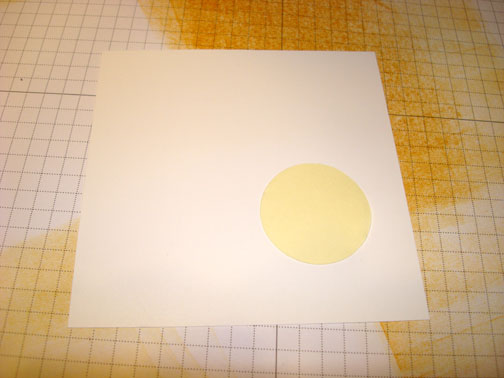
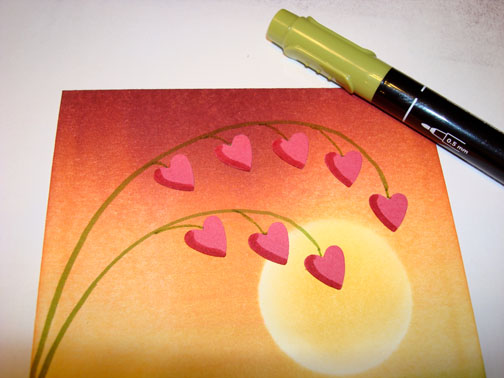
Punched a 2.5″ circle from Whisper White Card stock.

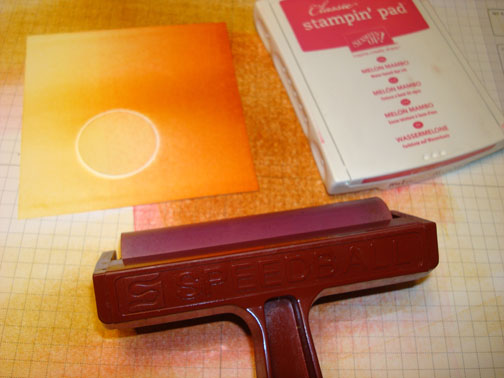
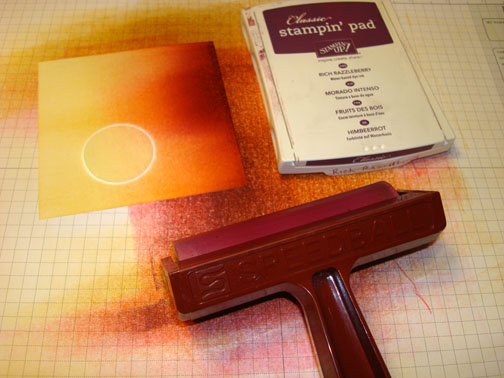
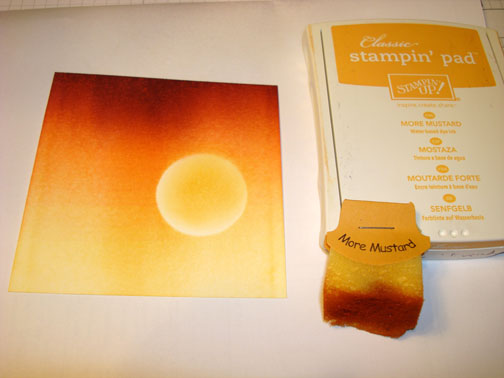
Brayer Bashful Blue ink at the top of the circle.

Brayer Lucky Limeade ink at the bottom of the card stock.

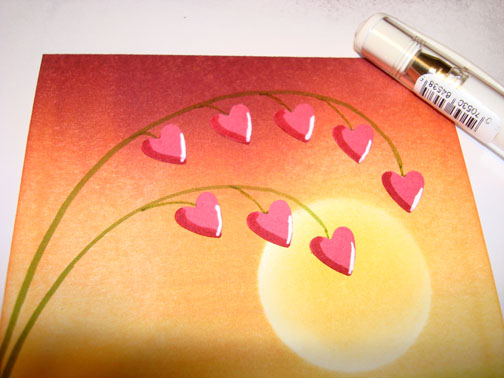
Stamped the bunny using Stazon Jet Black ink.

Colored the bunny in using a white gel pen.

Added a shadow to the bunny’s ear, left side of his face and his paws.

Colored the egg using a Blush Blossom marker.

Added a shadow to the bottom of the egg using a Blushing Bride marker and then added just a bit of Regal Rose at the very bottom of the egg.

Used the Sahara Sand marker below the egg to color in the shadow.

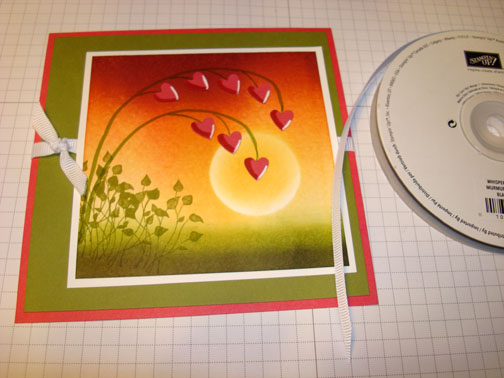
Used the Big Shot machine and the Small Dots Texture plate on a 4.75″ x 6.25″ piece of Whisper White card stock.

Taped the edge of my card stock to a glass mat.

Used Stampin’ Up Circle Scissors to cut two circle rings, one from Blushing Bride card stock and one from Bashful Blue card stock.   The Bashful Blue one is smaller than the Blushing Bridge one.


Adhered the rings and the main image circle to the textured panel.


Punched two Bashful Blue window punches and held them together and cut one end off of them.

Ahered the word window punches to the card stock and then added brads around the top of the bashful Blue ring.


Added Whisper White Ribbon and a Blushing Bride panel 6.5″ x 5″.

The finished card measures 5″ x 6.5″.


May you get to feel the sun on your face today.

Until my next post. . . . .  . . .

Hugs,

Get ready for Brayer and Direct to Paper Workshops!  I am coming to the following locations, click the location name for more information.

Indianapolis, Indiana (Sold Out)

Indiana, Pennsylvania

Sparta, New Jersey (Sold Out)

Piedmont, Alabama

Post Falls, Idaho (outside of Coeurd’Alene)

Sand Lake, Michigan (just North of Grand Rapids)

Lawrence, Kansas

Elizabethtown, Kentucky

West Bend, Wisconsin

Longmont (Gunbarrel), Colorado

Orange, Massachusetts

Scottsdale, Arizona

Sacramento, California

Staley, North Carolina


Here is a link to my workshop calendar where you can see all of my travel schedule and to get info on beginner and advanced Brayer workshops, along with the newly added Direct to Paper Workshop: http://zindorf.blogs.splitcoaststampers.com/workshop-calendar

Don’t see a workshop in your State?  Interested in hosting the workshops in your area   Click HERE to get hostess information.

Link to my Stampin’ Up website where you can order all of your must have Stampin’ Up products from me 24-7: http://michellezindorf.stampinup.net


Up, Up and Away Bunny – Tutorial #494


Hi There,

I spent the entire day yesterday in the kitchen to fill my freezer back up to capacity with freezer meals.  I put away 5 meals each of the following, beef stew, Salisbury steak, teriyaki Roast.  I had found yellow, red and orange bell peppers on sale too, so I purchased a bunch to have on hand in the freezer for fajitas.   Also, when I am gone teaching for the weekend, Russ runs out of fresh bread so the first thing he ask for me to do is make bread.  So, I also made french bread and Apple Wheat bread.   Oh, and lets not forget the no bake cookies I made.  Yes indeed, it was a busy Monday and the crockpots, oven and bread machine were working over time!  I guess you now know what I do when I am not blogging or traveling.  🙂

Also, this arrived while I was in Tennessee this past weekend.  It’s my chicken coop!!!  Woohoo!

My oldest son, Jesse took mercy on me and came over and assembled it.  It’s all ready now for the chickens, but they will not be arriving until the end of May.  They will be 1 day old chicks when they arrive at my post office and will live in the house with us for weeks before they get to be moved to their permanent coop and run.   I’ll keep you updated on my chicken saga for sure.

It reminds me of a doll house, lol.  I will be building on to this, no doubt.

My dog, Lucas who is 100 lbs keeps looking at.  I can just see his canine brain working and wondering if it is some type of dog house.  See the worried look on his face.  He’s an indoor dog.

Also, I have an announcement. . .  . .  I have added Scottsdale, Arizona Brayer and Direct to Paper Workshops to my workshop calendar for October 6-7, 2012.  Be sure to register early so you don’t miss out.   CLICK HERE TO GET THE DETAILS.

Now a little about today’s tutorial. . . .  . .

I broke out my forgotten Prisma Color pencils and paint thinner for this project.  When you dip the end of the pencil in the paint thinner is melts like butter on your card stock.   Lovely technique.  Join me, won’t you.

Reminders before I start on the tutorial:

Last month to pick up those free Sale-a-bration sets.  Stampin’ Up! Sale-a-bration sales period runs from January 24 – March 31, 2012. During this sales period you will receive your choice of a free stamp set from the Sale-a-bration catalog for every $50 in product you order.   CLICK HERE TO CHECK OUT THIS YEAR’S SALE-A-BRATION CATALOG! You won’t want to miss out on the sale-a-bration sets, paper and embellishments.

Don’t miss out on my Customer free stamp set program. Check it out!  Along with a thank you card from me for your order you will receive a token for each $50 in product you order using me as your demonstrator.  After you have collected 10 tokens you will receive a free current stamp set of your choosing, a value of $39 or less.   Here is a link to my online shopping page that you can shop at 24/7 (from the comfort of your home, even in your pj’s) and the products will be shipped directly to your door step from Stampin’ Up:   CLICK HERE TO SHOP.   My free stamp set program will be an on going program.  :)

Don’t forget the Stampin’ Up! new Occasions Mini Catalog CLICK HERE TO TAKE A LOOK AT IT. I know you will fall in love with the new stamp sets, dies and accessories.   They are to die for. . .

Now on with today’s tutorial. . . . .  . .

Supplies:

Stamps: Stampin’ Up! Everybunny (item number 122707)

Card Stock: Stampin’ Up! Whisper White, Pretty in Pink and Old Olive

Ink: Stampin’ Up! Basic Black, Old Olive, Pacific Point, Tempting Turquoise and Stazon Jet Black

Accessories: Stampin’ Up!  sponge, White Gel Pen, Prismacolor pencils, Odorless Paint Thinner, Brayer, Scallop punch, Blushing Bride Ribbon (item number 125570).

Want a free copy of the current Stampin’ Up! Occasions Mini Catalog?  Just e-mail your address to mzindorf@aim.com and I will get one right out to you.  Get your copy of the 2011-2012 Stampin’ Up! Idea Book & Catalog by sending $9.95 to me at P.O. box 116, West Alexandria, Ohio 45381 or via paypal to mzindorf@aim.com, shipping is free. Are you getting inspiration from this blog?   One way you can help support it is to order your Stampin’ Up products through me.   Click HEREto place an order and have your order delivered directly to your door step from Stampin’ Up!    Want to become a Stampin’ Up Demonstrator , receive a 20% discount on product and earn instant income on orders, get to purchase products before they are released to the public?  Consider being part of my Stampin’ Up Team and start your own business or become a Hobby Demo just for the discount.  Click HERE for more information.


Brayered Tempting Turquoise ink on a 3″ x 4″ piece of Whisper White card stock.


Brayered Pacific Point ink at the top of the card stock.

Sponged Old Olive ink at the bottom of the card stock.

Brayered Basic Black ink at the very bottom of the card stock.

Stamp the image using Stazon Jet Black ink.

Got out my Prismacolor pencils and Odorless Paint Thinner.  When using these pencils I like to dip the tip of the pencil in the paint thinner and then color with it.  The color melts onto the card stock like butter and it’s really smooth.

I pour just a little bit of the paint thinner in the cap from the bottle to use with my pencils.  Colored the bunny in with Peach Beige.

Added a shadow on the bunny using Prismacolor Light Umber.

Colored in the balloon using Prismacolor Hot Pink.

Added Prismacolor Process Red to the sides and bottom of the balloon to add depth.

Colored in the stripes and basket using Prismacolor Canary Yellow.

Colored in the dots, flowers and added highlights to the stripes on the balloon, basket Ribbon and the bunny using a White Gel Pen.

Added some Prismacolor Scarlet Lake to the sides and bottom of the balloon to create a bit more roundness.

Added Light Umber to the bottom and top of the basket.

Added 2 Pretty in Pink Panels, One Whisper White panel and an Old Olive Strip of card stock that has been punched with the Scallop Boarder punch.  Also added Blushing Bride ribbon.

Here is the finished project.  Please realize that the pencil colors will change on the project since they are layered over blue ink.  For instance the pinks will turn purple, yellow will turn green and the tan will turn gray.  🙂

Happy Stamping!

Until my next post. . . . .  . . .

Hugs,

Get ready for Brayer and Direct to Paper Workshops!  I am coming to the following locations, click the location name for more information.

Greeneville, Tennessee

Indianapolis, Indiana (Sold Out)

Indiana, Pennsylvania

Sparta, New Jersey (Sold Out)

Piedmont, Alabama

Post Falls, Idaho (outside of Coeurd’Alene)

Sand Lake, Michigan (just North of Grand Rapids)

Lawrence, Kansas

Elizabethtown, Kentucky

West Bend, Wisconsin

Longmont (Gunbarrel), Colorado

Orange, Massachusetts

Scottsdale, Arizona

Sacramento, California

Staley, North Carolina


Here is a link to my workshop calendar where you can see all of my travel schedule and to get info on beginner and advanced Brayer workshops, along with the newly added Direct to Paper Workshop: http://zindorf.blogs.splitcoaststampers.com/workshop-calendar

Don’t see a workshop in your State?  Interested in hosting the workshops in your area   Click HERE to get hostess information.

Link to my Stampin’ Up website where you can order all of your must have Stampin’ Up products from me 24-7: http://michellezindorf.stampinup.net


Just Passing Through – Tutorial #493

Hey There,

By the looks of today’s tutorial, I’m ready to get my hands dirty in the garden.     Come on Spring!!   Are you with me?

Any how, I hope you enjoy today’s tutorial.   I challenge you to give it a try.  You will be surprised at how quickly this card goes together.

Reminders before I start on the tutorial:

Last month to pick up those free Sale-a-bration sets.  Stampin’ Up! Sale-a-bration sales period runs from January 24 – March 31, 2012. During this sales period you will receive your choice of a free stamp set from the Sale-a-bration catalog for every $50 in product you order.   CLICK HERE TO CHECK OUT THIS YEAR’S SALE-A-BRATION CATALOG! You won’t want to miss out on the sale-a-bration sets, paper and embellishments.

Don’t miss out on my Customer free stamp set program. Check it out!  Along with a thank you card from me for your order you will receive a token for each $50 in product you order using me as your demonstrator.  After you have collected 10 tokens you will receive a free current stamp set of your choosing, a value of $39 or less.   Here is a link to my online shopping page that you can shop at 24/7 (from the comfort of your home, even in your pj’s) and the products will be shipped directly to your door step from Stampin’ Up:   CLICK HERE TO SHOP.   My free stamp set program will be an on going program.  :)

Don’t forget the Stampin’ Up! new Occasions Mini Catalog CLICK HERE TO TAKE A LOOK AT IT. I know you will fall in love with the new stamp sets, dies and accessories.   They are to die for. . .

Now on with today’s tutorial. . . . .  . .

Supplies:

Stamps: Stampin’ Up! Button Buddies (Item Number 122737) and Pocket Silhouettes (Item Number 111672)

Card Stock: Stampin’ Up! Whisper White, Rich Razzelberry and Lucky Limeade

Ink: Stampin’ Up! Wisteria Wonder, Rich Razzelberry, Chocolate Chip and Lucky Limeade

Accessories: Stampin’ Up!  sponge, Post It Note, White Gel Pen, Rich Razzelberry Ribbon, 2.5″ Circle Punch, Ticket Corner Punch, Markers (Basic Black, Old Olive and Wisteria Wonder).

Want a free copy of the current Stampin’ Up! Occasions Mini Catalog?  Just e-mail your address to mzindorf@aim.com and I will get one right out to you.  Get your copy of the 2011-2012 Stampin’ Up! Idea Book & Catalog by sending $9.95 to me at P.O. box 116, West Alexandria, Ohio 45381 or via paypal to mzindorf@aim.com, shipping is free. Are you getting inspiration from this blog?   One way you can help support it is to order your Stampin’ Up products through me.   Click HEREto place an order and have your order delivered directly to your door step from Stampin’ Up!    Want to become a Stampin’ Up Demonstrator , receive a 20% discount on product and earn instant income on orders, get to purchase products before they are released to the public?  Consider being part of my Stampin’ Up Team and start your own business or become a Hobby Demo just for the discount.  Click HERE for more information.

Punch a 2.5″ Circle Punch from the sticky part of a post it note and use it as a mask on a 3″ x 4″ piece of Whisper White card stock.

Sponge Wisteria Wonder ink lightly at the top of the card stock.

Remove the mask and Sponge Rich Razzelberry ink at the bottom of the card stock.

Sponge Chocolate Chip ink at the bottom of the ground area.

Stamp the snail from the Button Buddies stamp set using Lucky Limeade on a scrap piece of Whisper White card stock.

Cut out the snail using paper snips and add a shadow to the bottom and front of the snail using an Old Olive marker.

Adhere the snail to the card stock and stamp the Pocket Silhouettes plant using Lucky Limeade ink.

Added a shadow on the ground under the snail using a Wisteria Wonder marker.

Added dots to the ground and a trail behind the snail using a White Gel Pen.

Add 2 Rich Razzelberry panels and a Lucky Limeade panel using the measurements below.

Use the ticket corner punch on the corners off the main image panel, smallest Rich Razzelberry Panel and the Lucky Limeade Panel.


Assemble the card and add a Rich Razzelberry Ribbon.

Here it is finished measuring 4.25″ x 5.5″.

May your day be filled with all the things you love most.

I’m off to Greeneville, TN to teach this weekend.  So you have a wonderful weekend too!

Until my next post. . . . .  . . .

Hugs,

Get ready for Brayer and Direct to Paper Workshops!  I am coming to the following locations, click the location name for more information.

Greeneville, Tennessee

Indianapolis, Indiana (Sold Out)

Indiana, Pennsylvania

Sparta, New Jersey (Sold Out)

Piedmont, Alabama

Post Falls, Idaho (outside of Coeurd’Alene)

Sand Lake, Michigan (just North of Grand Rapids)

Lawrence, Kansas

Elizabethtown, Kentucky

West Bend, Wisconsin

Longmont (Gunbarrel), Colorado

Orange, Massachusetts

Sacramento, California

Staley, North Carolina


Here is a link to my workshop calendar where you can see all of my travel schedule and to get info on beginner and advanced Brayer workshops, along with the newly added Direct to Paper Workshop: http://zindorf.blogs.splitcoaststampers.com/workshop-calendar

Don’t see a workshop in your State?  Interested in hosting the workshops in your area   Click HERE to get hostess information.

Link to my Stampin’ Up website where you can order all of your must have Stampin’ Up products from me 24-7: http://michellezindorf.stampinup.net


A Little Note – Tutorial #492


Hey There,

Today’s tutorial is a fun one.  I love creating brick walls.  Why have a plain wall behind your main image when you can spruce it up with a brick one.   Follow along with today’s tutorial and I will show you just how easy it is.

Reminders before I start on the tutorial:

Last month to pick up those free Sale-a-bration sets.  Stampin’ Up! Sale-a-bration sales period runs from January 24 – March 31, 2012. During this sales period you will receive your choice of a free stamp set from the Sale-a-bration catalog for every $50 in product you order.   CLICK HERE TO CHECK OUT THIS YEAR’S SALE-A-BRATION CATALOG! You won’t want to miss out on the sale-a-bration sets, paper and embellishments.

Don’t miss out on my Customer free stamp set program. Check it out!  Along with a thank you card from me for your order you will receive a token for each $50 in product you order using me as your demonstrator.  After you have collected 10 tokens you will receive a free current stamp set of your choosing, a value of $39 or less.   Here is a link to my online shopping page that you can shop at 24/7 (from the comfort of your home, even in your pj’s) and the products will be shipped directly to your door step from Stampin’ Up:   CLICK HERE TO SHOP.   My free stamp set program will be an on going program.  :)

Don’t forget the Stampin’ Up! new Occasions Mini Catalog CLICK HERE TO TAKE A LOOK AT IT. I know you will fall in love with the new stamp sets, dies and accessories.   They are to die for. . .

Now on with today’s tutorial. . . . .  . .

Supplies:

Stamps: Stampin’ Up! You’re My Type (item number 125650)

Card Stock: Stampin’ Up! Whisper White, Early Espresso, Soft Suede and Stampin’ Up Designer Series paper Well Worn (item number 122359)

Ink: Stampin’ Up! Basic Black and Early Espresso

Accessories: Stampin’ Up!  sponge, Post It Note, Crumb Cake Marker, White Gel Pen, Ruler, Paper Snips.

Want a free copy of the current Stampin’ Up! Occasions Mini Catalog?  Just e-mail your address to mzindorf@aim.com and I will get one right out to you.  Get your copy of the 2011-2012 Stampin’ Up! Idea Book & Catalog by sending $9.95 to me at P.O. box 116, West Alexandria, Ohio 45381 or via paypal to mzindorf@aim.com, shipping is free. Are you getting inspiration from this blog?   One way you can help support it is to order your Stampin’ Up products through me.   Click HEREto place an order and have your order delivered directly to your door step from Stampin’ Up!    Want to become a Stampin’ Up Demonstrator , receive a 20% discount on product and earn instant income on orders, get to purchase products before they are released to the public?  Consider being part of my Stampin’ Up Team and start your own business or become a Hobby Demo just for the discount.  Click HERE for more information.


Cut a 3.5″ x 4.5″ piece of Stampin’ Up Designer Series Paper from the Well Worn Pack.   Made 6 Lines 1/2″ apart at the top of the card stock using a White Gel Pen.


Turned the paper and made White Gel Pen lines across every other line 1/2″ apart.   Although not pictured here, I made an “L” shape at the bottom of each brick using a Crumb Cake marker.  (See finished project)  Oops!  sorry missed the shot.

Covered up the bricks with a post it note and sponged Early Espresso ink on the unmasked area.

Stamped the Typewriter using Basic Black ink on a scrap piece of Whisper White card stock.

Stamped the sentiment on the image and then cut out the typewriter using paper snips.

Adhered the typewriter to the panel.  Cut out a couple of the half bricks on the sides.

Added a 3.75″ x 4.75″ piece of Soft Suede card stock and a 4.25″ x 5.5″ piece of Early Espresso card stock.

Here is the finished card measuring 4.25″ x 5.5″.

May your day be overflowing with fun and laughter.  I’m off to start packing for my trip to Greeneville, TN this weekend where I will be teaching my brayer and Direct to Paper workshops.   Below is a list of  the locations I will be teaching at.

Until my next post. . . . .  . . .

Hugs,

Get ready for Brayer and Direct to Paper Workshops!  I am coming to the following locations, click the location name for more information.

Greeneville, Tennessee

Indianapolis, Indiana (Sold Out)

Indiana, Pennsylvania

Sparta, New Jersey (Sold Out)

Piedmont, Alabama

Post Falls, Idaho (outside of Coeurd’Alene)

Sand Lake, Michigan (just North of Grand Rapids)

Lawrence, Kansas

Elizabethtown, Kentucky

West Bend, Wisconsin

Longmont (Gunbarrel), Colorado

Orange, Massachusetts

Sacramento, California

Staley, North Carolina


Here is a link to my workshop calendar where you can see all of my travel schedule and to get info on beginner and advanced Brayer workshops, along with the newly added Direct to Paper Workshop: http://zindorf.blogs.splitcoaststampers.com/workshop-calendar

Don’t see a workshop in your State?  Interested in hosting the workshops in your area   Click HERE to get hostess information.

Link to my Stampin’ Up website where you can order all of your must have Stampin’ Up products from me 24-7: http://michellezindorf.stampinup.net


Tami’s Bleeding Heart – Tutorial #491

Hey There,

I have a tutorial for you today.   It’s a card I made this morning for a new friend, Tami White.   Tami just lost a loved one and I wanted to send her a card that would let her know I am thinking of her.  So, Tami, if you are reading this expect this one in the mail, cyber hugs!

Tami and I at Stampin’ Up’s Leadership Conference back in January.

Reminders before I start on the tutorial:

Stampin’ Up! Sale-a-bration sales period runs from January 24 – March 31, 2012. During this sales period you will receive your choice of a free stamp set from the Sale-a-bration catalog for every $50 in product you order.   CLICK HERE TO CHECK OUT THIS YEAR’S SALE-A-BRATION CATALOG! You won’t want to miss out on the sale-a-bration sets, paper and embellishments.

Don’t miss out on my Customer free stamp set program. Check it out!  Along with a thank you card from me for your order you will receive a token for each $50 in product you order using me as your demonstrator.  After you have collected 10 tokens you will receive a free current stamp set of your choosing, a value of $39 or less.   Here is a link to my online shopping page that you can shop at 24/7 (from the comfort of your home, even in your pj’s) and the products will be shipped directly to your door step from Stampin’ Up:   CLICK HERE TO SHOP.   My free stamp set program will be an on going program.  :)

Don’t forget the Stampin’ Up! new Occasions Mini Catalog CLICK HERE TO TAKE A LOOK AT IT. I know you will fall in love with the new stamp sets, dies and accessories.   They are to die for. . .

Now on with today’s tutorial. . . . .  . .

Supplies:

Stamps: Stampin’ Up! Pocket Silhouettes (item number 111672)

Card Stock: Stampin’ Up! Whisper White, Old Olive, Rose Red and Melon Mambo

Ink: Stampin’ Up! Old Olive, Basic Black, More Mustard, Rich Razzelberry and Melon Mambo

Accessories: Stampin’ Up!  sponges,  1 1/4″ circle punch,  brayer, White Gel Pen, Old Olive Marker, Rose Red Marker, Heart Punch, Whisper White Ribbon, Gold Brads, post it note.

Want a free copy of the current Stampin’ Up! Occasions Mini Catalog?  Just e-mail your address to mzindorf@aim.com and I will get one right out to you.  Get your copy of the 2011-2012 Stampin’ Up! Idea Book & Catalog by sending $9.95 to me at P.O. box 116, West Alexandria, Ohio 45381 or via paypal to mzindorf@aim.com, shipping is free. Are you getting inspiration from this blog?   One way you can help support it is to order your Stampin’ Up products through me.   Click HEREto place an order and have your order delivered directly to your door step from Stampin’ Up!    Want to become a Stampin’ Up Demonstrator , receive a 20% discount on product and earn instant income on orders, get to purchase products before they are released to the public?  Consider being part of my Stampin’ Up Team and start your own business or become a Hobby Demo just for the discount.  Click HERE for more information.

Punched a 1 1/4″ circle from the sticky part of a post it note.  Used it to mask my sun on a 4″ square piece of Whisper White card stock.

Brayered More Mustard ink on the card stock.

Brayered Melon Mambo ink on the card stock.

Brayered Rich Razzelberry ink at the top of the card stock.

Removed the sun mask and sponged More Mustard ink in the center of the sun.

Made two stems using an Old Olive Marker.

Sponged Old Olive ink at the bottom of the card stock.

Sponged Basic Black at the very bottom of the card stock.

Punched 7 small hearts out of Rose Red card stock.

Colored the left side of the heart with a Rose Red marker to create a shadow and dimension in the heart.

Adhered the hearts to my main image panel.

Added a little stem to the hearts that connects to the large stem using an Old Olive marker.

Livened the heart up by putting a highlight on each heart using a white gel pen.

Stamped the leafy plant from the Stampin Up Pocket Silhouettes set using Old Olive ink a few times at the bottom left corner of the main image panel.

Added a Melon Mambo panel, Old Olive Panel, Whisper White Panel.

Added Whisper White Ribbon.

Added 4 Gold Brads.

Here is the finished card measuring 5.25″ square.

May you let someone you care about know it today.

Until my next post. . . . .  . . .

Hugs,

Get ready for Brayer and Direct to Paper Workshops!  I am coming to the following locations, click the location name for more information.

Greeneville, Tennessee

Indianapolis, Indiana (Sold Out)

Indiana, Pennsylvania

Sparta, New Jersey (Sold Out)

Piedmont, Alabama

Post Falls, Idaho (outside of Coeurd’Alene)

Sand Lake, Michigan (just North of Grand Rapids)

Lawrence, Kansas

Elizabethtown, Kentucky

West Bend, Wisconsin

Longmont (Gunbarrel), Colorado

Orange, Massachusetts

Sacramento, California

Staley, North Carolina


Here is a link to my workshop calendar where you can see all of my travel schedule and to get info on beginner and advanced Brayer workshops, along with the newly added Direct to Paper Workshop: http://zindorf.blogs.splitcoaststampers.com/workshop-calendar

Don’t see a workshop in your State?  Interested in hosting the workshops in your area   Click HERE to get hostess information.

Link to my Stampin’ Up website where you can order all of your must have Stampin’ Up products from me 24-7: http://michellezindorf.stampinup.net


Butterfly Love – Tutorial #490

Hey There,

I’m home again after a wonderful trip to Seattle, Washington.  Here is a shout out to my wonderful students that I had over the weekend.  Brayer on dear friends!

Now that I am back, I’m ready to create.  How about an anniversary card?  Well I have one for you today.   Although you could put any word on the front of this.  Think outside the box and put someone’s name on it and use it for a birthday card.

This card is very Spring like.  Since we are in the middle of Winter, I guess I’m just hoping for some warm weather.  🙂

I love to brayer in my backgrounds for garden scenes leaving one side of the card stock very light.  This gives you such a wonderful light effect.    Also, I brought out one of my all time favorite stamp sets from the current Stampin’ Up catalog, Baroque Motifs.  What an awesome flourish this set has.   No garden is complete without a butterfly which is in the beautiful Stampin’ Up set Summer Solstice.

Reminders before I start on the tutorial:

Stampin’ Up! Sale-a-bration sales period runs from January 24 – March 31, 2012. During this sales period you will receive your choice of a free stamp set from the Sale-a-bration catalog for every $50 in product you order.   CLICK HERE TO CHECK OUT THIS YEAR’S SALE-A-BRATION CATALOG! You won’t want to miss out on the sale-a-bration sets, paper and embellishments.

Don’t miss out on my Customer free stamp set program. Check it out!  Along with a thank you card from me for your order you will receive a token for each $50 in product you order using me as your demonstrator.  After you have collected 10 tokens you will receive a free current stamp set of your choosing, a value of $39 or less.   Here is a link to my online shopping page that you can shop at 24/7 (from the comfort of your home, even in your pj’s) and the products will be shipped directly to your door step from Stampin’ Up:   CLICK HERE TO SHOP.   My free stamp set program will be an on going program.  :)

Don’t forget the Stampin’ Up! new Occasions Mini Catalog CLICK HERE TO TAKE A LOOK AT IT. I know you will fall in love with the new stamp sets, dies and accessories.   They are to die for. . .

Now on with today’s tutorial. . . . .  . .

Supplies:

Stamps: Stampin’ Up! Baroque Motifs (item number 113490), Summer Solstice (item number 122037)

Card Stock: Stampin’ Up! Whisper White, Basic Black and Old Olive

Ink: Stampin’ Up! Tempting Turquoise, Not Quite Navy, Old Olive, Tangerine Tango and Stazon Jet Black

Accessories: Stampin’ Up!  Brayer, Curly Label Punch, Printed Designer Brads In Color, Old Olive brads, White Gel Pen, Markers (Basic Black, Tempting Turquoise and Tangerine Tango),  Stampin’ Dimensionals, Timeless Type Die Alphabet, Big Shot Machine

Want a free copy of the current Stampin’ Up! Occasions Mini Catalog?  Just e-mail your address to mzindorf@aim.com and I will get one right out to you.  Get your copy of the 2011-2012 Stampin’ Up! Idea Book & Catalog by sending $9.95 to me at P.O. box 116, West Alexandria, Ohio 45381 or via paypal to mzindorf@aim.com, shipping is free. Are you getting inspiration from this blog?   One way you can help support it is to order your Stampin’ Up products through me.   Click HEREto place an order and have your order delivered directly to your door step from Stampin’ Up!    Want to become a Stampin’ Up Demonstrator , receive a 20% discount on product and earn instant income on orders, get to purchase products before they are released to the public?  Consider being part of my Stampin’ Up Team and start your own business or become a Hobby Demo just for the discount.  Click HERE for more information.


Die Cut my “Love” sentiment using the Timeless Type Alphabet Dies and the Big Shot Machine out of Old Olive Card Stock.

Brayered Tempting Turquoise on a 3.25″ x 7.5″ piece of Whisper White Card Stock.

Brayer Not Quite Navy ink on the card stock, not covering the Tempting Turquoise entirely.

Stamped the Baroque Motifs Flourish on the card stock twice using Old Olive ink.

Stamped the flower from the Baroque Motifs set using Tangerine Tango ink.

Added White Gel Pen ink to the flourish to highlight it.

Added a bit of Basic Black marker the flourish to create some shadow.

Adhered the die cut letter to the main image panel and added White Gel pen highlights to it.

Stamped the flower on Whisper White card stock using Tangerine Tango ink.

Cut the flower out and added it to the center of the “O” using an Old Olive brad.

Stamped the Butterfly on a piece of Whisper White card stock using Stazon Jet Black ink.  Colored the butter using Tempting Turquoise and Tangerine Tango markers.


Cut the butterfly out and adhered it to the card stock using Stampin’ Dimensionals to pop it up.

Added an 8.5″ x 3.25″ Old Olive Panel, 4″ x 9″ Basic Black panel, 1/2 of a Basic Black Curly Lable Punch to each side of the main image panel and a 1/8″ strip of Basic Black card stock.

Added In Color Printed Designer Brads to the Curly Label Punches.

Here is the finished card measuring 4″ x 9″.  This size card will fit into a #10 size office envelop.

May you stay warm and happy today.

Until my next post. . . . .  . . .

Hugs,

Get ready for Brayer and Direct to Paper Workshops!  I am coming to the following locations, click the location name for more information.

Greeneville, Tennessee

Indianapolis, Indiana (Sold Out)

Indiana, Pennsylvania

Sparta, New Jersey (Sold Out)

Piedmont, Alabama

Post Falls, Idaho (outside of Coeurd’Alene)

Sand Lake, Michigan (just North of Grand Rapids)

Lawrence, Kansas

Elizabethtown, Kentucky

West Bend, Wisconsin

Longmont (Gunbarrel), Colorado

Orange, Massachusetts

Sacramento, California

Staley, North Carolina


Here is a link to my workshop calendar where you can see all of my travel schedule and to get info on beginner and advanced Brayer workshops, along with the newly added Direct to Paper Workshop: http://zindorf.blogs.splitcoaststampers.com/workshop-calendar

Don’t see a workshop in your State?  Interested in hosting the workshops in your area   Click HERE to get hostess information.

Link to my Stampin’ Up website where you can order all of your must have Stampin’ Up products from me 24-7: http://michellezindorf.stampinup.net


Up in the Air Bird House – Tutorial #488


Hey There,

Hope you are having an awesome Monday.  I absolutely took the entire day off yesterday so I am trying to play catch up today.  Russ and I hung out all day and totally vegged in front of the TV.  Sometimes you just need a down day, right?   He has a good excuse since he is still healing from his surgery last week.  But me, hmmm, I guess my excuse is Russ needed company on the couch, lol.

I have a pretty little card for you today.   It highlights the Stampin’ Up! set Up in the Air (item number 122477) and the brand new Framelits – Labels Collection (item number 125598).  Gotta love the New Framelits from Stampin’ Up.  Makes super quick work out of cutting the wonderful shapes using the Big Shot Machine, plus you have lots of layer options.

Reminders before I start on the tutorial:

Stampin’ Up! Sale-a-bration sales period runs from January 24 – March 31, 2012. During this sales period you will receive your choice of a free stamp set from the Sale-a-bration catalog for every $50 in product you order.   CLICK HERE TO CHECK OUT THIS YEAR’S SALE-A-BRATION CATALOG! You won’t want to miss out on the sale-a-bration sets, paper and embellishments.

Don’t miss out on my Customer free stamp set program. Check it out!  Along with a thank you card from me for your order you will receive a token for each $50 in product you order using me as your demonstrator.  After you have collected 10 tokens you will receive a free current stamp set of your choosing, a value of $39 or less.   Here is a link to my online shopping page that you can shop at 24/7 (from the comfort of your home, even in your pj’s) and the products will be shipped directly to your door step from Stampin’ Up:   CLICK HERE TO SHOP.   My free stamp set program will be an on going program.  :)

Don’t forget the Stampin’ Up! new Occasions Mini Catalog CLICK HERE TO TAKE A LOOK AT IT. I know you will fall in love with the new stamp sets, dies and accessories.   They are to die for. . .

Now on with today’s tutorial. . . . .  . .

Supplies:

Stamps: Stampin’ Up! Up in the Air (item number 122477) Mini Catlog Hostess set

Card Stock: Stampin’ Up! Whisper White, Basic Black, Old Olive and Cajun Craze

Ink: Stampin’ Up! Old Olive, Cherry Cobbler, Cajun Craze, So Saffron and Stazon Jet Black ink.

Accessories: Stampin’ Up!  sponge,  3/8″ circle punch,  brayer, White Gel Pen, Old Olive Marker, Scallop Trim Corner, Framelits – Label Collection (item number 125598)

Want a free copy of the current Stampin’ Up! Occasions Mini Catalog?  Just e-mail your address to mzindorf@aim.com and I will get one right out to you.  Get your copy of the 2011-2012 Stampin’ Up! Idea Book & Catalog by sending $9.95 to me at P.O. box 116, West Alexandria, Ohio 45381 or via paypal to mzindorf@aim.com, shipping is free. Are you getting inspiration from this blog?   One way you can help support it is to order your Stampin’ Up products through me.   Click HEREto place an order and have your order delivered directly to your door step from Stampin’ Up!    Want to become a Stampin’ Up Demonstrator , receive a 20% discount on product and earn instant income on orders, get to purchase products before they are released to the public?  Consider being part of my Stampin’ Up Team and start your own business or become a Hobby Demo just for the discount.  Click HERE for more information.


Die Cut the 3rd largest Framelit using the Big Shot Machine and Whisper White Card stock.


Brayered So Saffron ink all over the Whisper White Card stock.

Brayered Cajun Craze on the top 2/3rds of the card stock.

Brayered Cherry Cobbler ink at the top of the card stock.

Ink up just the branch on the Up in The Air stamp using Stazon Black ink and stamped it at the top of the card stock.  Inked up the branch and the bird house stamped it below the first stamping and over to the right just a bit.

Colored all of the flowers in using a White Gel Pen.

Colored the leaves in using an Old Olive marker.

Sponged a little bit of Old Olive at the bottom of the card stock to indicate a bit of ground.  You don’t want to get to dark with this otherwise your bird house will look like it is hanging really low.

Added 2 Old Olive panels, 1 Cajun Craze panel and 1 Basic Black panel.  Punched the corners of the Basic Black panel using the Scallop Trim Corner Punch (Item number 118870).

Adhered my panels together and punched 2 circles using the 3/8″ circle punch from the Itty Bitty Shapes Punch Pack (Item number 118309).  Adhered the circles to the main image panel.

Added an Old Olive brad to the center of each Basic Black circle.

Here is the finished card measuring 5″ square.  🙂

May your day bring a smile to your face.

Until my next post. . . . .  . . .

Hugs,

Get ready for Brayer and Direct to Paper Workshops!  I am coming to the following locations, click the location name for more information.

Seattle, Washington

Greeneville, Tennessee

Indianapolis, Indiana (Sold Out)

Indiana, Pennsylvania

Sparta, New Jersey (Sold Out)

Piedmont, Alabama

Post Falls, Idaho (outside of Coeurd’Alene)

Sand Lake, Michigan (just North of Grand Rapids)

Lawrence, Kansas

Elizabethtown, Kentucky

West Bend, Wisconsin

Longmont (Gunbarrel), Colorado

Orange, Massachusetts

Sacramento, California

Staley, North Carolina


Here is a link to my workshop calendar where you can see all of my travel schedule and to get info on beginner and advanced Brayer workshops, along with the newly added Direct to Paper Workshop: http://zindorf.blogs.splitcoaststampers.com/workshop-calendar

Don’t see a workshop in your State?  Interested in hosting the workshops in your area   Click HERE to get hostess information.

Link to my Stampin’ Up website where you can order all of your must have Stampin’ Up products from me 24-7: http://michellezindorf.stampinup.net


By The Brook – Tutorial #486

Hey There,

This morning I felt like making a big scene, on paper that is, lol.  I hope you take a moment and check out the tutorial below and better yet, give it a try!

Reminders before I start on the tutorial:

Stampin’ Up! Sale-a-bration sales period runs from January 24 – March 31, 2012. During this sales period you will receive your choice of a free stamp set from the Sale-a-bration catalog for every $50 in product you order.   CLICK HERE TO CHECK OUT THIS YEAR’S SALE-A-BRATION CATALOG! You won’t want to miss out on the sale-a-bration sets, paper and embellishments.

Don’t miss out on my Customer free stamp set program. Check it out!  Along with a thank you card from me for your order you will receive a token for each $50 in product you order using me as your demonstrator.  After you have collected 10 tokens you will receive a free current stamp set of your choosing, a value of $39 or less.   Here is a link to my online shopping page that you can shop at 24/7 (from the comfort of your home, even in your pj’s) and the products will be shipped directly to your door step from Stampin’ Up:   CLICK HERE TO SHOP.   My free stamp set program will be an on going program.  :)

Don’t forget the Stampin’ Up! new Occasions Mini Catalog CLICK HERE TO TAKE A LOOK AT IT. I know you will fall in love with the new stamp sets, dies and accessories.   They are to die for. . .

Now on with today’s tutorial. . . . .  . .

Supplies:

Stamps: Stampin’ Up! Winter Post

Card Stock: Stampin’ Up! Whisper White and Elegant Eggplant

Ink: Stampin’ Up! Basic Black Ink, Chocolate Chip, Bashful Blue, Elegant Eggplant, Garden Green and Crumb Cake

Accessories: Stampin’ Up!  Sponges,  Elegant Eggplant marker, Brayer, Curly Label Punch, Gold Brads, 3/8″ circle punch, post it notes.

Want a free copy of the current Stampin’ Up! Occasions Mini Catalog?  Just e-mail your address to mzindorf@aim.com and I will get one right out to you.  Get your copy of the 2011-2012 Stampin’ Up! Idea Book & Catalog by sending $9.95 to me at P.O. box 116, West Alexandria, Ohio 45381 or via paypal to mzindorf@aim.com, shipping is free. Are you getting inspiration from this blog?   One way you can help support it is to order your Stampin’ Up products through me.   Click HEREto place an order and have your order delivered directly to your door step from Stampin’ Up!    Want to become a Stampin’ Up Demonstrator , receive a 20% discount on product and earn instant income on orders, get to purchase products before they are released to the public?  Consider being part of my Stampin’ Up Team and start your own business or become a Hobby Demo just for the discount.  Click HERE for more information.


Punched a 3/8″ circle punch from the sticky part of a post it note and used it to mask my moon on a 4″ x 6″ piece of Whisper White card stock.

Ripped a post it note and masked for the largest hill.

Ripped a second post it note and mask for the small hills in the distance.

Brayered Crumb Cake ink at the top of the card stock.

Moved the top post it note down a bit and sponged Garden Green ink in for the top hill, leaving a bit of white showing at the top of the hill.

\

Removed the top mask and sponged Garden Green in the middle hill leaving a bit of white showing at the top of the hill.

Removed the bottom post it note and ripped a new one to mask for the brook.

Sponged Elegant Eggplant in the unmasked hill area.

Removed Brook mask and sponged Bashful Blue ink in the brook area.

Drew in a few little rock shapes using an Elegant Eggplant marker.

Stamped the deer using Basic Black ink.

Sponged Chocolate Chip ink at the bottom of the hill and along the edge of the brook.  Added 2 Elegant Eggplant panels and one Whisper White panel.

Punched one Curly Label punch from Elegant Eggplant card stock and then cut the label in two to use them as an embellishment.

Added 4 Gold Brads.

Here is the finished card measuring 5″ x 6.5″.

May your day be filled with wonderful things.

Until my next post. . . . .  . . .

Hugs,

Get ready for Brayer and Direct to Paper Workshops!  I am coming to the following locations, click the location name for more information.

Austin, Texas

Seattle, Washington

Greeneville, Tennessee

Indianapolis, Indiana

Indiana, Pennsylvania

Sparta, New Jersey (Sold Out)

Piedmont, Alabama

Post Falls, Idaho (outside of Coeurd’Alene)

Sand Lake, Michigan (just North of Grand Rapids)

Lawrence, Kansas

Elizabethtown, Kentucky

West Bend, Wisconsin

Longmont (Gunbarrel), Colorado

Orange, Massachusetts

Sacramento, California

Staley, North Carolina


Here is a link to my workshop calendar where you can see all of my travel schedule and to get info on beginner and advanced Brayer workshops, along with the newly added Direct to Paper Workshop: http://zindorf.blogs.splitcoaststampers.com/workshop-calendar

Don’t see a workshop in your State?  Interested in hosting the workshops in your area   Click HERE to get hostess information.

Link to my Stampin’ Up website where you can order all of your must have Stampin’ Up products from me 24-7: http://michellezindorf.stampinup.net


Going Vintage – Tutorial #485

Well Hello There,

Whew!  I had been put down completely by a respiratory virus.  Nasty illness that was.  Took two rounds of antibiotics to start feeling human again.   If you come down with it, run, don’t walk to your doctor.  Believe me you will not shake it without medication.   Any how, I am back and ready to stamp and create.  Feels so very good to be back in my office.   Funny how we take these things for granted until we can’t do them.

Today, I picked a new set from the Stampin’ Up! Occasions Mini Catalog (Take It to Heart) and one from the Stampin’ Up! Sale-a-bration Catalog (Fresh Vintage) to use in my project.   The fresh Vintage set is one that you can get for free with a Fifty Dollar order.  Gotta love beautiful free stamps!

Reminders before I start on the tutorial:

Stampin’ Up! Sale-a-bration sales period runs from January 24 – March 31, 2012. During this sales period you will receive your choice of a free stamp set from the Sale-a-bration catalog for every $50 in product you order.   CLICK HERE TO CHECK OUT THIS YEAR’S SALE-A-BRATION CATALOG! You won’t want to miss out on the sale-a-bration sets, paper and embellishments.

Don’t miss out on my Customer free stamp set program. Check it out!  Along with a thank you card from me for your order you will receive a token for each $50 in product you order using me as your demonstrator.  After you have collected 10 tokens you will receive a free current stamp set of your choosing, a value of $39 or less.   Here is a link to my online shopping page that you can shop at 24/7 (from the comfort of your home, even in your pj’s) and the products will be shipped directly to your door step from Stampin’ Up:   CLICK HERE TO SHOP.   My free stamp set program will be an on going program.  :)

Don’t forget the Stampin’ Up! new Occasions Mini Catalog CLICK HERE TO TAKE A LOOK AT IT. I know you will fall in love with the new stamp sets, dies and accessories.   They are to die for. . .

Now on with today’s tutorial. . . . .  . .

Supplies:

Stamps: Stampin’ Up! Fresh Vintage and Take it to Heart

Card Stock: Stampin’ Up! Whisper White, Pool Party and Everyday Enchanted Designer Series Paper

Ink: Stampin’ Up! Basic Black Ink, Lucky Limeade, Pool Party, Calypso Coral and Daffodil Delight

Accessories: Stampin’ Up!  Sponges,  Basic Black marker, Brayer, Basic Black Ribbon, Everyday Enchanted Brads, Mat Pack and Piercing Tool, Big Shot Machine and 3.75″ Clear Circle Die.

Want a free copy of the current Stampin’ Up! Occasions Mini Catalog?  Just e-mail your address to mzindorf@aim.com and I will get one right out to you.  Get your copy of the 2011-2012 Stampin’ Up! Idea Book & Catalog by sending $9.95 to me at P.O. box 116, West Alexandria, Ohio 45381 or via paypal to mzindorf@aim.com, shipping is free. Are you getting inspiration from this blog?   One way you can help support it is to order your Stampin’ Up products through me.   Click HEREto place an order and have your order delivered directly to your door step from Stampin’ Up!    Want to become a Stampin’ Up Demonstrator , receive a 20% discount on product and earn instant income on orders, get to purchase products before they are released to the public?  Consider being part of my Stampin’ Up Team and start your own business or become a Hobby Demo just for the discount.  Click HERE for more information.

Cut a 3.75″ circle from Whisper White card stock using the Big Shot Machine and Clear Circle Die.

Brayered Daffodil Delight ink on 3/4 of the card stock.


Brayered Calypso Coral ink over the Daffodil Delight ink without covering it completely.

Brayered Pool Party ink at the top of the card stock.

Colored just the kids on the bike using a Basic Black marker and then huffed on the stamp and stamped it on the card stock.

Sponged Lucky Limeade ink at the bottom of the card stock up to the bike.

Stamped the Take it to Heart flower stamp using Basic Black ink.

Sponged Basic Black ink around the main image panel edge.

Cut a 5″ x 6.5″ piece of Pool Party card stock and sponged Basic Black ink around the edges.

Added two panel of Everyday Enchantment Stampin’ Up! Designer Series paper.   One 4.50″ x 6″ and one 4″ x 5.5″.

Using the Mat Pack, added Pierced holes around the edge of the center panel.

Drew a line from one pierced hole to the next using a Basic Black marker to create faux stitching.

Stamped the small heart using Basic Black ink 4 times on Whisper White card stock and cut them out.  Adhered them to the corners of the faux stitching.    Added Basic Black ribbon and two Everyday Enchantment brads.


A little note:  When I plan on using designer series paper (DSP) in a project, I pick the paper out first and then pull my scene colors out of the paper.  🙂  Makes for much easier matching.

May your day be filled fun and laughter.

Until my next post. . . . .  . . .

Hugs,

Get ready for Brayer and Direct to Paper Workshops!  I am coming to the following locations, click the location name for more information.

Austin, Texas

Seattle, Washington

Greeneville, Tennessee

Indianapolis, Indiana

Indiana, Pennsylvania

Sparta, New Jersey (Sold Out)

Piedmont, Alabama

Post Falls, Idaho (outside of Coeurd’Alene)

Sand Lake, Michigan (just North of Grand Rapids)

Lawrence, Kansas

Elizabethtown, Kentucky

West Bend, Wisconsin

Longmont (Gunbarrel), Colorado

Orange, Massachusetts

Sacramento, California

Staley, North Carolina


Here is a link to my workshop calendar where you can see all of my travel schedule and to get info on beginner and advanced Brayer workshops, along with the newly added Direct to Paper Workshop: http://zindorf.blogs.splitcoaststampers.com/workshop-calendar

Don’t see a workshop in your State?  Interested in hosting the workshops in your area   Click HERE to get hostess information.

Link to my Stampin’ Up website where you can order all of your must have Stampin’ Up products from me 24-7: http://michellezindorf.stampinup.net


Birthday Birdy – Tutorial #484

Hi There,

Check it out, I had so much fun yesterday creating a scene on Stampin’ Up Designer Series Paper I thought I would do it again today.

But before I get into the tutorial I have some exciting things to tell you about.

Today kicks off this year’s Stampin’ Up! Sale-a-bration Period.  Sale-a-bration sales period runs from January 24 – March 31, 2012. During this sales period you will receive your choice of a free stamp set from the Sale-a-bration catalog for every $50 in product you order.   CLICK HERE TO CHECK OUT THIS YEAR’S SALE-A-BRATION CATALOG! You won’t want to miss out on the sale-a-bration sets, paper and embellishments.

Also starting today, January 24, 2012 I will be starting a new program of my own for my Stampin’ Up! Customers. Check it out!  Along with a thank you card from me for your order you will receive a token for each $50 in product you order using me as your demonstrator.  After you have collected 10 tokens you will receive a free current stamp set of your choosing, a value of $39 or less.   Here is a link to my online shopping page that you can shop at 24/7 (from the comfort of your home, even in your pj’s) and the products will be shipped directly to your door step from Stampin’ Up:   CLICK HERE TO SHOP.   My free stamp set program will be an on going program.  🙂

Don’t forget the Stampin’ Up! new Occasions Mini Catalog CLICK HERE TO TAKE A LOOK AT IT. I know you will fall in love with the new stamp sets, dies and accessories.   They are to die for. . .

Now on with today’s tutorial. . . . .  . .

Supplies:

Stamps: Stampin’ Up! Crazy for Cupcakes

Card Stock: Stampin’ Up! Marina Mist, Regal Rose, River Rock and Whisper White

Ink: Stampin’ Up! Melon Mambo, Basic Black, River Rock, Old Olive and Lucky Limeade

Accessories: Stampin’ Up!  Sponges,  Lg Bird Punch, paper snips, silver brads, Modern label punch, Stamp-a-ma-jig, Markers (Old Olive, River Rock, Rose Red & Basic Black), and piercing tools to start brads.

Want a free copy of the current Stampin’ Up! Occasions Mini Catalog?  Just e-mail your address to mzindorf@aim.com and I will get one right out to you.  Get your copy of the 2011-2012 Stampin’ Up! Idea Book & Catalog by sending $9.95 to me at P.O. box 116, West Alexandria, Ohio 45381 or via paypal to mzindorf@aim.com, shipping is free. Are you getting inspiration from this blog?   One way you can help support it is to order your Stampin’ Up products through me.   Click HEREto place an order and have your order delivered directly to your door step from Stampin’ Up!    Want to become a Stampin’ Up Demonstrator , receive a 20% discount on product and earn instant income on orders, get to purchase products before they are released to the public?  Consider being part of my Stampin’ Up Team and start your own business or become a Hobby Demo just for the discount.  Click HERE for more information.


Started this project with a 3″ x 6″ piece of checked Designer Series paper.

Punched the bird and wing from a piece of Whisper White card stock.

Sponged Lucky Limeade ink on the bottom of the card stock.

Used the negative punched paper as a stencil to sponge Old Olive ink in to create the shadow for the bird.

Sponged River rock ink at the bottom of the bird and wing.  Also colored in the birds beak and eye using the River Rock marker.  Put a bit of River Rock marker at the bottom of the bird and wing.

Figured out where I wanted to the bird on the card stock (don’t adhere it yet).    Put a dot under the birds beak on the background so I know where I want the string for the balloon to go.

Using the Stamp-a-ma-jig and Basic Black ink stamped the balloon so the string would go right over the dot I put on the background paper in the last step.


Stamped the balloon on Regal Rose card stock and cut it out.

Sponged Melon Mambo ink at the bottom of the balloon to make it appear 3D.

Adhered the bird and balloon on the background.

Added a dot of Regal Rose marker to the balloon image where it ties.

Drew in the shadow for the balloon string using an Old Olive marker.

Punched the Modern Label punch 2 times out of Whisper White card stock.  Held the two punches together and cut one end off.

Added 2 Marina Mist Panels, 1 River Rock panel and the main image panel.

Assembled my card adding the label punches and 6 silver brads.


Here is my finished card measuring 5″ x 6.5″.

May your day be extra special!

Until my next post. . . . .  . . .

Hugs,

Get ready for Brayer and Direct to Paper Workshops!  I am coming to the following locations, click the location name for more information.

Dayton, Ohio – Brayer Workshops

Austin, Texas

Seattle, Washington

Greeneville, Tennessee

Indianapolis, Indiana

Indiana, Pennsylvania

Sparta, New Jersey (Sold Out)

Piedmont, Alabama

Post Falls, Idaho (outside of Coeurd’Alene)

Sand Lake, Michigan (just North of Grand Rapids)

Lawrence, Kansas

Elizabethtown, Kentucky

West Bend, Wisconsin

Longmont (Gunbarrel), Colorado

Orange, Massachusetts

Sacramento, California

Staley, North Carolina


Here is a link to my workshop calendar where you can see all of my travel schedule and to get info on beginner and advanced Brayer workshops, along with the newly added Direct to Paper Workshop: http://zindorf.blogs.splitcoaststampers.com/workshop-calendar

Don’t see a workshop in your State?  Interested in hosting the workshops in your area   Click HERE to get hostess information.

Link to my Stampin’ Up website where you can order all of your must have Stampin’ Up products from me 24-7: http://michellezindorf.stampinup.net