ISC Wood and Leaf – Tutorial

dsc04685.JPG

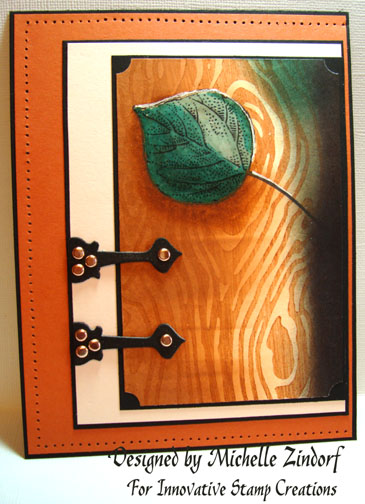
I’m continuing on with the ways to use a leaf image week here on my blog.  Why Leaf week, because I can, lol.  No, really I love leaf/nature images.  There is something comforting and peaceful about an image of a leaf.  At least that is how I view them.  🙂  They shouldn’t just be used for fall cards, as I have been so very guilty of in the past.  This creation ended up looking masculine to me, which is a plus in my world, since I’m surround by men.

The images used today are from Innovative Stamp Creations.  Here is a link to their online store:  http://www.innovativestampcreations.com/ischomepage.html

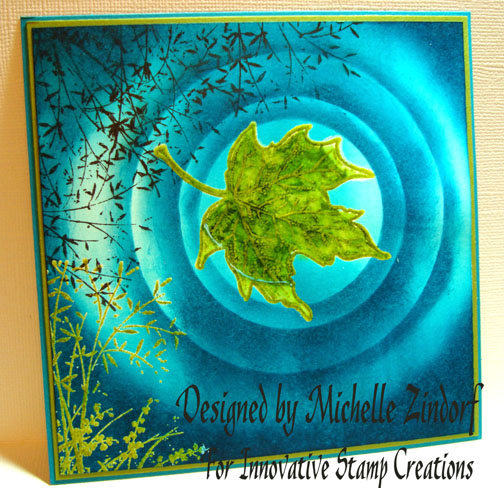
I also made this card, but I don’t have a tutorial for it.  My camera battery died after the first shot when I was making it.  I would probably be willing to recreate it, but only if there is enough interest in the tutorial.  So if you are interested in the tutorial, please leave a comment on this post or if you are getting this by e-mail click on this link to leave a comment.  http://zindorf.blogs.splitcoaststampers.com/2008/06/23/isc-wood-and-leaf-tutorial/

dsc04690.JPG

Let’s get started on the tutorial.  🙂

Supplies:

Stamps:  Innovative Stamp Creations “Wood Grain” & Fall Leaves

Paper:  SU Whisper White, Basic Black, Blush Blossom & Really Rust

Ink:  Palette Noir Black, SU Basic Black & Handsome Hunter, Adirondack Peach Bellini & Ginger

Assessories:  Prismacolor Markers Forest Green & Spearmint, Brayer, Versamark Marker, Clear embossing Powder, heat gun, Sponges, Brads, ticket corner punch, Piercing tools, White Gel pen, Grunge board hinges.

dsc04687.JPG

Stamped leaf on Whisper White card stock with Palette Noir Black ink. 

Note:  I used this ink because I am going to color the image with solvent based markers and the Palette ink will not smear with this medium.

dsc04664.JPG

Colored the leaf image in with a Prismacolor Spearmint marker.

dsc04665.JPG

Colored part of the leaf with a Prismacolor Forest Green marker.

dsc04666.JPG

Colored over the entire image again with the Spearmint marker to soften and blend the colors together.

dsc04667.JPG

Added a bit more Forest green at the bottom of the leaf.    I love these solvent based Prismacolor markers because, just like I’ve shown here with just two markers, you can layer the colors to get a whole lot of variation in shading.  Fun huh?

dsc04668.JPG

Colored over the entire image with a Versamark marker and heat embossed using clear embossing powder and a heat gun.

dsc04669.JPG

dsc04670.JPG

Brayered over the entire card stock with Peach Bellini ink.

dsc04671.JPG

Brayered Ginger ink on the right side of the card stock.

dsc04672.JPG

Using a large unmounted stamp, such as this Wood Grain stamp, is so very easy.  I just put them on my work surface face side up.  Ink them by swiping my ink pad across the top.  Put my card stock face down on the rubber stamp.  Put a scrap piece of paper over it and rub it with my hand to transfer the image onto the card stock.

Note:  After inking the wood grain stamp, I used a sponge and swiped from top to bottom on the rubber stamp to get more of a stripe in the wood image.

dsc04674.JPG

Sponged Basic Black ink heavily at the Right side of the card stock.

dsc04675.JPG

Sponged a little Handsome Hunter ink at the left side of the black ink to soften the black edge.

dsc04676.JPG

Sponged Ginger ink at the bottom of the leaf image to create a shadow.

dsc04677.JPG

Outlined the top of the leaf image with a white gel pen to add some highlight.

dsc04678.JPG

I got this Grunge board by Tim Holtz from Innovative Stamp Creations and decided to give it a try today.  First of all, this is not like chip board it is so flexible.  I was amazed at how it took ink too.  I inked my hinge pieces with basic black ink.

dsc04680.JPG

dsc04681.JPG

Used a ticket corner punch on the corners of my main image panel.

dsc04682.JPG

Assembled the card and pierced along the top, bottom and left side of the Really Rust Panel with my piercing tools.

dsc04683.JPG

Here is my finished card measuring 5″ x 6.5″.

dsc04685.JPG

Thanks for hanging out with me today while I continue on with my Leaf excursion.  Hopefully, you will start to see leaves in a whole new light too.

May your day be filled with the tinkling sound of  Aspen leaves.

Until my next post. . . . . . .

Michelle

94 thoughts on “ISC Wood and Leaf – Tutorial

  1. Susan Z's avatar Susan Z

    Your cards are gorgeous!!! Thank you, thank you, thank you for all the tutorials you do for us already… I am very interested in a tutorial on the second card if you get the time… Thanks in advance!

    Like

  2. Rockin Robin Caldwell's avatar Rockin Robin Caldwell

    Michelle, I love both of the cards and would love to see today’s 2nd card done as a tutorial!!! I think your stuff rocks, and I hope to be as talented as you are some day!!! I have a very loooonnnnggg way to go!!! Keep the good stuff coming. I look forward to the daily tutes!! Hisses, Rockin Robin Caldwell

    Like

  3. Wendy's avatar Wendy

    I love your cards – The leaves are beautiful. I hope you do a tutorial for the last one (or at least the one when your camera died). Looks like rings around the moon.

    Like

  4. Lauri Pittman's avatar Lauri Pittman

    I would love a tutorial for the leaf in water card. It is absolutely gorgeous! Thank you so much for all you teach us…it is invaluable!

    Like

  5. Helena's avatar Helena

    Your cards are always so beautiful. Please send me a tutorial of the other card and/or anything else you are willing to share. You are my favorite stamper and your tutorials can’t be compared to any other.

    Like

  6. Liz's avatar Liz

    I’ve learned so much from your tutorials and I’ve only been getting the emails for a short time. You are an amazing artist! I too want to know how you made the circles on the other card. Very creative. I’m so glad I found your blog.

    Like

  7. Sue M's avatar Sue M

    I would love to see the tutorial on the second card…I am totally intrigued on how you did the circles! Oh and did I mention how much I love all of your cards!! Just beautiful – thanks for sharing!!!

    Like

  8. Larie's avatar Larie

    I love your leaf series, I was the same in thinking only of fall leaves. I would like the tutorial on the leaf in the water also. I use the Cuttlebug a lot but yours was really great. I will have to try that. Thank you for all you do. Larie

    Like

  9. Debi Pippin's avatar Debi Pippin

    I would like to see the Tutorial for the water and aspen card too. “It is so Pretty!” Love it love it love it. You are so talented and sweet for sharing so much with us. You are no doubt my favorite # 1 spot to see and check out daily. I am hooked on your site with hook, line and sinker. Thanks so much
    Debi

    Like

  10. nina's avatar nina

    Michelle, Both cards are beautiful! I would love to see how you water ring effect. I think “nature week” is a great idea.
    hope you’re having a great day.
    nina

    Like

  11. Harriet Skelly's avatar Harriet Skelly

    I read every tutorial you provide Michelle so if you made the tutorial for the leaf in the water I’d definitely read it!! These cards are awesome as all your cards are!

    Like

  12. Both cards are gorgeous. I would love to see a tutorial for the second one. I love how the leaf looks partially underwater. I always look forward to seeing your work!

    Like

  13. Marcia's avatar Marcia

    Yes! I can echo what the others are saying … I read every tutorial and love seeing your creations every day!! Thank you for sharing your talent with us. You are an inspiration!!

    Like

  14. Andrea's avatar Andrea

    Michelle, your art is fantastic. I tried brayered skies last week for the first time and having read all your tutorials helped me so much. I would love to see a tutorial with the circles as even if I think I can work it out its always better to actually see how you do it. You are an inspiration. thanks

    Like

  15. Marliese's avatar Marliese

    Michelle,
    Both cards are awesome. Maybe you could do an explanation of how the circles were done. Of course, I would love to see a tutorial If that isn’t too much trouble.

    Like

  16. Marlene Iacuzzi's avatar Marlene Iacuzzi

    I am in awe of your talent. You inspire me to step outside of my comfort box. I love both cards, and hope for a tutorial on the second.

    Like

  17. Carol's avatar Carol

    I just can’t get enough of your fabulous cards and tutorials! I love the woodgrain pattern on this card with the leaf, and those hinges are awesome! I don’t know how you continue to come up with all these incredible ideas for cards, but I am so thankful that you share your expertise with your readers! I’ve learned a wealth of information from your FABULOUS blog. TFS!!! BTW, I’m always interested in another tutorial from you!!

    Like

  18. sandra's avatar sandra

    I am also amazed at your art. It’s beautiful. and I’ll add my “yes”, I’d like to see a tutorial on the second card.
    thank you
    Sandra

    Like

  19. Monica's avatar Monica

    Oh yes! Please, please, please post a tutorial on that second card! Both cards are gorgeous, and I love to see how you do what you do!

    Like

  20. Dawn Knight's avatar Dawn Knight

    ENOUGH INTEREST???!!!yes PLEASE! I love your cards and tutorials and am so thankful you share them with us! I love getting my e mails to see if you have posted yet… thanks so much… I would LOVE for you to share the second card tutorial as well… thanks so much!

    Like

  21. diane cooper's avatar diane cooper

    I actually gasped when I opened your blog feed! That woodgrain card and leaf is GORGEOUS! Of course I would totally love a tutorial for the second one… but no Pressure!
    Diane

    Like

  22. Kathee's avatar Kathee

    Wow! I am a big fan of leaves also and when I was sent your blog I about fell off my chair! PLEASE do the second tutorial; I woudl love to know how you did the circles. You have such an amazing way of bringin nature to teh next level in a paper format! Thanks so much for sharing your talent with us!

    Like

  23. Janine's avatar Janine

    That leaf looks so 3D it is amazing and the grungeboard hinges give it a more masculine feel. Love you other card too so pease do a tutorial. Thank you for all the time you give us.

    Like

  24. Tara's avatar Tara

    I’d love to see a tutorial for your leaf on water technique. At least that’s what it looks like to me. I think it’s absolutely beautiful!!!!! I love the wood and leaf card as well, but you already gave us a beautiful tutorial for that.

    Like

  25. Absolutely beautiful! I am amazed by your talent. You make me want to CASE every card I’ve seen. And yes, I would be interested in the tutorial on the “water rings” card technique. Another beautiful card. I now have a much larger wish list than I had before I found your BLOG! Keep stamping to inspire the rest of us!

    Like

  26. Dayla's avatar Dayla

    Wonderful! I would definitely be interested in a tutorial on the “ripple” card! I think it is absolutely gorgeous and I would love to CASE it!

    Like

  27. Mari's avatar Mari

    Ummm, had enough yet? lol Seems pretty obvious to me that your adoring fans want that ripple tutorial! 😀 I thought it was a grand idea to do it in another color(s?) with the original color(s) listed in parenthesis, thus givig us two – two tutorials in one! Yay!

    Like

  28. Awake in the night and cannot sleep. Decided to get some inspiration for the week so I began to jump around on blogs to see if my eye can catch some new ways. I´m really happy that I came across your blog and I have stayed much longer then I should at your place. Thanks a million for all the inspiration.

    http://www.digiscrapp.blogspot.com

    Like

  29. Lilann's avatar Lilann

    I would definitely like to see a tutorial for the second card. I look at your cards and they seem like they would be impossible to duplicate. Then after reading your tutorial, I always say to myself, “So that’s how she did it. I bet I can do that too.” Please continue your wonderful tutorials. I have learned so much from you.

    Like

  30. Dianne's avatar Dianne

    Michelle, once again you have outdone yourself. Your cards are just amazing! For the first time, I tried to re-create your first leaf creation from your tutorial. The tutorial, as always, was SO easy to follow. Mine didn’t turn out too bad, but nothing as exquisite as yours!

    Like

  31. Beth K.'s avatar Beth K.

    Michelle:

    Just found your blog…all I can say is WOW!!! Your tutorials are great, how wonderful to watch your step by step techniques, & creativity. You are most definitely in my FAVS & thank you soooooo much for sharing.

    Like

  32. Nicole Dufresne's avatar Nicole Dufresne

    Hi Michelle,
    I’d be interested in the tutorial on the second card as well, but I think (after staring at it for awhile) that I could figure it out. I’m assuming that you brayered the lightest color blue and then made small to large circles and sponged the edges? Let me know if that is correct. Thanks so much!!

    Like

  33. earline's avatar earline

    please do your tutorial on the second card love the blue in this falling leaf as it were cannot wait to see it thanks you for all the information that you give to all that see your work. p.s what a wonderful picture you took I guess you can say girls night out you guys were sitting at a table keep up the good work. WISH I LIVE NEXT DOOR TO YOU Earline

    Like

  34. I am loving Leaf week, I’ve gotten some new ideas for using all those leaf stamps I own! And if you would recreate the tutorial for the other card that would be great too. I’m sure I’d learn something there too! QP

    Like

Leave a comment