And the Winner is . . . . . .

The winner of the Great Stampin’ Up set “You’re a Gem”  is . . . .  . .drum roll, please. .  .. . . . . ..  ..  . .. . . .. .

Linda Zook who wrote”

To the “QUEEN” of the Brayer, I “ENJOY” your work so much, I will follow your blog “4EVER”, you are the “GEM of the GEMS”. Thanks again for all you do. Love this set!!!! It says it all! Linda”

Linda, flattery will get you ever where, lol.  Just kidding, I selected you using a random number generator.  Congratulations!!!

Linda Zook, please e-mail your address to me at mzindorf @aim.com and I will put these in the mail to you ASAP.

Thank you to all who played along.  🙂  Hopefully it will be you that is selected next time.

Well I am going to go sit and worry about my fur baby, Abby, my black Labrador.  I dropped her at the Vet this morning to have a lump removed from her chest.   I’m sure she will be fine, but I still am worried.  Please send good vibes to the Vet for me.     On a lighter note, my husband has been telling people that Abby is having a breast reduction, lol, Men!

May your day be filled with love and laughter.

Until my next post. . . . .

Hugs,

Michelle

   Get ready for Brayer Workshops!  I am coming to the following locations, click the location name for more information. 


Columbus, Ohio 

Fayetteville, Tennessee near Nashville, TN & Huntsville, AL 

Tucson, Arizona 

Virginia Beach, Virginia 

Houston, Texas 

Wichita, Kansas 

Syracuse (Bridgeport), New York 

St. Peters, Missouri 

La Porte, Indiana 

Orlando (Davenport), Florida 

St. Cloud, Minnesota 

Colorado Springs, Colorado 

Ottumwa, Iowa 

Owings Mills, Maryland (Baltimore Area)

Cleveland (Euclid), Ohio 

Staley , North Carolina (South of Greensboro) 

Monroe, Connecticut 

Sturgis, South Dakota 

Leesburg, Florida 

Montreal, Wisconsin 

Savannah, Georgia 

Lincoln, Illinois 

Jefferson, Louisiana (New Orleans Area) 

Here is a link to my workshop calendar where you can see all of my travel schedule and to get info on beginner and advanced Brayer workshops:   http://zindorf.blogs.splitcoaststampers.com/workshop-calendar  

Don’t see a workshop in your State?  Interested in hosting the workshops in your area in 2012?   Click HERE to get hostess information. 

Link to my Stampin’ Up website where you can order all of your must have Stampin’ Up products from me 24-7:  http://michellezindorf.stampinup.net 

Frequently asked questions answers:  http://zindorf.blogs.splitcoaststampers.com/frequently-asked-questions/


The Bench – Tutorial #388


Good Afternoon  🙂

I’m taking a break from my mass producing of swap cards.  Thought I would put together a little scene using the Stampin’ Up Set “Have a Seat”.   

Grab a cup of your favorite hot beverage and check out the tutorial below.

Let’s get started. . . . .

Supplies:

Stamps: Stampin’ Up Have a Seat
Paper: Stampin’ Up Whisper White, River Rock and Basic Black
Ink: Stampin’ Up Early Espresso, River Rock, Basic Black and Sahara Sand
Accessories: Stampin’ Up Sponges, Stamp-a-ma-jig, markers (Sahara Sand and Crumb Cake), post it notes

The Stampin’ Up USA Idea book and Catalog is here.   For your copy, please send a check for $9.95 to Michelle Zindorf, P.O. Box 116, West Alexandria, OH 45381 or send it via paypal to mzindorf@aim.com USA only.     My current customers will receive a new Occasions Mini Catalog automatically from me.   Not a current customer and want a free copy of the new Occasions Mini Catalog ?  E-mail your mailing address to mzindorf@aim.com and I will get one in the mail to you.  )  Are you getting inspiration from this blog?   One way you can help support it is to order your Stampin’ Up products through me.   Click HERE to place an order.    Want to become a Stampin’ Up Demonstrator , receive a 20% discount on product and earn instant income on orders?  Consider being part of my Stampin’ Up Team and start your own business or become a Hobby Demo just for the discount.  Click HERE for more information.

Masked the top of a 3.5″ square piece of Whisper White card stock using two post it notes put on at different levels.  The right post it note is a bit higher then the left one.

Sponged the unmasked area of the card stock using River Rock ink.

Repositioned the post it notes so that the floor of the scene and the right wall are still masked. 

Sponged Sahara Sand ink on the unmasked area.  This is the Left wall area.

Removed all the masks.  Using a Stamp-a-ma-jig, stamped the bench using Early Espresso ink.

Toned down the right wall using just a hint of Sahara Sand on it.

Masked the walls with a post it note and sponged Sahara Sand ink at the post it note edge and under the bench. 

Added a shadow for the right legs of the bench using a Sahara Sand marker (lightly).

Repositioned the mask to create a window on the wall.  Used 3 post it notes here.

Sponged Basic Black ink on the unmasked area.

Removed the masks and added Crumb Cake marker the the bench.

Added Basic Black and River Rock panels.

Here is the finished card measuring 5.25″ Square.

Hope your not sitting on the bench today.  🙂

Until my next post. . . . . . .

Hugs,

Michelle

   Get ready for Brayer Workshops!  I am coming to the following locations, click the location name for more information. 


Columbus, Ohio 

Fayetteville, Tennessee near Nashville, TN & Huntsville, AL 

Tucson, Arizona 

Virginia Beach, Virginia 

Houston, Texas 

Wichita, Kansas 

Syracuse (Bridgeport), New York 

St. Peters, Missouri 

La Porte, Indiana 

Orlando (Davenport), Florida 

St. Cloud, Minnesota 

Colorado Springs, Colorado 

Ottumwa, Iowa 

Owings Mills, Maryland (Baltimore Area)

Cleveland (Euclid), Ohio 

Staley , North Carolina (South of Greensboro) 

Monroe, Connecticut 

Sturgis, South Dakota 

Leesburg, Florida 

Montreal, Wisconsin 

Savannah, Georgia 

Lincoln, Illinois 

Jefferson, Louisiana (New Orleans Area) 

Here is a link to my workshop calendar where you can see all of my travel schedule and to get info on beginner and advanced Brayer workshops:   http://zindorf.blogs.splitcoaststampers.com/workshop-calendar  

Don’t see a workshop in your State?  Interested in hosting the workshops in your area in 2012?   Click HERE to get hostess information. 

Link to my Stampin’ Up website where you can order all of your must have Stampin’ Up products from me 24-7:  http://michellezindorf.stampinup.net 

Frequently asked questions answers:  http://zindorf.blogs.splitcoaststampers.com/frequently-asked-questions/


How about a bit of Blog Candy?

Well today I am busy making my swap cards for the Stampin’ Up Leadership Conference in Nashville next week.   I have put it off long enough and now I’m down to crunch time, lol.  Sound familiar?

So, while I am stamping away (only 100 to go) I’m going to give you a chance to win this great Stampin’ Up! Sentiment set “You’re a Gem”.

All you need to do to enter is leave a comment on this post telling me to enter you.  If you are getting this post via e-mail, please CLICK HERE and then leave a comment.  

I  will select the winner on Friday, January 7, 2011 using a random number generator.  Good luck to all!

If you didn’t see yesterdays post. . . . . . .The Brand New Occasions Mini Catalog is here, CLICK HERE TO VIEW.    Or e-mail your mailing address to me at mzindorf@aim.com and I will get a copy out to you, free of charge.  You don’t want to miss the yummy new stuff in this mini. 

Don’t forget you can shop for Stampin’ Up products 24/7 online, CLICK HERE TO START SHOPPING NOW

May your day be full of great surprises.  🙂

Until my next post. . . .  . .

Hugs,

Michelle

   Get ready for Brayer Workshops!  I am coming to the following locations, click the location name for more information. 


Columbus, Ohio 

Fayetteville, Tennessee near Nashville, TN & Huntsville, AL 

Tucson, Arizona 

Virginia Beach, Virginia 

Houston, Texas 

Wichita, Kansas 

Syracuse (Bridgeport), New York 

St. Peters, Missouri 

La Porte, Indiana 

Orlando (Davenport), Florida 

St. Cloud, Minnesota 

Colorado Springs, Colorado 

Ottumwa, Iowa 

Owings Mills, Maryland (Baltimore Area)

Cleveland (Euclid), Ohio 

Staley , North Carolina (South of Greensboro) 

Monroe, Connecticut 

Sturgis, South Dakota 

Leesburg, Florida 

Montreal, Wisconsin 

Savannah, Georgia 

Lincoln, Illinois 

Jefferson, Louisiana (New Orleans Area) 

Here is a link to my workshop calendar where you can see all of my travel schedule and to get info on beginner and advanced Brayer workshops:   http://zindorf.blogs.splitcoaststampers.com/workshop-calendar  

Don’t see a workshop in your State?  Interested in hosting the workshops in your area in 2012?   Click HERE to get hostess information. 

Link to my Stampin’ Up website where you can order all of your must have Stampin’ Up products from me 24-7:  http://michellezindorf.stampinup.net 

Frequently asked questions answers:  http://zindorf.blogs.splitcoaststampers.com/frequently-asked-questions/


What’s up in January?

What’s up in January you say?  Well Stampin’ Up! has a whole lot going on. . ..

The Brand New Occasions Mini Catalog his here, CLICK HERE TO VIEW.    Or e-mail your mailing address to me at mzindorf@aim.com and I will get a copy out to you, free of charge.  You don’t want to miss the yummy new stuff in this mini.  🙂

Don’t forget you can shop for Stampin’ Up products 24/7 online, CLICK HERE TO START SHOPPING NOW.    Any of my customers whose merchandise totals $50 or more will receive the above handmade card from me for the month of January, 2011.  Sorry no tutorial for this customer appreciation card.  But here is the supply list:

Stampin’ Up Stamps:  Thanks for Caring (featured in the new mini)

Stampin’ Up Ink:  Daffodil Delight, Cajun Craze, Not Quite Navy and Basic Black

Stampin’ Up Card Stock:  Whisper White, Cajun Craze and Baja Breeze

Stampin’ Accessories:  Brayer, Big Shot Machine, Silver Brads, Whisper White Ribbon, Markers (Daffodill Delight, Cajun Craze, Old Olive & Baja Breeze), White Gel Pen, Circle Die & 3″ Circle Die and Square Lattice embossing folder.

This card is also my swap for the Stampin’ Up Leadership Conference next week in Nashville, TN.  If you will be there, please look for me.

May your day be filled with special people and places. 

Until my next post. . . . . . . .

Hugs,

Michelle

   Get ready for Brayer Workshops!  I am coming to the following locations, click the location name for more information. 


Columbus, Ohio 

Fayetteville, Tennessee near Nashville, TN & Huntsville, AL 

Tucson, Arizona 

Virginia Beach, Virginia 

Houston, Texas 

Wichita, Kansas 

Syracuse (Bridgeport), New York 

St. Peters, Missouri 

La Porte, Indiana 

Orlando (Davenport), Florida 

St. Cloud, Minnesota 

Colorado Springs, Colorado 

Ottumwa, Iowa 

Owings Mills, Maryland (Baltimore Area)

Cleveland (Euclid), Ohio 

Staley , North Carolina (South of Greensboro) 

Monroe, Connecticut 

Sturgis, South Dakota 

Leesburg, Florida 

Montreal, Wisconsin 

Savannah, Georgia 

Lincoln, Illinois 

Jefferson, Louisiana (New Orleans Area) 

Here is a link to my workshop calendar where you can see all of my travel schedule and to get info on beginner and advanced Brayer workshops:   http://zindorf.blogs.splitcoaststampers.com/workshop-calendar  

Don’t see a workshop in your State?  Interested in hosting the workshops in your area in 2012?   Click HERE to get hostess information. 

Link to my Stampin’ Up website where you can order all of your must have Stampin’ Up products from me 24-7:  http://michellezindorf.stampinup.net 

Frequently asked questions answers:  http://zindorf.blogs.splitcoaststampers.com/frequently-asked-questions/ 


Preview Easter Blossoms – Tutorial #387

Here is a little sneak peek of the new Stampin’ Up! stamp set Easter Blossoms that will be in the Stampin’ Up! Occasions Mini Catalog that will be in effect from January 4, 2011 to April 30, 2011.  Love it!

Let’s get right into the tutorial today. . . . . .

Supplies:

Stamps: Stampin’ Up! Easter Blossoms
Paper: Stampin’ Up! Whisper White, Old Olive and Rose Red
Ink: Stampin’ Up! Rose Red, Basic Black, Old Olive, Not Quite Navy and Tempting Turquoise
Accessories: Stampin’ Up! Sponges, Brayer, White Gel Pen, Rose Red Marker, Basic Black marker, Rose Red and Whisper White Ribbon

The Stampin’ Up USA Idea book and Catalog is here.   For your copy, please send a check for $9.95 to Michelle Zindorf, P.O. Box 116, West Alexandria, OH 45381 or send it via paypal to mzindorf@aim.com USA only.     My current customers will receive a new Occasions Mini Catalog automatically from me.   Not a current customer and want a free copy of the new Occasions Mini Catalog ?  E-mail your mailing address to mzindorf@aim.com and I will get one in the mail to you.  )  Are you getting inspiration from this blog?   One way you can help support it is to order your Stampin’ Up products through me.   Click HERE to place an order.    Want to become a Stampin’ Up Demonstrator , receive a 20% discount on product and earn instant income on orders?  Consider being part of my Stampin’ Up Team and start your own business or become a Hobby Demo just for the discount.  Click HERE for more information.

Brayered Tempting Turquoise ink at the top of a 3.5″ x 5.5″ piece of Whisper White card stock.

Brayered Not Quite Navy ink at the top of the card stock, not covering the Tempting Turquoise ink entirely.

Stamped Easter Blossoms Branch using Basic Black ink.

Sponged Old Olive ink at the bottom of the card stock.

Sponged Basic Black ink at the bottom of the card stock, not covering the Old Olive ink entirely.

Extended the Branches stem down to the ground to create a tree using a Basic Black marker.

Colored the Blossoms in with a Rose Red Marker.

Added White Gel Pen highlights to the branches, trunk and blossoms.

Stamped the Easter Blossoms Girl Silhouette using Basic Black ink.

Added White Gel Pen highlights to the girl and grasses.

Stamped the Easter Blossoms Flourish on a 4.75″ x 6.25″ piece of Rose Red card stock using Rose Red ink.

Added two Old Olive Panels and Whisper White and Rose Red ribbon. 

Here is the finished card measuring 5″ x 6.5″.

May you experience something new today.

Until my next post. . .  . . . . .

Hugs,

Michelle

   Get ready for Brayer Workshops!  I am coming to the following locations, click the location name for more information. 


Columbus, Ohio 

Fayetteville, Tennessee near Nashville, TN & Huntsville, AL 

Tucson, Arizona 

Virginia Beach, Virginia 

Houston, Texas 

Wichita, Kansas 

Syracuse (Bridgeport), New York 

St. Peters, Missouri 

La Porte, Indiana 

Orlando (Davenport), Florida 

St. Cloud, Minnesota 

Colorado Springs, Colorado 

Ottumwa, Iowa 

Owings Mills, Maryland (Baltimore Area)

Cleveland (Euclid), Ohio 

Staley , North Carolina (South of Greensboro) 

Monroe, Connecticut 

Sturgis, South Dakota 

Leesburg, Florida 

Montreal, Wisconsin 

Savannah, Georgia 

Lincoln, Illinois 

Jefferson, Louisiana (New Orleans Area) 

Here is a link to my workshop calendar where you can see all of my travel schedule and to get info on beginner and advanced Brayer workshops:   http://zindorf.blogs.splitcoaststampers.com/workshop-calendar  

Don’t see a workshop in your State?  Interested in hosting the workshops in your area in 2012?   Click HERE to get hostess information. 

Link to my Stampin’ Up website where you can order all of your must have Stampin’ Up products from me 24-7:  http://michellezindorf.stampinup.net 

Frequently asked questions answers:  http://zindorf.blogs.splitcoaststampers.com/frequently-asked-questions/ 

Tags: , , , , , , ,


Pines Star – Tutorial #386

Hi Everyone!  Happy New Year to you and yours.  

This poem sums up my feeling this morning.

New Year’s Reflections

 Looking back on the months gone by,
As a new year starts and an old one ends,
We contemplate what brought us joy,
And we think of our loved ones and our friends.

Recalling all the happy times,
Remembering how they enriched our lives,
We reflect upon who really counts,
As the fresh and bright new year arrives.

And when I ponder those who do,
I immediately think of you.

Thanks for being one of the reasons I’ll have a Happy New Year!

                                                                                               By Joanna Fuchs

I took a bit of time off from creating and blogging to spend some quality time with family and to re-energize.   Now that I am all refreshed and ready for this new year, how about a tutorial? 

Let’s get started. . . .  . . . . .

Supplies:

Stamps: Stampin’ Up! Plant Hope, item number 117042 
Paper: Stampin’ Up! Whisper White
Ink: Stampin’ Up! Basic Black, Baja Breeze and Not Quite Navy
Accessories: Smooch Spritz, Brayer, Sponges, Star Punch, Crystal Brads, Whisper White Ribbon, Stamp-a-ma-jig, piercing tool, Sizzix Star, 5 Point 3-D Die, Big Shot

The Stampin’ Up USA Idea book and Catalog is here.   For your copy, please send a check for $9.95 to Michelle Zindorf, P.O. Box 116, West Alexandria, OH 45381 or send it via paypal to mzindorf@aim.com USA only.     My current customers will receive a new Occasions Mini Catalog automatically from me.   Not a current customer and want a free copy of the new Occasions Mini Catalog ?  E-mail your mailing address to mzindorf@aim.com and I will get one in the mail to you.  )  Are you getting inspiration from this blog?   One way you can help support it is to order your Stampin’ Up products through me.   Click HERE to place an order.    Want to become a Stampin’ Up Demonstrator , receive a 20% discount on product and earn instant income on orders?  Consider being part of my Stampin’ Up Team and start your own business or become a Hobby Demo just for the discount.  Click HERE for more information.

One of my new year resolutions is to use some of my many Big Shot dies more often.  🙂  We all have those supplies we need to use right?

I whipped out my Sizzix, Star, 5 Point 3-D Die and my big shot machine.  Cut five of these from Whisper White card stock.  I truly love that the die makes the score lines also.  Makes folding these perfectly a real snap.

Brayered Baja Breeze ink on each point.

Brayered Not Quite Navy ink on the very tips of each.

Using the Stamp-a-ma-jig for placement, stamped the pines from the Stampin’ Up set Plant Hope using Basic Black ink.  I lined the middle tree up on the center score line and the bottom branches of the right and left tree on the side score lines.  Repeated for all five pieces.

Folded the score lines and glued the pieces together.

Used my Smooch Spritz to make this project really sparkle.  Sorry it does not show up in the photographs.

Punched a star from Whisper White card stock.

Sponged Baja Breeze and Not Quite Navy on each point of the star.

Using the piercing tool to start my crystal brads, attached the star to the center of the large star and added additional brads to4 points of the large star.

On the last point, pierced through Whisper White Ribbon and the point and then added the crystal brad to attached the ribbon.

Here is the finished project.  All ready to be packed away with my Christmas decorations  that I am taking down today.  At least this project will not be rattling around in my head for a whole year, lol. 

May your new year be off to a great start.

Mine is, I started dieting before the holidays and I’m starting my new year 12 lbs lighter, woohooo!   Many more to go, but it’s a start.  🙂

Until my next post. . . . .

Huge Hugs,

Michelle

   Get ready for Brayer Workshops!  I am coming to the following locations, click the location name for more information. 


Columbus, Ohio 

Fayetteville, Tennessee near Nashville, TN & Huntsville, AL 

Tucson, Arizona 

Virginia Beach, Virginia 

Houston, Texas 

Wichita, Kansas 

Syracuse (Bridgeport), New York 

St. Peters, Missouri 

La Porte, Indiana 

Orlando (Davenport), Florida 

St. Cloud, Minnesota 

Colorado Springs, Colorado 

Ottumwa, Iowa 

Owings Mills, Maryland (Baltimore Area)

Cleveland (Euclid), Ohio 

Staley , North Carolina (South of Greensboro) 

Monroe, Connecticut 

Sturgis, South Dakota 

Leesburg, Florida 

Montreal, Wisconsin 

Savannah, Georgia 

Lincoln, Illinois 

Jefferson, Louisiana (New Orleans Area) 

Here is a link to my workshop calendar where you can see all of my travel schedule and to get info on beginner and advanced Brayer workshops:   http://zindorf.blogs.splitcoaststampers.com/workshop-calendar  

Don’t see a workshop in your State?  Interested in hosting the workshops in your area in 2012?   Click HERE to get hostess information. 

Link to my Stampin’ Up website where you can order all of your must have Stampin’ Up products from me 24-7:  http://michellezindorf.stampinup.net 

Frequently asked questions answers:  http://zindorf.blogs.splitcoaststampers.com/frequently-asked-questions/ 

Tags: , , , , , , ,


Happy Holidays!

holiday-plaque.jpg

Hey, I just wanted to wish you a Merry Christmas and a Happy New Year.  I am taking a bit of a break from blogging until January 2, 2011 so I can spend some much needed time with my family and friends before I hit the road again.  Feel free to e-mail me during this time.  I will be checking it.  🙂

Please stay safe and have the best holidays ever!

Much love to you,

Michelle

P.S.  Check out this poem I received from Pauline Slovak.   Gotta love it!

Brayers roll. . . . are you listening.

On the card. . . . ink is glistening.

A Beautiful sight. . .  we’re happy tonight.

Stamping in a Winter wonderland.


In the kitchen we can stamp a snowman.

Then add color to his carrot nose.

You’ll say:  Are you Finished?

I’ll say:  No Ma’am, I need to add some glitter to make snow.


When we stamp . . .  ain’t it thrilling.

Even when . . . .  the powders spilling.

We’ll create and we’ll play. . . .the art stamper way,

Stamping in a Winter wonderland.

Thank you so much Pauline!


Flamingo Love – Tutorial #385

How about another sneak peek today.  The images I used today are from a new Stampin’ Up set “Valentine Defined” that will be in the Stampin’ Up Occasions Mini Catalog that will be in effect from January 4, 2011 to April 30, 2011.    This mini catalog, my friends, is jammed packed with yummy stamps.    My current Stampin’ Up customers will automatically receive the new mini catalog.   Please e-mail me your address it you would like for me to mail you one.   Sorry USA addresses only.

Do you believe we are quickly approaching 2011.   Where on earth does the time go.  Wasn’t we just dealing with Y2K?  LOL      Anyway, my wish is for you to have the most fun, love filled, prosperous 2011 ever!

This is a photo of my Husband, Russ (on far right) with his 5 brothers, taken last night at a family holiday dinner.    Love these guys.  🙂  But, I bet the girls in their neighborhood ran past there house when they were young, LOL.

Ready?  Let’s get started on today’s tutorial. . . . . .  .

Supplies:

Stamps: Stampin’ Up! Valentine Defined
Paper: Stampin’ Up! Whisper White, Melon Mambo and Rich Razzelberry
Ink: Stampin’ Up! Rich Razzelberry, Old Olive, Basic Black, So Saffron and Melon Mambo
Accessories: Stampin’ Up! Sponges, Brayer, 1 3/8″ circle punch and Post it notes

The Stampin’ Up USA Idea book and Catalog is here.   For your copy, please send a check for $9.95 to Michelle Zindorf, P.O. Box 116, West Alexandria, OH 45381 or send it via paypal to mzindorf@aim.com USA only.     My current customers will receive a new Occasions Mini Catalog automatically from me.   Not a current customer and want a free copy of the new Occasions Mini Catalog ?  E-mail your mailing address to mzindorf@aim.com and I will get one in the mail to you.  )  Are you getting inspiration from this blog?   One way you can help support it is to order your Stampin’ Up products through me.   Click HERE to place an order.    Want to become a Stampin’ Up Demonstrator , receive a 20% discount on product and earn instant income on orders?  Consider being part of my Stampin’ Up Team and start your own business or become a Hobby Demo just for the discount.  Click HERE for more information.


Put a 1 3/8″ circle punched from the sticky part of a post it note on a 3.5″ x 5″ piece of Whisper White card stock to mask for the moon.

Brayered Melon Mambo ink on the top and bottom of the card stock.

Brayered Rich Razzelberry ink at the top and bottom of the card stock, not covering the Melon Mambo ink entirely.

Masked the sky area with a Post it note and sponged Rich Razzelberry ink at the post it note edge to create a horizon line.

Took all the masks off and sponged So Saffron ink in the moon.

Stamped the Flamingos using Basic Black ink.

Stamped the heart plants using Old Olive ink.

Stamp more heart plants using Basic Black ink.

Sponged Rich Razzelberry ink at the bottom corners of the card stock.

Cut 1″ off of each side of the main image panel.

Layered 2 Melon Mambo panels and 1 Rich Razzelberry panel.

Added the sections of the main image panel.  Here is the finished card measuring 5″ x 6.5″.

May you find joy in creating something new today.

Until my next post. . . .  . . . .

Michelle

   Get ready for Brayer Workshops!  I am coming to the following locations, click the location name for more information. 


Columbus, Ohio 

Fayetteville, Tennessee near Nashville, TN & Huntsville, AL 

Tucson, Arizona 

Virginia Beach, Virginia 

Houston, Texas 

Wichita, Kansas 

Syracuse (Bridgeport), New York 

St. Peters, Missouri 

La Porte, Indiana 

Orlando (Davenport), Florida 

St. Cloud, Minnesota 

Colorado Springs, Colorado 

Ottumwa, Iowa 

Owings Mills, Maryland (Baltimore Area)

Cleveland (Euclid), Ohio 

Staley , North Carolina (South of Greensboro) 

Monroe, Connecticut 

Sturgis, South Dakota 

Leesburg, Florida 

Montreal, Wisconsin 

Savannah, Georgia 

Lincoln, Illinois 

Jefferson, Louisiana (New Orleans Area) 

Here is a link to my workshop calendar where you can see all of my travel schedule and to get info on beginner and advanced Brayer workshops:   http://zindorf.blogs.splitcoaststampers.com/workshop-calendar  

Don’t see a workshop in your State?  Interested in hosting the workshops in your area in 2012?   Click HERE to get hostess information. 

Link to my Stampin’ Up website where you can order all of your must have Stampin’ Up products from me 24-7:  http://michellezindorf.stampinup.net 

Frequently asked questions answers:  http://zindorf.blogs.splitcoaststampers.com/frequently-asked-questions/ 

Tags: , , , , , , ,


Sew It – Tutorial #384

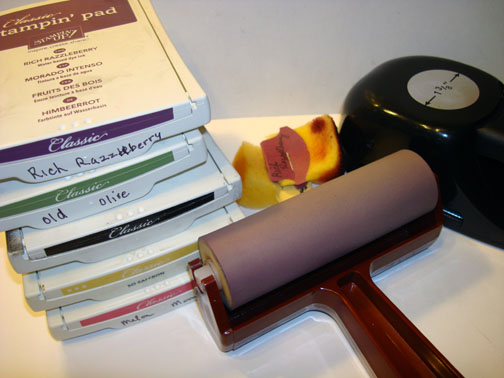
Holy Mackerel!  I just received my Stampin’ Up pre-order from the new Occasions Mini Catalog that will be in effect from January 4, 2011 through April 30, 2011.   Just let me say, I fell in love with so many of the new stamp sets.  I purchased just about everything in the new mini as fast as I could.   You can probably tell by the photo below that I got a bit carried away. . . .   I love new rubber!

I cannot show you the complete stamp sets or embellishments prior to January 4th, but I am allowed to give you a sneak peep by using the new stamps in my projects.    Let me say “You sewers out there will be so very happy”.  The thread image is from an up and coming Stampin’ Up set “Sew Suite”.  I don’t even sew and I had to have the set, lol.

One announcement before I get started on the tutorial.  I have added the Jefferson, Louisiana to my Brayer Workshop calendar.

 CLICK HERE FOR THE DETAILS.

Let’s get started on this tutorial. . . . . .  . .

Supplies:

Stamps: Stampin’ Up Sew Suite and Boho Friend Wheel
Paper: Stampin’ Up Whisper White, Soft Suede and Early Espresso
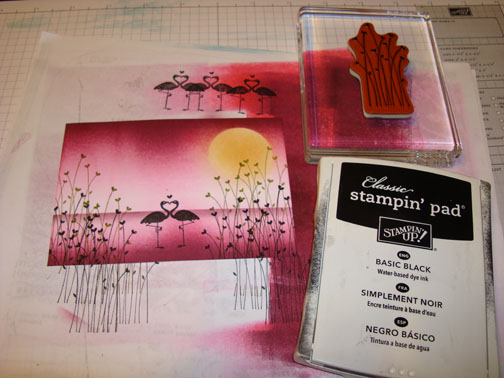
Ink: Stampin’ Up Baja Breeze, Not Quite Navy and Basic Black
Accessories: Stampin’ Up Markers – So Saffron, More Mustard, Pretty in Pink, Regal Rose, Rose Red, Certainly Celery, Old Olive, Always Artichoke, River Rock, Soft Suede, Chocolate Chip and Crumb Cake, Blender Pen, Brayer, Clear embossing powder, heat gun, Versamark pad and marker, Hodgepodge hardware Silver, 1″ circle and Designer Label Punches, White Gel Pen


The Stampin’ Up USA Idea book and Catalog is here.   For your copy, please send a check for $9.95 to Michelle Zindorf, P.O. Box 116, West Alexandria, OH 45381 or send it via paypal to mzindorf@aim.com USA only.     My current customers will receive a new Occasions Mini Catalog automatically from me.   Not a current customer and want a free copy of the new Occasions Mini Catalog ?  E-mail your mailing address to mzindorf@aim.com and I will get one in the mail to you.  )  Are you getting inspiration from this blog?   One way you can help support it is to order your Stampin’ Up products through me.   Click HERE to place an order.    Want to become a Stampin’ Up Demonstrator , receive a 20% discount on product and earn instant income on orders?  Consider being part of my Stampin’ Up Team and start your own business or become a Hobby Demo just for the discount.  Click HERE for more information.

Stamped the thread stamp on a 3.25″ x 6.25″ piece of Whisper White by first loading the stamp with Versamark and then with Basic Black ink before stamping it. Repeated 2 more times.

Heat embossed the images using clear embossing powder and a heat gun.

Colored the middle of the green spool using a Certainly Celery marker.

Colored in Old Olive marker and smudged the edge lines (where the two colors meet) using a Blender Pen.

Added Always Artichoke marker to the sides of the spool and smudged the edges using a Blender pen.

Repeated the process using a light, medium and dark color of pink for the second spool.  Used Pretty in Pink marker, Regal Rose marker, Rose Red marker and a Blender Pen.

Repeated again using River Rock marker, Soft Suede marker, Chocolate Chip marker and a Blender pen.

Added Crumb Cake Marker to each spool end.

Added Chocolate Chip marker to each edge of the spools and blended the edges of color with a Blender Pen.

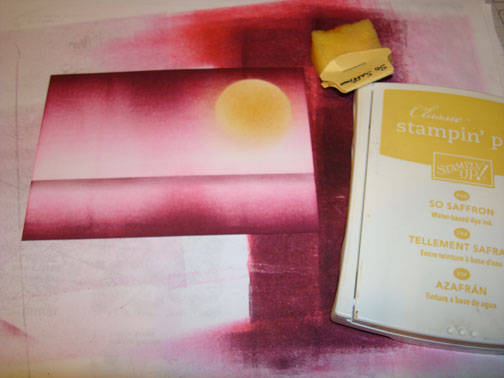
Sorry Folks, I changed my mind and decided to give the third spool a yellow cast by adding So Saffron marker to the middle of it and More Mustard to the edges.  Yeah, that’s better, looks like gold thread now.  🙂

Colored over the spools with a Versamark marker, making sure not to go outside of the image lines and heat embossed them using clear embossing powder and a heat gun.   Repeated again to make sure the images were fully covered and protected.   The should look like glass.

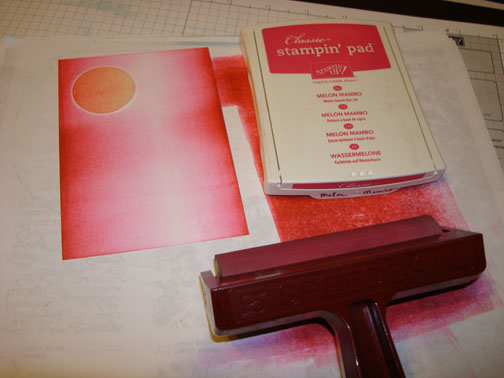
Maked the top of the card stock and brayered Baja Breeze at the top of the unmasked area to create the counter.

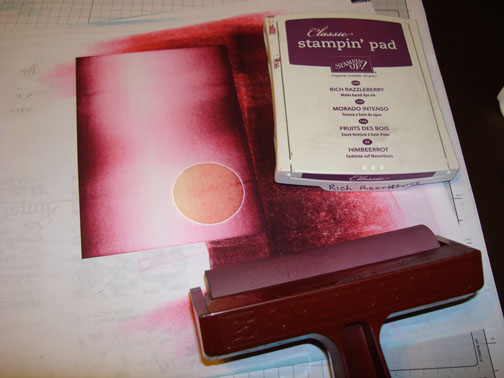
Brayered Not Quite Navy at the top of the unmasked area, not covering the Baja Breeze ink entirely.

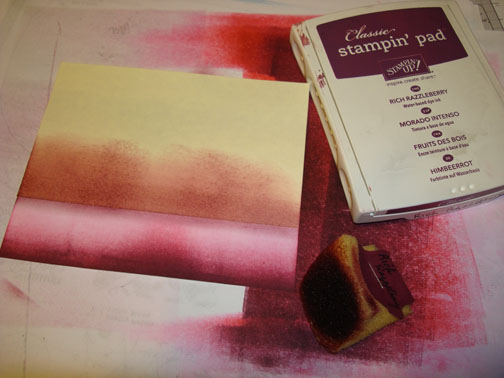
Removed the mask and buffed off my images lightly to remove any ink on them. 

Masked the bottom of the card stock.

Stamped my unmounted Boho Friend Wheel using Baja Breeze ink.

Brayered Baja Breeze ink at the top of the card stock.

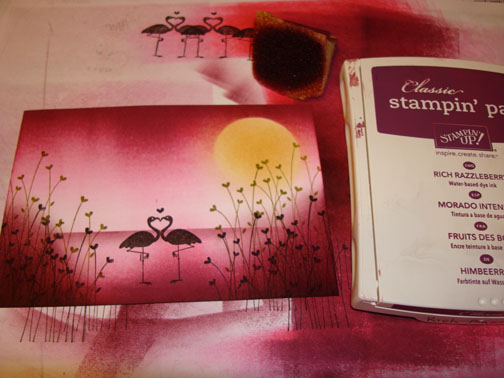
Sponge Not Quite Navy ink on all the edges of the card stock.

Add a bit of white gel pen to the wood part of the spools to create a highlight.  Rubbed the gel pen a bit when it is wet to soften.

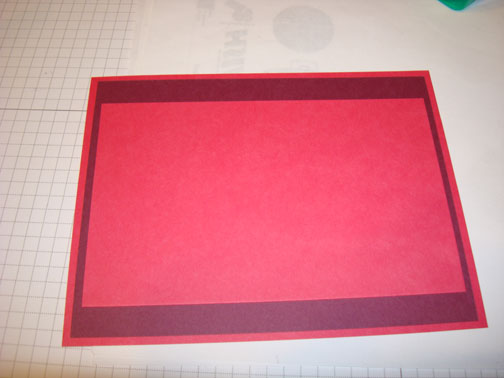
Added Soft Suede and Early Espresso card stock panels and a 1/2″ strip of Soft Suede to the middle left side.

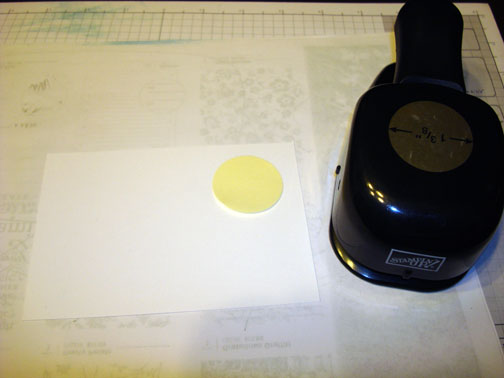
Punced a Design Label punch from Baja Breeze card stock and a 1″ circle punch from Soft Suede card stock.

Added a some Stampin’ Up Silver Hodgepodge Hardware.

Here is the finished card measuring 4″ x 8.5″. 

I hope you like this project. 

May your day be filled with new and exciting things.

Until my next post.. . . . . .  . .

Hugs,

Michelle

 dsc04164-2.jpg  Get ready for Brayer Workshops!  I am coming to the following locations, click the location name for more information.

Columbus, Ohio

Fayetteville, Tennessee near Nashville, TN & Huntsville, AL

Tucson, Arizona

Virginia Beach, Virginia

Houston, Texas

Wichita, Kansas

Syracuse (Bridgeport), New York

St. Peters, Missouri

La Porte, Indiana

Orlando (Davenport), Florida

St. Cloud, Minnesota

Colorado Springs, Colorado

Ottumwa, Iowa

Cleveland (Euclid), Ohio

Staley , North Carolina (South of Greensboro)

Monroe, Connecticut

Sturgis, South Dakota

Leesburg, Florida

Montreal, Wisconsin

Savannah, Georgia

Lincoln, Illinois

Jefferson, Louisiana (New Orleans Area)

Here is a link to my workshop calendar where you can see all of my travel schedule and to get info on beginner and advanced Brayer workshops:   http://zindorf.blogs.splitcoaststampers.com/workshop-calendar 

Don’t see a workshop in your State?  Interested in hosting the workshops in your area in 2012?   Click HERE to get hostess information.

Link to my Stampin’ Up website where you can order all of your must have Stampin’ Up products from me 24-7:  http://michellezindorf.stampinup.net

Frequently asked questions answers:  http://zindorf.blogs.splitcoaststampers.com/frequently-asked-questions/


Silent Freeze – Tutorial #383

Hellooooo out there!  Hope you all are staying warm and toasty during this very cold snowy time for part of this country.

I took this photo this morning.  I popped on my slippers (my pj’s are my official work uniform, lol) and stepped outside just long enough to snap this shot in 7 degree temperatures, Brrrrrrrr.  I changed it to black and white.  I love to play with Photo shop and find myself playing for hours, letting the time just slip away.    Black and white photos remind me of my childhood.  Guess I am dating myself, lol.


I was only outside for a moment but found I had to grab my favorite tea of the moment to warm back up.  Just the feel of the freezing temperatures sent me into action making this chilly card tutorial.    Hope you like it and will give it a try.  It goes together pretty quickly and screams “COLD”. 

Let’s get started. . . . . .

Supplies:

Stamps: Stampin’ Up Season of Friendship
Paper: Stampin’ Up Whisper White, Baja Breeze and Pacific Point
Ink: Stampin’ Up Baja Breeze, Pacific Point and Night of Navy
Accessories: Stampin’ Up sponge, Silver Brads, Word Window Punch, Brayer, Clear embossing powder, heat gun, Veramark pad and post it notes

The Stampin’ Up USA Idea book and Catalog is here.   For your copy, please send a check for $9.95 to Michelle Zindorf, P.O. Box 116, West Alexandria, OH 45381 or send it via paypal to mzindorf@aim.com USA only.     Want a free copy of the new Holiday Mini Catalog ?  E-mail your mailing address to mzindorf@aim.com and I will get one in the mail to you.  )  Are you getting inspiration from this blog?   One way you can help support it is to order your Stampin’ Up products through me.   Click HERE to place an order.    Want to become a Stampin’ Up Demonstrator , receive a 20% discount on product and earn instant income on orders?  Consider being part of my Stampin’ Up Team and start your own business or become a Hobby Demo just for the discount.  Click HERE for more information.

Stamped the tree from the Stampin’ Up set Season of Friendship using Versamark only on a 4″ x 5″ piece of Whisper White card stock.

Heat embossed the image using clear embossing powder and a heat gun.

Ripped a post it note and used it as a mask for the snow.

Brayered Baja Breeze ink at the bottom of the card stock up to the top.

Ripped another post it note and used it as a mask to create another hill in the scene.

Brayered Pacific Point ink at the bottom of the card stock, not covering the Baja Breeze ink entirely.

Sponged Night of Navy ink at the post it note edge.

Removed the post it note masks and brayered Baja Breeze ink at the very bottom of the card stock.

Punched a Word Window punch out of Pacific Point card stock and cut one end off.

Added 2 Pacific Point Panels, 1 Baja Breeze panel and 3 silver brads.

Here is the completed card measuring 5″ x 6.5″.

May laughter keep you warm inside today.

Until my next post. . . . . . . . .

Hugs,

Michelle

 dsc04164-2.jpg  Get ready for Brayer Workshops!  I am coming to the following locations, click the location name for more information.

Columbus, Ohio

Fayetteville, Tennessee near Nashville, TN & Huntsville, AL

Tucson, Arizona

Virginia Beach, Virginia

Houston, Texas

Wichita, Kansas

Syracuse (Bridgeport), New York

St. Peters, Missouri

La Porte, Indiana

Orlando (Davenport), Florida

St. Cloud, Minnesota

Colorado Springs, Colorado

Ottumwa, Iowa

Cleveland (Euclid), Ohio

Staley , North Carolina (South of Greensboro)

Monroe, Connecticut

Sturgis, South Dakota

Leesburg, Florida

Montreal, Wisconsin

Savannah, Georgia

Lincoln, Illinois

Jefferson, Louisiana (New Orleans Area)

Here is a link to my workshop calendar where you can see all of my travel schedule and to get info on beginner and advanced Brayer workshops:   http://zindorf.blogs.splitcoaststampers.com/workshop-calendar 

Don’t see a workshop in your State?  Interested in hosting the workshops in your area in 2012?   Click HERE to get hostess information.

Link to my Stampin’ Up website where you can order all of your must have Stampin’ Up products from me 24-7:  http://michellezindorf.stampinup.net

Frequently asked questions answers:  http://zindorf.blogs.splitcoaststampers.com/frequently-asked-questions/