Paris – Tutorial #323

dsc03591.JPG

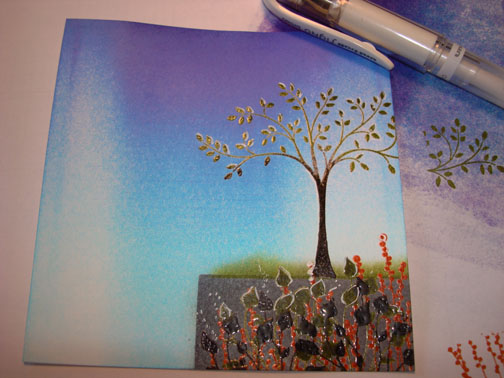
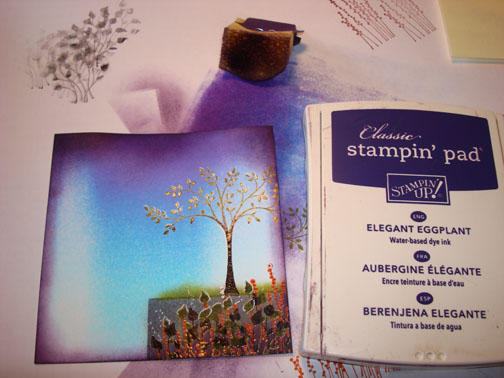
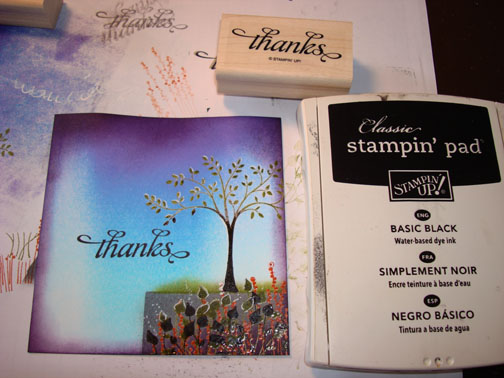
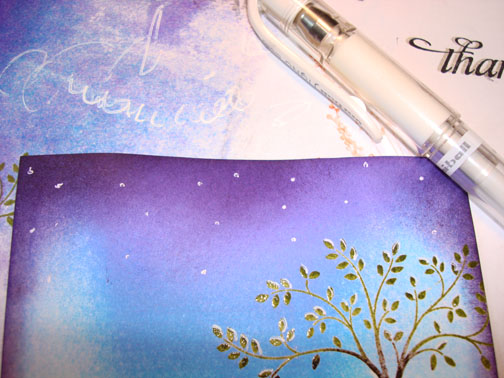
This morning I was in the mood to create something a little different and this is what I came up with.  I found myself pulling out set after set of stamps and combined them to create this little cologe. 

Before I start the tutorial I need to announce the lucky blog candy winner who won the Stampin’ Up stamp set “Forest Friends”.

The winner is. . . . . . .. . .. . . . . .

dsc03568.JPG

Snoopy von Seckendorff  Who Wrote  “How exciting! What a wonderful prize! Thank you for doing this! Someone is going to be thrilled when you pick their number. (I hope it’s me. I hope it’s me.)  Hugs,  Snoopy”

Congratulations Snoopy!  Please e-mail your address to mzindorf@aim.com within 30 days and I will put this set in the mail to you.  🙂

Thanks to all who played along.  It may just be you next time. 

Now on with the tutorial. . . . . .. .  . . .
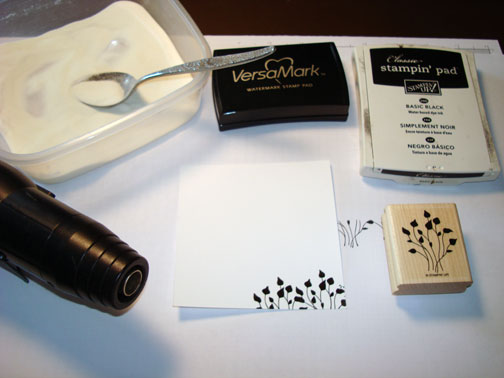
Supplies:

Stamps: Stampin’ Up! Chic Boutique, Bird on a Branch, Friends 24-7, En Francais, Sanded
Paper: Stampin’ Up! Very Vanilla, Dusty Durango, Sahara Sand
Ink: Stampin’ Up! Basic Gray, Sahara Sand, Creamy Caramel, Dusty Durango
Accessories: Stampin’ Up! Markers Creamy Caramel, Sahara Sand & Basic Black, Versamark pad, Clear embossing powder, heat gun,sponges, Photo Corner Punch, Piercing Tool and Mat Pack, Post it notes and Gold Brads

If you are a Stampin’ Up Customer of mine the new Summer Mini will be hitting your mail box any day now.  🙂  If you would like to be a customer of mine, please e-mail you address to me and I will send you free Stampin’ Up Summer Mini catalog.  Are you getting inspiration from this blog?   One way you can help support it is to order your Stampin’ Up products through me.   Click HERE to place an order.  Want to become a Stampin’ Up Demonstrator and earn instant income?  Consider being part of my Stampin’ Up Team and start your own business.  Click HERE for more information.

dsc03595.JPG

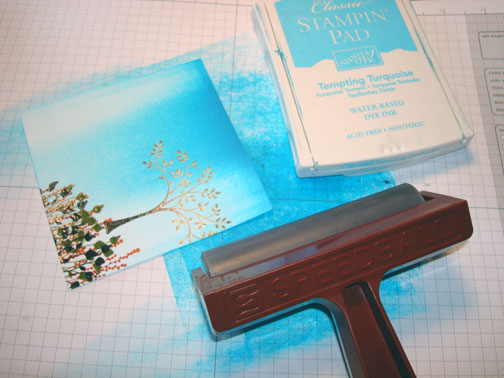
Stamped the leaves from the Stampin’ Up set Autumn Days by first loading the stamp with Versamark and then loading the stamp with Dusty Durango Ink before stamping it on a 4″ square piece of Very Vanilla card stock.  Heat embossed the images using clear embossing powder and a heat gun.

dsc03569.JPG

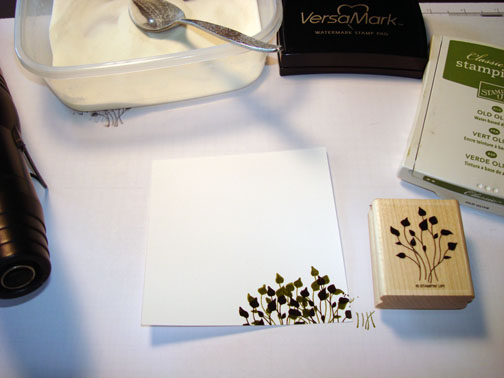
Stamped the Flourish from the Stampin’ Up set Friends 24-7 down the right side of the card stock with Sahara Sand ink stamping off once each time I inked the the stamp.

dsc03571.JPG

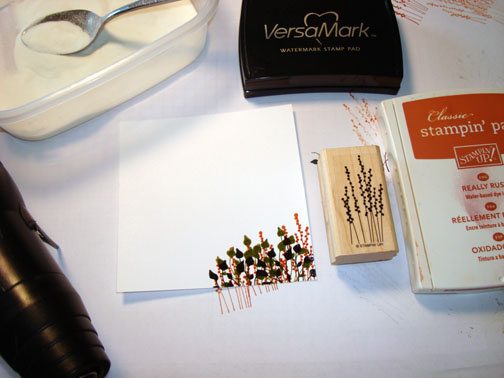
Stamped the branch from the Stampin’ Up set Bird on a Branch using Creamy Caramel ink.

dsc03573.JPG

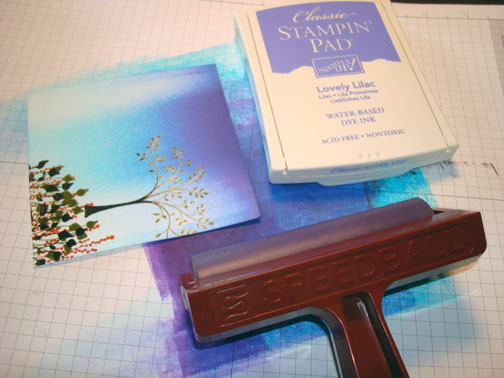
Masked the sides of the card stock using post it notes.

dsc03574.JPG

Stamped the Stampin’ Up Background stamp En Francais using Sahara Sand ink in the unmasked area of the card stock.

dsc03575.JPG

Unmasked.

dsc03576.JPG

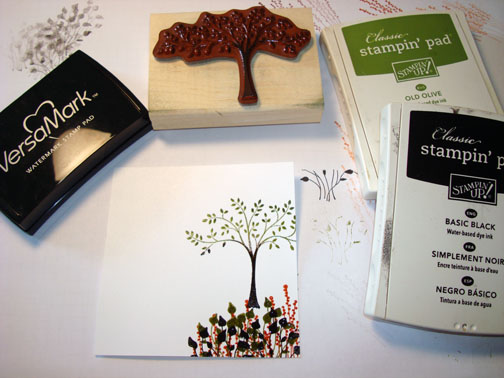
Stamped the tower using Sahara Sand ink.

dsc03577.JPG

Colored in a couple of sections of the tower using a Sahara Sand marker.

dsc03578.JPG

Drew in a branch and connected the two leaves using a Basic Black marker.

dsc03579.JPG

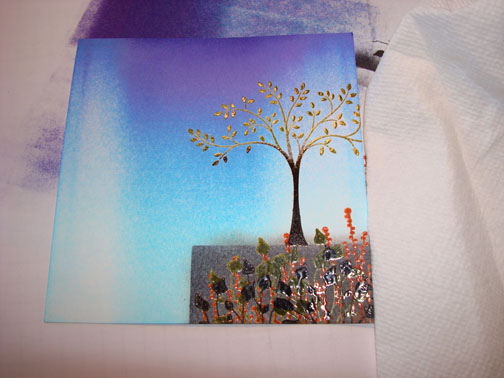
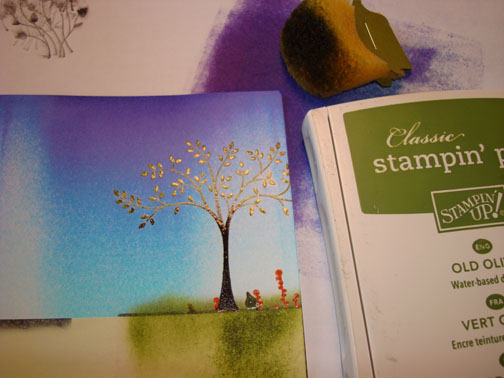
Stamped Lightly the Stampin’ Up Background stamp Sanded using Creamy Caramel ink.

dsc03580.JPG

Sponged Creamy Caramel ink around the edges of the card stock.

dsc03581.JPG

Sponged Basic Gray ink around the edges.

dsc03582.JPG

Cut a 5 1/8″ square piece of Sahara sand card stock and stamp just the tip of the Flourish using Sahara Sand ink all around the edge.

dsc03583.JPG

Added a Dusty Durango Panel under my main image panel, adhered them to the Sahara Sand panel.  Punched 4 small Photo Corners out of Dusty Durango card stock and adhered them to the sides of  the main image panel.

dsc03584.JPG

Cut the tips off of the photo corners so they were even with the Sahara Sand panel.

dsc03585.JPG

Sponged Basic Gray ink around the card stock panel.

dsc03586.JPG

Added a 5.25″ square piece of Dusty Durango as the last layer.

Using the Mat Pack and a piercing tool, pierced holes above the corners of the main image panel and then connected the wholes with a Creamy Caramel marker to create Faux Stitching. 

dsc03587.JPG

Added Gold brads to the main image panel corners.

dsc03588.JPG

Here is the finished card measuring 5.25″ square.

dsc03591.JPG

Have a very happy Monday!

Until my next post. . . .  . .

Hugs,

Michelle

 dsc04690.jpg   Get ready for Brayer Workshops!  I am coming to:

Boise area of Meridian, Idaho (seats available)

Riverside, California (Southern California)

Salem, Oregon

Wheaton, Illinois

St. Cloud, Minnesota

Rockville, Maryland (Sold Out)

North Chili, New York (near Rochester) (Sold Out)

New Johnsonville, Tennessee

Kenova (Huntington), West Virginia

Helena, Montana

Middleburg Heights, Ohio

Venice, Florida

Grinnell, Iowa

Piedmont, Alabama (Near GA border close to Cedartown)

Auburn, Washington (near Seattle)

Elk Grove Village, Illinois

Savannah, Georgia

Atlanta, Georgia

North Liberty, Indiana

Soledad, California

Here is a link to my workshop calendar where you can see all of my travel schedule and to get info on beginner and advanced Brayer workshops:   http://zindorf.blogs.splitcoaststampers.com/workshop-calendar 

Link to my Stampin’ Up website where you can order all of your must have Stampin’ Up products from me 24-7:  http://michellezindorf.stampinup.net

Frequently asked questions answers:  http://zindorf.blogs.splitcoaststampers.com/frequently-asked-questions/ 


Forest Friends Blog Candy!

Times up, the winner has been announced!

dsc03568.JPG

Hi there! 

I haven’t given away any blog candy in a couple of weeks and I have this sweet, sweet set of Stampin’ Up Forest Friends stamps that are looking for a wonderful new place to live.  Can you help out with that?  If so, please leave a comment telling me to enter you in the blog candy drawing.  If you are getting this blog update via e-mail please click HEREand it will take you to the blog page where you can leave a comment to enter.

I will use a random number generator to select the winner on Monday, April 19, 2010.  Have a super weekend and GOOD LUCK!

Until my next post. . . . . . . . . .

Hugs,

Michelle

 dsc04690.jpg   Get ready for Brayer Workshops!  I am coming to:

Boise area of Meridian, Idaho (seats available)

Riverside, California (Southern California)

Salem, Oregon

Wheaton, Illinois

St. Cloud, Minnesota

Rockville, Maryland (Sold Out)

North Chili, New York (near Rochester) (Sold Out)

Kenova (Huntington), West Virginia

Helena, Montana

Middleburg Heights, Ohio

Venice, Florida

Grinnell, Iowa

Piedmont, Alabama (Near GA border close to Cedartown)

Auburn, Washington (near Seattle)

Elk Grove Village, Illinois

Savannah, Georgia

Atlanta, Georgia

North Liberty, Indiana

Soledad, California

Here is a link to my workshop calendar where you can see all of my travel schedule and to get info on beginner and advanced Brayer workshops:   http://zindorf.blogs.splitcoaststampers.com/workshop-calendar 

Link to my Stampin’ Up website where you can order all of your must have Stampin’ Up products from me 24-7:  http://michellezindorf.stampinup.net

Frequently asked questions answers:  http://zindorf.blogs.splitcoaststampers.com/frequently-asked-questions/ 


Twilight Thanks – Tutorial #322

dsc03561.JPG

I am so very much in the garden mode that all I can think about is gardening.  So I guess you are just stuck with me creating pieces with flowers and trees for a while.  At least until the heat of summer kicks in and I get tired of pulling weeds, watering etc., lol. 

I have been spending at least 2 hours a day working in my perennial gardens and hanging out at our local garden store.   In the Spring the garden store gets the majority of my income, not really, but it seems like it.  Anyhow that is the reason behind my designs lately.  Hope you are in the garden mode too and don’t mind my floral pieces.

Let’s get started. . . . . . . . .. .  .

Supplies:

Stamps: Stampin’ Up! Thoughts & Prayers, Pocket Silhouettes and Thank you Kindly
Paper: Stampin’ Up! Whisper White, Old Olive, Lovely Lilac and Elegant Eggplant
Ink: Stampin’ Up! Tempting Turquoise, Lovely Lilac, Basic Black, Basic Gray, Really Rust, Old Olive, Elegant Eggplant and Whisper White
Accessories: Stampin’ Up! Sponges, Clear Circle Rhinestone Brads, Brayer, Clear embossing Powder, Heat Gun, Versamark pad, Elegant Eggplant Ribbon, White Gel Pen, Basic Black marker, Post it notes

If you are a Stampin’ Up Customer of mine the new Summer Mini will be hitting your mail box any day now.  🙂  If you would like to be a customer of mine, please e-mail you address to me and I will send you free Stampin’ Up Summer Mini catalog.  Are you getting inspiration from this blog?   One way you can help support it is to order your Stampin’ Up products through me.   Click HERE to place an order.  Want to become a Stampin’ Up Demonstrator and earn instant income?  Consider being part of my Stampin’ Up Team and start your own business.  Click HERE for more information.

dsc03565.JPG

On a 4″ square piece of Whisper White card stock stamp the plant from the Stampin’ Up! Pocket Silhouettes set by first loading the stamp with Versamark and then loading it with Basic Black ink before stamping it.  Stamped it twice and then heat embossed the images using clear embossing powder and a heat gun.

dsc03543.JPG

Over stamped the embossed images with the same stamp by loading it with Versamark and then Old Olive ink before stamping it.  Heat embossed the Old Olive images with clear embossing powder and a heat gun.

dsc03544.JPG

Stamped another stamp from the Stampin’ Up! set Pocket Silhouettes by first loading the stamp with Versamark and then Really Rust ink before stamping it.  Heat embossed the Really Rust images using clear embossing powder and a heat gun.

dsc03545.JPG

Stamped the Tree from the Stampin’ Up! Thoughts & Prayers by first loading the stamp with Versamark and then Old Olive ink, tapped a bit of Basic Black ink on the Trunk of the tree and then stamped it.  Heat embossed the tree image using clear embossing powder and a heat gun.

dsc03546.JPG

Now that my images are heat embossed the will resist ink so I can now put in my background.

Brayered Tempting Turquoise ink from the at the top of the card stock.

dsc03547.JPG

Brayered Lovely Lilack ink at the top of the card stock, not covering the Tempting Turquoise ink entirely.

dsc03548.JPG

Used two post it notes and mask the sky and the left side of the card stock in order to put in a wall.  Sponged Basic Gray ink in the unmasked area.

dsc03549.JPG

Removed the masks and wiped the ink off of my embossed images.

dsc03550.JPG

Put a post it note mask at the top of the wall and sponged a little Old Olive ink in for grass.

dsc03551.JPG

Added White Gel Pen highlights to the leaves of the tree and plants.

dsc03552.JPG

Sponged Elegant Eggplant ink around the edges of the card stock.

dsc03553.JPG

Stamped the Stampin’ Up! Thanks image from the set Thank You Kindly using Basic Black ink.

dsc03554.JPG

Added White Gel Pen highlights to the sentiment.

dsc03555.JPG

Added a few random dots in the sky for stars.

dsc03556.JPG

Out lined some of the branches to give the tree a bit more dimension.

dsc03557.JPG

Added Old Olive, Lovely Lilac and Elegant Eggplant Panels, Elegant Eggplant Ribbon and a couple of Clear Circle Rhinestone Brads.

Here is the finished card measuring 5.5″ square.

dsc03561.JPG

May you get the chance today to enjoy a bit of what nature has to offer.

Until my next post. . . .  . . . . . .  . . . . .

Hugs,

Michelle

 dsc04690.jpg   Get ready for Brayer Workshops!  I am coming to:

Boise area of Meridian, Idaho (seats available)

Riverside, California (Southern California)

Salem, Oregon

Wheaton, Illinois

St. Cloud, Minnesota

Rockville, Maryland (Sold Out)

North Chili, New York (near Rochester) (Sold Out)

New Johnsonville, Tennessee

Kenova (Huntington), West Virginia

Helena, Montana

Middleburg Heights, Ohio

Venice, Florida

Grinnell, Iowa

Piedmont, Alabama (Near GA border close to Cedartown)

Auburn, Washington (near Seattle)

Elk Grove Village, Illinois

Savannah, Georgia

Atlanta, Georgia

North Liberty, Indiana

Saledad, California

Here is a link to my workshop calendar where you can see all of my travel schedule and to get info on beginner and advanced Brayer workshops:   http://zindorf.blogs.splitcoaststampers.com/workshop-calendar 

Link to my Stampin’ Up website where you can order all of your must have Stampin’ Up products from me 24-7:  http://michellezindorf.stampinup.net

Frequently asked questions answers:  http://zindorf.blogs.splitcoaststampers.com/frequently-asked-questions/ 


Prismacolor Pencil Butterfly – Tutorial #321

dsc03535.JPG

I’m a bit late posting today.   I just arrived home yesterday evening from Colorado Springs where I had the best time teaching and this afternoon I spent some quality time with my oldest son, Jesse, who is 29.  No matter how old my sons get I still love spending time with them one on one.  We went out to lunch at a local diner and then came back here and played a few Wii Bowling games where I handed him a can of Whoop A**.   He still loves me though.

Also Spring is on my mind today and I cannot wait to see the first butterfly of the season.  Especially, since I just received my pre-order for the Stampin’ Up! Summer Mini catalog that will be in effect on June 1st.  I received in the pre-order this beautiful butterfly stamp, named All a Flutter and a bunch of other great stamps and products that I cannot wait to use.

Today’s tutorial shows how dramatic Prismacolor Pencils are when you use them on dark card stock with Odorless Paint Thinner.  It is so very easy.

Let’s get started. .. . . . . . . . .

Supplies:

Stamps: Stampin’ Up! All a Flutter and Bella’s Bloom
Paper: Stampin’ Up Basic Black, Lovely Lilac, Elegant Eggplant, Tempting Tuquoise and Whisper White
Ink: Whisper White Craft and Basic Black
Accessories: Stampin’ Up Photo Corner Punch, Big Shot Machine, Circles #2 Die cut, White Gel Pen, Prismacolor Pencils and Orderless Paint Thinner

If you are a Stampin’ Up Customer of mine the new Summer Mini will be hitting your mail box any day now.  🙂  If you would like to be a customer of mine, please e-mail you address to me and I will send you free Stampin’ Up Summer Mini catalog.  Are you getting inspiration from this blog?   One way you can help support it is to order your Stampin’ Up products through me.   Click HERE to place an order.  Want to become a Stampin’ Up Demonstrator and earn instant income?  Consider being part of my Stampin’ Up Team and start your own business.  Click HERE for more information.

dsc03542.JPG

Used the Big Shot machine and the Circles #2 die cut to cut a 2.5″ circle from Basic Black card stock.

dsc03513.JPG

Stamped the “All a Flutter” butterfly stamp with White Craft ink on the circle.

dsc03514.JPG

I used Prismacolor pencils and Odorless Paint Thinner to color in the image. 

To do this I pour a little bit of the paint thinner in the cap of the bottle and dip my Prismacolor Pencil point into it.  This will make the pencils melt like butter on to the card stock and blend oh so easily.

dsc03516.JPG

Started coloring with a True Blue Prismacolor Pencil.

dsc03518.JPG

Added Lilac Prismacolor Pencil.

dsc03519.JPG

Added Violet Prismacolor Pencil.

dsc03520.JPG

Added Rose Prismacolor Pencil.

dsc03521.JPG

Added White gel pen and a Lovely Lilac, Whisper White and Basic Black panels.

dsc03522.JPG

Added Elegant Eggplant Punched Photo Corners.  Butting the Photo-corners up to the Whisper White Panel corners.

dsc03523.JPG

Layered a Tempting Turquoise panel, an Elegant Eggplant Panel and a Basic Black Panel.  Then Stamped the Bella’s Bloom Flower stamp around the edge of the Elegant Eggplant Panel using Basic Black ink.

dsc03524.JPG

Colored the flowers in with Odorless Paint Thinner and Lilac, True Blue and Violet Prismacolor Pencils.

dsc03530.JPG

Added Basic Black Photo Corners.  Here is the finished card measuring 5.5″ square.

 dsc03535.JPG

I hope this tutorial has inspired you to do some coloring today on dark card stock.

May the sights and sounds of Spring warm your heart.

Until my next post. . .  . . . . . . ..

Hugs,

Michelle

 dsc04690.jpg   Get ready for Brayer Workshops!  I am coming to:

Boise area of Meridian, Idaho (seats available)

Riverside, California (Southern California)

Salem, Oregon

Wheaton, Illinois

St. Cloud, Minnesota

Rockville, Maryland (Sold Out)

North Chili, New York (near Rochester) (Sold Out)

New Johnsonville, Tennessee

Kenova (Huntington), West Virginia

Helena, Montana

Middleburg Heights, Ohio

Venice, Florida

Grinnell, Iowa

Piedmont, Alabama (Near GA border close to Cedartown)

Auburn, Washington (near Seattle)

Elk Grove Village, Illinois

Savannah, Georgia

Atlanta, Georgia

North Liberty, Indiana

Saledad, California

Here is a link to my workshop calendar where you can see all of my travel schedule and to get info on beginner and advanced Brayer workshops:   http://zindorf.blogs.splitcoaststampers.com/workshop-calendar 

Link to my Stampin’ Up website where you can order all of your must have Stampin’ Up products from me 24-7:  http://michellezindorf.stampinup.net

Frequently asked questions answers:  http://zindorf.blogs.splitcoaststampers.com/frequently-asked-questions/ 


Flowers for Mother – Tutorial #320

dsc03494.JPG

 After taking a good look at my calendar, I thought to myself “Mickey, you better get a move on and make a Mother’s Day card before you forget or run out of time.”  So, today’s card is a card I made for my Mom for this coming Mother’s Day.  I am safe to post it since my Mother is not computer literate and therefore, does not read my blog.  🙂  If I were a teenager, I would be so happy about that, lol.

And yes, my nickname is “Mickey” and that is what I call myself when I have a conversation with myself.   Scary huh?  My friends call me Mickey, so feel free to use it. 

Anyway, I used the Stampin’ Up! set Fifth Avenue Floral.  One of my wonderful customers purchased it recently and it made me think to pull mine out and use it.  Inspiration comes from so many different places. 

Although this card is for my Mother, I am dedicating this card to my Friend and Up Line, Karen Barber.  She said recently that I should do more flower cards.  Well Karen, here you go!  I hope she likes it and you do too.

Let’s get started on the tutorial. . . . . . . . .

Supplies:

Stamps: Stampin’ Up Fifth Avenue Floral and Elements of Style
Paper: Stampin’ Up! Whisper White, Basic Black, Sage Shadow, Really Rust
Ink: Stampin’ Up Bravo Burgundy, Chocolate Chip, Sage Shadow, Really Rust, Pumpkin Pie, Blush Blossom and Basic Black
Accessories: Stampin’ Up Blender Pen, Sponges, Markers (Apricot Appeal, Really Rust, Pumpkin Pie, Blush Blossom and Basic Black), Gold Brads, Stamp-a-ma-jig, Post it notes, Photo Corner Punch and Whisper White Ribbon

Don’t forget to request your copy of the Stampin’ Up Occasions Mini Catalog .   Just e-mail me your address and I will be glad to mail you one for free.  Are you getting inspiration from this blog?   One way you can help support it is to order your Stampin’ Up products through me.   Click HERE to place an order.  Want to become a Stampin’ Up Demonstrator and earn instant income?  Consider being part of my Stampin’ Up Team and start your own business.  Click HERE for more information.

dsc03506.JPG

Stamped the Rose on a 4 1/8″ square piece of Whisper White card stock by first loading my stamp with Versamark and then with Basic Black ink before stamping it.  Heat embossed the image using clear embossing powder and a heat gun.

dsc03471.JPG

dsc03472.JPG

I wanted a soft look to the rose so I added some Blush Blossom marker using my Blender pen.  When I use my Blender pen I rub the Blender pen on the marker’s brush tip and then color with the blender pen.  This gives a soft look with out hard edges.

dsc03474.JPG

Added Pumpkin Pie marker using my Blender pen.

dsc03475.JPG

Added Really Rust marker using my Blender pen.

dsc03476.JPG

Added Really Rust marker to the darkest parts using just the Really Rust marker.

dsc03477.JPG

Stamped the Rose on a post it note and cut it out.  I will be using this as a mask so when I cut it out I cut just inside the lines.  You want your mask to be a hair smaller than the original image.

dsc03478.JPG

dsc03479.JPG

Masked the rose and stamped the Daylily using my Stamp-a-ma-jig for placement and by loading my stamp with Versamark and then Basic Black ink before stamping it.

dsc03480.JPG

dsc03481.JPG

Heat embossed the image using clear embossing powder and a heat gun. 

dsc03482.JPG

Removed the mask temporarily and added Apricot Appeal marker to the center of the Daylily.

dsc03483.JPG

Added Really Rust marker to rest of the Daylily’s petals using a Blender pen.

dsc03484.JPG

Added Really Rust marker to the tips of the petals.

dsc03485.JPG

Colored the stamens in with a Really Rust marker and added Basic Black marker to the tips.

dsc03486.JPG

Stamped the Day-lily stamp on a post it note and cut it out.  Masked both flowers.

dsc03487.JPG

Sponged Blush Blossom ink on the card stock.

dsc03488.JPG

Sponged Really Rust ink on the card stock.

dsc03489.JPG

Sponged Bravo Burgundy ink on the card stock.

dsc03490.JPG

Added just a bit of Chocolate Chip ink at the edges of the flowers.

dsc03491.JPG

Loaded the Stamp from the Stampin’ Up set “Elements of Style” (This set will be in the Summer Mini Catalog) by loading the stamp with Sage Shadow ink and then added a little Really Rust ink to the stamp before stamping it.

dsc03492.JPG

Removed the masks, assembled the card by adding Basic Black and Sage Shadow card stock panels, Whisper White Ribbon, a Really Rust photo corner punch and Gold brads.

dsc03493.JPG

Here is the finished card measuring 5.5″ square.

dsc03494.JPG

I hope this tutorial inspires you to use your Blender pen to get a softer look when coloring.

I am off to beautiful Colorado Springs to teach my Brayer Workshops.  Behave yourselves until I return.  🙂

Hugs,

Michelle

 dsc04690.jpg   Get ready for Brayer Workshops!  I am coming to:

Colorado Springs, Colorado (Sold Out)

Boise area of Meridian, Idaho

Riverside, California (Southern California)

Salem, Oregon

Wheaton, Illinois

St. Cloud, Minnesota

Rockville, Maryland (Sold Out)

North Chili, New York (near Rochester) (Sold Out)

New Johnsonville, Tennessee

Kenova (Huntington), West Virginia

Helena, Montana

Middleburg Heights, Ohio

Venice, Florida

Grinnell, Iowa

Piedmont, Alabama (Near GA border close to Cedartown)

Auburn, Washington (near Seattle)

Elk Grove Village, Illinois

Savannah, Georgia

Atlanta, Georgia

North Liberty, Indiana

Saledad, California

Here is a link to my workshop calendar where you can see all of my travel schedule and to get info on beginner and advanced Brayer workshops:   http://zindorf.blogs.splitcoaststampers.com/workshop-calendar 

Link to my Stampin’ Up website where you can order all of your must have Stampin’ Up products from me 24-7:  http://michellezindorf.stampinup.net

Frequently asked questions answers:  http://zindorf.blogs.splitcoaststampers.com/frequently-asked-questions/ 


Monochromatic Reflection – Tutorial #319

dsc03465.JPG

My totally terrific Stampin’ Up Down Line, the Ink to Art Team, has started a technique swap among ourselves.   This months technique is “Monochromatic”. 

Today’s tutorial features my swap card.

If you don’t know what Monochromatic is, it is using the same color in different tones.  Hope you enjoy this one.

Let’s get started. . . . .  . . .

Supplies:


Stamps: Stampin’ Up! Trendy Trees and Priceless
Paper: Stampin’ Up! Bashful Blue, Brilliant Blue and Whisper White
Ink: Stampin’ Up! Bashful Blue, Brilliant Blue and Night of Navy
Accessories: Stampin’ Up! Modern Label Punch, Bashful Blue Brads, Brayer, Stamp-a-ma-jig, Brilliant Blue and Bashful Blue markers, Sponge, Post it note.

Don’t forget to request your copy of the Stampin’ Up Occasions Mini Catalog .   Just e-mail me your address and I will be glad to mail you one for free.  Are you getting inspiration from this blog?   One way you can help support it is to order your Stampin’ Up products through me.   Click HERE to place an order.  Want to become a Stampin’ Up Demonstrator and earn instant income?  Consider being part of my Stampin’ Up Team and start your own business.  Click HERE for more information.

dsc03470.JPG

On a 3.25″ x 5.25″ piece of Whisper White card stock, brayered Bashful Blue ink at an angle on the top right corner and then the bottom right corner.

dsc03447.JPG

dsc03448.JPG

Brayered Brilliant Blue ink on the same corners, not covering the Bashful Blue ink entirely.

dsc03450.JPG

Stamped the tree trunk upside down using Bashful Blue ink.

dsc03451.JPG

Stamped the tree trunk with Brilliant Blue ink, lining the trunks up. 

dsc03452.JPG

Stamped the leaves with Bashful Blue ink.

dsc03453.JPG

Stamped the leaves with Brilliant Blue ink.

dsc03454.JPG

Put a Post it note mask below the Brilliant Blue tree and sponged Brilliant Blue ink at the masks edge to create ground under the tree.

dsc03455.JPG

Removed mask and added dashes to the water using Bashful Blue and Brilliant Blue markers.

dsc03458.JPG

Punched two Brilliant Blue Modern Label Punches.

dsc03460.JPG

Rubbed the ends of the punches on my Night of Navy ink pad.

dsc03463.JPG

Stamped the flourish from the Stampin’ Up set Priceless using Bashful Blue ink at the top of the card stock.   Stamped the Flourish with Bashful Blue ink on my Stamp-a-ma-jig plastic and then flipped it over, rubbed it to make a light reflection of the image on the bottom of the card stock.

dsc03462.JPG

Assembled the card front by adding Bashful Blue and Brilliant Blue panels and Bashful Blue brads.

Here is the finished card measuring 4.75″ x 6″.

dsc03465.JPG

May you enjoy every single moment of your day.

Until my next post. . . . .  . . .

Hugs,

Michelle

 dsc04690.jpg   Get ready for Brayer Workshops!  I am coming to:

Colorado Springs, Colorado (Sold Out)

Boise area of Meridian, Idaho

Riverside, California (Southern California)

Salem, Oregon

Wheaton, Illinois

St. Cloud, Minnesota

Rockville, Maryland (Sold Out)

North Chili, New York (near Rochester) (Sold Out)

New Johnsonville, Tennessee

Kenova (Huntington), West Virginia

Helena, Montana

Middleburg Heights, Ohio

Venice, Florida

Grinnell, Iowa

Piedmont, Alabama (Near GA border close to Cedartown)

Auburn, Washington (near Seattle)

Elk Grove Village, Illinois

Savannah, Georgia

Atlanta, Georgia

North Liberty, Indiana

Saledad, California

Here is a link to my workshop calendar where you can see all of my travel schedule and to get info on beginner and advanced Brayer workshops:   http://zindorf.blogs.splitcoaststampers.com/workshop-calendar 

Link to my Stampin’ Up website where you can order all of your must have Stampin’ Up products from me 24-7:  http://michellezindorf.stampinup.net

Frequently asked questions answers:  http://zindorf.blogs.splitcoaststampers.com/frequently-asked-questions/ 


Whew, Finished :)

dsc03445.JPG

On occassion I will stamp things for personal use, lol.  I know, sounds weird, but I rarely stamp things to actually mail.  Most of my creations are put in albums and then I will haul the albums around to my brayer workshop. 

With that being said, today was a bit different.   I needed to create and get 26 invitations to our Spring cookout/bonfire out.  So far I have them made, I just need to address them and take them to the Post Office.  Unfortunately, I did not take the time to do a tutorial for you.  Please forgive me. 

dsc03446.JPG

Promise I will be back tomorrow with a tutorial.

Have a terrific evening!

Hugs,

Michelle


Spring By the Sea – Tutorial #318

dsc03437.JPG

I woke this morning feeling a little uninspired, still feeling under the weather.   It must have taken me over an hour just to pick out a stamp to use.   But once I picked up this Stampin’ Up! set “Abundant Hope” things started to fall into place.  Especially, since this set just screams SPRING!   So, with that being said, I picked out some Spring colors and off to the races I went with embossing powder and brayer in hand.

Let’s get started on the tutorial.. . . . . .  .

Supplies:

Stamps: Stampin’ Up! Abundant Hope and Inspired by Nature
Paper: Stampin’ Up! Tempting Turquoise, Whisper White and Brilliant Blue
Ink: Stampin’ Up Basic Black, Old Olive, Tempting Turquoise and Brilliant Blue
Accessories: Stampin’ Up Heat Gun, clear embossing powder, white gel pen, Versamark pad and marker, markers – Old Olive, Certainly Celery, Barely Banana, Yoyo Yellow and More Mustard, Gold Brads, Photo corner punch, sponges, Stamp-a-ma-jig, post it notes and brayer

Don’t forget to request your copy of the Stampin’ Up Occasions Mini Catalog .   Just e-mail me your address and I will be glad to mail you one for free.  Are you getting inspiration from this blog?   One way you can help support it is to order your Stampin’ Up products through me.   Click HERE to place an order.  Want to become a Stampin’ Up Demonstrator and earn instant income?  Consider being part of my Stampin’ Up Team and start your own business.  Click HERE for more information.

dsc03441.JPG

On a 3.5″ x 4.5″ piece of Whisper White card stock, stamped the flowers by first loading my stamp with Versamark and then with Basic Black ink before stamping it.  Then I heat embossed the image using clear embossing powder and a heat gun.

dsc03416.JPG

Colored the Flowers in with a Barely Banana marker.

dsc03419.JPG

Added Yoyo Yellow marker to the dark parts of the flowers.

dsc03420.JPG

Added More Mustard to the darkest parts of the flowers.

dsc03421.JPG

Colored the leaves and stems in with Certainly Celery marker.

dsc03422.JPG

Added Old Olive to the dark parts of the stems and leaves.

dsc03423.JPG

Colored over the flowers, leaves and stems using a Versamark marker, staying inside of the embossed lines.  Heat embossed the image using clear embossing powder and a heat gun.  Now my image is protected and will resist my back ground inks.

dsc03424.JPG

Brayered Tempting Turquoise ink at an angle in the sky area.  Note:  Wipe ink off of the embossed image after brayering.

dsc03425.JPG

Brayered Brilliant Blue ink at an angle, not covering the Tempting Turquoise ink entirely.

dsc03426.JPG

Masked the sky area of the card stock using a post it note and sponge Tempting Turquoise ink at the post it note edge.

dsc03427.JPG

Using the edge of a Old Olive ink pad, lightly smear grasses in the ground area.  I used a half of a “C” motion, top half.

dsc03428.JPG

Stamped some grasses in using Old Olive ink.

dsc03429.JPG

Stamped a few grasses in using Basic Black ink.

dsc03430.JPG

Sponged Basic Black ink at the bottom of the card stock.

dsc03431.JPG

Added highlights to the flowers, leaves and grasses using a White Gel Pen.

dsc03432.JPG

Sponged Basic Black ink on each edge of the card stock.

dsc03433.JPG

Assembled the main image panel, Tempting Turquoise panels and Brilliant Blue panels.  Using a Stamp-a-ma-jig stamp the flourish on each side of one of the Brilliant Blue panels using Basic Black ink.

dsc03434.JPG

dsc03435.JPG

Added Tempting Turquoise photo corner punches and 6 gold brads.  Also, sponged a bit of Basic Black ink on my largest Brilliant Blue panel.

Here is the finished card measuring 5″ x 6.5″.

dsc03437.JPG

Although I am not feeling well, the warm Spring weather is calling me outside to my gardens for a little bit of Spring clean up. 

May you get some fresh air today also.

Until my next post. . . . . . . .

Hugs,

Michelle

 dsc04690.jpg   Get ready for Brayer Workshops!  I am coming to:

Colorado Springs, Colorado (Sold Out)

Boise area of Meridian, Idaho

Riverside, California (Southern California)

Salem, Oregon

Wheaton, Illinois

St. Cloud, Minnesota

Rockville, Maryland (Sold Out)

North Chili, New York (near Rochester) (Sold Out)

New Johnsonville, Tennessee

Kenova (Huntington), West Virginia

Helena, Montana

Middleburg Heights, Ohio

Venice, Florida

Grinnell, Iowa

Piedmont, Alabama (Near GA border close to Cedartown)

Auburn, Washington (near Seattle)

Elk Grove Village, Illinois

Savannah, Georgia

Atlanta, Georgia

North Liberty, Indiana

Saledad, California

Here is a link to my workshop calendar where you can see all of my travel schedule and to get info on beginner and advanced Brayer workshops:   http://zindorf.blogs.splitcoaststampers.com/workshop-calendar 

Link to my Stampin’ Up website where you can order all of your must have Stampin’ Up products from me 24-7:  http://michellezindorf.stampinup.net

Frequently asked questions answers:  http://zindorf.blogs.splitcoaststampers.com/frequently-asked-questions/ 


Watercolored & Punched Potted Flower – Tutorial #317

dsc03408.JPG

Occasionally, we all need to step outside of the box and shake things up a bit or our creative side might just get a bit stagnate.    Today’s tutorial shows me stepping outside of my normal creations and trying something a bit different.  I have water-colored before and really love the process, but I haven’t done it in quite some time. 

When I watercolor, I like the image to look like it is water-colored and a bit messy.  This is achieved by using wet watercolor on wet watercolor paper.  This allows the color to spread.  Then you can dry your watercolor paper and proceed to darken and shade things using wet watercolor on the dry paper.   This gives you more control and the color won’t spread like it did on the wet watercolor paper. 

Today’s tutorial shows the process.

Let’s get started. . . . . .  . . .

Supplies:

Stamps: Stampin’ Up! Flower Fancy
Paper: Stampin’ Up! Watercolor Paper, Old Olive and Brilliant Blue card stock
Ink: Stampin’ Up Bashful Blue, Brilliant Blue and Jet Black Stazon Ink
Accessories: Stampin’ Up! 1 3/4 circle punch, White Gel Pen, Aqua Painter, Heat Gun, Basic Black marker, Mat Pack and Piercing Tool, Watercolor Wonder Crayons, Old Olive Brads, Non-stick craft ink.

Don’t forget to request your copy of the Stampin’ Up Occasions Mini Catalog .   Just e-mail me your address and I will be glad to mail you one for free.  Are you getting inspiration from this blog?   One way you can help support it is to order your Stampin’ Up products through me.   Click HERE to place an order.  Want to become a Stampin’ Up Demonstrator and earn instant income?  Consider being part of my Stampin’ Up Team and start your own business.  Click HERE for more information.

dsc03415.JPG

I started by covering my work surface with a non-stick craft sheet.   On this sheet you can wet your paper without it soaking through to your table etc.

Misted a 3.75″ x 4.5″ piece of Watercolor Paper using a spray bottle of water.  

dsc03374.JPG

Let the water soak into the paper.   Loaded my Aqua Painter with the Tempting Turquoise Watercolor Wonder Crayon, by swiping the tip of the Aqua Painter against the Crayon.   Dabbed the Aqua Painter on the wet watercolor painter creating a blotchy area in the top right corner.

Note:  You will want your color to be dark when wet because it will dry much lighter.

dsc03375.JPG

Heat you watercolor paper with your heat gun. I heat both sides of the paper a bit at a time to help with keeping the paper flat.  Drying the paper sets the color you just put on.

dsc03377.JPG

Stamped the flower image using Jet Black StazOn ink on my dry paper.

dsc03378.JPG

Misted the paper again with the water bottle.  Added Brilliant Blue Watercolor Crayon using the Aqua Painter. You will notice the color spreading on the wet paper, so you will want to put your color towards the center of the flower.

dsc03382.JPG

Added Old Olive Watercolor to the Leaves and stems on the wet paper.

dsc03383.JPG

Added a bit of Always Artichoke Watercolor to the base of the leaves.

dsc03384.JPG

Dried the paper with a heat gun and added more Brilliant Blue watercolor to the center of the flowers.  With the paper dry you will have more control on where the color ends up.

dsc03385.JPG

Added a bit more Always Artichoke to the leaves and added some to the stems.  Also, extended the stem to the bottom of the paper.

dsc03386.JPG

Added Basic Black marker to the stem to extend it to the bottom of the paper.

dsc03387.JPG

Dried the paper well with my heat gun.

dsc03388.JPG

Added Basic Black marker to the center of the flower and darkened the veins on the leaves.

dsc03389.JPG

Added highlights to the flower, leaves and stem using a white gel pen.  Also, added white gel pen dots to the center of the flower.

dsc03390.JPG

Cute a 4.75″ x 6.25″ piece of Old Olive card stock and sponged Brilliant Blue ink to the edges of it and my main image panel.

dsc03393.JPG

Loaded my Aqua Painter with Always Artichoke watercolor and tapped the Aqua Painter on the finger of my other hand to get it to speckle the watercolor paper.

dsc03394.JPG

dsc03395.JPG

This was a last minute decision, lol, I decided to make a pot for my flower.

Punched a 1 3/4″ circle from Bashful Blue card stock.  Cut the top and bottom off of the circle.

dsc03398.JPG

Sponged Bashful Blue ink on the pot to shade it.

dsc03399.JPG

Stamped leaves at the top of the pot using Bashful Blue ink.  Sponged Brilliant Blue ink on the pot not covering up all of the Bashful Blue ink.

dsc03401.JPG

Assembled my card front and added Old Olive and Brilliant Blue Panels, Old Olive brads and some pierced holes using my mat pack and piercing tool.

dsc03403.JPG

Here is the finished card measuring 5″ x 6.5″.

dsc03408.JPG

I hope this has encourage you to do something a bit different today.

May you feel the warmth of the sun on your face today.

Until my next post. . . . . .  .

Hugs,

Michelle

 dsc04690.jpg   Get ready for Brayer Workshops!  I am coming to:

Colorado Springs, Colorado (Sold Out)

Boise area of Meridian, Idaho

Riverside, California (Southern California)

Salem, Oregon

Wheaton, Illinois

St. Cloud, Minnesota

Rockville, Maryland (Sold Out)

North Chili, New York (near Rochester) (Sold Out)

New Johnsonville, Tennessee

Kenova (Huntington), West Virginia

Helena, Montana

Middleburg Heights, Ohio

Venice, Florida

Grinnell, Iowa

Piedmont, Alabama (Near GA border close to Cedartown)

Auburn, Washington (near Seattle)

Elk Grove Village, Illinois

Savannah, Georgia

Atlanta, Georgia

North Liberty, Indiana

Saledad, California

Here is a link to my workshop calendar where you can see all of my travel schedule and to get info on beginner and advanced Brayer workshops:   http://zindorf.blogs.splitcoaststampers.com/workshop-calendar 

Link to my Stampin’ Up website where you can order all of your must have Stampin’ Up products from me 24-7:  http://michellezindorf.stampinup.net

Frequently asked questions answers:  http://zindorf.blogs.splitcoaststampers.com/frequently-asked-questions/ 


Foxy Reflection – Tutorial #316

dsc03367-a.jpg

Hi there, I am still under the weather but decided to drag myself out of bed, after sleeping the last 24 hours away and get in a little stamping.  Since my mind is a bit foggy with cough medicine etc. I used the help of my Color Coach to come up with this color combo.   I should use my color coach more often, this color combo is wonderful!

On another note, thank you for all the get well wishes I have received.  My readers are the best!

Now on with this tutorial. . . .. . .  .

Supplies:

Stamps: Stampin’ Up Fox & Friends Eastern Blooms
Paper: Stampin’ Up Whisper White, Bashful blue and Mellow Moss
Ink: Stampin’ Up Night of Navy, Always Artichoke, Creamy Caramel, Mellow Moss, Bashful blue and Really Rust
Accessories: Stampin’ Up White Gel Pen, Brayer, Versamarker, Clear embossing powder, heat gun, Stamp-a-ma-jig, Really Rust & Apricot Appeal markers, Sponges, post it note and Color Coach

Don’t forget to request your copy of the Stampin’ Up Occasions Mini Catalog .   Just e-mail me your address and I will be glad to mail you one for free.  Are you getting inspiration from this blog?   One way you can help support it is to order your Stampin’ Up products through me.   Click HERE to place an order.  Want to become a Stampin’ Up Demonstrator and earn instant income?  Consider being part of my Stampin’ Up Team and start your own business.  Click HERE for more information.

dsc03373-a.jpg

Stamped the fox with Really Rust ink on my Stamp-a-ma-jig plastic, turned it over on my 2.5″ x 5.5″ piece of Whisper White card stock and then rub the back of the plastic to transfer the image.  This makes a reverse image of the original.

dsc03344.JPG

Stamped the fox using Really Rust ink.

dsc03345.JPG

Added shadowing to the original image using a Really Rust marker.

dsc03346.JPG

Colored over the original image only with a Versamark marker and heat embossed the image using clear embossing powder and a heat gun.

dsc03347.JPG

I wasn’t sure what colors to create my scene with so I pulled out the Color Coach.   The coordinating colors for Really Rust are Mellow Moss and Bashful Blue and the Complimentary color is Night of Navy.  Okay then, these will be the colors I will include in my scene.

dsc03348.JPG

Brayered Bashful Blue ink at the top and bottom of the card stock.

dsc03349.JPG

dsc03350.JPG

Also Brayered Night of Navy at the top and bottom of the card stock, not covering the Bashful Blue ink entirely.

Ripped a post it note and used it mask the bottom of the card stock.  Sponged Mellow Moss ink in to create the grass.

dsc03351.JPG

Sponged a bit of Creamy Caramel ink, not covering the Mellow Moss ink entirely.

dsc03352.JPG

Removed the post it note mask and sponged lightly Mellow Moss and Creamy Caramel ink  on the reflection side.

dsc03353.JPG

Stamped the Flowering Branch stamp using Mellow Moss ink on the reflection side.

dsc03354.JPG

Stamped the same image above the original image of the fox using Always Artichoke ink.

dsc03355.JPG

Colored the flowers in on the Always Artichoke branches with a white gel pen.

dsc03356.JPG

Colored over all the flowers using an Apricot Appeal marker.  The colored marker will stick to the White Jel Pen on the top flowers and they will appear lighter.

dsc03358.JPG

Added White Gel pen dashes in the water.

dsc03360.JPG

Cut a 4.75″ x 6.25″ panel out of Bashful Blue card stock.  Brayered Night of Navy ink at the top and bottom of the card stock and then stamped the flowering branch stamp again on the top and bottom left side using Night of Navy ink.

dsc03361.JPG

Sponged Night of Navy ink on the main image panel and the Bashful Blue panel edges.

dsc03363-a.jpg

Added Mellow Moss panels and Old Olive brads and here is my finished card measuring 5″ x 6.5″.

dsc03367-a.jpg

May your day be filled with the sights of Springs approach.

Until my next post. . . . . .

Hugs,

Michelle

dsc04690.jpg   Get ready for Brayer Workshops!  I am coming to:

Colorado Springs, Colorado (Sold Out)

Boise area of Meridian, Idaho

Riverside, California (Southern California)

Salem, Oregon

Wheaton, Illinois

St. Cloud, Minnesota

Rockville, Maryland (Sold Out)

North Chili, New York (near Rochester) (Sold Out)

New Johnsonville, Tennessee

Kenova (Huntington), West Virginia

Helena, Montana

Middleburg Heights, Ohio

Venice, Florida

Grinnell, Iowa

Piedmont, Alabama (Near GA border close to Cedartown)

Auburn, Washington (near Seattle)

Elk Grove Village, Illinois

Savannah, Georgia

Atlanta, Georgia

North Liberty, Indiana

Saledad, California

Here is a link to my workshop calendar where you can see all of my travel schedule and to get info on beginner and advanced Brayer workshops:   http://zindorf.blogs.splitcoaststampers.com/workshop-calendar 

Link to my Stampin’ Up website where you can order all of your must have Stampin’ Up products from me 24-7:  http://michellezindorf.stampinup.net

Frequently asked questions answers:  http://zindorf.blogs.splitcoaststampers.com/frequently-asked-questions/