Branch Out Blog Candy Winner!

 dsc03331-7.jpg

Good Morning.  

I have a blog candy winner to announce. 

The winner of the Stampin’ Up! Branch Out Stamp set and original card is. . .. .  . .drum-roll please. . . .  . . . . . . . .. .

Tina who wrote “Great set and such a wonderful card. Thanks for all the creativity you share!”

Tina, please e-mail your address to me at mzindorf@aim.com. within the next 30 days and I will get this blog candy out to you.

Thanks to all who played along, hopefully you will win the next time.

I don’t have a tutorial for you today.  I am quite under the weather and need to head to my doc’s office to get doctored up so this illness doesn’t linger.   I will be back as soon as possible.

Huge hugs to you!

Michelle


Blog Candy – Stampin’ Up! Branch Out Stamp Set and a Card

dsc03331-7.jpg

I will be flying out tomorrow morning to teach my Brayer workshops in Colleyville, Texas, Woohoo!  I hope those Texans are ready to get down to do some brayering.  Ready or not, here I come.  🙂

***********************************************************

I didn’t want to leave without putting up some blog candy for you.

This week I have a highly sot after Stampin’ Up! Stamp set for you, Branch Out.  This set is now retired.  I love, love, love this set and have used it in so many card tutorials.

Along with the stamp set I am giving away a card that features one of the Branch Out stamps.  This card is an original card designed and made by me.  Don’t get to excited about that card, lol. 

To enter the Blog Candy contest, please leave a comment at the bottom of this post telling me to enter you.   If you are getting this blog update via e-mail, please click on this link and then leave your comment:   CLICK HERE

Please no e-mail entries.  Thank you.

I will select the winner upon my return on Tuesday, March 30, 2010 using a random number generator. 

Good Luck!

May your weekend be filled with Joy and Laughter.  🙂 

Until my next post. . . . .  . . . .

Huge Hugs,

Michelle

dsc04690.jpg   Get ready for Brayer Workshops!  I am coming to:

Colleyville, Texas (Sold Out)

Colorado Springs, Colorado (Sold Out)

Boise area of Meridian, Idaho

Riverside, California (Southern California)

Salem, Oregon

Wheaton, Illinois

St. Cloud, Minnesota

Rockville, Maryland (Sold Out)

North Chili, New York (near Rochester) (Sold Out)

New Johnsonville, Tennessee

Kenova (Huntington), West Virginia

Helena, Montana

Middleburg Heights, Ohio

Venice, Florida

Grinnell, Iowa

Piedmont, Alabama (Near GA border close to Cedartown)

Auburn, Washington (near Seattle)

Elk Grove Village, Illinois

Savannah, Georgia

Atlanta, Georgia

North Liberty, Indiana

Saledad, California

Here is a link to my workshop calendar where you can see all of my travel schedule and to get info on beginner and advanced Brayer workshops:   http://zindorf.blogs.splitcoaststampers.com/workshop-calendar 

Link to my Stampin’ Up website where you can order all of your must have Stampin’ Up products from me 24-7:  http://michellezindorf.stampinup.net

Frequently asked questions answers:  http://zindorf.blogs.splitcoaststampers.com/frequently-asked-questions/ 


Summer Mini Sneak Peak “Elements of Style” – Tutorial #315

dsc03314.JPG

I received this Stampin’ Up! set “Elements in Style” when I went to the Stampin’ Up! Leadership Conference in Phoenix back in January.  This set will be in the upcoming Stampin’ Up! Summer Mini Catalog that will be out May 1, 2010.  It has taken a lot of will power to hold back this long to use it, lol.  I don’t like to tease you too far in advance.  You will definitely want to put this set on your wish list for summer.   I know, now I am enabling you for the future.  🙂

Let’s get started. . . . . .. .  . .

Supplies:

Stamps: Stampin’ Up! Elements of Style
Paper: Stampin’ Up! Whisper White, Bashful Blue and Old Olive
Ink: Stampin’ Up! Not Quite Navy, Night of Navy, Bashful Blue, Basic Black and Old Olive 
Accessories: Stampin’ Up Brayer, White Gel Pen, Markers – Old Olive, Always Artichoke, Certainly Celery, Blush Blossom and Basic Black, sponges, Stamp-a-ma-jig, Big Shot, Circle Die 

Don’t forget to request your copy of the Stampin’ Up Occasions Mini Catalog and Sale-a-bration Mini Catalog.   Just e-mail me your address and I will be glad to mail you a set for free.  Are you getting inspiration from this blog?   One way you can help support it is to order your Stampin’ Up products through me.   Click HERE to place an order.  Want to become a Stampin’ Up Demonstrator and earn instant income?  Consider being part of my Stampin’ Up Team and start your own business.  Click HERE for more information.

dsc03319.JPG

Started out by using my Big Shot Machine and the Circle Die to cut a circle out of a piece of Whisper White card stock.  This die cuts a 3.75″ circle.

dsc03288.JPG

Brayered Bashful Blue ink  on 3/4 of the circle.

dsc03289.JPG

Brayered Night of Navy ink on the circle, not covering the Bashful Blue ink entirely.

dsc03290.JPG

Loaded the Hummingbird stamp with Old Olive and then patted my Not Quite Navy ink pad on the head and tail of the stamp before stamping it.

dsc03291.JPG

dsc03292.JPG

Using my Stamp-a-ma-jig for placement, stamped the flower stamp using Basic Black ink.

dsc03293.JPG

Colored the darkest parts of the flowers with a Blush Blossom marker.

dsc03294.JPG

Colored the leaves and stems with a Certainly Celery Marker.

dsc03295.JPG

Added Always Artichoke marker to the darkest parts of the leaves.

dsc03296.JPG

Colored the light parts of the flowers in with a White Gel Pen.   Also, added some White Gel pen to the birds throat.

dsc03298.JPG

Added more Blush Blossom marker. 

Note:  The Marker sticks to the White Gel pen that was put on in the last step.

dsc03299.JPG

Adhered the main image panel to a 5″ Old Olive panel.  Stamped the flourish stamp using Old Olive ink.

dsc03300.JPG

When stamping over two layers of card stock be sure to have a matching marker to fill in the gaps that will happen next to the highest layer.

Filled in the gaps using an Old Olive marker.

dsc03301.JPG

Sponged Old Olive ink around the edges of the Old Olive panel.

dsc03302.JPG

Added Not Quite Navy ink with a sponge on the edges of the Old Olive panel, not covering all the Old Olive ink entirely.

dsc03304.JPG

Added a 5 1/8″ Bashful Blue Panel and a 5.5″ Old Olive panel.

Added a shadow to the birds underside and wing using an Old Olive Marker.

dsc03306.JPG

Added More Shadow to the Bird’s underside with a Basic Black marker and highlighted the top of the bird and a few of the leaves with a White Gel Pen.

Added a shadow to a few of the flourishes to bring them forward in the scene using a Basic Black marker.

Colored in the birds eye with a Basic Black marker.

dsc03310.JPG

Here is the finished card measuring 5.5″ square.

dsc03314.JPG

May your day be filled with surprise and wonder.

Until my next post. . . . . . . .

Hugs,

Michelle

 dsc09200-small.jpg  Get ready for Brayer Workshops!  I am coming to:

Colleyville, Texas (Sold Out)

Colorado Springs, Colorado (Sold Out)

Boise area of Meridian, Idaho

Riverside, California (Southern California)

Salem, Oregon

Wheaton, Illinois

St. Cloud, Minnesota

Rockville, Maryland (Sold Out)

North Chili, New York (near Rochester) (Sold Out)

New Johnsonville, Tennessee

Kenova (Huntington), West Virginia

Helena, Montana

Middleburg Heights, Ohio

Venice, Florida

Grinnell, Iowa

Piedmont, Alabama (Near GA border close to Cedartown)

Auburn, Washington (near Seattle)

Elk Grove Village, Illinois

Savannah, Georgia

Atlanta, Georgia

North Liberty, Indiana

Saledad, California

Here is a link to my workshop calendar where you can see all of my travel schedule and to get info on beginner and advanced Brayer workshops:   http://zindorf.blogs.splitcoaststampers.com/workshop-calendar 

Link to my Stampin’ Up website where you can order all of your must have Stampin’ Up products from me 24-7:  http://michellezindorf.stampinup.net

Frequently asked questions answers:  http://zindorf.blogs.splitcoaststampers.com/frequently-asked-questions/ 


Good Neighbors Owl – Tutorial #314

dsc03274_edited-1.jpg

Stampin’ Up’s sale-a-bration period will be ending March 31, 2010 so I wanted to highlight one of the free sets you can get with a $50 order.  The house in this scene is from the Stampin’ Up, Sale-a-bration set “Good Neighbors”.    This is a set that I am keeping my fingers crossed, hoping to see it in a future Stampin’ Up Catalog.  Hello, anyone out there hearing me, lol.

Anyway, I decided to team it up with the owl and tree stamp from the Stampin’ Up set “House of Haunts”.  I’m getting some mileage of out this stamp.  🙂

This tutorial also highlights how to make a window frame for your scene.  Hope you enjoy it.

Let’s get started.. … . . . . .

Supplies:

Stamps: Stampin’ Up! Good Neighbors and House of Haunts
Paper: Stampin’ Up! Whisper White Sahara Sand and Basic Black
Ink: Stampin’ Up! Tempting Turquoise, Basic Black, Sahara Sand, Always Artichoke, Old Olive, Elegant Eggplant, Basic Gray and Orchid Opulence
Accessories: Stampin’ Up sponges, Brayer, Stamp-a-ma-jig, White Gel Pen, Ruler, Sahara Sand, Summer Sun and Basic Black markers, post it note

Don’t forget to request your copy of the new Stampin’ Up Occasions Mini Catalog and Sale-a-bration Mini Catalog.   Just e-mail me your address and I will be glad to mail you a set for free.  Are you getting inspiration from this blog?   One way you can help support it is to order your Stampin’ Up products through me.   Click HERE to place an order.  Want to become a Stampin’ Up Demonstrator and earn instant income?  Consider being part of my Stampin’ Up Team and start your own business.  Click HERE for more information.dsc03283_edited-1.jpg

Brayered Tempting Turquoise ink at the bottom of a 3.5″ square piece of Whisper White card stock.

dsc03243_edited-1.jpg

Brayered Orchid Opulence at the top of the card stock.

dsc03244_edited-1.jpg

Brayered Elegant Eggplant at the top of the card stock, not covering up the Orchid Opulence ink entirely.

dsc03245_edited-1.jpg

Stamped the house using Basic Gray ink.

dsc03246_edited-1.jpg

Using a Stamp-a-ma-jig for placement, stamped the roof using Elegant Eggplant ink.

dsc03247_edited-1.jpg

dsc03248_edited-1.jpg

Sponged Old Olive ink at the bottom of the card stock.

dsc03249_edited-1.jpg

Ripped a post it note and sponged Always Artichoke ink at the post it note edge to create hills.

dsc03250_edited-1.jpg

dsc03251_edited-1.jpg

dsc03252_edited-1.jpg

dsc03253_edited-1.jpg

dsc03254_edited-1.jpg

Colored over the roof, chimneys and windows of the house with a Sahara Sand marker.

dsc03256_edited-1.jpg

Added Basic Black marker to the bottom of the house for bushes and colored the house in with a White Gel pen.

dsc03257_edited-1.jpg

Stamped the Tree/Owl stamp using Basic Black ink.

dsc03260_edited-1.jpg

Added white gel pen highlights to the owl and tree.  Also added a few white gel pen dots in the area below the tree.

dsc03262_edited-1.jpg

Added Summer Sun marker to the windows and the owl’s eyes.

dsc03265_edited-1.jpg

Added two Sahara Sand panels, one Whisper White panel and One Basic Black panel.

Added Sahara Sand Marker to the Sahara Sand panels, using the brush end.  Also added Basic Black marker to the Sahara Sand panels, not covering the Sahara sand marker completely.  This gives you an illusion of a shadow.

dsc03266_edited-1.jpg

Close up.

dsc03267_edited-1.jpg

Grunged up the Window frame by sponging Sahara Sand ink at the top and right sides of the Whisper White Panel.

dsc03269_edited-1.jpg

Sponged Basic Black ink at the top and right sides of the Whisper White panel, not covering the Sahara Sand ink entirely.

dsc03270_edited-1.jpg

Using a ruler, drew lines from the main image panel corners to the corners of the Whisper White panel. 

dsc03271_edited-1.jpg

Here is the finished project measuring 5.5″ square.

dsc03274_edited-1.jpg

May your day be filled with peace and love.

Until my next post. . . . . . . ..

Hugs,

Michelle

 dsc09200-small.jpg  Get ready for Brayer Workshops!  I am coming to:

Colleyville, Texas (Sold Out)

Colorado Springs, Colorado (Sold Out)

Boise area of Meridian, Idaho

Riverside, California (Southern California)

Salem, Oregon

Wheaton, Illinois

St. Cloud, Minnesota

Rockville, Maryland (Sold Out)

North Chili, New York (near Rochester) (Sold Out)

New Johnsonville, Tennessee

Kenova (Huntington), West Virginia

Helena, Montana

Middleburg Heights, Ohio

Venice, Florida

Grinnell, Iowa

Piedmont, Alabama (Near GA border close to Cedartown)

Auburn, Washington (near Seattle)

Elk Grove Village, Illinois

Savannah, Georgia

Atlanta, Georgia

North Liberty, Indiana

Saledad, California

Here is a link to my workshop calendar where you can see all of my travel schedule and to get info on beginner and advanced Brayer workshops:   http://zindorf.blogs.splitcoaststampers.com/workshop-calendar 

Link to my Stampin’ Up website where you can order all of your must have Stampin’ Up products from me 24-7:  http://michellezindorf.stampinup.net

Frequently asked questions answers:  http://zindorf.blogs.splitcoaststampers.com/frequently-asked-questions/ 


My New Office/Stamp Room – Update

Many of you have asked how my new Office/Stamp Room is coming along.  Well it is not completely done but here are a few photos.

My New Room has two work stations for me.  One for office work and one for creative work.  🙂

Please excuse the bare windows, like I said it is still a work in progress, lol.  At least I am starting to be able to find my supplies.  🙂

dsc03285_edited-1.jpg

I have these bookcases on every wall for storage.

dsc03284_edited-1.jpg

I do have my flat screen and X-box 360 in the room.   This is for my breaks, lol.

dsc03286_edited-1.jpg

And of course, my stamps!

dsc03287_edited-1.jpg

I will take a few more photos after I have had some time to actually decorate the space.  So far I love it.

I will be back again today to share a tutorial.

Hugs,

Michelle


I’m Still Here

Hi Everyone, sorry I haven’t been posting much lately.  I have had extremely important stuff to take care of, like this.

dsc03241-2_edited-1.jpg

Russ and I picked our Grand Daughter up on Friday, she lives out of state, and have been having a blast playing with her.  🙂 

dsc03240-2_edited-1.jpg

Here we are at a local Mexican Restaurant, yum!

Anyway, I will be posting some other stuff today, in between playing games and such.

Hugs!

Michelle


Spring Time – Tutorial #313

dsc03231.JPG

We are getting some really great, 60 degree temperatures here in Ohio.  Along with sunny, sunny days.  I know it won’t last but while it is here it is making me want to stamp Spring stuff.  🙂  So today I created another Spring card using the Stampin’ Up! set “Thoughts and Prayers”.  Gotta love this tree.  Of course, I have never met a tree I didn’t like.  I know, TREE HUGGER!

Let’s get started. . . . .  . .

Supplies:

Stamps: Stampin’ Up! Thoughts & Prayers
Paper: Stampin’ Up Whisper White, Basic Black and Rose Red
Ink: Stampin’ Up! Summer Sun, Cameo Coral, Pink Passion, Rose Red and Basic Black
Accessories: Stampin’ Up White Gel Pen, Brayer, Barely Banana Brads, Flower and Word Window Punches, Big Shot Machine and Alphabet Die

Don’t forget to request your copy of the new Stampin’ Up Occasions Mini Catalog and Sale-a-bration Mini Catalog.   Just e-mail me your address and I will be glad to mail you a set for free.  

Are you getting inspiration from this blog?   One way you can help support it is to order your Stampin’ Up products through me.   Click HERE to place an order. 

 Want to become a Stampin’ Up Demonstrator and earn instant income?  Consider being part of my Stampin’ Up Team and start your own business.  Click HERE for more information.

dsc03237.JPG

Brayered Summer Sun at the bottom of a 4″ x 5″ piece of Whisper White card stock.

dsc03213.JPG

Added a 1″ circle punched from the sticky part of a post it note as a mask for the sun.

dsc03214.JPG

Brayered more Summer Sun ink at the bottom of the card stock, just until the sun shape shows up.

dsc03215.JPG

Brayered Cameo Coral ink at the top of the card stock.

dsc03216.JPG

Brayered Pink Passion at the top of the card stock, not covering the Cameo Coral ink entirely.

dsc03217.JPG

Stamped the tree from the Stampin’ Up set Thoughts and Prayers using Basic Black ink.

dsc03218.JPG

Turned the card stock upside down and dragged the Basic Black ink pad from the bottom of the card stock up toward the tree base.  This creates a grassy/rocky type ground area.

dsc03219.JPG

dsc03221.JPG

Using my Big Shot Machine and the alphabet die, die cut the letters Spring, using Summer Sun card stock.

dsc03222.JPG

Sponged Cameo Coral at the bottom of each letter.

dsc03223.JPG

Lined a post it note up so it would be straight across the card stock where I wanted the lettering to be.  This was easy using the Stampin’ Up Grid pad underneath the panel.  Glued my lettering in place using the post it note as a guide to keep my letter straight.

dsc03224.JPG

Sponged Rose Red ink at the top and sides of the panel.

dsc03225.JPG

Added White Gel pen highlights to the tree and the grasses.

dsc03226.JPG

Punched two word window punches from Basic Black card stock and cut the very end of them off.

dsc03227.JPG

Punched some flowers from cameo coral card stock.

dsc03228.JPG

Added Basic Black and Rose Red panels.  Also added the punches and Barely Banana brads.

dsc03229.JPG

Here is the finished card measuring 5.5″ square.

dsc03231.JPG

I hope you are seeing mild tempatures and sunshine in your area also.

Until my next post. . . . . . . .

Hugs,

Michelle

dsc09200-small.jpg  Get ready for Brayer Workshops!  I am coming to:

Colleyville, Texas (Sold Out)

Colorado Springs, Colorado (Sold Out)

Boise area of Meridian, Idaho

Riverside, California (Southern California)

Salem, Oregon

Wheaton, Illinois

St. Cloud, Minnesota

Rockville, Maryland (Sold Out)

North Chili, New York (near Rochester) (Sold Out)

New Johnsonville, Tennessee

Kenova (Huntington), West Virginia

Helena, Montana

Middleburg Heights, Ohio

Venice, Florida

Grinnell, Iowa

Piedmont, Alabama (Near GA border close to Cedartown)

Auburn, Washington (near Seattle)

Elk Grove Village, Illinois

Savannah, Georgia

Atlanta, Georgia

North Liberty, Indiana

Saledad, California

Here is a link to my workshop calendar where you can see all of my travel schedule and to get info on beginner and advanced Brayer workshops:   http://zindorf.blogs.splitcoaststampers.com/workshop-calendar 

Link to my Stampin’ Up website where you can order all of your must have Stampin’ Up products from me 24-7:  http://michellezindorf.stampinup.net

Frequently asked questions answers:  http://zindorf.blogs.splitcoaststampers.com/frequently-asked-questions/ 


Out on a limb – Tutorial #312

dsc03207.JPG

I thought a Spring type reflection card would be nice to create today.  I am so very ready for Spring.  🙂

It took me a while to put this together since I have my supplies all over the place.  I am in the process of moving it all to the new room and organizing it along the way.  So without further ado, let’s get started.

Supplies:

Stamps: Stampin’ Up Bird on a Branch
Paper: Stampin’ Up Whisper White, Pretty in Pink and Brilliant Blue
Ink: Stampin’ Up, Basic Black, Sahara Sand, Regal Rose, Pink Passion, Tempting Turquoise and Brilliant Blue
Accessories: Stamp-a-ma-jig, White Ribbon, Pink Crystal Brads, Ticket Corner Punch, Mat Pack and Piercing Tool, Brayer, White Gel Pen, Basic Black Marker, Certainly Celery marker, Old Olive Marker

Don’t forget to request your copy of the new Stampin’ Up Occasions Mini Catalog and Sale-a-bration Mini Catalog.   Just e-mail me your address and I will be glad to mail you a set for free.  

Are you getting inspiration from this blog?   One way you can help support it is to order your Stampin’ Up products through me.   Click HERE to place an order. 

 Want to become a Stampin’ Up Demonstrator and earn instant income?  Consider being part of my Stampin’ Up Team and start your own business.  Click HERE for more information.

dsc03212.JPG

Brayered Tempting Turquoise ink at the top of a 3.5″ x 5″ piece of Whisper White card stock.

dsc03179.JPG

Brayered Brilliant Blue ink at the top of the card stock, not covering the Tempting Turquoise ink entirely.

dsc03181.JPG

Stamped the flower stamp using Regal Rose ink on the plastic piece of my Stamp-a-ma-jig and then flipped it over onto the card stock and rubbed the back of the plastic to transfer the image.  This produces a reverse image.

dsc03183.JPG

Stamped the branch stamp using Sahara Sand ink on the plastic piece of my Stamp-a-ma-jig and then flipped it over onto the card stock and rubbed the back of the plastic to transfer the image.  This produces a reverse image of the branch.

dsc03184.JPG

Stamped the branch using Basic Black ink in the sky area matching it up with the reflection image.

Note:  it is easier to match up your original image with the reflection image than it is to match up the reflection image with the original image.

dsc03185.JPG

Using my Stamp-a-ma-jig for placement, stamped the flowers on the Basic Black branch using Pink Passion ink.

dsc03187.JPG

dsc03188.JPG

Colored in the Pink Passion flowers using a white gel pen.

dsc03190.JPG

Used a Basic Black marker to connect the branches to some of the flowers so they made more sense in the scene.

dsc03191.JPG

Stamped a reverse image of the bird by stamping the image with Sahara Sand ink on the plastic piece of my Stamp-a-ma-jig and then flipped it over onto the card stock and rubbed the back of the plastic to transfer the image. 

dsc03192.JPG

Stamped the Bird on the top branch using Basic Black ink.

dsc03193.JPG

Holding my Old Olive marker sideways, touched the brush end of it down to create little leaves on the top branch.

dsc03194.JPG

Holding a Certainly Celery marker sideways, touched the brush end of the marker down to create leaves on the reflection branch.

dsc03195.JPG

Using my Stamp-a-ma-jig for placement, stamped the Sentiment using Brilliant Blue ink.

dsc03196.JPG

Sponged Brilliant Blue ink around the edge of the card stock.

dsc03197.JPG

Added White gel pen and Tempting Turquoise marker water lines.

dsc03198.JPG

dsc03199.JPG

Used a Ticket Corner Punch on the panels.

dsc03201.JPG

Added a white ribbon.

dsc03202.JPG

Added Pink crystal brads to the ribbon using a piercing tool to start the brads.

dsc03203.JPG

Pierced holes using the mat pack and piercing tool.

dsc03206.JPG

Here is the finished card measuring 5″ x 6.5″.

dsc03207.JPG

I hope this tutorial has inspired you to try a reflection card today.

May your day be warm and cheerful.

Until my next post. . . .  . . . . . .

dsc09200-small.jpg  Get ready for Brayer Workshops!  I am coming to:

Colleyville, Texas (Sold Out)

Colorado Springs, Colorado (Sold Out)

Boise area of Meridian, Idaho

Riverside, California (Southern California)

Salem, Oregon

Wheaton, Illinois

St. Cloud, Minnesota

Rockville, Maryland (Sold Out)

North Chili, New York (near Rochester) (Sold Out)

New Johnsonville, Tennessee

Kenova (Huntington), West Virginia

Helena, Montana

Middleburg Heights, Ohio

Venice, Florida

Grinnell, Iowa

Piedmont, Alabama (Near GA border close to Cedartown)

Auburn, Washington (near Seattle)

Elk Grove Village, Illinois

Savannah, Georgia

Atlanta, Georgia

North Liberty, Indiana

Saledad, California

Here is a link to my workshop calendar where you can see all of my travel schedule and to get info on beginner and advanced Brayer workshops:   http://zindorf.blogs.splitcoaststampers.com/workshop-calendar 

Link to my Stampin’ Up website where you can order all of your must have Stampin’ Up products from me 24-7:  http://michellezindorf.stampinup.net

Frequently asked questions answers:  http://zindorf.blogs.splitcoaststampers.com/frequently-asked-questions/ 


Office/Stamp Room Remodel and a Blog Candy Winner

dsc03167.JPG

After much prodding, lol.  Russ has finished his part in the remodeling of my new office/stamp room.  He has put a few coats of a light blue paint on the walls, painted the ceiling white and put in a brand new Pergo floor.  It looks terrific, but now I must do my part, lol. 

I have decided not to put in cabinetry, but instead went out and purchased around $2,000 worth of IKEA furniture.   I said to myself after looking at this huge stack of boxed, un-assembled furniture “WHAT WAS I THINKING!”  I purchased a really long “S” shaped desk, 3 super large bookcases and one small one.  All un-assembled!  Did I say that already, lol. 

Anyway, I will be very, crazy busy assembling and moving things into the newly redecorated room, along with packing for my trip to Virginia and North Carolina, which I leave for on Thursday.  Unfortunately, this will leave no time for stamping.  I can’t find my supplies right now anyway, grin.  I just wanted you to know I am taking a break from blogging this week.  Please, please check out the previous 311 tutorials until I am back up and running.  I will keep you posted on how things are coming along in my new room.  Wish me strength and wisdom so I know just where to put everything the first time around.

Before I close, let me announce the winner of the Stampin’ Up! set House of Haunts.  The winner is. . . . . .  . .drum-roll please. . . . . . . . . .  . . . . . .

dsc03166.JPG

Comment #169       Melody who wrote “Another fabulous card! And I just love this set and never got it. That owl in the tree looks just like one in our yard a couple years ago in the fall. Oh, please pick me!!
Your creative process amazes me. I really hope to be able to get in on one of your classes somewhere sometime — I missed out on the Phoenix one, already full when I heard about it.”

Melody, Congratulations on winning the stamp set.  Please e-mail your address to mzindorf@aim.com within 30 days and I will ship this set out to you.

Thank you to all who played along.  Maybe it will be you next week!

Well I best get to assembling and moving. 

Until my next post. . . . . . . .

May your week be one of miracles.

Huge Hugs,

Michelle

dsc09200-small.jpg  Get ready for Brayer Workshops!  I am coming to:

Mechanicsville, Virginia (Sold Out)

Raleigh, North Carolina (Sold Out)

Colleyville, Texas (Sold Out)

Colorado Springs, Colorado (One spot available)

Boise area of Meridian, Idaho

Riverside, California (Southern California)

Salem, Oregon

Wheaton, Illinois

St. Cloud, Minnesota

Rockville, Maryland (Sold Out)

North Chili, New York (near Rochester) (Sold Out)

New Johnsonville, Tennessee

Kenova (Huntington), West Virginia

Helena, Montana

Middleburg Heights, Ohio

Venice, Florida

Grinnell, Iowa

Piedmont, Alabama (Near GA border close to Cedartown)

Auburn, Washington (near Seattle)

Elk Grove Village, Illinois

Savannah, Georgia

Atlanta, Georgia

North Liberty, Indiana

Saledad, California

Here is a link to my workshop calendar where you can see all of my travel schedule and to get info on beginner and advanced Brayer workshops:   http://zindorf.blogs.splitcoaststampers.com/workshop-calendar 

Link to my Stampin’ Up website where you can order all of your must have Stampin’ Up products from me 24-7:  http://michellezindorf.stampinup.net

Frequently asked questions answers:  http://zindorf.blogs.splitcoaststampers.com/frequently-asked-questions/ 


On Top of the World – Tutorial #311 and Blog Candy!

dsc03161.JPG

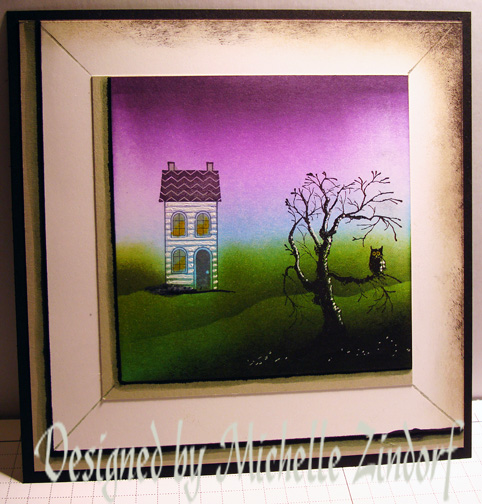
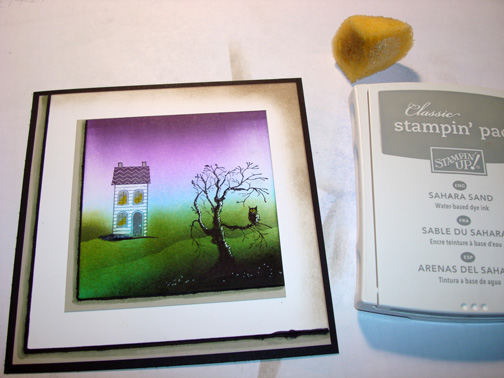
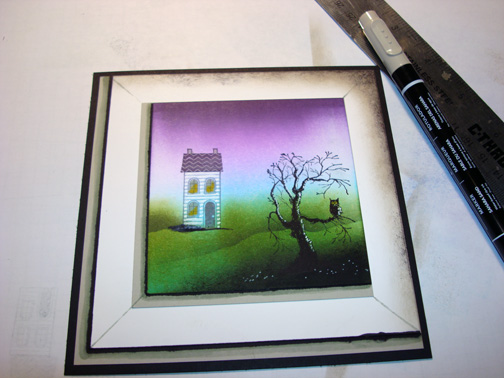
Some may think I am a bit strange, but one of my favorite sets is the Stampin’ Up! set House of Haunts.  It is just because of this stamp with the tree that has the owl in it.   The rest of the set is wonderful too.  In fact, that haunted house looks a little like the old Victorian house I use to own, lol.  But that little owl, he  just speaks to me.   Yeah, I know, Michelle is hearing voices again, lol.   I think I love it so much because it can be used out of season.

I thought one of you may want to have this set too, so I am offering it for Blog candy this week.

dsc03166.JPG

If you would like to enter to try to win this House of Haunts stamp set, please leave a comment on this blog post telling me to enter you.  If you are getting this blog update via e-mail you will need to click HERE and then leave a comment on the blog post. I will select the winner via random number generator on Monday, March 8, 2010.

Good Luck!

Now let’s get started on the tutorial. . . . . .
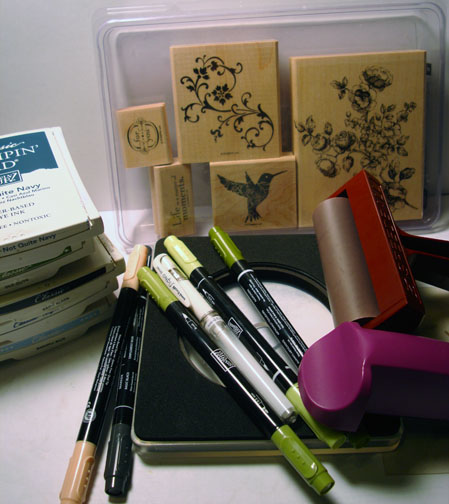
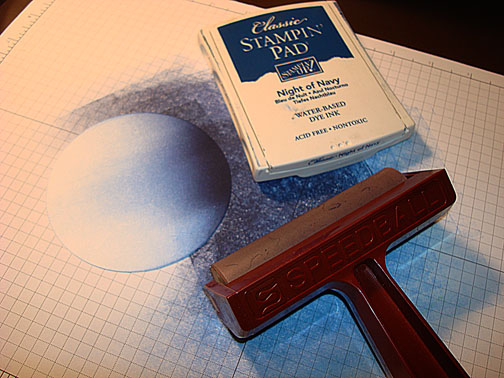
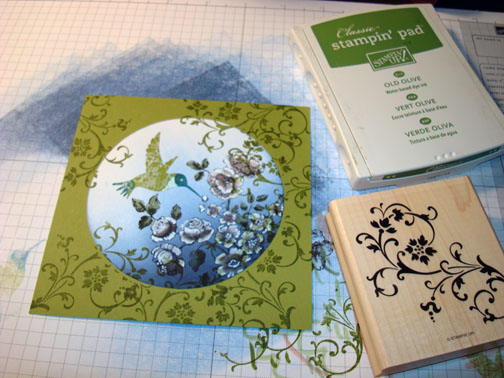
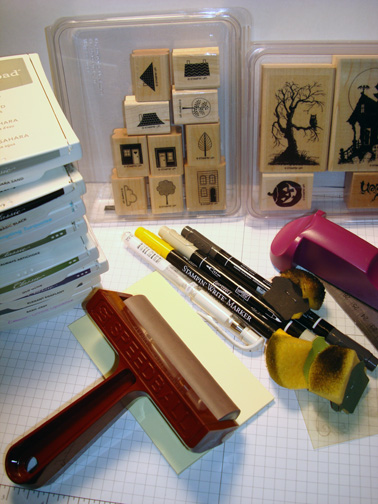
Supplies:

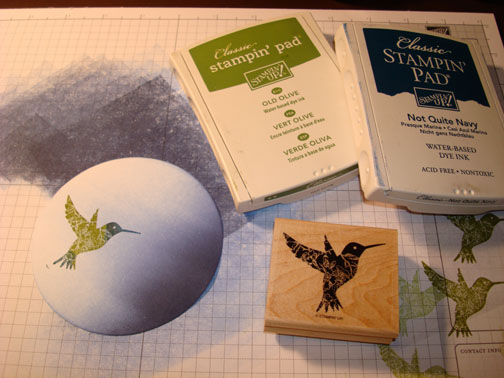
Stamps: Stampin’ Up House of Haunts and Season of Joy
Paper: Stampin’ Up Whisper White and Always Artichoke
Ink: Stampin’ Up Bravo Burgundy, Basic Black, Craft White, Really Rust and Summer Sun
Accessories: Stampin’ Up Shimmer Paint Frost White, Brayer, Sponges, 1 3/4″ circle punch, white gel pen and post it notes

Don’t forget to request your copy of the new Stampin’ Up Occasions Mini Catalog and Sale-a-bration Mini Catalog.   Just e-mail me your address and I will be glad to mail you a set for free.  

Are you getting inspiration from this blog?   One way you can help support it is to order your Stampin’ Up products through me.   Click HERE to place an order. 

 Want to become a Stampin’ Up Demonstrator and earn instant income?  Consider being part of my Stampin’ Up Team and start your own business.  Click HERE for more information.

dsc03162.JPG

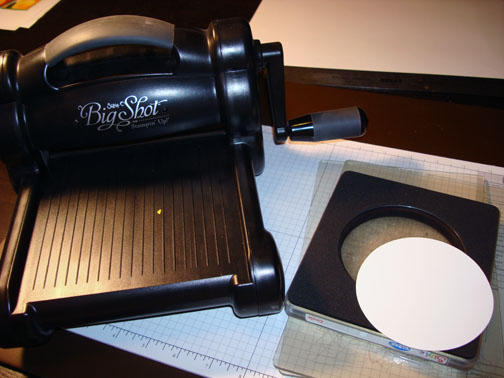
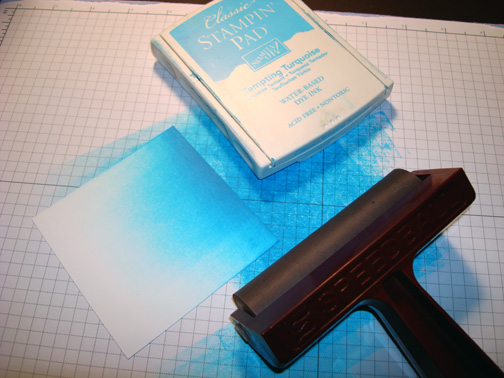
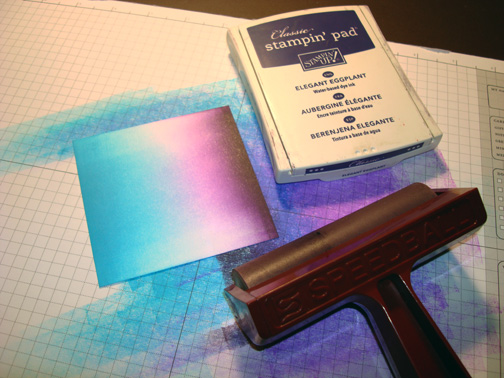
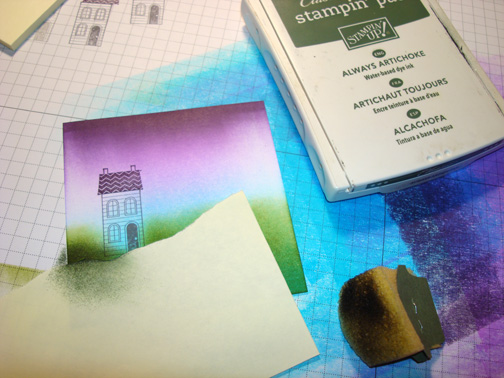
Punched a 1 3/4″ circle from a post it note and used it as a mask for the sun.  I stick it to a 3.5″ x 7″ piece of Whisper White card stock.

dsc03136.JPG

Brayered Summer Sun ink at the top of the card stock.

dsc03137.JPG

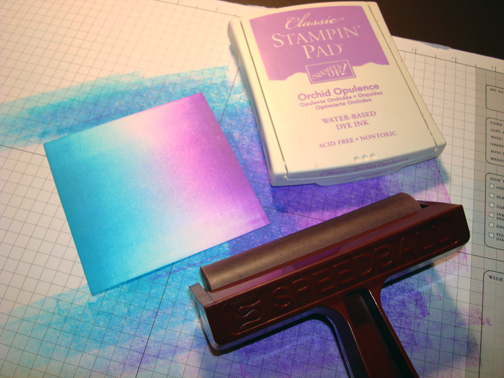
Brayered Really Rust ink at the bottom and at the top of the card stock.

dsc03138.JPG

Brayered Bravo Burgundy ink at the top and bottom of the card stock.

dsc03139.JPG

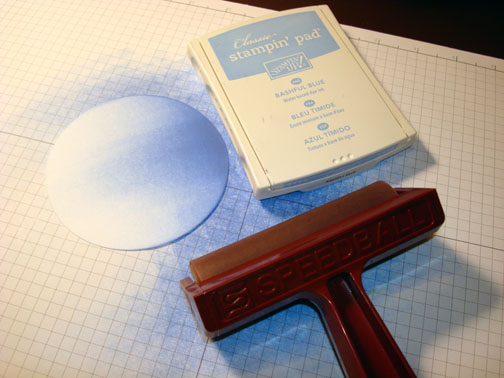
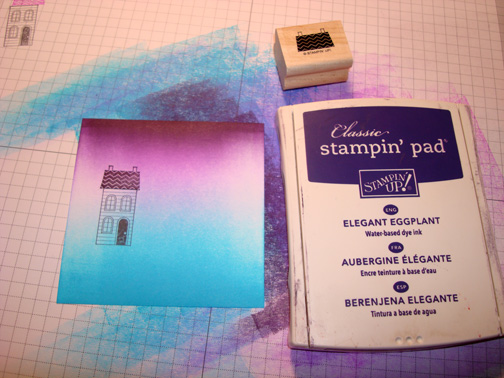
Removed the post it note sun mask and sponged Summer Sun ink in the middle of the sun.

dsc03140.JPG

Sponged just a bit of Really Rust ink in the sun, leaving the middle light.

dsc03141.JPG

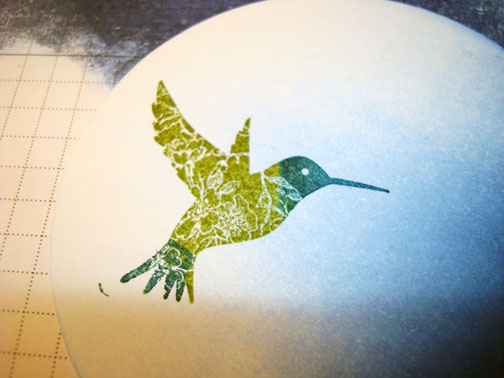
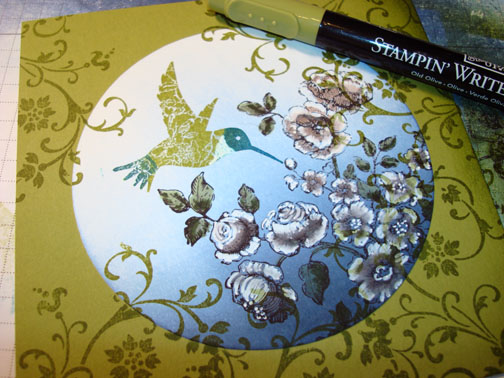
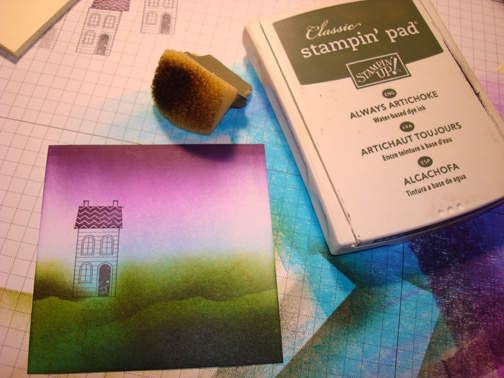
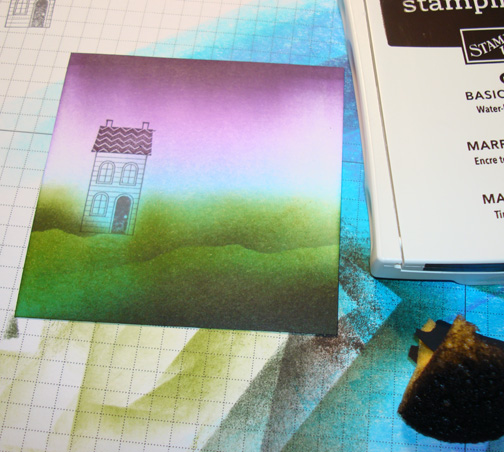
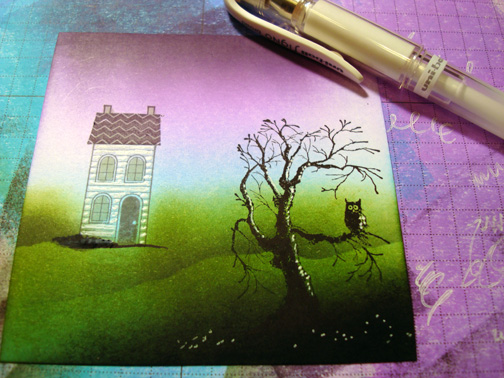
Stamped the tree/Owl stamp using Basic Black ink.

dsc03142.JPG

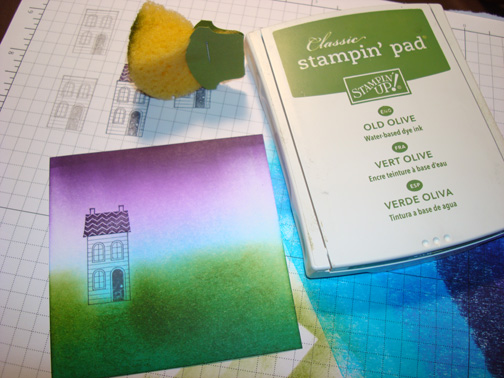
Ripped a couple of post it notes and used them as a mask so I could create the cliff.

dsc03143.JPG

Sponged Basic Black ink in between the post it notes to make the cliff.

dsc03144.JPG

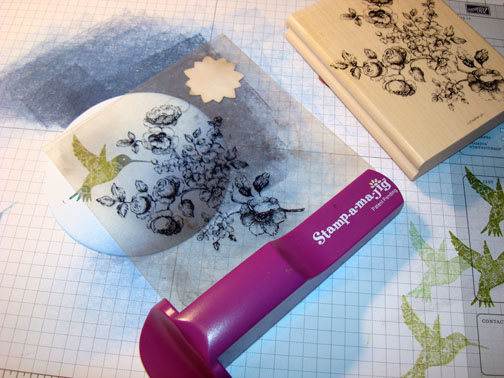
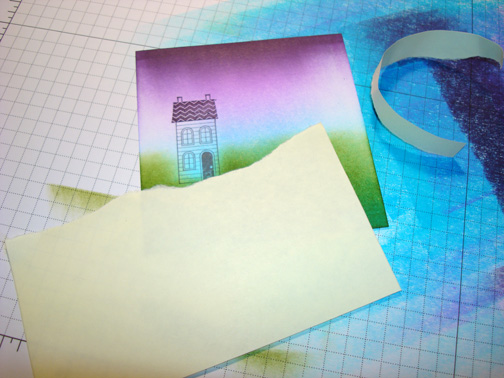
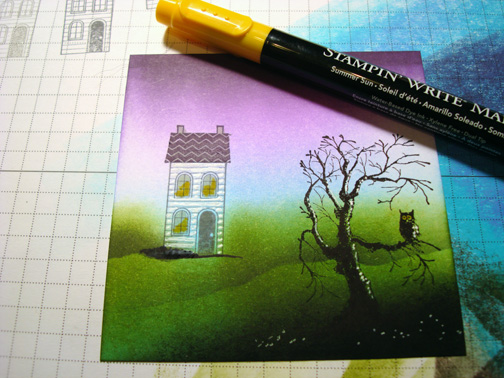
Stamped the flourish stamp from the Stampin’ Up set Season of Joy using White Craft ink.

dsc03145.JPG

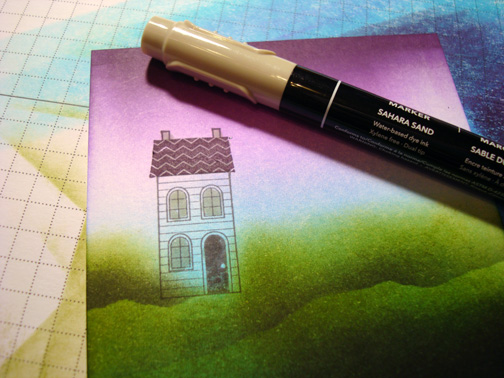
Added highlights to the tree, Owl, grasses and some dots around the sun using a White Gel Pen.

dsc03148.JPG

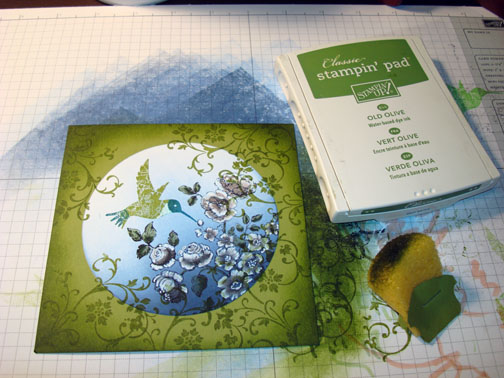
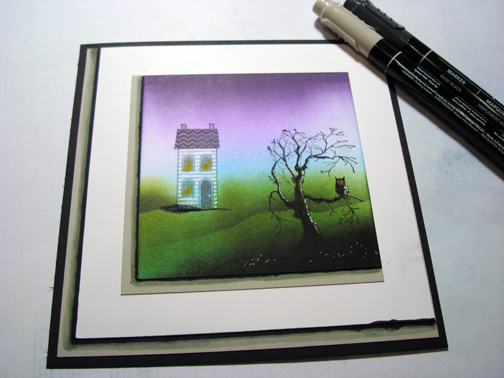
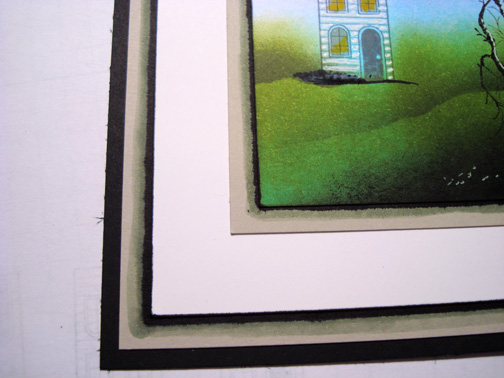
Added a Whisper White and Always Artichoke panels and then stamp some more Flourishes with White Craft ink at the bottom of the Always Artichoke panel.

dsc03149.JPG

High lighted some of  of the flourishes so they would pop using a white gel pen.

dsc03150.JPG

Pounced a bit of the Frost White Shimmer Paint at the bottom of the card stock.  These photos do not due the shimmer paint justice.  It is really very pretty in real life.

dsc03151.JPG

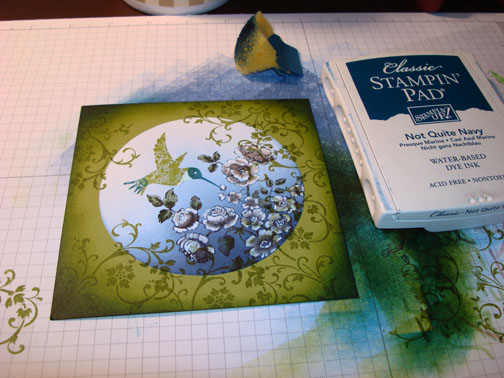
Sponged Basic Black ink at the bottom of the card stock.

dsc03152.JPG

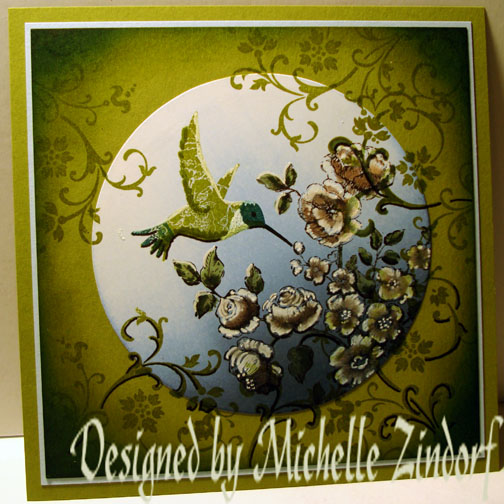
Here is the finished card measuring 4″ x 9″.  This will fit in a #10 size office envelope.

dsc03161.JPG

I hope this tutorial has inspired you to take a different look at your holiday stamps today.

Until my next post. . . . . . . .

Hugs,

Michelle

dsc09200-small.jpg  Get ready for Brayer Workshops!  I am coming to:

Mechanicsville, Virginia (Sold Out)

Raleigh, North Carolina (Sold Out)

Colleyville, Texas (Sold Out)

Colorado Springs, Colorado (Sold Out)

Boise area of Meridian, Idaho

Riverside, California (Southern California)

Salem, Oregon

Wheaton, Illinois

St. Cloud, Minnesota

Rockville, Maryland (Sold Out)

North Chili, New York (near Rochester) (Sold Out)

New Johnsonville, Tennessee

Kenova (Huntington), West Virginia

Helena, Montana

Middleburg Heights, Ohio

Venice, Florida

Grinnell, Iowa

Piedmont, Alabama (Near GA border close to Cedartown)

Auburn, Washington (near Seattle)

Elk Grove Village, Illinois

Savannah, Georgia

Atlanta, Georgia

North Liberty, Indiana

Saledad, California

Here is a link to my workshop calendar where you can see all of my travel schedule and to get info on beginner and advanced Brayer workshops:   http://zindorf.blogs.splitcoaststampers.com/workshop-calendar 

Link to my Stampin’ Up website where you can order all of your must have Stampin’ Up products from me 24-7:  http://michellezindorf.stampinup.net

Frequently asked questions answers:  http://zindorf.blogs.splitcoaststampers.com/frequently-asked-questions/