
Hi from Monroe, Louisiana. I had a great time today teaching and attending the Mardi Gras Parade. I have a great number of beads to show for it. Wish you all were with me!


Hugs!
Michelle
Hi from Monroe, Louisiana. I had a great time today teaching and attending the Mardi Gras Parade. I have a great number of beads to show for it. Wish you all were with me!
Hugs!
Michelle

Hi All, I am hitting the road bright and early tomorrow morning (Friday). Heading down South to wonderful Monroe, Louisiana to teach some awesome stampers how to brayer spectacular scenes. I just cannot tell you how excited I am. Besides getting to meet some terrific ladies at my workshops, I am hoping to be able to attend the Mardi Gras Parade and also see the Super Bowl on TV of course, which the New Orleans Saints are in. Since my beloved Cincinnati Bengals are not in the Super Bowl, I have to say, Go Saints! I have a feeling Louisiana will be rocking this weekend, lol.
Even though I am excited to go teach in Louisiana, I did not want to forget the rest of my readers. So I have a special blog candy for you this week. This is one of my all time favorite Stampin’ Up! stamps sets, Baroque Motifs.

All you need to do to enter to win is leave a comment on this blog post tell me to enter you. If you are getting this blog update via e-mail you will need to click this link and leave a comment at the bottom of the page: http://zindorf.blogs.splitcoaststampers.com/2010/02/04/baroque-motifs-blog-candy/
Please no e-mail entries. 🙂
I will pick the winner via random number generator when I return on Tuesday, February 9, 2010.
Remember, you cannot win unless you enter… . . .
Good Luck to all and have a superb weekend!
Until my next post. . . . . . . .
 Get ready for Brayer Workshops! I am coming to:
Jacksonville, Florida
St. Louis, Missouri
Mechanicsville, Virginia
Raleigh, North Carolina
Colleyville, Texas
Colorado Springs, Colorado
Boise area of Meridian, Idaho
Riverside, California (Southern California)
Salem, Oregon
Wheaton, Illinois
St. Cloud, Minnesota
Rockville, Maryland
North Chili, New York (near Rochester)
New Johnsonville, Tennessee
Kenova (Huntington), West Virginia
Helena, Montana
Middleburg Heights, Ohio
Venice, Florida
Grinnell, Iowa
Piedmont, Alabama (Near GA border close to Cedartown)
Auburn, Washington (near Seattle)
Elk Grove Village, Illinois
Savannah, Georgia
Atlanta, Georgia
North Liberty, Indiana
Saledad, California
Here is a link to my workshop calendar where you can see all of my travel schedule and to get info on beginner and advanced Brayer workshops: http://zindorf.blogs.splitcoaststampers.com/workshop-calendar
Link to my Stampin’ Up website where you can order all of your must have Stampin’ Up products from me 24-7: http://michellezindorf.stampinup.net
Frequently asked questions answers: http://zindorf.blogs.splitcoaststampers.com/frequently-asked-questions/

How about this little Funky number? You are either going to love it or hate it. I actually love it. 🙂 But I find the pieces that I really, really love, nobody else does, lol.
On a personal note, thank you to all of you that gave me advice regarding my dog Lucas and his anxiety attacks. I read every comment and e-mail and so appreciate that you took the time to help me out. Lucas thanks you too. 🙂
Now on with this Bright Funky Tutorial. . . . . .
Supplies:
| Stamps: Stampin’ Up! Vitage Vogue, Thoughts & Prayers, Boho Backgrounds |
| Paper: Stampin’ Up! Brilliant Blue, Whisper White and Apricot Appeal |
| Ink: Stampin’ Up! Basic Black, Elegant Eggplant, Tempting Turquoise, Summer Sun, Pumpkin Pie, Sahara Sand, Metallic Gold and Brilliant Blue |
| Accessories: Stampin’ Up! Pumpkin Pie and Summer Sun Markers, Sponges, Circle #2 Die and Big Shot Machine, Stamp-a-ma-jig, Post it notes, Clear embossing Powder, Heat Gun, Ruler, Gold Metallic Marker |
Don’t forget to request your copy of the new Stampin’ Up Occasions mini catalog and Sale-a-bration mini. Just e-mail me your address and I will be glad to send you a set for free.
The new Occasions mini catalog can also be viewed on-line here: http://204.228.150.61/catalogs/20091231/OccasionsMini10_US.pdf
The New Sale-a-Bration Mini Catalog can also be viewed on-line here:http://204.228.150.61/catalogs/20091231/SAB_10_US.pdf
Are you getting inspired and enjoying this blog. One way you can help support it is to order your Stampin’ Up products through me. You can order from me 24-7 from this link: http://michellezindorf.stampinup.net or e-mail me at mzindorf@aim.com.
Want to become a Stampin’ Up Demonstrator and earn instant income? Consider being part of my Stampin’ Up Team and start your own business.

Cut a 3″ square of Whisper White card stock on the diagonal to get two triangles.

Using a Stamp-a-ma-jig for placement, stamped the Tree from the Thoughts & Prayers Set using Metallic Gold ink.

Heat embossed the image using clear embossing powder and a heat gun.

Using the left over triangle, masked the middle of the triangle with the tree on it.

Sponged Sahara Sand ink on the edges holding the triangle mask in place.

Removed the mask and used two post it notes to mask the Sahara Sand ink I just put on the edges. Sponged Tempting Turquoise ink in the unmasked area.

Sponged Brilliant Blue ink at the top of the unmasked area.

Removed the masks and wiped the ink off of the embossed image with a cotton rage.

Used the Circles #2 Die Cut and my Big Shot Machine to cut the largest circle out of Apricot Appeal card stock.

Using the Stamp-a-ma-jig for placement, stamped the medallion from the Boho Backgrounds stamp set in the middle of the circle using Pumpkin Pie ink.

Sponged Pumpkin Pie ink on the edges.

Sponged Summer Sun ink in the middle of the circle to brighten things up.

Using a Ruler drew a line from the points on the medallion to the edge using a Pumpkin Pie marker.

Sponged a bit of Elegant Eggplant ink on.

Sponged Tempting Turquoise ink on a 5″ square piece of Whisper White card stock.

Adhered the circle and triangle to the panel and sponged Elegant Eggplant ink around the outside of the panel, not covering all of the Tempting Turquoise ink. I awanted the middle images to have a glowing effect.

Sponged Basic Black ink around the outside edges.

Stamped The Flower Flourish from the Stampin’ Up! Vintage Vogue set (love this image) using metallic Gold ink.

Using a Metallic Gold Paint Marker, edged the panel.

Added a Brilliant Blue Panel and here is the finished card measuring 5.5″ Square.
May your day be extremely bright and cheerful. 🙂
Until my next post. . . . . . . . . . . . ..
Hugs,
Michelle
Get ready for Brayer Workshops! I am coming to:
Monroe, Louisiana (just a couple of seats left)
Jacksonville, Florida
St. Louis, Missouri
Mechanicsville, Virginia
Raleigh, North Carolina
Colleyville, Texas
Colorado Springs, Colorado
Boise area of Meridian, Idaho
Riverside, California (Southern California)
Salem, Oregon
Wheaton, Illinois
St. Cloud, Minnesota
Rockville, Maryland
North Chili, New York (near Rochester)
New Johnsonville, Tennessee
Kenova (Huntington), West Virginia
Helena, Montana
Middleburg Heights, Ohio
Venice, Florida
Grinnell, Iowa
Piedmont, Alabama (Near GA border close to Cedartown)
Auburn, Washington (near Seattle)
Elk Grove Village, Illinois
Savannah, Georgia
Atlanta, Georgia
North Liberty, Indiana
Saledad, California
Here is a link to my workshop calendar where you can see all of my travel schedule and to get info on beginner and advanced Brayer workshops: http://zindorf.blogs.splitcoaststampers.com/workshop-calendar
Link to my Stampin’ Up website where you can order all of your must have Stampin’ Up products from me 24-7: http://michellezindorf.stampinup.net
Frequently asked questions answers: http://zindorf.blogs.splitcoaststampers.com/frequently-asked-questions/

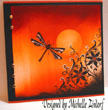
I love to work with Silhouette stamps and this Stampin’ Up! set, Dream Gardens, item number 114395 is beautiful and fun to work with.
Today’s tutorial gives a little lesson on putting mountains in a scene.
 First I have a question, I know there are a lot of dog lovers out there. Anyone know what I can do to relieve my poor big baby, Lucas of anxiety attacks? This tends to happen when I leave town and then he starts to tear up rugs. My husband stays home with him, but he apparently misses me. I’m not a fan of drugs. Any suggestions? Just thought I would ask.
Now let’s get started on that tutorial. . . .
Supplies:
| Stamps: Stampin’ Up! Dream Gardens |
| Paper: Stampin’ Up! Whisper White, Apricot Appeal, Not Quite Navy, Going Gray and Basic Black |
| Ink: Stampin’ Up! Going Gray, Basic Black, Not Quite Navy, Pumpkin Pie and Apricot Appeal |
| Accessories: Stampin’ Up! Distress Texture Plate, Not Quite Navy Brads, Apricot Appeal Ribbon, Scallop Edge Punch, Big Shot Machine, Sponges, Brayer |
Don’t forget to request your copy of the new Stampin’ Up Occasions mini catalog and Sale-a-bration mini. Just e-mail me your address and I will be glad to send you a set for free.
The new Occasions mini catalog can also be viewed on-line here: http://204.228.150.61/catalogs/20091231/OccasionsMini10_US.pdf
The New Sale-a-Bration Mini Catalog can also be viewed on-line here:http://204.228.150.61/catalogs/20091231/SAB_10_US.pdf
Are you getting inspired and enjoying this blog. One way you can help support it is to order your Stampin’ Up products through me. You can order from me 24-7 from this link: http://michellezindorf.stampinup.net or e-mail me at mzindorf@aim.com.
Want to become a Stampin’ Up Demonstrator and earn instant income? Consider being part of my Stampin’ Up Team and start your own business.

Brayed Going Gray ink at the top of a 4.5″ square piece of Whisper White card stock.

Brayered Not Quite Navy ink at the top of the card stock, not covering the Going Bray ink entirely.

Brayered Apricot Appeal ink at the bottom of the card stock.

Brayered Pumpkin Pie ink at the bottom of the card stock, not covering the Apricot Appeal ink entirely.

Ripped a mountain shape in a post it note and sponged Pumpkin Pie ink at the post it note edge to create the mountain.


Sponged a bit of Not Quite Navy, right at the point of the mountain.

Removed the post it note and stamped the Stamp from the Dream Gardens set using Basic Black ink.

Decided to put another mountain in the scene. Repeated the steps above.


Stamped the sentiment “Dream” using Basic Black ink.

Sponged Basic Black ink around the edges and at the bottom of the card stock.

Smeared Going Gray ink on “Distressed” texture plate and ran a Going Gray Card stock panel through the Big Shot machine with it. This creates a colored texture. Be sure to clean up your texture plate after doing this. 🙂


Used the Scallop Edge punch on the main image panel.
Assembled the card and added Apricot Appeal Ribbon and Not Quite Navy Brads.

Here is the finished card measuring 5″ x 6.5″.
Hope your Monday runs smooth as silk.
Until my next post. . . . . . . . . . . . ..
Hugs,
Michelle
Get ready for Brayer Workshops! I am coming to:
Monroe, Louisiana (just a couple of seats left)
Jacksonville, Florida
St. Louis, Missouri
Mechanicsville, Virginia
Raleigh, North Carolina
Colleyville, Texas
Colorado Springs, Colorado
Boise area of Meridian, Idaho
Riverside, California (Southern California)
Salem, Oregon
Wheaton, Illinois
St. Cloud, Minnesota
Rockville, Maryland
North Chili, New York (near Rochester)
New Johnsonville, Tennessee
Kenova (Huntington), West Virginia
Helena, Montana
Middleburg Heights, Ohio
Venice, Florida
Grinnell, Iowa
Piedmont, Alabama (Near GA border close to Cedartown)
Auburn, Washington (near Seattle)
Elk Grove Village, Illinois
Savannah, Georgia
Atlanta, Georgia
North Liberty, Indiana
Saledad, California
Here is a link to my workshop calendar where you can see all of my travel schedule and to get info on beginner and advanced Brayer workshops: http://zindorf.blogs.splitcoaststampers.com/workshop-calendar
Link to my Stampin’ Up website where you can order all of your must have Stampin’ Up products from me 24-7: http://michellezindorf.stampinup.net
Frequently asked questions answers: http://zindorf.blogs.splitcoaststampers.com/frequently-asked-questions/
Hello there, so sorry I’m late picking the winner for of the Chocolate Bunny Stamp. Shesh, I decide to take the weekend off completely, but forgot I was suppose to give this stamp away. This stamp is so darn cute, I guess I just wanted to keep if for a few more days, lol.

And the winner is. . . . . . . . . . . . ..
Gabriele, who wrote “300 tutorials – wow – and I love them all. I often do not comment on blogs, but your note really made me think. I just assumed you knew how much we love your work since you keep posting. I can see though that sometimes you must wonder about that if not many people comment. I will do a better job with that from now on. Thanks for all your great tutorials. You have been an inspiration.”
Congratulations! Gabriele, please e-mail your shipping address to: mzindorf@aim.com within the next 30 days to claim your Chocolate Bunny Stamp.
Thanks everyone for your very kind comments and for playing along with the give away.
Huge Hugs,
Michelle Zindorf
Get ready for Brayer Workshops! I am coming to:
Monroe, Louisiana (just a couple of seats left)
Jacksonville, Florida
St. Louis, Missouri
Mechanicsville, Virginia
Raleigh, North Carolina
Colleyville, Texas
Colorado Springs, Colorado
Boise area of Meridian, Idaho
Riverside, California (Southern California)
Salem, Oregon
Wheaton, Illinois
St. Cloud, Minnesota
Rockville, Maryland
North Chili, New York (near Rochester)
New Johnsonville, Tennessee
Kenova (Huntington), West Virginia
Helena, Montana
Middleburg Heights, Ohio
Venice, Florida
Grinnell, Iowa
Piedmont, Alabama (Near GA border close to Cedartown)
Auburn, Washington (near Seattle)
Elk Grove Village, Illinois
Savannah, Georgia
Atlanta, Georgia
North Liberty, Indiana
Saledad, California
Here is a link to my workshop calendar where you can see all of my travel schedule and to get info on beginner and advanced Brayer workshops: http://zindorf.blogs.splitcoaststampers.com/workshop-calendar
Link to my Stampin’ Up website where you can order all of your must have Stampin’ Up products from me 24-7: http://michellezindorf.stampinup.net
Frequently asked questions answers: http://zindorf.blogs.splitcoaststampers.com/frequently-asked-questions/

Cheers Everyone, to the next 300 tutorials! Thank you to all of you readers that left me such heartfelt comments on the post for tutorial #300. I love, love, love stamping and the very best thing about it is being able to share it with so many wonderful people.
Here is a little blue number for you today that shows the depth you can get by layering colors of ink.
I organized my sponges yesterday and I could not wait to use them, lol.
Let’s get started.
Supplies:
| Stamps: Stampin’ Up Friends 24-7 and Baroque Motifs |
| Paper: Stampin’ Up! Whisper White, Basic Black, Brilliant Blue and Sahara Sand |
| Ink: Stampin’ Up! Basic Black, Brilliant Blue, Going Gray, Bashful Blue, Night of Navy and Tempting Turquoise |
| Accessories: Stampin’ UP Spiral Punch, Trio Flower Punch, Sponges, Sahara Sand, Not Quite Navy, Bashful Blue and Basic Black marker, White Gel Pen, Bashful Blue Marker, Clear embossing powder, heat gun, Versamark Pad |
Don’t forget to request your copy of the new Stampin’ Up Occasions mini catalog and Sale-a-bration mini. Just e-mail me your address and I will be glad to send you a set for free.
The new Occasions mini catalog can also be viewed on-line here: http://204.228.150.61/catalogs/20091231/OccasionsMini10_US.pdf
The New Sale-a-Bration Mini Catalog can also be viewed on-line here:http://204.228.150.61/catalogs/20091231/SAB_10_US.pdf
Are you getting inspired and enjoying this blog. One way you can help support it is to order your Stampin’ Up products through me. You can order from me 24-7 from this link: http://michellezindorf.stampinup.net or e-mail me at mzindorf@aim.com.
Want to become a Stampin’ Up Demonstrator and earn instant income? Consider being part of my Stampin’ Up Team and start your own business.

On a 4.5″ x 5″ piece of Whisper White card stock, pounced Bashful Blue ink with a sponge all over the card stock.

Stamped the bird image from the Stampin’ Up! set “Friends 24-7” by loading with Going Gray ink and then tapping my Basic Black ink pad on the bottom half of the stamp before stamping it.

I used my heat gun to dry the ink on the card stock and then used my Embossing buddy on the card stock also. This was to make sure that the embossing powder in the next steps will not stick to the bird image or the blue ink that was sponged on.

Stamped the Flower stamp from the Stampin’ Up! set “Baroque Motifs” with Versamark only and then heat embossed the image using clear embossing powder and a heat gun.


Stamped the Flourish from the “Baroque Motifs” using Versamark only. Heat embossed the flourish using clear embossing powder and a heat gun.


Pounced on Tempting Turquoise ink using a sponge.

Pounced on Brilliant Blue ink using a sponge.

Pounced on Night of Navy ink with a sponge.

Pounced on Basic Black ink using a sponge.

Wiped the ink off of the embossed images using cotton towel.

Stamped the Flourish from the “Friends 24-7” set using Basic Black ink on the bottom of the card stock a few times.

Stamped a couple of the little flowers from the set “Baroque Motifs” using Brilliant Blue ink.

Added Sahara Sand marker to the bird.

Added a little Bashful Blue marker to the bird.

Added a little Not Quite Navy to the birds wing and underside. This left a few hard lines, so to tone things down, went over the bird image again with the Sahara Sand marker.

Added Basic Black marker to the wing,head and tail. Also added some sketchy lines of White Gel Pen to the birds head, chest and a tiny bit to the back.

Punched a small Tempting Turquoise flower for the center of my embossed flower. Added a Night of Navy brad to the center.

Traced the underside of the flourish with a Not Quite Navy marker to add a shadow to it. Wiped the marker off of the embossed image, where went over it.

Using the Spiral punch, punched the edge of a 5″ x 1.5″ piece of Brilliant Blue.

Stamped the flourish image with Basic Black ink three times across the top of the card stock. Stamped a few of the same image really lightly further down the card stock.

Assembled the card using a 5″ x 6.5″ piece of Sahara Sand as the base of my card front. Added a Bashful Blue ribbon to the front.

Here is the finished card measuring 5″ x 6.5″.
I hope you try layering and building up ink to get some depth in your projects.
May your day be one filled with peace and serentity.
Until my next post. . . . . . . . . . . . ..
Hugs,
Michelle
Get ready for Brayer Workshops! I am coming to:
Monroe, Louisiana (just a couple of seats left)
Jacksonville, Florida
St. Louis, Missouri
Mechanicsville, Virginia
Raleigh, North Carolina
Colleyville, Texas
Colorado Springs, Colorado
Boise area of Meridian, Idaho
Riverside, California (Southern California)
Salem, Oregon
Wheaton, Illinois
St. Cloud, Minnesota
Rockville, Maryland
North Chili, New York (near Rochester)
New Johnsonville, Tennessee
Kenova (Huntington), West Virginia
Helena, Montana
Middleburg Heights, Ohio
Venice, Florida
Grinnell, Iowa
Piedmont, Alabama (Near GA border close to Cedartown)
Auburn, Washington (near Seattle)
Elk Grove Village, Illinois
Savannah, Georgia
Atlanta, Georgia
North Liberty, Indiana
Saledad, California
Here is a link to my workshop calendar where you can see all of my travel schedule and to get info on beginner and advanced Brayer workshops: http://zindorf.blogs.splitcoaststampers.com/workshop-calendar
Link to my Stampin’ Up website where you can order all of your must have Stampin’ Up products from me 24-7: http://michellezindorf.stampinup.net
Frequently asked questions answers: http://zindorf.blogs.splitcoaststampers.com/frequently-asked-questions/

Today I have a little Tool Time segment for you on sponge organization. I gave up along time ago trying to keep a sponge for each color of ink I have, until I seen this cute and quick idea. I am not sure who to give credit to since I have heard this idea from a few different sources. But it is such a good idea I thought I would try it and share it with you.
Supplies:
Stampin’ Up! Sponges, Item #101610 – cut into wedges
Stampin’ Up! Round Tab Punch, Item #108340
A scrap of each color of card stock that matches your ink colors. If you don’t have colored card stock to match your ink colors, smear ink on white card stock.
Stapler
Stampin’ Up has card stock that matches all of their ink colors, so using the Stampin’ Up! tab punch, punched one tab out of each color card stock that I have in ink. Pardon me, but I have them all, lol. By the way, so should you. 🙂 I know I am an enabler, I hear that often.
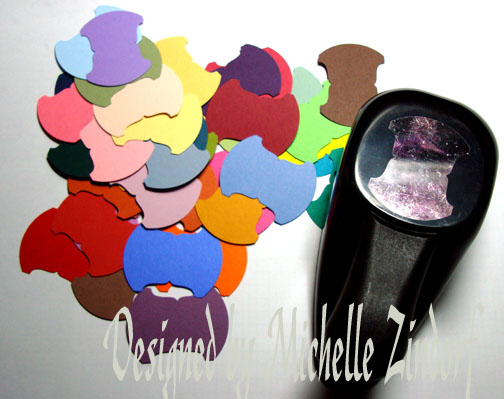
Next fold the tab over a wedge of sponge and staple it. The colored tab not only lets you quickly identify the ink color that the sponge is designated for, but also gives you something to hold onto when sponging.
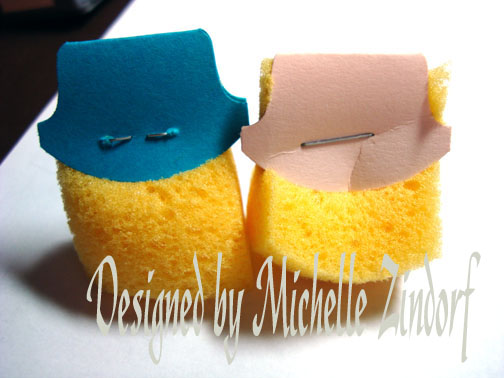
I have this plastic container that has dividers in it. I found it to be perfect to store my sponges.
This little project only took me about 30 minutes to throw together and will hopefully save me a bit of time and money.
I hope you enjoyed this little Tool Time segment. Let me hear from you in the comments section if you have great craft organization tips to share.
May your day be filled with lots of belly laughs. 🙂
Until my next post. . . . . . . . . . . . ..
Hugs,
Michelle
Get ready for Brayer Workshops! I am coming to:
Monroe, Louisiana (just a couple of seats left)
Jacksonville, Florida
St. Louis, Missouri
Mechanicsville, Virginia
Raleigh, North Carolina
Colleyville, Texas
Colorado Springs, Colorado
Boise area of Meridian, Idaho
Riverside, California (Southern California)
Salem, Oregon
Wheaton, Illinois
St. Cloud, Minnesota
Rockville, Maryland
North Chili, New York (near Rochester)
New Johnsonville, Tennessee
Kenova (Huntington), West Virginia
Helena, Montana
Middleburg Heights, Ohio
Venice, Florida
Grinnell, Iowa
Piedmont, Alabama (Near GA border close to Cedartown)
Auburn, Washington (near Seattle)
Elk Grove Village, Illinois
Savannah, Georgia
Atlanta, Georgia
North Liberty, Indiana
Saledad, California
Here is a link to my workshop calendar where you can see all of my travel schedule and to get info on beginner and advanced Brayer workshops: http://zindorf.blogs.splitcoaststampers.com/workshop-calendar
Link to my Stampin’ Up website where you can order all of your must have Stampin’ Up products from me 24-7: http://michellezindorf.stampinup.net
Frequently asked questions answers: http://zindorf.blogs.splitcoaststampers.com/frequently-asked-questions/

Holy Cow! or Rabbit! or Chocolate Bunny, lol. This is tutorial #300 here on my blog. I hope you all are still with me and enjoying the tutorials. You do still want me to continue on, right?
I will be continuing this blog as long as I am able and it is still fun. 🙂 I do enjoy reading your comments. They let me know I am not doing all these tutorials for nothing and helps me get to know you, my readers.
So for this milestone of tutorial #300 I have a special Stampin’ Up! stamp to give away. It is this super cute Chocolate Bunny stamp that I used in today’s tutorial. This stamp is in the new Occasions Mini Catalog, item #116980.
To enter to win this Stampin’ Up! Chocolate Bunny, please leave a comment on this post telling me to enter you. If you are receiving this blog update via e-mail, please click on this link and leave a comment at the bottom of this post: http://zindorf.blogs.splitcoaststampers.com/2010/01/27/easter-chocolate-bunny-tutotial-300-and-chocolate-bunny-blog-candy/
Please no e-mail entries.
I will select the winner on Saturday, January 30, 2010 using a random number generator. Good Luck to all!
Let’s get started. . . . . . .
Supplies:
| Stamps: Stampin’ Up! Chocolate Bunny and Pocket Silhouettes |
| Paper: Stampin’ Up! Whisper White, Rose Red, Always Artichoke, Old Olive and Pretty in Pink |
| Ink: Stampin’ Up Rose Red, Old Olive, Chocolate Chip, Tempting Turquoise, Always Artichoke, Not Quite Navy and More Mustard |
| Accessories:Stampin’ Up! Sponges, Big Shot Machine, Tulipe Die, Brayer, Creamy Caramel, Old Olive, Rose Red and Always Artichoke Markers, Versamark Pad and Marker |
Don’t forget to request your copy of the new Stampin’ Up Occasions mini catalog and Sale-a-bration mini. Just e-mail me your address and I will be glad to send you a set for free. If you are a customer of mine your copy will come to you automatically. 🙂 The new Occasions mini catalog can also be viewed on-line here: http://204.228.150.61/catalogs/20091231/OccasionsMini10_US.pdfThe New Sale-a-Bration Mini Catalog can also be viewed on-line here:http://204.228.150.61/catalogs/20091231/SAB_10_US.pdfAre you getting inspired and enjoying this blog. One way you can help support it is to order your Stampin’ Up products through me. You can order from me 24-7 from this link: http://michellezindorf.stampinup.net or e-mail me at mzindorf@aim.com. If you are within the United States. Want a copy 2009-2010 Stampin’ Up Catalog for $9.95 with free shipping, just e-mail me at mzindorf@aim.com and I will get one in the mail to you. Want to become a Stampin’ Up Demonstrator and earn instant income? Consider being part of my Stampin’ Up Team. Also check out the Stampin’ Up specials, click this link to check it out: http://www.stampinup.net/esuite/home/michellezindorf/promotions Stamped Pocket silhouettes stamp, by first loading the stamp with Versamark and then with Old Olive ink before stamping it each time. Heat embossed the images using clear embossing powder and a heat gun.


Stamped Chocolate Bunny by first loading the stamp with Versamark and then with Chocolate Chip ink before stamping it. Heat embossed the image using clear embossing powder and a heat gun.


Colored the bunny in with a Creamy Caramel marker.

Colored over the image with a Versamark marker and then heat embossed the image using clear embossing powder and a heat gun.


Stamped the Pocket Silhouettes stamp again, by first loading the stamp with Versamark and Always Artichoke ink before stamping it. Heat embossed the image using clear embossing powder and a heat gun.


Stamped another image from the Pocket Silhouettes set, by first loading the stamp with Versamark and then with More Mustard ink before stamping it. Heat embossed the images using clear embossing powder and a heat gun.


Brayered Tempting Turquoise ink at the top of the card stock.

Brayered Not Quite Navy ink at the top of the card stock, not covering the Tempting Turquoise ink entirely.

Brayered Always Artichoke ink at the bottom of the card stock.

Tore a post it note in a mountain shape and used it as a mask in order to sponge in two mountains with Tempting Turquoise ink.


Sponged Chocolate Chip ink at the bottom of the card stock.

Using the Big Shot Die Cut Machine, cut the die cuts using the Tulipe die. Cut one from Rose Red, Old Olive and Always Artichoke card stock.

Put a shadow on the bottom of each piece using the coordinating marker.

Sponged Rose Red on the left side of a 5″ square piece of Pretty in Pink card stock.

Assembled the card and here it is finished measuring 5.5″ square.
May your Wednesday be extra special.
Until my next post. . . . . . . . . . . . ..
Hugs,
Michelle
 Get ready for Brayer Workshops! I am coming to:
2010
Monroe, Louisiana
Jacksonville, Florida
St. Louis, Missouri
Mechanicsville, Virginia
Raleigh, North Carolina
Colleyville, Texas
Colorado Springs, Colorado
Boise area of Meridian, Idaho
Riverside, California (Southern California)
Salem, Oregon
Wheaton, Illinois
St. Cloud, Minnesota
Rockville, Maryland
North Chili, New York (near Rochester)
New Johnsonville, Tennessee
Kenova (Huntington), West Virginia
Helena, Montana
Middleburg Heights, Ohio
Venice, Florida
Grinnell, Iowa
Piedmont, Alabama (Near GA border close to Cedartown)
Auburn, Washington (near Seattle)
Elk Grove Village, Illinois
Savannah, Georgia
Atlanta, Georgia
North Liberty, Indiana
Saledad, California
Here is a link to my workshop calendar where you can see all of my travel schedule and to get info on beginner and advanced Brayer workshops: http://zindorf.blogs.splitcoaststampers.com/workshop-calendar
Link to my Stampin’ Up website where you can order all of your must have Stampin’ Up products from me 24-7: http://michellezindorf.stampinup.net
Frequently asked questions answers: http://zindorf.blogs.splitcoaststampers.com/frequently-asked-questions/

I arrived at home in Ohio last night from Phoenix, AZ and was greeted by a bit of snowfall. You got to love it! 🙂 I am still amazed that I can hop on a plane and travel across the country in a matter of hours.
One plane ride on this trip was a bit scary though. When we were suppose to be landing in Phoenix, I noticed we were circling the airport and had been for about 15 minutes. Our cheerful sounding pilot got on the PA to announce that we would be circling the airport for a bit more, since they needed to clear the runways for our landing. Apparently, the flaps on the plane would not go down so we would need to land fast and hard and need to use every bit of the runway. The pilot tried to reassure us by telling us emergency vehicles would be waiting on us when we landed. Some how that bit of info did not make me feel any better, lol.
Thank goodness we had a well trained pilot. He landed the plane and received cheers from all of us on board. 🙂 Needless to say, I am happy to be home safe and sound so I can announce the winner of the Stampin’ Up! set Eggcoutrements.

And the winner is. . . . . .. . .. .. . . . . . . . . . .
Candy Farley who wrote “Would love to be entered be safe on your trip. I am sure the weather is much nicer there then here in N. Dakota ![]() Love all your beautiful card designs. Maybe our next duty station will be somewhere closer to where you do classes so I can attend. Would love that!!!!
Love all your beautiful card designs. Maybe our next duty station will be somewhere closer to where you do classes so I can attend. Would love that!!!! ![]()
Candy Farley, CONGRATULATIONS! Please e-mail your mailing address to mzindorf@aim.com within 30 days to claim your stamp set.
Thanks to everyone who played along!
May you be snug and warm at your house today.
Until my next post. . . . . . . . . . . . ..
Hugs,
Michelle
Get ready for Brayer Workshops! I am coming to:
2010
Monroe, Louisiana
Jacksonville, Florida
St. Louis, Missouri
Mechanicsville, Virginia
Raleigh, North Carolina
Colleyville, Texas
Colorado Springs, Colorado
Boise area of Meridian, Idaho
Riverside, California (Southern California)
Salem, Oregon
Wheaton, Illinois
St. Cloud, Minnesota
Rockville, Maryland
North Chili, New York (near Rochester)
New Johnsonville, Tennessee
Kenova (Huntington), West Virginia
Helena, Montana
Middleburg Heights, Ohio
Venice, Florida
Grinnell, Iowa
Piedmont, Alabama (Near GA border close to Cedartown)
Auburn, Washington (near Seattle)
Elk Grove Village, Illinois
Savannah, Georgia
Atlanta, Georgia
North Liberty, Indiana
Saledad, California
Here is a link to my workshop calendar where you can see all of my travel schedule and to get info on beginner and advanced Brayer workshops: http://zindorf.blogs.splitcoaststampers.com/workshop-calendar
Link to my Stampin’ Up website where you can order all of your must have Stampin’ Up products from me 24-7: http://michellezindorf.stampinup.net
Frequently asked questions answers: http://zindorf.blogs.splitcoaststampers.com/frequently-asked-questions/
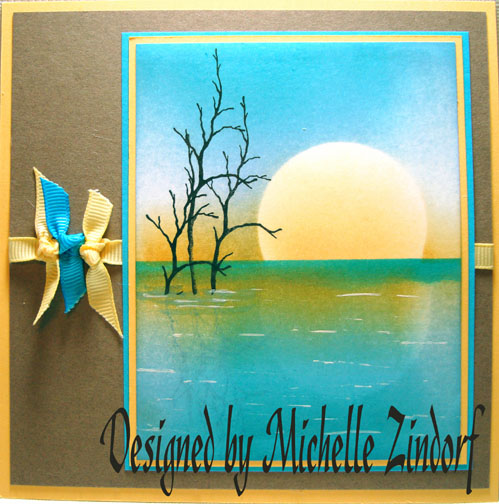
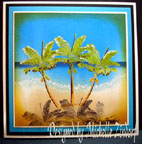
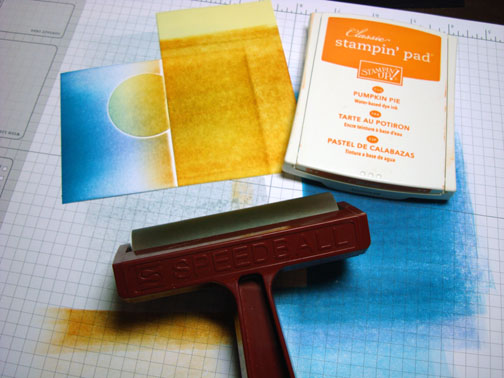
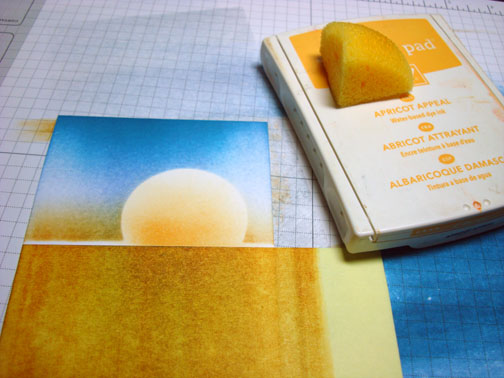
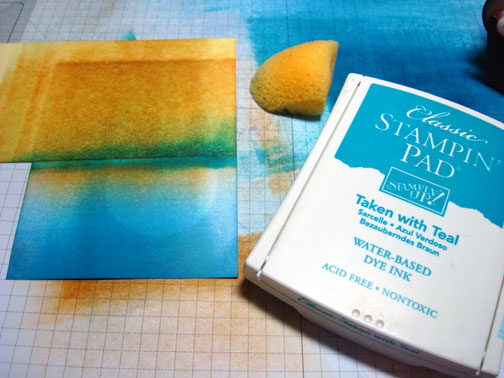
Hey, I’m still in Arizona teaching, but here is a tutorial I put together for you before I left. Check it out.
Supplies:
| Stamps: Stampin’ Up! Bird on a Branch |
| Paper: Stampin’ Up! Tempting Turquoise, Apricot Appeal and Whisper White |
| Ink: Stampin’ Up! Pumpkin Pie, Taken with Teal, Bashful Blue, Basic Black, Apricot Appeal |
| Accessories:Stampin’ Up! Bashful Blue Marker, Sponge, White Gel Pen, Brayer, Stamp-a-ma-Jig, Apricot Appeal & Tempting Turquoise ribbon, Post it notes, 1 3/4″ Punch |
Don’t forget to request your copy of the new Stampin’ Up Occasions mini catalog and Sale-a-bration mini. Just e-mail me your address and I will be glad to send you a set for free. If you are a customer of mine your copy will come to you automatically. 🙂 The new Occasions mini catalog can also be viewed on-line here: http://204.228.150.61/catalogs/20091231/OccasionsMini10_US.pdfThe New Sale-a-Bration Mini Catalog can also be viewed on-line here:http://204.228.150.61/catalogs/20091231/SAB_10_US.pdf
Are you getting inspired and enjoying this blog. One way you can help support it is to order your Stampin’ Up products through me. You can order from me 24-7 from this link: http://michellezindorf.stampinup.net or e-mail me at mzindorf@aim.com. If you are within the United States. Want a copy 2009-2010 Stampin’ Up Catalog for $9.95 with free shipping, just e-mail me at mzindorf@aim.com and I will get one in the mail to you. Want to become a Stampin’ Up Demonstrator and earn instant income? Consider being part of my Stampin’ Up Team. Also check out the Stampin’ Up specials, click this link to check it out: http://www.stampinup.net/esuite/home/michellezindorf/promotions

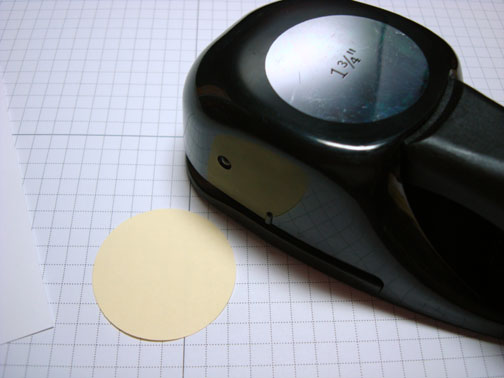
Punched through the sticky part of two layers of post it notes with a 1 3/4″ punch.
Cut part of the circle off of the 2 layers.
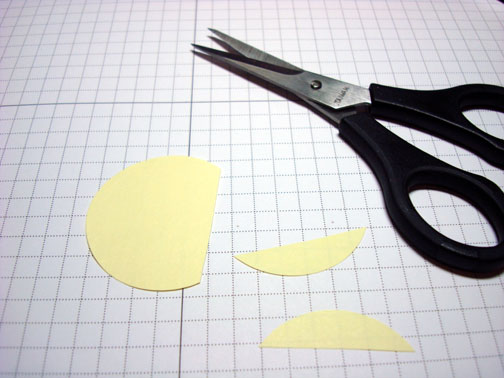
Mask the sun in the sky with one of the sun mask and masked the bottom of the 3.5″ x 4.5″ piece of Whisper White card stock with another post it note.
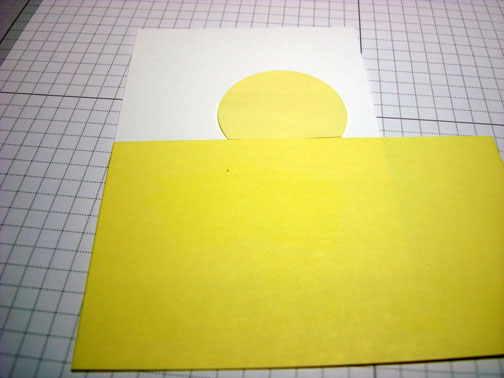
Brayered Bashful Blue ink at the top of the card stock.
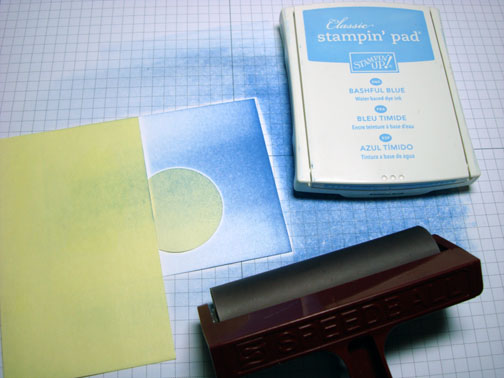
Brayered Taken with Teal ink at the top of the card stock, not covering the Bashful Blue ink entirely.
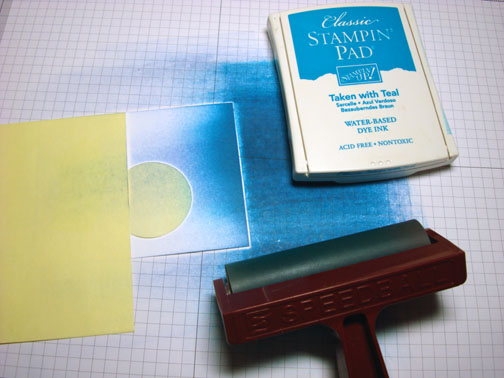
Brayered Pumpkin Pie ink at the post it note edge to add color to the horizon line.
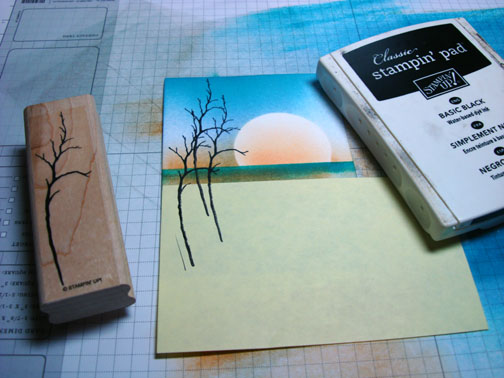
Removed the sun mask and sponged Apricot Appeal in the sun area.
Removed the bottom mask and added the second sun mask in water area of the card stock, lining it up with the sun in the sky.
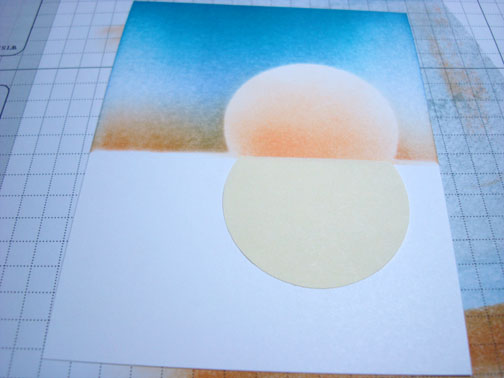
Masked the sky area of the card stock with a post it note.
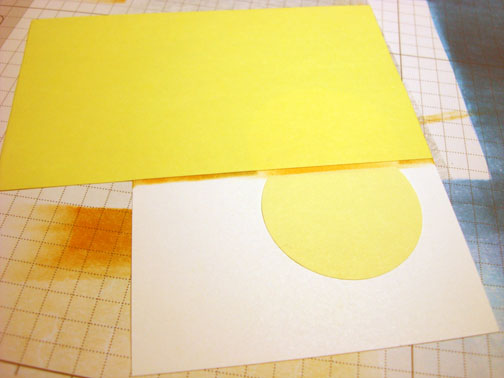
Brayered Bashful Blue ink and Taken with Teal ink at the bottom of the card stock.
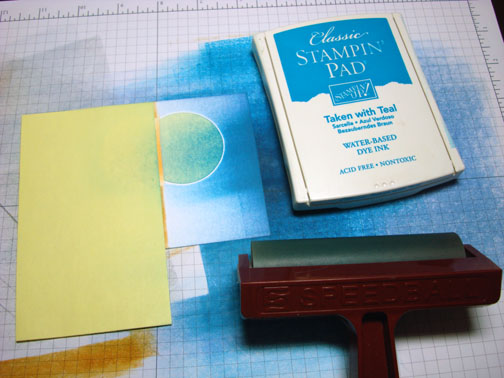
Removed the reflection sun mask and brayered more Bashful Blue and Taken with Teal ink to tone down the reflection.

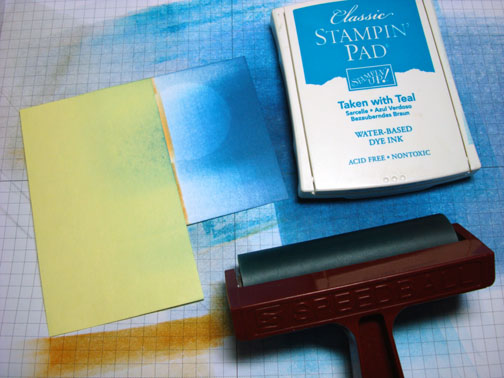
Brayered Pumpkin pie ink at the post it note edge.

Sponged Taken with Teal ink at the post it note edge.
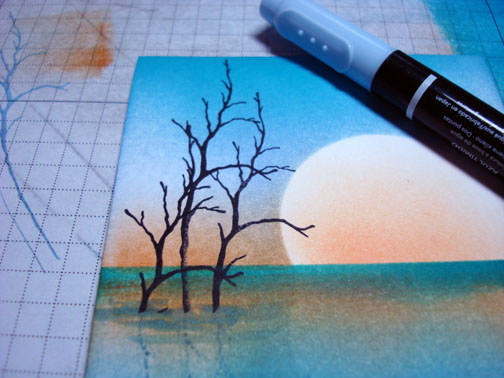
Moved the post it note mask so it was a bit below the horizon line and stamped the Branch image 3 times with Basic Black ink.
Turned the post it note mask so it is covering the sky area and stamped the branch on my stamp-a-ma-jig plastic with Bashful Blue ink and then turned it over and lined it up with the Basic Black images and rubbed the back of the plastic to transfer the image. This gives you a reverse image.
I did this three times.

Removed all of the post it note masks and put a couple of streaks of Bashful Blue marker at the base of the Basic Black images.
Added a few dashes in the water area with a white gel pen.
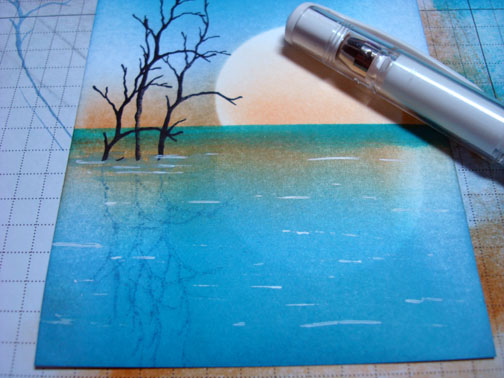
Added Apricot Appeal Ribbon, Tempting Turquoise ribbon and panels of Apricot Appeal, Close to Cocoa and Tempting Turquoise.
Here is the finished card measuring 5.5″ square.
May you be warm and cozy where ever you are today.
Until my next post. . . . . . . . . . . . ..
Hugs,
Michelle
Get ready for Brayer Workshops! I am coming to:
2010
Monroe, Louisiana
Jacksonville, Florida
St. Louis, Missouri
Mechanicsville, Virginia
Raleigh, North Carolina
Colleyville, Texas
Colorado Springs, Colorado
Boise area of Meridian, Idaho
Riverside, California (Southern California)
Salem, Oregon
Wheaton, Illinois
St. Cloud, Minnesota
Rockville, Maryland
North Chili, New York (near Rochester)
New Johnsonville, Tennessee
Kenova (Huntington), West Virginia
Helena, Montana
Middleburg Heights, Ohio
Venice, Florida
Grinnell, Iowa
Piedmont, Alabama (Near GA border close to Cedartown)
Auburn, Washington (near Seattle)
Elk Grove Village, Illinois
Savannah, Georgia
Atlanta, Georgia
North Liberty, Indiana
Saledad, California
Here is a link to my workshop calendar where you can see all of my travel schedule and to get info on beginner and advanced Brayer workshops: http://zindorf.blogs.splitcoaststampers.com/workshop-calendar
Link to my Stampin’ Up website where you can order all of your must have Stampin’ Up products from me 24-7: http://michellezindorf.stampinup.net
Frequently asked questions answers: http://zindorf.blogs.splitcoaststampers.com/frequently-asked-questions/
