Pumpkins by the Lake – Tutorial #117 and Blog Candy

dsc05950.JPG

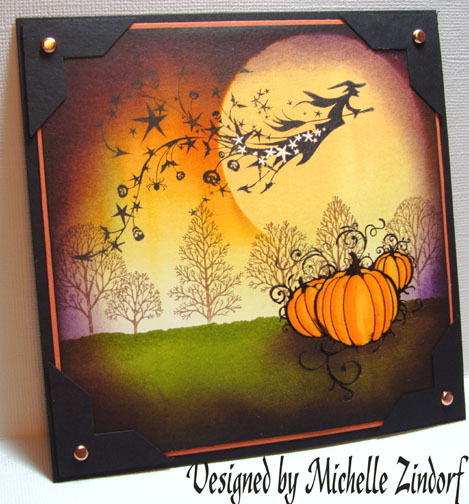
This set “All Hallow’s Eve” by Inkadinkado was still out on my desk from Yesterday’s piece so I gave it another go.  This time throwing a purple cast on the pumpkins and using a teal color and purple together, which I love by the way.

I’m also going to give this card away as blog candy.  I’ll use a random number generator on Saturday, September 13th to select the winner.  To enter to win this card, please leave a comment on this post telling me your favorite color combination to use in fall creations.  If you are getting this blog update by e-mail you will need to click this link to leave a comment on this post:  http://zindorf.blogs.splitcoaststampers.com/2008/09/10/pumpkins-by-the-lake-tutorial-117-and-blog-candy/

One more thing, I have scheduled an Advanced brayer workshop in Dayton, Ohio on November 1st.  For more info on my Beginner and advanced Brayer workshops, please check out this link:  http://zindorf.blogs.splitcoaststampers.com/workshop-calendar/

Let’s get started on the tutorial.  🙂

Supplies:

Stamps: Inkadinkado “All Hallow’s Eve” & Stampin’ Up “Baroque Motifs”
Paper: Stampin’ Up Whisper White, Tempting Turquoise, Black & Elegant Eggplant
Ink: Adirondack Eggplant, Black, Stream, Hazelnut, Purple Twilight, Aqua
Accessories: Versamark marker & pad, Prismacolor markers, Sponges, White gel pen, black marker, Brayer, Fine detail clear embossing powder, heat gun, photo corner punch

dsc05951.JPG

Stamped the Pumpkins on Whisper White card stock by first loading my stamp with Versamark and then Black ink before stamping the image. 

Note:  I started out with a much too large piece of card stock.  I later cut this down to measure 3.5″ x 3.5″. 

dsc05924.JPG

Heat emboss the image using fine detail clear embossing powder and a heat gun.

dsc05925.JPG

Colored some Prismacolor Violet Mist marker on the pumpkins.

dsc05926.JPG

Colored over the pumpkins with Wheat.

dsc05927.JPG

Colored some Yellow Orange marker on the pumpkins.

dsc05928.JPG

Went over the entire image with the Wheat marker to blend the colors together a bit.

dsc05929.JPG

Used the Violet Mist marker again at the bottom and top of the pumpkins to darken.

dsc05930.JPG

Colored over the entire image with a Versamark marker.

dsc05931.JPG

Heat embossed using clear embossing powder and a heat gun.

dsc05932.JPG

Cropped my paper down to 3.5″ x 3.5″. 

I also made a few dots with a Versamark marker in the sky area of the card stock and then heat embossed them using clear embossing powder and a heat gun.  You won’t be able to see them until the next step.

dsc05933.JPG

Brayered on Aqua ink at the top of the card stock.

dsc05936.JPG

Brayered on Purple Twilight ink at the top of the card stock, but not covering the Aqua ink entirely.

dsc05937.JPG

Sponged Hazelnut ink on in a swiping motion going from left to right.

dsc05938.JPG

Sponged on Stream ink in a swiping motion going from right to left.

dsc05939.JPG

Sponged on some Black ink to the left of the pumpkins and under them.

dsc05940.JPG

Sponged Eggplant ink around the edge of the card stock.

dsc05941.JPG

Added to layers to the card front and adhered them together.  Stamp Flourish with Black ink.  Note:  I have a gap in my design since I stamped over multiple layers of card stock.  When doing this step make sure you have a marker that matches the color of ink you stamped in so you can fill in the gaps.

dsc05942.JPG

Filled in the gaps of the flourish with a black marker.

dsc05943.JPG

Sponged Eggplant ink at the left and bottom of the Eggplant card stock.

dsc05944.JPG

Added a bottom layer, corner punches and brads.

dsc05945.JPG

Added White Gel pen to the right side of some of the flourishes to make them stamp out more.

dsc05946.JPG

Here you have it the finished card measuring 5.25″ x 5.25″.

dsc05950.JPG

I hope this tutorial has inspired you to create a scene that is a little out of the ordinary. 

May your day be filled with joy & love!

Until my next post. . . . . . . . .

Hugs,

Michelle

Note:  Links to all my tutorials can be found here:  http://zindorf.blogs.splitcoaststampers.com/tutorials-ive-written/

Here is a link to my workshop calendar if you want to get info on beginner and advanced Brayer workshops:  http://zindorf.blogs.splitcoaststampers.com/workshop-calendar/


Is It Autumn Yet? – Tutorial #116

dsc05918.JPG

I love Autumn and would create cards of a Fall nature all year around if I could use them all.  The Earthy colors of Autumn are my favorite to use. 

Is there a Stamp Buyers Anonymous Group?   I really need some help to stay out of the craft stores.  Here lately I have been buying stamps like mad.  This set I picked up yesterday.  The set name is “All Hallow’s Eve” and it is by Inkadinkado.  Don’t you just love the name Inkadinkado.  Isn’t it fun to say, INKADINKADO, LOL.  Ok, I’m a bit punchy this morning.  🙂  Anyhoo, I got it from Michael’s Craft Store.

It’s raining here in Ohio and I tend to get out every color of ink I own for some reason when it is raining.  Today was no exception.

Grab a cup of your favorite beverage and join me for this Autumn scene tutorial.  Let’s get started.

Supplies:

Stamps:Inkadinkado “All Hallow’s Eve, Stampin’ Up “Lovely As a Tree”
Paper: Stampin’ Up Whisper White, Really Rust, Basic Black
Ink:Stampin’ Up Basic Black, Elegant Eggplant, Certainly Celery, Close to Cocoa, Pumpkin Pie, Really Rust, Barely Banana, Apricot Appeal, Old Olive
Accessories:Versamark Pad and Marker, Prismacolor Markers Orange & Yellow Orange, White Gel Pen, Brayer, Fine Detail Clear embossing Powder, Heat Gun, Brads, Sponges, Circle Coluzzle Template, Post it Note

dsc05923.JPG

Stamped pumpkins on a 5″ x 5″ piece of Whisper White card stock by first loading my stamp with Versamark and then with Black ink.  I then heat embossed the image using clear embossing powder and a heat gun.

dsc05890.JPG

dsc05891.JPG

Colored the pumpkins in with a Prismacolor Yellow Orange marker.

dsc05892.JPG

Added Orange marker to them along the left sides of each section of pumpkin.

dsc05893.JPG

Went over the pumpkins again with the Yellow Orange marker to blend the two colors together.

dsc05894.JPG

Colored over the pumpkins with a Versamark marker.  Heat embossed the image with clear embossing powder and a heat gun.

dsc05895.JPG

dsc05896.JPG

Brayered on Barely Banana ink.

dsc05897.JPG

Brayered on Apricot Appeal ink, not covering the Barely banana ink entirely.

dsc05898.JPG

Cut a 2.5″ circle with my Coluzzle and held it in place as a mask.

dsc05899.JPG

Brayered over the mask as I held it in place with Pumpkin Pie Ink.

dsc05900.JPG

Brayered over the mask with Really Rust ink, not covering the Pumpkin Pie ink entirely.

dsc05901.JPG

Brayered on Elegant Eggplant ink, not covering the Really Rust ink entirely.

dsc05902.JPG

Removed the mask.

dsc05903.JPG

Tore through the sticky part of a post it note and used it as a mask for the sky area.

OK, so you think I don’t make mistakes?  Check this out.  I put my post it note too far down and I ended up with a levitating pumpkin.  That’s OK for a spooky scene I guess, but watch out for this, lol.

dsc05904.JPG

Brayered on Certainly Celery ink in the ground area.

dsc05905.JPG

Brayered on Old Olive ink at the bottom of the card stock, not covering the Certainly Celery ink entirely.

dsc05907.JPG

Sponged Old Olive ink along the post it note edge to create a horizon line.

dsc05908.JPG

Removed post it note mask and stamp the trees with Close to Cocoa ink.  Note:  I only inked the tree portion of the stamp.  I did not ink the ground portion so it would be omitted.

dsc05909.JPG

Wiped the embossed pumpkins off with an old soft rag to get the Close to Cocoa ink off of them.

dsc05910.JPG

Stamped the Witch with Basic Black ink.

dsc05912.JPG

Sponged Elegant Eggplant around the outside edges of the card stock.

dsc05913.JPG

Sponge Basic Black ink around the very outside edges of the card stock, not covering the Elegant Eggplant ink entirely.

dsc05914.JPG

Sponged on Elegant Eggplant under the pumpkins to create a shadow for them.  Colored in the stars on the Witch with a White Gel pen.

dsc05915.JPG

Assembled my layers of card stock.

dsc05916.JPG

Added black photo-corners in each corner and copper brads.   Here is the completed card measuring 5 3/8″ x 5 3/8″.

dsc05918.JPG

So are you in the mood for Autumn too?  If so, give this type of Autumn scene a whirl.  Just watch out for levitating Pumpkins, lol.

May your day be one of peace and joy.

Until my next post. . . . .. . . . .

Hugs,

Michelle

Note:  Links to all my tutorials can be found here:  http://zindorf.blogs.splitcoaststampers.com/tutorials-ive-written/

Here is a link to my workshop calendar if you want to get info on beginner and advanced Brayer workshops:  http://zindorf.blogs.splitcoaststampers.com/workshop-calendar/


Coffee Anyone? – Tutorial #115

dsc05887.JPG

I apparently have Java on my mind this morning.  I drink a pot of it each day. 

Stamp set I used today is by Impression Obsession “Smell the Coffee”.   I don’t normally use bright colors, but these cups just screamed “make me bright”.

Let’s get going on the tutorial.  🙂

Supplies:

Stamps: Impression Obsession “Smell the Coffee”
Paper: Stampin’ Up Whisper White, Old Olive, Brilliant Blue & Chocolate Chip
Ink: Palette Noir Black, STampin’ Up Creamy Caramel, Adirondack Ginger, Sail Boat Blue, Peach Bellini, Aqua, Espresso
Accessories: Versamark Marker, Fine Detail Clear embossing powder, heat gun, Prismacolor markers, White Gel Pen, Faber Castell fine point marker, Sponge, Brads, Cuttlebug embossing folder

dsc05889.JPG

Stamped image with Palette Noir Black ink.

dsc05866.JPG

Colored image with Prismacolor markers, starting with Yellow Orange.

dsc05867.JPG

Added Magenta

dsc05868.JPG

Added Chartreuse

dsc05869.JPG

Colored over the bottom of the coffee cups with the same colors used already.  This creates a darker shadow effect.

dsc05870.JPG

Colored coffee Light Tan.

dsc05871.JPG

Went over the coffee cup handles to make them darker by using a fine point black marker.

dsc05872.JPG

Colored over the cups with a Versamark marker and heat embossed using fine detail clear embossing powder and a heat gun.

dsc05873.JPG

dsc05874.JPG

Sponged on Creamy Carmel. 

Note:  The embossed image will resist the ink put on it now, hence the name of the technique emboss resist.

dsc05875.JPG

Used the direct to paper technique by dragging the Aqua ink pad edge over the card stock. 

dsc05876.JPG

Used the direct to paper technique with a Peach Bellini ink pad.

dsc05877.JPG

Used the direct to paper technique using a Sail Boat Blue pad.

dsc05879.JPG

Sponged on Ginger ink below the coffee cups and around the edge of the card stock.

dsc05880.JPG

Sponged on Espresso ink right under the cups to give them a really dark shadow and then added some Espresso ink with a sponge along the edges of the card stock.

dsc05881.JPG

Out lined the right side of the steam with a fine point black marker.

dsc05882.JPG

Added white gel pen to the right side of the steam.

dsc05884.JPG

Embossed two of my panels with a Cuttlebug folder.

dsc05885.JPG

Assembled card and added brads.  Here it is finished measuring 5″ x 6.5″.

dsc05887.JPG

I hope this tutorial will inspire you to use the emboss resist technique along with the direct to paper technique to come up with interesting backgrounds in your projects.

May your day start off right and stay bright all day.

Until my next post. . . . . . . . . . . .

Hugs,

Michelle

Note:  Links to all my tutorials can be found here:  http://zindorf.blogs.splitcoaststampers.com/tutorials-ive-written/

Here is a link to my workshop calendar if you want to get info on beginner and advanced Brayer workshops:  http://zindorf.blogs.splitcoaststampers.com/workshop-calendar/


Another Blog Candy Winner and a Thank You

I want to give a big shout out to all the fantastic ladies that attended my workshops yesterday in Dayton, OH at Marco Paper http://marcopaper.com/index.html.  It was such a pleasure to meet you and I had the BEST TIME!   Also a very big thank you to Greg at Marco Paper and his staff for hosing the workshops.  Your store if terrific.   I believe you have everything a stamper could possibly want.

dsc05864.JPGNow for the winner of this card, out of 149 entries the random number generator pick number 62.

Bee who wrote:  “I’m just amazed Michelle! Your work is absolutely fabulous. I have tons of beautiful stamps but lately have been just sitting and staring at them instead of creating. I have been itching to try something different with them and this is it! I’m so inspired by your art that I’m going to pull out my brayer and start playing right now (who needs a clean house – lol). I’m so thankful a friend forwarded me an email that had a link to your work. I’m going to see about attending a workshop. Thank you so much for sharing and, “Happy Belated Birthday” – my birthday was August 26th! May we live long, happy and healthy lives. Bee”

Bee, please e-mail your address to mzindorf@aim.com and I will get this card in the mail to you.  🙂

Thanks to all who played along!  I really loved reading about your favorite tools.  You have inspired me to try some new tools and to get out some of my old tools and give them another go.

May your Sunday be a relaxing one.

Until my next post. .. . . . . . . .

Hugs,

Michelle

Note:  Links to all my tutorials can be found here:  http://zindorf.blogs.splitcoaststampers.com/tutorials-ive-written/

Here is a link to my workshop calendar if you want to get info on beginner and advanced Brayer workshops:  http://zindorf.blogs.splitcoaststampers.com/workshop-calendar/


My Brayer Has Found a New Home!

dsc02889.JPG  My Beloved Brayer has found a new home.  170 of you had entered to be the one to get it, but the random number generator pick lucky number 56!

Linda Peterson, who wrote “I would give your magic brayer a special place of its own in my craft room.  Thanks for the chance to win.” 

Linda, e-mail your address to mzindorf@aim.com and I will get it in the mail to you!  I know you will be a kind and gentle owner to my old friend.  We have made many, many cards together.  

I took a trip down memory lane (my Split Coast Stamper Gallery) and I found this card which is one of the first I created with this Brayer and an ink pad that was not multi-colored.   I made this January 14, 2007. 

moon_lite_trees_three_by_zindorf.jpg

So long old friend, lol.

Thanks to all who entered,  I treasure each and every one of you!!!

Until my next post. . . . . . . .

Hugs,

Michelle

Note:  Links to all my tutorials can be found here:  http://zindorf.blogs.splitcoaststampers.com/tutorials-ive-written/

Here is a link to my workshop calendar if you want to get info on beginner and advanced Brayer workshops:  http://zindorf.blogs.splitcoaststampers.com/workshop-calendar/


The Wave – Tutorial #114 and Blog Candy

dsc05864.JPG

I have a stormy ocean scene for you today.   I swear when my allergies act up and I’m not feeling well I always reach for shades of blue ink.  The color blue must sooth me.  🙂

Maybe this card will sooth someone else too, so I’ll give it away as blog candy.

To enter for a chance to win this card, please leave me a comment on this post telling me your all time favorite rubber stamping tool, besides rubbers stamps, lol.   I love reading your comments that tell me a bit about yourself.  If you are getting this blog update by e-mail you will need to click this link to leave a comment on this blog post:

 I will use a random number generator to pick the winner on the morning of Sunday, September 7th.

OK then, it is time to get on with this stormy scene tutorial.  🙂

Supplies:

Stamps: Impression Obsession “Branches of a Tree”
Paper: Stampin’ Up Whisper White, Basic Black and Tempting Turquoise
Ink: Adirondack Pitch Black, Pool, Denim & Cloudy Blue
Accessories: Brayer, Sponges, White Gel Pen, Circle Coluzzle Template

dsc05865.JPG

Brayered on Pool ink on the right side of a 5″ x 5″ piece of Whisper White card stock.

dsc05848.JPG

Brayered Denim ink at the right and left sides of the card stock.

dsc05849.JPG

Brayered Denim ink at the top of the card stock.

dsc05850.JPG

Used a circle cut with a coluzzle that measures 3 5/8″ and sponge Denim ink lightly at the edge of one side of the circle.  Move the circle up a bit and sponged again.  I did this a total of 5 times.

dsc05851.JPG

dsc05852.JPG

Sponged Denim ink at the left side of the card stock to blend the sponged lines in a bit.

dsc05853.JPG

Tore a cliff shape from a piece of Whisper White card stock.

dsc05854.JPG

Sponged Cloudy Blue ink on the cliff shape.

dsc05855.JPG

Sponged Denim ink on the cliff shape not covering all of the Cloudy Blue ink.

dsc05856.JPG

Sponged Pitch Black ink on the cliff shape not covering the Denim ink entirely.  I also sponged Pitch Black ink on the top of the cliff shape and along the top of curve shape.

dsc05857.JPG

Adhered the cliff shape to the main panel.

dsc05858.JPG

Stamped the tree with Pitch Black ink.

dsc05859.JPG

Sponged some Pitch Black ink at the top of the sky area to add some drama.

dsc05860.JPG

Used the circle mask again and traced one side of it at the top of each wave to create a highlight in the water.

dsc05861.JPG

Assembled the card and here it is finished measuring 5.25″ x 5.25″.

dsc05864.JPG

I hope this tutorial has inspired you to get inky today.

May your day be filled with calm seas.

Until my next post. . . . . . . . .. .

Hugs,

Michelle

Note:  Links to all my tutorials can be found here:  http://zindorf.blogs.splitcoaststampers.com/tutorials-ive-written/

Here is a link to my workshop calendar if you want to get info on beginner and advanced Brayer workshops:  http://zindorf.blogs.splitcoaststampers.com/workshop-calendar/


Tool Time – Versamark Pad and Marker

dsc05846.JPG

What would I do without my Versamark Pad and Versamark Marker?   If you follow my tutorials you know that I love to use the Emboss resist technique.  Versamark is the main ingredient for heat embossing images when using Dye Based inks.  Dye based inks are thin in nature so they need something added that will help the embossing powder stick.  Versamark is definitely the stuff to make it stick.

Note:  To heat emboss with Dye based inks, load your stamp with Versamark and then load the stamp with ink before stamping.  Then you are able to add your embossing powder and heat with your heat gun.  Your image will now resist ink.

Note 2:  You can also stamp your image with ink, color it with markers and then color over it with a Versamark Marker and then heat emboss your image with clear embossing powder and a heat gun.  Your image will now resist ink.  I use this method a lot in my tutorials, love it!  

Tip 1, when coloring over your image with a Versamark marker, start coloring on the lightest parts of your image and work to the darker areas.  I clean the tip of my marker during this process a lot just by coloring on a scrap piece of paper. 

Tip 2, don’t worry when you are coloring over an image and the Versamark looks like it is drying on your card-stock.  Even though it looks dry it still contains it’s stickiness properties and your embossing powder will stick fine.

Here is a picture of my two Versamark pads.  I keep one Versamark pad (the clean one) just for stamping with Versamark alone.  When you stamp with Versamark by itself it makes a watermark looking image of the stamp on your card stock.  In other words, the stamped image will be a little bit darker in color than your card-stock.

I also keep a pad to use with inks (the yucky looking one on the left).  I use this pad when I am loading my stamp with Versamark and then loading it with ink before stamping.  I’m not real good at cleaning my stamp between stamping multiple images that I want to heat emboss.  🙂  Looks pretty bad, but still works fine.  🙂

dsc05847.JPG

I’ve been asked over and over if loading the stamp with Versamark and then loading it with ink will harm you ink pads.  I have not seen any ill effects on my ink pads and I have been using this method for around 2 years.

Also, I don’t try to refill my Versamark pads and markers, I just by new ones.  I know there are methods for refilling them, but I chose not to.  I don’t use my clean looking pad much so I start using it with inks and use the brand new one for watermarking alone.    The tip of my marker usually looks pretty ratty after a while.  So I just buy a new one and throw the old one away. 

Furthermore, I don’t own stock in Versamark, I just love this product!

Here is a link to my tutorials if you would like to check out how I use Versamark in the majority of them:   http://zindorf.blogs.splitcoaststampers.com/tutorials-ive-written/

I hope you have found this information on Versamark helpful.

Emboss resist on fellow stampers!!!!!

Until my next post. . . . . . . . . . .

Hugs,

Michelle


Summer’s End – Tutorial #113 and Brayer Give away

dsc05844.JPG

Many of you have notice and commented on the fact that I am using a new brayer.  I’m using a new one because I wanted to use the exact one the people attending my brayer workshops get to use and take home with them.   The new brayer is only different from the old brayer due to the handle.  It has the exact same roller.  🙂   There is this crazy rumor that my old Speedball Brayer is magical, lol.  It is not magical, but it still has a great deal of life left in it although it is stained from a few years of use.  Many of you have e-mailed me asking if you could have my old beloved brayer.  Since there is more than one of you asking, I’m going to give it away.  If you wish to enter for a chance at my brayer, please leave a comment on this post and I will use a random number generator to select the winner on the morning of Saturday, September 6th.  If you are receiving my blog update by e-mail you will need to click on this link to enter a comment on this post:   http://zindorf.blogs.splitcoaststampers.com/2008/09/03/summers-end-tutorial-113-and-brayer-give-away/


dsc02568.JPG

Ok, enough about that.   Today’s tutorial is for the SCS Sketch Challenge 192 and I’m using a stamp that I have had for years and has never seen ink.

Let’s get going on the tutorial!

Supplies:

Stamps: Stampin’ Up Summer by the Sea and Canvas Background
Paper: Stampin’ Up Whisper White, Tempting Turquoise, Baja Breeze & Creamy Caramel
Ink: Stampin’ Up Close to Cocoa, Creamy Caramel & Tempting Turquoise, Palette Noir Black & Adirondack Aqua
Accessories: Prismacolor Markers, Sponges, Brayer, Versamark Marker, Fine Detail Clear embossing Powder, Heat gun, Brads, Ribbon, Tim Holtz Ruler, Push Pin, White Gel Pen, Post it Note

dsc05845.JPG

Stamped image on a 3.5″ x 5″ piece of Whisper White card stock with Palette Noir Black ink.

dsc05814.JPG

Colored his shirt in with a Prismacolor Carmine Red Marker.

dsc05815.JPG

Added Crimson Red to the creases of the shirt.

dsc05816.JPG

Colored his pants with Soft Sky Blue.

dsc05817.JPG

Added Periwinkle to the creases of his pants.

dsc05818.JPG

Colored over his pants again with the Sky Blue Light marker to blend them more.

dsc05819.JPG

Colored his shoval with Sunburst Yellow.

dsc05820.JPG

Colored his skin with Pale Peach.

dsc05821.JPG

Colored his hair with Walnut.

dsc05822.JPG

Added some Tuscan Red to the dark areas in his hair.

dsc05823.JPG

Went over all his hair with the walnut marker again to blend.

dsc05824.JPG

Colored the Sand Castle with Eggshell.

dsc05825.JPG

Colored over the boy, starfish and castle with a Versamark marker and heat embossed the images with fine detail clear embossing powder and a heat gun.

dsc05826.JPG

dsc05827.JPG

Brayered Adirondack Aqua ink at an angle on the top of the card stock.

dsc05828.JPG

Brayered Creamy Caramel ink at an angle at the bottom of the card stock.

dsc05829.JPG

Brayered more Aqua ink at an angel at the top of the card stock, bringing it down closer to the Creamy caramel ink.

dsc05830.JPG

Masked about an inch of the card stock top with a post it note and sponged on Tempting Turquoise ink, not covering the Aqua entirely.  This puts in the horizon line.

dsc05831.JPG

Removed post it note mask and sponged Creamy Caramel ink at the water line.

dsc05832.JPG

Added a foam look to the water edge with a white gel pen by making dots and dashes.

dsc05833.JPG

Cut my two panels and sponged Tempting Turquoise ink on 3 edges of the two panels.

dsc05834.JPG

Sponged Close to Cocoa around the edge of the main image panel.

dsc05835.JPG

Stamped the Canvas background stamp in Creamy Caramel on the main image panel. 

Note:  I flip my large background stamps over so the rubber side is up and ink them by rubbing my ink pad across them.  I then flip my card stock face down on the stamp and roll my brayer one time over the card stock.  If you roll back and forth you will smear your image.

dsc05836.JPG

dsc05837.JPG

dsc05838.JPG

Wiped the ink from my embossed images with an old rag.

dsc05839.JPG

Sponged Close to Cocoa ink on the edges of the two panels.

dsc05840.JPG

Used my Tim Holtz Ruler and a push pin to add piercings to the bottom panel.

dsc05841.JPG

Assembled card and added ribbon and brads.  Here it is finished measuring 5″ x 6.5″.

dsc05844.JPG

Hope you enjoyed this tutorial and are now inspired to try a beach scene of your own. 🙂

May your day be filled with the smell of salt in the air and warm breezes blowing your hair.

Until my next post. . . . . . . . .. .

Hugs,

Michelle

Note:  Links to all my tutorials can be found here:  http://zindorf.blogs.splitcoaststampers.com/tutorials-ive-written/

Here is a link to my workshop calendar if you want to get info on beginner and advanced Brayer workshops:  http://zindorf.blogs.splitcoaststampers.com/workshop-calendar/


Monochromatic Maple Tree – Tutorial #112

dsc05811.JPG

Woohoo!  New Innovative Stamp Creations Stamp Sheets are out!  Here is the link:  http://www.innovativestampcreations.com/ischomepage.html

Today I used the new Innovative Stamp Creations stamp sheet “Maple Tree Paintings” and combined the images with today’s SCS Monochromatic Challenge CC182.    I decided to go for an old photo or pen and ink drawing look by using Greys and was quite happy with the way it turned out.  Who knew Grey could be so interesting? 

Let’s get started.  🙂

Supplies:

Stamps: Innovative Stamp Creations “Maple Tree Paintings”
Paper: Stampin’ Up Whisper White, Going Grey, Black
Ink: Adirondack Black, Pebble & Lake Mist
Accessories: Aqua Painter, White Gel Pen, Sponge, Photo Corner Punch, Black marker, Brayer

dsc05813.JPG

Stamped Maple Tree with Pitch Black ink on a 4″ x 4.5″ piece of Whisper White card stock.

dsc05795.JPG

Brayered Lake Mist ink at the top of the card stock.

dsc05796.JPG

Squeezed my Pebble stamp pad so it would make a puddle of ink on the lid and used the puddle to water color the leaves of tree with an Aqua Painter.

dsc05797.JPG

dsc05798.JPG

Sponged in a hill with Pebble ink.

dsc05799.JPG

Sponged Black ink at the bottom of the card stock, but did not cover the Pebble ink entirely.

dsc05801.JPG

Watercolored some Black ink on the right side of the tree leaves.

dsc05802.JPG

Sponged some Pebble ink at the top of the card stock to make the sky a bit more interesting.

dsc05803.JPG

Darkened some of the tree branches on the Right side of the tree with a Black marker.

dsc05804.JPG

Made White Dots on the Left side of the trees leaves to create highlights and some dashes on the hill to indicate grasses.

dsc05806.JPG

Stamped the birds with Pitch Black ink.

dsc05807.JPG

Sponged Black ink on all the edges of the main image panel.

dsc05808.JPG

Assembled card and here it is finished measuring 5″ x 5.5″.

dsc05811.JPG

This was a fun and challenging project.  Why don’t you give a Monochromatic card a try today?  Here is a link to the SCS challenge:  http://www.splitcoaststampers.com/forums/showthread.php?t=378798

May your day be filled with fantastic images!

One last thing,  thank you for all of the birthday wishes.  I received over one hundred Happy Birthday comments, about one hundred e-mails and a whole bunch of e-cards.  You all made my birthday a very happy one indeed!  Thank you, thank you!

Until my next post. . . . . . . . . . .

Hugs,

Michelle

Note:  Links to all my tutorials can be found here:  http://zindorf.blogs.splitcoaststampers.com/tutorials-ive-written/


Happy Birthday to me

Happy Birthday to me, happy birthday to me, happy birthday dear Michelle.. . . . . . . . Happy Birthday to me…….. and many more, lol.

gallery-photo2_thumbnail.jpg

Hey everyone, I just wanted to explain why I’m taking this holiday weekend off.   One, today is my birthday, two tomorrow is a holiday and three I’m working on workshop projects that won’t be posted.  These projects are being especially made for my advanced workshops I’m doing in San Jose, California in October.  I say advanced workshops because you have to already have taken one of my workshops to be able to attend the advanced one.   Here is a link to my workshop calendar if you want to get info on beginner and advanced workshops:  http://zindorf.blogs.splitcoaststampers.com/workshop-calendar/

 May your weekend be filled with lots of love and joy!

Until my next post. . . . . . . . .

Hugs,

Michelle

Note:  Links to all my tutorials can be found here:  http://zindorf.blogs.splitcoaststampers.com/tutorials-ive-written/