25th Anniversary, Wine and New Weekly Deals

DSC_0001

Hello There,

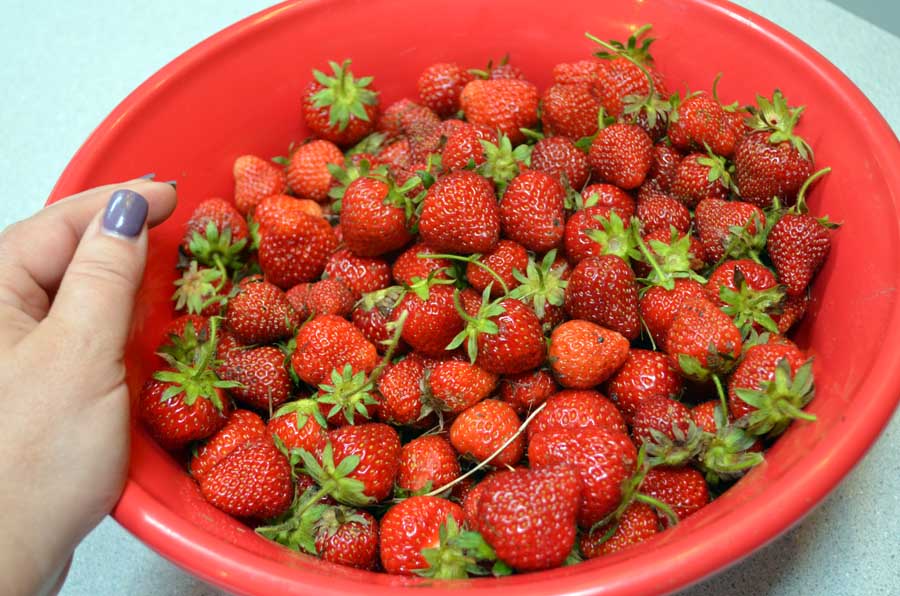
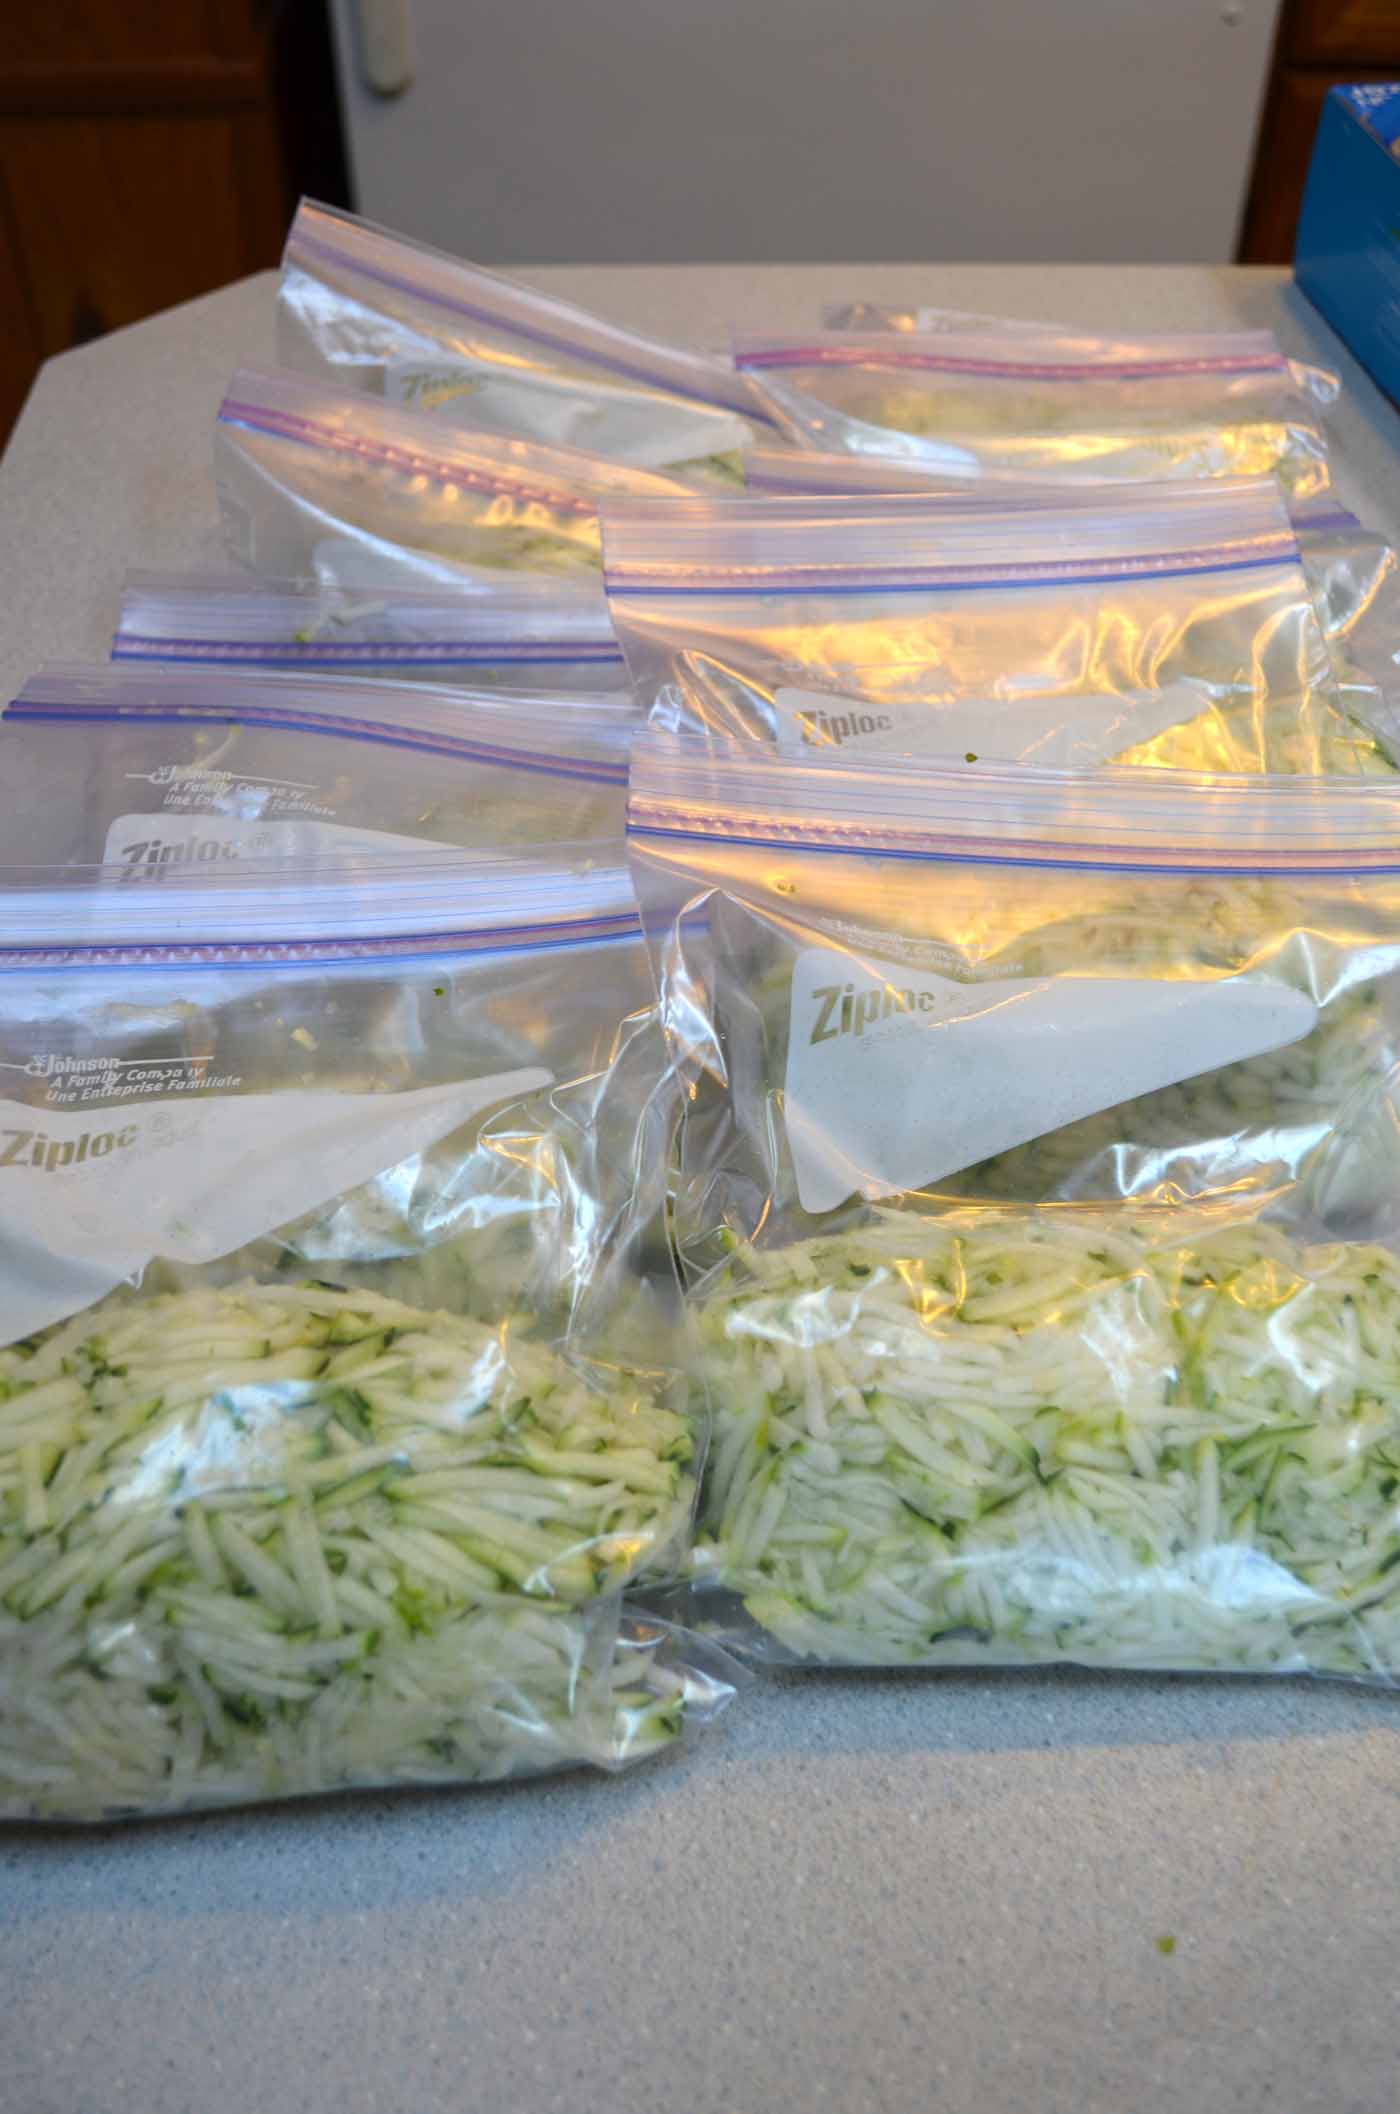
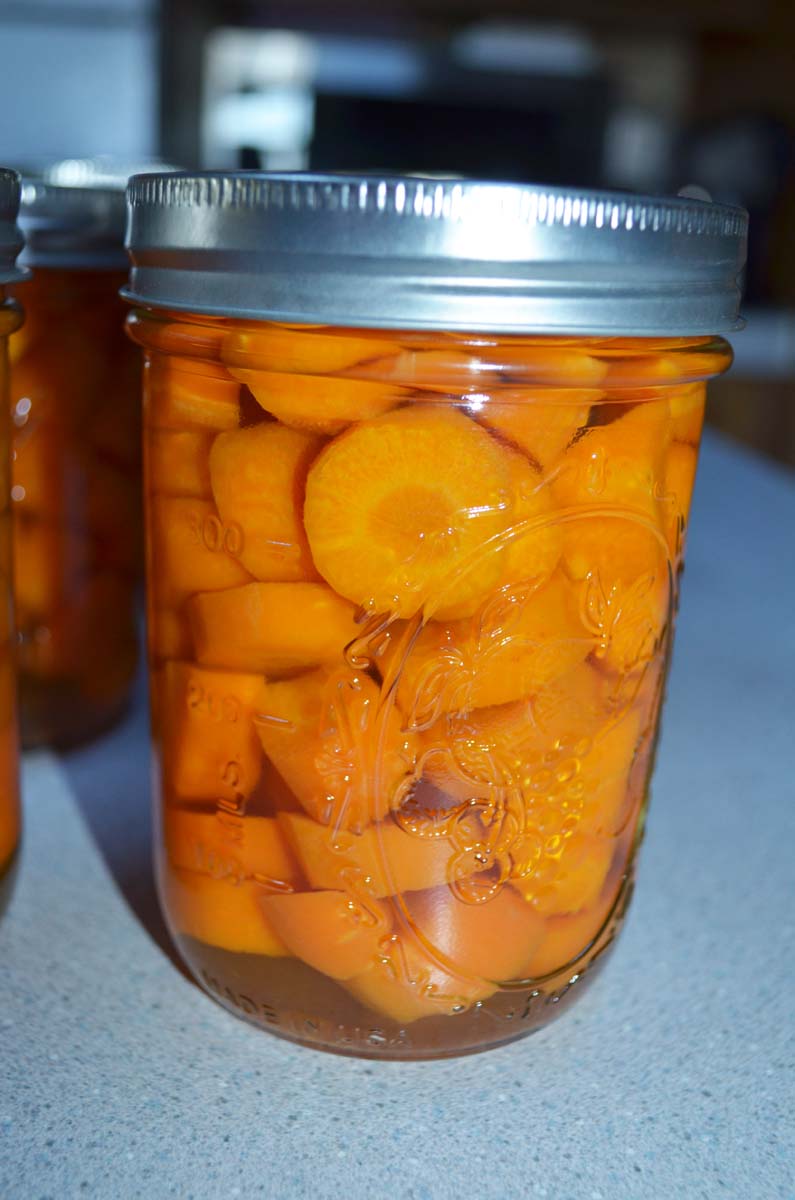
Remember this strawberry goodness I grew, well some of it ended up like this. . ..  what better way to use berries, right?

DSC_0002_edited-2

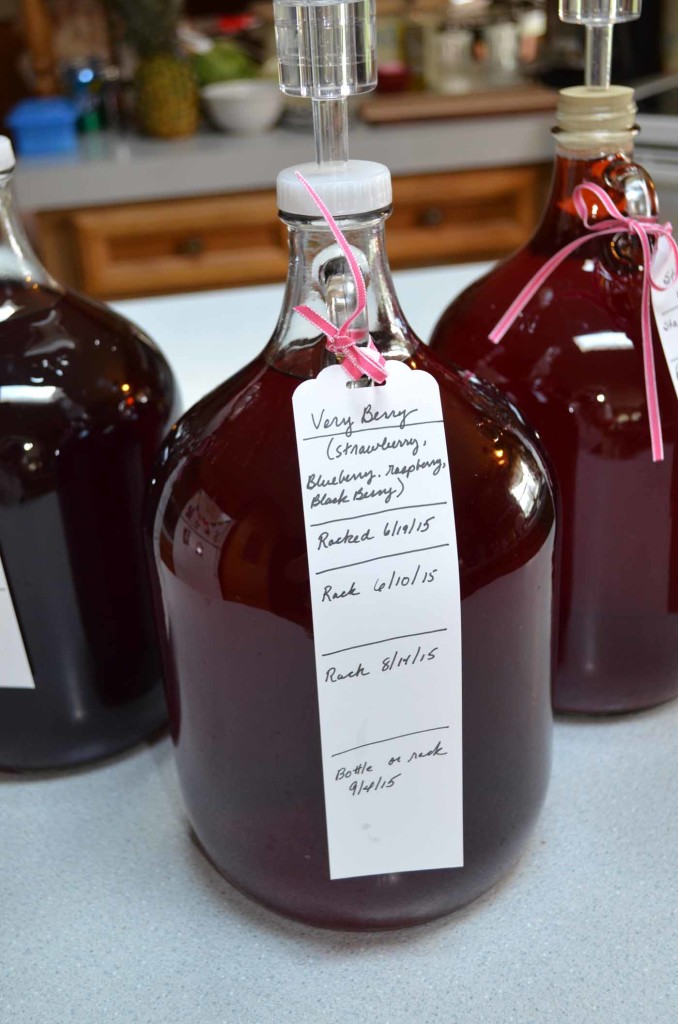
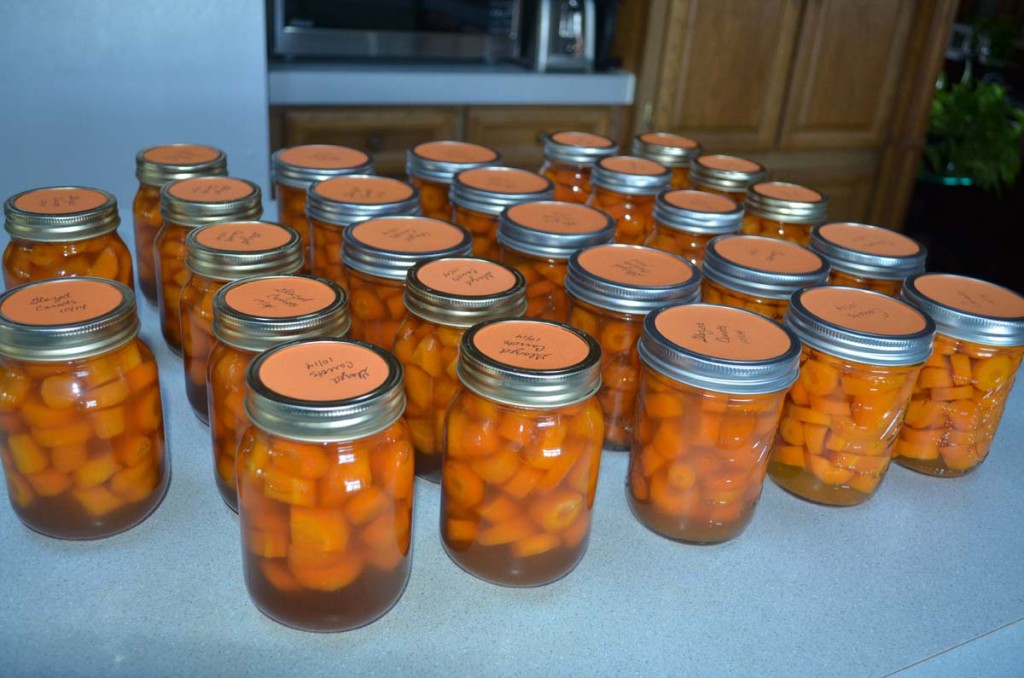
I’m a new home wine maker and I have been storing these three gallon jugs of Strawberry, Mixed Berry and Blue Berry wine in a closet for a few months until they were ready to bottle.  Well today was the day.. .. . . . .

DSC_0006_edited-2

This is a photo of the Strawberry wine after bottling.  Now more waiting. . .. 9 more months of waiting.  Can I wait that long, time will tell.

If you are interested in wine making check out You Tube and of course there are many books on the subject.  It’s not difficult and it’s fun to make and fun to drink too, grin.

On another note. . ..

Screen Shot 2015-08-11 at 2.48.24 PM

Today Russ and I are celebrating our 25th anniversary.  It seems like yesterday we were this young.  But, like fine wine it only got better with time.  I’m looking forward to spending many, many more years with the love of my life.  Cheers Baby!

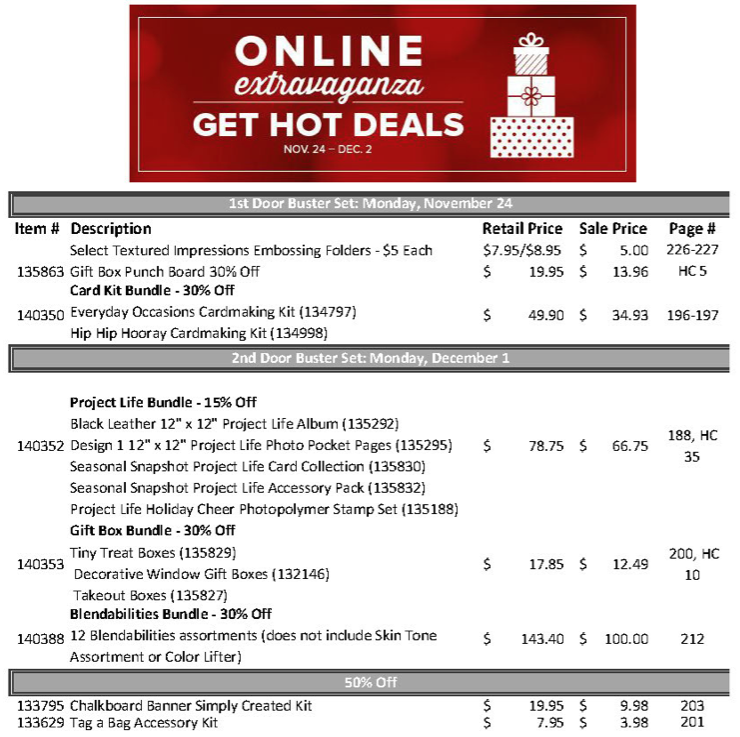
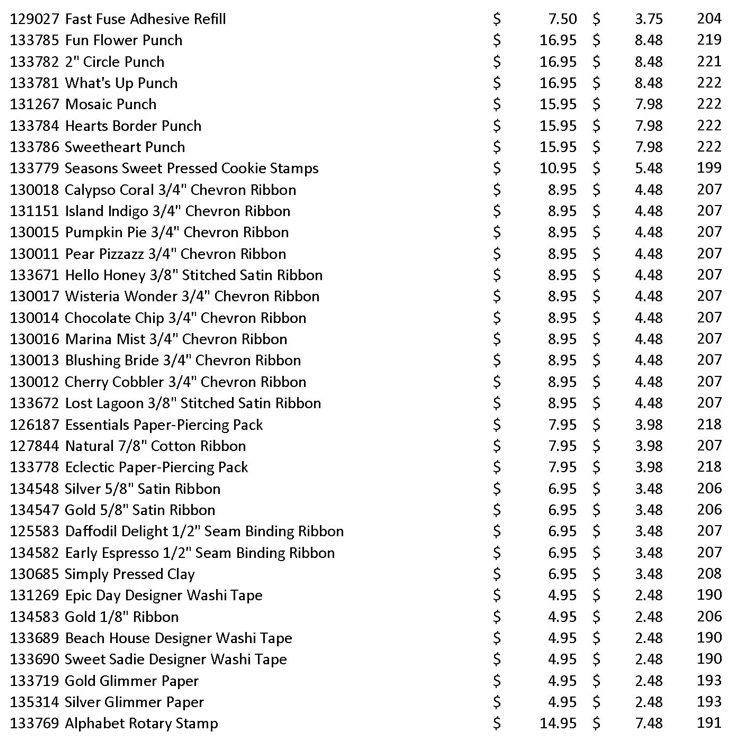
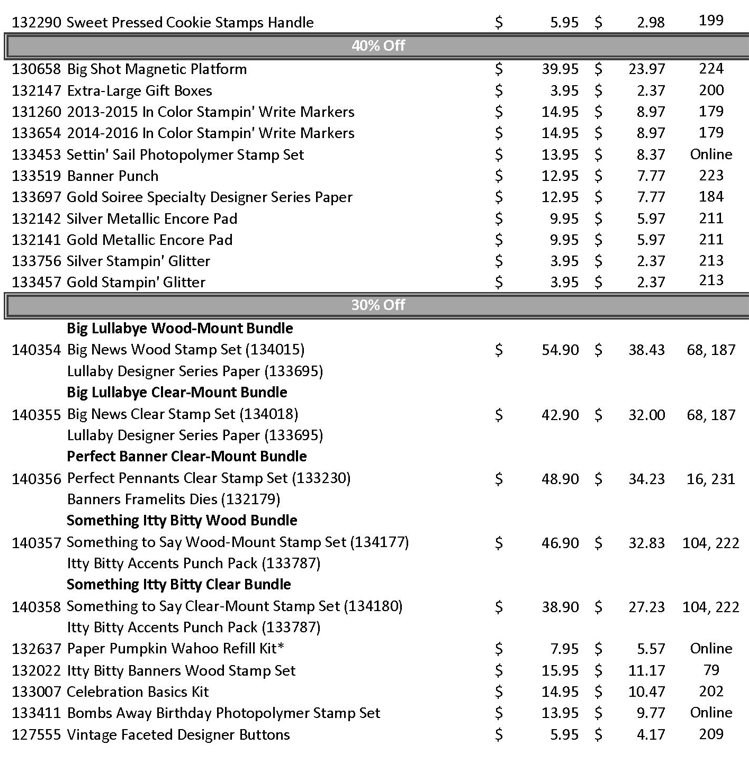
One last thing before I close today, THERE ARE NEW WEEKLY DEALS STARTING TODAY!  Check them out.

Screen Shot 2015-08-11 at 2.58.20 PM

CHECK OUT THE LATEST BATCH OF STAMPIN’ UP! WEEKLY DEALS IN MY ON-LINE STORE.  DISCOUNTED PRICES ON THIS WEEK’S DEALS END AUGUST 17TH. 

Note:  Deal prices are only good while supplies last.  Hurry and get them now!

Until my next post. . . . . . .  .

Huge Hugs!

*******************************************************************

Oh My, Get a Whole Month Worth of Tutorials Free!

Place a $50 merchandise order between August 1, 2015 and August 31, 2015 and receive the entire month of tutorials (at least 12) free of charge via e-mail.

You will receive all of the projects pictured below and they will keep coming until August 31st.  You will also receive 1 virtual token from me for each $50 in merchandise purchased with your order.  Collect 10 tokens and receive a free stamp set of your choice up to a $30 value.   Now, that’s the way to get some bang for your buck!
Free tutorials are an exclusive perk for my valued Stampin’ Up! customers and down line.
DSC_0031_edited-2  DSC_0027_edited-2  DSC_0028_edited-2  DSC_0037_edited-2  
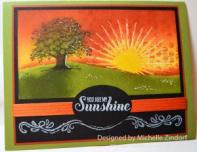
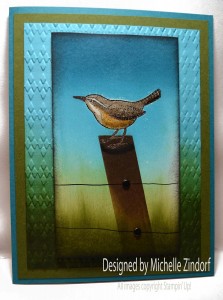
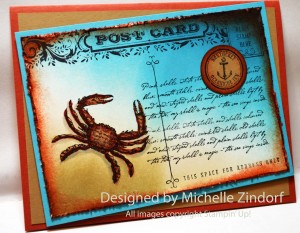
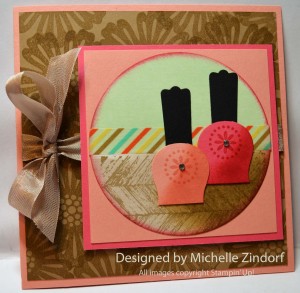
plus 8 more to come.
PLEASE USE HOSTESS CODE:  BAN9W7RS     (DO NOT USE IF MERCHANDISE ORDERED IS OVER $150)

If you wish to receive the tutorials please do not click the “no contact” box when placing your order. ************************************************************

Shop my online store now CLICK HERE *

Please note that this Free Stamps with Tokens Rewards Program  and free tutorials offer are being offered by me, Michelle Zindorf only, and not Stampin’ Up!

*******************************************************************

IF YOU WISH TO PURCHASE THIS MONTH’S SINGLE TUTORIALS OR THIS MONTH’S TUTORIAL PACKAGE CLICK HERE FOR DETAILS.

*******************************************************************

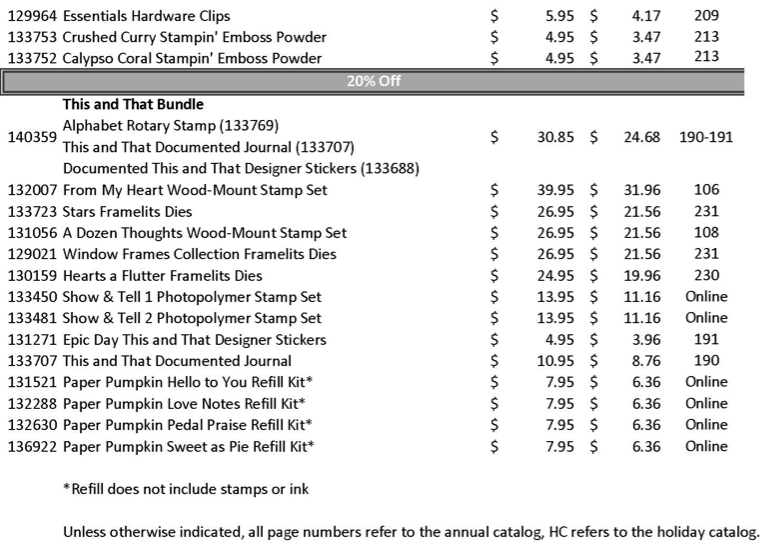
Stampin’ Up! Specials Happening Now!

********************************************************************

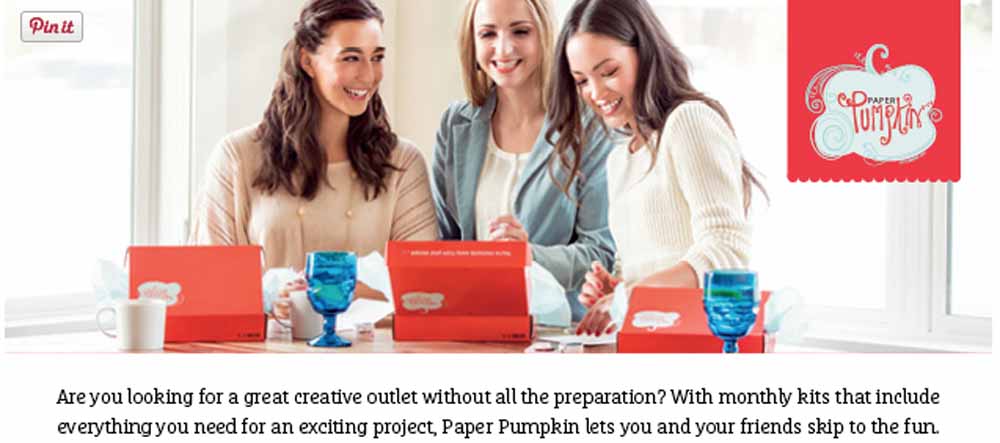
1/2 off Paper Pumpkin!

Screen Shot 2015-07-29 at 3.06.16 PM
Screen Shot 2015-07-29 at 2.45.34 PM

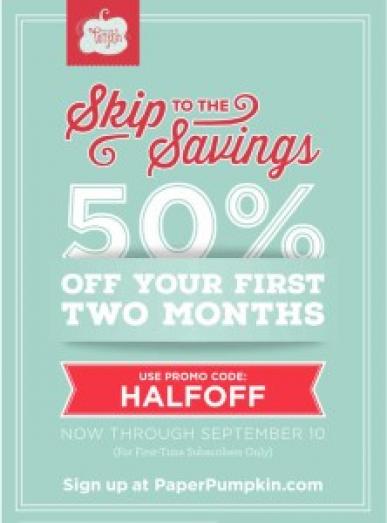
Paper Pumpkin is one of my very favorite Stampin’ Up! products. Each month you’ll receive an orange box with darling curated projects—sometimes cards, sometimes gift packaging, sometimes both!—that you can complete in less than an hour. All supplies and instructions included.  I’m always delighted at the projects I have received each month. When that orange box shows up in my mailbox I get so excited.  🙂

I hope you’ll give Paper Pumpkin a try and enjoy this fabulous get-started special at the same time. Just go to PaperPumpkin.com and enter HALFOFF as the promo code and choose me as your demonstrator!  Thank you!


Crazy Gardening Time

DSC_0001_edited-1

Hello there,

I’ve got a chicken coop and run to give a good Summer cleaning too this morning so I thought I would do a quick post regarding my other love, gardening.  My garden is in full swing and with all the rain we have had here in Ohio the entire month of June and now in July my veggie beds are overflowing.  This is just what I picked this morning and it pretty much looks like this every morning.  Between squash, zucchini, cucumbers and peppers my refrigerator can only hold so much.  So I give away a great deal of vegetables to neighbors, Russ’ co-workers and stamp class attendees, lol.  Pretty much everyone we are in contact with.  🙂

I also freeze some veggies. Here is how I freeze my zucchini.

DSC_0009_edited-1  DSC_0010_edited-1

I first wash my zucchini well, of course.  Then I use my Kitchen Aide Mixer and the shredding attachment and shred a bunch and put 2 cup portions in quart freezer bags.  I squeeze all of the air out of the bags that I can before sealing them.  Then I put the small bags into a 2 gallon freezer bag and into the freezer.  Thats it!   I freeze them in 2 cup portions because that is what the majority of my recipes call for.    That way I can pull out one small bag when I want to make zucchini bread or cookies.  The shredded zucchini is also good to slip into pasta dishes or soups.

I’m off to shovel chicken poop. . .. .

*************************************************

Have a great weekend!

Until my next post. . . . . . .  .

Huge Hugs!

*******************************************************************

A Whole Month Worth of Tutorials Free!

Place a $50 merchandise order between July 1, 2015 and July 31, 2015 and receive the entire month of tutorials (at least 12) free of charge via e-mail.

You will receive all of the projects pictured below and they will keep coming until July 31st.  You will also receive 1 virtual token from me for each $50 in merchandise purchased with your order.  Collect 10 tokens and receive a free stamp set of your choice up to a $30 value.   Now, that’s the way to get some bang for your buck!
Free tutorials are an exclusive perk for my valued Stampin’ Up! customers and down line.
  DSC_0022  DSC_0030  DSC_0033_edited-1  DSC_0026_edited-1 DSC_0027_edited-1  DSC_0027_edited-1  DSC_0030_edited-1
 5 MORE TUTORIALS TO COME THIS MONTH.
 PLEASE USE HOSTESS CODE:  HAG3GC7S     (DO NOT USE IF MERCHANDISE ORDER IS OVER $150)

If you wish to receive the tutorials please do not click the “no contact” box when placing your order. ************************************************************

Shop my online store now CLICK HERE *

***************************************************************************

 I would be amiss if I didn’t tell you that Stampin’ Up! is adding more and more great products to the clearance rack this month at up to a 60% discount.  Only available while supplies last. Be sure to check it out when placing your order!

***************************************************************************

New Deals Start Today!

CHECK OUT THE LATEST BATCH OF STAMPIN’ UP! WEEKLY DEALS IN MY ON-LINE STORE.  DISCOUNTED PRICES ON THIS WEEK’S DEALS END JULY 20TH. 

Note:  Deal prices are only good while supplies last.  Hurry and get them now!


In The Kitchen – Moose Munch

DSC_0013

Hello There,

I’m in the kitchen today whipping up some little gifts.

Inside these bags is the most wonderful snack.  Just beware it’s addictive!

DSC_0002

Moose Munch is a wonderful mixture of homemade caramel corn, peanuts, tiny Reeses and chocolate, YUMMY!

DSC_0010

I put the Moose Munch in the Petite Cafe Gift Bags (135826) and one recipe filled 10 bags, less the snacking along the way, lol.  These bags are food safe, have a poly coating inside and tin tie closure.  🙂  I did a quick tag for the front and used the Moose  stamp from Visions of Santa stamp set.  Used my printer to put “Moose Munch” title on the card stock.

Moose Munch Recipe

Carmel Corn
3-4 quarts popped corn
1 stick of butter (no substitutes)
¾ Cup brown sugar
½ tsp salt
¼ Cup corn syrup
1 tsp baking soda
Put butter, brown sugar, salt and corn syrup in a microwave safe bowl. Microwave until it boils. Once it come to a boil remove and stir. Return to the microwave and cook 1 minute longer.
Remove, add baking soda and stir well. The mixture will get lighter in color. Pour mixture over your bowl of popcorn and stir for a few moments. Put in the microwave and cook for 1 minute. Stir the popcorn again. Your popcorn should be pretty well coated.

Moose Munch
3-4 quarters Caramel Corn
1 bag chocolate Chips (I used semi sweet)
½ cup peanuts
1 small bag of miniature Reeses
2 Tablespoons vegetable oil
Spread caramel corn out on parchment paper lined cookie sheets. Sprinkle the peanuts and Reeses over the Caramel Corn.
Put chocolate chips in a microwave safe bowl with the vegetable oil. Microwave 1 minute, stir and microwave one more minute.
Pour melted chocolate in a plastic bag and clip the bottom point of the bag off. Drizzle chocolate over Caramel Corn. Put the cookie sheets in the refrigerator for 30 minutes until chocolate hardens. Break the Moose Munch up and put in containers.

***************************************************************

Supply List

******************************************************************************

FREE TUTORIALS

******************************************************************************

Want the entire month worth of tutorials free?

Place a $50 merchandise order between December 1, 2014 and December 31, 2014 and receive the entire month of tutorials (at least 12) free of charge via e-mail.
You will receive all of the projects pictured below, plus, they will keep coming until December 31, 2014.  You will also receive 1 virtual token from me for each $50 in merchandise purchased with your order.  Collect 10 tokens and receive a free stamp set of your choice up to a $30 value.  Now, that’s the way to get some bang for your buck!
Free tutorials are an exclusive perk for my valued Stampin’ Up! customers and down line.
DSC_0030  DSC_0027DSC_0018   DSC_0022 8 more to come. . . . .
************************************************************
Note:  Please do not select the option for no contact when placing your order or I will not be able to send you the tutorials.  Also, please make sure that my e-mail address, mzindorf@aim.com is approved in your e-mail account so your e-mail does not reject my e-mails which contain the tutorials.  🙂

Shop my online store now CLICK HERE *

Please use Hostess Code: PFGKMHF2     (Do not use if merchandise order is over $150)

*********************************************************

If you wish to purchase tutorials or check out the monthly Tutorial subscription option.

CLICK HERE FOR DETAILS.

**********************************************************

May today’s project inspire you to get inky!

Until my next post. . . . . . .  .

Huge Hugs!
**********************************************************

1 weekly deals

Check out the latest batch of Stampin’ Up! Weekly Deals in my on-line store.  Discounted prices on this week’s deals end December 15th.

************************************************************

Current catalogs
2014-15 Catalog  Holiday Catalog  Holiday Supplement
*************************************************************


In the Kitchen – Freezer Friendly Sweet Potato Casserole

DSC_0002

Happy Thanksgiving!!!   I am so very thankful for my family and friends and that includes you.  I hope your day is filled with family, friends and all that you are thankful for as well.

*********************************************************

Sweet Potato Casserole

One thing about freezer meals is that you can shop when things are on sale.  Always around Thanksgiving the Sweet Potatoes are on sale at a really good price, at least 1/2 off.  So, I cannot resist a bargain so I bought 20 sweet potatoes and decided to make Sweet Potato Casseroles.  Why not, one for Thanksgiving and 3 more to stash away in the freezer to be eaten at a later date, mmmmmm.  🙂

Here is how I made mine:

I washed and baked my potatoes right on the rack in my oven at 350 degrees for 1hour and 10 minutes.  Tip, put aluminum foil on a second rack under the potatoes to catch any drips, you will thank me for this later, lol.

DSC_0001

I tripled the following recipe to get (4) 8×8 pans.  Mix the following together with your mixer.

5 Cups mashed sweet potatoes, 1/2 cup brown sugar, 1/2 cup milk, 1/4 cup melted butter, 2 eggs, 1 teaspoon vanilla, 1 teaspoon salt, 1/2 teaspoon ground cinnamon, 1/4 teaspoon ground nutmeg.

Fill your pan(s).

DSC_0002

Combine the crumb topping and sprinkle it onto the top of your casserole(s).

Crumb Topping (I tripled the following)

1 cup brown sugar, 1/2 cup flour, 1/2 cup cold butter, 1/2 cup chopped pecans. Combine all and cut in the butter until crumbly.  I used my food processor to make quick work of this.

Bake uncovered at 350 for 30-40 minutes, until bubbly and the crumbs just begin to brown.

DSC_0003

DSC_0004

FREEZER DIRECTIONS:  cover with aluminum foil and freeze.  I put mine in a food saver bag, add the recipe in the bag and seal.  You can also put the pan in a 2 gallon freezer bag and seal or  You  put the potato mixture in a gallon freezer bag and the crumb topping in a quart size bag.  Put both in another bag, label and freeze.

Note:  I put a copy of the recipe in the bag so I don’t have to write the cooking directions, name of dish etc. on the bag.  When I cook the dish I save the recipe for the next time I prepare the same dish.  I have a binder with plastic sleeves in it to store the copies of the recipes in.  🙂

To bake:  Thaw in the refrigerator.  Bake uncovered at 350 degrees for 30-40 minutes.

*****************************************************************************

FREE TUTORIALS

Only 3 days left to get this month’s tutorials free!

******************************************************************************

Want the entire month worth of tutorials free?

Place a $50 merchandise order between November 1, 2014 and November 30, 2014 and receive the entire month of tutorials (at least 12) free of charge via e-mail.
You will receive all of these, plus, they will keep coming until November 30, 2014.  You will also receive 1 virtual token from me for each $50 in merchandise purchased with your order.  Collect 10 tokens and receive a free stamp set of your choice up to a $30 value.  Now, that’s the way to get some bang for your buck!
Free tutorials are an exclusive perk for my valued Stampin’ Up! customers and down line.
DSC_0025  DSC_0027  DSC_0026  DSC_0036  DSC_0020  DSC_0035  DSC_0034  DSC_0031 DSC_0020  DSC_0017  DSC_0018
************************************************
Have a smaller order?  The complete tutorial for today’s project along with all of the card tutorials I create from November 16, 2014 through November 30, 2014 (at least 6 tutorials) will be e-mailed to my customers who place a minimum  $20 merchandise order anytime between November 16, 2014 through November 30, 2014 free of charge.
Note:  Please do not select the option for no contact when placing your order or I will not be able to send you the tutorials.  Also, please make sure that my e-mail address, mzindorf@aim.com is approved in your e-mail account so your e-mail does not reject my e-mails which contain the tutorials.  🙂

Shop my online store now CLICK HERE *

Please use Hostess Code: WUE9BG32     (Do not use if merchandise order is over $150)

***************************************************************************

If you wish to purchase a tutorial or check out the monthly Tutorial subscription option.

CLICK HERE FOR DETAILS.

*********************************************************

Have one heck of a Thanksgiving!

Until my next post. . . . . . .  .

Huge Hugs!
********************************************************

The Online Extravaganza  – Check out all of the items in the list on sale up to a 50% discount, Wooohooo!

stampin up sale online exravaganze 1

stampin up sale online exravaganze 2

stampin up sale online exravaganze 3

stampin up sale online exravaganze 4

*****************************************************

Header_saveandearn_demo_11.24.14_ENG

Starting November 24 through December 2 when you join my team you will save 25% off the kit! That is $125.00 worth of stamping products for $75.00  You can even pick items off the Extravaganza sale in your customizable kit.  Plus you will be earning 5% cash back on all commissionable orders placed in December.

On top of this great deal as part of my team you will receive my tutorials for free.  Whether you join just to receive the 20% discount on product or if you wish to build your own business I would love to have you join my team and would love to answer any questions you may have.

  Click Here

*********************************************************

New Deals start today!

Weekly deals 11 25

Check out the latest batch of Stampin’ Up! Weekly Deals in my on-line store.  Discounted prices on this week’s deals end December 1st.

************************************************************

Current catalogs
2014-15 Catalog  Holiday Catalog  Holiday Supplement
******************************************


In the Kitchen – Freezer Friendly Pizza Pockets

DSC_0014

Baby it’s cooollllldddd outside!  That is why I’m in the kitchen with the oven on, lol.  Also, I have gotten so many requests for me to show more freezer meal options.  Here is one for you that the whole family will love.

I have a hard time keeping homemade pizza pockets in the freezer these days.  They are so good and once in the freezer they are ready to eat after 40 seconds in the microwave.  Lunch in 40 seconds, that rocks!

Here is how I made them. . . . .

You can use store bought pizza dough for these.  I used pizza dough I whipped up in my bread machine.  Any pizza dough will work.  Want a healthy dough use whole wheat pizza dough.  🙂

DSC_0001

Roll a bit of the dough out in a circle on a floured surface, I use my counter.  Roll it out to the size of your hand.

DSC_0002

Add a spoon full of pizza sauce, don’t get too saucy or it will make your dough wet and it won’t stick together.  Leave about 1/2″ of the edge of the dough dry.

DSC_0003

Add whatever you want as filling.  I made mine simple with turkey pepperoni and cheese.

DSC_0004

Fold the dough over.

DSC_0005

Roll the edges up and pinch to seal.

DSC_0006

Using the tines of a fork, go around the edges pressing down to seal well.

DSC_0008

Put them on a parchment paper lined cookie sheet and put a small slit in the top of each one to let the steam release during cooking.

DSC_0009

Mix together a few tablespoons of Olive Oil, 1 t. spoon of garlic powder and 1 t. of parsley flakes.  Brush this mixture on top of the pizza pockets.  Gives the pocket a great garlic taste, mmmm.

DSC_0014

Bake in a 350 oven for 15-20 minutes.  Take them out of the oven and cool completely.  Wrap each one separately with plastic wrap and put in a gallon size freezer bag.  Label and freeze.  When ready to use microwave unwrapped frozen pizza pocket on high for 40 seconds.  Enjoy!

One more thing that you can make at home that you will know exactly what is in it and save quite a bit of money doing it.

Stay warm!

Until my next post. . . . . . .  .

Huge Hugs!

******************************************************************************

FREE TUTORIALS

******************************************************************************

Want the entire month worth of tutorials free?

Place a $50 merchandise order between November 1, 2014 and November 30, 2014 and receive the entire month of tutorials (at least 12) free of charge via e-mail.
You will receive all of these, plus, they will keep coming until November 30, 2014.  You will also receive 1 virtual token from me for each $50 in merchandise purchased with your order.  Collect 10 tokens and receive a free stamp set of your choice up to a $30 value.  Now, that’s the way to get some bang for your buck!
Free tutorials are an exclusive perk for my valued Stampin’ Up! customers and down line.
DSC_0025  DSC_0027  DSC_0026  DSC_0036  DSC_0020  DSC_0035  DSC_0034  DSC_0031
************************************************
Have a smaller order?  The complete tutorial for today’s project along with all of the card tutorials I create from November 16, 2014 through November 30, 2014 (at least 6 tutorials) will be e-mailed to my customers who place a minimum  $20 merchandise order anytime between November 16, 2014 through November 30, 2014 free of charge.
Note:  Please do not select the option for no contact when placing your order or I will not be able to send you the tutorials.  Also, please make sure that my e-mail address, mzindorf@aim.com is approved in your e-mail account so your e-mail does not reject my e-mails which contain the tutorials.  🙂

Shop my online store now CLICK HERE *

Please use Hostess Code: WUE9BG32     (Do not use if merchandise order is over $150)

***************************************************************************

If you wish to purchase the tutorial for this project or check out the monthly Tutorial subscription option.

CLICK HERE FOR DETAILS.

********************************************************

DSC_0020 
Want to learn how to brayer to make fantastic skies for your scenes? CLICK HERE TO CHECK OUT MY VIDEOS
*********************************************************
Current catalogs
2014-15 Catalog  Holiday Catalog  Holiday Supplement
**********************************************************
New Deals start today!

Weekly deal 11 18

Check out the latest batch of Stampin’ Up! Weekly Deals in my on-line store.  Discounted prices on this week’s deals end November 24th.


Freezer Apple Pie Filling and Instant Oatmeal Packets

DSC_0001

Hello there,

I’m back in the kitchen and I thought I would share what I have been up to.

I was at the our little grocery store yesterday and I cannot resist stopping at their clearance fruit and veggie bin.  Does your store have one?

Our store always have these great bags of apples that may have a bruise or two for $2 for a 5 lb bag.  Now that’s cheap for apples.   I don’t care about any bruises since I use them to make apple pie filling or apple sauce with.   Also, I put my apple pie filling in freezer bags and freeze it.  This is done with a smile on my face knowing there is no added preservatives.

So here is how to freeze Apple Pie Filling:

DSC_0003

If you are going to be processing a lot of apples you can peel, core and slice them thin by hand or invest in an apple peeler/corer/slicer.    You can peel, core and slice an apple with one of these in just seconds.  I got mine from Amazon.

So after you get your apples peeled, cored and sliced, put 7-8 cups of apples in a gallon freezer bag.  Put 2 tablespoons of lemon juice in the bag and shake it up.  The lemon juice keeps your apples from turning brown.

Next, put the following in the bag:

1 cup of sugar, 1/4 cup of flour, 1 teaspoon Cinnamon, 1/4 teaspoon salt, 1/8 teaspoon nutmeg.

Seal and shake the bag coating the apples.

Lastly, cut up into chunks 2 tablespoons of butter and add it to the bag.

Squeeze as much air out of the bag as possible, seal and put it in the freezer.  🙂  I lay mine flat so they take up less space in the freezer.

To Cook:  Remove bag from the freezer and lay on the counter for about an hour to 45 minutes to defrost or in the refrigerator overnight.  Squish the bag to mix well and dump into a pie shell.  Either cover with a top crust and flute the edges or add a crumb topping.  Bake as you would any normal apple pie.  I bake mine at 350 degrees for about 1 hour and 10 minutes.

Left over apple slices:

DSC_0004

Any left over apple slice get put in my dehydrator and dried.  We love to chop these dried apples up to put in our home made oatmeal packets (below).  Yep, I have all the kitchen toys, lol.

********************************************************

Instant Oatmeal Packets

DSC_0001

Making up your own instant oatmeal packets is so easy and they literally cost you pennies to make.  You will save around $2 on 10 packets.  Not to mention you can customize your packets to be just how you like them.

Here are a couple of some suggestions:

Brown Sugar Oatmeal:

1/4 cup quick cooking oats (instant), 1 1/2 teaspoons brown sugar, 1 teaspoon powdered nonfat milk, 1/8 teaspoon salt

Apple Cinnamon Oatmeal:

1/4 cup quick cooking oats (instant), 1 sugar, 1/4 teaspoon cinnamon, 1 teaspoon powdered nonfat milk, 1-2 tablespoons dried apples, chopped

Cocoa Oatmeal:

1/4 cup quick cooking oats (instant), 1 teaspoon sugar, 1 teaspoon baking cocoa

Today I customized mine to be brown sugar cinnamon apple raisin and put the following in them:

1/4 cup quick cooking oats (instant), 1 tablespoon of brown sugar, 1/4 teaspoon cinnamon, 1 teaspoon powdered nonfat milk, 2 tablespoon of dried apples and 2 tablespoons of raisins.

DSC_0002

I make up 20 quart size baggies at a time and store them rolled up in a 1 gallon bag.

To use dump the contents of one baggie into a bowl, add 1/2 cup water and microwave for around 1 minute.

The baggies are super easy to recycle.  When you empty one put it back in the gallon bag to use for the next round.  🙂  Mine have been used many, many times.

Have a terrific weekend!

Until my next post. . . . . . .  .

Huge Hugs!

******************************************************************************

FREE TUTORIALS

******************************************************************************

Want the entire month worth of tutorials free?

Place a $50 merchandise order between November 1, 2014 and November 30, 2014 and receive the entire month of tutorials (at least 12) free of charge via e-mail.
You will receive all of these, plus, they will keep coming until November 30, 2014.  You will also receive 1 virtual token from me for each $50 in merchandise purchased with your order.  Collect 10 tokens and receive a free stamp set of your choice up to a $30 value.  Now, that’s the way to get some bang for your buck!
Free tutorials are an exclusive perk for my valued Stampin’ Up! customers and down line.
DSC_0025  DSC_0027  DSC_0026  DSC_0036
************************************************
Have a smaller order?  The complete tutorial for today’s project along with all of the card tutorials I create from November 1, 2014 through November 15, 2014 (at least 6 tutorials) will be e-mailed to my customers who place a minimum  $20 merchandise order anytime between November 1, 2014 through November 15, 2014 free of charge.
Note:  Please do not select the option for no contact when placing your order or I will not be able to send you the tutorials.  Also, please make sure that my e-mail address, mzindorf@aim.com is approved in your e-mail account so your e-mail does not reject my e-mails which contain the tutorials.  🙂

Shop my online store now CLICK HERE *

Please use Hostess Code: UR62BD6S     (Do not use if merchandise order is over $150)

***************************************************************************

If you wish to purchase the tutorial for this project or check out the monthly Tutorial subscription option.

CLICK HERE FOR DETAILS.

*********************************************************

DSC_0020 
Want to learn how to brayer to make fantastic skies for your scenes? CLICK HERE TO CHECK OUT MY VIDEOS
*********************************************************
Current catalogs
2014-15 Catalog  Holiday Catalog  Holiday Supplement
**********************************************************

Table built using Product Table Builder by The Crafty Owl – Independent Stampin’ Up! Demonstrator.

Check out the latest batch of Stampin’ Up! Weekly Deals in my on-line store.  Discounted prices on this week’s deals end November 10th.


Freezer Biscuits

Hello there,

I’m in the kitchen this morning.  If you don’t know me well you probably don’t know that I am a freezer meal addict.  Not store bought freezer meals but homemade freezer meals.

Last week I purchased 80 lbs of fresh chicken breast from Zaycon and made over forty freezer meals, plus divided the remaining chicken breast up into meal size portions for Russ and I.  It took me 3 days, 1 for shopping and two for cooking.  Normally doesn’t take that long but I had a few other things going as well, like stamping and holding a stamp class,  lol.

DSC_0002

My chest freezer in my garage is now stuffed with meals that I can take out and either bake or put in the crockpot.   All that work really pays off for me for a long time.

DSC_0001

To keep organized and know what is in my freezer I keep a wipe board up to date that hangs above my freezer.   Not exactly rocket science but works out really well for me.  Yeah I’m not very classy, lol.  Don’t you just love the tupperware bowl screwed to the wall that holds my markers and eraser, grin.  Remember my freezer is in my garage.

DSC_0018

Today I made up a batch of freezer biscuits. No store bought biscuits at my house, especially since they are so super easy to make and they freeze wonderfully.

Here is how I make them. . . . .

DSC_0003  DSC_0006

DSC_0007

Using my food process add the following:

4 cups of all purpose flour, 2 tablespoons baking powder, 1 teaspoon salt.  Put the top on and process for a few seconds to mix.

DSC_0008

Cube 1 cup of cold butter and put in processor and process until mixture is crumbly.

DSC_0010

Now I have to laugh at this picture, I tried to pour my 1 1/2 cups of milk in the processor as I took the picture, lol.  Don’t try this at home folks!  You want to put the entire 1 1/2 cups of milk in the processor as it is processing.

DSC_0012

Process until your dough just comes together.


DSC_0017  DSC_0013

Important step here, lol.  Take off your rings, nothing worse than picking dough out of your rings, lol.   Put dough on floured surface.  Do not knead, just put it into a ball.

DSC_0014  DSC_0015

Roll it out to 1/2″ to 3/4″ thickness and cut with a biscuit cutter.  If you are fancy like me you use a glass, lol.   Yep, I know they will never ask me to be on the food network!

DSC_0016

Freeze on a cookie sheet for 1 to 2 hours.

DSC_0018

Put in a freezer bag and don’t forget to write on the bag to thaw biscuits for 30 minutes and bake at 450 degrees for 8-12 minutes.  You can cook as few or as many as you need.

Now you too can give up the processed biscuits you find at the grocery.  It’s that easy!

******************************************************************************

FREE TUTORIALS

******************************************************************************

Want the entire month worth of tutorials free?

Place a $50 merchandise order between November 1, 2014 and November 30, 2014 and receive the entire month of tutorials (at least 12) free of charge via e-mail.
You will receive all of these, plus, they will keep coming until November 30, 2014.  You will also receive 1 virtual token from me for each $50 in merchandise purchased with your order.  Collect 10 tokens and receive a free stamp set of your choice up to a $30 value.  Now, that’s the way to get some bang for your buck!
Free tutorials are an exclusive perk for my valued Stampin’ Up! customers and down line.
DSC_0025
************************************************
Have a smaller order?  The complete tutorial for today’s project along with all of the card tutorials I create from November 1, 2014 through November 15, 2014 (at least 6 tutorials) will be e-mailed to my customers who place a minimum  $20 merchandise order anytime between November 1, 2014 through November 15, 2014 free of charge.
Note:  Please do not select the option for no contact when placing your order or I will not be able to send you the tutorials.  Also, please make sure that my e-mail address, mzindorf@aim.com is approved in your e-mail account so your e-mail does not reject my e-mails which contain the tutorials.  🙂

Shop my online store now CLICK HERE *

Please use Hostess Code: UR62BD6S     (Do not use if merchandise order is over $150)

***************************************************************************

If you wish to purchase the tutorials or check out the monthly Tutorial subscription option.

CLICK HERE FOR DETAILS.

*********************************************************

Wishing you a super happy day!

Until my next post. . . . . . .  .

Huge Hugs!
********************************************************
DSC_0020 
Want to learn how to brayer to make fantastic skies for your scenes? CLICK HERE TO CHECK OUT MY VIDEOS
*********************************************************
Current catalogs
2014-15 Catalog  Holiday Catalog  Holiday Supplement

Carrots, Carrots and More Carrots

DSC_0002

Hello there,

I’ve been MIA from the blog today because it was time to dig up those carrots, scrub them, peel them, cut them up and can them.   We now have glazed carrots with orange juice and brown sugar glaze and plain carrots ready to be put in the pantry.

DSC_0005

If you are a gardener you know just how satisfying it can be to look at a counter full of canned goods, you will be enjoying all Winter long, that you put up with your own two hands from seed to table.  Ahhhh!  I’m doing the happy dance.

The past couple of weeks it was everything I could do to put up two trees worth of pears.  But we now have pear sauce, jam and syrup.

Week before that it was all about the tomatoes.  I now have stashed away all the tomato sauce and spaghetti sauce we will need for the entire year.

Does this sound familiar to anyone?

I still have frozen tomatoes and strawberries to deal with in the freezer.  I think I will can some BBQ sauce and strawberry jam.

So if you ever wondered what I do for fun in my spare time, now you know, I CAN!

Have a wonderful evening!

Until my next post. . . . . . .  .

Huge Hugs!
********************************************************************

FREE TUTORIALS

************************************************************************

Want the entire month worth of tutorials free?

Place a $50 merchandise order between October 1, 2014 and October 31, 2014 and receive the entire month of tutorials (at least 12) free of charge via e-mail.
You will receive all of these, plus, they will keep coming until October 31, 2014.  You will also receive 1 virtual token from me for each $50 in merchandise purchased with your order.  Collect 10 tokens and receive a free stamp set of your choice up to a $30 value.  Now, that’s the way to get some bang for your buck!
Free tutorials are an exclusive perk for my valued Stampin’ Up! customers and down line.
 

DSC_0020  DSC_0031  DSC_0025

************************************************
Have a smaller order?  The complete tutorial for today’s project along with all of the card tutorials I create from October 1, 2014 through October 15, 2014 (at least 6 tutorials) will be e-mailed to my customers who place a minimum  $20 merchandise order anytime between October 1, 2014 through October 15, 2014 free of charge.
Note:  Please do not select the option for no contact when placing your order or I will not be able to send you the tutorials.  Also, please make sure that my e-mail address, mzindorf@aim.com is approved in your e-mail account so your e-mail does not reject my e-mails which contain the tutorials.  🙂

Shop my online store now CLICK HERE *

Please use Hostess Code:   4UHDAF9E    (Do not use if merchandise order is over $150)

**********************************************************************

If you wish to purchase tutorials or check out the monthly Tutorial subscription option.

CLICK HERE FOR DETAILS.

*********************************************************

Pick a Pack of Paper

 Join my team now and you can receive one free package of Designer Series Paper each month for the next six months!

How you ask?

Join my Stampin’ Up! Ink to Art Team, during October 1 – 31, that’s how.

Details:

  • Receive one FREE package of Designer Series Paper, every month for six months.
  • Free Designer Series Paper must be redeemed on a Demonstrator Order. If other items are not added to this order the order will incur shipping costs.
  • Demonstrators must remain active during incentive period to be eligible for free items.
  • Paper will be limited to non specialty paper only; Specialty Designer Series Paper and Designer Series Paper Stacks not included.
  • Please note Designer Series Paper will be available based on availability. Holiday catalog paper will be unavailable after the catalog ends, at which point occasions catalog paper will be available on January 6, 2015.

Don’t forget my team gets all of my tutorials for free as they are created, Bonus!

*************************************************

Check out the latest batch of Stampin’ Up! Weekly Deals in my on-line store.  Discounted prices on this week’s deals end October 13th.


Kitchen Time – Sausage Buiscuits and Sweet Pickles

Hello There,

Sorry, no stamping today.

I haven’t blogged much about the happenings in my kitchen of late and it’s just because I haven’t had the time to do much in it.  But then I went into the grocery yesterday and the butcher was marking down the fresh ground turkey packages from $4.59 to $1.99.  Guess what, I stood there until he put the last mark down sticker on and put all 5 packages of it in my cart.  5 lbs of fresh ground turkey for under $10, you bet I bought it all.

It’s these buys that I am always looking for to make my freezer meals out of.  So, today I turned that ground turkey into turkey sausage.  Click here for the link to the recipe.

After I seasoned the ground turkey I made patties out of it and fried it.

While the turkey sausage patties cooled I made some biscuits from scratch.  Click here for the biscuit recipe I used.

Put the sausage biscuits together and food saved them (wrap in plastic wrap and then place in a freezer bag if you don’t have a food saver).  Into the freezer they go.  When we want to eat them we microwave them.  7 breakfasts done for my darling husband and I.  This will also keep Russ from stopping at McDonald’s on his way to work when I am too busy stamping out my latest project to make him breakfast.  Yes, I confess, many a day you can find me stamping in the wee hours of the morning.

The remainder of the sausage patties get packaged up and froze.  7 more packages in the freezer.  Nice to pull out heat and eat as is, broken up into omlets, breakfast burritos etc.  Being fully cooked means no messy pan to deal with when you are in a hurry.

14 items in my freezer for $15 ($10 for turkey, $3 for spices and $2 for biscuits).  Not bad.  🙂  Yes I confess, I’m a freezer meal junky, lol.  This type of thing rocks my world.

On another note, my garden is producing cucumbers and onions so it is time to start a batch of sweet pickles.  Click here for the recipe. These were mixed up and they go right into the frig and will be stirred once a day for the next 5 days.  Then they go into pint jars and are put in the freezer, mmmm.  They stay crisp even after freezing.

Now it’s time to go visit the girls (chickens) and relax a bit.

**********************************************************

FREE TUTORIALS – Only 2 more days to get this set of tutorials free.

**********************************************************

Want the entire month worth of tutorials free?

Place a $50 merchandise order before July 31, 2014 and receive the entire month of tutorials (at least 12) free of charge via e-mail.
You will receive all of these, plus, they will keep coming until July 31, 2014.  You will also receive 1 virtual token from me for each $50 in merchandise purchased with your order.  Collect 10 tokens and receive a free stamp set of your choice up to a $30 value.  Now, that’s the way to get some bang for your buck!
Free tutorials are an exclusive perk for my valued Stampin’ Up! customers and down line.
This month’s tutorials include the following plus 1 more to come.

************************************************
Have a smaller order?  The complete tutorial for today’s project along with all of the card tutorials I create from July 16, 2014 through July 31, 2014 (at least 6 tutorials) will be e-mailed to my customers who place a minimum  $20 merchandise order anytime between July 16, 2014 and July 31, 2014 free of charge.

Note:  Please do not select the option for no contact when placing your order or I will not be able to send you the tutorials.  Also, please make sure that my e-mail address, mzindorf@aim.com is approved in your e-mail account so your e-mail does not reject my e-mails which contain the tutorials.  🙂

**********************************************************

May your day be all you hoped it would be!

Until my next post. . . . . . .  .

Huge Hugs!

**********************************************************************

Check out the latest batch of Stampin’ Up! Weekly Deals in my on-line store.  Discounted prices on this week’s deals end August 4th.

**********************************************************


Strawberry Days

Hello There,

Happy Sunday!  I hope you are having a relaxing weekend.  But if you are anything like me you tend to use the weekend to get caught up on things.  🙂

It’s strawberry time here.  I have a little patch of strawberries that gives me about a quarter a day from the last week of May to the end of June.  That is if I get out early to pick them before the local birds eat them.

They are yummy just eaten as is, straight from the garden.   We have had strawberry short cake a few times and this morning I made Fresh Strawberry Banana Chocolate Chip Muffins,  Mmmmmmmmmmmmm!

Click here to check out the Muffin Recipe.

Any strawberries left get frozen immediately to be used later in jam etc.

This is how I freeze them.  I rinse them off with cool water.  I hull them (cut the tops off).  Then I let them dry on a kitchen towel for a few moments.  After they are dry I put them on a cookie sheet in a single layer and par freeze them for 1 hour.  Then into a freezer bag and off to the freezer they go for later use.  Super simple!

The tops that I have cut off when hulling them are given to the girls as a treat.  We don’t waste anything we grow.  🙂

They love them.

****************************************************

Alert:

JUST ONE MORE DAY! The Stampin’ Up! 2014-2015 Annual Catalog begins tomorrow, June 2, at Noon, Mountain.  Do you have your wish list ready?

BLENDABILITIES UPDATE: The Stampin’ Up! Blendabilities Markers will not be available for customer purchase on June 2 when the catalog begins.  Stampin’ Up! expects to have enough inventory to meet customer demand at the end of June or early July.  I’ll keep you posted on a date.

A COOL WAY TO GET BLENDABILITIES NOW: Blendabilities Markers are available to Stampin’ Up! demonstrators immediately, including the option to add them to the $50 Stampin’ Up! Starter Kit when you join or placing a demonstrator order after you join (and getting the demonstrator discount)!

Join Stampin’ Up! and my Team  for a low discounted cost of $50   🙂

Whether you want to start a business of your own or want to be a  hobby demo that will enjoy a 20% discount on those Stampin’ Up! products you so love, along with other perks such as my tutorials e-mailed to you as they are created free, check out this great offer.

For the next month, new recruits that join Stampin’ Up! can do so at the traditional Starter Kit priced at $99 ($125 product value), or for a limited time, a reduced priced Starter Kit at the low price of $50 ($55 product value.)

Dates: May 28 – June 30, 2014

  • As a demonstrator, you can get a discount on new products like Blendabilities and Project Life, and you’ll be able to get in on the preorder for the brand new holiday catalog (starts August 1st)!
  • Because you’re a new demonstrator you will receive free convention registration!
  • A Free paper-pumpkin kit will also be included in the starter kit.
  • But wait, there’s more–you will also get two FREE months of Demonstrator Business Web Services (DBWS) if you sign up for the DBWS within your first 21 days.
  • All starter kit orders must be finalized by June 30, 2014

CLICK HERE to learn more.

*******************************************

New and exciting deals each week.  Check out this week’s deals.  CLICK HERE


Hope you are having one of your best days ever!

Until my next post. . . . . . .  .

Huge Hugs!