Gently Falling – Tutorial #452

Hey All,

Are you ready for Autumn?  I think I am.   I find myself eyeing those sweaters in the dresser.   I’m always glad to get them out.  There is something comforting about them.   Sweaters are like old friends, don’t you think?    But, some of you are still in sweltering hot weather.  You will be the people rubbing it in when we are trudging through snow in the  winter, lol.   Here in Ohio, we are starting to see a bit of yellow in those green leaves on the trees.  Our maples will be bright yellow, orange and red in no time.   Leaf peeping season is not to far away, grin. . . .

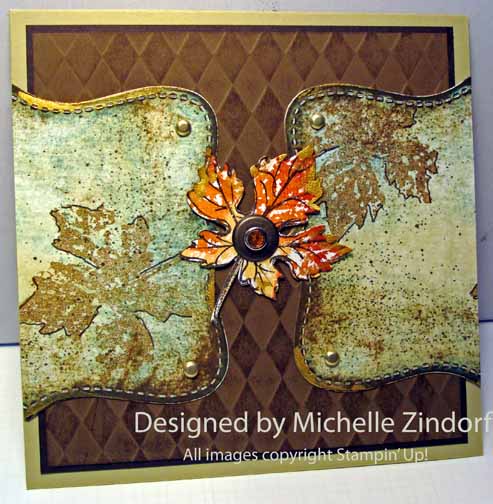
I think you can tell by my creation today Autumn is on my mind and the new Stampin’ Up! set “Gently Falling” made quick work of  this card.   You can find this set in the Stampin’ Up! Holiday Mini Catalog (CLICK HERE TO VIEW IT).      Hang out and see how this card was put together.

Announcement before I get started:

I have added some wonderful place to my Workshop Calendar.  You will be able to catch my workshops in Dayton, Ohio,    Seattle, Washington and Post Falls, Idaho.   Click on the location to check out the details.  🙂

Reminder:

BIG SHOT – CUSTOMER GIVE AWAY. . . . . . DON’T MISS OUT!

Until October 31, 2011 you can get a chance to win a free brand new Big Shot Die Cut Machine worth $99.95 

How to enter. . . . Every person that orders Stampin’ Up! products through my Stampin’ Up Web Site (CLICK HERE TO SHOP) until October 31, 2011 will receive 1 entry for each $25 increment of products purchased.  So if you place a product order that totals $50 that is 2 chances to win!  How about those beans.   I love giving things away!  I will announce the winner on November 1, 2011. 

Let’s get started on that tutorial. . . . .
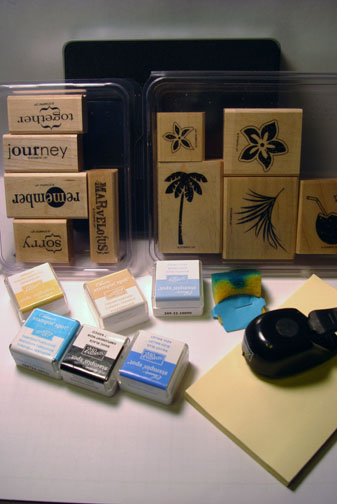
Supplies:

Stamps: Stampin’ Up! Gently Falling
Paper: Stampin’ Up! Whisper White, River Rock, Early Espresso and Soft Suede
Ink: Stampin’ Up! Marina Mist, River Rock, Soft Suede, So Saffron, Cherry Cobbler, Cajun Craze and Early Espresso
Accessories: Stampin’ Up! Gold Smooch, Big Shot Machine, Harlequin Texture Plate, Top Note Die, Color Spritzer, Stamp-a-ma-Jig, Brayer, Antique Brass Grommet, Gold Brads, Pumpkin Pie Crystal Brad


 Get your copy of the new 2011-2012 Stampin’ Up! Idea Book & Catalog by sending $9.95 to me at P.O. box 116, West Alexandria, Ohio 45381 or via paypal to mzindorf@aim.com, shipping is free.      Are you getting inspiration from this blog?   One way you can help support it is to order your Stampin’ Up products through me.   Click HEREto place an order and have your ordered delivered directly to your door step from Stampin’ Up!    Want to become a Stampin’ Up Demonstrator , receive a 20% discount on product and earn instant income on orders?  Consider being part of my Stampin’ Up Team and start your own business or become a Hobby Demo just for the discount.  Click HERE for more information.

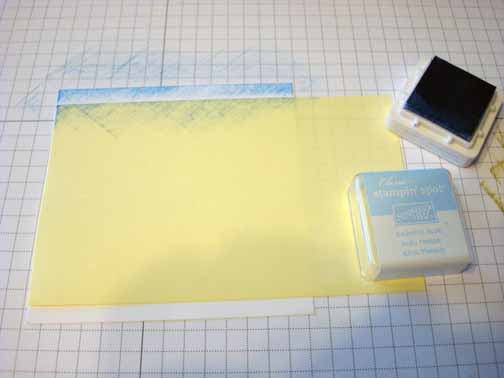
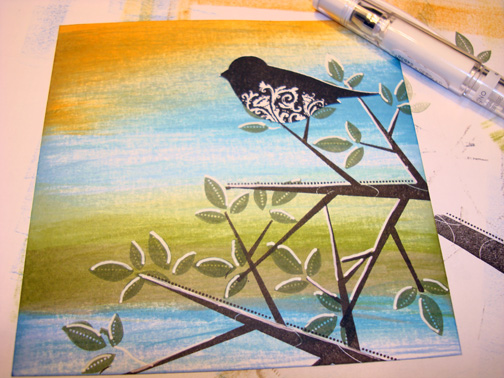
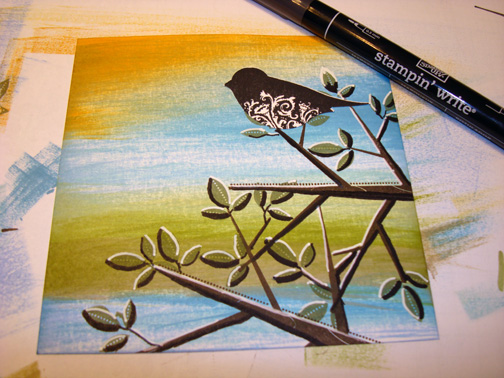
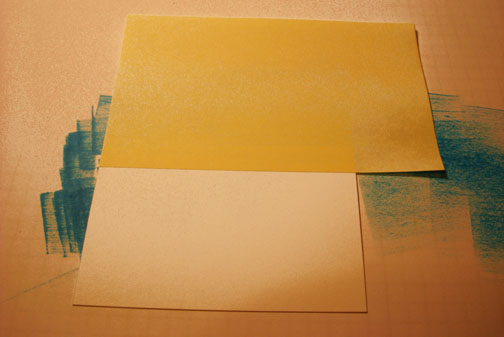
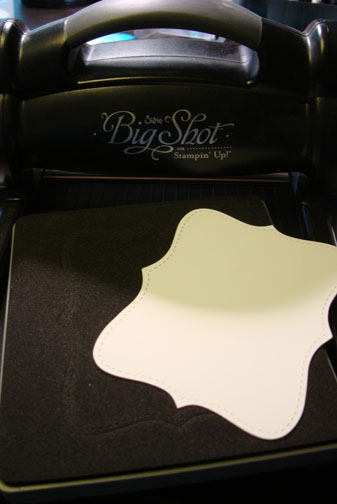
Die cut from Whisper White card stock a Top Note using the Big Shot Die Cut Machine.

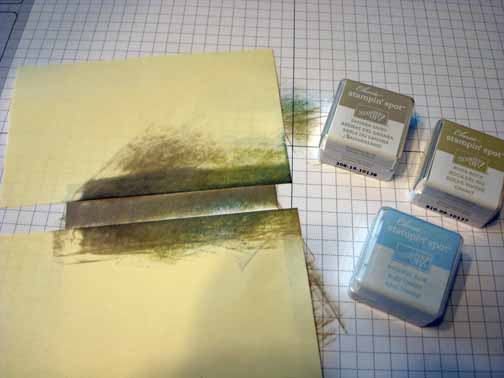
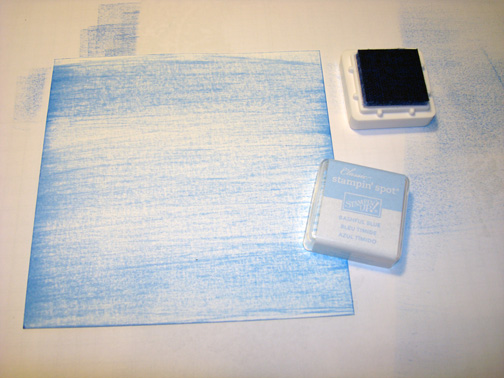
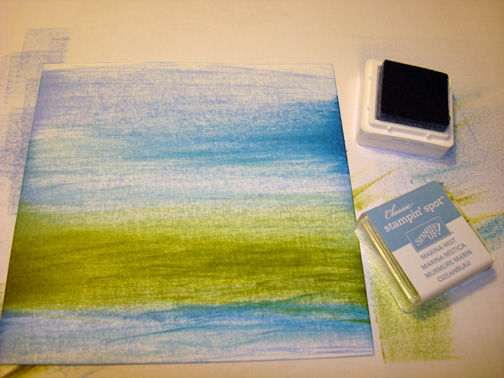
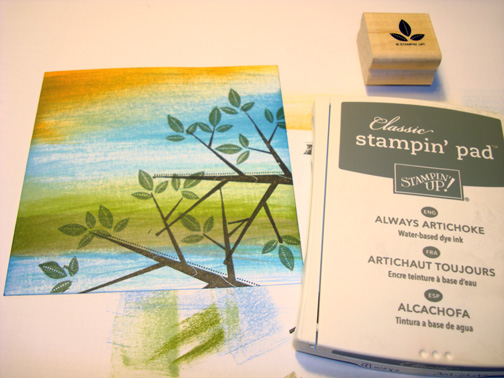
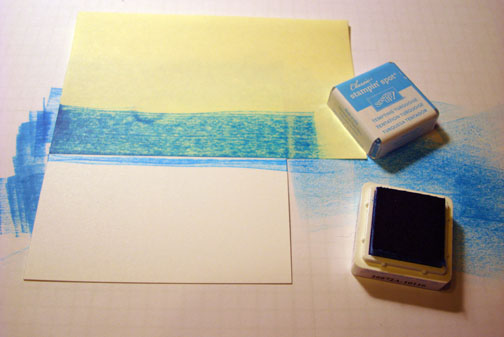
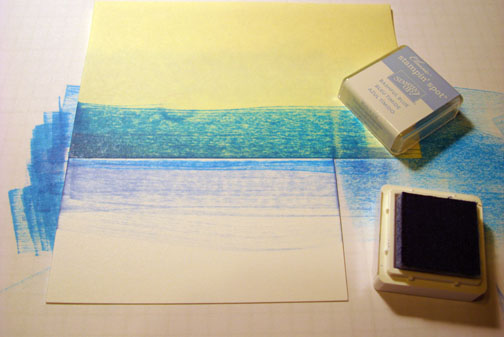
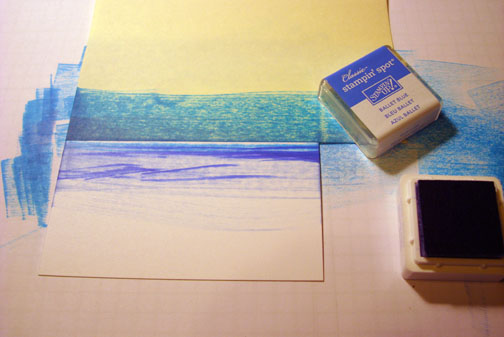
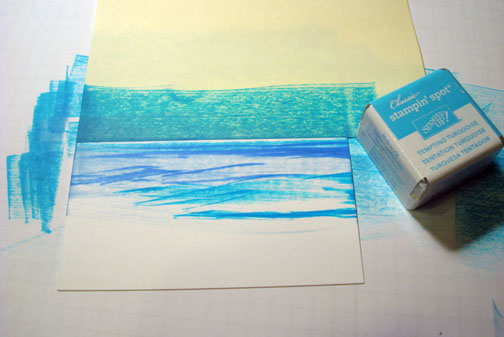
Starting from the edge of the card stock with the pad upside down and using circular motions added River Rock ink to the top note.

Starting from the edge of the card stock with the pad upside down and using circular motions added Marina Mist ink to the top note.

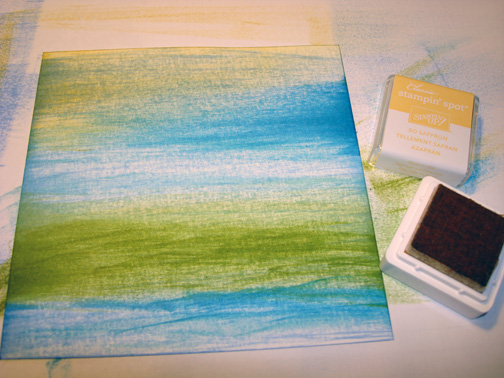
Starting from the edge of the card stock with the pad upside down and using circular motions added Soft Suede ink to the top note.

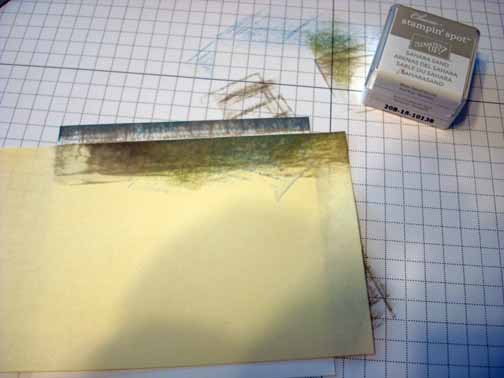
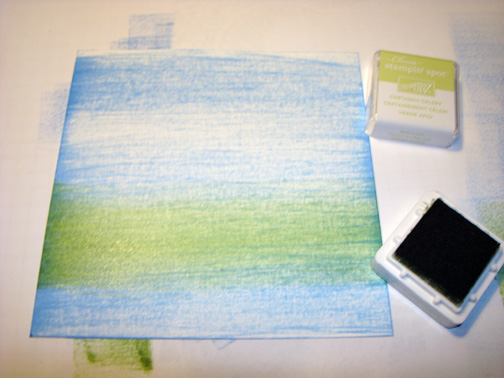
Using the Color Spritzer and a Soft Suede marker added speckles to the card stock.

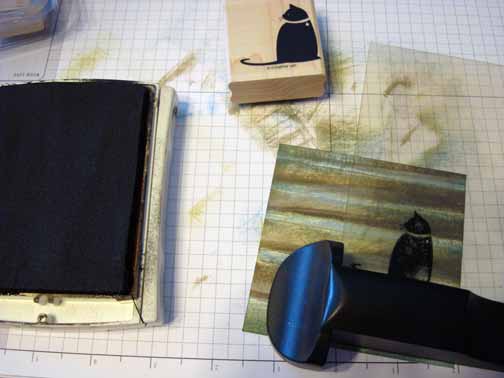
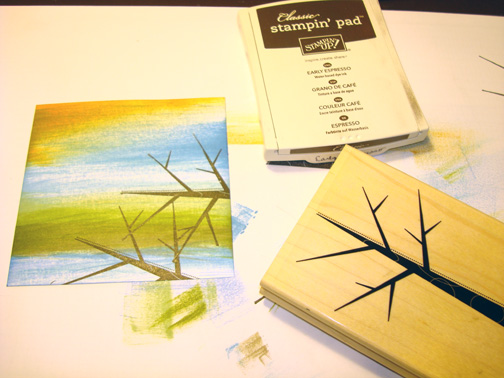
Stamped the leaf using Soft Suede ink and stamping off once on my scrap paper (Second Generation stamping).

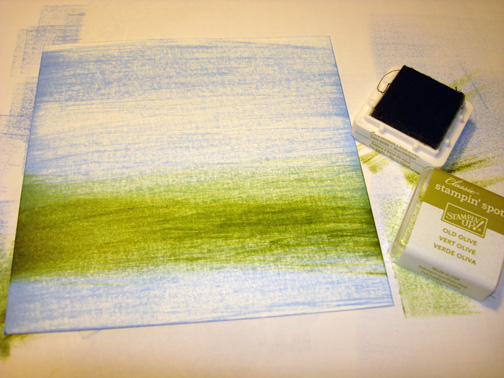
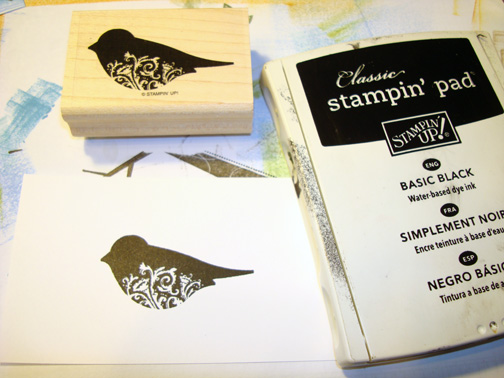
Using the fine point of a Basic Black marker, outlined just pieces of the leaves.

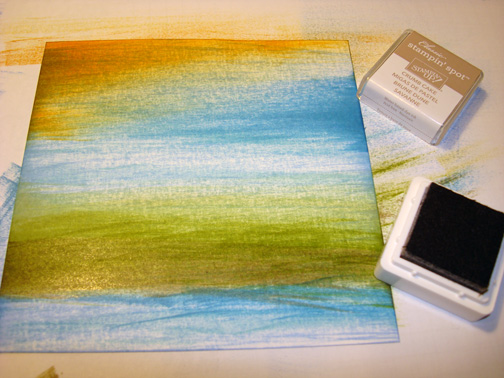
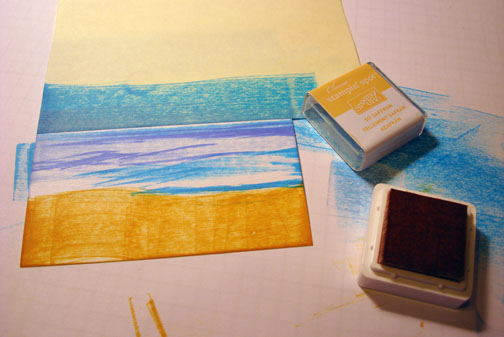
Loaded the leave stamp with So Saffron, patted a bit of Cajun Craze and Cherry Cobbler ink on the stamp.  Stamped the image on a scrap piece of Whisper White card stock.

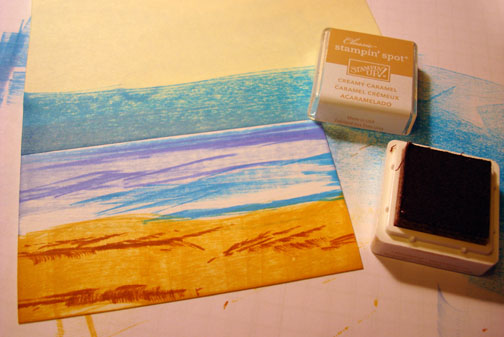
Using a Stamp-a-ma-jig for placement, stamped the outline leaf usng Early Espresso ink.

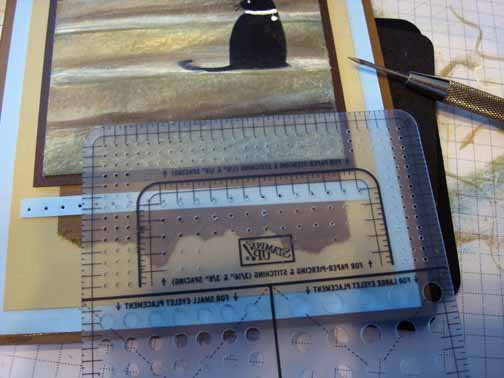
Using my very sharp Stampin’ Up! paper snips, cut the leave out.

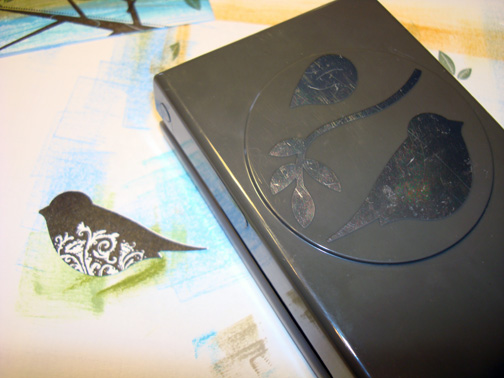
Added a bit of gold Smooch to the edge of the top note and the leaf.

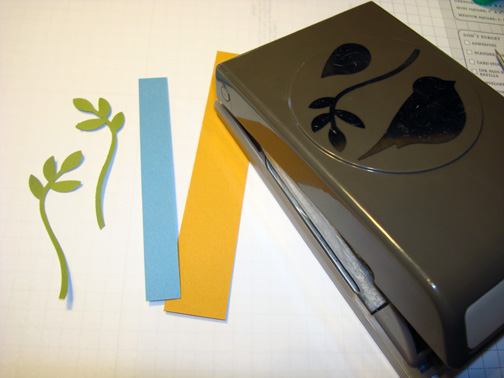
Cut a 4.75″ square piece of Soft Suede card stock and texturized it using the Harequin texture plate and the Big Shot Machine.

Gently brayered Soft Suede ink on the texturized card stock to bring out the design a bit more.

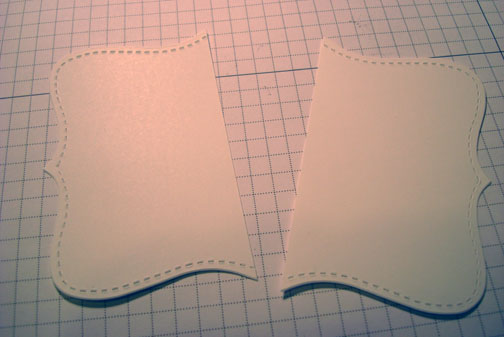
Added a 4 7/8″ square Early Espresso panel and a 5.25″ River Rock panel.    Cut the Top Note in half and put half on each side of the card front.

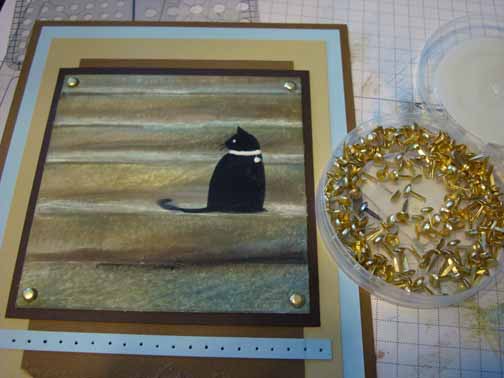
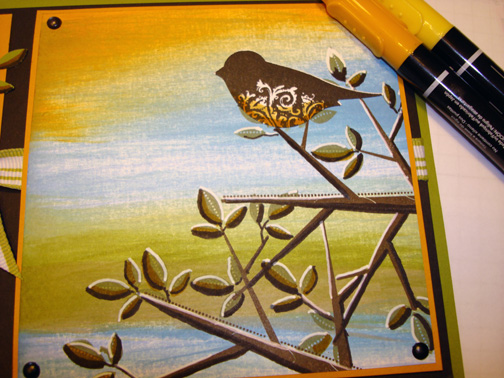
Using the Crop o dile, added a large antique brass grommet and then put a Pumpkin Pie Crystal in the middle.

Added the leaf and 4 gold brads.  Here is the finished card measuring 5.25″ square.

May the sun be warming you face and the wind at your back.

Until my next post. . . .

Hugs,

   Get ready for Brayer Workshops!  I am coming to the following locations, click the location name for more information.    

Leesburg, Florida       Sold Out 

Montreal, Wisconsin        

Savannah, Georgia 

Lincoln, Illinois    

Dayton, Ohio – Direct to Paper Workshops   

 Las Vegas, Nevada   
 

Austin, Texas 

Seattle, Washington

 Greeneville, Tennessee
 

Indianapolis, Indiana
 

Indiana, Pennsylvania
 

Sparta, New Jersey
 

Piedmont, Alabama

Post Falls, Idaho (outside of Coeurd’Alene)

 Sand Lake, Michigan (just North of Grand Rapids)
 

Lawrence, Kansas
 

Longmont (Gunbarrel), Colorado
 

Staley, North Carolina

 
Here is a link to my workshop calendar where you can see all of my travel schedule and to get info on beginner and advanced Brayer workshops, along with the newly added Direct to Paper Workshop: http://zindorf.blogs.splitcoaststampers.com/workshop-calendar        
 

Don’t see a workshop in your State?  Interested in hosting the workshops in your area   Click HERE to get hostess information.       
 

Link to my Stampin’ Up website where you can order all of your must have Stampin’ Up products from me 24-7:  http://michellezindorf.stampinup.net

Stamps: Stampin’ Up! Gently Falling
Paper: Stampin’ Up! Whisper White, River Rock, Early Espresso and Soft Suede
Ink: Stampin’ Up! Marina Mist, River Rock, Soft Suede, So Saffron, Cherry Cobbler, Cajun Craze and Early Espresso
Accessories: Stampin’ Up! Gold Smooch, Big Shot Machine, Harlequin Texture Plate, Top Note Die, Color Spritzer, Stamp-a-ma-Jig, Brayer, Antique Brass Grommet, Gold Brads, Pumpkin Pie Crystal Brad

Waterfall – Tutorial #441

Hey All,

Today’s tutorial is my version of a direct to paper waterfall.  Check it out.  🙂

Supplies:

Stamps: Stampin’ Up! Plant Hope
Paper: Stampin’ Up! River Rock and Cherry Cobber
Ink: Stampin’ Up! Basic Black, River Rock and Baja Breeze ink pads, River Rock ink spot
Accessories: Stampin’ Up! Sponges, Cherry Cobbler Seam Binding, Silver Brads, Jumbo Silver Grommet, White Gel Pen, Basic Black and Certainly Celery markers
Techniques: Direct to Paper


Get your copy of the new 2011-2012 Stampin’ Up! Idea Book & Catalog by sending $9.95 to me at P.O. box 116, West Alexandria, Ohio 45381 or via paypal to mzindorf@aim.com, shipping is free.   Want a free copy of the new Summer Mini Catalog ?  E-mail your mailing address to mzindorf@aim.com and I will get one in the mail to you.   Are you getting inspiration from this blog?   One way you can help support it is to order your Stampin’ Up products through me.   Click HERE to place an order.    Want to become a Stampin’ Up Demonstrator , receive a 20% discount on product and earn instant income on orders?  Consider being part of my Stampin’ Up Team and start your own business or become a Hobby Demo just for the discount.  Click HERE for more information.

Using the edge of a River Rock ink spot, put the lines in for my waterfall on a 3.5″ x 7″ piece of River Rock card stock.

Sponged River Rock ink around the outside of the the waterfall.   This brings out the waterfall and makes it seem much lighter in color.

Sponged Baja Breeze ink at the top of the card stock.

Using a Basic Black marker, colored in just the tree (excluded the pot on the stamp) and stamp the tree repeatedly, attaching the trees together on the right side so they look like they are hanging down.  Note:  ignore the white tree at the top of the card stock.  I tried to stamp the trees in white first, but they did not show up well.

Colored in the tree trunks with the brush end of a Basic Black marker.

Colored in all of the leafy areas using a Certainly Celery marker.  Added White Gel Pen highlights to the tops of the leaves.  Also added white gel pen highlights within the waterfall.

Added Basic Black marker to the bottom of some of the leafy bunches to create some depth in the trees.

Added more White Gel pen highlights to the leafy areas and highlighted the tree trunks.

Added a Cherry Cobber and River Rock panels.     Also added Silver Brads to the corners of the main image panel, Cherry Cobbler Seam Binding to the bottom of the card and a Jumbo Silver Grommet to the ribbon.

Here is the finished card measuring 4″ x 8.5″.

May your day be nothing but cool or kool.  🙂

I’m off to take my Grand Daughter to the local Teahouse for Desert and Tea and then to the movies to see the Zoo Keeper.

Until my next post. . . . . . .

Hugs,

Michelle

   Get ready for Brayer Workshops!  I am coming to the following locations, click the location name for more information.    

Staley , North Carolina (South of Greensboro)       

Monroe, Connecticut       

Dayton, Ohio     

Leesburg, Florida       

Montreal, Wisconsin       

Savannah, Georgia       

Lincoln, Illinois       

Jefferson, Louisiana (New Orleans Area)       

Here is a link to my workshop calendar where you can see all of my travel schedule and to get info on beginner and advanced Brayer workshops:   http://zindorf.blogs.splitcoaststampers.com/workshop-calendar        

Don’t see a workshop in your State?  Interested in hosting the workshops in your area in 2012?   Click HERE to get hostess information.       

Link to my Stampin’ Up website where you can order all of your must have Stampin’ Up products from me 24-7:  http://michellezindorf.stampinup.net


On the Rocks – Tutorial #433

Happy Monday!

Let’s make some waves today using clear embossing powder to protect the white of the card stock.  But before we get started on today’s tutorial I have a blog candy winner to announce.  

The winner of the Stampin’ Up! Playful Pieces stamp set is. . . . . . . . . .

Sharleen Beresford who wrote “OOH LA LA count me in and enter my name please for this wonderful stamp set!  Thanks for the “blog candy” and as usual thank you for your inspiration and generous artistic spirit!”

Sharleen Beresford, Congratulations!  Please e-mail your mailing address to me at mzindorf@aim.com within 30 days and I will get this great stamp set right out to you.

Thanks to all who played along!

Now on with the tutorial. . . . . .

Supplies:

Stamps: Stampin’ Up! Just Believe
Paper: Stampin’ Up! Whisper White, Pacific Point and Basic Black
Ink: Stampin’ Up! Marina Mist, Basic Black, Pacific Point
Accessories: Stampin’ Up! sponges, Rhinestone Brads, Marina Mist Grosgrain Ribbon, Top Note Die, Big Shot, Photo Corner Punch, Brayer, Clear embossing powder, heat gun, post it note, Versamark pad
Techniques: Emboss Resist, Brayering, Direct to Paper


The Stampin’ Up USA Idea book and Catalog is here.   For your copy, please send a check for $9.95 to Michelle Zindorf, P.O. Box 116, West Alexandria, OH 45381 or send it via paypal to mzindorf@aim.com USA only.     My current customers will receive a new  Summer Mini Catalog automatically from me.   Not a current customer and want a free copy of the new Summer Mini Catalog ?  E-mail your mailing address to mzindorf@aim.com and I will get one in the mail to you.  )  Are you getting inspiration from this blog?   One way you can help support it is to order your Stampin’ Up products through me.   Click HERE to place an order.    Want to become a Stampin’ Up Demonstrator , receive a 20% discount on product and earn instant income on orders?  Consider being part of my Stampin’ Up Team and start your own business or become a Hobby Demo just for the discount.  Click HERE for more information.

Die cut a Top Note from Whisper White card stock using my Big Shot Machine.

Stamped the plant images using Basic Black ink and heat embossed them using clear embossing powder.

Using a sponge, applied Versamark lightly where I want my wave to be in the scene.  Heat embossed the Versamark using clear embossing powder and a heat gun.   Note:  When you put the embossing powder on you can lightly remove some of it until it looks like what you want before heating it.

Brayered Marina Mist ink on the card stock.  Now you can see where the embossed Versamark is.  🙂

Ripped a post it note and used it as a mask to create my rocks.

Sponged the unmasked area of the card stock using Marina Mist ink.

Smeared Pacific Point ink on the card stock (Direct to paper technique) from the left side of the card stock to the right, lightly.  Leave some of the Marina Mist ink showing through.

Sponged Basic Black ink at the bottom of the card stock.  Buffed the embossed parts of the card stock with a paper towel to remove any excess ink that may be on it.

Cut a 5″ square Whisper White card stock panel and Sponged Marina Mist around the edges.  Distressed edges of the card stock using Basic Black ink.  Also distress the edges of the top note using Basic Black ink.

Assembled the card by adding a 5.5″ square Basic Black panel, 5.25″ square Pacific Point panel, Marina Mist Grosgrain Ribbon, Basic Black and Pacific Point photo corner punches and Rhinestone brads.

Here is the finished card measuring 5.5″ square.

May your

   Get ready for Brayer Workshops!  I am coming to the following locations, click the location name for more information.    

Cleveland (Euclid), Ohio       

Staley , North Carolina (South of Greensboro)       

Monroe, Connecticut       

Dayton, Ohio     

Leesburg, Florida       

Montreal, Wisconsin       

Savannah, Georgia       

Lincoln, Illinois       

Jefferson, Louisiana (New Orleans Area)       

Here is a link to my workshop calendar where you can see all of my travel schedule and to get info on beginner and advanced Brayer workshops:   http://zindorf.blogs.splitcoaststampers.com/workshop-calendar        

Don’t see a workshop in your State?  Interested in hosting the workshops in your area in 2012?   Click HERE to get hostess information.       

Link to my Stampin’ Up website where you can order all of your must have Stampin’ Up products from me 24-7:  http://michellezindorf.stampinup.net   

 Link to my Scentsy website where you can order the best smelling, safest wickless candles from me 24-7:  https://zindorf.scentsy.us/Home


Cat on the Steps – Tutorial #429

Hello there peeps!   I’m back from beautiful Colorado Springs where I  had the pleasure of teaching some wonder students how to brayer over the weekend.  Unfortunately, that all means that I am playing catch up as usual after my trip.  🙂  Maybe I should re-think my stand on the whole cloning issue.

I hope everyone had an wonderful weekend and had a chance to stop by my blog to sign up for the blog candy that am about to give away.  So here goes it, the winner of the adorable Stampin’ Up Kimono Kids stamp set is. . . . . . . .  .

Caroline King who wrote “have fun in colorado springs. lovely place.  Please enter me in the blog candy contest.   have a great weekend yourself.
Caroline
Minnetonka, MN”

Caroline King, CONGRATULATIONS!!!!  Please e-mail your mailing address to me at mzindorf@aim.com within 30 days and I will get this set in the mail to you.

Thank you to everyone that played along.  Check back at the end of this week for a chance to win another stamp set.

Now on with today’s cat tutorial. . . .  . .

Supplies: 

Stamps: Stampin’ Up! “C” is for Cat
Paper: Stampin’ Up! Whisper White, Early Espresso, Soft Suede, Crumb Cake, Bashful Blue
Ink: Stampin’ Up! Bashful Blue, Sahara Sand, River Rock and Crumb Cake
Accessories: Stampin’ Up! Tab Punch, White Gel Pen, Crumb Cake marker, Stamp-a-ma-jig, mat pack, piercing tool, post it note, Latte button, gold brads, Linen Thread
Techniques: Direct to Paper


The Stampin’ Up USA Idea book and Catalog is here.   For your copy, please send a check for $9.95 to Michelle Zindorf, P.O. Box 116, West Alexandria, OH 45381 or send it via paypal to mzindorf@aim.com USA only.     My current customers will receive a new  Summer Mini Catalog automatically from me.   Not a current customer and want a free copy of the new Summer Mini Catalog ?  E-mail your mailing address to mzindorf@aim.com and I will get one in the mail to you.  )  Are you getting inspiration from this blog?   One way you can help support it is to order your Stampin’ Up products through me.   Click HERE to place an order.    Want to become a Stampin’ Up Demonstrator , receive a 20% discount on product and earn instant income on orders?  Consider being part of my Stampin’ Up Team and start your own business or become a Hobby Demo just for the discount.  Click HERE for more information.


Time to create some steps.

Mask the bottom of a 3.5″ square piece of Whisper White card stock with a post it note.  Using the edge of a Bashful Blue ink spot, smeared the ink on the top of the unmasked area.

Smeared some Sahara Sand ink over it a bit.

Took my post it note mask off and turned it so it was covering the top of the card stock.  Masking the colored area and a bit of white paper.  The white paper area that I am masking at the top will be the flat part of the step.

Added another post it note mask below it leaving space in between the 2 post it notes.  This space will be the front of the step.

Smeared Bashful Blue, River Rock and Sahara Sand ink in the unmasked area.

Kept shifting the post it notes down and inking the same colors, masking and leaving white space in between each colored section.

Removed the mask and smeared Bashful Blue ink lightly in the white areas.  Added some Crumb Cake ink the right sides of the steps to create a bit of a shadow.

Stamped my cat from the Stampin’ Up set “C” is for cat on one of the steps using a Stamp-a-ma-jig for placement and Basic Black ink.

Added a bit of white gel pen to the Bashful Blue areas (tops of steps) and then smeared it a bit with my finger to lighten it.   Added straight lines of Crumb Cake maker to the steps where the front of the step meets the top of the step.  Also colored the cat’s eye and collar using the White Gel pen.

Added the following layers of card stock under the main image panel as follows:

Early Espresso, Soft Suede (ripped at the bottom), Crumb Cake, Bashful Blue, Soft Suede and just a thin strip of Bashful Blue on the bottom.

Using my mat pack and piercing tool, pierced holes on my strip of Bashful Blue card stock.

Add 4 gold brads to the main image panel corners.

Stamped the cat paw stamp at the bottom of the main image panel 3 times using Basic Black ink.

Punched a tab punch from Early Espresso card stock and cut the tab in half.

Added the 1/2 tab punch and a flower button with a piece of Linen thread tied through the buttons holes.

Here is the finished card measuring 5″ x 6.5″.

Before I end my post for today I want to make you aware of the new Scentsy Burner and scent of the month.   They are discounted.

Good old American pride—there's simply nothing like it! Share your love of country with Star Spangled, a whimsical representation of our nation's flag. Buy today and save 10%      CLICK HERE TO CHECK THEM OUT!  You will love all of the Scentsy Burners and scents.

May your day be the cat’s meow.  🙂

Until my next post. . . .  . .

Hugs,

Michelle

   Get ready for Brayer Workshops!  I am coming to the following locations, click the location name for more information.    

 Ottumwa, Iowa       

Owings Mills, Maryland (Baltimore Area)      

Cleveland (Euclid), Ohio       

Staley , North Carolina (South of Greensboro)       

Monroe, Connecticut       

Dayton, Ohio     

Leesburg, Florida       

Montreal, Wisconsin       

Savannah, Georgia       

Lincoln, Illinois       

Jefferson, Louisiana (New Orleans Area)       

Here is a link to my workshop calendar where you can see all of my travel schedule and to get info on beginner and advanced Brayer workshops:   http://zindorf.blogs.splitcoaststampers.com/workshop-calendar        

Don’t see a workshop in your State?  Interested in hosting the workshops in your area in 2012?   Click HERE to get hostess information.       

Link to my Stampin’ Up website where you can order all of your must have Stampin’ Up products from me 24-7:  http://michellezindorf.stampinup.net   

 Link to my Scentsy website where you can order the best smelling, safest wickless candles from me 24-7:  https://zindorf.scentsy.us/Home


Water Lilies – Tutorial #424 & Blog Candy Give Away

Hello, hello, hello!  Today’s tutorial features the Stampin’ Up! Level 2 Hostess set “Fast & Fabulous”.  This is also the stamp set that I am giving away as blog candy!!!  Woohoo!

All you have to do to enter for a chance to win this Fabulous stamp set is leave a comment on this blog post telling me to enter you.    If you are getting this blog post via e-mail, please click here and then leave a comment at the bottom of the actual blog post.

I will select the winner using a random number generator on May 29, 2011.  Remember you have to enter to win!   Good luck to all.

Now let’s get started on the tutorial. . . .  .

Supplies:

Stamps: Stampin’ Up! Fast & Fabulous
Paper: Stampin’ Up! Always Artichoke, Old Olive, Melon Mambo, Basic Black, Marina Mist, Not Quite Navy and Night of Navy
Ink: Stampin’ Up! Whisper White, Always Artichoke, Marina Mist and Not Quite Navy
Accessories: Stampin’ Up! Sponge, Pear Pizzazz Seam Binding, Gold Brads, Large Oval Punch, Photo corner Punch, Basic Black and Always Artichoke markers
Techniques: Direct to paper


The Stampin’ Up USA Idea book and Catalog is here.   For your copy, please send a check for $9.95 to Michelle Zindorf, P.O. Box 116, West Alexandria, OH 45381 or send it via paypal to mzindorf@aim.com USA only.     My current customers will receive a new  Summer Mini Catalog automatically from me.   Not a current customer and want a free copy of the new Summer Mini Catalog ?  E-mail your mailing address to mzindorf@aim.com and I will get one in the mail to you.  )  Are you getting inspiration from this blog?   One way you can help support it is to order your Stampin’ Up products through me.   Click HERE to place an order.    Want to become a Stampin’ Up Demonstrator , receive a 20% discount on product and earn instant income on orders?  Consider being part of my Stampin’ Up Team and start your own business or become a Hobby Demo just for the discount.  Click HERE for more information.

Smeared Marina Mist ink on a 3.5″ x 4.5″ piece of Whisper White card stock using the edge of the ink pad.

Smeared Not Quite Navy ink on the left and right sides of the card stock using the edge of the ink pad.

Smeared Night of Navy ink on the right and left edges of the card stock, not covering the Not Quite Navy ink entirely.

Punched out 4 ovals out of Certainly Celery card stock using the large oval punch.

Cut a small wedge out of the edge of each oval.

Sponged Old Olive ink around the edges of the ovals.

Darkened the edges of the ovals using an Always Artichoke marker.

Scraped the edges of the ovals over my Alway Artichoke ink pad.

Stamped the flowers using Melon Mambo ink on Whisper White card stock.

Stamped the outline stamps over the Melon Mambo images using Basic Black ink.

Cut out the flowers and scraped the bottom of each flower on my Melon Mambo ink pad to darken.

Lined the bottom of the flowers using a Basic Black marker.

Assembled my scene and drew stems on the two small flowers using a Basic Black marker.  Also cut some of the lily pads so they would be going off the edge of the card stock. 

Assembled the card adding  a 3 5/8″ x 4 5/8″ Always Artichoke panel, 4.75″ x 6.25″ Marina Mist Panel, 5″ x 6.5″ Always Artichoke panel, 4 Not Quite Navy photo corner punches, 4 gold brad and  Pear Pizzaz Seam Binding.

Here is the finished card measuring 5″ x 6.5″.

May your week be totally fabulous.

Until my next post. . . . . .

Hugs,

Michelle

   Get ready for Brayer Workshops!  I am coming to the following locations, click the location name for more information.    
 

Ottumwa, Iowa       

Owings Mills, Maryland (Baltimore Area)      

Cleveland (Euclid), Ohio       

Staley , North Carolina (South of Greensboro)       

Monroe, Connecticut       

Dayton, Ohio     

Leesburg, Florida       

Montreal, Wisconsin       

Savannah, Georgia       

Lincoln, Illinois       

Jefferson, Louisiana (New Orleans Area)       

Here is a link to my workshop calendar where you can see all of my travel schedule and to get info on beginner and advanced Brayer workshops:   http://zindorf.blogs.splitcoaststampers.com/workshop-calendar        

Don’t see a workshop in your State?  Interested in hosting the workshops in your area in 2012?   Click HERE to get hostess information.       

Link to my Stampin’ Up website where you can order all of your must have Stampin’ Up products from me 24-7:  http://michellezindorf.stampinup.net   

 Link to my Scentsy website where you can order the best smelling, safest wickless candles from me 24-7:  https://zindorf.scentsy.us/Home


Shadowed Tree – Tutorial #411


I’m getting so excited, I’m back on the road this weekend and heading to St. Peters, Missouri, Woohooo!! 

How about a tutorial before I leave.   This tutorial has a bit of everything thrown in, brayering, direct to paper, emboss resist, even a shadow.  🙂

An FYI for you before the tutorial, today is the last day for Stampin’ Up’s Sale-a-bration period.    So if you would like to receive a free stamp set with each $50 in product you purchase check out this link.   http://www.stampinup.net/esuite/home/michellezindorf/promotions   You can order at that link also and your purchase will be shipped directly to you.  🙂

Let’s get started. . . . . . . .

Supplies:

Stamps: Stampin’ Up! Season of Friendship
Paper: Stampin’ Up! Whisper White, Bashful Blue and Early Espresso
Ink: Stampin’ Up! Basic Black, Soft Suede, Sahara Sand, More Mustard, So Saffron, Chocolate Chip, Pacific Point, Bashful Blue
Accessories: Stampin’ Up! Gold Brads, White Gel Pen, Basic Black Marker, Versamark Pad, Sponges, Brayer, Clear Embossing Powder, Heat Gun, Photo Corner Punch
Techniques: Emboss Resist, Brayering, Direct to Paper

  My Stampin’ Up customers that order $50 in Stampin’ Up merchandise will receive this handmade card though March 31, 2011.

Don’t forget it is Sale-a-bration time at Stampin’ Up.  Receive a free Sale-a-bration set for each $50 in merchandise purchased.   Click HERE to place an order.   Your order will be shipped directly to your door step from Stampin’ Up!

The Stampin’ Up USA Idea book and Catalog is here.   For your copy, please send a check for $9.95 to Michelle Zindorf, P.O. Box 116, West Alexandria, OH 45381 or send it via paypal to mzindorf@aim.com USA only.     My current customers will receive a new Occasions Mini Catalog automatically from me.   Not a current customer and want a free copy of the new Occasions Mini Catalog ?  E-mail your mailing address to mzindorf@aim.com and I will get one in the mail to you.  )  Are you getting inspiration from this blog?   One way you can help support it is to order your Stampin’ Up products through me.   Click HERE to place an order.    Want to become a Stampin’ Up Demonstrator , receive a 20% discount on product and earn instant income on orders?  Consider being part of my Stampin’ Up Team and start your own business or become a Hobby Demo just for the discount.  Click HERE for more information.

On with the tutorial. . . .

Stamped the tree on a 3.75″ x 6.25″ piece of Whisper White card stock by first loading the stamp with Versamark and then loaded it with So Saffron ink before stamping it.

Heat embossed the image using clear embossing powder and a heat gun.

Ripped the very edge off of a post it note and then masked the bottom of card stock.

Brayered Bashful Bliss ink at the top of the card stock.

Brayered Pacific Point ink at the bottom of the un-masked area.

Make sure you gently wipe the ink from your embossed image using a paper towel every time you get ink on it.

Sponged a hill in using Chocolate Chip ink.

Sponged a Basic Black hill in, over lapping the Chocolate Chip hill.

Removed the post it note mask.  Using the edge of the So Saffron ink pad, smeared ink across the ground area in the scene.

Using the corner of an More Mustard ink pad, smeared ink across the ground area.

Added a bit of Sahara Sand ink.

Stamped the tree using Basic Black ink to create a shadow for the tree.

Added Basic Black marker to the sides of the branches, next to the embossed image.   The marker will not stick to the embossed image.

Wiped the ink from the embossed image.  Found the Basic Black ink stained the middle of the tree trunk when I put in the hill, so I purposely stained the bottom of the tree trunk by smearing ink on the embossed tree using the corner of the ink pad.  Let the ink sit for a moment and then wiped it off.     Be careful with this step so you don’t get any on your background.

Added Soft Suede ink using the corner of the ink pad.

Added White gel pen to the left side of the tree.

Added a 3 7/8″ x 6 3/8″ Bashful Blue Panel, 5″ x 6.5″ Early Espresso Panel and 6 small Bashful Blue Photo Corner Punches.

Added 6 Gold Brads.  Here is the finished project measuring 5′ x 6.5″.

Have a super weekend!

Until my next post. . . .  . . . . .

Hugs,

Michelle

   Get ready for Brayer Workshops!  I am coming to the following locations, click the location name for more information.       

St. Peters, Missouri       

La Porte, Indiana       

Orlando (Davenport), Florida       

St. Cloud, Minnesota       

Colorado Springs, Colorado       

Ottumwa, Iowa       

Owings Mills, Maryland (Baltimore Area)      

Cleveland (Euclid), Ohio       

Staley , North Carolina (South of Greensboro)       

Monroe, Connecticut       

Dayton, Ohio     

Leesburg, Florida       

Montreal, Wisconsin       

Savannah, Georgia       

Lincoln, Illinois       

Jefferson, Louisiana (New Orleans Area)       

Here is a link to my workshop calendar where you can see all of my travel schedule and to get info on beginner and advanced Brayer workshops:   http://zindorf.blogs.splitcoaststampers.com/workshop-calendar        

Don’t see a workshop in your State?  Interested in hosting the workshops in your area in 2012?   Click HERE to get hostess information.       

Link to my Stampin’ Up website where you can order all of your must have Stampin’ Up products from me 24-7:  http://michellezindorf.stampinup.net   

 Link to my Scentsy website where you can order the best smelling, safest wickless candles from me 24-7:  https://zindorf.scentsy.us/Home   

 Donate cards to the Give Thanks Project and help out Cancer Patients.   CLICK HERE TO HELP


Is it Spring Yet – Tutorial #403

I hope your weekend was fabulous.  Mine was, I spent the day yesterday with loved ones, eating, playing, etc.   To me that is the best way to spend time.  In a close second place is stamping, lol.  I’m a bit addicted to ink, stamps and card stock, Dah!

I found something else to be addicted to also, Scentsy Wickless Candle Warmers, love them!   I had an unfortunate event recently with a candle and my dining room table, which long story short, my table is ruined and now needs refinished. 

But I found a wonderful safe, beautiful and totally fragrant solution to my candle delema and I became a consultant in a blink of an eye.   Here is a link to my Scentsy web site if you want to check out their great products:      https://zindorf.scentsy.us/Home  .  This link will be at the left side of my blog permanently, you can order from my Scentsy Site 24/7 and your order will be shipped direct to you from Scentsy.   No sales pressure here folks, I just love their products.

Now, a bit about today’s tutorial.  I created the background using ink spots to create a faux texture.

Let’s get started. . . . . . . . .  . . .

Supplies:

Stamps:   Stampin Up! Upsy Daisy and Dreams du Jour

Card stock:  Stampin’ Up! Whisper White, Early Espresso, River Rock and Not Quite Navy

Ink:  Stampin’ Up! Early Espresso, Soft Suede, Baja Breeze, Marina Mist and River Rock

Accessories:  Stampin’ Up sponge, White Gel Pen, Gold Brads, Markers – Baja Breeze, Marina Mist & Certainly Celery, Curly Label Punch, piercing tools and mat pack.

  My Stampin’ Up customers that order $50 in Stampin’ Up merchandise will receive this handmade card though March 31, 2011.

Don’t forget it is Sale-a-bration time at Stampin’ Up.  Receive a free Sale-a-bration set for each $50 in merchandise purchased.   Click HERE to place an order.   Your order will be shipped directly to your door step from Stampin’ Up!

The Stampin’ Up USA Idea book and Catalog is here.   For your copy, please send a check for $9.95 to Michelle Zindorf, P.O. Box 116, West Alexandria, OH 45381 or send it via paypal to mzindorf@aim.com USA only.     My current customers will receive a new Occasions Mini Catalog automatically from me.   Not a current customer and want a free copy of the new Occasions Mini Catalog ?  E-mail your mailing address to mzindorf@aim.com and I will get one in the mail to you.  )  Are you getting inspiration from this blog?   One way you can help support it is to order your Stampin’ Up products through me.   Click HERE to place an order.    Want to become a Stampin’ Up Demonstrator , receive a 20% discount on product and earn instant income on orders?  Consider being part of my Stampin’ Up Team and start your own business or become a Hobby Demo just for the discount.  Click HERE for more information.

I started with a 4 3/8″ Square piece of Whisper White card stock.    Using the edge of a River Rock ink spot, smeared in a square of color.

Dabbed the corner of the ink spot all over the square of color to create a bit of texture.

Using a Baja Breeze ink spot created another textured spot.

Repeated creating another spot using Marina Mist ink.

The last spot of color was created with Marina Mist ink for the square and then the texture was put in with a Not Quite Navy ink spot.

Using the edge of a Soft Suede ink spot, smeared in strips of color in between the color spots.

Distressed the edges using the same Soft Suede ink spot.

Stamped the Flowers using Soft Suede first and them stamped the same image, only lower, using Early Espresso ink.

On a scrap piece of Whisper White card stock, smeared River Rock ink.

Stamped the Butterfly image using Soft Suede ink.

Lined the butterfly up in the center of the Curly Label Punch and punched it out.

Added Certainly Celery Marker to the body of the butterfly and Baja Breeze ink to it’s wings.

Added White Gel Pen to the center of the wings and Marina Mist marker to outside edges of the wings. 

Sponged Early Espresso ink to the edges of the card stock and the Curly Label Punches.

Aded White gel pen highlights to the flowers.

Added 2 Early Espress, 1 Not Quite Navy and 1 River Rock panels of card stock and 5 Gold Brads.

Here is the finished card measuring 5.5″  square.

May your day be one of pure delight!

Until my next post… . . . . . . .

Hugs,

Michelle

22.1 lbs down, 44.2 to go!

   Get ready for Brayer Workshops!  I am coming to the following locations, click the location name for more information.   


Houston, Texas   

Wichita, Kansas   

Syracuse (Bridgeport), New York   

St. Peters, Missouri   

La Porte, Indiana   

Orlando (Davenport), Florida   

St. Cloud, Minnesota   

Colorado Springs, Colorado   

Ottumwa, Iowa   

Owings Mills, Maryland (Baltimore Area)  

Cleveland (Euclid), Ohio   

Staley , North Carolina (South of Greensboro)   

Monroe, Connecticut   

Dayton, Ohio 

Leesburg, Florida   

Montreal, Wisconsin   

Savannah, Georgia   

Lincoln, Illinois   

Jefferson, Louisiana (New Orleans Area)   

Here is a link to my workshop calendar where you can see all of my travel schedule and to get info on beginner and advanced Brayer workshops:   http://zindorf.blogs.splitcoaststampers.com/workshop-calendar    

Don’t see a workshop in your State?  Interested in hosting the workshops in your area in 2012?   Click HERE to get hostess information.   

Link to my Stampin’ Up website where you can order all of your must have Stampin’ Up products from me 24-7:  http://michellezindorf.stampinup.net


Patriotic Cowboy – Tutorial #399

A few days ago I requested that my readers let me know what they would like to see on my blog.  Well, there were many requests to see more Western themed cards and more Direct To Paper Tutorials.    I think we have those two requests covered with this tutorial. 

Folks, it is so very easy to put in this flag background.  I hope you give this one a try.  🙂

Let’s get started. . . .  . .

Supplies:

Stamps: Stampin’ Up! Out West & Seeing Stars
Paper: Stampin’ Up! Very Vanilla, Bravo Burgundy and Soft Suede
Ink: Stampin’ Up! Ink Spots – Not Quite Navy, Bravo Burgundy, Soft Suede, Early Espresso, Craft ink pad Whisper White
Accessories: Stampin’ Up! Sponges, Basic Black marker, Gold Brads


  My Stampin’ Up customers that order $50 in Stampin’ Up merchandise will receive this handmade card though March 31, 2011.

Don’t forget it is Sale-a-bration time at Stampin’ Up.  Receive a free Sale-a-bration set for each $50 in merchandise purchased.   Click HERE to place an order.   Your order will be shipped directly to your door step from Stampin’ Up!

The Stampin’ Up USA Idea book and Catalog is here.   For your copy, please send a check for $9.95 to Michelle Zindorf, P.O. Box 116, West Alexandria, OH 45381 or send it via paypal to mzindorf@aim.com USA only.     My current customers will receive a new Occasions Mini Catalog automatically from me.   Not a current customer and want a free copy of the new Occasions Mini Catalog ?  E-mail your mailing address to mzindorf@aim.com and I will get one in the mail to you.  )  Are you getting inspiration from this blog?   One way you can help support it is to order your Stampin’ Up products through me.   Click HERE to place an order.    Want to become a Stampin’ Up Demonstrator , receive a 20% discount on product and earn instant income on orders?  Consider being part of my Stampin’ Up Team and start your own business or become a Hobby Demo just for the discount.  Click HERE for more information.

Using a Stampin’ Up Not Quite Navy ink spot, swiped it on the top left corner of a 4″ x 5.5″ piece of Very Vanilla card stock.

Swiped a Bravo Burgundy ink spot on the card stock creating stripes.

Smeared Soft Suede ink around the sides of the card stock.

Swiped Early Espresso ink at the edges of the card stock, not covering the Soft Suede ink entirely.

Ripped a Post it note mask in the shape of a mountain.  Masked the card stock and sponged Soft Suede ink in the mountain shape.

Stamped the Cowboy using Basic Black ink.

Colored the cowboy in to create a silhouette.

Filled the bottom of the card stock in by swiping Soft Suede ink on.

Swiped Basic Black ink at the bottom of the card stock to create the ground.

Stamped the star in the Not Quite Navy ink area using Whisper White ink.

Sponged Basic Black ink around the edges of the card stock.

Cut a 4.75″ x 6.25″ piece of Soft Suede card stock and sponged Basic Black ink around the edges.

Added two Bravo Burgundy card stock panels and gold brads. 

Here is the finished card measuring 5″ x 6.5″.

May your day be one to remember.

Hugs,

Michelle

   Get ready for Brayer Workshops!  I am coming to the following locations, click the location name for more information.  

Houston, Texas  

Wichita, Kansas  

Syracuse (Bridgeport), New York  

St. Peters, Missouri  

La Porte, Indiana  

Orlando (Davenport), Florida  

St. Cloud, Minnesota  

Colorado Springs, Colorado  

Ottumwa, Iowa  

Owings Mills, Maryland (Baltimore Area) 

Cleveland (Euclid), Ohio  

Staley , North Carolina (South of Greensboro)  

Monroe, Connecticut  

Dayton, Ohio

Leesburg, Florida  

Montreal, Wisconsin  

Savannah, Georgia  

Lincoln, Illinois  

Jefferson, Louisiana (New Orleans Area)  

Here is a link to my workshop calendar where you can see all of my travel schedule and to get info on beginner and advanced Brayer workshops:   http://zindorf.blogs.splitcoaststampers.com/workshop-calendar   

Don’t see a workshop in your State?  Interested in hosting the workshops in your area in 2012?   Click HERE to get hostess information.  

Link to my Stampin’ Up website where you can order all of your must have Stampin’ Up products from me 24-7:  http://michellezindorf.stampinup.net


Happy Little Black Bird – Tutorial #397


Well, well, well, I’m approaching another tutorial milestone here on Freedom to Create.   I hope you are still with me and enjoying the tutorials as I make my way to the 400th tutorial!   Where does the time go.  I could swear I just started this blog yesterday.   How about cheering me on by leaving a comment on this post telling me things you would like to see used or done in one of my tutorials?  Let me hear from you, my cyber friends!  If you are receiving this post via e-mail CLICK HERE TO LEAVE A COMMENT.

Let’s get started. . . . .  .

Supplies:

Stamps: Stampin’ Up! Punch Potpourri and Season of Friendship
Paper: Stampin’ Up! Whisper White, More Mustard, Old Olive, Marina Mist and Basic Black
Ink: Stampin’ Up! Bashful Blue, Marina Mist, More Mustard, So Saffron, Crumb Cake, Certainly Celery, Old Olive, Baja Breeze, Basic Black, Always Artichoke & Early Espresso
Accessories: White Gel Pen, Markers – Basic Black, So Saffron & More Mustard, White Gel Pen, Old Olive Striped Grosgrain Ribbon, Basic Black Brads, Bird Punch
Techniques: Direct to Paper

  My Stampin’ Up customers that order $50 in Stampin’ Up merchandise will receive this handmade card though March 31, 2011.

Don’t forget it is Sale-a-bration time at Stampin’ Up.  Receive a free Sale-a-bration set for each $50 in merchandise purchased.   Click HERE to place an order.   Your order will be shipped directly to your door step from Stampin’ Up!

The Stampin’ Up USA Idea book and Catalog is here.   For your copy, please send a check for $9.95 to Michelle Zindorf, P.O. Box 116, West Alexandria, OH 45381 or send it via paypal to mzindorf@aim.com USA only.     My current customers will receive a new Occasions Mini Catalog automatically from me.   Not a current customer and want a free copy of the new Occasions Mini Catalog ?  E-mail your mailing address to mzindorf@aim.com and I will get one in the mail to you.  )  Are you getting inspiration from this blog?   One way you can help support it is to order your Stampin’ Up products through me.   Click HERE to place an order.    Want to become a Stampin’ Up Demonstrator , receive a 20% discount on product and earn instant income on orders?  Consider being part of my Stampin’ Up Team and start your own business or become a Hobby Demo just for the discount.  Click HERE for more information.

I love creating direct to paper projects using the Stampin’ Spots Ink pads.  They are so very easy to control for this type of work.

On a 4 3/8″ Square piece of Whisper White card stock, smeared the edge of the Bashful Blue ink spot across the card stock.

Smeared Certainly Celery ink across the card stock.

Smeared Old Olive ink across the card stock.

Smeared Baja Breeze ink across the card stock.

Smeared Marina Mist ink across the card stock from the right side only.

Smeared So Saffron ink across the card stock from the left side only.

Smeared More Mustard ink across the top of the card stock from the left side only.

Smeared Crumb Cake ink across the card stock at the bottom of the green area.

Stamped the branch twice using Early Espresso ink.

Stamped the leaves using Always Artichoke ink.

Stamped the bird using Basic Black ink on a separate piece of Whisper White card stock and then punched it out using the bird punch.

Adhered the bird to the card stock and added White Gel Pen highlights to the leaves and branches.

Added Basic Black marker shadows under the leaves and branches.

Added an Old Olive panel, Basic Black panel and a More Mustard panel.  Added Old Olive Striped Grosgrain ribbon and Basic Black brads.

I felt the card was a little out of balance so I added a strip of More Mustard and Marina Mist card stock under the ribbon.  Also added two leave punches from Old Olive card stock.

Added Basic Black and More Mustard marker to the punched leaves.

Added More Mustard marker to some of the leaves and to the bottom of the bird’s belly.  Also added So Saffron Marker to the bird’s belly.

Here is the completed card measuring 5″ x 6.5″.

May your day be filled with all of the people and things that you love.

Until my next post. . . .  . . . .

Hugs,

Michelle

   Get ready for Brayer Workshops!  I am coming to the following locations, click the location name for more information.  

Houston, Texas  

Wichita, Kansas  

Syracuse (Bridgeport), New York  

St. Peters, Missouri  

La Porte, Indiana  

Orlando (Davenport), Florida  

St. Cloud, Minnesota  

Colorado Springs, Colorado  

Ottumwa, Iowa  

Owings Mills, Maryland (Baltimore Area) 

Cleveland (Euclid), Ohio  

Staley , North Carolina (South of Greensboro)  

Monroe, Connecticut  

Sturgis, South Dakota  

Leesburg, Florida  

Montreal, Wisconsin  

Savannah, Georgia  

Lincoln, Illinois  

Jefferson, Louisiana (New Orleans Area)  

Here is a link to my workshop calendar where you can see all of my travel schedule and to get info on beginner and advanced Brayer workshops:   http://zindorf.blogs.splitcoaststampers.com/workshop-calendar   

Don’t see a workshop in your State?  Interested in hosting the workshops in your area in 2012?   Click HERE to get hostess information.  

Link to my Stampin’ Up website where you can order all of your must have Stampin’ Up products from me 24-7:  http://michellezindorf.stampinup.net


Just Beachy – Tutorial #333

dsc03954.JPG

It is still raining at my house today, just like it has been the past couple of days.  I decided to look on the sunny side of things though and created a beach scene using my new favorite tools, the ink spots.  These little cuties are sold as sets.   Each Stampin’ Up! color family has a set.  Of course, I had to have them all.  The little ink spot pads are a mere 1 inch and the pads are raised from the base of the ink pad holder so you can easily use them to apply ink directly to the paper.  They are much easier to control then the larger pads when doing Direct to Paper Techniques.

dsc03932.JPG

Today’s project was also made for my Stampin’ Up! Down Line, Ink To Art Team’s Technique Swap.  This month’s technique is, you guest it, Direct to Paper. 

Let’s get started. . . . . . . . .

Supplies:

Stamps: Stampin’ Up! Tropical Party and In a Word
Paper: Stampin’ Up! Whisper White, Basic Black, More Mustard and Tempting Turquoise
Ink: Stampin’ Up! Ink spots, Tempting Turquoise, Basic Black, Ballet Blue, Bashful Blue, So Saffron and Creamy Caramel
Accessories: Stampin’ Up! Top Note Die, Big Shot Machine, 1/2″ circle Punch, Sponge, Post it Notes

Live in the USA and need a copy of the Summer Mini Catalog?  E-mail your mailing address to mzindorf@aim.com and I will get one in the mail to you.  )  Are you getting inspiration from this blog?   One way you can help support it is to order your Stampin’ Up products through me.   Click HERE to place an order.  Want to become a Stampin’ Up Demonstrator , receive a 20% discount on product and earn instant income on orders?  Consider being part of my Stampin’ Up Team and start your own business.  Click HERE for more information.

dsc03955.JPG

Masked the sun using a 1/2″ punch from the sticky part of a post it note.    Put the mask on a 3.75″ x 4″ piece of Whisper White card stock.

dsc03933.JPG

Swiped the Tempting Turquoise ink spot across the top of the card stock.

dsc03934.JPG

Masked the top of the card stock using a post it note.

dsc03935.JPG

Swiped the Tempting Turquoise ink spot across the card stock right at the post it note edge.

dsc03936.JPG

Swiped the Bashful Blue ink spot across the card stock.

dsc03937.JPG

Swiped the Ballet Blue ink spot onto the card stock using the edge of the pad.

dsc03938.JPG

Swiped the Tempting Turquoise ink spot at the bottom of the water area.

dsc03939.JPG

Swiped the So Saffron ink spot at the bottom of the card stock to create a sandy area.

dsc03940.JPG

Added a marks of Creamy Caramel using the edge of the Ink pad.

dsc03941.JPG

Removed all of the Post it Note Masks.

dsc03942.JPG

swiped in a piece of island using the edge of the Basic Black ink spot.

dsc03943.JPG

Stamped the Palm Tree from the New Stampin’ Up set Tropical Party using Basic Black ink.

dsc03944.JPG

Stamped the Palm Fod using Basic Black ink.

dsc03945.JPG

Sponged around the egde of the main image panel using Tempting Turquoise ink.

dsc03946.JPG

Die Cut a Top Note Die using my Big Shot Die Cut machine and Whisper White card stock.

dsc03947.JPG

Cut the Top Note in half.

dsc03948.JPG

Stamped the word Marvelous on the top note half using Basic Black ink.

dsc03949.JPG

Assembled the card adding Basic-Black, More Mustard and Tempting Turquoise panels.

Here is the finished card measuring 5.5″ square.

dsc03954.JPG

Hey, I am taking off on a road trip to Illinois to teach my Brayer Workshops this weekend, woohoo!  I love road trips, stamping and new friends.  🙂

I will be back on Monday.

May your weekend be filled with lots of fun and laughter.

Until my next post. . . . . . 

Hugs,

Michelle

dsc03326-2.jpg   Get ready for Brayer Workshops!  I am coming to:

Wheaton, Illinois

St. Cloud, Minnesota (2 spots available)

Rockville, Maryland

North Chili, New York (near Rochester)

Kenova (Huntington), West Virginia

Helena, Montana

Middleburg Heights, Ohio (Sold Out)

Venice, Florida

Grinnell, Iowa

Piedmont, Alabama (Near GA border close to Cedartown)

Auburn, Washington (near Seattle)

Elk Grove Village, Illinois

Savannah, Georgia

Atlanta, Georgia

Soledad, California

Here is a link to my workshop calendar where you can see all of my travel schedule and to get info on beginner and advanced Brayer workshops:   http://zindorf.blogs.splitcoaststampers.com/workshop-calendar 

Link to my Stampin’ Up website where you can order all of your must have Stampin’ Up products from me 24-7:  http://michellezindorf.stampinup.net

Frequently asked questions answers:  http://zindorf.blogs.splitcoaststampers.com/frequently-asked-questions/