Windy Tree – Tutorial #262 and a Blog Candy Winner!

dsc00927.JPG

Happy First Day of Autumn!   In the spirit of Fall here is a card using Stampin’ Up ink pads and the direct to paper technique to swipe in the background quickly.  But before we get into today’s tutorial let me congratulate the lastest blog candy winner.

dsc09913.JPG  Congratulations Carole Philpot who wrote:  “I love your blog, it has been such an inspiration to me. I have been a “technique junkie” for years of cardmaking, mostly folds, never stamped much until I signed up for your blog and now I am attempting to brayer and sponge backgrounds and stamp! Thanks for all the good tutorials”

Carole, please e-mail your mailing address to mzindorf@aim.com within 30 days and I will put this great set in the mail to you.  🙂

Thank you to everyone that played along.

Now on with this mornings Autumn themed tutorial. . . . .

Supplies:

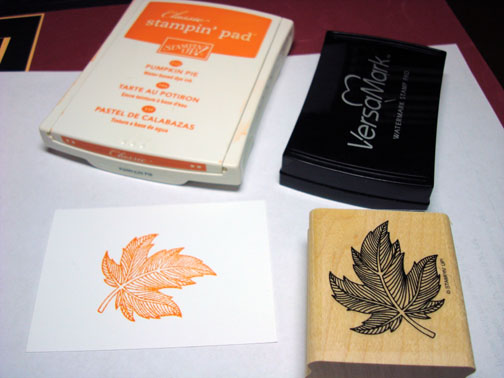
Stamps: Stampin’ Up Branch Out & Baroque Motifs
Paper: Stampin’ Up Whisper White, Bashful Blue & Old Olive
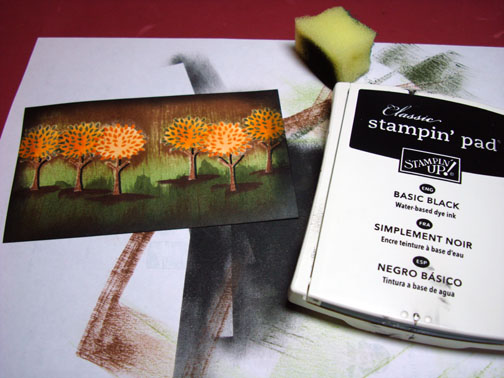
Ink: Stampin’ Up Basic Black, Really Rust, Old Olive, Always Artichoke & Bashful Blue
Accessories: Silver Brads, Sponge, White Gel Pen

Want a free 39 page, Stampin’ Up Mini catalog?  If you are a resident of the United States,  just e-mail your mailing address to me and I will get one in the mail to you.  Are you inspired by this Blog?  One way you can help support this blog is by ordering your Stampin’ Up products through me.   You can order from me 24-7 from this link:  http://michellezindorf.stampinup.net or e-mail me at mzindorf@aim.com  If you are within the United States.  Want a copy of the brand new 2009-2010 Stampin’ Up Catalog for $9.95 with free shipping, just e-mail me at mzindorf@aim.com and I will get one in the mail to you.  Want to become a Stampin’ Up Demonstrator and earn instant income?  Consider being part of my Stampin’ Up Team.  Also check out the Stampin’ Up specials, click this link to check it out:  http://www.stampinup.net/esuite/home/michellezindorf/promotions

dsc00928.JPG

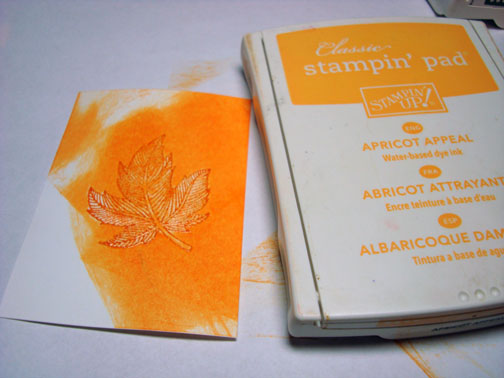
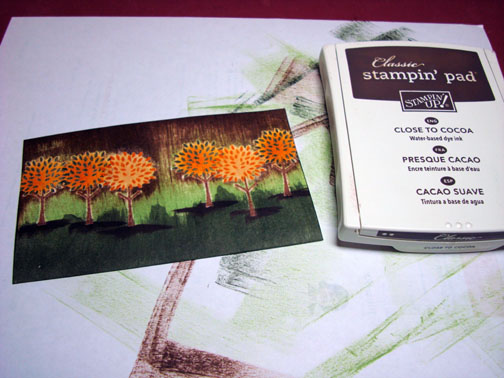
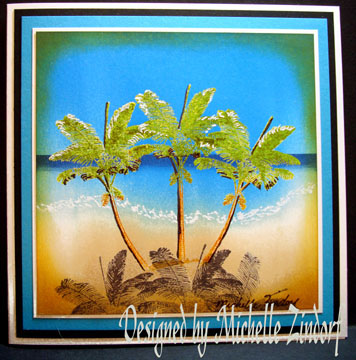
On a 3.5″ x 5″ piece of Whisper White card stock, smeared Bashful Blue Ink on using the short end of the ink pad.

dsc00912.JPG

Stamped the Flourish from the Stampin’ Up Baroque Motifs set with Bashful Blue ink.

dsc00913.JPG

Smeared Bashful Blue ink at the bottom of the card stock.

dsc00914.JPG

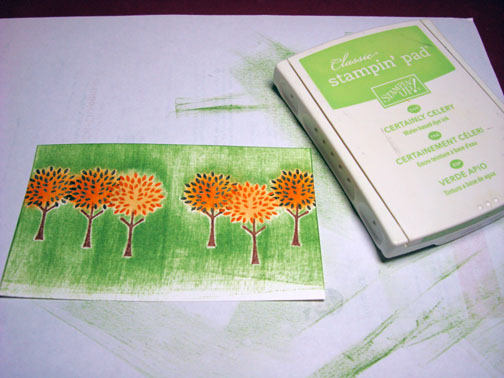
Smeared Old Olive ink at the bottom of the card stock.

dsc00915.JPG

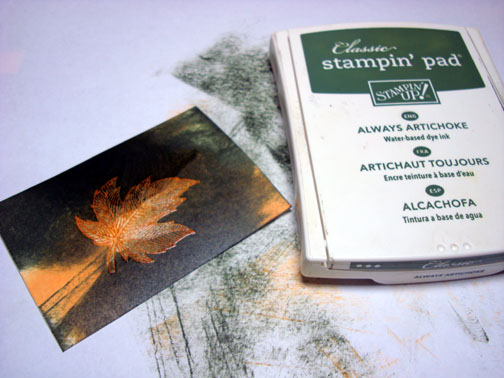
Turned the card stock up side down and smeared Always Artichoke ink from the ground toward the sky using the edge of the ink pad.

dsc00916.JPG

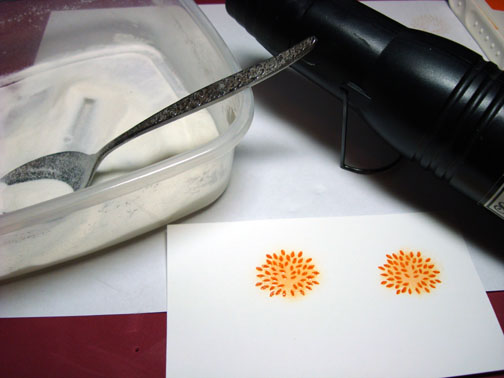
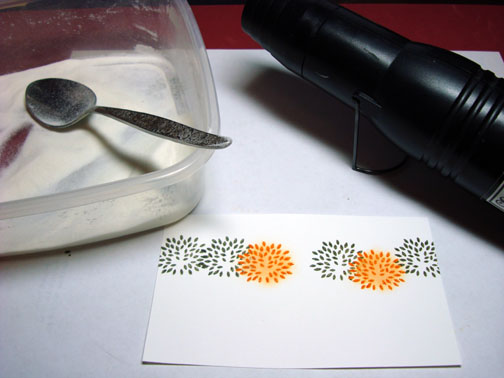
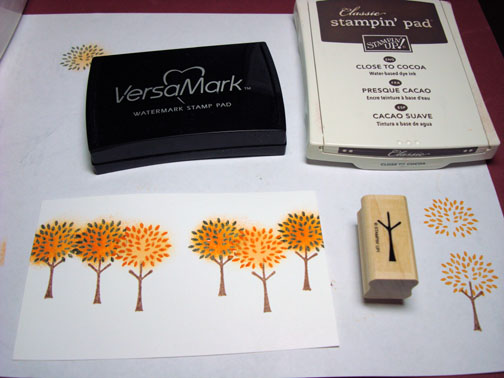
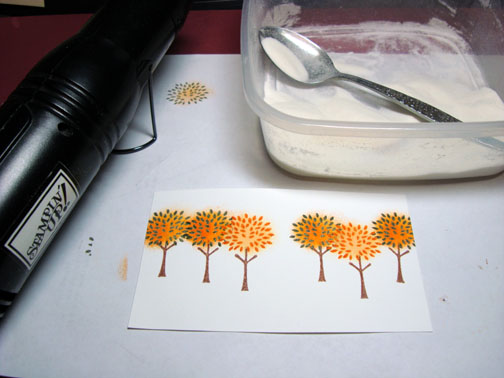
Stamped the Stampin’ Up Branch Out sets Tree using Basic Black ink.

dsc00917.JPG

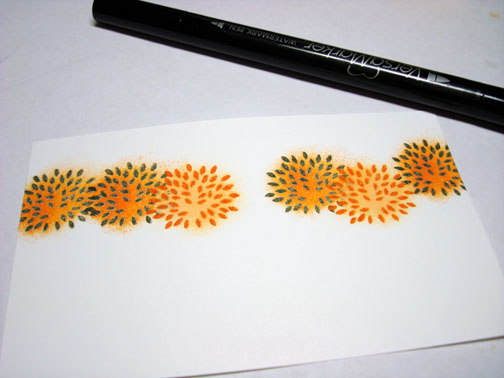
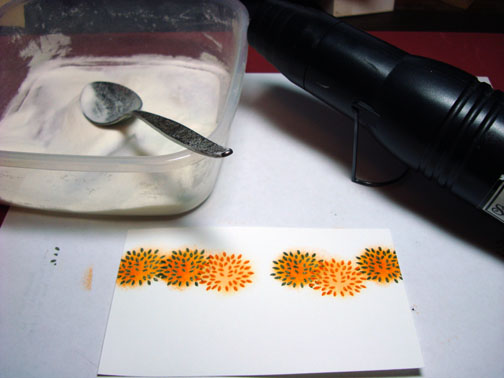
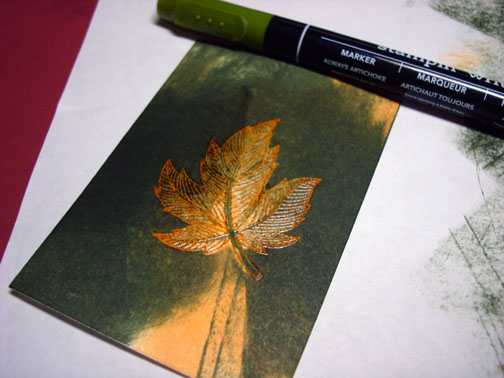
Stamped leaves using Old Olive and Really Rust ink on the tree and to the side of the tree.

dsc00918.JPG

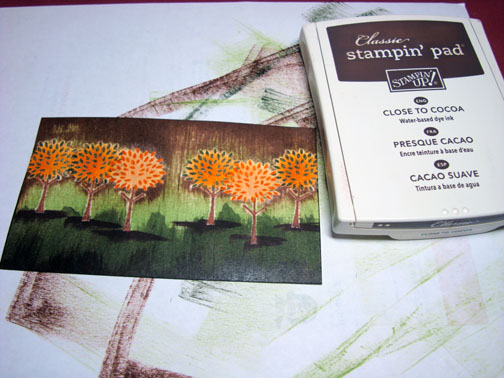
Added White Gel Pen highlights to the Flourish to bring it a bit forward in the scene.

dsc00919.JPG

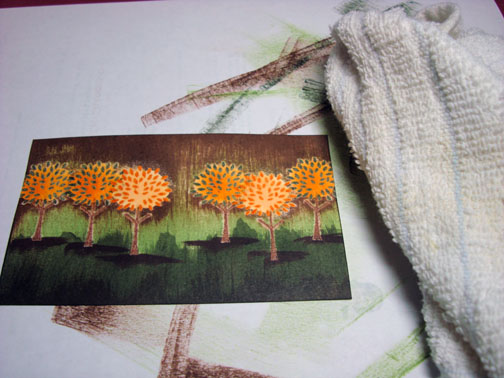
Sponged Old Olive ink around the outside edges of the card stock.

dsc00920.JPG

Sponged Basic Black ink around the outside edges of the card stock, not covering the Old Olive sponged ink entirely.

dsc00921.JPG

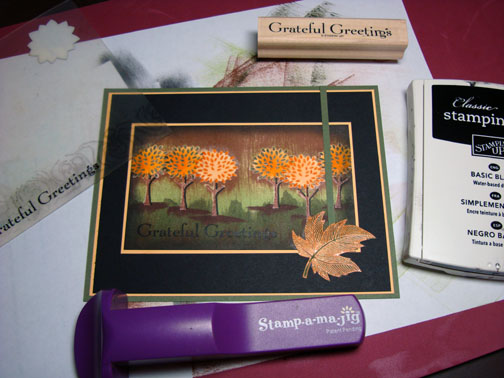
Added Whisper White, Bashful Blue and Old Olive card stock panels.

dsc00922.JPG

Added Silver Brads in the corners of the main image panel using a piercing tool to start the brads.

dsc00923.JPG

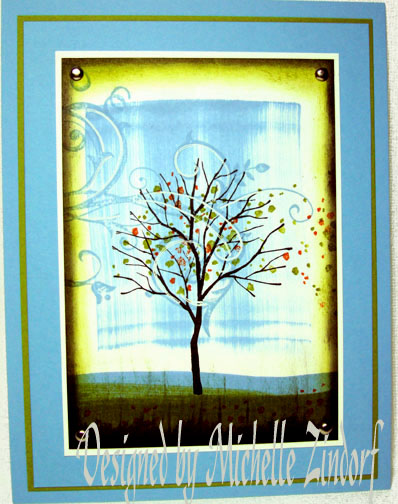
Here is the finished card measuring 5″ x 6.5″.

dsc00927.JPG

I just got home last night after spending the weekend in Yardley, PA teaching my brayering techniques to totally terrific groups of ladies.  My drive there and back was wonderful.  I found myself in some very scenic country in Ohio, West Virginia, Maryland and Pennsylvania.

Here is one photo taken just as the sun was rising as I was driving along yesterday morning.

dsc00869.JPG

The traffic was a bit slow going through Philly so I was able to take this photo in bumper to bumper traffic.  

dsc00892.JPG

May your day be smooth sailing!

Until my next post. . . . .

Huge Hugs,

Michelle

moon-glow-edited-7-tiny.jpg  Get ready for Brayer Workshops!  I am coming to:

Knox, Maine

Akron, Ohio

Broomfield, Colorado

Moore, Oklahoma

Nashville, Indiana

Portland, Michigan

2010

Dayton, Ohio at Marco Paper

Phoenix, Arizona

Monroe, Louisiana

Jacksonville, Florida

St. Louis, Missouri

Mechanicsville, Virginia

Raleigh, North Carolina 

Colleyville, Texas

Colorado Springs, Colorado

Boise area of Meridian, Idaho

Riverside, California (Southern California)

Salem, Oregon

Wheaton, Illinois

St. Cloud, Minnesota

Rockville, Maryland

North Chili, New York (near Rochester)

New Johnsonville, Tennessee

Kenova, West Virginia

Helena, Montana

Middleburg Heights, Ohio

Venice, Florida

Ginnell, Iowa

Piedmont, Alabama

Auburn, Washington

Elk Grove Village, Illinois

Here is a link to my workshop calendar where you can see all of my travel schedule and to get info on beginner and advanced Brayer workshops: 

 http://zindorf.blogs.splitcoaststampers.com/workshop-calendar 

Link to my Stampin’ Up website where you can order all of your must have Stampin’ Up products from me 24-7: 

 http://michellezindorf.stampinup.net

Frequently asked questions answers: 

 http://zindorf.blogs.splitcoaststampers.com/frequently-asked-questions/


Direct Trendy Trees – Totorial #254

dsc00692edited.jpg

Happy Sunday!  Sunday is usually my chill out day.  A day when I just put my feet up and relax.  Today however, I felt I should give you fine readers a tutorial since I have been busy prepping for my September brayer workshops and yesterday I was in Greenwood, Indiana teaching some super fun ladies at Sharon’s Crop Studio.  That being said, I have not had the time in the past few days to sit down and create.

I put together this Autumn card using Stampin’ Up Classic Ink pads using the direct to paper method for the background.  This card also highlights the Stampin’ Up Trendy Tree set and two new sets that are in the new Stampin’ Up Holiday Mini Catalog, Autumn Splendor and Grateful Greets, must have sets! 

On a side note, e-mail me your address if you want a free copy of the new Stampin’ Up Mini Catalog and you reside in the USA, mzindorf@aim.com.

I created this card the other day and got a few e-mails asking me why I had used the Tim Holtz Distress ink pads instead of using Stampin’ Up ink pads.  dsc00636.JPG

Below is a picture of the Stampin’ Up ink pad on the left and the Tim Holtz Distress ink pads on the right.  There is a really big, big difference in how much the pad is raised above the pad base with the Distress ink pads.  So that is why when I do a direct to paper project and I want to smear the ink directly on the card stock using the ink pad, I will reach for my Distress ink pads.  They are much easier to use because of how much the pad is raised off of the base. 

Don’t get me wrong you can do the same method with the Stampin’ Up ink pads because the pad is raised off the base a bit.  Todays tutorial demonstrates it.  🙂

dsc00699.JPG

Okay, let’s get started on today’s tutorial “Direct Trendy Trees”.

Supplies:

Stamps: Stampin’ Up Trendy Trees, Autumn Splendor & Grateful Greetings
Paper: Stampin’ Up Whisper White, Basic Black, Apricot Appeal & Always Artichoke
Ink: Stampin’ Up Apricot Appeal, Pumpkin Pie, Certainly Celery, Always Artichoke, Close to Cocoa, Chocolate Chip and Basic Black
Accessories: Stamp-a-ma-Jig, Stampin’ Up Markers Always Artichoke & Basic Black, Paper Snips, Versamark pad and marker, sponge

Are you inspired by this Blog?  One way you can help support this blog is by ordering your Stampin’ Up products through me.   You can order from me 24-7 from this link:  http://michellezindorf.stampinup.net or e-mail me at mzindorf@aim.com  If you are within the United States.  Want a copy of the brand new 2009-2010 Stampin’ Up Catalog for $9.95, just e-mail me at mzindorf@aim.com and I will get one in the mail to you.  Want to become a Stampin’ Up Demonstrator and earn instant income?  Consider being part of my Stampin’ Up Team.  Through August 31 you can become a Stampin’ Up Demonstrator for as little as $85 with the mini kit.  Also check out the Stampin’ Up specials, click this link to check it out:  http://www.stampinup.net/esuite/home/michellezindorf/promotionsdsc00698.JPGStamped the tree leaves on a 3″ x 5″ piece of Whisper White card stock by first loading my stamp with Versamark and then loading my stamp with Pumpkin Pie ink before stamping it.  Heat embossed the images using clear embossing powder and a heat gun.dsc00662.JPGdsc00663.JPGSponged Apricot Appeal ink in the center of the leaves and then colored over the sponged ink with a Veramark marker and heat embossed the images again using clear embossing powder and a heat gun.dsc00664.JPG

dsc00665.JPG

dsc00666.JPG

Stamped the Leaves 4 more times by first loading my stamp with Versamark and then Always Artichoke ink before stamping them.  Heat embossed the images using clear embossing powder and a heat gun.

dsc00667.JPG

dsc00668.JPG

Sponged Pumpkin Pie ink in the middle of the leaves and colored over the sponged ink with a Versmark marker and heat embossed the images with clear embossing powder and a heat gun.

dsc00669.JPG

dsc00670.JPG

dsc00671.JPG

Stamped the Trunks by first loading my stamp with Versamark and Close to Cocoa ink before stamping them.   Heat embossed the images using clear embossing powder and a heat gun.

dsc00672.JPG

dsc00673.JPG

Smeared Certainly Celery ink on the card stock using the edge of the Stamp pad.

dsc00674.JPG

Smeared Always Artichoke ink at the bottom of the card stock using the edge of the ink pad.

dsc00675.JPG

Smeared Close to Cocoa ink at the top and bottom of the card stock using the edge of the ink pad.  Used the corner of the Close to Cocoa pad to smear a shadow under each tree trunk.

dsc00679.JPG

Outlined the right sides of the tree trunk with a Basic Black marker.

dsc00680.JPG

Sponged Black ink around the edge of the card stock.

dsc00681.JPG

Stamped the leaf from the Stampin Up “Autumn Splendor” set by first loading my stamp with Versamark and then with Pumpkin pie ink before stamping it on a scrap of Whisper White card stock.  Heat embossed the image using clear embossing powder and a heat gun.

dsc00682.JPG

dsc00683.JPG

Smeared Apricot Appeal ink over the embossed leaf using the edge of the ink pad.

dsc00684.JPG

Smeared on some Always Artichoke ink  on the leaf using the edge of the ink pad.

dsc00685.JPG

Colored the stem and a few veins of the leaf in with an Always Artichoke marker.

dsc00686.JPG

Cut out the leaf with a pair of Stampin’ Up Paper Snips, love these little sharp scissor by the way.  🙂

dsc00687.JPG

Assembled my card and stamped the greeting using a Stamp-a-ma-jig for placement and Basic Black ink.

dsc00688.JPG

Here is the completed card measuring 5″ x 6.5″. 

dsc00692edited.jpg

Hey it is now time for me to relax and put my feet up, right after I answer my e-mails, check my P.O. Box, update my accounting paperwork for my business, do some laundry, feed the dogs and the bird, make some breakfast, do the dishes etc, etc.  . . . . . . . . . Thank goodness it is not Monday!  Sigh. ..  .

May your Sunday be one of rest and relaxation.

Until my next post. . . . .  . . . . . . . . . . . . . ..

Huge Hugs,

Michelle

dsc04306-tiny.jpg Get ready for Brayer Workshops!  I am coming to:

Castro Valley, California 

Yardley, Pennsylvania (near Philadelphia) 

Knox, Maine

Akron, Ohio

Broomfield, Colorado

Moore, Oklahoma

Nashville, Indiana

Portland, Michigan

2010

Dayton, Ohio at Marco Paper

Phoenix, Arizona

Monroe, Louisiana

Jacksonville, Florida St. Louis, MissouriMechanicsville, VirginiaRaleigh, North CarolinaColleyville, TexasColorado Springs, ColoradoBoise area of Meridian, Idaho

Riverside, California (Southern California)

Salem, Oregon

Wheaton, Illinois

St. Cloud, Minnesota

Rockville, Maryland

North Chili, New York (near Rochester)

New Johnsonville, Tennessee

Helena, Montana

Middleburg Heights, Ohio

Venice, Florida

Here is a link to my workshop calendar where you can see all of my travel schedule and to get info on beginner and advanced Brayer workshops:  http://zindorf.blogs.splitcoaststampers.com/workshop-calendar

Link to my Stampin’ Up website were you can order all of your must have Stampin’ Up products from me 24-7:  http://michellezindorf.stampinup.net

Frequently asked questions answers:  http://zindorf.blogs.splitcoaststampers.com/frequently-asked-questions/


Direct to Paper Branched Out – Tutorial #252

dsc00636.JPG

I love Tim Holtz Distress Inks and can spend hours whiling away smearing ink on card stock and creating backgrounds for silhouette images.  Here is one I put together this morning.  I hope this tutorial inspires you to smear some ink today.  🙂

Supplies:

Stamps: Stampin’ Up Branched Out
Paper: Stampin’ Up Whisper White, Basic Black and So Saffron
Ink: Stampin’ Up Basic Black, Handsome Hunter, Old Olive and Tim Holtz Distress inks Black Soot, Scattered Straw, Weathered Wood, Brushed Corduroy, Faded Jeans and Broken China
Accessories: White gel pen

Are you inspired by this Blog?  One way you can help support this blog is by ordering your Stampin’ Up products through me.   You can order from me 24-7 from this link:  http://michellezindorf.stampinup.net or e-mail me at mzindorf@aim.com  If you are within the United States.  Want a copy of the brand new 2009-2010 Stampin’ Up Catalog for $9.95, just e-mail me at mzindorf@aim.com and I will get one in the mail to you.  Want to become a Stampin’ Up Demonstrator and earn instant income?  Consider being part of my Stampin’ Up Team.  Through August 31 you can become a Stampin’ Up Demonstrator for as little as $85 with the mini kit.  Also check out the Stampin’ Up specials, click this link to check it out:  http://www.stampinup.net/esuite/home/michellezindorf/promotions

dsc00638.JPG

Started with a 4″ square piece of Whisper White card stock.  Used the edge of the Broken China Distress ink pad and smeared it across the card stock.  This technique is called “Direct to Paper”.

dsc00622.JPG

Added Faded Jeans Distress ink with the corner of the pad.

dsc00623.JPG

Added a little bit of Brushed Corduroy using the corner of the pad.

dsc00624.JPG

Added Black Soot Distress ink using the edge of the pad and a light touch.

dsc00625.JPG

Added Weathered Wood Distress ink using the edge of the pad in the sky area of the card stock.

dsc00626.JPG

Added Scattered Straw Distress ink using the edge of the pad in the sky area of the card stock.

dsc00627.JPG

Stamped the Tree from the Stampin’ Up Branched Out Set with Basic Black ink.

dsc00628.JPG

Stamped the leaf stamp from the Branched Out set with Old Olive ink on the left side of the tree.

dsc00629.JPG

Added some more leaves with Handsome Hunter ink in the middle of the tree.

dsc00630.JPG

Stamped some more leaves with Basic Black ink on the right side of the tree.

dsc00631.JPG

Put some highlights in the leaves on the left side of the tree, out lined the left side of the trunk and added a few grasses at the base of the tree with a white gel pen.

dsc00632.JPG

Teamed the main image panel up with a few card stock panels and left off embellishments.  Some times embellishments take from your design instead of adding to.  I felt that was the case with this piece today.

This is the finished card measuring 5.25″ square.

dsc00636.JPG

Until my next post. . . . .  . . . . . . . . . . . . . ..

Huge Hugs,

Michelle

dsc04306-tiny.jpg Get ready for Brayer Workshops!  I am coming to:

Greenwood, Indiana

Castro Valley, California

Yardley, Pennsylvania (near Philadelphia)

Knox, MaineAkron, Ohio

Broomfield, Colorado

Moore, Oklahoma

Nashville, Indiana Portland, Michigan

2010

Dayton, Ohio at Marco Paper

Phoenix, Arizona

Monroe, Louisiana

Jacksonville, Florida

St. Louis, Missouri

Mechanicsville, Virginia

Raleigh, North Carolina

Colleyville, Texas

Colorado Springs, Colorado

Boise area of Meridian, Idaho

Riverside, California (Southern California)

Salem, Oregon

Wheaton, Illinois

St. Cloud, Minnesota

Rockville, Maryland

North Chili, New York (near Rochester)

New Johnsonville, Tennessee

Helena, Montana

Middleburg Heights, Ohio

Venice, Florida

Here is a link to my workshop calendar where you can see all of my travel schedule and to get info on beginner and advanced Brayer workshops:  http://zindorf.blogs.splitcoaststampers.com/workshop-calendar

Link to my Stampin’ Up website were you can order all of your must have Stampin’ Up products from me 24-7:  http://michellezindorf.stampinup.net

Frequently asked questions answers:  http://zindorf.blogs.splitcoaststampers.com/frequently-asked-questions/


Dream a Little – Tutorial #210

dsc09104.JPG

dsc09056.JPG Before we start today’s tutorial I need to announce the winner of the Creative Hot Marks tool.  The random number generator selected. . . . . . . . ..  .. . ..  .

Cledith who wrote “After discovering your website, I’ve bought a brayer. Now I have to use it!”

Congratulations Cledith, please e-mail address to mzindorf@aim.com and I will pop this set in the mail to you.

Thank you to all 459 of you that entered the drawing.  Wish I had a set for each of you.

One other announcement, I will be teaching my Beginner & Advanced workshops for one day only in Greenwood, Indiana (right outside of Indianapolis) at Sharon’s Crop Studio Store on August 29, 2009.   E-mail me at mzindorf@aim.com for information on the workshops or to register.  Warning, these workshops are filling very fast.

Now a bit about today’s project.  This project was done using the direct to paper technique for the background.  I wanted to demonstrate how effective it is to leave the white of the paper showing through on your backgrounds to give the scene a real sparkle of light.  Hang out a few moments with me and check it out.

Let’s get rolling or smearing, lol . . . .

Supplies:

Stamps: Innovative Stamp Creations “Marvels of Nature” & Stampin’ Up Totally Tabs and Dream a Little
Paper: Stampin’ Up Design Paper, Whisper White & Pacific Point card stock
Ink: Distress Inks Peeled Paint, Black Soot, Old Paper, Faded Jeans, Antique Linen
Accessories: Stampin’ Up Basic Black & Close to Cocoa Markers, White Gel Pen, Tim Holtz Distress Tool, Stampin’ Up Old Olive Brads, Tab Punch, Stamp-a-ma-Jig, Piercing Tool

Are you inspired by this Blog?  One way for you can help support this blog is by ordering your Stampin’ Up products through me.   You can order from me 24-7 from this link:  http://michellezindorf.stampinup.net or e-mail me at mzindorf@aim.com if you are within the United States.  Want to become a Stampin’ Up Demonstrator and earn instant income?  Consider being part of my Stampin’ Up Team. 

dsc09108.JPG

Start out with a 3.5″ square piece of Whisper White card stock.

dsc09089.JPG

Mask a little over half the bottom of the card stock with a post it note.

dsc09090.JPG

Drag one edge of the Antique Linen Distress ink pad across the unmask portion of the card stock, LEAVE SOME OF THE WHITE PAPER SHOWING THROUGH.

dsc09091.JPG

Flip your card stock upside down and cover the sky area you just smeared in with the post it note to mask it.

dsc09092.JPG

Smear about 3/4 of an inch of Faded Jeans Distress ink right above the post it note, LEAVE SOME WHITE OF THE PAPER SHOWING THROUGH!

dsc09093.JPG

Smear Old Paper Distress ink on the rest of the card stock that is unmasked, LEAVE SOME OF THE WHITE PAPER SHOWING THROUGH.

dsc09094.JPG

Unmask the scene and turn it around so it is upright.

dsc09095.JPG

Load this great Palm tree from Innovated Stamp Creations with Peeled Paint ink, then load the trunk of the tree with Black Soot ink before stamping it.

dsc09096.JPG

Colored in the trunk of the tree with a Stampin’ Up Basic Black marker.

dsc09097.JPG

Added a bit of Close to Cocoa marker to the leaves of the tree.

dsc09098.JPG

Added White Highlights to some of the leaves on the tree.

dsc09099.JPG

Oops!  Missed a photo, after I applied the White Gel pen Highlights I used a Tim Holtz Distressing Tool to fray the edges of the main image panel.

Next, stamped the Totally Tab image on a piece of Whisper White card stock and then punched it out with the Stampin’ Up Tab Punch.  Folded it in half and adhered it to the main image panel while assembling the card front.

dsc09100.JPG

dsc09101.JPG

Look at this, I’m using pattern paper!  Gasp!  I know, I know, I never use pattern paper.  Well you will probably be seeing me use more of it since I went wild and purchased about every piece of pattern paper Stampin’ Up has.  They have a sale going on right now, buy 3 packs and get one free.  Yep, I love a sale!

I added some Old Olive brads to the tag, by starting the hole for the brad with my piercing tool.

dsc09102.JPG

Stamped the sentiment from the Stampin’ Up “Dream a little set”, using my Stamp-a-ma-jig for placement.

dsc09103.JPG

Here is the finished card measuring 5.25″ square.  Check out that sparkle.

dsc09104.JPG

Now it is your turn to leave a little white showing in your backgrounds!

Until my next post. . . . . . . . . . . . .  . .

Hugs,

Michelle

Get ready for Brayer Workshops!  I am coming to:

dsc07666supersmall.jpg

Dayton, Ohio

Covington, Indiana

Buffalo, Minnesota

Webster, New York

New Johnsonville, Tennessee

Stoughton, Wisconsin

Columbia, Missouri

Lynchburg, Virginia

Greewood, Indiana

Castro Valley, California

Yardley, Pennsylvania (near Philadelphia)

Knox, Maine

Broomfield, Colorado

Moore, Oklahoma

Portland, Michigan

2010

Jacksonville, Florida

Pocatello, Idaho

Salem, Oregon

Here is a link to my workshop calendar where you can see all of my travel schedule and to get info on beginner and advanced Brayer workshops:  http://zindorf.blogs.splitcoaststampers.com/workshop-calendar

Link to my Stampin’ Up website were you can order all of your must have Stampin’ Up products from me 24-7:  http://michellezindorf.stampinup.net

Here is a link to all of my tutorials:  http://zindorf.blogs.splitcoaststampers.com/tutorials-ive-written/

Frequently asked questions answers:  http://zindorf.blogs.splitcoaststampers.com/frequently-asked-questions/


Wild Direct to Paper Sky – Tutorial #191

dsc08302.JPG

Okay, I know this is my second tutorial today, but it has been raining all day and I am procrastinating.  I should be out doing my grocery shopping.  Instead I am hanging out in my PJ’s stamping away. 

This is a very easy sky to create with Tim Holtz Distress ink pads.  I used just the corner edge of the pad and smeared in different colors.  I think I like the effect of this.  I bet it would look great with pastels too.

Let’s get started.  🙂

Supplies:

Stamps: Stampin’ Up Branch Out
Paper: Stampin’ Up Whisper White & Basic Black
Ink: Tim Holtz Distress inks Aged Mahogany, Faded Jeans, Dried Marigold, Dusty Concord, Black Soot & Scattered Straw
Accessories: Gray marker, White Gel Pen, Post it Note

Please don’t forget you can order your Stampin’ Up products from me 24-7 from this link:  http://michellezindorf.stampinup.net or e-mail me at mzindorf@aim.com if you are within the United States.  Also, please consider being part of my Stampin’ Up Team.  We have valuable monthly meetings in Miamisburg, Ohio.dsc08303.JPGI started out with a 4.5″ Square piece of Whisper White card stock and smeared the Scatter Straw distress ink directly on the card stock using the raised edge of the ink pad.

dsc08289.JPG

Smeared on a little Dusty Concord distress ink using only the corner of the raised pad.

dsc08290.JPG

Smeared on Aged Mahogany Distress ink using only the corner of the raised pad.

dsc08291.JPG

Smeared on a bit of Faded Jeans Distress ink only using the corner of the raised pad.

dsc08292.JPG

Add a touch of Dried Marigold Distress ink using the only the corner of the raised pad.

dsc08293.JPG

Smeared on more of the Dusty Concord Distress ink at the bottom of the card stock.

dsc08294.JPG

Tore through the stick part of a post it note and used it as a mask at an angle to create my ground area.

dsc08295.JPG

Using the edge of a Black Soot Distress ink pad I smeared the ink on the bottom of the card stock, pulling the pad straight down.  This created those streaky lines.

dsc08296.JPG

Removed the post it note and added some more Black Soot ink at the bottom of the card stock.  I liked the streaky look of the the black ink so I did not cover it all up.  I think it adds some interest to the piece.

dsc08297.JPG

Stamped the tree using Black Soot Distress ink.

dsc08298.JPG

Added White Gel pen highlights to the right side of the tree.

dsc08299.JPG

Assembled card and added a Gray marker outline to the left and bottom sides of the small black card stock panel to add a casted shadow.  I also added a few white gel pen dots to the ground area.

dsc08300.JPG

Here is the finished card measuring 5.5″ square.

dsc08302.JPG

I hope this has inspired you to smear some ink around today.

Until my next post. . . . . . . . . . . . .

Hugs,

Michelle

Get ready for Brayer Workshops!  I am coming to:

3-small.jpg

Fort Smith, Arkansas

Dayton, Ohio

Savannah, Georgia

Covington, Indiana

Buffalo, Minnesota

Webster, New York

New Johnsonville, Tennessee

Stoughton, Wisconsin

Castro Valley, California

Yardley, Pennsylvania (near Philadelphia)

Knox, Maine

Broomfield, Colorado

Lynchburg, Virginia

Columbia, Missouri

Here is a link to my workshop calendar where you can see all of my travel schedule and to get info on beginner and advanced Brayer workshops:  http://zindorf.blogs.splitcoaststampers.com/workshop-calendar

Link to my Stampin’ Up website were you can order all of your must have Stampin’ Up products from me 24-7:  http://michellezindorf.stampinup.net

Here is a link to all of my tutorials:  http://zindorf.blogs.splitcoaststampers.com/tutorials-ive-written/

Frequently asked questions answers:  http://zindorf.blogs.splitcoaststampers.com/frequently-asked-questions/