Flourished Collage Card with Flourishes Tutorial

dsc02266-copy.jpg

Flourishes are all the craze now.  You can get flourish stamps by just about every stamp company out there.  I love flourishes!  They can add so much to a piece. 

I get comments on my cards saying “I can’t believe you cut those flourishes out”.  Well I didn’t and today I will show you how to make those flourishes look 3D.

Supplies:  SU Soft Sky card stock, Tim Holtz Distress Ink Faded Jeans, White Gel Pen, SU Not Quite Navy Marker, Sponge.

dsc02272.JPG

Stamp Flouish with Faded Jeans Ink on Soft Sky card stock.

dsc02273.JPG

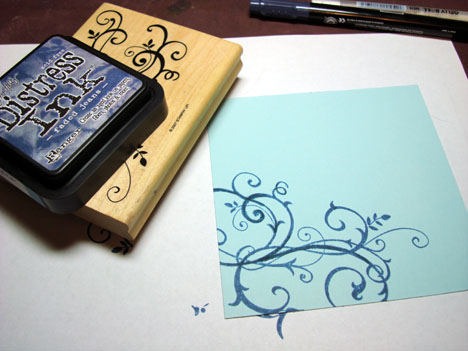
I like to make my flourishes come out of the shadows.  Sponge Faded Jeans in a circular motions, starting from the far left of the Cardstock and working in.  You will want it to be a little darker at the edge of the cardstock.

dsc02274.JPG

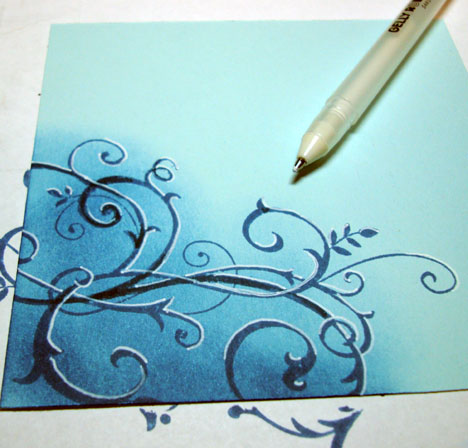
Now to figure out where you want your light source to come from.  The pen on the card stock shows the direction of where I want mine to come from.

dsc02275.JPG

Keeping your light source in mind, use your gel pen and highlight the flourish by tracing the right side (light source side) of the flourishes.  This does not have to be exact.

dsc02276.JPG

Now to the dark side (starting to sound like Star Wars, lol).

Your shadow is coming from the left side (dark side), in the direction the marker is pointing.

dsc02279.JPG

Traced the left side of the flourishes with a Stampin’ Up Night of Navy Marker.

dsc02281.JPG

There you have it, 3D looking flourishes.  This is the same technique I used on my Flourished Collage card.

I hope you enjoyed this tutorial and come away inspired to make your flourishes pop!

Your comments, questions and suggestions are always appreciated.

25 thoughts on “Flourished Collage Card with Flourishes Tutorial

  1. Robbie's avatar Robbie

    Thanks for this super easy tutorial. Can’t wait to try it – and I will. When looking at SCS every day, your creations seem to draw my eye to your beautiful artwork. I would have had no idea that you hadn’t taken any art classes. You’re a natural!! Thanks for sharing.

    Like

  2. Chris's avatar Chris

    Another easy to follow tutorial Michelle, thank you. On the card you’re showing us is the main design on the main backing paper or is it another layer? If so, how have you managed to get the flourishes stamped without a break in the stamping. When stamping over 2 layers, even if the difference in thickness is very slight, I never seem to manage a continuous stamp between the two different areas.

    Like

  3. Another great questions from Chris, her mind is working and I love it!
    Chris wants to know “On the card you’re showing us in the main design on the main backing paper or is it another layer? If so, how have you managed to get the flourishes stamped without a break in the stamping”.
    The collage stamp is stamped on a separate piece of Whisper White and attached to the Soft Sky card stock. I then stamped over both. It is very hard not to get a break in your design when stamping over layers of card stock, so have a marker close at hand that is close to the shade you are stamping in to fill in the gaps.

    Like

  4. Another fabulous tutorial. You’re amazing. I can’t believe you haven’t been to any formal questions…art is truly a gift. Thank you for easy-to-follow instructions. 🙂 Can’t wait to try this one out.

    Like

  5. Carol's avatar Carol

    I am so pleased to have found your site, truly inspirational, your use of colour is amazing. The tutorials are all excellent. I will be watching avidly. Thank you so much for sharing.

    Like

  6. Stunning card yet again 🙂 Your tutorial is great – one I will definitely try as soon as I get my inky pinkys on a suitable flourish stamp. (oh the wait for a new SU catty in Australia is agonising) ….. Thanks for sharing

    Like

  7. Fantastic tutorial Michelle and the result is just stunning. I’m kicking myself now that I didn’t get the ‘Beautiful’ set on the order I just placed at CHF! Thanks for taking the time to put this together, much appreciated.

    Like

  8. Debra Hogg's avatar Debra Hogg

    Great – thanks for explaining the white stockcard layering, but what colours did you use to get your beautiful effects on the ww. Thanks you are an inspiration!! and for showing us how to get your artisty [hope that’s a word] flair on to my cards

    Like

  9. Debra asked “what colours did you use to get your beautiful effects on the Whisper White card stock?

    Sorry Debra, I did the Main image piece a few days ago and put away the colors I used. I wanted to mainly focus on the flourishes so I didn’t take note. I’ll try to keep track in the future.

    Like

  10. Elizabeth's avatar Elizabeth

    In total awe over your talent. You are a huge inspiration and what a delight that you are sharing your secrets with the blogging community. I cannot thank you enough.

    Like

  11. Laurie's avatar Laurie

    Okay, so I just left your pastel work and made my way to your tutorials. I loved this card when I saw it and I so appreciate that you shared your technique for these flourishes. I love this stamp — it is one of my SU all time favorites — and I loved what you did with it. The flourishes are gorgeous!

    Like

  12. Sandy's avatar Sandy

    AMAZING, what a wonderful tutorial, I have enjoyed everyone I have looked at. The colors, the techniques, the, the, the..what more can one say?

    Like

  13. ellie's avatar ellie

    I like your card very much! Is the picture of the flower and butterfly one stamp, or did you collage it yourself? If it is a stamp, what company is it from?

    Like

Leave a reply to Lisa Cancel reply