Inspired Treasure me Blue – Tutorial

dsc02374-copy.jpg

This card was inspired by a beautiful photograph by Werol that can be seen here:  http://www.deviantart.com/print/475044/

It is also inspired by this weeks Split Coast Stampers Inspiration Challenge IC117 found here: http://www.splitcoaststampers.com/forums/showthread.php?t=328890

Let’s get started with today’s tutorial.  🙂

Supplies: 

Stamps: Cornish Heritage Farms-Ash Tree, Stampin Up Noble Deer (pines)
Paper: Stampin Up Whisper White, Soft Sky and Black
Ink: Stampin Up Soft Sky, Blue Bayou, Not Quite Navy, Night of Navy, Basic Black
Accessories: Stampin Up markers in Not Quite Navy and Night of Navy, Cuttlebug Die Cut, 1 3/8″ Circle Punch, Post It Notes, Sponges

dsc02375.JPG

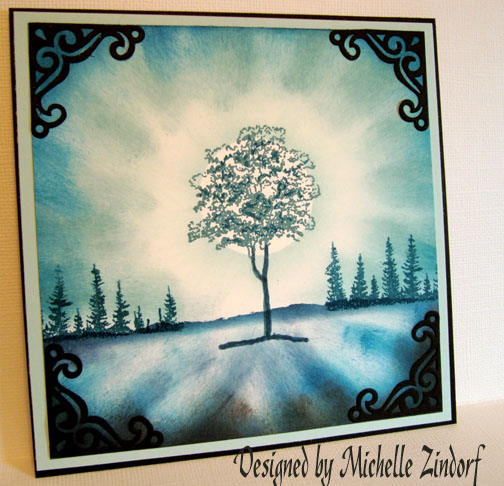
Stamp tree on Stampin’ Up Whisper White card stock using Blue Bayou ink.

dsc02351.JPG

Stamped background pines using a Not Quite Navy Marker to color in just the trees on the stamp.  Huffed on it to moisten then stamped.

dsc02353.JPG

Used Post-It-Notes to mask sky area.  I torn the Post it Notes on the stick edge of the note, making sure to leave some of the stick part on the Note to adhere to the card stock.

dsc02354.JPG

Sponged Night of Navy ink right at edge of Post It Note mask to create a horizon line. 

dsc02355.JPG

Sponged on Soft Sky ink, working from the edge of the paper and swiping the ink on toward the tree base.

dsc02356.JPG

Did the last step again only using Not Quite Navy ink and not covering all of the Soft Sky ink already applied.

dsc02357.JPG

Same step again, only with Night of Navy ink and not covering all of the Not Quite Navy ink applied in the last step.  We are getting a graduation of color here. 🙂

dsc02358.JPG

Removed Post It Notes.

dsc02359.JPG

Went over the tree trunk with a Not Quite Navy Marker to make it stand out more.

Now for the sky:  Sponged on Soft Sky ink in a swiping motion from the edge of the paper toward the tree, leaving white card stock showing around the tree.

dsc02360.JPG

Sponge on Blue Bayou and then Not Quite Navy in the same swiping motion as in the last step creating a graduation in color, by not covering entirely the lighter colors before it.

dsc02361.JPG

Used a Night of Navy marker to make a few of the leaves in the tree darker to create dimension.

dsc02362.JPG

Punched a circle out of the sticky part of a Post It Note to use as a mask to create a sun.

Sponged Soft sky ink with a swiping motion from the mask out toward the edge of the card stock.  Leaving white card stock showing to create a glow.

dsc023632.jpg

Removed Post it Note mask and sponged some black ink at very bottom of the card stock in a swiping motion.

dsc02366.JPG

Added a couple of layers of card stock and Cuttlebug die cut corners and here is the finished card.

dsc02374-copy.jpg

I hope you enjoyed today’s tutorial.  I realize my tutorials are long, but I like to show each step individually, as much as possible. 

Hope your day is filled with as much light as this tree!

22 thoughts on “Inspired Treasure me Blue – Tutorial

  1. Chris's avatar Chris

    There’s a lovely feel of depth to this design. I would have been tempted to have included another none blue colour which would have been a big mistake.

    Thank you Michelle again for a superb tutorial. Keep them coming. I’m now going looking for a picture to inspire me. I’ve ever tried this before.

    Like

  2. Kathy's avatar Kathy

    The way you captured the light is amazing. This is soooo beautiful and serene. Thank you for providing the step by step on how you created this! Perfect tutorial!

    Like

  3. Evelynn Saddler's avatar Evelynn Saddler

    This is so beautiful it gives me goose-bumps, you know what I mean. Thanks for the excellent tutorial. Keep them coming.
    Ks.stamper

    Like

  4. Debra Hogg's avatar Debra Hogg

    Your tutorials are never to long, I love how you explain what you do to achieve your beautiful art works, so that maybe I can do the same!! Just love it

    Like

  5. christine's avatar christine

    I love your tutorials, don’t change the amount of information. your web site is on my must check list. Thanks for all the inspiration.

    Like

  6. dana's avatar dana

    Hi,

    I wanted to comment again on your artwork. Love the tutorials as usual, but this time I wanted to comment on your artistic ability….have you been doing other forms of art before cards, i.e., painting, drawing, etc.? Because your eye for light, composition, color, and a lot of other things is wonderful and I’ve learned so much from what’s included in your turtorials. The things you point out would seem to be common knowledge if one just payed attention and had an artist’s eye to go along with it. You’re making me want to pay closer attention to the little things in life. Thanks for all your free tutorials and hints. Dana

    Like

  7. Kay's avatar Kay

    I have been an admirer of your work on SCS for a long time, so I was overjoyed to find your blog – the step by step tutorials are just icing on the cake for me. Thanks so much for taking the time (which must be considerable) to share your talent.

    Looking forward to many visits here 🙂

    Like

  8. Trish's avatar Trish

    Your tutorials are not too long! They are perfect in every way! Thank you so much for sharing all your tips and tricks to recreate your beautiful art. This morning I found myself holding my breath for just a moment while the page was loading hoping for something new. Awesome!

    Like

  9. Hey, Zin! I *finally* got a chance to pop in here! Lovely place ya’ got here on the web! *wink* Well, you know how much I love your stuff, so I’ll just continue with the drooling, and leave it at that! Hugs, Jules

    Like

  10. Lisa C.'s avatar Lisa C.

    wow, this looks so neat, when I first saw the picture I thought it was the bouning brayer technique..wow, this looks so great!

    Like

  11. Tejal's avatar Tejal

    You truly captured the photograph in your art….I cannot decide which is better…the photograph or your work of art…but I’ve seen the art develop before my eyes in your tutorial..and I love it..
    Thank you for taking the time to put this together…its awesome … even just to see it come alive..

    Like

  12. Annette M's avatar Annette M

    I love your work so much I would like to attempt this project and was wondering what stampin up colours could I substitute Soft Sky and Blue Bayou with as neither are available now……. Thank you for your tutorials they are so easy to understand.

    Like

Leave a reply to Kay Cancel reply