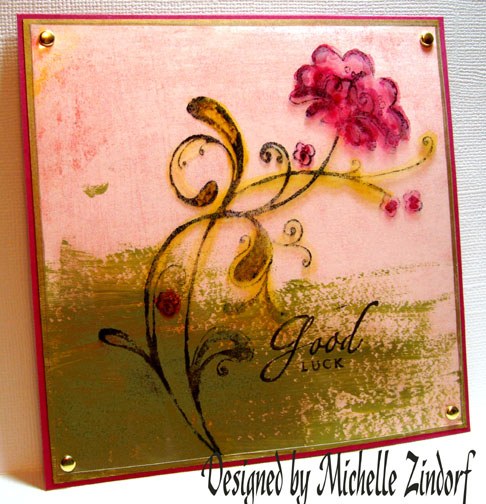
This card is an experiment with Alcohol inks and transparency Film. I found this great on line tutorial (here is the link: http://ironorchiddesigns.typepad.com/iod/2008/03/clear-paintable.html) and decided to play around with the technique.
Supplies:
| Stamps: Basic Grey Two Scoops/Flower Swash, Stampin’ Up Sincere Salutations |
| Paper: Purely Pomegranate, Basic Grey Two Scoops |
| Ink: Adorpmdacl Alcohol Inks – Cranberry, Currant, Lettuce and Gold Mixative, Stazon Black, Distress ink Walnut Stain |
| Accessories: Alcohol Blending Solution, Aqua Brush, Piercing Tool, Brads, Sharpie Gold Paint Pen, Sponge, Distress Crackle Paint – Peeled Paint, Transparency Film, Styrofoam plate |

On a 5″x5″ piece of Basic Grey Two Scoops Design Paper, painted Distress Crackle Paint – Peeled Paint color on lower left hand corner. This is my first time using this Crackle paint. It has a handy little built in brush. The thicker you apply it the more cracks that appear in the paint. Let dry throughly.

I’m using the Basic Grey Two Scoops Flower Swash Set. I don’t have a clear mount big enough for the large flower in this set so I improvised by sticking it on the wood of one of my background stamps. I’m so cheap, no wait, thrifty someone once told me, lol.

I stamped the stamp on a Transparency Film with Stazon Black Ink. Beware this will stain your stamp. I was not able to get all of the ink off of it. I’m not one to freak out about stains on my stamps, but some of you don’t like it, I know.

When the paint dried on the design paper I flipped the transparency film over so the ink side is facing down and put it over the design paper.

I put some of the Alcohol Blending Solution in an Aqua Brush.

I put a couple of drops of Lettuce Alcohol Ink on a Styrofoam plate. Picked up some of the color on the Aqua brush and loosely painted over the leaves and stem of the image on the transparency. This ink drys super fast and flows like butter with the Alcohol filled aqua brush.

I started painting in my flower with Cranberry. You will want to clean your brush in between the Lettuce and Cranberry ink by wiping it on your scrap paper a few times.

Outlined the flower loosely with Currant Alcohol ink.

Although you can’t see it in the pictures, I put a little Gold Mixative on the larger leaves.

Removed Transparency film from Design Paper and outlined the paper with a Sharpie Gold Paint Pen. This creates a layered look without the bulk, plus gives it a little bling. 🙂
It’s simple to do, just rest your marker on the side of the cardstock and run it along the edge. One swipe usually does it. It will put half of the color on the card stock and half on your scrap paper with an even line.

Put a little Walnut Stain ink on the crackle paint to highlight cracks.

Stamped sentiment with Stazon Black ink.

Glued card stock layers together and a fixed the transparency to the top with brads. I use my piercing tool to make the holes for the brads.

Finished card!
I really like painting with these Alcohol inks on the transparency. It goes on very smooth and dries quickly. I’ll have to play some more with this technique.
Give it a try!
Have a bloom’n wonderful day!

17 thoughts on “Alcoholic Flower – Tutorial”