Sunset Wheat – Tutorial

dsc02896.jpg

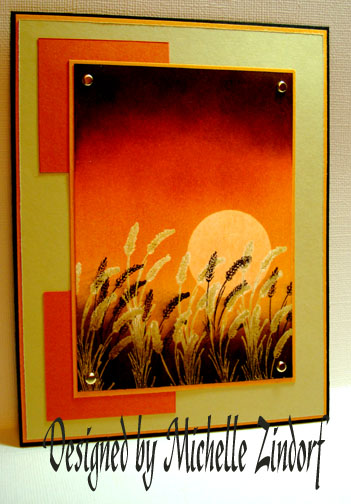
I have so many stamps that have not seen ink yet.  This wheat stamp from Cornish Heritage Farms is one of them.  Here is their wonderful website:  http://www.cornishheritagefarms.com/intro.php?osCsid=dtmnia8l444rr6anm95hm03995  check it out.

dsc02875.JPG

Let’s get started.

Supplies:

Stamps: Cornish Heritage Farms Wheat
Paper: Stampin’ Up Whisper White, More Mustard, Really Rust, River Rock, Basic Black
Ink: Stampin’ Up River Rock, More Mustard, Pumpkin Pie, Really Rust, Cranberry Crisp, Apricot Appeal and Basic Black
Accessories: Versamark pad and marker, Brayer, Clear Embossing Powder, Heat Gun, Post It Note, Circle Punch, Brads

dsc02903.JPG

On Whisper White card stock, stamped first row of wheat, loading my stamp first with Versamark and then with River Rock ink.  Heat embossed the images with Clear embossing powder and a heat gun.

dsc02876.JPG

I wanted the wheat to stay light in color so I went over just the heads of the wheat with a Versamark Marker and then heat embossed them again with clear embossing powder and a heat gun.

dsc02878.JPG

dsc02879.JPG

Stamped second row of wheat the same as the first, by loading my stamp with Versamark then with River Rock ink and heat embossing with clear embossing powder.  Then going over the wheat with a Versamark marker and heat embossing again with clear embossing powder.

dsc02880.JPG

dsc02883.JPG

dsc02884.JPG

Punched a circle out of the sticky part of a Post It Note and used it as a mask for the sun.

dsc02885.JPG

Brayered More Mustard ink over the entire piece of card stock.

dsc02886.JPG

Brayered Pumpkin ink over top 1/3 of card stock.  Then brayered Really Rust ink over top 1/2 of card stock.

dsc02887.JPG

Brayered Cranberry Crisp ink over top 1/4 of card stock and a little at the bottom.  We now have a graduation of color going on.

dsc02888.JPG

Removed Post It Note mask and brayered on Apricot Appeal to tone down the starkness of the sun.

dsc02890.JPG

Stamped more wheat with Basic Black ink.

dsc02891.JPG

Sponged Basic Black ink at the bottom and top of the card stock.  Used a clean part of the sponge to wipe the black ink off of the embossed images.

dsc02893.JPG

Assembled card.

dsc02893.JPG

Assembled card.

dsc02896.jpg

Glad you were able to join me for this tutorial.

Have a beautiful day!

41 thoughts on “Sunset Wheat – Tutorial

  1. Hi Michelle~ This is a beautiful creation!! I have visited your blog several times and always marvel at your very artistic creations!! 🙂 I saw where I live really close to you – I moved to Miamisburg, OH a year and a half ago…..from New York where I had a thriving SU business and a plethura of stamping friends, to HERE where I have not met many people who are all that interested….what a difference!! 😦 I actually have a job here that usurps a lot of my time and energy…..anyway- I just noticed you grew up in this area……and wanted to say HI! 🙂 I think I would love to try something like what you have done here- thanks for the awesome tutorial!! 🙂 Blessings, Karen Barber

    Like

  2. Linda Vogt's avatar Linda Vogt

    Absolutely breathtaking! I appreciate the tutorials you post with your artwork, thank you so much! Your blog is now on my toolbar and I visit it every single day, and continue to be amazed and inspired by your creativity.

    Like

  3. Terri's avatar Terri

    Michelle, This is another gorgeous creation. Thanks again so much for all your work on making the tutorials! They are awesome. One question, I noticed that sometimes you brayer with classic dye ink and at times with craft ink. What is your reasoning behind your choices?

    Like

  4. Terri asked ” I noticed that sometimes you brayer with classic dye ink and at times with craft ink. What is your reasoning behind your choices?”
    Terri, there is no reason, I just have a few of my colors of Stampin’ Up pads in craft. I can brayer with either one. Makes no difference to me. 🙂

    Like

  5. Cindy H.'s avatar Cindy H.

    Wow, I can’t believe you made this gorgeous creation (it looks like a photo) with *one* stamp!!! Fantastic!!! Of course, your tutorial is super!

    Like

  6. Montannie's avatar Montannie

    I followed a link from Paperlicious to your blog, and I’m glad i did!

    Absolutely awesome cards and tutorials! Thanks for sharing your considerable talent.

    Like

  7. Oh wow…..I actually have this same stamp!! I had it pulled out on Friday when I was going to try your technique but then I changed and went another direction! Now I am totally going to have to try making this exact same card (or as close as I can get to it!!). I love it of coure! Thanks

    Like

  8. Absolutely gorgeous! I have been reading your blog for a few weeks now and I am amazed at what you can do with your brayer! I have been stamping for 100 years and have never felt the “love” for my brayer. You inspire me to dust it off and give it a whirl.

    Hugs,
    Melissa

    Like

  9. Judy Gabriel's avatar Judy Gabriel

    Another beautiful card and a great tutorial. You always use your versamark before your coloured ink is this to make dye ink embossable? Thanks again for sharing.

    Like

  10. Elizabeth's avatar Elizabeth

    Absolutely stunning!! Can’t believe you only used one stamp in this creation! Thanks for the tutorial.

    Oh! A question/comment if I may…
    I actually thought I would attempt a Zindorf knockoff this weekend until I realized I only have the SU ink spots. Ugh! Can those be used with a brayer?? Or should I just try with a sponge??

    Like

  11. Tonniece's avatar Tonniece

    Well my jaw is on the floor, this is beautiful.

    I’m really curious as to how long it takes you to complete these works of art and do you sell any of them?

    Like

  12. Tonniece asked “I’m really curious as to how long it takes you to complete these works of art and do you sell any of them?”
    Tonniece, it takes me 2 1/2 hours each day to make the card and create the tutorial for it. My day starts ar 4:00 a.m. and I have to be done by 6:30 a.m with my card and blog so I can get ready for work. I’m definately a morning person!
    I do sell my cards, mostly to the people I work with. If you are ever interested in one of them that you see. E-mail me, they are $5 a piece. Each one of my cards is an original, I don’t do copies, nor mass produce them, lol. It’s the creative process I love so very much!
    Great Questions, thanks.
    Michelle

    Like

  13. Julia (Artystamper on SCS)'s avatar Julia (Artystamper on SCS)

    Michelle – I tried this tutorial on my sketch card at SCS today – check it out! I only did a little portion as a first try!

    it’s also on my blog – http://www.createwithjulia.blogspot.com

    with full credit to you and a link to this site!

    thank you so much for showing us all how you do your creations – I will never get it as good as yours – but it’s a reasonable facimile and I love being able to do it!

    Like

  14. Cathy's avatar Cathy

    Love your work. Your technique with this card is intriguing. I can hardly wait to try it. You explain it so well. I really appreciate that!TFS :0)

    Like

  15. Laurie's avatar Laurie

    Again, WOW! I am still going backwards. You added those black wheat stalks at the end, that just takes it over the top! I just love your work and I love that you take the time — and I know it must be time, I can’t imagine — to do these detailed step by step tutorials. I read each line and go back and forth through the pictures. I just love it. Like I said — WOW! Just in case your wondering I am not some crazy stalker person, just a true admirer of your art work!

    Like

  16. Simply stunning!!!
    I teach classes and I know my ladies would totally love this idea.
    (I live in Australia).

    I love your work and have now subscribed to your blog – never to miss an amazing creation.

    Truly inspiring!!

    Like

  17. Teresa's avatar Teresa

    Michelle – I love this card, but I’ve tried this technique and I all I get is lines where the colors used to brayer change. How can I fix this?

    Like

  18. Teresa asked “I’ve tried this technique and I all I get is lines where the colors used to brayer change. How can I fix this?”

    Teresa, I start my brayering at the very top of the card-stock, meaning most of the roller is off of the card stock and on my scrap paper and with each roll of the brayer I move a bit more down the card-stock so I am rolling over my lines. I ink the roller about 4 times for each color. I also, brayer, brayer and brayer some more to work the ink into the card-stock in between inkings. The more ink you get on the card stock the better the ink will blend together and your lines will disappear.

    Like

Leave a reply to carol Cancel reply