Owl in Flight – Tutorial

dsc03052.jpg

Did you miss me yesterday?  I took the day off and did absolutely nothing but lay on the coach and watch a Godfather marathon on TV.  Sometimes you just have to have a complete down day. 🙂

But I did make it to the craft room this morning to work up a new tutorial for you all.  So let’s begin.

Supplies:

Stamps: Stampin’ Up Essence of Love, Owl (maker unknown)
Paper: Stampin’ Up Whisper White, Old Olive, Night of Navy
Ink: Stampin’ Up Not Quite Navy, Night of Navy & Old Olive, Palette Noir Black
Accessories: Versamark Marker, Brads, Ribbon, Black marker, Brayer, Clear Embossing Powder, Heat Gun, Paper Towel, Sponge, Summer Sun Marker

 dsc03056.JPG

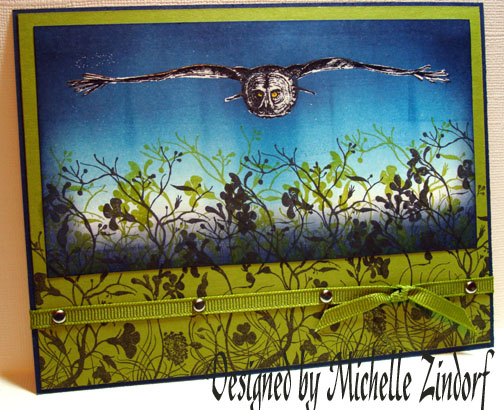
 Stamped Owl with Palette Noir Black ink on Whisper White Card stock.

This owl stamp was purchased from E-bay and I have no idea who the maker is. 

dsc03037.JPG

Colored the eyes with a Summer Sun Marker.

dsc03038.JPG

Heat set the black ink with a heat gun.

dsc03039.JPG

Went over the entire owl with a Versamark marker.  Be careful to clean your marker by wiping it on scrap paper before going over the white part of the image.  Some times the black ink will smear or make the white gray.  

dsc03040.JPG

Heat emboss the image with clear embossing powder and a heat gun.

dsc03041.JPG

Brayer Not Quite Navy ink over 2/3rds of the card stock.

dsc03043.JPG

Brayer Night of Navy ink over top 1/4 of card stock and a little at the bottom of the card stock.

dsc03044.JPG

dsc03045.JPG

Wipe the ink off of the embossed owl with a paper towel and stamp weeds with Black ink.

dsc03046.JPG

Sponged Night of Navy ink around the edges of the card stock.

dsc03047.JPG

Decided the piece looked a little bleak so I over stamped the weeds with Old Olive ink.  Now that’s better, lol.  You know I make this stuff up as I go along, so please bare with me.

dsc03048.JPG

Adhered the image to Old Olive card stock and stamped the weeds again with black ink.  Since I stamped over two layers of card stock there was a gap in the images, which I filled in with a black marker.

dsc03050.JPG

Assembled card.  Another one finished.

dsc03052.jpg

This creation is a bit masculine, but we need a few of those cards too.

I’m so glad you could join me today for this tutorial.  Give it a try!

Have a super day!

Until tomorrow. .. .. . . .

26 thoughts on “Owl in Flight – Tutorial

  1. Mary L.'s avatar Mary L.

    I wish I was you!!!! LOL!!! You do such awesome work!!! How do you come up with this stuff? Do you have an idea before you get started or do you pick a stamp and “run” with it? I could never just pull something like this out of my head!!!

    Thanks for sharing!!!

    Mary

    Like

  2. Terri's avatar Terri

    Another gorgeous tutorial Michelle. I love the owl stamp! My sister-in-law is part of the raptor recovery society here in Nebraska and rescues all types of birds. She has had a great horned owl in her basement for years. It was injured and cannot be released back into the wild, so she takes it with her when she does a teaching presentation. She would love a card with this stamp. I man have to do a little searching. Thanks for sharing!

    Like

  3. Beth's avatar Beth

    I did miss you yesterday, I was starting to get worried. This was worth the wait. The owl is a little erie, but this is a great scene! Your turotials are more like daily classes. Thanks.

    Like

  4. Mary asked “How do you come up with this stuff? Do you have an idea before you get started or do you pick a stamp and “run” with it?”

    Mary, I start with my main image stamp and then figure out what I want to do with it. I really just fly by the seat of my pants daily, lol.

    Like

  5. Gidget-Trish's avatar Gidget-Trish

    Yes I did miss you! I’m glad you took the day off when you were having “one of those days”. 🙂 Did you use a stamp-a-ma-jig to line up the weeds on the main image and old olive cardstock? If not, how did you get them to line up so perfectly? Thanks for your wonderful tutorials.
    Trish

    Like

  6. Trish asked “Did you use a stamp-a-ma-jig to line up the weeds on the main image and old olive cardstock?”
    Trish, I adhered the main image panel to the Old Olive and then stamped on both layers. 🙂

    Like

  7. Tonniece's avatar Tonniece

    Miss you?, I was going to sent out the troops looking for you. I needed my daily dose yesterday.

    Thanks yet again for this beautiful tutorial and card. I LOVE IT.

    Like

  8. Cindy H.'s avatar Cindy H.

    As usual, michelle, fab-u-lous!!! It’s a great guy card and what came to mind when I saw it is: “Whoooo’s looking at you kid!” That’s a wonderful owl image and you showed it off to great advantage. Love it!!!

    Like

  9. Shelly Schmidt's avatar Shelly Schmidt

    I have no clue how you choose your colors, but i LOVE everything you make- you are so talented- and so generous to make these tutorials to teach us who …well for me I can make these cards- with a little help from a friend…..!!! You! Thanks so much for your time and sharing your talent with us!!! Nice to hear that you took a day off -hope you are having decent weather there-well, I guess the TV is not outside, is it???

    Like

  10. Glenda's avatar Glenda

    Truly amazing!!! You are an artist and I feel the person who receives one of your cards must know they are getting a work of art!!! Is the brayer from Stampin Up? It looks different than the ones I see at the craft store. Also, how long does it usually take you to make one of these special creations? Thanks so much for sharing and your instructions. Maybe I’ll be brave soon and try one!

    Like

  11. Glenda asked” Is the brayer from Stampin Up?”

    Glenda, I bought my brayer, I believe at Michael’s. It’s just a regular Speedball brayer. Mine is about 5 years old though.

    “How long does it usually take you to make one of these special creations?”

    My day starts at 4:00 a.m. and I post my card and tutorial at 6:30 a.m. So, it takes me 2 1/2 hours to come up with the design, create, document and post. 🙂 Oh yeah, and drink a pot of coffee 🙂

    Like

  12. Conniecrafter's avatar Conniecrafter

    Just awesome, so love the stamping and the owl does feel like it is going to come right off the card..love the brads in the ribbon too!

    Like

  13. Veee Schenk's avatar Veee Schenk

    This is another stunner! Now I HAVE to have these stamps. If I keep looking at your blog everyday, I’ll need to buy stamps every day! What am I to do? I’m off to have fun. Thanks

    Like

  14. lisa's avatar lisa

    your creations are simply works of art..wonderful use of combining a love of stamping and traditional art forms for realistic scenes… just beautiful!

    Like

Leave a reply to Gidget-Trish Cancel reply