Dappled Light Garden – Tutorial

dsc03121.jpg

This is what I ended up with while trying to create the look of dappled light with my Stampin’ Up set – Simply Circles.    I think I will continue to practice this.  🙂

Ready for the tutorial?  Let’s get started.
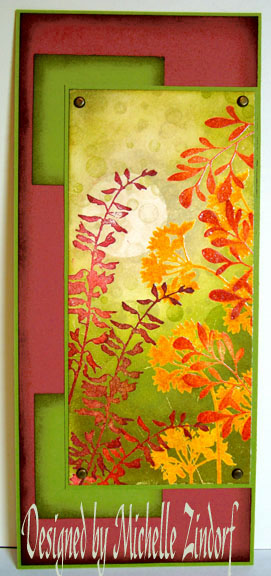
Supplies:

Stamps: See D’s Silhouettes, Stampin Up Simply Circles
Paper: Whisper White, Old Olive, Brovo Burgundy
Ink: Stampin’ Up True Thyme, River Rock, Old Olive and Bravo Burgundy, Distress Inks Walnut Stain & Old Paper, Adirondack Butterscotch, Rust & Oregano

Accessories: Versmark Pad, Brads, Sponges, 1 3/8″ circle punch, post it note, Clear embossing powder, heat gun

dsc03119.JPG

On Whisper White card stock stamped the first set of silhouettes, on the left hand side, by loading my stamp first with Versamark and then with Bravo Burgundy ink.  Heat embossed each image as I went along using clear embossing powder and a heat gun.

dsc03081.JPG

dsc03082.JPG

Stamped second set of leaves, on the right side of card, by first loading stamp with Versamark and then with Rust ink.  Heat embossed each image as it was stamped with clear embossing powder and a heat gun.

Note:  When creating a scene with emboss resist you will want to work from the foreground toward the background.

dsc03083.JPG

dsc03084.JPG

Stamped third set of images by loading the stamp with Versamark and then Butterscotch ink.  Each image was heat embossed as I went along using clear embossing powder and a heat gun.

dsc03085.JPG

dsc03086.JPG

dsc03087.JPG

Sponged on Old Paper ink lightly with a circular motion on upper left hand corner of card stock.

dsc03089.JPG

Cut a mask for the sun out of the sticky part of a Post it Note with a 1 3/8″ circle punch.  Put it on my card stock where I want the sun to be.

dsc03091.JPG

Sponged on more Old Paper ink over and around the mask to give the sun definition.  Removed mask.

dsc03092.JPG

dsc03093.JPG

Stamped circle with Old Paper ink and stamping off once on my scrap paper before stamping on my card stock, for a lighter image.

dsc03094.JPG

Sponged on River Rock ink working into the Old Paper ink area, but not covering it entirely.

dsc03095.JPG

Sponged on Old Olive ink working into the River Rock ink, but not covering it completely.

dsc03096.JPG

Sponged on True Thyme ink, working over some of the Old Olive ink, but not covering it entirely.

dsc03097.JPG

Getting even darker yet by sponging on Oregano ink at the bottom of the card stock using a pouncing motion with the sponge.  This looks really dark, but it will all dry lighter in color.

dsc03098.JPG

Stamped some more circles around the top half of card stock with Old Paper ink and some with Old Olive towards the middle of the card stock.

dsc03099.JPG

I thought my Sun looked a little faded so I put my sun Post it Note mask back on and sponged more Old Paper ink over the area to define it even more.

dsc03100.JPG

Sponged Oregano ink around edges of my two square layers and Walnut Stain ink around the edge of my Burgundy card stock layer.

dsc03101.JPG

dsc03102.JPG

Cropped image on the right side to make the left side more interesting.  It’s amazing what a little cropping can do to highlight your main subject.  Main subject here is the plants on the left and then sun.

Assembled the card and here it is finished!

dsc03121.jpg

Glad you could follow along with this tutorial.  Now you give it a try!

Hope your day is filled with soft filter sun and peaceful gardens.

Until tomorrow. . . . . .

28 thoughts on “Dappled Light Garden – Tutorial

  1. Tonniece's avatar Tonniece

    Good morning Michelle

    Stunning as always. I love how it looks as though it pops right off the page.
    When I grow up I want to make cards just like you. LOL
    Have a great day

    Like

  2. Karen Castanheiro's avatar Karen Castanheiro

    Amazing…just amazing! I now start my day the Zindorf way! Coffee and a lot at the Zindorf creation of the day. Thank you for the inspiration Michelle. I look forward to our daily visits lol.

    Have a super day

    Karen

    Like

  3. Lisa Foster's avatar Lisa Foster

    This is beautiful as always! I really really really appreciate your tutorials! I am learning so much! Thank you for sharing! Your artistry brings out the beauty in life…which makes everyone feel better…(I am also an ostrich with my head in the sand for the same reasons:)
    Have a wonderful day!
    Lisa

    Like

  4. Gidget-Trish's avatar Gidget-Trish

    Hi Michelle,
    Fabulous card! Do you use an emboss buddy so stray bits of embossing powder don’t ruin your images? I don’t see it mentioned and I always seem to have this problem when embossing. Thanks once again!
    Trish

    Like

  5. Gidget – Trish asked “Do you use an emboss buddy so stray bits of embossing powder don’t ruin your images?”

    I don’t own one. I use a small paint brush to brush bits off if I see them.

    Like

  6. Melissa asked “do you find you have to be careful when you do layers of embossing so you don’t “burn” your early embossed images? Or is this really not an issue?”

    Melissa, I’ve not had any problem burning earlier layers of embossing. I really keep my heat gun moving though. 🙂

    Like

  7. Tejal's avatar Tejal

    Hi Michelle,

    I truly love walking thru each step of your card making process. I really love each and every of your cards.

    I look forward to each and every tutorial that you do..

    Thank you so much for taking the time to do this!

    Hugs
    Tejal

    Like

  8. Becky's avatar Becky

    another beautiful card, I just love coming here every day to see what you have done, I will be picking up my inks Sat. and I can not wait to try (copy) 🙂 your tech. Have a great day.

    Like

  9. Hello Michelle,

    I have enjoyed your website lately. I have had a brayer for a while, but hardly use it. I really like a couple of your tutorials, so I did a version of what I saw here. Check it out at itsastampthing.blogspot.com. I even gave you a reference in my post! Hope you like my versions!

    Kristy

    Like

  10. Janine B's avatar Janine B

    Love your tutorials but I only have chocolate chip in Stampin Up inks and a selection of various other makes and types – lots of colorbox colours in the cats eyes – can you please tell me will they work with emboss resist in the same way – I would love to try but don’t want to create mud! Thank you

    Like

  11. Janine asked “I only have chocolate chip in Stampin Up inks and a selection of various other makes and types – lots of colorbox colours in the cats eyes – can you please tell me will they work with emboss resist in the same way?”

    Janine, I believe they will, but I don’t own any colorbox inks, so I think you will need to experiment. 🙂

    Like

  12. Your talent is beyond amazing. I am so thankful you do tutorials because I learn so much from your visuals. I am thrilled to learn that I can emboss with my adirondaks. Awesome. TFS. It was very enjoyable to read all the messages left for you. The phrase, “I start my day the Zindorf way” is so much me too. Please don’t tire of these labourous tutorials.

    Like

  13. Sue (suen)'s avatar Sue (suen)

    Wow, gorgeous card, Michelle! I love the colorful leaves and dappled BG! The green is so rich and what a great layout! Thanks for the tutorial!

    Like

  14. Eileen M's avatar Eileen M

    Oh, man, you make me want to stay home all day to play!!! This is so gorgeous! I have several sets of silhouette stamps but have yet to do amything with them. I have tried a few of your ideas and am having a lot of fun, hope I have something soon to share.
    Thank you for sharing your awesome talent!

    Like

  15. Glenda's avatar Glenda

    Your card is such a work of art! Your tutorials explain the steps so clearly and the results are amazing. I don’t know how you pick the colors, but they all end up looking beautiful. Thanks for sharing your techniques.

    Like

  16. - dlm.'s avatar - dlm.

    Not only are your cards stunning, but your tutorials are wonderful! Thank you so much for taking the time to show us each step in your design process.

    Like

  17. Maria Grosson's avatar Maria Grosson

    Michelle, your work is just amazing. Your step by step instructions are so easy to follow. I look forward to seeing more of your work. TFS.

    Like

Leave a reply to Becky Cancel reply