At the End of the Day – Tutorial

dsc03351.jpg

Feels very good to be back in my craft-room stamping again.  These stamp images are from http://www.mypapermoon.com

Ready for a tutorial?  If so, let’s get started.

Supplies:

Stamps: Stamps by My Paper Moon
Paper: Stampin’ Up Whisper White, Going Gray & Basic Black
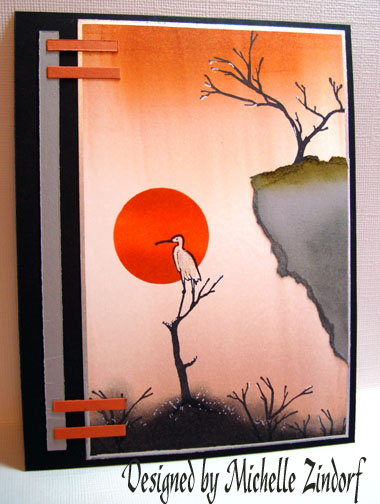
Ink: Stampin’ Up Going Gray, Stazon Black, Adirondack Hazelnut, Salmon, Terra Cotta, Rust & Oregano
Accessories: Sponges, Post it note, 1 3/8″ circle punch, brayer, white Gel pen, Prismacolor Metallic Silver Paint Pen

dsc03349.JPG

On Whisper White card stock brayered Hazelnut ink on both ends, leaving a white space.

dsc03325.JPG

On both ends again, brayered on Salmon ink, not covering the Hazelnut completely.

dsc03326.JPG

Punched a 1 3/8″ circle in a post it note and used the negative image as a mask.

dsc03327.JPG

Sponged Terra Cotta ink in a circular motion over circle in post it note.

dsc03328.JPG

Sponged Rust ink in a circular motion over bottom and top of circle in post it note.

dsc03329.JPG

Tore a cliff shape from a piece of Going Gray card stock.

dsc03331.JPG

Sponged Going Gray ink along the front edge of the cliff shape and Oregano ink along the top edge.

dsc03332.JPG

dsc03333.JPG

Ignore the color at the bottom of the card stock.

Stamped bird in tree stamp with Stazon black ink.

dsc03335.JPG

Stamped Tree stamp with Stazon Black ink at top of card stock.

dsc03336.JPG

Adhered cliff shape to main card stock.

dsc03337.JPG

Stamped tree stamp along bottom of card stock with Stazon Black ink.

dsc03338.JPG

Sponged Going Gray ink at bottom of card stock using a bouncing motion.

dsc03339.JPG

Sponged  Stazon Black ink at bottom of card-stock not covering all of the Going Gray ink.

dsc03340.JPG

Decided I wanted the scene to be a lot darker at the top of the card stock so I brayered on Rust ink along the top.

dsc03341.JPG

Used a white gel pen to color in the bird.

dsc03342.JPG

Sponged Going Gray in at the backside of the cliff.

dsc03343.JPG

Used a Prismacolor Silver Paint Pen to go around the edge of the card stock.  Note:  just hold the pen so it is half on the card stock and half on your scrap paper and you will get a straight line without a ruler.

dsc03344.JPG

Used the white gel pen again to make highlights in the trees and to add a few specks on the ground area to simulate weeds and grasses.

dsc03345.JPG

Here is the assembled card.

dsc03351.jpg

Thanks for following along with me and I hope you will give it a try.

May your evening be filled with a sunset!

Until tomorrow. . . . .

31 thoughts on “At the End of the Day – Tutorial

  1. Chris's avatar Chris

    I hope you had an enjoyable time away and have come back full of new ideas to share with us. 🙂

    No one looking at the visual simplicity of your new card would realise how much time and effort must have gone into designing and making it. You’ve started back at the top. Long may it continue.

    Like

  2. Tamara's avatar Tamara

    Hope your vacation was wonderful.
    Glad you are back, have been missing your tutorials.
    I am just in awe when I see your work. It is amazing.
    Thank You so much for sharing.

    Like

  3. Veee Schenk's avatar Veee Schenk

    Michelle, Thank you so much for another great tutorial. As you saw at SCS (vlstrs) I have been putting them to good use. LOL! I have never been so inspired. I cannot thank you enough. I am going to try to work through every one of them. I learned how much work goes into them just by entering the information on SCS. How on earth do you do it and work?
    Thanks, Veee

    Like

  4. Veee asked “I learned how much work goes into them just by entering the information on SCS. How on earth do you do it and work?”
    Well Veee, My day starts at 4:00 or 4:30 a.m. I spend 2 to 2 1/2 hours on creating and posting a card. I need to be done by 6:30 a.m. in order to get ready for work. I must be nuts, lol.
    So very glad you are trying the tutorials out. You have made my day!

    Like

  5. Carol's avatar Carol

    Michelle, so pleased to see you back, I was getting withdrawal symptoms LOL!! This is a beautiful piece of art. Thank you so much as always for sharing with us. I have been trying your brayering techique, but have a way to go yet, I can’t seem to get the light airiness( is that a word ) that you are able to get.I think I am too heavy handed !! Hope your trip left you refreshed.

    Like

  6. Evelynn Saddler's avatar Evelynn Saddler

    Welcome back Michelle, you were missed…….This card is beautiful, I love how you did the scenery and the colors are just right……love it. Hope your vacation was relaxing for you. I am so excited to have your tutorials start again.
    Ks.stamper

    Like

  7. Wow! How you can pull nature into your cards with such ease. I saw the photos this morning and when I saw this post, and my first thought was the photo I saw this morning. I scrolled down to make sure and there it was.

    Great job and thanks for the tutorial. Now only if I had all those ink pads 😉

    Like

  8. Gidget-Trish's avatar Gidget-Trish

    4:00 or 4:40 a.m………..good grief!!!! What time do you go to bed in order to get up that early and still be able to work all day? You must be a morning person. I love to start my day with creating something but I sure don’t start that early!!!!*L* This card is awesome in its colours and style. I love seeing your creative process in your tutorials. Thanks so much for sharing with us. It’s great to have you back!
    Trish

    Like

  9. Elizabeth's avatar Elizabeth

    Sooo glad you are back!! Missed you and have been checking daily for updates. Hope you enjoyed your time off. This scene is really enchanting. It has a mysterious feel to it. Thanks for returning with an outstanding piece!

    Like

  10. Trish asked “4:00 or 4:40 a.m………..good grief!!!! What time do you go to bed in order to get up that early and still be able to work all day? You must be a morning person.”
    Trish, I am definately a morning person. My mind is mush after 7:00 p.m. and I’m in bed usually by 9:00. I’m a real party animal, lol.
    Michelle

    Like

  11. Cindy H.'s avatar Cindy H.

    When I saw your post on SCS, I couldn’t believe it! I know you told us vac. until the 20th but I thought you’d be back from vacation and then take a couple of days to unpack, etc. What a pleasant surprise! This is gorgeous as always! Looks like that perfect picture we like to capture on our cameras!!!

    Like

  12. MSBetsyZ's avatar MSBetsyZ

    Oh, thank Heaven’s you’re back! I’d just barely found you and you were off! LOL….I’m lovin’ your tutorials, too, Michelle, and drool over them. Thanks so much for the work you put into your blog. Welcome home!

    Betsy

    Like

  13. Cindy B's avatar Cindy B

    Welcome home! I only found your site a week before you left on vacation, what a treasure! I totally love your style. I’ve shared your site with all my friends. They feel so sorry for me because I just started this stamping-scrapping thing about 6 months ago and I am totally obsessed. If you know a cure I might still have a chance?!? Maybe? Thanks again for a beautiful and educational site!!!

    Like

  14. Heather Fullerton's avatar Heather Fullerton

    Wow this is a great tutorial Michelle. I can hardly wait to give it a try. Thanks for sharing your talent.
    Retired Heather

    Like

  15. Stephanie L.'s avatar Stephanie L.

    Yea! What a wonderful surprise to find my Zindorf tutorial when I logged on this morning w/ my cup of coffee. Welcome back – and its definitely glad to have you back!!!! 🙂 Blessings!

    Like

  16. Becky's avatar Becky

    Good to have you back :), what a another wonderful picture and great instructions. Can not tell you again what a great inspiration you are.

    Like

  17. Carol said: I have been trying your brayering techique, but have a way to go yet, I can’t seem to get the light airiness( is that a word ) that you are able to get.I think I am too heavy handed !!

    Me, too. I just have this definate line. Sigh. But I’ll keep working on it. I finally have one of the beach ones down to my liking.

    4:00 a.m.! I’m still inspecting my eyelids. But then, I’m a nightowl and would rather stay up all night. Definately not a morning person. Need more coffee.

    As usual, you have done a wonderful job. I love the colors and the light and shadow. Stunning! Thanks for sharing with us.

    Like

  18. Tonniece's avatar Tonniece

    WELCOME BACK
    Another great card and tutorial. Been missing my morning fix.
    I did try a few more cards useing your tutorials, you might say I’ve been brayering (?) everything in sight, and am loveing the whole process,

    Lord knows I need lots more practise though.

    TFS the fun

    Have a good day

    Like

  19. Sue (suen)'s avatar Sue (suen)

    Wow, this is so cool, Michelle! I love the rock outcropping for the rugged tree, the sun behind the bird and the neat hinge style pieces for the left side! Outstanding! So glad you’re back!

    Like

  20. Karen's avatar Karen

    Nice to “see” you again! Looks like you had a productive break.
    Your tutorial today is superb! What a stunning card. Thanks for taking the time to show us your gorgeous work and how to try to achieve a similar result!

    Like

  21. Ying's avatar Ying

    Glad to hear you have a wonderful time at Monterey, CA. It is a wonderful getaway. It is such a nice place to visit, the ocean and the relaxation atmosphere.
    Another great card. You make it look so easy.

    Like

Leave a reply to Annapurna Cancel reply