Floral Faux Tooled Leather – Tutorial

dsc03774.jpg

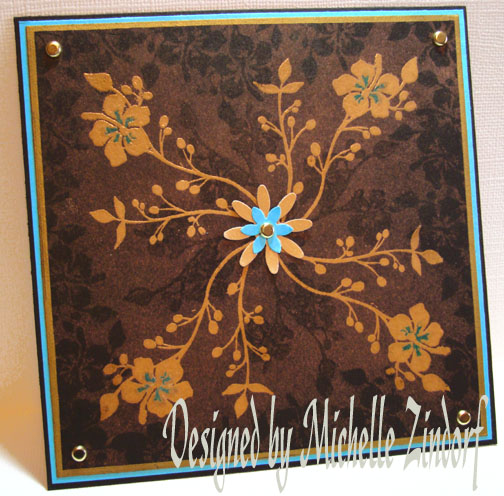
The combination of embossed Creamy Caramel & Brayered Chocolate Chip ink reminds me of tooled leather so that is why I’m naming it Faux Tool Leather, lol.  Oh, the Power one has on their own blog 🙂

I’m also using the set from Gina K. Designs, Comfort & Peace.  You can get this set from http://www.shop.ginakdesigns.com/main.sc

or you may be the lucky winner of this set from yesterdays blog candy, which I will announce at the end of this tutorial.

Ready for todays tutorial?  Let’s give it a go.

Supplies:

Stamps: Gina K. Designs – Comfort & Peace
Paper: Stampin’ Up Creamy Caramel, Tempting Turquoise & Basic Black
Ink: Stampin’ Up Chocolate Chip & Basic Black
Accessories: Versamark Pad & Marker, Stampin’ Up markers, Sharpie Gold Paint Pen, Brayer, Clear Embossing Powder & Heat Gun, Flower Punches, Ruler, Piercing Tool, Brads

dsc03778.JPG

Started out with a piece of Creamy Caramel card stock that measures 5″ x 5″,  used a ruler to find the center of it.  I put a little dot in the center with a creamy caramel marker so it wouldn’t show up later in the finished piece.

dsc03746.JPG

Stamped the larger floral image on my Stamp-a-ma-jig plastic with basic black ink.

dsc03747.JPG

Using my Stamp-a-ma-jig for placement I stamped the floral image using Versamark and lining the stem end up with the center dot and the leaf point with the corner.

dsc03748.JPG

Heat embossed image with clear embossing powder and a heat gun.

dsc03749.JPG

Repeated the last two steps again 3 more times, embossing each image as I stamped it.

dsc03750.JPG

dsc03751.JPG

Colored the un-embossed centers of the flowers with a Tempting Turquoise marker.

dsc03752.JPG

Went over the Tempting Turquoise with a Versamark marker and heat embossed using clear embossing powder and a heat gun.

dsc03753.JPG

dsc03754.JPG

Heavily brayered on Chocolate Chip ink over the entire piece of card stock, turning the card stock different directions to get good coverage over the entire piece. 

Note:  The ink will look almost black, but as it dries it lightens up a whole lot.

dsc03755.JPG

Let it dry a few moments and then wipe the Chocolate Chip ink off of the embossed images with a paper towel.

dsc03756.JPG

Using the smaller floral stamp in the set, I colored just part of the image on the stamp with a Chocolate Chip marker and then stamped it on my Stamp-a-ma-jig plastic.

dsc03757.JPG

dsc03758.JPG

Used my Stamp-a-ma-jig for placement.

dsc03759.JPG

Colored the same particle part of the stamp I did before, I colored it in with a Chocolate Chip Marker.  Stamped it on the card stock four times, coloring the same part of the stamp between stampings and huffing my breath on it to get the color moist.

dsc03760.JPG

dsc03761.JPG

dsc03762.JPG

Let the images dry for a few moments and then wiped the ink off of the embossed images again with a paper towel.

dsc03763.JPG

Stamped large floral stamp around the edge of the card stock with black ink.

  dsc03764.JPG

Let the black ink dry a few moments and then wiped the ink from the embossed images again with a paper towel.

dsc03765.JPG

Used a Sharpie Gold Paint Pen and drug it along the outside edge of the card stock on all sides.  This creates the look of a gold layer with out the bulk or cost of gold card stock.

Note:  Hold the tip of the Paint Pen half on the card stock and half on your scrap paper and drag it straight down the edge.  It’s easier than it looks to get a nice straight line. 🙂

dsc03766.JPG

dsc03767.JPG

Punched a small flower from Tempting Turquoise card stock and a large flower from Creamy Caramel card stock.

Adhered them to the center of the layered card front.  Poked a hole in the center of the flowers and each corner with my piercing tool.

dsc03768.JPG

dsc03769.JPG

Added gold brads and here you have it, the finished card that measures 5.25″ x 5.25″. 

dsc03774.jpg

Yesterday I offered as blog candy this great set from Gina K. Designs. 

 dsc03745.JPG

But first, I want to thank everyone who left a comment.  You all are the most wonderfully supportive group of stampers ever!  I received so many good suggests for things to added to this blog.  Thanks again.

Well my Husband, Russ selected a number and we have a winner, Charmaine!  Charmaine left this comment:

  • # Charmaineon 09 May 2008 at 12:59 pm edit this

    WOW, how generous of you! What do I want to see more of on your blog? Just more of the same GORGEOUS things that you create! Those scenes and backgrounds you create are just STUNNING! So, you don’t have to change a thing for me! ) Thanks for the chance to win!

  • Charmaine please e-mail your address to me at mzindorf@aim.com  and I’ll get this in the mail to you.  Congrats!
  • Have a super Saturday!

    Until my next post. . . . . . .

    Michelle

    28 thoughts on “Floral Faux Tooled Leather – Tutorial

    1. Carol's avatar Carol

      WOW! This has to be one of your best yet! I just love this card. It’s so much more than a card actually – it’s a beautiful piece of art! TFS your talents so we can re-create this beautiful item too!
      Congrats Charmaine, enjoy that beautiful stamp set!

      Like

    2. Beth Van Brunt's avatar Beth Van Brunt

      Great tutorial, really demonstrates the power of the Stamp-a-ma-jig as well as the brayer. The end result is just terrific.

      Like

    3. Gidget-Trish's avatar Gidget-Trish

      This is one fabulous tutorial and card!!! Wow! I hope to make good use of my Stamp-a-ma-jig to create a similar effect as I don’t have this stamp set but I’m sure it would work well with other stamps too. Thanks for the inspiration Michelle. And congratulations to Charmaine. 🙂
      Trish

      Like

    4. Lisa Foster's avatar Lisa Foster

      Beautiful card, Michelle! I have a question (I know this is silly, but…)When I brayer and/or emboss, my cardstock gets very ripplely and dries that way. Is there a way to prevent this, or do you somehow flatten out your piece before you put it all together on the card? I use SU cardstock, if that makes any difference. Thank you so much! Congrats to Charmaine!

      Like

    5. Lisa asked “When I brayer and/or emboss, my cardstock gets very ripplely and dries that way. Is there a way to prevent this, or do you somehow flatten out your piece before you put it all together on the card?”
      Lisa, mine sometimes gets a little wavy too. It usually happens when I don’t let my heat gun get hot before trying to heat emboss my images. Therefore, I’m holding it towards the card stock too long. Try holding the heat gun away from the card stock while running for a few moments and then heating your images. Also, don’t hold it really close to the card stock. See if that helps.
      I don’t know of any way to flatten out the card stock after it gets really wavy. A little wavy can be corrected when it is glued to another piece of card stock. Clear as mud, lol?

      Like

    6. Kathy's avatar Kathy

      How lovely. These colors are so pretty together, and I like the design and texture you’ve created. I love this idea of having a central image and then a pattern that radiates out from it. You have made some other beautiful cards that are similar to this that I really like too 🙂 Congrats Charmaine!

      Like

    7. GailSK's avatar GailSK

      This is a beautiful card! I’m definitely going to have to dig out my stamp-a-ma-jig and start using it. Thanks for the tutorial!

      Like

    8. Kadie Labadie's avatar Kadie Labadie

      Congrats to Charmaine – ENJOY your new stamp set! And Thank you Michelle for the great tutorial today-WOW……You always make things look SO EASY-but I know better. You must have spent a lot of time on this tutorial-It’s BEAUTIFUL. Look forward to reading your tutorials-and seeing all your wonderful creations. Thanks again for offering the free stamp set…..I’m sure Charmaine will LOVE IT! Kadie

      Like

    9. Barb Eyring's avatar Barb Eyring

      Michelle, This is gorgeous – just gorgeous! Thank you so much for all of the work you put into each one of your tutorials, just to share with us!
      Barb

      Like

    10. Shelly Schmidt's avatar Shelly Schmidt

      I am totally and completely amazed by your talent- every time I open your daily blog, I am in awe of the card you have made for the day……..Another beauty and I love the technique you used here…….Just Gorgeous!!! You are wonderful to share your talent with us- you should consider writing books Michelle!!! Have a great day!

      Like

    11. Absolutely gorgeous cards! You make it look way easier than it is. I love the tutorials. You are very generous to share your talents with all of us.

      Like

    12. Jill's avatar Jill

      I AM LOVIN IT!!!!!!!!!
      I can’t wait to go home tonight and try this out. I love the look. Thank you for all the time put into these lessons! It’s just wonderful!
      God Bless you

      Like

    Leave a reply to Beth Van Brunt Cancel reply