First Butterfly – Tutorial

dsc03809.jpg

Winter has seemed to hang around way to long this year.  I was so very happy to see a butterfly flying around in my garden Saturday and the humming birds have returned to enjoy the feeders I have put out for them.  I assume that means warm weather is here to stay. 🙂

To celebrate I have created this butterfly tutorial for you.  Let’s get started.

Supplies:

Stamps: Stampin’ Up Wonderful Wings, Stampendous Marble Texture Cube
Paper: Stampin’ Up Whisper White, Old Olive & Soft Sky
Ink: Adirondack Lettuce, Rust, Denim, Aqua, Ginger & Stonewashed, Butterscotch, Stampin’ Up Not Quite Navy, Distress ink Peeled Paint, Palette Noir Black
Accessories: Prismacolor Markers Goldenrod, Orange, Yellow Orange, Brads, Sponges, Versamark Marker, Clear embossing powder, Heat Gun

dsc03816.JPG

Stamped the Butterfly image on Whisper White card stock using Palette Noir Black Hybrid Ink.

Note:  This is a very good ink to use with Prismacolor Markers.  It doesn’t smear with the alcohol based markers.

dsc03784.JPG

Sorry for the first 3 pictures being blurry.  I changed my camera setting and forgot to change it back, yikes!

Anyway, I colored the image with a Yellow Orange Prismacolor Marker.

dsc03787.JPG

Colored the inside and outside edges of the wings with an Orange Prismacolor marker.

dsc03789.JPG

Colored the body of the butterfly with a Goldenrod Prismacolor marker.

dsc03790.JPG

Felt I wanted the color to me more intense so I went over the entire butterfly again with the Yellow Orange marker. 

Here we go the camera is in focus again.  🙂

dsc03792.JPG

Also, went over the inside and outside of the wings with the Orange marker once more.  Yep, that is much better! 

dsc03792.JPG

Being careful to stay within the lines of the image I colored in the butterfly with a Versamark marker and then heat embossed it using clear embossing powder and a heat gun.

Wow, that makes this butterfly pop!

dsc03795.JPG

dsc03796.JPG

Sponged on Lettuce ink using a streaking motion with the sponge to get some grass texture started.

dsc03798.JPG

To continue getting texture I used the narrow end of the Butterscotch ink pad and did direct to paper with it.  Using a streaking motion.

Note:  It’s a good idea to try this out on your scrap paper first to get a feel for how much presser you want to put on the stamp pad.

For direct to paper techniques I like to use these Adirondack pads because the pad sits up more on the base giving you access to the edges of the pad.

dsc03799.JPG

Using the narrow edge of the Ginger ink pad I made lines to simulate grasses by just touching it to the paper at an angle.

I also did a bit of sponging with the Ginger ink at the bottom of the card stock.

dsc03800.JPG

Using a circular motion, sponged Aqua ink in the sky area.

dsc03801.JPG

Stamped side “A” of the Marble Texture Cube with Stone Washed ink in the top of the sky area.

dsc03802.JPG

Sponged side “B” of the Marble Texture Cube with Not Quite Navy ink over the Stonewashed ink.

dsc03803.JPG

Sponged some Not Quite Navy ink at the top of the card stock.

dsc03804.JPG

Sponged some Denim ink at the top of the card stock to make the sky really dramatic.

dsc03805.JPG

Applied Peeled Paint ink at the horizon line, by using the edge of the ink pad and pulling down.

dsc03806.JPG

Created a shadow for the butterfly by sponging in a circular motion around the side edge and bottom edge of the butterfly with Not Quite Navy ink.  I keep most of the sponge on the butterfly and barely go onto the background to get the shadow.

dsc03807.JPG 

I think I need more grasses so I put some in with the edge of a Rust ink pad.

dsc03808.JPG

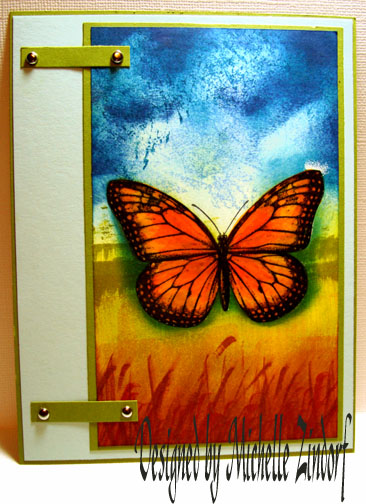
Assembled card and here it is finished measuring 5 x 6.5.

dsc03809.jpg

Thank you for coming along on this celebration of warmer weather.

Just a note:  I have added a new tab at the top of this blog in which I answer the most frequently asked questions.  I will be updating this from time to time so you may want to check it out occassionally if you have questions.  🙂

Until my next post. . . . .

Michelle

37 thoughts on “First Butterfly – Tutorial

  1. yvonne w.'s avatar yvonne w.

    Another amazing card!!!! Not only are you the Sponge Queen, Brayer Queen, but, also the Color Queen!! Have a great day and thanks as always for sharing your incredible talent with the rest of us

    Like

  2. Bessey's avatar Bessey

    Great card! I think I could make this one with no problem, there’s no brayering! lol
    Thanks for the tutorials, I wish more people would do it. Have a nice day.

    Like

  3. Mary L.'s avatar Mary L.

    Beautiful!!! Are the Prismacolor markers similar to Copic?? Have you ever tried Copics??? I’m wondering if I should go with Prismacolor.

    Like

  4. Mary asked “Are the Prismacolor markers similar to Copic?? Have you ever tried Copics?”
    Mary, I’ve heard they are similar. You can do a search on the internet and get a bunch of different opinions as to which ones are the better marker. I have not tried the Copic markers. I am thrifty so I went with the less expensive Prismacolor markers. After all I don’t use them that often and couldn’t justify the expense. I spent a couple of hundred dollars on a complete set and bought mine from E-bay. I’ve been very happy with them.

    Like

  5. Becky's avatar Becky

    what another beautiful card, I have no butterfly stamps, I have very few stamps :), just starting out, but I must find me one.
    Becky

    Like

  6. Jen's avatar Jen

    I love your blog. You are so talented. I have tried several times to do what you do and I have yet to master it. But everytime you do a different background I try it. Im hoping with enough practice I can at least get mine to kind of look like yours. You are so amazing. Thanks for the inspiration 🙂

    Like

  7. Tonniece's avatar Tonniece

    HI Michelle

    I see that I’ve been missing even more stunning tutorials then before, and a great give away toooooooooo……………………..
    Just my luck to have missed that. I was really sick, but now I am over the top sick to find that out. lol
    Oh well, the winner is soooo talented, and I can’t wait to see what she creates with the set. So congrats to her.

    I don’t know where to start here, I just love all of your creations, and this is no exception. Thanks so much for shareing your wonderful talent with us.
    (oh, and I am still trying to master that barn roller, but alas…… that’s a story into itself).

    Hope you had a great Mom’ s Day

    Like

  8. Kathy's avatar Kathy

    Love it…Love it…Love it !!!! Did I mention that I love it?! The background is so gorgeous. You are too good with that Marble cube, the sponge, and the direct to paper technique! The flutterby is beautiful! This one rocks 🙂

    Like

  9. Laurie's avatar Laurie

    Wow Michelle! (It seems like I start a lot of these comments off that way!) The butterfly looks like it is about to fly off the page.

    Like

  10. Phyllis Gunn's avatar Phyllis Gunn

    Absolutely a master piece on wings! I checked out your new tab too. Great information. Thanks for doing that for us. I start each day looking for your next creation.

    Like

  11. Larie Manning's avatar Larie Manning

    It seems I love the next one you make thinking the last one was the best and you just keep them coming. You never fail to awe me with your art work. Thank you.

    Like

  12. Jamie Wilcox's avatar Jamie Wilcox

    OH my gosh, Michelle! This is a stunner! The colors are so vibrant and that butterfly looks like he might just fly off the page at any moment! Absolutely gorgeous!

    Like

  13. Ret's avatar Ret

    michelle, you blow me away every time i see a card & read your tutorial. you’re so creative! I am going to have to try this one, it’s so beautiful. if mine comes out even half as nice as yours, i’ll be thrilled. lol i’ll have to get a butterfly tho, i don’t have one that isn’t tiny. you really draw me in with your brayering & sponging. i love it & have learned alot from you already.
    love your blog!!!
    Ret
    http://www.picturetrail.com/photos/crafty1ret

    Like

  14. Barb's avatar Barb

    This card is really beautiful!
    I love Monarch Butterflies!
    I use sponging with my cards a lot and this has given me new inspiration.
    I just bought some Adirondack Alcohol Inks that I have been playing with on film paper.
    How do the alcohol inks work for sponging?
    Is that what you used?
    Barb

    Like

  15. Barb asked “How do the alcohol inks work for sponging?
    Is that what you used?”
    Barb, I used Adirondack dye inks they are completely different than the alcohol inks. 🙂

    Like

  16. Heather Fullerton's avatar Heather Fullerton

    What can I say that has not already been said. You are the Queen of all you create. It is a pleasure to read your blog and learn from you. Please never think you are not the most appreciated blogger out there. Your tuturorials are the best. Thanks for sharing your talent.
    Retired Heather

    Like

  17. Glitter Queen's avatar Glitter Queen

    You never cease to amaze me. Your cards and tutorials are absolutely super. I thank you so much for sharing your creations.

    Like

  18. Karen's avatar Karen

    Stunning, yet again! I’m so pleased I was able to find a marble cube- now to give this a go! Thanks for the beautiful start to the day.

    Like

  19. Such a beautiful card – your work is awesome. Can I ask how you keep the background inks from staining the butterfly. I stamped and then embossed a yellow bird on white cs and when I went to sponge in the black background the bird got all “muddy”. Your butterfly looks crisp as ever.

    Like

  20. Lorraine asked “Can I ask how you keep the background inks from staining the butterfly? I stamped and then embossed a yellow bird on white cs and when I went to sponge in the black background the bird got all “muddy”.”

    Lorraine, I haven’t had much luck with black inks over embossed images either. Other colors seem to work just fine and don’t stain the embossed images.

    Like

  21. karen m's avatar karen m

    Michelle, beautiful card!!! hoping to purchase some prismcolor marker in the future. the colors are so much more brighter than regular markers it seems. I enjoy have you make use of all the ink pads as well. Thank you again. Blessings
    Karen M.

    Like

Leave a reply to Lorraine Cancel reply